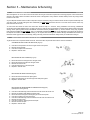
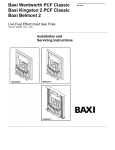
1
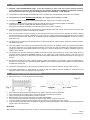
0102 095 52541 18”Inset Raised User, Installation & Servicing Instructions This appliance is for use on NATURAL GAS (G20) ONLY at a supply pressure of 20mbar Please hand this booklet to the user and advise to keep in a safe place Important Notice: Before disposal of the outer packaging, please enter the product code, purchase and installation details in section 1.1 of this booklet. 18” Inset Taper 010710 This booklet details instructions for USER (section 1), INSTALLATION (section 2) & SERVICING (section 3). IMPORTANT NOTICE It is important for the safe and continued operation of this appliance that the instructions contained in this booklet are observed! TABLE OF CONTENTS Section Section 1.0 Instructions for Use 1.1 1.2 1.3 1.4 1.5 1.6 Record of purchase/installation Important notes Lighting and extinguishing the appliance Re-laying the coal/pebble bed Spare parts Guarantee 2.0 Installation Instructions 2.1 2.2 2.3 2.4 2.5 2.6 2.7 2.8 Important notes Statutory requirements Technical data Installing the appliance (Ventilation) Flue Clearance to sides and shelves Hearth Clearances Fitting the appliance in position 2.4.4.1 Connecting the gas supply 2.4.4.2 Checking the appliance setting pressure 2.4.4.3 Checking the correct operation Laying the coal/pebble bed Clearance of combustion products Front and Frets (Requirements for ventilation) Advising the customer 3.0 Maintenance and Servicing 3.1 3.2 3.3 3.4 Removal of debris or soot Servicing components below the heat engine Spare parts Useful telephone numbers 2.4.1 2.4.2 2.4.3 2.4.4 Section Page 1 18” Inset Taper 010710 Section 1 – Instructions for Use 1.1 RECORD OF PURCHASE/INSTALLATION 18” Inset Purchase Details Date of purchase ______ / ______ / ______ Purchase from _____________________ Address _____________________ _________________________________________ Installation Details Date of installation ______ / ______ / ______ Installed by _____________________ Registration number _____________________ Telephone number _____________________ Appliance Details Serial number _____________________ (located on rating label) Product Code _____________________ (located on white label on outer carton) It is advisable to have all the above information available if assistance is required. It will aid our service department in helping you more efficiently. Page 2 18” Inset Taper 010710 1.2 IMPORTANT NOTES 18 “ Inset CAUTION – THIS PACKAGE WEIGHS 6.5Kgs – assess the load before you move it and note any other handling information on the packaging. If you think the load is beyond your safe capability, DO NOT PUT YOURSELF AT RISK! Seek assistance from other person(s) and/or use appropriate handling equipment. IT’S YOUR BODY – LOOK AFTER IT! This appliance is for DECORATIVE PURPOSES ONLY and is manufactured to the requirements of the current issue of EN 509. This appliance is for use on NATURAL GAS (G20) ONLY, at a supply pressure of 20mbar +/- 1mbar. This appliance MUST be installed by a REGISTERED INSTALLER. Failure to do so may lead to prosecution. Ventilation for this appliance must be fitted in accordance with the rules in force and checked regularly for obstructions. If the appliance is installed in GREAT BRITAIN, additional ventilation is required. If the appliance is installed in IRELAND, a minimal cross sectional area of 100cm2 is required. Any permanent flue restriction must be removed and any variable dampers locked fully open or removed. If the flue has been used previously for solid fuel, it MUST be swept PRIOR to installation. If any soot accumulation becomes excessive, the fuel effect pieces should be removed from the appliance for cleaning. Cleaning should be carried out in a sufficiently ventilated area or in the open air, by gently brushing with the pieces held away from your face so that you avoid inhaling the dust. THE USE OF A NORMAL VACUUM CLEANER IS NOT RECOMMENDED as dust may be blown back into the room. This appliance has a naked flame and a fireguard to the current issue of BS 8423 - 2002 should be used for the protection of children, the elderly and the infirm. Care must be taken on the selection of wall coverings within close proximity of the appliance as some vinyl and embossed materials may become discoloured by convected heat. Soft furnishings must be kept clear from the radiant heat of the appliance and from impinging the hearth area. Combustible materials must not be put on or left in the hearth area nor should the coal bed be used to burn rubbish or other materials. This appliance uses fuel effect components, gaskets and insulation material containing Refractory Ceramic Fibre, (RCF), which are man-made vitreous silicate fibres. Excessive exposure to such material may cause temporary irritation to the eyes, skin and respiratory tract. Consequently, it makes sense to take care when handling these articles to ensure that the release of dust is kept to a minimum. This appliance is fitted with an ODS, a spillage monitoring system which operates if the evacuation of products is interrupted (i.e. blocked or incorrect flueing). If the appliance repeatedly `goes out’ it may indicate a problem and the installer or specialist should be consulted before further use. o The minimum temperature rating of any back panel or hearth must have a minimum fire resistance rating of CLASS 0 (100 C). If any home improvements i.e. double glazing are carried out after this appliance has been installed, you should contact your Registered Installer and have the operation of the flue checked. 1.3 LIGHTING AND EXTINGUISHING THE APPLIANCE 1. Remove the fret (Fig. 1), to gain access to the controls (Fig. 2). Fig. 2 Fig. 1 2. 3. 4. 5. 6. 7. 8. Fret Piezo Button Gas Control Press and turn the gas control anti-clockwise to the `IGN’ position. Keep the control fully depressed. Press and release the piezo button until the main burner behind the simulated front coal has lit. Once lit, keep the gas control depressed for a further 15 seconds. Release the gas control and check that the main burner has remained alight. Press and turn the gas control anti-clockwise to the required setting. Replace the fret (controls cover). To turn the appliance off, depress and turn the gas control clockwise from any position to the `OFF’ position. In the event of the piezo button failing, the appliance may be lit by placing a lighted taper or match at the main burner while depressing the gas control in the `IGN’ position. IMPORTANT After turning off or if the appliance goes out for any reason, wait for three minutes before attempting to relight. Page 3 18” Inset Taper 010710 1.4 RE - LAYING THE BED 18 “ Inset Fig. 3 The support shelf is positioned on the fibre support metalwork. There are two metal `stops’ that prevent the support shelf from sitting on the main burner outlet (Fig. 3). Fig. 4 Metal `stops’ The simulated front is positioned on the shelf directly in front of the support shelf. Two metal `stops’ locate the simulated front in position. Fit the two front retaining brackets with the two No 8x3/8 screws supplied in the fixing pack to secure the front into position (Fig. 4). Note: Large coals/pebbles (grey) and small coals/pebbles (black) are coloured for illustration purposes only! Fig. 5 Metal `stops’ Front Retaining Bracket Place 6 large coals/pebbles on top of the simulated front (one in each groove). Allow the coals/pebbles to rest on the support shelf. Place 5 large coals/pebbles on the on the first tier of the support shelf (Fig. 5). Fig. 6 Place 6 small coals/pebbles between the 6 large coals/pebbles located on top of the simulated front. Allow the coals/pebbles to rest on the 5 large coals/pebbles on the first tier. Place 4 small coals/pebbles on top of the 5 large coals/pebbles and allow them to rest on the back tier of the support shelf (Fig. 6). Side View To obtain the best visual appearance, it may be necessary to `slightly’ adjust the position of the coals. If any of the coals or coal bed become damaged or lost, replacements MUST be obtained before further use. ADDITIONAL COALS/PEBBLES MUST NOT BE USED Page 4 18” Inset Taper 010710 1.5 SPARE PARTS 18” Inset For a list of spare parts for this appliance, please refer to section 3.3. 1.6 GUARANTEE Please complete the registration section of the white card supplied in the IFU kit. Any part of this appliance is guaranteed against the manufacturer’s defective workmanship or faulty materials for a period of twelve months from the date of purchase. Any such part will be replaced free of charge on receipt of the purchaser’s address at the cost of postage only. Please take time to fill in section 1.1 of this booklet for your future reference. Page 5 18” Inset Taper 010710 Section 2 – Instructions for Installation 2.1 IMPORTANT NOTES 18” Inset CAUTION – THIS PACKAGE WEIGHS 6.5Kgs – assess the load before you move it and note any other handling information on the packaging. If you think the load is beyond your safe capability, DO NOT PUT YOURSELF AT RISK! Seek assistance from other person(s) and/or use appropriate handling equipment. IT’S YOUR BODY – LOOK AFTER IT! This appliance is for DECORATIVE PURPOSE ONLY and is manufactured to the requirements of the current issue of EN 509. This appliance is for use on NATURAL GAS (G20) ONLY, at a supply pressure of 20 mbar +/- 1mbar. This appliance MUST be installed by a REGISTERED INSTALLER. Failure to do so may lead to prosecution. Ventilation for this appliance must be fitted in accordance with the rules in force and checked regularly for obstructions. If the appliance is installed in GREAT BRITAIN, additional ventilation is required. 2 If the appliance is installed in IRELAND, a minimal cross sectional area of 100cm is required. Any permanent flue restriction must be removed and any variable dampers locked fully open or removed. If the flue has been used previously for solid fuel, it MUST be swept PRIOR to installation. Care must be taken on the selection of wall coverings within close proximity of the appliance as some vinyl and embossed materials may become discoloured by convected heat. Soft furnishings must be kept clear from the radiant heat of the appliance and from impinging the hearth area. Combustible materials must not be put on or left in the hearth area nor should the coal bed be used to burn rubbish or other materials. This appliance uses fuel effect components, gaskets and insulation material containing Refractory Ceramic Fibre, (RCF), which are man-made vitreous silicate fibres. Excessive exposure to such material may cause temporary irritation to the eyes, skin and respiratory tract. Consequently, it makes sense to take care when handling these articles to ensure that the release of dust is kept to a minimum. This appliance is fitted with an ODS, a spillage monitoring system which operates if the evacuation of products is interrupted (i.e. blocked or incorrect flueing). If the appliance repeatedly `goes out’ it may indicate a problem and the installer or specialist should be consulted before further use. o The minimum temperature rating of any back panel or hearth must have a minimum fire resistance rating of CLASS 0 (100 C). Materials used in the manufacture of this appliance DO NOT contain asbestos. When fitting or servicing this appliance, care must be taken when handling sheet metal parts to avoid any possibility of personal injury. If any home improvements i.e. double glazing are carried out after this appliance has been installed, you should contact your Registered Installer and have the operation of the flue checked. 2.2 STATUTORY REQUIREMENTS A REGISTERED INSTALLER must carry out the installation of this appliance in accordance with the current issue and relevant requirements of:9 9 9 9 9 9 9 This installation booklet. The gas safety (installation and use) regulations. The building regulations. The building standards (Scotland) regulations. The health and safety at work act. The control of substances hazardous to health. Any applicable local regulations. Detailed recommendations are contained in the current issue of the following British Standards and Codes of Practice:BS 5440 Part 1 BS 5440 Part 2 BS 6461 Part 1 BS 5871 Part 3 BS 6891 BS 8303 BS 1251 Specifications for installation of flues. Specification for installation of ventilation for gas appliances. Codes of practice for masonry chimneys and flue pipes. Decorative fuel effect gas appliances of heat input not exceeding 15kW (2nd & 3rd family gases). nd Specification for installation of low pressure gas pipe work of up to 28mm (R1) in domestic premises (2 family gases). Installation of domestic heating and cooking appliances burning solid mineral fuels. Specification for open-fireplace components. This installation booklet must not be taken as overriding statutory requirements. Page 6 18” Inset Taper 010710 2.3 TECHNICAL DATA 18” Inset Fig. 7 Fig. 8 Minimum height of opening is 555mm Minimum Depth of opening is 215mm 295mm 215mm Minimum width of opening is 415mm 415mm SPECIFICATIONS 2.4 Injector 044/341/196/087M Gas Control MP 21301B Main Burner Aeromatix AC03/211658 Thermocouple T100/927-400 Ignition Single spark electrode direct to main burner Gas Connection 8mm OD (restrictor elbow) Gas Type G20 NATURAL GAS Maximum Heat Input 7.8kW (26.003btu/hr) Gross Minimum Heat Input 3.6kW (12,283btu/hr) Supply Setting Pressure 20mbar +/- 1mbar (Cold) Flue Types Class 1 INSTALLING THE APPLIANCE (Ventilation) Ventilation required for this appliance must be fitted with the rules in force and checked regularly for obstructions:If the appliance is installed in GREAT BRITAIN, additional ventilation is required. 2 If the appliance is installed in IRELAND, a minimal cross sectional area of 100cm is required. Page 7 18” Inset Taper 010710 2.4.1 INSTALLING THE APPLIANCE (Flue) 18” Inset Any permanent flue restriction must be removed and any variable dampers locked fully open or removed. If the flue has been used previously for solid fuel, it MUST be swept PRIOR to installation. This appliance is suitable for installation into CLASS 1 flues ONLY. 540mm Class 1 A conventional brick or stone chimney with a minimum effective cross sectional dimension of 225mm x 225mm 415/445mm A lined flue with a minimum diameter of 175mm having a chair brick and throat lintel conforming to the current issue of BS 1251 (Fig. 9A). When an existing refractory chair brick is fitted, the minimum distance required between the rear of the opening and the front face of the surround is 215mm. Any remedial work should be carried out including levelling the base beneath the fire (Fig 9A). 560/590mm 600mm Fig. 9 Hatched area must be non-combustible. Min 100mm Max 65mm surround or lintel. 215mm Fig. 9A Fire 2.4.2 INSTALLING THE APPLIANCE (Clearance to sides and shelves) The minimum clearance to any combustible material to the side of the appliance must be 150mm (Fig. 10). The minimum clearance to any non-combustible material around the perimeter of the appliance must be 75mm. The minimal clearance to the underside of a 150mm depth combustible shelf from the hearth must be 790mm. Add 12.5mm to this clearance for every 25mm increased depth of shelf (Fig. 10). A `SHELF CHART’ (Fig. 11) is provided to aid in calculating clearances to shelves. Fig. 11 SHELF CHART 852.5 Add 12.5mm to clearance for every 25mm increased depth of shelf 840 827.5 Fig. 10 815 790mm 150mm 802.5 Shelf Height 790 Shelf Depth 150 175 200 225 275 250 All dimensions are in MM Page 8 18” Inset Taper 010710 2.4.3 INSTALLING THE APPLIANCE (Hearth clearances) 18” Inset A non-combustible hearth with a minimum thickness of 12.5mm and having a perimeter of 50mm above floor level is required to discourage placing carpets or combustible materials close to the hearth. The width must be a minimum of 150mm either side of the fireplace opening and a depth of 300mm from the front face of the fire opening (Fig. 12). Fig. 12 FIRE OPENING 150mm 300mm HEARTH AREA Minimum hearth height - 50mm Minimum hearth width - 805mm Minimum hearth thickness - 12.5mm 2.4.4 INSTALLING THE APPLIANCE (Fitting the appliance in position) BEFORE COMMENCING WORK, TURN OFF ALL APPLIANCES THAT ARE FED BY THE METER. ISOLATE THE GAS SUPPLY BY TURNING OFF AT THE METER. Site the appliance as far back in the chairbrick as possible whilst maintaining a central position in the fire opening. Carefully make a mark in each of the slots in the base of the appliance. Drill two holes suitable for the fixing plugs provided. Using the No 10 x 1” woodscrews provided, carefully screw the appliance into position (Fig. 13). Fig. 13 Fixing Slot Fixing Slot 2.4.4.1 INSTALLING THE APPLIANCE (Connecting the gas supply) A restrictor elbow complete with pressure test point is fitted to the appliance to facilitate servicing. The gas supply to the appliance may be from the front left hand side or as a concealed fitting from the rear left or right hand side. The preferred method of connection should be from the rear left. It is important to note the requirements of the current issue of BS 6891, dealing with enclosed pipes. This standard requires that when a gas pipe is fed through a wall, it should be enclosed in a gas tight sleeve to protect against failure caused by movement and shall be constructed to prevent passage of gas either between the pipe and sleeve or sleeve and wall. Page 9 18” Inset Taper 010710 2.4.4.2 INSTALLING THE APPLIANCE (Checking the appliance setting pressure) 18 “ Inset The pressure test point enables verification of the inlet pressure at the appliance under operating conditions and can also be used to check the gas soundness of the connections to the appliance gas controls (Fig. 14). Fig. 14 Restrictor elbow c/w PTP (Pressure Test Point) Control knob Piezo ignitor Rating label 2.4.4.3 INSTALLING THE APPLIANCE (Checking the correct operation) 1. Remove the fret (Fig. 15), to gain access to the controls (Fig. 16). Fig. 16 Fret Fig. 15 2. 3. 4. 5. 6. 7. 8. Piezo Button Gas Control Press and turn the gas control anti-clockwise to the `IGN’ position. Keep the control fully depressed. Press and release the piezo button until the main burner behind the simulated fron coal has lit. Once lit, keep the gas control depressed for a further 20 seconds. Release the gas control and check that the main burner has remained alight. Press and turn the gas control anti-clockwise to the required setting. Replace the fret. To turn the appliance off, depress and turn the gas control to the `OFF’ position. In the event of the piezo button failing, the appliance may be lit by placing a lighted taper or match at the main burner while depressing the gas control in the `IGN’ position. IMPORTANT After turning off or if the appliance goes out for any reason, wait three minutes before attempting to relight. Page 10 18” Inset Taper 010710 2.5 LAYING THE BED 18 “ Inset Fig. 17 The support shelf is positioned on the fibre support metalwork. There are two metal `stops’ that prevent the support shelf from sitting on the main burner outlet (Fig. 3). Fig. 18 Metal `stops’ The simulated front is positioned on the shelf directly in front of the support shelf. Two metal `stops’ locate the simulated front in position. Fit the two front retaining brackets with the two No 8x3/8 screws supplied in the fixing pack to secure the front into position (Fig. 4). Note: Large coals/pebbles (grey) and small coals/pebbles (black) are coloured for illustration purposes only! Fig. 19 Metal `stops’ Front Retaining Bracket Place 6 large coals/pebbles on top of the simulated front (one in each groove). Allow the coals/pebbles to rest on the support shelf. Place 5 large coals/pebbles on the on the first tier of the support shelf (Fig. 5). Fig. 20 Place 6 small coals/pebbles between the 6 large coals/pebbles located on top of the simulated front. Allow the coals/pebbles to rest on the 5 large coals/pebbles on the first tier. Place 4 small coals/pebbles on top of the 5 large coals/pebbles and allow them to rest on the back tier of the support shelf (Fig. 6). Side View To obtain the best visual appearance, it may be necessary to `slightly’ adjust the position of the coals. If any of the coals or coal bed become damaged or lost, replacements MUST be obtained before further use. ADDITIONAL COALS/PEBBLES MUST NOT BE USED Page 11 18” Inset Taper 010710 2.6 CLEARANCE OFCOMBUSTION PRODUCTS 18” Inset . Relight the appliance and allow to run for five minutes with the gas control in the `HIGH’ position. Check for satisfactory clearance of combustion products by inserting a lighted smoke match into the opening 100mm below the top of the opening and 10mm in from the face of the surround (Fig. 21). Smoke match to be positioned 100mm down and 10mm in from this point Fig. 21 The majority of smoke must be drawn up into the flue. If this does not occur, allow a further 10 minutes and repeat the test. Should spillage still occur, examine the chimney for fault and rectify. The test should be repeated if an extractor fan or fan powered flue appliance is fitted to the room. If there is a connected room with an extractor fan, the test should be repeated with all the connecting doors to that room opened. 2.7 Smoke match FRONT AND FRETS (REQUIREMENTS FOR VENTILATION) Minimum ventilated area of front must be 60cm 2 The front and fret illustrated (Fig. 22), is a recommended CROSSLEE front and fret. If an alternative front and fret is to be used on the appliance, it is very important to maintain the equivalent ventilation. Fig. 22 Minimum ventilated area of fret must be 50cm 2.8 2 ADVISING THE CUSTOMER Advise the customer on the following points: The lighting and extinguishing procedures that are described in section 1.3. They should read the `Instructions for Use’ section at the beginning of this booklet. The appliance should be serviced at regular intervals and checked for spillage in accordance with the method described in section 2.6. The curing effect of heating the coals will cause an initial odour. This is not harmful although additional ventilation (i.e. an opened window) may be required until the odour has disappeared. If the appliance is turned off or shuts off automatically, wait for at least three minutes before attempting to relight. Page 12 18” Inset Taper 010710 Section 3 – Maintenance & Servicing 3.1 REMOVAL OF DEBRIS OR SOOT 18” Inset Allow the appliance to cool for two to three hours before removing all of the fibre components for cleaning purposes. Once all the fibre is removed, check that no debris is located in the burner holes of the appliance. If any debris is located, carefully remove any foreign matter from the burner holes. Any soot deposits or debris left on the fibre components may be removed by using a soft brush. Brush with the component held away from your face so that you avoid inhaling the dust. CROSSLEE plc DOES NOT recommend the use of a normal vacuum cleaner, which may blow dust back into the room. To ensure that the release of fibres from these RCF articles is kept to a minimum, during installation and servicing, CROSSLEE recommend that a HEPA filtered vacuum is used to remove any dust and soot accumulated in and around the appliance before and after working. When replacing these articles, CROSSLEE recommend that they are NOT broken up, but are sealed in heavy duty polythene bags and clearly labelled as RCF WASTE. This is not classified as hazardous waste and may be disposed of at a tipping site licensed for the disposal of industrial waste. Protective clothing is not required when handling these articles although CROSSLEE recommend you follow the normal hygiene rules of not smoking, eating or drinking in the work area and to always wash your hands before doing so. 3.2 SERVICING COMPONENTS BELOW THE BURNER To gain access to the components below the burner, remove the fibre components and the burner unit from the firebox. CLEANING OR REPLACING THE INJECTOR (Fig. 23). Unscrew the compression nuts from the gas control to the injector. Remove the formed pipe. Unscrew the injector from the burner. Replace in reverse order. Fig. 23 REPLACING THE GAS CONTROL (Fig. 24). Disconnect the two formed pipes from the gas control. Disconnect the thermocouple from the gas control. Remove the control knob. Undo the retaining nut on the facia panel. Replace in reverse order. REPLACING THE PIEZO IGNITOR (Fig.25). Fig. 25 Disconnect the HT lead from the piezo ignitor. Retain the metal fixing nut with one finger and rotate piezo ignitor. Replace in reverse order. REPLACING THE MAIN BURNER & THERMOCOUPLE (Fig.26). (Atmospheric sensing device) Fig. 24 Fig. 26 Unscrew the two fastening nuts and washers from the rear of the burner unit. Remove the stainless steel baffle and spacer plate. Disconnect the formed pipe connecting the gas control and injector. Unscrew the injector from the main burner Unscrew the two fastening nuts and washers from the front of the burner unit. Remove the main burner. Unscrew the locknut, retaining the thermocouple. Remove the thermocouple. Replace in reverse order. Page 13 18” Inset Taper 010710 18” Inset 16 15 13 18 4 9 10 12 17 1 5 3 14 2 6 8 11 7 Fig. 27 3.3 SPARE PARTS PART DESCRIPTION 1 2 3 4 5 6 7 8,9 10 11 12 13 14 15 16 17 18 Aeromatix Burner (Natural Gas) (Manuf No AC03/211658 ) Piezo Ignitor c/w Steel Nut (Manuf No 66142/100) 087M Straight Injector (Manuf No 044-341-196-087M) Ignition Lead (250mm) Inlet Bundy Gas Valve (Aero Burner) (Manuf. No MP21301B) Control Knob 18” Facia Assembly (painted) Restrictor Elbow c/w Pressure Test Point Bundy Pipe Aero Burner Heat Shield Raised Assy Stainless Steel Baffle Thermocouple c/w Nut (manuf No T100/927-400) Electrode Rear Support Frame Front Retaining Bracket Baffle Spacer Plate Black Coal Bed (see section 1.4) Black Simulated Front (see section 1.4) Set of Ceramic Coals (see section 1.4) (11 Large & 10 small) Set of Ceramic Pebbles (see section 1.4)(11 Large & 10 small) CROSSLEE PART No QUANTITY 0102 078 04311 40245 0102 078 04321 40244 0102 078 02391 0102 078 02431 0102 078 02791 0102 089 55831 0102 078 00041 0102 078 04331 0102 075 32541 0102 075 33201 0102 078 02351 0102 078 02421 0102 089 55781 0102 075 33451 0102 070 31551 0102 095 52521 0102 095 52531 0102 092 40331 0102 092 40341 1 1 1 1 1 1 1 1 1 1 1 1 1 1 1 2 1 1 1 1 1 Page 14 18” Inset Taper 010710 3.4 USEFUL TELEPHONE NUMBERS In the event that you may require service, spares or technical information, please contact us at: Crosslee PLC Halifax West Yorkshire HX3 8DE Customer Service Service Engineer (REPAIRCARE) Telephone 01422 203963 0844 8797422* Fax 01422 204767 *Calls cost 5p per minute from a UK BT landline. Charges from mobile and other network providers may vary. Page 15 18” Inset Taper 010710