1
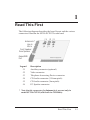
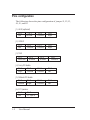
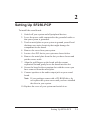
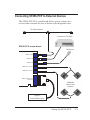
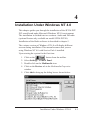
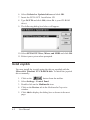
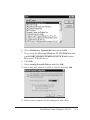
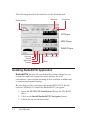
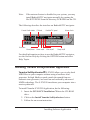
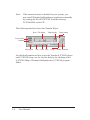
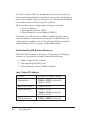
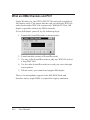
SF256-PCP 4-channels PCI Audio Board User Manual User Manual 1 Read This First The following diagram describes the board layout and the various connectors found on the SF256-PCP PCI sound card: J5 Antenna In * Line In Mic In Front Speaker Rear Speaker J4 J2 J3 J1 J6 Game/MIDI Port Legend J1 J2 J3 J4 J5 J6 Description Auxiliary connector (optional) Video connector Telephone Answering Device connector CD Audio connector (2.54mm pitch) CD Audio connector (2mm pitch) PC Speaker connector * Note that the connector for Antenna In is present only in model SF256-PCP-R (with built-in FM Radio). Read This First 1-1 Pins configuration The following shows the pins configuration of jumper J1, J2, J3, J4, J5, and J6: J1, AUX (optional) Pin 1 Left Pin 2 Ground Pin 3 Ground Pin4 Right Pin 3 Ground Pin4 Right J2, VIDEO Pin 1 Left Pin 2 Ground J3, TAD Pin 1 Mono-out Pin 2 Ground Pin 3 Ground Pin4 Phone-in J4, Sony CD Audio Pin 1 Right Pin 2 Ground Pin 3 Ground Pin4 Left Pin 3 Ground Pin4 Left J5, Mitsumi CD Audio Pin 1 Ground Pin 2 Right J6, PC Speaker Pin 1 +5V 1-2 Pin 2 PC Spk in User Manual 2 Setting Up SF256-PCP To install the sound board: 1. Switch off your system and all peripheral devices. 2. Leave the power cable connected to the grounded outlet so that your system is grounded. 3. Touch a metal plate on your system to ground yourself and discharge any static electricity that might damage the components on the board. 4. Remove the cover from your system. 5. Locate a free PCI slot in your system as shown below. 6. Remove the metal plate from the slot you have chosen and put the screws aside. 7. Align the gold fingers on the board with the vacant expansion slot and gently lower the board into the slot. 8. Secure the board to the expansion slot with the screws you have removed from the metal plate. 9. Connect speakers to the audio output jack on your sound board. Note: If your package comes with a CD-ROM drive, do not replace the system cover until you have installed the drive in your system. 10. Replace the cover of your system and switch it on. Setting Up SF256-PCP 2-1 Minimum System Requirements F Pentium 133MHz CPU F Microsoft DirectX version 5 F 16MB RAM (32MB if using 4MB sound library software wavetable) F Microsoft Windows 95, Windows 98 or Windows NT 4.0 F Active speakers (connects to the Front speaker jack) Positioning Your Sound Speaker This section decribes how to position two pairs of powered speakers or external amplifier speakers for best surround-sound effect. Connect one pair to the Front Speaker Jack (on the sound board) and identify this pair as Front Speakers. The other pair should connects to the Rear Speaker Jack and is identified as Rear Speakers. Position your Front Speaker and Rear Speakers such that they form a square encircled around you. Try to position your speaker angled towards you for best audio effect. You may want to adjust the relative positions of the speakers until you get the audio experience you like best. If you have a subwoofer, place this unit at the center on the carpet floor or in a corner of the room for best experience. 2-2 User Manual Connecting SF256-PCP to External Devices The SF256-PCP PCI sound board allows you to connect it to several other external devices as shown in the diagram below: FM Dipole Antenna Cassette and CD Player SF256-PCP sound board Microphone (CON5) ANTENNA (CON1) LINE IN (CON2) MIC IN (CON3) FRONT SPEAKER (CON4) REAR SPEAKER 12 12 (CON6) GAMEPORT / MIDI CONNECTOR 12 12 12 12 Multimedia Stereo Power Speakers Joystick / External MIDI devices Setting Up SF256-PCP 2-3 Line-In Jack, CON1 The Line-In Jack allows standard audio output from e.g. Hi-Fi system, CD player or cassette deck, to be channelled into sound board. This facilitates direct recording of external audio and also the mixing of external audio with sound produced by the sound board. Mic Jack, CON2 The Mic Jack accepts both dynamic and electret condenser microphones as voice input for recording and mixing. Front Speaker Line-Out Jack, CON3 This Front Speaker Line-Out Jack connects to a pair of stereo power speakers or any external amplifier for front audio output. Rear Speaker Line-Out Jack, CON4 This Rear Speaker Line-Out Jack connects to another pair of stereo power speakers or any external amplifier for rear audio output. Antenna Jack, CON5 (only for SF256-PCP-R model) The antenna jack connects to a dipole anrenna for proper reception of FM radio signals. The location or orientation of the antenna may be adjusted for optimum reception. This jack is only present on model SF256-PCP-R with built-in FM Radio on board. Game / MIDI Port, CON6 The D-sub connector serves two functions, namely for the connection of a PC joystick and also for connecting external MIDI instruments. 2-4 User Manual 3 Installation Under Windows 95/98 This chapter guides you through the installation of the SF256-PCP PCI sound board under Microsoft Windows 95/98 environment. The installation is divided into two sections : Audio and FM radio (optional feature only available on model SF256-PCP-R). Installation of the Radio software is described in chapter 5. Please verify that the sound card does not share resources with legacy peripheral cards. Refer to the FAQ in the on-line manual to "Resolve any Resource Conflicts". Installation Under Windows 95/98 The various version of Windows 95/98 will display different dialog boxes during installation. This manual assumes that you are using Windows 98 1. Upon starting the system for the first time after inserting the SF256-PCP PCI Sound board, Windows will notify that it has detected PCI Multimedia Audio Device. 2 Click Next. 3. In the next dialog box, select Search for the best driver for your device. (Recommended) and click Next. 4. Select CD-ROM drive to install directly from D: drive or select Specify a location: and Browse... to D:\ (where D: is your CD-ROM drive.) Installation Under Windows 95/98 3-1 5. You will see the SF256-PCF PCI Audio/Game Device detected as shown below: 6. Click Next and Windows will start copying files into your harddrive. 7. Click Finish to complete the installation and reboot your system. 3-2 User Manual 4 Installation Under Windows NT 4.0 This chapter guides you through the installation of the SF256-PCP PCI sound board under Microsoft Windows NT4.0 environment. The installation is divided into two sections: Audio and FM radio (optional feature only available on model SF256-PCP-R). Installation of the Radio software is described in chapter 5. The various versions of Windows NT 4.0 will display different screens during installation. This manual assumes that you are using Windows NT 4.0 with Service Pack 4 installed. Upon starting the system for the first time: 1. 2. 3. 4. Click on the button from the taskbar. Select Settings - Control Panel. Double-click on the Multimedia icon. Click on the Devices tab in the Multimedia Properties window. 5. Click Add to bring up the dialog box as shown below: Installation Under Windows NT 4.0 4-1 6. Select Unlisted or Updated driver and click OK. 7. Insert the SF256-PCP Installation CD. 8. Type D:\NT4 and click OK (where D: is your CD-ROM drive). 9. The following dialog box below will appear: 10. Select SF256-PCP Wave, Mixer, and MIDI and click OK. 11. Reboot your system when prompted. Install Joystick You may install the joystick using the drivers supplied with the Microsoft's Windows NT CD-ROM disk. To install the joystick driver manually: 1. 2. 3. 4. Click on the button from the taskbar. Select Settings - Control Panel. Double-click on the Multimedia icon. Click on the Devices tab in the Multimedia Properties window. 5. Click Add to display the dialog box as shown in the next page: 4-2 User Manual 6. Select Unlisted or Updated driver and click OK. 7. Next, insert the Microsoft Windows NT CD-ROM disk and type D:\DRVLIB\MULTIMED\JOYSTICK\x86 (where D: is your CD-ROM drive). 8. Click OK. 9. Select Analog Joystick Driver and click OK. 10. Select any port address 0x0200 or 0x0201 and click OK. 11. Reboot your computer for the changes to take effect. Installation Under Windows NT 4.0 4-3 User Manual 5 Installing Software Application The SF256-PCP PCI sound card is bundled with a few software applications as listed below: F Ezaudio AudioRack Application (Win95/98/NT) F Yamaha Soft-Synthesizer Application (Win95/98) F RadioAKTIV Navigator (Win95/98/NT) - only applicable to model SF256-PCP-R Ignore the installation for RadioAKTIV if your sound card does not have the built-in FM Radio function. Installing EzAudio Rack Application EzAudio is a simple audio rack application for playback of audio CD, MIDI and WAV files. You may also use the EzAudio to record WAV files. To install the EzAudio rack application: 1. Insert the SF256-PCP Installation CD into the CD-ROM drive. 2. When the autorun screen appears, click on the Install EzAudio button. 3. Follow the on screen instruction. Note: If the autorun feature is disabled in your system, you may install EzAudio manually by running the file SETUP.EXE from the directory D:\EZAUDIO on the CD. Installing Software Application 5-1 The following describes the interface on the Ezaudio rack: Minimise Properties Power Switch CD Player MIDI Player WAVE Player Previous Record Backward Forward Pause Play Stop Next Installing RadioAKTIV Application RadioAKTIV features 20 user-definable station settings for you to tune into and lock in your favourite stations for total convenience. Auto station scanning is also available in additional to conventional manual tuning. Be sure that you have purchased the model SF256-PCP-R with built-in FM Radio. To install the RadioAKTIV navigator: 1. Insert the SF256-PCP Installation CD into the CD-ROM drive. 2. Click on the Install RadioAKTIV Navigator button. 3. Follow the on screen instruction. 5-2 User Manual Note: If the autorun feature is disabled in your system, you may install RadioAKTIV navigator manually by running the file SETUP.EXE from the directory D:\RADIO on the CD. The following describes the interface on RadioAKTIV navigator: Current Radio station FM level RadioAKTIV panel Volume Knob Real time Mono/Stereo Alarm on/off Mute on/off Sleep on/off For detail information on how to use the RadioAKTIV navigator, use the On-line Help by clicking the OPTION button and select Help Topics. Installing Yamaha SoftSynthesizer Application S-YXG50 allows you to play back Yamaha SoftSynthesizer MIDI files on your computer without using a hardware tone generator. Its high fidelity sounds, match the sounds from an authentic tone generator, are based on and realized by advanced MMX technology. The S-YXG50 transforms your computer into a music synthesizer. To install Yamaha S-YXG50 Application, do the following: 1. Insert the SF256-PCP Installation CD into the CD-ROM drive. 2. Click on the Install Yamaha SoftSynthesizer button. 3. Follow the on screen instruction. Installing Software Application 5-3 Note: If the autorun feature is disabled in your system, you may install Yamaha SoftSynthesizer application manually by running the file SETUP.EXE from the directory D:\YAMAHA on the CD. The following interface shows the Yamaha Player: Music / Title display Tempo display Tempo setting Power Switch Minimize Add song list Play Pause Stop Setup Volume control bar For detail information on how to use the Yamaha S-YXG50 player and S-YXG50 Setup, use the On-line help by the clicking on the S-YXG50 Help of Yamaha SoftSyntheszier S-YXG50 program folder. 5-4 User Manual A Specification PCI Bus Master Interface q Ensures low system overhead for audio data transfer q Plug-N-Play compatible q 32-bit PCI Bus Master, PCI 2.1 compliant Compatibility q q q q q Sound Blaster Pro, Roland MPU401 (UART mode) Microsoft Direct Sound and MMSystem support Microsoft Windows 95, Windows 98 and Windows NT 4.0 Microsoft Windows Sound System Support Adlib Music Synthesizer, Real DOS Sound Blaster Pro q Multi-channel EAX games support q AC97 rev2.1 and PC98 compliance q Plug-and-Play compliance Wavetable Synthesizer q 20-Voice, 4-operator music synthesis hardware with professional 64-Voice Software wavetable for Symphony quality Sound in Games and Music q Programmable pan, tremolo, vibrato, rate conversion and tone filtering per voice q With a 256-voice software wavetable q Fully compliant to General MIDI Specification A-1 Effects Synthesis q Advanced audio effects such as reverb, chorus, flange, echo on all Wave and MIDI playback Digital Audio q Support DirectSound and DirectSound 3D games in Windows 95 and Windows 98. q Record, compress and playback 16-bit digital audio in stereo/mono q < 0.5% PCI Bus Bandwidth for Playing 16-bits/stereo/ 44.1kHz q Enable Interpolate Sample Rate Conversion to improve the quality of sounds that are converted to different samples rates and Doppler effects Audio Quality q Low Signal-to-Noise ratio with superior split Digital/Analog implementation q High-quality AC’97 codec with 48kHz sampling rate q Full-duplex operation for simultaneous recording and playback Positional 3D and EAX q Experience dynamic 3D positional audio under DirectX 5.0 or later on all Microsoft DirectSound3D q Hear sound above you, below you and approach you from every direction in 4-channels q Q3D 2.0, QSound Technology, Inc. uses reverb to enhance the qualities of the surrounding environment A-2 User Manual q Enable Reverb supports games taking advantage of Creative’s EAX Environmental Audio Extensions q Select default environment to preset to your personal preference for non-EAX DS3D game titles Analog/Digital Mixer q 7-channels record source and playback mixer with stereo inputs for Line, CD-audio, Music Synthesizer, Auxiliary input, Video input and mono inputs for Phone, PC speaker and Microphone q Selectable mixing of input sources for recording and playback with programmable volume controls q Mixer-controlled record and playback with 32 steps logarithmic master volume control MIDI / Joystick Interface q Roland MPU 401 (UART mode) port with FIFO emulate for Sound Blaster MIDI port q Standard PC joystick interface DOS Game Compatibility q Complete Sound Blaster Pro game compatibility over PCI bus using PC/PCI DMA, and Distributed DMA, Serial IRQ q Support Real DOS games in DOS mode or DOS box on all Pentium and Pentium-II machines Internet q Full-duplex support for InternetPhone and Microsoft NetMeeting for two-way conversation on the Internet Specification A-3 Digital Tuning FM Radio (on SF256-PCP-R model only) q q q q q Frequency range: VHF Band II (88MHz to 108MHz) 75 ohms dipole antenna to improve reception in PC User-friendly GUI provides ease of tuning Alarm and sleep function turn ON/OFF to specific time Program in background allows you to listen to your favorite station in the background even while working on other programs q Radio recording and playback System Requirement q IBM PC or compatible Pentium with CPU 133 MHz or equivalent q 16MB of RAM ( 32MB if software wavetable 4MB sound library is used ) q Microsoft Windows 95, Windows 98 or Windows NT4.0 or MS-DOS 6.0 or higher q Approximately 16MB of space on your hard disk q CD ROM drive q VGA monitor q Microsoft DirectX version 5 or later q One pair of powered stereo speakers or headphones q Second pair of powered stereo speakers that give four channels “QUAD” mode for additional 3D sound immersion. (optional) A-4 User Manual B FAQ and Trouble-Shooting This section provides some tips to troubleshoot the sound card. F F What are the Configuration Problems? What are DMA channels and PCI? Example: The SF256-PCP PCI sound card has been functioning fine and well. After adding some new devices to your computer, you are puzzled why it stops working. Sometimes you may experience similar situation when you replace your fax-modem card. There maybe a conflict between the sound card and the fax-modem card (such as I/O address or IRQ). Often, other problems are extermely simple: poor cable connections etc. Check the obvious first, not last. What are the Configuration Problems? Adding new hardware and software to your computer requires no conflicts existing devices in the system. If you have difficulty with the installation procedure or are unable to make the card work, a conflict may be present. The section provides the sound card's resources information. Even though the SF256-PCP PCI sound card is a Plug-and-Play card, the presence of other legacy cards can still cause resource conflicts. FAQ and Trouble-Shooting B-1 To resolve such conflicts, it is important to know the settings of other cards and peripherals currently in your system, including the mouse, fax-modem, video accelerators, etc. For detail information, refer to the section on Resolving I/O conflicts. There are three major configuration settings to consider: a. I/O Port Address, b. Interrupt Request line (IRQ), c. Direct Memory Access channels (DMA) Generally, you will only have a DMA conflict if your system contains another sound card or an external CD-ROM drive. To verify resource conflict, refer to "Resolving Hardware conflicts under Windows 95/98" on page 5 within this chapter. Understanding SB System Resource SF256-PCP PCI sound card's Legacy Audio refer to SB legacy resource of your sound card and contains the following: 1. Input / Output (I/O) Address 2. Interrupt Request (IRQ) Line 3. Direct Memory Access (DMA) Channel Input / Output (I/O) Address B-2 Device Default I/O Address Range SB interface 220H to 22FH (preferred) 240H to 24FH MPU 401 UART 300H to 301H MIDI interface 320H to 321H 330H to 331H (preferred) 340H to 341H FM Synthesizer 338H to 38BH (preferred) User Manual Interrupt Request (IRQ) Line Usage SB interface Default IRQ Range 5 , 7, 9 Direct Memory Access (DMA) Channel Usage DMA channel Default DMA Range 0,1 The SB legacy environment variable is: F SB legacy interface's base I/O address F IRQ line used by the audio interface F DMA channel used by audio interface F MPU401 UART interface's base I/O address Determine System Resources To find out your SB16 legacy resources in Windows 95/98. Do the following: 1. Click on the Start button from the taskbar, select Settings and then click on Control Panel. 2. Double-click on the System icon. 3. In the System Properties dialog box, click on the Device Manager tab. 4. Double-click on SF256-PCP Legacy component, and then double-click on the Resource tab. You can use the information in the resource list to help you to configure MS-DOS games using your sound card. FAQ and Trouble-Shooting B-3 The resource list shows three I/O address range entries, one DMA entry and one IRQ entry. Some old games have difficulty detecting the PCI audio card at certain resource settings. as the game developer expects the PCI card to be fixed at a set of resources and would fail to load if those resources are not detected. If you are running older MS-DOS games that do not work properly, try changing the PCI audio legacy's configuration. Most MS-DOS based games that provide sound have some procedure for audio setup. These procedures generally present a list of popular audio card or audio device. Resolve I/O Resource Conflicts Conflicts between your audio card and other peripheral device may occur if your card and another device are using the same I/O address range. To resolve I/O address conflicts, change the resource setting of your audio card or the conflicting peripheral device in your system using the Device Manager under Windows 95/98. If you still do not know which card is causing the conflict, remove all cards except the sound card and other essential card (for example, disk controller and graphics cards). Next, add each card back one at a time until Device Manager indicates that a conflict has occured. This way you will know which card causes the conflict with your audio card. B-4 User Manual Resolving Hardware Conflicts under Windows 95/98 Resolve hardware conflict using automatic settings: 1. Click on the Start button, select Setting and click on Control Panel. 2. Double-click on the System icon. 3. In the System Properties dialog box, click on the Device Manager tab. 4. Under the Sound, Video and Game Controllers entry, select the conflicting audio card driver as indicated by an exclamation mark (!) and click on the Properties button. 5. In the Properties dialog box, click on the Resources tab. 6. Make sure that the Use Automatic Setting check box is selected, and click on the OK button. 7. Restart your system to allow Windows 95/98 to reassign resources to your audio card or conflicting device. Resolve hardware conflict using manual settings: 1. Repeat steps 1 to 5 listed above (automatic settings). 2. Unselect the check box for Use Automatic Setting. 3. Next, select different Basic configuration or click on the Conflict Resource type and then click on Change setting. 4. Select different value using the up or down arrow until the conflict information box indicates No devices are conflicting and then click OK. FAQ and Trouble-Shooting B-5 What are DMA Channels and PCI? Under Windows 9x, the SF256-PCP PCI Sound card is capable of full duplex audio. This means that the card can playback WAV file and record another WAV file concurrently. With the PCI bus, full duplex is possible without any DMA channels. To test full-duplex yourself, try the following steps: 1. Launch the Sound Recorder as shown below: 2. Launch another session of Sound Recorder. 3. Use one of the Sound Recorder to play any WAV file (select a long WAV file). 4. Use the other Sound Recorder to record your voice through a microphone. 5. If both works, your sound card support full-duplex. There is no microphone support in the MS-DOS Mode and therefore only a single DMA is required for legacy emulation. B-6 User Manual Problems with Joystick and Games What should I do if my joystick does not work? 1. The audio card's joystick port may conflict with the system's joystick port. Disable the audio card's joystick port and use the system port instead. Refer Install Joystick under chapter 4 if you are using Windows NT. 2. If you are having a problem with external joystick or game port, make sure that the Joystick is enabled and the Windows 9x Gameport Joystick drivers are loaded and working properly in the Device Manager. You can test your joystick by clicking on Game controller icon in the Control Panel. 3. In order to use two joysticks, you will need to use a SoundBlaster-compatible Y-connector (such as Radio Shack part # 26-380), or use an industry-standard MIDI Joystick kit. This will make allowances for the proper direct connections for dua joysticks. What should I do if I have problem with playing games? Make sure that you have the game set up in a music option that the SF256-PCP PCI sound card supports i.e. use SF256-PCP Internal FM in the Multimedia properties' MIDI tab. If your game takes advantage of DirectX or DirectSound be sure that you have the latest DirectX installed. FAQ and Trouble-Shooting B-7 My DOS games do not work properly with SF256-PCP PCI sound card and the system pops up the message "Can't find PCI Chipset Device!" during system boot-up. If your sound card does not work properly with your DOS games, and you see the message "Can't find PCI Chipset Device!" when the system is executing CFG801.EXE in AUTOEXEC.BAT, open the file C:\AUTOEXEC.BAT to check if there is one line which states "C:\CFG801". If this line does not exist, it means the driver is not installed properly. Please re-install the SF256-PCP audio driver again. Double-check and make sure that the AUTOEXEC.BAT file have the following statements: C:\CFG801 C:\DOS801 Problems With My Sound Card Can I install two sound cards? Having another sound card in your system in addition to the SF256-PCP PCI Sound card will greatly increase the chances of having system conflicts. We highly recommended that any other sound devices and their associated Windows drivers be removed before installing the SF256-PCP PCI Sound card. Does SF256-PCP support Linux OS? SF256-PCP PCI sound card supports Windows 95, Windows 98, Windows NT 4.0 and DOS. Linux is not supported. B-8 User Manual Why are some of the Windows Multimedia Components (i.e. Media Player) are missing? If you install the SF256-PCP PCI sound card after Windows 9x is installed, Windows will not install the sound utilities that you would expect to find. Features such as the Audio CODEC, the Media Player, and the Microsoft Mixer may not be present. This may cause your sound card not to function properly, even when the drivers are installed. If this is the case, these applications must be installed onto the system from the Windows 9x installation CD. I have bought the sound card with Yamaha software Wavetable synthesizer in the package. But I can not install Yamaha Wavetable synthesizer in my computer. You need to install SF256-PCP PCI sound card driver first before you install Yamaha SoftSynthesizer. Refer Chapter 3 to install SF256-PCP PCI Sound card driver in Windows 9x or Chapter 4 in Windows NT4.0. Refer Chapter 5 Installing Yamaha Softsynthesizer Application to install the Yamaha Wavetable. The Yamaha 256 SoftSynthesizer for Windows NT is currently not available yet. Yamaha soft-synthesizer or Games performance is slow or there are intermediate pauses. There is insufficient memory to run Yamaha soft-synthesizer or some game. Increase memory if you encounter system slow down when you run games or Yamaha soft-synthesizer. Since the sound card is HSP (host-based processing), it requires enough memory to allocate the wavetable samples bank. It is recommended to run the application in a 32MB RAM system. If you still experience games performance degrading, turn off the Yamaha driver. FAQ and Trouble-Shooting B-9 Why are two interrupts allocated for my SF256-PCP sound card? The PCI audio uses one PCI interrupt for operation. Additional IRQ is used for ISA legacy support. One PCI IRQ is needed for the audio to function under a PnP operating systems such as Windows 9x. An additional ISA IRQ is dedicated for legacy audio support. Legacy audio support is used for DOS based applications and games that are SoundBlaster compatible. Most DOS based applications and games only use SoundBlaster compatible legacy audio requiring the use of a ISA IRQ. By disabling the ISA legacy audio support in the operating system the dedicated ISA IRQ is freed, thus using only one PCI IRQ. DOS Applications and games that require SoundBlaster Audio support will have no audio output if ISA legacy audio is disabled. Another way to save one IRQ is to make the BIOS assign IRQ5 or IRQ7 or IRQ9 to SF256-PCP PCI Audio. This way, ISA legacy audio can also be supportd via SF256-PCP PCI Audio. Please refer to the BIOS user manual of your motherboard to see the details on how to allocate the IRQ to PCI slots. What happened if my SF256-PCP sound card and driver are both properly installed, yet, there is still no sound? If the SF256-PCP PCI Sound card drivers are properly installed with no conflicts, yet there is no sound, the problem may be with your audio connections. Here are some suggestions: 1. Try playing both WAV file and MID file to ascertain that there is no sound at all coming from the speakers. If you hear one and not the other, the problem is internal and has nothing to do with your audio system. 2. Be sure that your speakers system is properly set up. Try connecting a sound source CD audio player other than SF256-PCP and establishing whether or not you can hear it. B-10 User Manual Refer Chapter 2 Setting Up SF256-PCP Sound Board to check on the speakers connection. 3. To eliminate the possibility of a bad cable, try plugging a pair of high impedance headphones to the SF256-PCP PCI sound card's Front Speaker jack or Rear Speaker jack and see if you can hear any sound. My speakers system has no problem, but there is no Audio output when playing digital files such as WAV, MIDI files or AVI clips. Check through the following possible causes: 1. You may be using a pair of passive speaker. This sound card does not work on passive speakers. You need to use active speakers or external powered speakers. 2. The external amplifier speakers' volume control knob is at minimum. Turn your external powered speakers' volume control knob to mid-range. 3. The external amplifier speakers maybe connected to the wrong jack. You need to check and ensure that they not connected to Line-In jack or Mic jack or Antenna jack (on model SF256-PCP-R). 4. You may have connected your external powered speakers to the Rear Speakers jack and have selected dual speaker mode in the Q3D control panel. Remove the jack and connect it to the Front Speaker jack and unmute the Front speaker volume and Master Volume. 5. There could be a hardware resources conflict. Refer to the section on "Resolving I/O Resource conflicts". FAQ and Trouble-Shooting B-11 How do I change volume and balance levels under Windows 9x? To make adjustments to SF256-PCP PCI sound card's volume settings and balance levels, use the EzAudio Rack Mixer. The Install Wizard adds the EzAudio icon to your taskbar. Click on the EzAudio icon and the EzAudio Rack pop-up on the screen. Double-click on the Mixer button and the Volume control window pop-up on the screen. You can adjust the volume bar up and down, or adjust the balance bar left and right. Adjust the Front Master and Rear Master to set your own preference of mixing front and rear speakers system, this add some difference in your surround effect. My sound card works but there is no sound when playing CD-audio or when playing DOS games that required a CD-ROM drive. 1. Be sure that your CD volume is turned up to the maximum in the volume control of the Mixer. If you hear no sound from CD-audio, you need to verify that the internal audio cable is connected between your CD-ROM drive and the sound card's CD header, J3 or J4. This is typically a small connector with three or four wires coming out of it. Refer Chapter 1 for connectors information. 2. Another tip is to obtain a 1/8" stereo patch cord and connect one end to the "headphone out" on the front of the CDROM drive, and the other end to the Line Input on the back of the sound card. Make sure the headphone volume dial on the CD-ROM drive is at maximum, and try playing a CD audio track. You should hear the music playing. If your internal patch cable is missing or defective, contact your CD-ROM manufacturer for information on how to obtain another cable. B-12 User Manual My microphone recording is soft, or with distortion, or not at all? For ease of installation, we recommend that you use a dynamic microphone. These require the least amount of setup. Do the following to ensure that your software is set up correctly: 1. Check your microphone connection. You microphone should be connected to MIC jack. 2. Make sure the MIC slider in the Volume contol is all the way up, the mute box is not checked and the MIC Boost box is checked. Speak to your microphone and you should hear yourself speaking. 3. Make sure the MIC slider in the Record control is all the way up, the select box is checked and the MIC Boost box is checked. Launch window Sound Recorder and try recording through your microphone. Playback your recorded wave file and you should hear yourself speaking. 4. If you experence distortion with a dynamic microphone, adjust the volume levels of the Microphone and Master audio devices. Disable the Mic Boot will help to remove distortion. 5. Another tip is to obtain a 1/8" stereo patch cord and connect one end to the "headphone out" on the front of the CDROM drive, and the other end to the MIC jack. Repeat steps 2 and 3 to test MIC recording. If you can hear the music, this mean no problem with the sound card. You may need to change your microphone. FAQ and Trouble-Shooting B-13 Experience choppiness in Netmeeting or InternetPhone or other 3rd party conferencing software when you do video conferencing. If you experience choppiness in Netmeeting or Internet Phone, the followings may be the possible cause: 1. Check the modem connection. You need to check whether your modem connection speed has dropped, or the modem connection speed at the other end may be low. Your connection will depend on your ISP (Internet Service Provider). Busy traffic during peak hours may reduce the connection speed. 2. Check whether full-duplex audio is enabled. If you use Internet Phone and have enabled your sound card's full-duplex option, you can listen and talk at the same time (e.g. standard telephone conversation). In order for you to do this, the person that you are talking with also needs to have a full-duplex card. Otherwise, you will experience intermediate pauses during conversation. If the other person uses a half-duplex sound card, you must wait for the other person to stop talking before you can talk (e.g. talking on walkie-talkie). 3. Check other application driver is enabled. If you had installed Yamaha SoftSynthesizer, check that your sampling rate is not at 44KHz. It is recommended to use 22KHz sample rate for video conferencing. Otherwise, disable the Yamaha SoftSynthesizer driver. Reboot the system for the changes to take effect. This will improved any choppiness. 4. Check Video is enabled. If you have setup a video camera together with your audio card, you will experience choppiness because more data are being sent out to the network (internet). B-14 User Manual In Windows 9x, the installation does not Auto-run after the CD-ROM is inserted. 1. Double-click on the My Computer icon on your Windows desktop. 2. In the My Computer window, right-click on the CD-ROM drive icon. 3. On the shortcut menu, click AutoPlay and follow the on-screen instruction. To enable AutoPlay through Auto Insert Notification: 1. Click on the Start button from the taskbar, select Settings and then click Control Panel. 2. In the Control Panel window, double-click on the System icon. 3. In the System Properties dialog box, click on the Device Manager tab and select your CD-ROM drive. 4. Click on the Properties button. 5. In the Properties dialog box, click on the Settings tab and select Auto Insert Notification. 6. Click on the OK button to exit from the dialog box. In a 4 speakers system configuration, there is no sound from the rear speakers. Check the following: 1. The rear speakers are connected to the audio card's Rear Out jack. 2. Ensure your rear speakers are active speaker (with built-in amplifier). 3. You are playing sound from one of the following sources: CD audio, Line-in, TAD, Auxiliary (AUX) or Video, Microphone. FAQ and Trouble-Shooting B-15 To solve the problem: In the Q3D Control Panel view, make sure that the 4 Speaker option is checked and click the Apply button. Next, under the SF256-PCP PCI sound card's volume control, ensure that the check box of the source Rear Master is unmuted and set to Maximum. In the recording control view, make sure that the corresponding check box is also selected for recording. If you still experience no sound from the Rear speaker, try connecting the Front speakers to the Rear connection. Radio no sound or cannot tune or scan radio station 1. Check that your audio card's driver is properly installed. Make sure no exclamation mark (!) appears in the Sound, Video, or Game controller in the Device Manager. Refer to the Resolving conflict section for more detail. 2. Check that the Master volume is ummuted or the Auxiliary volume is unmuted. 3. Check that the Antenna is connected to the Antenna jack on the SF256-PCP-R. 4. Check that the RadioAKTIV navigator is installed properly. If there is an error message No Radio Card detected, then it means that wrong version of the RadioAKTIV navigator installed, or you have purchased the SF256-PCP PCI sound card without radio feature. The radio feature is only available on model SF256-PCP-R. B-16 User Manual How to re-install RadioAKTIV navigator under Windows 9x? Remove your current RadioAKTIV application by: 1. 2. 3. 4. Click on the Start button from the taskbar. Select Settings and click on Control Panel. Click on the Add/Remove Program icon. Highlight RadioAKTIV v3.60 and click on the Add/ Remove button. 5. The uninstallation of driver will take place. Reboot your system before re-installing the RadioAKTIV navigator. 6. After restarting Windows, insert the SF256-PCP Installation CD into your CD-ROM drive. 7. Click on the Install RadioAKTIV Navigator button to begin installation. Radio poor reception even Antenna is connected into the Antenna jack or you have experienced Radio volume changing from loud to soft. Re-adjust the antenna until the reception is optimised. The best way to position the antenna in a T-shape as shown in page 3 under Chapter 2. Position the antenna high above the ground. Note that radio reception is a subjective matter and it can be affected by nearby electrical equipment (e.g. television set) or poor radio signal in your area. FAQ and Trouble-Shooting B-17 Part Number: MAN-PCP Printed in Singapore


![ft.757gx ]i hf all mode computer aided transceiver](http://vs1.manualzilla.com/store/data/005735092_1-f8362b9c1e3279439f07a335507c2c8e-150x150.png)