1
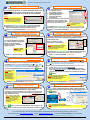
MTX-15 Terminal & Time Guardian® Quick-Start Guide ww m-a4 no0 .coB m/ito imm e etric FwP.aT Innovative Time Solutions Terminal Quick Start Guide TO PLACE AN ORDER CALL: 866-487-4751 Contents & Wall Mounting First - Remove the contents from the box: 50 ft. serial to USB cable included only with Ethernet TG/MTX‐15 serial cable included terminal package. only with TG/MTX‐15 Ethernet 25 or 50 Mag‐cards terminal included with TG/MTX‐15 package. packages only. Next - wall mount the MTX-15 Terminal. Note: Remove the wall mount plate by unlocking it with the supplied key. Remove the green insulating strip from the coin battery. Wall mount the unit within 6 feet of AC power and network connections (for Ethernet terminal). For direct connection with the serial terminal and the Amano CommStik™ serial-toUSB cable the unit should be mounted within 50 ft of the PC to use supplied cable without extension cable. MTX-15 Ethernet Connection For Ethernet PC connection, with the back plate off, insert one end of the 6ft supplied Ethernet cable into the network connection and the other end into the Ethernet port located on the bottom of the MTX-15 PCB. See Step 2 about contact relay and DIP switch use. Connect terminal to back plate & lock. Next, plug-in the MTX-15 AC adapter. The Time and Day/Date should appear on the terminal display. Note: Put the terminal into the diagnostic mode, and follow the procedure described in the MTX-15 User Guide to obtain the automatic IP Address or define and store a specific IP Address (settings that might have been supplied by a network administrator). TG Software Activation Click Next to finish the InstallShield Wizard at the end o f the InstallShield. When the Amano Software Activation s creen appears enter the 9-digit serial number supplied with T G and click the Activate button. Upon successful activation t he registration screen will appear to perform on-line r egistration. Click SAVE to complete and the TG program will l aunch and display the initial Setup Wizard. Proceed thru the etup Wizards to configure TG for the site. S ctivation fails and/or an error message appears possibly; the serial nNuomtebe: rIfisthwerA ong; there is no Internet connection with the Amano authorization server; or the same serial number was previously installed. For Activation Help and to vate TG contact support @ 1-800-253-9836. If you fail Activation you have 1m4adnauyasllytoaccotim plete Activation. or optional TG module(s) Activation see the User Guide for F additional instructions or contact support @ 1-800-253-9836. Wizard – Department Setup Department Setup is optional. However, all st employees, by default, are assigned to the 1 department. Select Yes and click on the button. Press the button to create a new department with a unique number and name. Departments can be used to filter employee lists and reports. Note: When creating a department, t he number & name must be entered. Use the Save button or Apply button to save entries (universal). All yellow fields must be filled (universal for all screens). Click Next to proceed with the Pay Code Setup. MTX-15 Direct PC Connection For direct PC connection, with the back plate off, insert the RJ11 connector from the 50ft cable into the serial port on the MTX-15. Connect the other end of the 50 ft USB CommStik serial cable to an available USB port on the PC. Optional – connect bell wires to relay contacts on terminal block for bell. DIP Switch – For single terminal use factory setting. Connect terminal to back plate & lock. Next, plug-in the AC adapter for the MTX-15 (to start up terminal). Time and Day/Date should appear on display (not correct until polled by TG). Skip to Step 3 for Ethernet connection. Skip to Step 4 for TG Installation. TG Software Install Options Insert the Time Guardian® (TG) CD into your PC and follow the on screen prompts. Install TG using one of these 3 options; Standalone – Amano recommends using this default selection to install TG and the database on the same PC. The following selections are recommended for network setup. Server – install TG database on a server. Client – install TG on a PC with connection to the database on a server. Firebird – Use this default to install the Firebird database with TG. Microsoft® SQL – Only select this option if you have Microsoft SQL Server database already installed on a server or on the PC that TG is being installed on. Note: During software installation, you can choose from 2 database options, but Amano recommends using the Firebird default. Note: The installation should start automatically, but if installation stalls, browse on CD to \Disk1\InstData\Windows\VM\install.exe Note: See CD for detailed Macintosh & QuickBooks install instructions. Wizard - General Setup From the Steps Summary screen click the Next start the Setup Wizard with General Setup to define: button to Press button to: Enter general company info and settings for hour’s format, time format, and auto poll on login. Click Yes for Payroll to select from one of the 13 supplied Payroll interfaces such as QuickBooks. This provides export file settings to transfer employee’s hours. Click Next to proceed with the Department Setup. Wizard – Pay Code Setup Click on the Pay Code button to edit Pay Codes from 9 pre-defined Pay Codes. You must also decide whether hours assigned to a Pay Code will count towards attendance as this would be used to track absences or exceptions. Note: Primary & Also, select/define; Hours type fields a re fixed. Cost Multiplier Split Hours Counts Towards Overtime Press button to create new holidays or edit pre-defined holidays. Click Next to proceed to Schedule Setup. Information in this document is subject to change without notice. Reproduction in any manner without the written permission of Amano is strictly forbidden. AMX-406800 Copyright © 2010 Amano Cincinnati, Inc. 05/10 TO PLACE AN ORDER CALL: 866-487-4751 Wizard – Schedule Setup The default for TG is No to schedule employees with no schedule assignment. To create a Schedule Click on the button to enter a name; then click on the Add button to select the Days of the Week, & enter Start/End times. Notes: All salary employees require a schedule for hour’s calculation. No schedule overlaps allowed and only 1 schedule per day. The optional Advanced Schedule Module provides enhanced scheduling such as auto scheduling, schedule rotation, and advanced schedule for vacation and other time off. Click Next to proceed with the Pay Class Setup. Wizard – Exceptions Setup 11 Exceptions Setup provides the ability to track differences in the time that an employee was scheduled and actual time worked. TG has 10 exceptions such as LI – Late In and EO – Early Out, which are generated by using meal rules, schedule, and/or punches. Note: The default is all Exceptions are selected. Click Next to proceed to Employee Setup. Wizard - Clock Setup Direct Connection 13 Clock Setup provides the ability to configure the MTX-15 terminal. A default Location will be created for the MTX-15. For MTX-15 Direct connection first select Yes Do you have terminal(s) other than Access Control terminal(s)? then Yes Do you want to configure terminal(s)? The default MTX-15 button. Location automatically defines everything. Click on Note: Upon initial startup after Login, the Auto Find will detect the connected terminal and request selection of terminal type. Click Next to proceed to Login Setup. Wizard - Login Setup 15 Login Setup provides the ability to decide who will have access to TG and assign employees to a user. Unlimited Login users can be created with different privileges (Admin, Supervisor, or Payroll user) but only one user can concurrently login (additional concurrent user login upgrade is available at http://www.amano.com). Note: At least 1 user profile must be created with Admin rights in TG. Please select “Administrator” as the group. Also, the Password needs to be 6 to 20 characters. Click button to finish the Setup Wizard. The settings can be changed at any time using the Setup Wizard from the Edit menu. 11 14 Wizard – Pay Class Setup From the Pay Class screen define: Pay Period Interval Day Change Settings Overtime Authorization Hours Authorization Overtime, Rounding & Meal Rules A pay period (interval) with start date (end date for semi-monthly only) must be set. Also, define overtime, and when it should be reset? Note: At least 1 Pay Class must be created. The optional Advanced Pay Class Module provides enhanced day change rules, custom pay period and holiday group setup. Click Next to proceed with the Exceptions Setup. Wizard – Employee Setup 12 12 Employee Setup provides the ability to directly import employee information from a text file. TG allows the entry of employees with unique employee and badge numbers and/or Payroll ID. Also, personal & contact information can be entered. Note: Define employee Schedules, make Assignments, select Labor Levels and set Wages from the Employees module. The optional Benefit Time Module provides enhanced tracking of employees time off, limiting to hours earned, and reports. Click Next to proceed with Clock Setup. 14 Wizard - Clock Setup Ethernet Connection For MTX-15 Ethernet connection first select Yes Do you have terminal(s) other than Access Control terminal(s)? then Yes Do you want to configure terminal(s)? Click on the Location/Terminal button for Ethernet connection: Select “MTX-15 Default” on the General tab . Click on Connection tab to select Ethernet for Connection Type and enter your IP Address. The default MTX-15 Location automatically defines everything else for Ethernet. Click on button. Note: Upon initial startup after Login, the Auto Find will detect the connected terminal and request selection of terminal type. Click Next to proceed to Login Setup. Wizard – Finish & Login 15 16 Congratulations! after the Setup Wizard is complete the TG “Login” screen will appear. Enter a Username and Password created during the Login Setup step and click on the button. Username = Password = Note: All employee badge numbers, names, and terminal setup will be downloaded to the MTX-15 from TG. For more information see the Time & Attendance Software & MTX-15 User Guides included on the TG CD. You can also go to www.amano.com/time , e-mail [email protected] , or call us at 1-800-253-9836 or 973-364-0294. Information in this document is subject to change without notice. Reproduction in any manner without the written permission of Amano is strictly forbidden. AMX-406800 Copyright © 2010 Amano Cincinnati, Inc. 05/10