1
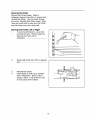
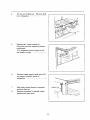
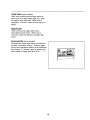
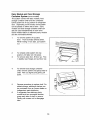
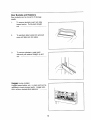
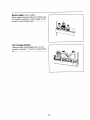
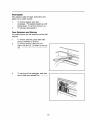
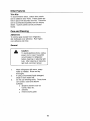
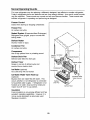
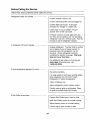
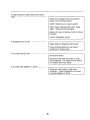
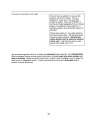
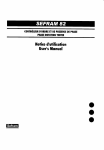
"R" Series
Bottom Freezer
Refrigerator
Use and Care
Manual
Attention:
Keep these instructions
for future reference.
If
the refrigerator changes ownership, be sure this
manual accompanies
refrigerator.
Consumer
Information
1-800-843-0304
Line
Contents
2
Electrical Requirements
Model Identification
Setting
Automatic
Ice Maker (optional)
Freezer Shelf
3
Controls
4
4
6
Temp-Assure
TM
Refrigerator
and Freezer
Model Diagrams
Refrigerator
Features
Refrigerator
Shelves
Deli Chiller
Crisper
Other
10
Utility Rack (some models)
Egg Bucket
12
12
(some
models)
14
Bottle Hugger (some models)
Tall Package Retainer
__
(some models)
Freezer Features
Free-O'-Frost TM
Ice Service
Vacation Tips
Normal Operating Sounds
Before Calling For Service
Asure TM Extended Service
15
16
Rack (some models)
22
22
23
24
Plan
28
__ 16
THIS SYMBOL
AS A SAFETY PRECAUTION
WARNING
Electrical Grounding
Instructions-This
appliance is equipped with a three-prong
(grounding)
plug for protection against possible shock hazards.
If a two-prong wall receptacle is
encountered,
customer is required to contact a qualified electrician and have the two-prong
wall receptacle replaced with a properly grounded three-prong
wall receptacle in accordance
with the National Electrical Code.
Refrigerator
is designed
to operate
on a separate
103 to 126 volt, 15 amp., 60 cycle line.
DO NOT UNDER ANY CIRCUMSTANCES
CUT OR REMOVE THE ROUND GROUNDING
PRONG FROM THE PLUG. THE UNIT MUST BE GROUNDED
AT ALL TIMES.
DO NOT
REMOVE WARNING
TAG FROM THE SERVICE CORD.
WARNING
DO NOT USE A TWO-PRONG
DO NOT USE AN EXTENSION
ADAPTER.
CORD.
Round Grounding
2
18
20
21
Electrical Requirements
RECOGNIZE
16
16
17
17
20
Light Bulbs
Energy Tips
15
16
18
18
19
19
19
Food Storage Containers
Door Gaskets
Odor Removal
Mechanical
Condenser
Coil
Snaccess Bin (some models)
__
12
Dairy Module and Food Storage
Container System (some models) _ 13
Door Buckets and Retainers
14
Hugger
__
Care and Cleaning
Adhesives
General
Glass Shelves
8
Drawers
Shelf Divider (some models)
Wire Basket
Door Retainers and Shelves
Features
Trim Kits
__
Plug
Model Identification
Please read this Use and Care Manual thoroughly.
This manual
information for maximum benefit of the features selected.
provides
proper
maintainance
Complete enclosed registration
card and promptly return card to Amana's Product Registration
department.
If registration card is missing, call Amana's Consumer
Information
Line at
1-800-843-0304.
When contacting
Amana, provide product information.
Product information
nameplate, found in upper left-hand corner of refrigerator
section.
Record
information:
Model
is located on the
the following
Number:
Manufacturing
Number:
Serial or S/N Number:
Date of purchase:
Dealer's name and address:
Keep a copy of sales
receipt
for future reference
or in case warranty
service
is required.
If something
is operating incorrectly,
read "Before Calling for Service" section.
Any further
questions or to locate an authorized
Amana servicer, call 1-800-843-0304.
Amana recommends
contacting an authorized
servicer if service is required.
Amana offers a complete line of appliances...freezers,
ranges, cooktops, wall ovens, microwave
ovens, dishwashers,
washers and dryers. Amana also manufactures
a complete selection of high
efficiency gas furnaces plus both central and room air conditioners.
When buying one of these
products, choose Amana.
Enjoy this new refrigerator.
Setting Controls
This refrigerator
is designed
to operate
most
efficiently under normal household
temperatures
ranging from 55 ° to 110°F.
Temp-Assure
TM
Thermostatic
Control
Temp-Assure TM thermostatic
control is located
on upper back wall of refrigerator
section and
operates independently of freezer control. A
hidden thermostatic sensor measures
refrigerator air temperature constantly. If
temperature rises as little as 1 1/2°F (.8°C) from
setting, Temp-Assure
in more cold air.
Refrigerator
Refrigeratcr
refrigerator
TM
thermostatic
control lets
and Freezer Controls
control is located at top back of
section.
....
<
Freezer control is located
freezer section.
When freezer
control
at left front corner
of
is set to "Off", neither
refrigerator
nor freezer.sections
will cool.
Initially set both controls to "4". Wait 24 hours
for refrigerator and freezer to reach desired
temperatures.
After 24 hours, adjust controls
as desired.
"1" is warmest
"7" is coldest.
setting.
4
L_J
To set temperaturesmoreprecisely,use a
householdthermometerthat includes
temperaturesbetween-5° to 50°F
(-20.5° to 10°C). Thermometercan usuallybe
purchasedat a hardwarestore.
In freezer section,put thermometersnugly
betweenfrozen food packages. Wait 5-8
hours.If temperatureis not 0° to 2°F
(-18° to -17°C),adjust control,one numberat a
time. Checkagain after 5-8 hours.
/
Frozen Food Packages
In refrigerator section, put thermometer
in a
glass of water and place in middle of
refrigerator.
Wait 5-8 hours. If temperature
is
not 38 ° to 40°F (3 ° to 4°C), adjust control, one
number
hours.
at a time.
Check
/
again after 5-8
_s
"_
/
•
!
!
/
Glass of Water
Model Diagrams
Model Shown
is BZ20R
Temp-Assure TM
Thermostatic Control
Utility Rack
Egg Bucket
Door Buckets
' Module
Model, Manufacturing
and Serial Numbers
Food Storage
Containers
Refrigerator Shelf
Dell Chiller
Bottle Hugger
Tall Package
Retainer
Crisper Drawers
Door Retainer
Freezer Control
--
_ Door Shelves
Ice Service Rack __._.
Shelf Divider
Wire Basket
Freezer Shelf
Features
vary from model
to model.
Model Shown is BZ22R
Temp.Assure
Thermostatic
TM
Control
Utility Rack
Egg Bucket
Snaccess
Model, Manufacturing
and Serial Numbers
Bin
Dairy Module and
Food Storage
Container System
Refrigerato
Door Buckets
Deli Chiller
Bottle Hugger
Tall Package
Retainer
Crisper Drawers
\
Door Retair',er
Freezer Control
Door Shelves
_ce Service Rack
Door Retainers
Shelf Divider
Wire Basket
Freezer Shelf
Features
vary from
model
to model,
Refrigerator Features
Refrigerator
Shelves
Shelves can be adjusted to match size of items
stored in refrigerator. Some models feature
Spillsaver TM shelves.
Spillsaver TM shelves hold
simple spills for easier
cleaning.
To remove shelves,
and pull out.
1,
,
tilt up front.
Lift back
To reinstall, tilt front higher than back.
Insert hooks into metal track and lower
front.
Caution
Gently apply downward
pressure
to front edge of shelf to insure
proper installation.
Deli
Chiller
Deli Chiller features a drawer inside a sleeve.
Freezer air circulates between Dell Chiller and
sleeve. This keeps food fresh longer and up to
5°F (.3°C) colder than refrigerator. A control,
located on front trim, adjusts amount of freezer
air.
Slide control to right for normal refrigerator
temperatures and to left for colder temperatures
(ice crystals may form). Additional cold air can
affect refrigerator
temperatures
and refrigerator
control may need to be adjusted.
ii
i
i
Moving Dell Chiller
Remove
Dell Chiller drawer,
Refer to
refrigerator shelves instructions to remove and
reinstall Dell Chiller. Use only fourth through
sixth slots. Reinstall Dell Chiller drawer.
Slide
hand along back wall to make sure Dell Chiller
boot fits snugly
over hole in back wall.
Moving
Deli Chiller
Left or Right
1.
To avoid scratching
liner, use a knife
covered with tape. Remove plastic air
hole cap from back wall of
refrigerator.
Rotate
side.
2_
,
4.
Reinstall
Dell Chiller
boot 180 ° to opposite
Dell Chiller.
Insert plastic
air hole cap in opposite
side of refrigerator.
Be sure cap is
snugly in place. If cap is left out, cold
air may cause food to freeze.
I
Crisper Drawers
Crisper
drawers
store fresh fruits and
vegetables.
To keep fresh longer, tightly wrap
produce to seal in natural moisture.
Do not
wash produce before placing in crisper drawers.
Excess moisture could cause produce to spoil.
Do not line crisper drawers with paper towels.
Paper towels will retain moisture.
Leafy vegetables
such as lettuce,
spinach
or
cabbage should be stored in crisper drawers at
high humidity settings. Produce with skins, such
as apples, cauliflower,
corn or tomatoes, should
be stored in crisper drawers at low humidity
settings.
Removing Crisper
Glass Shelf
!.
2.
3.
Drawers and
To remove crisper drawers and glass
shelf, remove food. It may be necessary
to remove shelves located above crisper
drawers to remove bottom glass shelf.
Open left* crisper drawer.
*For refrigerator doors hinged on left,
open right crisper drawer.
Gently
push shelf up from underneath.
Caution
Handle
tempered
glass shelves
with care. Chipping, scratching
and twisting may cause shelves
to break suddenly.
Replace
shelves immediately
if scratched
or chipped. Do not expose
shelves to rapid temperature
changes.
10
,
Tilt one end of glass up.
from refrigerator.
Remove
5_
left* crisper
Remove
drawer
by
lifting front up while supporting
underneath.
*For refrigerator
doors
use crisper on right.
°
shelf
hinged
drawer
on left,
Remove crisper support post which fits
into recess at bottom center of
refrigerator.
7_
8.
Slide other crisper drawer
wall and slide out.
Reverse
drawers
Suppo_ Post
to opposite
procedure to reinstall
and glass shelf.
crisper
11
Utility
Rack
(some models)
Utility rack provides extra storage space for
items such as a large bottle, eggs, etc. Slide
flat edge of rack onto shelf. Move shelf if
necessary.
If bottle is used, be sure cap is on
tightly.
Egg Bucket
Take-to-the-counter
egg bucket
has a
removable tray and cover. When tray is
removed, bucket will accept a standard egg
carton.
Snaccess
Snaccess
Bin (some models)
bin stores small items and snacks
in
an easy, convenient
location.
Remove upper
portion and use bottom portion as an additional
door bucket.
To remove, open lid, place hand
below center of upper shelf and lift up.
12
Dairy Module
Container
and
System
Food
Storage
(some models)
This system comes with dairy module, food
storage container shelf and two containers.
Entire system fits in top position of refrigerator
door. Depending on the model, entire system
can be placed on either side of door. Dairy
module and food storage container shelf can
also be used independently of each other.
Some models feature a stationary dairy module
and two removable shelves.
,
To remove system, lift up dairy
door.
Push lock tabs toward center.
While
out.
.
3.
holding
,
near hinges
Flex
and pull door out.
To remove food storage container
shelf, remove system and grasp sides of
shelf.
down.
,
pull system
To reinstall, slide system into top
position until tabs lock into place.
To remove dairy door, lift door up.
in slightly
,
in lock tabs,
Flex out slightly
and gently
pull
Reverse procedure to replace shelf. For
added storage, additional shelves can
be purchased
from an Amana dealer
independent
parts distributor.
If refrigerator
has stationary dairy
module and two removable shelves,
or
grasp each side of shelf to remove.
Gently pull corners out to disengage
tabs.
13
Door Buckets and Retainers
Door buckets
needs.
,
can be moved to fit storage
To remove buckets, push lock tabs
toward center. Pull bucket straight
out.
To reinstall, slide bucket into grooved
area until tabs lock into place,
2,
,
To remove
retainers,
side and pull retainer
out.
Hugger
grasp each
straight
up and
(some models)
Hugger keeps bottles, etc., in place and can be
adjusted to meet storage needs. Hugger also
fits in atl door buckets and retainers.
14
Bottle
Hugger
(some models)
Bottle hugger prevents bottles from tipping over
in buckets and retainers,
Bottle hugger can be
moved
to meet storage
needs.
Tall Package
Retainer
Retainer keeps tall packages secure in door
buckets or retainers,
To remove, rotate and lift
up.
15
Freezer Features
Free-O-Frost
TM
System
Freezer and refrigerator sections are completely
frost free. Amana's Frost-Magnet®
evaporator
coil stops frost before frost starts. Under normal
operating conditions,
refrigerator
and freezer
never have to be defrosted.
Defrosting is
automatic.
Ice Service
Rack
will
(some models)
Service rack holds two ice cube trays and an
ice bin. Service rack can be moved to right side
by completing
.
2.
the following
Slide rack toward
steps.
front of freezer
until
screws are in middle of mounting holes.
Gently pull rack away from side wall of
freezer.
3.
Using 1/4" hex nut driver,
screws from side wall.
4.
To prevent
scratching
remove
liner, use a flat
blade screwdriver
covered with tape.
Gently pry plastic plugs from opposite
side of side wall.
,
Replace plastic
vice versa.
plugs with screws
and
6.
Line up middle mounting holes in side of
rack with screws on side wall.
7.
Gently slide rack back until secure.
Automatic
Ice Maker (optional)
The bottom freezer refrigerator
has an electrical
connection
in freezer for installation of an ice
maker. To ensure good ice cubes, a water filter
can also be added. Ice maker, model IC6, and
water filter, part #R0183114,
can be purchased
separately from an Amana dealer.
Freezer Shelf
Some models feature a glass or metal shelf.
2.
To remove shelf, pull out. A sharp tug
may be necessary.
To reinstall, slide until back of shelf
snaps in.
Shelf
Divider
.
(some models)
Shelf divider separates food for more storage
space. To move divider, rotate clockwise and
slide to new position.
16
Wire Basket
Wire basket
glides
,
.
Door
out for easier
2.
access.
To remove basket, open door
completely.
Pull basket straight out until
basket stops. Tilt up front and pull out.
To reinstall, slide basket in.
Retainers
All models
shelves.
,
is ideal for large, bulky items and
feature
and
Shelves
two full retainers
TO remove retainers, grasp each side
and pull retainers up and out.
To remove shelves, slide front trim
right or left and up.
out.
,
and two half
Lift shelf up and pull
To use area for tall packages,
slide front
trim off shelf and reinstall trim.
17
Other Features
Trim
Kits
To accent kitchen decor, custom door panels
can be added to door fronts. These panels are
held in place with decorator trim kits. These kits
can be purchased separately from an Amana
dealer. Custom panels can be purchased
locally.
Care and Cleaning
Adhesives
To remove glue residue from refrigerator,
dab toothpaste over adhesive.
Rub fingers
over adhesive and rinse.
General
Caution
To avoid electrical
shock,
unplug
power cord or open household
circuit breaker to refrigerator
before cleaning or replacing light
bulb. After cleaning or replacing
light bulb, reconnect
=
.
3.
Wash refrigerator
water as needed.
power.
with warm, soapy
Rinse and dry
thoroughly.
If using concentrated
liquid detergent,
dilute in warm water first.
Do not use following item& These items
can scratch, crack and discolor
su rfaces.
•
abrasive cleaners such as
•
Comet, Ajax, etc.
solvents
•
metal scouring
pads
t8
Glass Shelves
Caution
Handle tempered glass shelves
with care. Chipping, scratching
and twisting may cause shelves
to break suddenly.
Replace
shelves immediately
if scratched
or chipped.
Do not expose
shelves to rapid temperature
changes.
After removing shelf, place on soft surface such
as a towel or dishcloth.
Allow shelf to adjust to
room temperature
before
cleaning.
Food Storage Containers
When using containers to reheat food in a
microwave oven, follow storage container
manufacturer's
instructions.
Containers are
dishwasher
dishwasher.
safe. Always
If containers
storage container
for cleaning.
place in top rack of
should stain, follow
manufacturer's
instructions
Door Gaskets
1.
At least four times a year, clean gaskets
with a liquid detergent or baking soda
diluted in water.
2.
3.
Rinse and dry thoroughly.
Apply a light film of petroleum jelly to
keep gaskets soft and pliable.
Do not use cleaners which contain
ammonia or chlorine bleach.
4.
19
Odor Removal
Caution
To avoid electrical shock, unplug
power cord or open household
circuit breaker to refrigerator
before cleaning or replacing light
bulb. After cleaning or replacing
light bulb, reconnect power.
Remove
.
2.
all food.
Thoroughly
wash refrigerator
and
freezer liners with four tablespoons
of
baking soda dissolved in a quart of
warm water. Pay special attention to
corners, crevices or grooves and include
all accessories,
drawers, shelves and
gaskets.
Rinse and dry thoroughly.
Return food to refrigerator.
Wash all
bottles, containers and jars. Wrap foods
,
4.
in tightly sealed containers to prevent
further odors. Wait 24 hours before
checking to see if odor has been
eliminated.
If odor is still present,
1-800-843-0304
methods.
for additional
call
cleaning
Mechanical
Condenser
Coil
It is important to clean condenser
coil every
three months.
Dust and lint will cause the
following:
•
reduced
•
•
.
2.
3.
4.
increased
premature
cooling
performance
energy usage
part failure
Grasp toe grille at each end and pull
forward to remove.
Clean coil with a vacuum cleaner hose
nozzle.
Snap toe grille into place.
To clean behind refrigerator,
rotate
stabilizing leg counterclockwise
until leg
is off floor. Pull refrigerator away
from wall and run a vacuum brush
across condenser
fan outlet grille on
lower back of refrigerator.
20
Light
Bulbs
Caution
To avoid
electrical
shock,
unplug
power cord or open household
circuit breaker to refrigerator
before cleaning or replacing light
bulb. After cleaning or replacing
light bulb, reconnect
power.
A 40 watt appliance bulb is needed and can
usually be purchased from a hardware store or
independent
parts distributor.
Examples are as
follows:
Amana
#A0282803
GE or Westinghouse
Sylvania
#40A15/1
#40A 15
Important
Wear gloves to protect hands should bulb
break.
,
2.
.
If hot, allow bulb to cool.
To remove light bulb cover, press in on
back corners and slide off screws. --
Slide cover toward
back wall and
remove.
4.
5.
Replace
Reverse
cover.
light bulb.
procedure
to reinstall
light bulb
21
Energy Tips
This refrigerator
is designed
to be one of the
most energy efficient refrigerators
available.
Reduce energy use by following these
suggestions:
.
,
.
4.
5,
Operate in normal room temperatures
away from heat sources and direct
sunlight.
Set freezer, refrigerator
and Deli Chiller
controls so compartments
are no colder
than necessary.
Keep freezer section full.
Keep door gaskets clean and pliable,
replace if worn.
Clean condenser
coil.
Vacation Tips
For short vacations, remove perishable foods.
Check refrigerator
warranty certificate for
specific coverage.
Warranty
does not cover
food loss. If an ice maker is installed, move
wire "arm" to up position.
For long vacations,
do the following:
1.
2.
3.
4.
Empty refrigerator and freezer.
Unplug refrigerator,
Clean refrigerator.
Prop doors open, so air can circulate
inside.
5.
If an ice maker is installed,
supply
off at saddle
turn water
valve.
22
Normal Operating Sounds
This new refrigerator
may be replacing a differently designed,
less efficient or smaller refrigerator.
Today's refrigerators
have new features and are more energy efficient.
As a result, certain sounds
may be unfamiliar.
These sounds are normal and will soon become familiar. These sounds also
indicate refrigerator
is operating and performing
as designed.
Freezer
Control
Clicks when starting or stopping compressor.
Freezer Fan
Air rushes and whirs.
Sealed
System
(Evaporator/Heat
Refrigerant flow gurgles,
boiling water.
Exchanger)
pops or sounds
like
Defrost Heater
Sizzles, hisses or pops.
Condenser Fan
Air rushes and whirs.
Compressor
Has a high pitched hum or 3ulsating sound.
Defrost
Freezer
Control
Drain Pan
Ice Maker
Defrost water falls into drain pan.
Sealed System
1
Defrost Timer
Snaps in and out of defrost cycle and
sounds like an electric clock.
I
Ice Maker (optional)
Ice cubes drop into ice bucket.
Water
Valve
I
Fan
Compl:essor
I
I
Hook-up
(optional)
Buzzes when ice maker fills with water.
I
I
Condenser
Ice Maker
Defrost Heater
Ice Maker Water
Valve Hook-up
This
Defrost
Drain Pan
occurs whether or not refrigerator
is connected
to household water supply.
If refrigerator is not
hooked up to water, stop sound by raising ice
/
/
Defrost Timer
maker shut off "arm" to up position.
Insulation
Foam insulation is very energy efficient and has
excellent insulating capabilities.
However, it is
not as sound absorbent as previously used
fiberglass insulation.
23
Before Calling For Service
Check
these simple
Refrigerator
does
problems
before
calling
for service,
not operate
Confirm
freezer
control
Confirm
electrical
is on.
power
cord is plugged
in.
Confirm light bulb works. A dim light
indicates low voltage or a weak bulb.
Check fuse or circuit breaker.
Plug in
another item at that wall outlet.
If freezer control is on and lights work but
two fans and compressor
are not operating,
refrigerator may be in defrost cycle. Wait 40
minutes to see if refrigerator restarts.
If refrigerator
still won't
operate
Unplug refrigerator.
Transfer food to another
unit or place dry ice in freezer section to
preserve food until refrigerator
can be
serviced.
Check refrigerator
warranty
certificate for specific
does not cover food
coverage.
loss.
Warranty
For additional help and/or to find nearest
authorized
Amana servicer, call
1-800-843-0304.
If food temperature
appears
too warm
See above
sections.
If a large supply of food was recently
added,
allow adequate time for food to reach
refrigerator
or freezer temperature.
Clean
condenser
Adjust
refrigerator
coil.
and/or
freezer
control.
Confirm rear air grille is not blocked.
air grille is located behind left crisper,
If Deli Chiller
Rear
is too warm
Confirm
Deli Chiller
boot is over air hole.
Slide Deli Chiller control
Adjust freezer
Confirm
24
control
to a colder setting.
to a colder
cap is over unused
setting.
air hole.
If refrigeratorfood temperatureis too cold --
Cleancondensercoil.
Adjust refrigeratorcontrol.
Adjustfreezercontrolto warmersetting.
Allow several hoursfor temperatureto
adjust.
If refrigeratorruns too frequently
It may be normalto maintainan even
temperature.
Doorsmay have been openedfrequentlyor
for an extendedperiod of time.
Cleancondensercoil.
Adjustfreezer control.
Checkgasketfor proper seal.
If refrigeratormakesunfamiliarsounds or
seemstoo loud
section.
I OperatingSounds
Thesemay be normal.
See Normal
If water dropletsform on inside of
refrigerator
This is normal duringperiodsof high
humidityor if doors havebeen opened
frequently.
If water droplets
refrigerator
form
on outside
of
I Check
25
gasket
f°r pr°per
seat"
]
If crisperdrawersor Dell Chillerdo not close
freely
Check for a package
drawers from closing
Confirm
drawers
Clean drawer
water.
which may prevent
properly.
are in proper
channels
position.
with warm, soapy
Rinse and dry thoroughly.
Apply a thin layer of petroleum
channels.
Confirm
refrigerator
jelly to drawer
is level.
If refrigeratorhas an odor
Clean
inside of refrigerator
Cover all foods tightly
containers
or freezer
See above
section.
and freezer.
and use freezer
wrap,
If ice cubes havean odor
Discard
ice and clean ice bucket
or trays
more frequently.
Ice cubes are very porous
and absorb odors very easily.
If ice cubesstick togetheror 'shrink'
Empty ice cube bucket or trays more
frequently.
If used infrequently,
ice cubes
may stick together
26
or shrink.
If ice forms
in inlet tube to ice maker
Check
if there is sediment
in valve which
prevents valve from closing.
If there is
sediment in valve, an in-line water filter
should be added.
Filter, part #R0183114,
can be purchased
separately from an Amana
dealer or independent
parts distributor.
If
problem persists, valve should be cleaned or
changed.
Check water pressure.
Low water pressure
wil! cause valve to leak. Self piercing valves
cause low water pressure.
Self piercing
valves should never be used and warranty
will be void. If self piercing valve is used,
replace with saddle valve in kit.
Any questions regarding above or to locate an authorized
Amana servicer, call 1-800-843-0304.
When contacting
Amana, provide product information
including model and serial numbers and
date of purchase.
Model and serial numbers are located on the nameplate, found in upper lefthand corner of refrigerator section.
Amana recommends
contacting
an authorized
Amana
servicer if service is required.
27
Rest assured against
unexpected repair bills.
Asure
_u Extended
Service
Plan
Amana is pleased to offer long-term service
protection on this new refrigerator.
Asure TM
Extended Service Plan is specially designed to
supplement
Amana's strong warranty.
Asure TM
provides budget-protecting
coverage on
refrigerator
for up to five full years and includes
parts, labor and travel charges.
A participating
contact:
Amana
Amana
Refrigeration,
Consumer
Affairs
Amana, IA 52204
1-800-843-0304
dealer
has details
or
Inc.
Department
Consumer
Information
1-800-843-0304
Line
Part No, 10459207
Printed in U.S.A,
_
A_
Company
©Amana Refrigeration,
Inc,
Amana, Iowa 52204