1
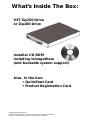
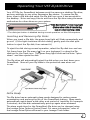
VST Zip 250 and
Zip100 Drive
®
For: 1999 Version Macintosh® PowerBook®
G3 Series, 1998 PowerBook G3 Series,
PowerBook 3400/G3 & 5300/190
and PowerBook 1400
What’s Inside The Box:
VST Zip250 Drive
or Zip100 Drive
Installer CD-ROM
including IomegaWare
(and bootable system support)
Also, in the box:
• QuickStart Card
• Product Registration Card
© 2000 VST Technologies, Inc..
Iomega, the Iomega logo and Zip are trademarks of Iomega Corporation.
All other Trademarks are property of their respective holders.
VST Zip User’s Guide Contents
Setting Up the VST Zip Software . . . . . . . . . . . . . . . . . . . . . . . . . . . . . .2
Operating your VST Zip Drive
Inserting and Removing Zip Disks . . . . . . . . . . . . . . . . . . . . . . . . . . . . .3
Drive Sleep . . . . . . . . . . . . . . . . . . . . . . . . . . . . . . . . . . . . . . . . . . . . . . .3
Emergency Disk Eject . . . . . . . . . . . . . . . . . . . . . . . . . . . . . . . . . . . . . . .4
Booting from the Zip Drive . . . . . . . . . . . . . . . . . . . . . . . . . . . . . . . . . .4
Creating a Bootable Zip Disk - using Iomega Tools . . . . . . . . . . . . . . . .4
Creating a Bootable Zip Disk - without Iomega Tools . . . . . . . . . . . . . .5
Instructions for Hot-Swapping . . . . . . . . . . . . . . . . . . . . . . . . . . . . . . .5
Instructions for Sleep-Swapping . . . . . . . . . . . . . . . . . . . . . . . . . . . . . .5
Compatibility of 100MB and 250MB Zip Disks . . . . . . . . . . . . . . . . . . .6
Zip Tips . . . . . . . . . . . . . . . . . . . . . . . . . . . . . . . . . . . . . . . . . . . . . . . . .6
Troubleshooting . . . . . . . . . . . . . . . . . . . . . . . . . . . . . . . . . . . . . . . . . . . .7
Iomega Tools Software
Read/Write Protecting Zip Disks . . . . . . . . . . . . . . . . . . . . . . . . . . . . . .8
Electronic Compliance . . . . . . . . . . . . . . . . . . . . . . . . . . . . . . . . . . . . . . .9
Limited Warranty . . . . . . . . . . . . . . . . . . . . . . . . . . . . . . . . . . . . . . . . . .10
PowerBook Identification Chart
Model
ZIP3400
ZIP3400
ZIPG3
ZIPG32
Family Number
PowerBook G3 introduced October 1997
M3553
PowerBook G3 Series introduced May 1998
M4753
PowerBook G3 Series introduced September 1998
M4753
PowerBook G3 Series (Bronze keyboard) introduced May 1999
M5343
1
Setting Up the VST Zip Software
Before using your new VST Zip for PowerBook, it is necessary to
install driver software to allow the drive to interact properly with your
PowerBook. The Tools software adds functionality to the drive while
extending its features making it easier to use. Follow the instructions
below to ensure that the software installs properly.
Note: You will need to restart your PowerBook during
the installation process, so be sure to quit all open
applications and save all files.
Macintosh PowerBook
1.
Insert the Installation CD into the CD-ROM drive.
2.
Double click on the IomegaWare install icon and follow
the directions.
* If necessary, select the internal hard drive (Mac HD) as the
destination for the IomegaWare software.
3.
Restart the PowerBook.
4.
Remove the Installation CD from the CD-ROM drive (Drag to Trash).
5.
Remove the CD-ROM drive from the Expansion Bay.
6.
Insert the VST Zip drive into the expansion bay.
Congratulations!
You are now ready to use your new VST Zip drive.
The VST Zip Drive is known to be compatible with the following Macintosh Operating
Systems: System 7.6, System 7.6.1, Mac™ OS 8, Mac OS 8.1, Mac OS 8.5 and Mac OS 8.6.
If you are using an earlier version of the Mac OS, we recommend you upgrade to one
of the more modern versions.
2
Operating Your VST Zip100 Drive
Your VST Zip for PowerBook behaves much the same as a desktop Zip drive,
and very similarly to any other Expansion Bay device. To access the Zip
drive, insert a Zip disk and select the Zip disk icon once it has mounted to
the desktop. Store and copy files to and from the Zip drive using the same
methods as for other drives on your system.
* The disk eject button is disabled during normal operation on Mac OScomputers.
Inserting and Removing Zip Disks
When you insert a Zip disk, the green busy light will flash momentarily and
go out. (If the light continues to blink slowly, gently push the disk eject
button to eject the Zip disk, then reinsert it.)
To eject the disk during normal operation, select the Zip disk icon and use
Put Away from the File menu ( Y on your keyboard ) or drag the Zip
disk icon to the Trash icon. The green busy light blinks as the drive “spins
down” and then ejects the disk.
The Zip drive will automatically eject the disk when you shut down your
PowerBook. Store all your Zip disks in the protective case when not
in use.
Drive Sleep
The Zip drive has an automatic sleep mode designed to reduce power
consumption and prolong the life of the PowerBook battery. Sleep mode
automatically spins down a disk after a set period of inactivity (for example
3 minutes), and the disk automatically spins up again when accessed.
The sleep mode time for the PowerBook Zip drive can be changed using
the Iomega Drive Options Control Panel. For more information, refer to
the Iomega Drive Options Manual in your Iomega Tools folder.
3
Emergency Disk Eject
The PowerBook must be powered on for normal disk ejection from the Zip
drive. Never use force to remove a disk from the VST Zip Drive. If you must
remove a Zip disk from the drive when power is not available, carefully
push a fully straightened paper clip into the emergency eject hole located
on the eject button (see illustration). Use care when using this method,
excessive force or a bent paper clip may cause damage to your Zip drive.
Caution: Use the emergency disk eject procedure
only when the laptop is without power. Do not
use excessive force to remove a Zip disk from the drive.
If the disk does not eject immediately, repeat the emergency
disk eject procedure as described above.
Booting from the Zip Drive
You can boot from your Zip drive using either of two methods:
1. Using the Startup Disk Control Panel, select the Zip Drive to
be the Startup Drive. Insert a bootable disk (for information
on creating a bootable disk, see below) prior to starting or
restarting your PowerBook; or
2. Shut down your PowerBook. Insert a bootable Zip disk (while the
system is still off). Hold down the
(Command), Option, Shift,
and Delete keys while starting your PowerBook.
• Note: Make sure the
key is not engaged
L
Creating A Bootable Zip Disk - using Iomega Tools
1.
Insert a Zip disk into your VST Zip Drive.
Note: All data on this disk will be erased.
2.
3.
4.
Launch Iomega Tools (located in your IomegaWare Folder) and click
on the Create Rescue Disk function.
You may select to install your entire system folder or just a minimal
folder on the disk. If your entire system folder will not fit on the disk,
your only choice will be a minimal system. You may choose to have
Disk First Aid installed as well.
Click Create. The process will take 10-15 minutes to complete.
Should you desire to boot from your Rescue disk at any time, hold the
command, option, shift and delete keys down while booting.
4
Creating A Bootable Zip Disk - without Iomega Tools
1.
2.
3.
4.
Reformat a blank Zip disk using the Erase Disk command from the
Finder Special menu.
Copy a valid System Folder (i.e. for your particular PowerBook model)
or run the Mac OS installer to install a Mac OS to the Zip disk.
If using OS 8.6 or higher copy the ‘Mac OS ROM’ file from the
Macintosh System Folder to the System Folder on the rescue disk.
You can now boot from this disk using either method described above.
Instructions for Hot-Swapping
Note: Expansion bay devices can be hot-swapped on the Macintosh
PowerBook G3 Series, 3400/G3, and 5300/190. It is possible to sleepswap expansion bay devices on the PowerBook 1400 (see “Instructions
for Sleep-Swapping”)
1.
2.
3.
4.
Be sure to quit any applications and close any open files that are being
run from the present expansion bay device.
Highlight the present expansion bay device, then select Put Away ( Y)
from the File menu.
Wait until the Finder has removed the device icon from the desktop,
then remove the present expansion bay device from the PowerBook.
Insert the VST Zip drive either with or without a disk. If a disk is inserted, the drive should mount on the desktop within a few seconds and is
now ready for use.
Instructions for Sleep-Swapping
1.
2.
3.
4.
5.
6.
Be sure to quit any applications and close any open files that are being
run from the present expansion bay device.
Highlight the present expansion bay device, then select Put Away ( Y)
from the File menu.
Wait until the Finder has removed the device icon from the desktop,
then put the PowerBook to sleep using the Sleep command from the
Special menu.
Remove the present expansion bay device from the PowerBook.
Insert the VST Zip drive either with or without a disk.
Wake the PowerBook by hitting any key. If a disk is inserted, the drive
should mount on the desktop within a few seconds and is now ready
for use.
5
Compatibility of 100MB and 250MB Zip Disks
The 250MB Zip drive features backward compatibility that allows you to
read and write 100MB Zip disks. However, because of the higher capacity of
the 250MB Zip drive, performance when writing to a 100MB Zip disk is significantly reduced. This means that a large file that takes 10 seconds to
write to a 250MB Zip disk could take about a minute-and-a-half to write to
a 100MB Zip disk.
To maximize performance of the 250MB Zip drive, you should use 250MB
Zip disks whenever you want to store new information. If you have existing
data on 100MB disks, you can transfer it to 250MB Zip disks using Copy
Machine (double click the Copy Machine icon in your IomegaWare folder
and follow instructions).
Here are some important things to know about using 250MB and 100MB
Zip disks and drives together:
•
•
•
•
If you write information to a 100MB Zip disk using a 250MB Zip
drive and later find that the disk cannot be read by a 100MB Zip
drive, try reading the disk again in your 250MB Zip drive.
If the 250MB Zip drive appears to hang when you are writing to a
100MB Zip disk, you can verify that the drive is operating correctly
by checking that the green activity light is blinking irregularly. (A
slow, steady blink may indicate a problem with the drive. If there is
a slow, steady blink, try pushing the disk eject button to eject the
disk, then reinserting it.)
You can use the Short Format option if you need to format a
100MB Zip disk in a 250MB Zip drive; the Long Format option is
not supported for 100MB Zip disks in the 250MB Zip drive.
A 250MB Zip disk cannot be used in a 100MB Zip drive; the 100MB
Zip drive will automatically reject a 250MB disk.
Zip Tips
The following section offers valuable tips to help ensure that you get
the most from your VST Zip drive. Adhering to these tips will help
your drive to continue running problem free. If any of the tips listed
below are unclear, or if you have additional questions about the Zip drive’s
proper use and care, please contact VST’s technical support department
at (978) 635-8282.
•
•
6
Never force a Zip disk into or out of the drive.
Never use ordinary 3.5” diskettes or floppy head-cleaning disks
in your Zip drive. They WILL damage your drive.
•
•
It is a good idea to return the Zip disk to its case when it is
not in use.
Avoid exposing Zip disks to direct sunlight, high temperature,
moisture, and magnetic fields.
Warning: Do not use ordinary 3.5” floppy head cleaning diskettes
or data diskettes. They WILL damage your Zip drive.
Troubleshooting
If you encounter a problem while installing or using your Zip drive, check
this section for help or visit VST’s web site at www.vsttech.com.
1.
Green power light does not come on, or Zip disk cannot be inserted.
The drive may not be inserted correctly in the expansion bay. Remove
and reinsert the drive.
2.
PowerBook does not start up properly after the Zip drive is installed.
Remove the Zip drive from the computer and restart. If the PowerBook
restarts correctly, reinstall the Zip drive.
3.
The Iomega software cannot find the Zip drive or the Zip drive is
not recognized.
a. Make sure the drive is properly inserted (The green power light
on the drive should be ON.) Try removing the Zip drive and then
reinserting.
b. Open the Extensions folder in the System Folder.
If Iomega Driver is not present, reinstall the Zip
drive software following the instructions on Page 2,
‘Setting Up the VST Zip Software’.
7
Iomega Tools Software
IomegaWare is a package of software tools and applications designed to
help you take advantage of all the features of your Zip drive. You can use
Tools to format, copy, and protect your Zip disks. If Iomega Tools are not
already set up on your PowerBook, you need to install them using the
instructions in the section “Getting Started” starting on page 1.
For information on using Tools, open the Tools application program after
the software is installed (located in the Iomega Tools folder) on the Mac
hard disk and click the Help button.
Read/Write Protecting Zip Disks
Your Tools software includes a special read/write protect feature that
lets you:
• Write Protect a Zip disk through software instead of with a
mechanical write protect switch.
• Write Protect a Zip disk and assign a password that must be used
to remove the write protect.
• Read Protect a Zip disk so that it cannot be read from, or written
to, unless the user enters the password you assign.
For information on using read/write protect, refer to the Tools manual
in the Iomega Tools folder.
8
Electronic Compliance
Federal Communications Commission
Verified to comply with FCC Rules for Radiated and Conducted Emission, Part 15,
Subpart B, for Class B Equipment.
EC-EMC Declaration of Conformity
We
VST Technologies
125 Nagog Park
Acton, MA 01720
declare under sole responsibility that the VST Zip Drives model numbers
ZIPG32-250, ZIPG3-250, ZIPG32, ZIPG3, ZIP3400, ZIP1400
to which this declaration relates, meet the essential requirements and
are in conformity with the relevant EC Directives listed below using the
relevant section following EC standards and other normative documents:
EU EMC Directive 89/336/EEC
Essential health and safety requirements relating to electromagnetic compatibility
EN 55022 (1987) Class B
Limits and methods of measurements of Radio interference characteristics of
information technology equipment
IEC 801-2 (1991)
Electrostatic discharge requirements for industrial process measurement and
control equipment
EC 801-3 (1984)
Radiated electromagnetic field requirements for industrial process measurement
and control equipment
IEC 801-4 (1988)
Electrical fast transients for industrial process measurement and control equipment
EN 50082-1 (1992)
EC generic immunity requirements, category A&B
The CE marking has been affixed on the device according to article 10 of the EC Directive 89/336/EEC.
Place ____________________________
Signature ______________________________
Date ____________________________
Full Name ______________________________
9
Limited Warranty
VST Technologies, Inc. warrants its products to be free of defects in material and workmanship under normal use and service for a period of 1 year from the date of purchase or 18 months from the date of manufacture, whichever occurs first. VST's sole obligation with respect to claims of non-conformance made
within the one (1) year warranty period described above shall be, at its option, to repair or replace any
item of Equipment which VST, in its sole discretion, determines to be defective. The Customer shall obtain
a Return Merchandise Authorization (RMA) number from VST prior to returning any Equipment to VST
under this warranty by contacting Technical Support at (978) 635-8282 or email at [email protected].
The Customer shall prepay shipping charges for Equipment returned to VST for warranty service, and VST
shall pay freight charges for the return of the Equipment to the Customer, excluding customs duties or
taxes, if any. All returns require a dated proof of purchase and a letter explaining the problem. VST
Technologies, Inc. will not be responsible for items returned without an RMA or improperly packaged.
Replacement Equipment shall be new or like new in performance and shall be warranted for the remaining duration of the warranty term of the non-conforming Equipment. All replaced Equipment shall
become the property of VST. Any claims of defects not made within such one (1) year period shall be
deemed waived by Customer.
VST's warranty obligations hereunder are expressly conditioned upon (i.) the Products being properly
installed, used and maintained at all times by Customer; (ii.) the Products not being subject to unusual
mechanical stress or unusual electrical or environmental conditions or other acts of God; (iii.) the Products
not being subjected to misuse, accident or any unauthorized installation/ deinstallation by Customer or
other third party; (iv.) the Products not being altered or modified in an unauthorized manner, unless
approved in writing or otherwise performed by VST and (v.) Customer promptly installing all Product revi sions which have been released for such Products by VST throughout the warranty term. VST does not warrant that the Products will operate in any specific combination which may be selected for use by Customer
or that the operation of the Products will be uninterrupted or er ror free, or that all non-conformance or
defects will be remedied. Additionally, VST shall have no warranty obligations for any failure of the
Products to conform to the applicable Product specifications resulting from the combination of any
Product(s) with hardware and/or software not supplied by VST. If it is determined that any Product(s)
reported as defective or non-conforming by Customer during the warranty period is not defective or nonconforming, VST may, at its option, charge Customer for any labor provided and expenses incurred by VST
in connection with such determination, at VST's then current rates.
THE WARRANTIES OF VST AND REMEDIES OF CUSTOMER SET FORTH IN THIS SECTION ARE EXCLUSIVE AND
ARE GIVEN BY VST AND ACCEPTED BY CUSTOMER IN LIEU OF ANY AND ALL OTHER WARRANTIES,
WHETHER EXPRESSED OR IMPLIED, INCLUDING WITHOUT LIMITATION, ALL WARRANTIES OF MERCHANTABILITY AND FITNESS FOR A PARTICULAR PURPOSE, ALL SUCH OTHER WARRANTIES BEING HEREBY
EXPRESSLY AND UNEQUIVOCALLY DISCLAIMED BY VST AND WAIVED BY CUSTOMER.
10
VST’s Technical Support
home page • • • • • • • • • • • • • • • • • • • • www.vsttech.com
email • • • • • • • • • • • • • • • • • • • • • • • • • • • [email protected]
phone • • • • • • • • • • • • • • • • • • • • • • • • • • (978) 635-8282
fax • • • • • • • • • • • • • • • • • • • • • • • • • • • • • • (978) 635-8283
MacRent-Hyrcentralen
Birger Jarlsg 108
114 20 Stockholm
http://www.macrent.se
Tel: 08-673 01 00
VST Technologies, Inc.
125 Nagog Park
Acton, Massachusetts 01720
32-01050-01-01