1
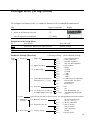
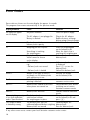
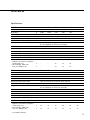
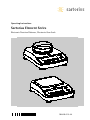
Operating Instructions
Sartorius Element Series
Electronic Precision Balances, Electronic Gem Scale
98648-013-44
Contents
2 Warnings and Safety Precautions
3 Getting Started
7 Operation
7 Basic Weighing Function
7 Description of the Keys
8
8
9
10
11
12
13
Application Programs
Toggling between Weight Units
Counting
Weighing in Percent
“Hold” Display
Totalizing
Specific Gravity
14 Calibration/Span Adjustment
15 Configuration (Setup Menu)
16 Error Codes
17
17
18
19
Overview
Specifications
Accessories (Options)
C Marking
Warnings and
Safety Precautions
Safety Information
§ To prevent damage to the equipment,
please read these operating instructions
carefully before using your balance/scale.
! Do not use this equipment in
hazardous areas.
! Make sure the voltage rating printed
on the power supply is identical to your
local line voltage.
! Use only commercially available non-
rechargeable or rechargeable battery:
8+ AA, Mignon (not included).
The rechargeable batteries are not
charged when you use the AC adapter.
Please use the charger to recharge the
batteries outside the balance/scale.
– The balance/scale is energized at all
times unless you disconnect the AC
adapter and, if connected, the battery.
– Protect the AC adapter from contact
with liquid
! Exposure to excessive electromagnetic
interference can cause the readout value
to change. Once the disturbance has
ceased, the instrument can be used
again in accordance with its intended
purpose.
Installation
– It is recommended to connect Sartorius
accessories and options, as these are
optimally designed for use with your
balance.
– Do not open the balance/scale housing
as this may void the manufacturer’s
warranty.
2
Getting Started
–
–
–
–
Equipment Supplied
Balance/scale
Weighing pan
Plug-in AC adapter
Level indicator and adjustable feet
Additional equipment with models ELT602,
ELT402, ELT202, ELT1001, ELT601:
– Calibration weight
Additional equipment with model ELT103, GD502:
– Calibration weight
– Round glass draft shield
– Only with GD502: Gem tray
–
–
–
–
Installation
Choose a location that is not subject to the
following negative influences:
Heat (heater or direct sunlight)
Drafts from open windows and doors
Extreme vibrations during weighing
Excessive moisture
Setting Up the Balance/Scale
§ Place the components on the balance/scale in the
following order:
– Weighing pan
– Round glass draft shield on model ELT103, GD502
3
! Use only original Sartorius AC adapters:
– for Asia:
– for the U.S.:
400081.1
400314.1
Connecting the Balance/Scale to AC Power
§ Insert plug into the jack (located on back of the
balance/scale)
§ Plug the AC adapter into an electrical outlet
! LISTED power supply 11 V–21 V compliant with
NEC Class 2 output.
Below-Balance/Scale Weighing
A port for a below-balance/scale weighing hanger
is located on the bottom of the balance/scale.
§ Open the cover plate on the bottom of the
balance/scale.
§ Attach the sample (e.g., using a suspension wire)
to the hanger.
$ Install a shield for protection against drafts if
necessary.
4
Using a Non-Rechargeable/Rechargeable Battery
(not for model ELT103, GD502)
$ A non-rechargeable or rechargeable battery is not
included with the equipment supplied.
! Use only a commercially available non-rechargeable
(8+ AA/Mignon) or rechargeable battery.
! When using a rechargeable battery, be sure to
recharge it outside the balance/scale using a separate charger.
● Lay the balance/scale on its side
● Lift the compartment cover
● Insert the non-rechargeable (8+ AA/Mignon)
or rechargeable batteries into the compartment.
$ Make sure to connect the positive and negative poles
correctly.
● Close the battery compartment: press down on
the cover until it clicks into place.
! All used batteries are classified as waste that requires
special handling (not “household” waste). Dispose
of rechargeable batteries in accordance with the
applicable special waste disposal regulations.
5
Leveling the Balance/Scale
§ Always level the balance/scale again any time after it
has been moved to a different location.
Example: moving bubble from R to L
§ Turn the feet as shown in the diagram until the
air bubble is centered within the circle of the level
indicator.
> In most cases this will require several adjustment
steps.
Removing Weights for Calibration/Span
Adjustment
(only for models ELT103, ELT602, ELT402, ELT202,
ELT1001, ELT601, GD502)
§ Grasp the tab to turn and pull out the weight
compartment.
$ Follow instructions on page 14 for calibration/span
adjustment.
6
Operation
Basic Weighing Function
Features
– Zeroing the balance/scale
You can zero the balance/scale within
the entire weighing range, up to the
maximum capacity.
Preparation
§ Switch on the balance/scale:
press the e key
§ If necessary, zero the balance/scale:
press the w key
$ If necessary, change the configuration
settings: see the chapter entitled
“Configuration”
$ If desired, load the factory settings:
see the chapter entitled
“Configuration,” menu item 9.– 1
Additional functions
$ Switching off the balance/scale:
press the e key
$ Battery operation: automatic shut-off
after 2, 5 or 10 minutes; see chapter on
configuration. Example: 2 minutes. If
the weight readout remains unchanged
and no keys are pressed for at least two
minutes, the battery symbol “
”
starts flashing. After another 2 seconds,
the balance/scale shuts off automatically, unless a key is pressed.
Example: Determine weight of sample
Step
1. Switch on the balance/scale
Self-test runs
Display: Software version
Description of the Keys
e On/off key: switches the balance/scale
on and off or switches it to the
standby mode.
Battery operation: on; turns
backlight on; off
w Press less than 2 seconds:
zeros the balance/scale
Press and hold 2 seconds:
opens the application menu
q Starts calibration/adjustment
v Starts an application program
Scrolls in the application, configuration and in the calibration menus
Enter
Confirms the selected setting;
CF
exits application, configuration &
calibration menu if key is pressed
and held for at least 2 seconds.
r Generates a printout or data output
Key (or instruction)
e
r 31.01 g
52.0 g
2. Place container on the balance/scale
(in this example, 52 g)
3. Zero the balance/scale
4. Place sample in container on balance/scale
(in this example, 150.2 g).
Display
w
0.0 g
150.2 g
7
Application Programs
Toggling between Weight Units
With this application program you can toggle the display of a weight value back and forth
between two weight units (see table below).
Example: Toggle weight unit from pounds [lb] (application) to grams [g] (basic unit)
Step
Key (or instruction)
1. Select application program
w > 2 sec
2. Select Toggling between Weight Units
v
3. Confirm unit
4. Select weight unit; in this example:
“5. Pounds” (see table below)
5. Confirm weight unit (pounds)
Display
Enter
CF
v repeatedly
Enter
CF
6. Place sample on balance/scale
7. Toggle weight unit
Menu code
1. user 1)
2.grams (fact. setting ELT models)
4.carat (fact. setting GD502)
5.Pound
6.ounce
7.tryo
8.tl.hon
9.tl.sin
10.tl.ta
11.grai
12.peny
15.tl.ch
22.pdoz
23.newt
1
v
Unit
Grams
Grams
Carats
Pounds
Ounces
Troy ounces
Hong Kong taels
Singapore taels
Taiwanese taels
Grains
Pennyweights
Chinese taels
lb/oz
Newtons
Conversion factor
1.00000000000
1.00000000000
5.00000000000
0.00220462260
0.03527396200
0.03215074700
0.02671725000
0.02645544638
0.02666666000
15.4323583500
0.64301493100
0.02645547175
0.03527396200
0.00980665000
) User-defined conversion can be loaded in balance with RS-232 or USB program option.
8
Display
o
g
o
lb
oz
ozt
tlk
tl
tl
GN
dwt
tl
lb:oz
N
Counting
Purpose
With the Counting program you can determine the number of parts or items by weighing.
Example: Determine the number of uncounted parts; weigh in the selectable reference
sample quantity (in this example: 20)
Step
Key (or instruction)
1. Select application program
w > 2 sec
2. Select Counting
v repeatedly
3. Confirm setting
Symbol “ ” on the display:
application is active
Display
Enter
CF
4. Place empty container on the
balance/scale
5. Zero the balance/scale
w
6. Place reference sample quantity (20)
on the balance/scale
7. Select reference sample quantity:
in increments of 1 (1, 2, 3, ..., 99) or
in increments of 10 (10, 20, 30, ...,100)
8. Confirm selected reference sample
quantity
v repeatedly (briefly) or
v > 2 sec.
Enter
CF
9. Place uncounted parts on balance/scale
10. Toggle display between mean
piece weight, total weight, and quantity
v repeatedly
11. Unload the balance/scale
12. Counting application:
clear the reference value
13. Reactivate Counting (if no other
application program has been selected)
Enter
CF
> 2 sec
v
14. Repeat procedure starting from Step 5
9
Weighing in Percent
Purpose
This application program allows you to obtain weight readouts in percent which are in
proportion to a reference weight.
Example: Determine an unknown percentage; store the weight on the balance/scale as
the reference percentage (100%)
Step
Key (or instruction)
1. Select application program
w > 2 sec
2. Select Weighing in Percent
v repeatedly
3. Confirm setting
Symbol “ ” on the display:
application is active
Enter
CF
4. Place empty container on the
balance/scale
5. Zero the balance/scale
w
6. Place the reference weight
for 100% on the balance/scale
7. If desired, change the number
of decimal places displayed: 100.0%,
100.00% or 100% (factory setting)
8. Confirm selected no. of decimal places
v repeatedly
Enter
CF
9. Place unknown weight on the
balance/scale
10. Toggle display between weight
and percentage
v repeatedly
11. Unload the balance/scale
12. Weighing in Percent application:
clear the reference percentage
13. Reactivate Weighing in Percent (if no other
application program has been selected)
14. Repeat procedure starting from Step 5.
10
Enter
CF
v
> 2 sec
Display
“Hold” Display
Purpose
The last stable value remains displayed for 5 seconds after removing the sample from
the pan.
Example: Determine weight of oversized sample
Step
Key (or instruction)
1. Select application program
w > 2 sec
2. Select Display Hold (“HLdon”)
v repeatedly
3. Confirm setting
Symbol “ ” on the display:
application is active
4. If necessary: zero the balance/scale
Display
Enter
CF
w
5. Place sample on balance/scale
6. Start application program
v
Symbol “ ” flashes on the display:
the weight value is locked
7. Unload the balance/scale:
the weight value remains displayed
for a further 5 seconds; or
8. Zero the balance/scale
9. End the Display Hold application
10. Reactivate Display Hold (if no other
application program has been selected)
w
Enter
CF
> 2 sec
v
11. Repeat procedure starting from Step 5.
11
Totalizing
Purpose
With this application program you can add up successive weight values exceeding the
capacity of the balance/scale.
Example: Totalizing weight values
Step
Key (or instruction)
1. Select application program
w > 2 sec
2. Select Totalizing
v repeatedly
3. Confirm setting
Symbol “ ” on the display:
application is active
4. If necessary: zero the balance/scale
Enter
CF
w
5. Place sample on balance/scale
(in this example, 380 g)
6. Store value in memory. Total weight is
displayed steadily; ∑ symbol flashes.
Enter
CF
7. Remove sample from balance/scale
8. Place the next sample
on the balance/scale
(in this example, 575 g)
9. Store value in memory. Totalized stored
weight is displayed; symbol ∑ flashes.
Note: ∑ symbol remains on indicating
stored value in memory until cleared
Enter
CF
10. To view the current weight for 2 seconds
(if a printer is connected, a printout
is generated)
v
11. Clear totalizing memory
(if a printer is connected, total is printed)
v > 2 sec
12. End Totalizing
13. Reactivate Totalizing (if no other
application program has been selected)
(if a printer is connected, total is printed).
14. Repeat procedure starting from Step 6.
12
Enter
CF
v
> 2 sec
Display
Specific Gravity
Purpose
Use this application program to determine the specific gravity of a sample. The result is
displayed with one decimal place. Beaker and wire not included with balance/scale.
Example: Determine the specific gravity of a solid.
Step
Key (or instruction)
1. Select application program
w > 2 sec
2. Select Specific Gravity
v repeatedly
3. Confirm setting
Symbol “ ” on the display:
application is active
Enter
CF
4. If necessary, zero the balance/scale
w
5. Start application program
v
6. Confirm the display, “airval”
Display
Enter
CF
7. Determine weight of the sample in air:
place sample on the balance/scale
8. Store weight-in-air value
Enter
CF
9. Remove sample from balance/scale
10. Determine weight of sample in liquid:
connect wire and set up beaker
11. Confirm the display “Water”
Enter
CF
12. Place sample in liquid
13. Store the weight-in-liquid value
and view the result
14. Clear the display
15. Exit the Specific Gravity application
16. Reactivate Specific Gravity (if no other
application program has been selected)
Enter
CF
w
Enter
CF
> 2 sec
v
17. Repeat procedure starting from Step 5.
13
Calibration/Span Adjustment
Calibration is recommended after initial installation and each time the balance/scale
is moved.
Features
Calibration/adjustment can be
performed only when:
– there is no load on the balance/scale,
– the balance/scale is zeroed, and
– the internal signal is stable.
If these conditions are not met, an error
message is displayed.
The weight required for calibration/
span adjustment is displayed.
Standard calibration weights for selected
models: to remove, see instructions on
page 6.
Press v to select a different weight
value.
To cancel the procedure: press and hold
the Enter
key (> 2 sec.).
CF
Example: Calibrate/adjust span of the balance/scale (here: model ELT 6001)
Step
Key (or instruction)
1. Switch on the balance/scale
e
2. Zero the balance/scale
w
3. Start calibration
The preset calibration weight
is displayed without the weight unit
(in this example, 5000 g)
q
4. To select a different calibration
weight value
5. Confirm calibration weight value and
adjustment
After the zero point is stored, the required
calibration weight flashes on the display.
6. Place the required calibration
weight on the balance/scale
The readout stops flashing if the weight
is applied within the defined time limit and
tolerance. If the weight value is accepted,
the display stops flashing and the stability
symbol
appears on the display.
7. Remove the calibration weight
8. Calibration/span adjustment has been completed
14
Display
v repeatedly
Enter
CF
start calibration/span
Configuration (Setup Menu)
To configure the balance/scale; i.e., adapt the balance/scale to individual requirements.
Step
Key (or instruction)
1. Switch off the balance/scale
e
2. Switch on the balance/scale and
e
while all segments are displayed
Display
w briefly
Navigation in the Setup Menu
Key
Press briefly
Menu level: Move to the right (cyclical)
Menu item: Scrolling
Menu level: Move to the left
Enter
CF
v
w
Parameter Settings (Overview)
Setup
menu
1 Weighing
Press and hold
Confirm setting
–
Save settings and exit Setup
ο Factory setting
√ User-defined setting
1.1. Adapt filter
1.1.1
1.1.2
1.1.3
1.1.4
Very stable conditions
ο Stable conditions
Unstable conditions
Very unstable conditions
1.2. Application filter
1.2.1
1.2.2
ο Final readout
Filling
1.3. Stability range
1.3.1
1.3.2
1.3.3
1.3.4
1.3.5
1/4 digit
1/2 digit
1 digit
ο 2 digits
4 digits
1.5. Calib./adjust./linearization:
Function of the Q key
1.5.1
1.5.2
1.5.3
ο Calibration/span adjustment
Linearization: for service
personnel only
Key blocked
1.6. Auto zero
1.6.1
1.6.2
ο On
Off
1.7. 1st weight unit, or 2nd unit
in Toggle Weight Units app.
1.7.1
to 1.7.23
User-defined unit: see
“Toggling between Weight
Units”
5. and 6.
Only relevant with built-in data interface: see corresponding interface description
8. Additional
functions
8.1. Block key functions
8.1.1
8.1.2
All keys blocked except
for e and w
ο All keys unblocked
8.2. Automatic shut-off
8.2.1
8.2.2
8.2.3
ο After 2 minutes
After 5 minutes
After 10 minutes
9.1. Factory settings
9.1.1
9.1.2
Restore
ο Do not restore
9. Reset menu
15
Error Codes
Error codes are shown on the main display for approx. 2 seconds.
The program then returns automatically to the previous mode.
Display/Problem
No segments appear
on the display
oL
UL
disErr
calErr
appErr
PrtErr
Bal.Err
Sys.Err
Max. weighing capacity
is less than indicated
under “Specifications”
The weight readout
is obviously wrong
Cause
No power available
Solution
Check the power supply
The AC adapter is not plugged in
Battery is drained
Plug in the AC adapter
Replace battery; recharge
battery using external charger
Unload the balance/scale
The load exceeds the
balance/scale capacity
Weighing pan not in place
Something is touching
the weighing pan
Display overflow:
Value cannot be shown
on the display
Calibration parameter not met;
e.g.:
– Balance/scale not zeroed
– Balance/scale is loaded
Weight is too light or there is
no sample on the balance/scale
with application in use
Data interface for
printing is blocked
Balance/scale loaded or defective
when power was turned on
Place the weighing pan
on the balance/scale
Move the object that is
touching the weighing pan
Reduce load on the
balance/scale
Calibrate only when zero
is displayed
Press w to tare the
balance/scale
Unload the balance/scale
Increase the weight
on the balance/scale
Contact the Sartorius
customer service center
Unload balance/scale before
switching on or contact
Sartorius customer service
Balance/scale defective
Contact Sartorius customer
service
The balance/scale was
Place the weighing pan
switched on without
on the balance/scale and
the weighing pan in place
press e
The balance/scale was not
Calibrate/adjust the
calibrated/adjusted before weighing balance/scale
Balance/scale not zeroed
Zero the balance/scale
If any other errors occur, contact your local Sartorius customer service center.
16
Overview
Specifications
Model
Weighing capacity
Readability
Tare range (subtractive)
Linearity
Operating temperature range
Stabilization time (average)
Adaptation to ambient conditions
Calibration weight
Net weight, approx.
Pan size
Power source/voltage/frequency
Power consumption (average)
Power requirements, DC voltage
Hours of operation with battery:
– Mignon, AA alkaline manganese
(2200 mAh), avg.
– Rechargeable 1500 mAh,
fully ch., (NiMH), avg.
Model
Weighing capacity
Readability
Tare range (subtractive)
Linearity
Operating temperature range
Stabilization time (average)
Adaptation to ambient conditions
Calibration weight
Net weight, approx.
Pan size
Power source/voltage/frequency
Power requirements, DC voltage
Power consumption (average)
Hours of operation with battery:
– Mignon, AA alkaline manganese
(2200 mAh), avg.
– Rechargeable 1500 mAh,
fully ch., (NiMH), avg.
g
g
<±g
s
g
kg
mm
W
GD502
ELT103 ELT602 ELT402 ELT202
500 ct
100 g
600 g
400 g
200 g
0.005
0.001
0.01
0.01
0.01
500 ct
100 g
600 g
400 g
200 g
0.015 ct 0.003 g 0.03 g
0.03 g
0.035 g
10°C to 30°C (273°K to 303°K; 50°F to 86°F)
2.5
2.5
2
2
2
By selection of 1 of 4 optimized filter levels; display update:
0.1–0.8 (depends on filter level selected)
100 (F1)* 100 (F1)* 200 (F2)* 200 (F2)* 100 (F2)*
1.2
1.2
1.35
1.35
1.25
107 d
107 d
140+127 140 +127 140 +127
AC adapter, 230 V or 115 V, +15% to –20%, 48–60 Hz
1
1
0.8
0.8
0.8
12 V to 20 V
h
–
–
35
35
35
h
–
–
24
24
24
W
ELT6001 ELT4001 ELT2001 ELT1001 ELT601 ELT6000
6000
4000
2000
1000
600
6000
0.1
0.1
0.1
0.1
0.1
1
6000
4000
2000
1000
600
6000
0.2
0.2
0.2
0.2
0.2
2
10°C to 30°C (273°K to 303°K; 50°F to 86°F)
2
2
2
1.5
1.5
1.5
By selection of 1 of 4 optimized filter levels; display update:
0.1–0.8 (depends on filter level selected)
5 (F2)
2 (F2)
2 (F2)
0,2 (F2)* 0,1 (F2)* 5 (M1)
1.25
1.25
1.25
1.1
1.1
1.1
140+127
AC adapter, 230 V or 115 V, +15% to –20%, 48–60 Hz
12 V to 20 V
0.8
0.8
0.8
0.6
0.6
0.6
h
35
35
35
60
60
60
h
24
24
24
42
42
42
g
g
g
<±g
s
kg
kg
mm
* = included in delivery
17
Accessories (Options)
Product
Data interface, mounting kit
– RS-232 interface with cable
– USB interface with cable
–
–
–
–
Order No.
YADAP-RS
YADAP-USB
Data printer
YDP03-0CE
Lock-down capability
(for anti-theft locking device)
LC-1
Calibration weights
for ELT6001 (5 kg; F2)
for ELT4001/2001 (2 kg; F2)
for ELT6000 (5 kg; M1)
for weight compartment, (rear side), (100 g; F1)
Round glass draft shield
(25 mm high)
YCW6548-00
YCW6248-00
YCW655-00
Available on request
Available on request
Weighing pan
– Round
– Rectangular
Available on request
Available on request
Pan support
– Round
– Rectangular
Available on request
Available on request
Leveling feet (set of one adjustable foot and one fixed foot)
Available on request
Plug for level indicator port
Available on request
Covers
– Battery compartment
– Interface port
– Below-balance/scale port
Available on request
Available on request
Available on request
Weight compartment
Available on request
18
C
19
Sartorius AG
Weender Landstrasse 94–108
37075 Goettingen, Germany
Phone +49.551.308.0
Fax +49.551.308.3289
www.sartorius.com
Copyright by Sartorius AG,
Goettingen, Germany.
All rights reserved. No part
of this publication may
be reprinted or translated in
any form or by any means
without the prior written
permission of Sartorius AG.
The status of the information,
specifications and illustrations
in this manual is indicated
by the date given below.
Sartorius AG reserves the
right to make changes to the
technology, features,
specifications and design of the
equipment without notice.
Status:
October 2006, Sartorius AG,
Goettingen, Germany
W4A000 · KT
Publication No.: WEL6001-e06102