1
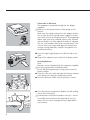
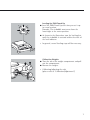
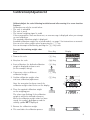
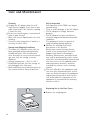
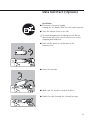
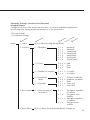
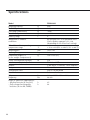
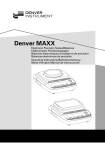
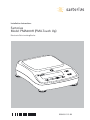
Installation Instructions
Sartorius
Model PMA600H (PMA.Touch Up)
Electronic Paint-mixing Scales
uc
PMA.To
h up
98648-015-82
General View of the Equipment PMA600H
1
2
12
11
uc
PMA.To
h up
3
4
5
6
7
10
9
1
2
3
4
5
6
7
Weighing pan
Level indicator
e key (On/Off/Standby)
t key: Zero/Tare
r key (not assigned)
Leveling foot
h key to confirm parameter
settings:
– Configuration
– Calibration
h key (Clear Function)
8 DC jack
9 Weight compartment
10 v key (change menu item)
11 q key (start calibration)
12 Display
2
8
The following symbols are used in
these instructions:
§ Indicates required steps
$ Indicates steps required only under
certain conditions
> Describes what happens after you have
performed a particular step
– Indicates an item in a list
! Indicates a hazard
2
Contents
Intended Use
General View of the Equipment . . . . . . 2
The PMA600H (PMA.Touch Up) is a
specially designed portable scale for use
in paint-mixing operations. The scale can
be battery-operated or connected to the
AC adapter.
Intended Use . . . . . . . . . . . . . . . . . . . . 3
Warnings and Safety Precautions . . . . . 4
Getting Started . . . . . . . . . . . . . . . . . . 5
If required, Sartorius can supply a data
interface for connecting the scale to a PC.
Operation . . . . . . . . . . . . . . . . . . . . . . 8
Calibration/Adjustment . . . . . . . . . . . . 9
Menu Settings (Setup Menu) . . . . . . . 10
Troubleshooting Guide . . . . . . . . . . . 11
Care and Maintenance . . . . . . . . . . . . 12
Recycling . . . . . . . . . . . . . . . . . . . . . . 14
Data Interface (Options) . . . . . . . . . . . 15
Pin Assignment Chart: YADAP-RS . . . 18
Default Settings . . . . . . . . . . . . . . . . . 19
Specifications . . . . . . . . . . . . . . . . . . 20
Accessories . . . . . . . . . . . . . . . . . . . . 21
Declaration of Conformity . . . . . . . . . 22
Note:
Read the PMA600H installation and
operating instructions carefully before
connecting the scale and putting it into
operation.
3
Warnings and Safety Precautions
–
–
–
–
–
–
4
This scale meets the guidelines and standards governing electronic equipment,
electromagnetic compatibility and the
stipulated safety standards. Improper
use or handling can result in property
damage and/or personal injury. To prevent
damage to the equipment, read these
operating instructions thoroughly before
using your scale. Keep these instructions
in a safe place.
Do not expose the scale to extreme
temperatures, aggressive chemical vapors,
moisture, shocks or vibrations.
Exposure to excessive electromagnetic
interference can cause the readout value
to change. Do not use transmitting
devices (e.g., mobile telephones) in the
immediate vicinity (i.e., within approximately 1 meter) of the scale. Once the
disturbance has ceased, the instrument
can be used again in accordance with its
intended purpose.
Do not operate the scale in hazardous
areas.
To ensure safety, disconnect the equipment from power before connecting or
disconnecting the cables or electronic
peripheral devices.
If you use cables purchased from another
manufacturer, check the pin assignments
in the cable against those specified by
Sartorius before connecting the cable
to Sartorius equipment, and disconnect
any wires that are assigned differently.
The operator shall be solely responsible for
any damage or injuries that occur when
using cables not supplied by Sartorius.
When connecting the scale to the power
supply, the laws valid in your country
must be observed. If you have any questions, please contact your supplier or
Sartorius Customer Service for information on the legal regulations applicable in
your country. The scale must be installed
–
–
–
–
–
-
by a certified technician to avoid forfeiture of all claims under the manufacturer’s warranty.
If you see any indication that the scale
cannot be operated safely (for example,
if the AC adapter shows visible damage
or is obviously defective), disconnect the
equipment from power and lock it in a
secure place to ensure that it cannot be
used for the time being. Comply with the
accident prevention regulations and
inform operators accordingly.
Always make sure the equipment is
disconnected from AC power before
performing any installation, cleaning,
maintenance or repair work on the scale.
To avoid forfeiture of all claims under the
manufacturer’s warranty, any repair and
maintenance work must be performed by
authorized Sartorius service technicians.
Use only commercially available batteries:
(8 size AA batteries; not included).
Batteries are not automatically recharged
during use.
Use a suitable external battery charger
to recharge the battery pack.
The casing on all connecting cables,
as well as the casing on wires inside the
equipment housing, is made of PVC.
Chemicals that could damage the PVC
may not be used in the vicinity of the
cables.
Never close the lid of a paint can while
it is still on the weighing pan. Otherwise,
you will damage the weighing system.
Avoid applying strong force to the weighing pan. Otherwise, you will damage the
weighing system.
Getting Started
§ Remove the scale from its packaging.
§ After unpacking the scale, check it immediately for
any visible damage as a result of rough handling
during shipment.
–
–
–
–
–
PMA.Touc
Equipment Supplied
Weighing pan
In-use dust cover
Scale
Calibration weights
AC adapter
h up
Setting Up the Scale
Choose a suitable place to set up the scale. Avoid
exposure to drafts, heat, moisture and vibration.
Make sure to read the instructions carefully before
connecting the scale to AC power.
°C
! Observe the safety precautions and warnings in this
manual.
§ Place the weighing pan on the scale.
PMA.Touc
h up
5
Connection to AC Power
The equipment is powered through the AC adapter
supplied.
!Observe the safety precautions and warnings in this
manual.
Make sure the voltage rating of the AC adapter matches
that of your local line voltage (mains supply). If it does
not match your local voltage rating or if the plug design
differs from your local standard, contact your Sartorius
office or dealer. Use only original Sartorius AC adapters.
The use of AC adapters from other manufacturers, even
if these units have a registered approval rating from a
national testing laboratory, requires the approval of a
certified technician.
§ Insert the right-angle plug into the DC jack (8) on the
scale.
§ Plug the AC adapter into an electrical AC power outlet.
-
+
-
+
-
+
+
-
-
+
-
+
-
+
Inserting Batteries
Note:
Batteries are not included with the equipment supplied.
!Use only commercially available batteries.
(8 size AA). Recharge batteries using only an external
battery charger.
§ Turn the scale on its side and open the battery compartment (remove the battery compartment cover).
§ Insert the batteries. Make sure the polarity is correct.
+
-
§ Close the battery compartment (replace the lid, making
sure it locks into place).
!Used batteries constitute hazardous waste (i.e., are not
household waste) and must be disposed of in accordance with the waste management laws applicable in
your country.
6
Leveling the PMA.Touch Up
R
L
§ Level the PMA.Touch Up each time you set it up
R
in a new location.
Example: The air bubble must move from the
lower-right to the center position.
L
§ As shown in the illustration, turn the leveling feet
until the air bubble is centered within the circle of
the level indicator.
> In general, several leveling steps will be necessary.
PMA.Touc
h up
R
L
Calibration Weights
§ Turn the tab of the weight compartment and pull
out the compartment.
§ Remove the weights
> Calibrating/adjusting the scale
(please refer to “Calibration/Adjustment")
7
Operation
–
§
§
$
$
$
Basic Weighing Functions
Features
Zeroing/taring the scale:
You can zero/tare the scale within the
entire weighing range.
Preparation
Switch on the scale: press the e key
If necessary, zero/tare the scale: press the
t key
Change the menu settings, if necessary:
see the chapter entitled “Menu Settings"
Load factory settings, if necessary: see
“Parameter 9. – 1" in the chapter entitled
“Menu Settings,"
Additional functions:
Turning off the scale: press the e key
Function Keys
PMA.Touch up
Enter
e key
t key
q key
v key
h key
r key
Example: Determining weight value
Step
1. Turn on the scale
A self-test is performed
Display shows software version
Key (or instruction)
e key
PMA.Touc
4. Pour in paint component
(in this example, 150.2 g)
Display
h up
2. Position the can for the paint
(in this example, 52 g)
3. Zero/tare the scale
On/Off
Zero/tare; press and hold
(2 seconds): Save settings
Start calibration/adjustment.
In the configuration menu and
when calibrating/adjusting,
scroll to select parameters
Confirm parameter settings:
– Configuration
– Calibration/adjustment
(not assigned)
52.0 0
t key
50.0 0
150.2 0
Note:
Avoid applying strong force to the weighing pan. Otherwise, you will damage the
weighing system. Never close the lid of a paint can while it is still on the weighing pan.
Otherwise, you will damage the weighing system.
8
Calibration/Adjustment
Calibrate/adjust the scale following installation and after moving it to a new location.
Features:
Calibration can only be started when:
– The scale is unloaded
– The scale is tared
– The internal weighing signal is stable
If these prerequisites have not been met, an error message is displayed when you attempt
to start calibration.
The required calibration weight is displayed.
Standard calibration weights for selected models: see page 7 for instructions on removal.
You can select other weight values by pressing the v key.
You can interrupt calibration by pressing the e key twice.
Example: Determining weight value
Step
Press Key
1. Turn on the scale
e key
2. Zero/tare the scale
t key
3. Start calibration; the defined calibration
weight is displayed without a unit
(in this example, 200 g)
q key
4. If necessary, select a different
calibration weight
v key
5. Confirm calibration weight value
and start calibration/adjustment
h key
Display
Once the zero point has been stored, the
calibration weight value flashes on the display.
6. Place the required calibration weight
on the weighing pan
The value stops flashing if the calibration
weight is within the defined tolerances.
When the calibration weight value has been
stored, the symbol Wdisappears and the
stability symbol w is displayed.
7. Remove the calibration weight
8. This concludes the calibration process
9
Menu Settings (Setup Menu)
You can configure the scale to adapt it to particular requirements.
Step
Key
Display
1. Turn off the scale
2. Turn on the scale;
press
briefly while all segments are displayed,
or press and hold for more than 2 seconds
e key
e key
t key
Key Functions in the Setup Menu:
Key
Press briefly
h key
Menu level: scroll to the right (continuous)
v key
Menu item: scroll upwards
t key
Menu level: scroll to the left
Parameter Settings (Overview)
Setup
Menu
o Factory Settings; W User-defined Settings
1 Weighing
1.1.
Adapt filter
1.2.
1.3.
Application filter
Stability range
1.2.1
1.2.2
1.3.1
1.3.2
1.3.3
1.3.4
1.3.5
Calibration/linearization
Key function (CAL)
1.5.1
1.5.2
1.5.3
1.6.
Auto zero
1.6.1
1.6.2
Weight units
5. and 6.: Relevant only if an interface
port is installed; refer to the description
of the interface port
8. Additonal –– 8.1. Block key
functions
functions
9. Reset menu
10
1.1.1
1.1.2
1.1.3
1.1.4
1.5.
1.7.
Press and hold
Confirm setting
–
Save settings and
exit the setup menu
9.1. factory settings
o
o
o
o
o
Very stable conditions
Stable conditions
Unstable conditions
Very unstable conditions
Final readout
Filling mode
1/4 digit
1/2 digit
1 digit
2 digits
4 digits
Calibration
Linearization (for service only)
Key is blocked
On
Off
1.7.1
1.7.2
Parts per pound
Grams
8.1.1
8.1.2
o
All blocked except
(ON/OFF) and (ZERO) functions
All keys unblocked
9.1.1
9.1.2
o
Reset
Do not reset
Troubleshooting Guide
Error messages are displayed for approximately 2 seconds, after which the program automatically returns to the weighing mode.
Problem
Cause
No segments appear – No AC power available
on the weight display – AC adapter is unplugged
– Batteries are drained
oL
UL
disErr
calErr
appErr
PrtErr
– The load on the pan
exceeds the scale’s capacity
– Weighing pan is not positioned
– Contact between weighing
pan and other objects
– Display overrun:
Value to be output
cannot be displayed
– Calibration prerequisites
were not met, e.g.,:
– Zero/tare
– Weighing pan is loaded
– Too little weight or, in the case
of application programs,
no paint can on weighing pan
– Interface port
disabled for print function
bAL.Err
– Scale is loaded
or defective when
turned on
SYS.Err
– Scale is defective
Max. weighing
capacity less than
defined in chapter
on “Specifications"
The weight readout
is obviously wrong
– Scale was turned on
before positioning
weighing pan
– Scale is not calibrated
– Scale was not tared
prior to weighing
Solution
– Check the AC power supply
– Connect AC adapter to power
supply
– Replace batteries or recharge
them using an external battery
charger
– Unload the scale
– Correctly position the
weighing pan
– Weighing pan may not come
into contact with other objects
– Reduce load on the pan
– Unload scale
Zero/tare with the t key
Do not calibrate until “Zero" is
displayed
– Increase weight
– Contact Sartorius Customer
Service responsible for
application programs
– Unload scale before
turning it on
– Contact Sartorius Customer
Service
– Contact Sartorius Customer
Service
– Position weighing pan
– Turn the scale off and on
again using the e key
– Calibrate scale
– Zero/tare scale
If any other errors occur, please contact your local Sartorius customer service center.
11
Care and Maintenance
Cleaning
! Unplug the AC adapter from the wall
outlet (mains supply). If you have a data
cable connected to the interface, unplug
it from the scale.
! Do not use caustic agents, concentrated
acids or pure alcohol.
$ Make sure that no liquid enters the scale
housing.
$ Clean the scale using either a brush or a
soft, dry, lint-free cloth.
Storage and Shipping Conditions
$ To ensure safe shipment, your scale has
been packaged using environmentallyfriendly materials. You should retain
these materials in case you need to package your scale for storage or return
shipment.
$ Storage temperature: –20°C to +75°C
$ Permissible moisture level for storage of
the packaged scale: 90% max.
$ Read and follow the instructions given in
the section entitled “Safety Inspection.”
Safety Inspection
Safe operation of the PMA is no longer
ensured when:
– There is visible damage to the AC adapter
– The AC adapter no longer functions
properly
– The AC adapter has been stored for a
relatively long period under unfavorable
conditions
– The equipment has been exposed to
rough handling during shipment
§ Observe the warnings and safety
precautions in this manual
Notify your nearest Sartorius Service
Center or the International Technical
Support Unit based in Goettingen,
Germany. Maintenance and repair work
may only be performed by service technicians who are authorized by Sartorius and
who have access to the required service
and maintenance manuals, and have
attended the relevant service training
courses.
! The seals affixed to this equipment indicate that only authorized service technicians are allowed to open the equipment
and perform maintenance work so that
safe and trouble-free operation of the
equipment is ensured and the warranty
remains in effect.
Replacing the In-Use Dust Cover
§ Remove the weighing pan
PMA.Touc
12
h up
§ Remove the screw and remove the pan support.
PMA.Touc
h up
§ Replace the soiled in-use dust cover and ensure
that the adhesive points on the new cover properly
adhere to the scale's surface. The dust cover must
be firmly attached.
PMA.Touc
Important Note:
If the dust cover does not adhere to the scale,
weighing results may be distorted.
h up
§ Replace and refasten the pan support.
PMA.Touc
h up
§ Position the weighing pan.
PMA.Touc
h up
13
Recycling
Information and Instructions
on Disposal and Repairs
In Germany and many other countries
(see www.sartorius.com, Service Download area for details), Sartorius or the
organization contracted by us takes care
of the proper return and legally compliant disposal of its electrical and electronic
equipment on its own. These products
may not be placed with the household
waste or brought to collection centers
run by local public disposal operations –
not even by small commercial operators.
For disposal in Germany and in the other
Member States of the European Economic Area (EEA), please contact our service
technicians on location or our Service
Center in Goettingen, Germany:
Sartorius Weighing Technology GmbH
Service Center
Weender Landstrasse 94-108
37075 Goettingen, Germany
In countries that are not members
of the European Economic Area (EEA) or
where no Sartorius affiliates, subsidiaries,
dealers or distributors are located, please
contact your local authorities or a commercial disposal operator.
Prior to disposal and/or scrapping
of the equipment, any batteries should be
removed and disposed of in local collection boxes.
Sartorius, its affiliates, subsidiaries, dealers and distributors will not take back
equipment contaminated with hazardous
materials (ABC contamination) – either
for repair or disposal. Please refer to the
accompanying leaflet/manual or visit our
Internet website (www.sartorius.com) for
comprehensive information that includes
our service addresses to contact if you
plan to send your equipment in for
repairs or proper disposal.
If you no longer need the
packaging after successful
installation of the equipment,
you should return it for recycling. The packaging is made
from environmentally-friendly
materials and is a valuable source of
secondary raw material.
14
Data Interface (Options)
Installation
§ Disconnect the power supply:
Unplug the AC adapter from the wall socket (mains).
§ Turn the balance/scale on its side.
! To avoid damaging the weighing system, do not
turn the balance/scale over so that it rests on the
weighing pan/load plate.
§ Push out the panel on the bottom of the
balance/scale.
§ Insert the interface.
§ Make sure the interface snaps into place.
§ Guide the cable through the channel/raceway.
15
Intended Use of YADAP-USB Adapter
This USB interface adapter is a solution
that enables direct connection of the
balance/scale to a computer on the
USB (universal serial bus) port.
The USB interface is implemented as
a virtual serial interface over RS-232
(virtual COM port). For the application
program running on the computer, there
is no difference whether the serial interface is installed in the PC or enabled in
the form of a virtual interface.
The interface offers the same capabilities
in either case.
! The USB port is designed for the labora-
tory environment and is not suitable for
use in purely industrial environments.
Full IP protection is only guaranteed
when the USB cover is closed.
System Requirements
– Computer (PC) with Windows 98SE®,
Windows ME®, Windows 2000®,
Windows XP®, Windows Vista®,
or Windows 7®, Linux, Mac OS 8, 9, or X
– Available USB port on the PC
– USB cable
The equipment supplied with the USB
interface adapter includes a CD containing the software drivers you need to set
up a virtual interface on your computer.
16
Software Driver and Installation Guides
The VCP driver, used to set up the
virtual interface on the computer,
can be downloaded from the internet:
http://www.ftdichip.com/FTDrivers.htm
The installation guides for the driver can
be found at
http://www.ftdichip.com/Documents/
InstallGuides.htm
Connecting the PC via USB
The current USB port for the computer
is established when the software driver is
being installed. The driver must be
re-installed every time you wish to
change the port.
Therefore, choose one USB port that can
permanently or regularly be used to
connect the balance.
§ Switch off the balance.
§ Unplug the balance from the mains.
§ Connect the USB cable to the balance
and to the USB port on the computer.
§ Plug the balance into the mains again
and switch it on.
$ Windows will detect the device connected
to the USB port. If the device is being
connected for the first time, the Windows
Installation Wizard will run.
Installing the Software Driver
§ Run the Installation Wizard for the
driver.
§ Open the settings for the USB serial port
in Windows®:
– START > My Computer > Control Panel
– System > Hardware > Device Manager
§ Follow the instructions that appear.
§ Open the Connections submenu.
§ To complete the installation, click on
Finish.
§ Double-click on USB Serial Port.
$ The virtual interface is ready for use.
§ Select Port Settings > Advanced.
Windows® usually adds the virtual port
in the position following your highestnumbered COM port.
Changing the Latency Time
§ Open the settings for the USB serial port,
following the above instructions.
Example:
For a PC with up to 4 COM ports, the
new virtual port would then be COM5
(see Device Manager).
§ For a faster rate of communication,
change the setting for the latency timer
to 1 msec.
Installation Guides
for Microsoft XP®, Vista®, and 7®
Changing the Port Number
If you use the USB interface with a program that limits the number of COM port
designations (e.g., only COM1, 2, 3, 4),
you may have to assign one of these port
numbers to the new virtual port.
Plug & Play Mode in Autoprint (SBI)
§ Open the settings for the USB serial port,
following the above instructions.
§ Stop the Plug & Play mode from
running.
Uninstalling the Driver
The software driver for the USB
connection can be uninstalled with the
Windows® Uninstaller.
17
Pin Assignment Chart:
YADAP-RS
5
1
9
6
Female Interface Connector:
9-contact D-Submini (DB9) with screw lock
hardware for cable gland, for direct connection
to a computer or an optional Sartorius printer
(PC compatible).
Pin assignments:
Pin 1: Not connected
Pin 2: Data output (TxD)
Pin 3: Data input (RxD)
Pin 4: Clear to send (CTS)
Pin 5: Internal ground (GND)
Pin 6: Connected to pin 8
Pin 7: Not connected
Pin 8: Data terminal ready (DTR)
Pin 9: Not connected
Parameter Settings
(Menu Navigation)
Purpose
Configuring the balance/scale and its data interface
to meet individual requirements by selecting from
among the predefined parameters in the operating
menu.
Factory Settings
The factory-set configurations are marked with an
“o" in the list (see next page).
Preparation and Examples
§ Please refer to the installation and operating
instructions supplied with your balance/scale.
18
Parameter Settings – Interface Port (Overview)
Intended Purpose
Configuration of the scale and its interface port; i.e., to meet individual requirements
by selecting from among predefined parameters in the Setup menu.
o Factory settings
User-defined settings
W
el 1
lev
u
n
Me
Menü
el 2
lev
u
n
Me
g
tin
l3
m
set
eve
l
ite
y
r
to
nu
nu
c
e
e
a
M
F
M
1 and 8:
Refer to Menu Settings (Setup Menu)
5 Interface
5 1 Baud Rate
5
5
5
5
5
5
5
5 2 Parity
5 2 3 o Odd
5 2 4
Even
5 2 5
None
5 3 Number of Stop Bits
5 3 1 o 1 stop bit
5 3 2
2 stop bits
5 4 Handshake
Mode
5
5
5
5
5
5 5 Datenbits
1
1
1
1
1
1
1
4
4
4
5
5
2
300 baud
3
600 baud
4
1,200 baud
5 o 2,400 baud
6
4,800 baud
7
9,600 baud
8
19,200 baud
1
Software handshake
2 o Hardware handshake
3
None
1 o 7 data bits
2
8 data bits
6 Data Output
6 1 Print on request/
Auto print
6 1 1
On request regardless
of stability
6 1 2
On request after
stability
6 1 3 o Auto print regardless
of stability
6 1 4
Auto print after
stability
9 Reset Menu
Refer to “Menu Settings (Setup Menu)" on page 10.
19
Specifications
Model
Weighing capacity
Readability
Tare range (subtractive)
Max. linearity
Stability range
Adaptation to ambient
conditions
Allowable ambient operating
temperature range
Weighing pan
Net weight, approx.
Calibration weights, 2
(in the weight compartment)
Power consumption (average)
Interface port (optional)
Format:
Parity:
Transmission rates
Handshake
AC power source
Frequency
Hours of operation, approximate:
– Alkaline batteries (8 size AA )
– Fully charged rechargeable
batteries. (8 size AA, NiMH)
20
g
g
g
g
s
PMA600H
600
0.01
–600
< ±0.03
2
By selection of 1 of 4 optimized filter
levels; display sequence: 0.1–0.8,
(depending on the filter level setting)
°C
mm
kg
g
+10 to +40 (273 to 303 K, 50° to 86°F)
140 + 127
1.3
100 Class (F1)
W
V
Hz
0.8
RS-232 or USB
7-bit ASCII, 1 start bit, 1 or 2 stop bits
Even, odd, none
300 to 19,200 baud
Software, hardware, none
230 or 115 V +15%…– 20%,
48–60
h
h
35
24
Accessories
In-use dust cover
Interface port, installation kit
RS-232 interface with cable (2 m)
or
USB interface with cable (2 m)
Carrying case
Anti-theft locking device
Calibration weights, universal
(for weight compartment in scale) (100 g, F1)
Weighing pan, square
Feet:
Set 1 leveling foot with 1 fixed foot
Set of covers for :
– Battery compartment
– Interface port
– Weight compartment
YDC-02PMA
YADAP-RS
YADAP-USB
Upon request
LC-1
69V0007
Upon request
Upon request
Upon request
21
22
Sartorius Weighing Technology GmbH
Weender Landstrasse 94–108
37075 Goettingen, Germany
Phone +49.551.308.0
Fax +49.551.308.3289
www.sartorius.com
Copyright by Sartorius,
Goettingen, Germany.
All rights reserved. No part
of this publication may
be reprinted or translated in
any form or by any means
without the prior written
permission of Sartorius.
The status of the information,
specifications and illustrations
in this manual is indicated
by the date given below.
Sartorius reserves the
right to make changes to the
technology, features,
specifications and design of the
equipment without notice.
Status:
November 2011,
Sartorius Weighing Technology GmbH,
Goettingen, Germany
Printed in Germany on paper that has
been bleached without any use of chlorine
W_PMA Touch · KT
Publication No.: WPM6060-e11114