1
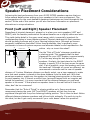
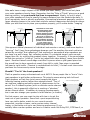
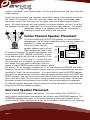
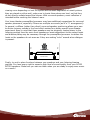
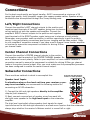
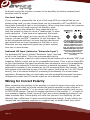
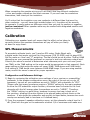
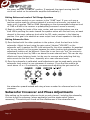
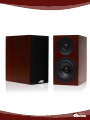
The ELT525 Speaker
Line
Enjoyment Guide
Table of Contents
Thank You for your ELT525 purchase
3
Safety Precautions
4
Unpacking and Product Registration
5
Speaker Placement Considerations
6
Inventory
Limited Warranty Coverage
Front (Left and Right) Speaker Placement
Center Channel Speaker Placement
Surround Speaker Placement
Subwoofer Placement Considerations
6
7
8
9
Speaker Placement Alternatives
11
Connections
13
Calibration
15
Technical Specifications
18
Limited Warranty and Return Policies
20
Shelf Mounting
Stand Mounting
Wall Mounting
Left/Right Connections
Center Channel Connections
Wiring for Correct Polarity
SPL Measurements
Subwoofer Crossover and Phase Adjustments
Caring for your ELT525 speakers
Service Assistance for AV123 ELT525 speakers Page 2
5
5
11
12
12
13
13
14
15
16
18
20
Thank You for your ELT525 purchase
Dear Home Entertainment Enthusiast,
At AV123, our absolute highest priority begins and ends with you,
the customer. As our valued customer, you can rest assured that
if you are not 100% satisfied with your purchase within 30 days
from your original receipt date, you may return your product(s)
for a prompt refund in full (excluding shipping charges) with no
explanation necessary. Coupled with the expert advice on our
website and through our trained advisors, there is simply not a
safer way or place to buy today.
Mark with his pride and
joy, Granddaughter
Gracie, after her
performance in the
Nutcracker Ballet
We make every effort to make sure your home entertainment needs are met with the
great products and unbeatable service we offer every single day. Not only do we give
you the tools and the resources to fully evaluate your purchase before your order is
placed, we back this up after the fact by allowing you a full month to audition our
products in your own home before your final decision is made. AV123 simply does not
engage in misleading and high-pressure sales tactics. In the long run, we know it’s not
the way either one of us wants to do business. We want customers for a lifetime.
We’ve done our best to provide you with products and services meeting or exceeding
your expectations. However as good as our products are, they do not match our
dedication to each and every sale. Should you need any further assistance in the future
with your A/V system, you can bet that AV123 will be there supporting and assisting you
as you make your way to your next level of audio/visual enjoyment.
Mark L. Schifter
President
Page 3
Safety Precautions
At AV123, we don’t want to see any of our
customers experience the inconvenience
or unfortunate mishap of a precaution that
was ignored. Please review the following
precautions so you may enjoy your AV123
ELT525 speakers without unnecessary
damage or misuse.
IM PO RTA NT!
PLEASE R EAD THESE
I NSTR U C TI O NS
C AR EFU LLY
1) If you suspect you have a component failure in
your speakers at any time, please call AV123 for help. Our experts can assist you in diagnosis and, if
necessary, provide you with field repair parts where applicable. Our goal is your complete satisfaction.
2) Do not lift these speakers if you feel strain or they are just plain too heavy for you. The weight of each
AV123 ELT525 speaker is listed in the Technical Specifications section of this manual for your reference.
3) When lifting these speakers, do so with caution. If you need to use a cart or hand truck to move them
around to their final destination, please do so with care and caution. Odd shaped boxes may require a 2
person lift even if the weight of the box does not seem prohibitive.
4) Do not install these speakers near water (or expose them to water) or any other liquids. If you have a
place in the basement that floods or a leaky roof in certain spots, do not install your AV123 ELT525 (or
any other home entertainment equipment) in that location. Use good judgment, but if you are not sure
if your chosen location is acceptable, chances are you should call us. It never hurts to ask.
5) Do not poke, prod, or “heavily pet” these speakers. Do not set drinks on them (or it’s just about
guaranteed the drinks will leave a ring and spill too). Do not use the speakers as tables or chairs.
Whenever possible, ask the kids and pets to play elsewhere than on (or directly in front of) the
speakers. All of these suggestions come from many years of experience by our AV123 experts so you
can trust the origin.
6) Do not install these speakers near a heat source such as a floor heater, space heater, fireplace, stove,
heat register, active volcano, or any other device (including amplifiers) that may radiate heat.
7) These speakers in a home entertainment environment can easily produce high sound pressure levels
that can impair hearing if you (or other listeners) undergo extended exposure. Use caution when
listening at high volumes and, by all means, please discontinue use if your ears are ringing. If you must
play these speakers at extremely high volumes, we recommend the use of OSHA approved hearing
protection.
8) Please read and follow the instructions in this manual. Keep this manual for future reference.
Page 4
Unpacking and Product Registration
The AV123 ELT525 speakers should reach you in absolutely perfect condition. If you
notice any shipping damage or other issues upon unpacking the unit, please contact
AV123 immediately. We have gone out of our way to ensure the speakers are shipped
with the utmost care, but if that is not the case when they arrive at your door, please do
not hesitate to contact us.
Inventory
Your AV123 ELT525 speakers are carefully hand packaged utilizing molded foam inserts
to protect their fine furniture grade finish. When removing the speakers from the box,
hold the wood sides of the cabinet, rather than the front and back. It is important to
save all the packing materials and the box in case your AV123 ELT525 speakers ever
need to be moved or shipped back to AV123 for service or repairs.
All ELT525 speakers include rubber mounting feet in the packaging to
decouple the speaker from the floor or speaker stand.
Getting Started
Once you have established that all of your speakers and accessories are
present and accounted for, we ask that you PLEASE READ THIS MANUAL Rubber Feet
FIRST before installing and positioning the speakers. We have thoughtfully assembled
many useful tips to maximize the performance of your AV123 ELT525 speakers in your
home entertainment environment.
Limited Warranty Coverage
All products sold through AV123 carry a limited manufacturer’s parts and labor warranty.
All AV123 ELT525 loudspeakers are guaranteed to be free from manufacturer’s defects
for a period of one year from the date of purchase. Make sure that you keep your
sales receipt. It is the only way for AV123 to establish the duration of your limited
warranty and it may come in useful for insurance purposes if your AV123 speakers
are ever damaged or stolen. Warranties apply only to the original owner and are nontransferable. Full warranty details are found at the end of this manual.
Extend your warranty by registering your AV123 speakers at AV123.com
Please take a moment to visit AV123.com and register your AV123 ELT525 purchase.
When you go online and register your product, AV123 will extend the warranty by an
additional two years. In addition to the 1 year limited warranty this is a total of 3 years!
This extended warranty is free simply for registering within 60 days of your purchase.
We urge you to take advantage of this offer.
Page 5
Speaker Placement Considerations
Achieving the best performance from your AV123 ELT525 speakers requires that you
follow several details when setting up your speakers in their new environment. Tips
and suggestions for the most desirable placement techniques are listed throughout this
section. At the end of this section you will also find more information on placement
alternatives in unique situations.
Front (Left and Right) Speaker Placement
Regardless of physical placement, always try to place your main speakers (LEFT and
RIGHT) with the tweeter positioned at the same elevation as or slightly above ear level.
This yields better detail in the upper vocal range, which is especially important for
understanding dialog in home theater systems. Physical placement of front speakers
should be along the same wall of your listening/viewing room. Although we’ve seen
successful installations that didn’t follow these guidelines, they’re generally more
problematic in terms of system response and accurate theater sound reproduction. Our
1/3
2/3
advice - why re-invent the wheel?
Back Wall of Room
Use the “Rule of Thirds” whenever possible as
a starting guide. This suggests that the best
placement for your LEFT speaker is approximately
1/3 of the way along the wall behind your
speakers. Similarly, the best place for the RIGHT
speaker is usually 2/3 of the way across the same
wall. If at all possible, move the speakers out from
the back wall. Although all rooms are different, we
recommend a minimum wall-to-rear-of-speaker
distance of 3 inches. Whatever distance you finally select, use a tape measure to make
sure that each speaker is placed at the same distance from the back wall. With that
same tape measure, make sure the speaker-to-listening/viewing position is the same
for each speaker, too. If there’s a conflict here (as would happen with an irregular wall
behind the speakers), it is more important that the distance between you and each
speaker is the same. If that places one speaker closer to the wall behind it than the
other, don’t be too concerned.
LEFT
RIGHT
Minimum of 3”
from Wall
Primary Listening Position
Remember that the “Rule of Thirds” is a basic guideline only. Some acousticians
recommend placing the main (LEFT and RIGHT) speakers so that they form an
equilateral triangle with the prime listening/viewing position. This is close to ideal. Notice
different distances between speakers and left and right sidewalls. It’s worth trying for
this ideal, but don’t get overly concerned if your room doesn’t allow this precision.
Page 6
Side walls have a major impact on the sound you hear. Ideally, you should not place
your main speakers close to them. Remember that the “Rule of Thirds” gives you a good
starting position, but you should feel free to experiment. Ideally, try not to place
your main speakers so they’re exactly the same distance from the closest side walls. A
bit of asymmetry here is actually preferable. Symmetrical placement generally results in
larger standing waves in the room that reinforce certain frequencies and diminish others.
When you take the time to place your speakers properly, you’ll realize better “imaging”
2/3
2/3
Back Wall of Room
1/3
LEFT
RIGHT
Minimum of 3”
from Wall
Primary Listening Position
Maintain the
same distance
to the listener
Placement in rooms with
odd shaped back walls
should still align the
speaker distances equally
to the listening position.
Don’t rely on electronic
time delay correction to fix
these problems whenever
possible as the difference
in room shape cannot
always be accounted for
with a straight time delay.
Back Wall of Room
1/3
RIGHT
LEFT
NOT
RECOMMENDED!
Primary Listening Position
(the apparent lateral placement of individual instruments or voices), and more depth or
“layering”. You’ll hear those advantages because you’ll be avoiding the aural confusion
caused by so-called “first reflections” that confuse our perceptions when speakers are
too close to a wall’s large, flat, reflecting surface. If a centered singer’s voice sounds
bigger than life, try moving the speakers closer together. Conversely, if the sound stage
sounds too narrow or “piled up” (not to be judged with video dialog), move them farther
apart. Excellent lateral sound stage resolution is proven when a jazz grand piano has
the sound from its keys spread out evenly from left to right (Jazz piano is recorded
left-bass to right-treble. Classical is recorded back to front.) A small vocal chorus also
positions the voices evenly across the stage.
Should I “Toe In” the front speakers?
That’s a question many enthusiasts ask us at AV123. Some people like to “toe-in” their
main speakers to get better performance. This simply means aiming both Left and
Right speakers so that they point more towards the prime
“Toe In” of Left and Right Speakers
listening/viewing position rather than straight ahead. “Toe-in”
can improve imaging and add a sense of spaciousness to the
RIGH
T
T
LEF
sound. In a 2-channel system (with no discrete center channel
speaker), this is especially effective in creating a “phantom”
center channel effect. In addition to imaging improvements,
toe-in can also change your speaker’s tonal balance (or timbre).
For that reason, you may want to play with toe-in to get the
most out of your speakers. Some time spent experimenting
here can yield a better match to your room’s acoustic
Primary Listening Position
properties, provide a clearer, more precise center channel
image, or just better suit your own listening preferences. If you
actually have a center speaker and are in a matrix mode like Dolby PLII, DTS Neo:6, or
Page 7
another “simulated” multi-channel mode, the toe in positioning can also help blend that
center channel.
Just as focusing a camera lens improves visual detail, toeing-in the speakers improves
the “focus” of the sound. Often this focus also makes the center sound stage image
more solid, even to the point that you can again move the speakers slightly farther
apart. For video situations with short speaker-to-listener distance, you can “cross-fire”
the speakers to widen the “sweet spot” for multiple left-to-right listeners. This means
Center Speaker Equally Between Left and Right
additionally toeing-in the speakers such that the left speaker is
aimed to the right-side listener, and vice-versa.
T
LEF
CENTER
RIGH
T
Center Channel Speaker Placement
If you are installing AV123 ELT525 speakers in a home theater
arrangement, you will need a dedicated center channel speaker for
Center (Above)
accurate 5.1 sound reproduction.
Place your center channel
speaker between your Left and
Primary Listening Position
12” or
Less
Right speakers as close to your
TV screen as possible. Try to keep the tweeters of all
Video Display
three speakers (LEFT, CENTER, and RIGHT) as close
12” or
to the same height from the floor as possible. If the
Left
Right
Less
tweeters are at - or very close to - on-axis with your
ear level when you are seated, you are doing very
well indeed (this may pose a challenge if you are
Center (Below)
placing a single CENTER speaker either above or below
the screen). Try to maintain a deviation of 12” or less between the CENTER and MAIN
speakers. Aiming the CENTER speaker slightly down or up to compensate can also help
acoustically “align” the three speakers). It’s a good idea to place the CENTER speaker
at exactly the same distance from your listening/viewing position as the main LEFT and
RIGHT speakers. This will ensure the sound from all three front speakers arrives at your
ears at the same time. This will help to create the most convincing image. While most
surround receivers and processors have circuitry that can electronically compensate
for different speaker distances, that still does not maintain as deep of sound stage as
bringing the left/right speakers forward.
Surround Speaker Placement
Similar to the CENTER speaker requirement, if you are installing AV123 ELT525 in a
multi-channel home theater arrangement you will also need SURROUND speakers. The
SURROUND speaker placement is a bit more challenging than front speakers or the
center channel. Ideal placement can either be on the back or side walls of your listening/
Page 8
viewing room depending on how the system will be used. Regardless of exactly where
they are placed on either wall, make sure to locate them above ear level, so that they
do not directly radiate toward the listener. With surround speakers, some reflection is
intended before reaching the listener’s ears.
Your home theater preamplifier/processor may have additional suggestions for surround
speaker placement, especially if there are multiple surrounds (as in a 7.1 arrangement).
In general, a diffuse (rather than direct) surround speaker positioning allows your ears
to anchor primary sounds in the front which makes for a better overall home theater
experience. Keep in mind that these speakers may be physically located closer to the
listening position than the main front speakers so some adjustment to the output levels
and distance/delay may be necessary through the preamplifier/processor to reduce the
levels so the speakers do not seem as if they are making “echo” sounds when dialogue
is present.
Side
Wall
Side
Wall
LEFT
RIGHT
Primary Listening Position
Should be positioned ABOVE listener’s ears OR
so that they DO NOT DIRECTLY FACE the listener.
LEFT
SURROUND SPEAKERS
RIGHT
Wall or Space Behind Listener
Finally, try not to place furniture between your speakers and your listening/viewing
position. You have every right to expect a high level of sound quality from your AV123
ELT525 speakers. Make sure you can see them when you are ready to enjoy some music
or a movie!
Page 9
Subwoofer Placement Considerations
Unlike regular loudspeakers, subwoofers will often work best when placed in a corner,
even if located a few feet to the side and/or behind the closest main speaker. Typically
the front right and left corners sound the most natural, though rear corner placement
is also an acceptable option. The driver can be facing you or be pointed along either
wall. The low frequency sound waves emitted by subwoofers are quite long and will
therefore interact greatly with the walls of your room. As a result, even small placement
adjustments can have a significant impact on the sound you hear. A room corner will
provide maximum output at a given power level, and the maximum number of room
modes will be excited, translating to a flatter response in most rooms. Often one rather
large peak in the subwoofer’s operational frequency range will standout with corner
placement.
The low frequencies played by your subwoofer tend to be non-directional due the
extraordinarily long wavelengths involved. As a result, regardless of where your
subwoofer is placed, it should not be easily localized, but should instead produce a
balanced and enveloping response.
Factors that can affect performance in relation to placement and localization of the
sound are rattles from shelves, walls, or other nearby objects, as well as distorted
output. If you are having issues with subwoofer localization, try to isolate any rattling
or buzzing objects, or place the sub in another corner of your room. If the sub’s output
is distorted, check to see that you are not at the maximum sub level setting on your
receiver or preamplifier/processor. An overdriven output can induce audible distortion. To
resolve this, you may need to turn down the subwoofer level on your processor and turn
the gain level up on the subwoofer itself to compensate.
One trick (learned from experienced home entertainment installers) is to feed a low
frequency test tone to the subwoofer input while it’s placed in the listening position.
Then walk around the room and identify places where bass is louder (or quieter). This
is easier than moving the subwoofer around. Once you determine a good location - both
audibly and visually - you should be able to make the switch and place the sub in the
new location, with better results.
Finally, you can use the control of the subwoofer’s output level control (gain) and phase
control (0 or 180°) to further blend the sound into the other system speakers as a result
of where you ultimately choose to position the subwoofer. If you are using the subwoofer
in a home theater arrangement, the bass management functions of the preamplifier/
processor will also help to compensate for some of the positioning issues, but remember
that there is no substitute for correct speaker placement. Overall bass level is a
personal preference that varies greatly among listeners. That said, we still suggest you
Page 10
try lowering the subwoofer level periodically until you no longer notice the subwoofer
playing. You may be surprised at how much more real and natural the low end of your
system sounds!
Speaker Placement Alternatives
In a perfect world, you have a room dedicated only to your audio/video needs and you
can set up the room to suit the needs of speaker and equipment placement. At AV123
we are aware that most rooms have other uses too. Next we suggest some alternatives
to speaker placement and/or mounting that may help you blend the ideal placement into
a practical solution for your environment.
Shelf Mounting
Logically, this may be your first consideration and that’s fine if the shelf is sturdy enough
and deep enough to hold your speakers securely. Remember, a shelf that is up against
a wall should be at least 3” deeper than the speaker itself to allow for cable connections
and port “breathing” room. So, since your ELT525 speaker is nearly 10” deep, you will
need to allow a minimum 13” of shelf space which may not be possible with all types
of shelving (especially the stuff you assemble yourself such as IKEA, etc.). Since the
ELT525 monitors are bass reflex enclosures with a port on the rear panel, the distance
between the back wall and the port is very important for proper bass reproduction.
Please do not block it. In fact, if you are positioning your speakers on a shelf, try to keep
3” of open space behind the rear panel whenever possible.
Note: These recommendations are for open shelves. Mounting your speakers on
“enclosed shelves” as would be found in an entertainment center or built-in cabinets can
affect bass response substantially. We do not recommend this as it forms a
“speaker cabinet within a cabinet” effect.
Rubber Feet
For shelf mounting, use the adhesive rubber feet provided or a moldable,
reusable adhesive such as BluTack or other “earthquake wax.” If you elect
to use the rubber feet, simply peel them from the protective sheet and
apply them close to the corners of the speaker bottom. Be sure the shelf
itself is firmly in place and there are no loose items on the shelf to rattle or
buzz while the speaker is playing.
Page 11
Stand Mounting
If you are placing your AV123 ELT525 monitors speakers on stands, you have several
options:
• You can use the rubber feet on a generic speaker stand that does not have mounting
holes, but this may be risky if there is a chance the speaker or stand may be bumped
and the speaker knocked off.
• You can use a material like BluTack to keep your speakers firmly (but not permanently)
attached to the stands. If you can’t find BluTack, just ask your neighborhood hardware
store for an equivalent.
• We do not recommend the use of double sided foam tape or other strong adhesives to
secure your speakers to a stand, as they will damage the furniture grade finish if and
when removed.
• TIP: The speaker has the best vertical off axis and most balanced in-room response
with the woofer over tweeter, especially if the speaker height is lower than ideal. Try
flipping the speaker over so the woofer is on top and see if you again hear better detail
in the upper vocal range.
Wall Mounting
Wall mounting is also an option. The base and the back of the ELT525 has a standard
size mounting insert. Wall mount bracket companies we like are Vogel (www.vogelsusa.
com), Haropa (www.haropa.com), OmniMount (www.omnimount.com) and Btech (www.
btech-usa.com). When you shop for brackets you’ll find different models which allow you
to mount to a wall, ceiling, or cabinet top, allowing for a great deal of flexibility.
Whatever brackets you choose, make sure they support the full weight of the speaker
(even a little over) and that they meet your expectations aesthetically. Follow the
bracket manufacturer’s instructions carefully as you attach it to the wall. You should
mount into the studs in the wall themselves as a first option. If this is not possible,
a 50 lb. dry wall anchor should also be suitable. Extra effort here is well worth it. An
inadvertent fall will damage your speaker as well as anything under it! If you are in
doubt about how best to do this, please call a qualified carpenter or contractor to help.
Page 12
Connections
For the best sound quality and signal transfer, AV123 recommends a minimum of 16
gauge high quality, multi stranded, oxygen free copper speaker cables. Speaker wiring
connections are accomplished through the 5-way binding posts.
Left/Right Connections
To
To
Connect the amplifier’s LEFT channel outputs to the positive and
Amplifier
Amplifier
negative input terminals of the LEFT speaker, being sure to observe Negative
Positive
correct polarity at both the speaker and amplifier. Connect the
amplifier’s RIGHT channel outputs to the positive and negative
input terminals of the RIGHT speaker, again being sure to observe correct polarity.
Remember, every speaker cable connection is another opportunity to get the polarity
wrong! Incorrect polarity connections lead to poor imaging and low bass output. Refer
to your amplifier’s connection manual if you have a multi-channel home theater amplifier
or receiver to ensure the component is suitable for driving 8 Ohm
per channel loads.
Center Channel Connections
To
Amplifier
Negative
To
Amplifier
Positive
Connect the amplifier’s CENTER channel outputs to the positive
and negative input terminals of the CENTER CHANNEL speaker. Be
sure to observe correct polarity. Refer to your amplifier’s or home theater receiver’s
connection manual to ensure the component is suitable for driving 8 Ohm per channel
loads or the center channel output. Also, you must make sure the preamplifier/processor
has been configured to enable the center channel output.
Subwoofer Connections
There are three methods in which to accomplish this:
From left and right channel
monitor or tower speakers
Speaker Level Inputs
In situations where a line level out from your receiver or preamp is not available, we recommend the following method for
connecting an AV123 subwoofer:
1) Connect the left and right speakers directly to the amplifier
outputs (both channels).
2) Next, connect a second pair of speaker wires from each left
and right main speaker to the high level input on the subwoofer
amplifier.
Not Used
The high level input safely allows speaker-level signals for signal
input and sums the left and right channels to a mixed mono input so that the subwoofer
always plays whether the receiver’s Balance control is moved left or right.
Page 13
By directly wiring the monitors or towers to the amplifier, the bottom octaves blend
smoother with the output.
Line Level Inputs
If your receiver or preamplifier has a set of full range RCA line outputs that are not
already being used, you can connect these into the subwoofer’s LEFT and RIGHT Line
Input jacks (pictured at right in the illustration). When using these inputs, the crossover
is still active so a full-range input will be filtered to allow
only bass to reach the subwoofer. Many subwoofers do not
have line outputs on them to use as a “feedthrough” to other
audio equipment. If you have more equipment that needs
the full-range audio signal, but only one pair of RCA preamp
outputs, you can use RCA “Y adapters” to split the signal. We
Use the LINE INPUT (right)
do not recommend splitting it to more than two devices and
for standard full range inputs
each should have an input impedance of 20k Ohm or more.
OR the SUBWOOFER INPUT
(left) for applications where
Otherwise you may experience signal loss (a lower volume)
a home theater processor is
from one or more devices.
used. The difference is that the
Dedicated LFE Input (Labeled as “Subwoofer Input”)
SUBWOOFER INPUT bypasses
the active crossover because
the preamplifier already
takes care of that in the LFE
processing.
The dedicated LFE input is labeled “Subwoofer Input” (pictured
at left in the illustration). This is the recommended input to
use if your subwoofer is part of a multi-channel home theater with a discrete “LFE” (Low
Frequency Effects) output jack on the preamplifier/processor. There is only a single RCA
for this input because the signal has already been summed to mono in the preamplifier.
Additionally, the subwoofer’s internal crossover is disabled (bypassed). Instead, the
subwoofer’s crossover is now provided by the LFE processing within the receiver. Along
with speaker level matching by way of the Gain control (and using the 0 or 180° Phase
switch), this is the easiest method of connecting the subwoofer in a home theater
application. Remember that you must make sure the preamplifier/processor has been
configured to enable the LFE channel output so the subwoofer will receive a signal.
Wiring for Correct Polarity
When connecting the speakers to the amplifier you need to observe the proper polarity.
This simply means that you should connect the positive terminal on your receiver or
amplifier (may be marked “+” or be colored red) to the positive terminal (red) on your
AV123 ELT525 speaker. Connect the negative terminal on the amplifier (“-” or black) to
your speaker’s negative (black) terminal. Don’t worry about damaging anything if you
make a mistake here. Sound quality will suffer but you won’t ruin anything. You can
definitely hear a difference if it gets connected backwards though. It really affects the
imaging and low frequency response in a negative way, so double check your work!!
Page 14
When connecting the speaker wiring you’ll see that it has two different conductors
- silver and copper colored are the most common. If you can’t see the conductors
themselves, look closely at the insulation.
You’ll notice that the insulation over one conductor is different than that over the
other conductor - one will have slight molded ridges in it, the other will be smooth,
for example. It really makes no difference which one you pick for positive or negative,
just be consistent! Other speaker cable may be marked with designated positive and
negative conductors.
Calibration
Calibrating your speaker levels will ensure that the effort you’ve taken to
correctly position the speakers themselves will pay off when you finally
sit down to enjoy them.
SPL Measurements
Radio Shack
Digital SPL
Meter
To accurately calibrate levels, you’ll need an SPL meter. Radio Shack sells
a digital meter that works very well for this purpose (P/N 33-2055) and it’s about $50.
Set the meter on ‘slow’ and “C” weighting. The dial should be set at either 70dB or 80dB
depending on your preamplifier/processor or receiver’s test tone reference output level.
Consult your owner’s manual to determine what reference point your unit uses (most
use 75dB, so the 70dB setting on the meter would be appropriate in that example). Each
range setting on that particular meter will cover 20dB (10dB above and 10dB below).
So a setting of 70dB would cover between 60dB-80dB range. If you are using another
meter, consult the owner’s manual for proper operation.
Configuration and Reference Settings
1) Begin by reviewing the calibration menu settings of your receiver or preamplifier/
processor. In the speaker configuration menu (as a part of the set-up on your HT
processor), be sure all your speakers are set to “SMALL” with subwoofer to “YES”.
(Please note that many processors require a “SMALL” setting for the main speakers
to allow the LFE subwoofer output function, otherwise bass is directed to the front
channels with the full energy when the speakers are set to “LARGE”. Therefore,
the “SMALL” setting is a good thing, because it ensures low bass is kept out of
the monitors, allowing the entire system to be played louder without strain on the
monitors. It also helps the subwoofer and monitor to blend better, because too much
overlap can actually lead to less bass or ill-defined bass.)
2) From the processor’s speaker calibration menu, set the subwoofer output level to 0
dB. (Start with the gain on the subwoofer at about 1/4 of maximum and make sure
Page 15
the power switch is in the “ON” position. If equipped, the signal sensing Auto ON
circuit will switch on the subwoofer amplifier automatically.)
Setting Reference Levels of Full Range Speakers
3) Set the volume control on your receiver to the “00dB” level. If your unit uses a
positive number scale for volume instead of a minus-to-plus scale, just watch the
meter until it reaches 75dB or 85dB (depending on the recommended reference level
of 70dB or 80dB in the receiver or preamplifier/processor’s owner’s manual).
4) Begin by setting the levels of the main, center, and surround speakers one at a
time. While pointing the meter toward the speaker active with the test tone, set each
channel to the same reference level while the SPL meter remains in the listening
position. Your goal is to establish an even output level of each speaker to that spot.
Setting Subwoofer Gain
5) Once finished with the other speakers in the system, direct the test tone to the
subwoofer. Adjust its level using the gain control (labeled “VOLUME”) on the
subwoofer until it reaches the SPL level achieved by the other speakers. An assistant
will be very helpful for this process because the meter location and subwoofer level
adjustment location will be different. Some like to run their sub “hot” for movies by
increasing the sub level by 5dB or so above the main channel level. This can be very
effective at lower listening levels, but be sure to use care when watching that big
action movie for the first time - especially at or near reference levels.
6) Once the subwoofer is calibrated, small adjustments can be made easily using the
subwoofer level control in your processor or receiver. If you find the need to go
much above +2 or +3 consistently, we recommend adjusting the gain control on
the subwoofer upward instead and using a lower number for reference level on the
processor.
Subwoofer Crossover and Phase Adjustments
After setting up the system reference levels on each channel, including the subwoofer,
it’s time to set the crossover (where applicable) and the phase switch (where
necessary). This activity will round out the effectiveness of the subwoofer as an
Page 16
extension of the main speakers, rather than a box in the room making noise!
Setting Subwoofer Crossover
This adjustment is between 40Hz-150Hz. If your preamplifier/processor has a dedicated
“LFE” or “SUB” output, then you should be using the input jack labeled “SUBWOOFER
INPUT”. This input bypasses the crossover because the filtering function is handled
upstream in the Dolby Digital/DTS processor. When your processor is not on a Dolby or
DTS source format, it will make the necessary filtering for the LFE output so this input
configuration will yield the best result for that equipment. If you have a home theater
system, this is more than likely the input you should use.
If you do not have a dedicated output for the subwoofer, you should be using the left
and right “LINE INPUT” jacks. In this situation it is recommended to use the adjustable
crossover in the subwoofer. Begin at the highest setting and slowly dial it down until it
seems as if the bass is anchored in the front speakers rather than just the subwoofer.
We strongly recommend settings above 80Hz because this will allow a nice blend with
the other ELT525 speakers without making them work too hard with reproducing the
bulk of the low frequencies. Note that the front speakers are “protected” only if the
pre/pro is switched to SMALL. If you are a traditional 2 channel enthusiast or are using
components free of a dedicated LFE output, this method is then the correct choice.
The easiest way to test different methods and frequencies for crossing over your
subwoofer is by using bass sweeps from the AVIA Guide To Home Theater DVD.
Specifically, the tones that descend in frequency from the individual satellite speakers
to the subwoofer are quite useful and effective. Using your SPL meter, watch for the
smallest amount of overall needle fluctuation while you direct and descend the tones
from the main speakers to the subwoofer going around your system. If you are not sure
about how to do this or where to locate the AVIA disc, please call AV123 at (877) 5437500 for assistance or email us at [email protected].
Setting Subwoofer Phase
The Phase Switch controls the relative phase of the subwoofer to best reinforce the other
loudspeakers in your system. Adjustments to this control will change the subwoofer’s
interaction with the rest of your speaker system, providing the least cancellation, and
thus the best response in any room. With SPL meter in hand (or, better yet, on a tripod
in the listening position), play an 80Hz tone (for this exercise the crossover point must
be set to 80Hz if you are not using the LFE Subwoofer Input) and switch the Phase
Switch from “0” to “180°.” Watching your SPL meter, select the setting that results in
the biggest peaks in sound pressure levels (i.e. reads highest on the meter).
To verify your measurements, go back to the listening position and listen for yourself
using music you know. If the bass from the subwoofer seems to be coming from the
front speakers rather than noticeably separated from them and reduced in output level,
you have got it right. The optimum setting indicates the least amount of bass wave
Page 17
cancellation, and should be left alone until the subwoofer or other speakers in your room
are moved, or placement is altered in any way. With typical front corner placement in
most rooms you may very well find that the “0°” setting is best.
Caring for your ELT525 speakers
Your AV123 ELT525 speakers do not need much exterior maintenance other than an
occasional dusting. Please use care with the wood veneer finish and treat them as you
would a fine furniture finish. We recommend the 3M Yellow Detail Cloth (part # 39016)
for dust on the wood veneer surfaces as it does not scratch the finish.
Technical Specifications
ELT525 Monitor
System Description:
2 Way
Woofer:
5.25” treated paper cone
Tweeter:
1” fabric dome with oversized surround
Enclosure Type:
Vented, Rear Firing
Frequency Response (+/-3dB):
60Hz- 20KHz
Nominal Impedance:
8 Ohms
Sensitivity:
83dB @ 1w/1m
Crossover:
2200Hz, 2nd Order Acoustic
Raw Weight:
24 lbs pair / 10.8 kg pair
Shipping Weight: 26 lbs pair / 11.8 kg pair
Dimensions:
6.12” W x 11.25” H x 9.81” D / 155mm W x 287mm H x 250mm D
Mounting:
1/4”-20 threaded insert built into the back and bottom. For wall mounting, we recommend Peerless item# PM732
Video Shielded:
Yes
Page 18
Technical Specifications
ELT525 Tower
System Description:
2 Way
Woofer:
2x 5.25” treated paper cone
Tweeter:
1” fabric dome with oversized surround
Enclosure Type:
Vented, Front Firing
Frequency Response (+/-3dB):
48Hz- 20KHz
Nominal Impedance:
8 Ohms
Sensitivity:
87dB @ 1w/1m
Crossover:
2000Hz, 2nd Order Acoustic
Raw Weight:
62lbs pair / 14kg pair
Shipping Weight: 75lbs pair / 34kg pair
Dimensions:
6.2” W x 37.9” H x 9.9” D / 156mm W x 962mm H x 250mm D
Video Shielded:
Yes
2 Way
ELT525 Center
System Description:
Woofer:
2x 5.25” treated paper cone
Tweeter:
1” fabric dome with oversized surround
Enclosure Type:
Vented, Rear Firing
Frequency Response (+/-3dB):
74Hz- 20KHz
Nominal Impedance:
8 Ohms
Sensitivity:
86dB @ 1w/1m
Crossover:
2400Hz, 2nd Order Acoustic
Raw Weight:
16lbs each / 7kg each
Shipping Weight: 20lbs each / 9.1kg each
Dimensions:
17.7” W x 6.2” H x 9.9” D / 449.5mm W x 156mm H x 250mm D
Mounting:
1/4”-20 threaded insert built into the back. For wall mounting, we recommend Peerless item# PM732
Video Shielded:
Yes
Page 19
Limited Warranty and Return Policies
The AV123 ELT525 speakers have been created to perform flawlessly for many years
with regular use. As a result of this quality and craftsmanship, AV123 is proud to offer
the following warranty policies to our customers:
• All products manufactured by AV123 carry a limited manufacturer’s parts and labor
warranty. This is for the peace of mind that, no matter what your purchase, there is a
warranty on which you can depend.
• All AV123 ELT525 loudspeakers are guaranteed to be free from manufacturer’s defects
for a period of one year from the date of purchase (see below to get three years!).
This warranty applies to the original purchaser of the AV123 ELT525 product(s) and is
nontransferable.
• The AV123 ELT525 warranty does not cover damage by misuse, abuse, neglect,
unauthorized product modification, failure to follow the instructions outlined in this
owner’s manual, failure to perform routine maintenance, damage resulting from
unauthorized repairs, or claims based upon misrepresentations of the warranty by the
seller.
• If you visit av123.com and register your AV123 ELT525 speaker purchase, AV123
will extend the warranty by an additional two years. This, in addition to the 1
year limited warranty is a total of 3 years! This extended warranty is free simply for
registering within 60 days of your purchase. We urge you to take advantage of this
offer. Simply look under the ‘Support’ link on our home page.
Service Assistance for AV123 ELT525 speakers and subwoofers
AV123 will exchange all defective merchandise, including shipping charges to the original
shipment destination, at no charge for up to 60 days after the date of purchase. After
60 days the product must be returned to AV123 for repair only and the return shipping
cost is the responsibility of the customer. Please note that BEFORE sending your AV123
ELT525 speakers in for repair or replacement, you MUST call AV123 and obtain a return
authorization (R/A) number. Before contacting AV123 to begin the R/A process, please
have as detailed a description of the problem(s) you are experiencing and the conditions
under which the problem(s) occur. Once you have obtained the R/A number, you must
print this clearly on the outside of the box so it will be possible to determine from whom
the AV123 speaker(s) came once the parcel arrives. Parcels arriving without an R/A
number will be refused and returned freight collect.
Contact Information
Toll Free - Website -
Page 20
(877) 543-7500
www.av123.com
Add photo “ELT Group 2949“ or “ELT525 Tower 2977“
here.
Page 21
Distributed Exclusively by:
AV123
Longmont, CO 80501
Toll Free - (877) 543-7500
Website -
www.av123.com
Rev 1.3 4/2008