1
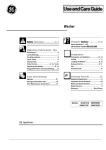
Instruction Manual
IC,,,,,,,,R
AF
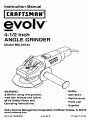
4-1/2 inch
ANGLE GRINDER
Model 900.24543
WARNING:
• Safety
A Before using this product,
read this manual and follow
• Operation
• Maintenance
all its Safety Rules and
Operating Instructions.
• Parts List
. Espa_ol
Sears Brands Management Corporation, Hoffman Estates, IL 60179
www.craftsman,com
Form No. 90565294
June 2010
Printed in China
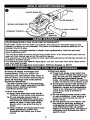
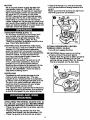
4)
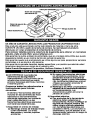
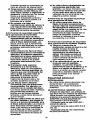
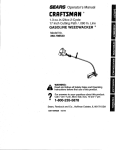
Lock-OnSutton(2]
Sw_ch(1)
SpindleLock B_Jtton
Handle (5)
Accesso_Whee_(41
.Whee!
Guard (6)
CRAFTSMAN
EVOLV
ONE YEAR
LIMITED
WARRANTY
FOR ONE YEAR from the date of purchase, this product is warranted against any
de!ects in material or workmanship. With proof of purchase, defective product will be
replaced lree ol charge.
For warranty coverage details to obtain free replacement, visit the web site:
www.craftsman_com
Th_s warranty does not cover the grinding wheel, which is an expendable part that can
wear out from norrnaf use within the warranty period.
This warranty is void il this product is ever used while providing commercial services or
if rented to another person.
This warranty gives you specific legat rights, and you may also have o_er rights which
vary from state to state,
Sears Brands Management Corporation, Hoffmen Estates, IL 60179
2) Electrical
a) Power
outlet,
& Read all safety wamlngs and
!nstruct!ons. Failure to follow the
warnings and instructions may result in
electric shock, fire and/or serious injury.
Save all warnings and Instructions
for future reference.
The term "power tooi" in the warnings
refers to your mains-operated (corded)
power tool or battery-operated
(cordless) power tool.
safety
too! plugs must match the
Never modify the plug in any
way. Do not use any adapter plugs
with earthed (grounded) power
tools. Unmodified ptugs and matching
outlets wil! reduce risk of electric shock
b) Avoid body contact with earthed or
grounded
surfaces such as pipes,
radiators,
ranges and refrigerators.
There is an increased risk o! electric
shock if your body is earned or
grounded.
c) Do not expose power tools to rain
!) Work area safety
a) Keep work area clean and wel! lit.
Cluttered or dark areas inviteaccidents.
b) Do not operate power tools in
or wet oondltion_ Water entering a
power _ool will increase the risk of
electric shock.
d) Do not abuse the cord. Never use
explosive atmospheres,
such as in
the presence of flammable
liquids,
gases or dust. Power tools create
sparks which may ignite the dust or
fumes
c) Keep children and bystanders away
while operating a power tooL
D_strac_onscan cause you _olose
control.
the cord for can'ying, pulltngor
unplugging
the power tool, Keep
cord away from heat, oil, sharp
edges or moving parts,
entangled cords increase
ekgcfric shock.
2
Oamags:_ or
the risk of
will do the job better and safer at the
rate for which it was designed,
b) Do not use the power tool if the
switch does not turn it on and off.
Any power too! that cannot be
controlled with the switch is
dangerous and must be repaired.
c) Disconnect
the plug from the
power source and/or the battery
pack from the power tool before
making any adjustments,
changing
accessories,
or stodng power
tools. Such preventive safety
measures reduce the risk of starting
#_e power tool accidentaf_
d) Store Idle power tools out of the
reach of children and do not allow
parsons
unfamiliar with the power
too! or these instructions
to
operate the power tooL Power _/s
are dangerous in the hands of
suitable for outdoor use, Use of a
oord suitable for ou_oor
the risk of_
sho_.
use
f) If operating a power too! in a damp
locatlm
is unavoidable,
use a
lGround fault circuit Interrupter
FC!) protected supply, Use of a
GFCt reduces the risk of e_
_,
3) Personal ssfery
a) Stay alert, watch what you are
doing and use common sense
when operating a power tool, Do
not use a power tool while you are
tired or under the influence of
drugs, alcohol or medication.
A
n'_ment of inattention while operating
power tools may result in serious
personal
injury.
b) Use personal protective equipment,
Always wear eye protection.
Protective equipment such as dust
mask, non-skid safety _,
hard
hat, or heanng protection used for
appropriate conditions will reduce
person#
injuries.
c) Prevent unintentional
starting.
Ensure the switch is in the offposition before connecting
to
power source and/or battery pack,
picking up or carrying the too!,
e) Maintain power tools. Check for
other condition that may affect the
wer tool's operation.
If damaged,
ve the power tool repaired
before
Use. Many _
are caused by
poorly maintained power tools.
Keep tools sharp and clean.
Properly maintained
tools with sharp
edges are tess likely to bind and are
easier _ oon_o!.
g) Use
tools that have the swish on invites
accidents.
the power tool, accessories
and tool bits etc,, in accordance
with these instructions,
taking into
account the working conditions
and the work to be performed.
Usa
of the power tool for operations
different from _ose intended could
result in a hazardous situation.
d) Remove any adjusting key or
wrench before turning the power
tool on. A wrench or a key left
attached to a K_ating part of the power
too! may result in persona! inju_
e) Do not overreach,
Keep proper
footing and balance at al! times.
This enables better control of the
power tool in unexpected situations.
f) Dress properly. Do not wear loose
clothing or jewellery, Keep your
hair, clothing and gloves away from
moving parts. Loose c_!othes,
S) Service
a) Have your power tool serviced by a
qualified repair person using only
Identica! replacement
parts, This wN
ensure that the safety of _e power
_o! is maintained.
jewetle_ or longhair can be caughtin
movingparts.
SAFETY INSTRUCTIONS
ALL OPERATIONS
g) If devices are provided for the
connection
of dust extraction and
collection facilities, ensure these
are connected
and properly used,
Use of dust collection can reduce
dust-related hazards.
FOR
Safety Warnings
Common for Grinding,
Sanding,
Wire Brushing
a) This power tool is intended to
function as a grinder, wire brush,
sander. Read al! safety warnings,
instructions,
illustrations
and
specifications
provided with this
power tool. Failure to fogow all
ran'
struclior_ listed below may result in
etectdc shock, fire and/or serious
injury. Operations such as poliehing
4) Power tool use and care
a) Do not force the power too!. Use
the correct power too! for your
application. The correct power _ol
3
or cuttlng-off am not recommended
tO be performed with this power
tooL Opeh'ationsfor which the power
b)
c)
d)
e)
f)
filtrating particles generated by your
operation. Prolonged exposure to
high intensity noise may cause
hearing loss.
h) Keep bystanders a safe distance
away from work area, Anyone
entering the work area must wear
_rarSOnal protective equipment,
grnents of workplace or of a
broken accessory may fly away and
cause injury beyond immediate area
of operation.
i) Ho!d power tool by insulated
gripping surfaces only, when
performing an operation where the
accessory may contact hidden
wiring or Its own cord, Accessory
contacting a "live" wire may make
exposed metal pads o! the power
toot "live" and shock the operator.
j) Position the cord clear of the
spinning accessory. If you ;ose
control, the cord may be cut or
snagged and your hand or arm may
be pulled into the spinning accessory.
k) Never lay the power tool down
until the accessory has come to a
complete stop. The spinning
accesson/may
grab the sudace and
pull the power tool out o4 your control.
I) Do not nJn the power tool while
carrying it at your side, ,Accidental
contactwil_the spinning accessory
could snag your oiolhing, pulling the
accesso_ into your boo_,
m)Regularly clean the power too!'s
alr vents. The motor's lan will draw
the dust inside the housing and
excessive accumulation olpowdered
metal may cause electrical hazards.
n) Do not operate the power tool near
flammable materials. Sparks could
ignite these materials.
o) Do not use accessories
that
require liquid coolants. Using water
or other liquid coolants may result in
electrocution or shock,
p) Do not use Type 11 (flaring cup)
wheels on this tooL Usr_ _te
accessories can result in injury.
q) Always use side handle. Tighten
the handle securely= The side
handle should always be used to
maintain control of 1he too_ at all times.
R) Use clamps or another practical
way to secure and support the
work piece to a stable platform.
Holding the work by hand or against
OaUr
body leaves it unstable and may
d to loss of control.
toot was not designed may create a
hazard and cause persona0 injury.
Do not use accessories
which are
not specifically
designed and
recommended
by the tool
manufacturer.
Just because the
accessory can be attached to your
power tool, it does not assure sale
operation.
The rated speed of the accessory
must be at least equal to the
m_ximum
speed marked on the
wer too!. Accessories running
letthan their rated speed can
break and fly apart.
The outside diameter and the
thickness
of your accessory
must
be within the capacity rating of
your power tool. Incorrectly sized
accessories cannot be adequately
guarded or controlled.
The arbor size of wheels, flanges,
backing pads or any other
accessory
must properly fit the
spindle of the power tool.
Accessories with arbor holes that do
not match the mounting hardware o!
the power toot will run out of balance.
vibrate excessively and may cause
loss of control.
Do not use a damaged accessory.
Before each use inspect the
accessory
such as abrasive wheel
for chips and cracks, backing pad
for cracks, tear or excess wear,
wire brush for loose or cracked
wires. If power too! or accessory
is dropped,
inspect for damage or
instal! an undamaged
accessory.
After inspecting
and installing an
accessory,
position yourself and
bystanders away from the plane of
the rotating accessory and run the
power too! at maximum no-load
speed for one minute. Damaged
accessories will normally break apart
dudng this test time.
g) Wear personal protective
equipment.
Depending
on
application,
use face shield, safety
goggles or safety glasses. As
appropriate,
wear dust mask,
hearing protectors, gloves and
work shop apron capable of
stopping
small abrasive
or
workplace
fragments.
The eye
protection must be capable o!
stopping flying debris generated by
vanous operations. The dust mask or
respirator must be capable o!
4
Further safety instructions for all
Safety Warnings
Specific for Grinding
Operations
a) Use only wheel types that are
recommended
for your power too!
and the specific
guard designed
for the selected wheel. Wheels for
which the power too_ was not
designed cannot be adequately
guarded and are unsate.
b) The guard must be securely
attached to the power tool and
positioned
for maximum
safety, so
the least amount
of wheel is
exposed towards the operator. The
guard helps to protect operator from
broken wheel fragments
and
a_cidentat contact wilfl wheel.
operations
Kickback and Related Warnings
Kickback is a sudden reaction to a
_inched or snagged rotating wheel,
acking pad, brush or any other
accessory. Pinching or snagging
causes rapid s_lling of the rotating
accessory which in turn causes the
uncontrolled power tool to be forced
in the direction opposite of the
acce_'s
rotation at the point ol the
binding,
For example, i! an abrasive wheel is
snagged or pin_
by the wod<piece.
the edge of the wheel that is entering
into the pinch point can dig into the
surface of the material causing the
wheel to climb out or kick out. The
wheeAmay either jump toward or
away from the operator, depending
on direction of the wheel's movement
at the point of pinchmgo Abrasive
wheels may also break under these
conditions.
Kickback is the resu|t of tool misuse
andtor incorrect operating procedures
or conditions and can be avoided by
taking proper precautions as given
below:
a) Malntain a firm grip on the power
c) Wheels must be used only for
recommended
applications.
For
example:
do not grind with the side
of wheel Abrasive wheels are
inter_ed for peripheral grinding, side
forces applied to these wheels may
cause them to shatter.
d) Always use undamaged
wheel
flanges that are of correct
size and
shape for your selected
wheel.
Proper wheel flanges support the
wheel thus reducing the possibility
ot
wheel breakage. Flanges for cut-off
wheels may be different from grinding
wheel flanges,
e) Do not use worn down wheels from
too! and position your body and
arm to allow you to resist kickback
b)
c)
d)
e)
larger power tools. Wheel intended
for larger power tool is not suitable for
the higher speed of a smaller tool and
may burst.
Safety Warnings Specific for Sanding
Operatlons
a) DO not use excessively oversized
sanding disc paper. Follow
manufacturers
recommendations,
when selecting sanding paper.
Larger sanding paper extending
beyond the sanding pad presents a
laceration hazard and may cause
snagging, tearing ol the disc or kickback.
Safety Warnings Specific for Wire
Brushing Operations
forces. Always use auxiliary
handle, If provided, for maximum
control Over kickback or torque
reaction during start up. The
operator can control torque reaction
or kickback forces, if proper
precautions are taken.
Never place your hand near the
rotating accessory. Accessory may
kickback over your hand.
Do not position your body in the
area where power tool will move if
kickback occurs. Kickback will
propel the toot in direction opposite to
the whee!'s movement at the point of
snagging.
Use special care when working
corners, sharp edges etc. Avoid
bouncing and snagging the
accessory. Corners, sharp edges or
bouncing have a tendency to snag
the rolatl"ngaccessory and cause/oss
ot control or kickback.
Do not attach a saw chain
woodcarving blade or toothed saw
blade. Such blades oreate frequent
a) Be aware thal wire bristles are
thrown by the brush even during
ordinary operation.
Do not
overstress
the wires by applying
excessive
load to the brush. The
wire bristles can easily penetrate light
dolhing andlor skin.
b) !f the use Of a guard Is recommended
for wire brushlng,
do not allow any
Interference
of the wlre wheel or
brush with the guard. Wire wheel or
txush may expand in diameter due to
work and centrifugal forces.
kickback and loss of control,
5
ADDITIONAL SAFETY
INFORMATION
•
_1,WARNING:
Always use eye
protection.
A# users and bystanders
must wear eye pro_ecfion that conforms
to ANSI Z87. !.
-& WARNING;
When not in use, place
grinder on a stable surface where it
Do not use Type t fiat abrasive
diamond wheels without proper guard.
(Guard not included with unit.)
& WARNfNG: ALWAYS use safety glasses.
Everyday eyeglassas are NOT safety
glasses. A/so use face or dust mask if
will not move inadvertently, roll or
cause a tripping or falling hazard.
A CAUTION: To reduce the risk of
personal injury, use extra care when
working into a comer or edge because a
sudden, sharp movement of the _
may
be experlertced when the wheel or other
accessory contacts a secondary surface
F REo O, ALWA
SAFETY EQUIPMENT."
• ANS! Z87.1 eye protection (CANtCSA
Z94.3},
• ANSI $12.6 ($3.19) hearing protection,
• NIOS!-!_SHAJMSHA respiratory
protection.
WARNING: Some dust created by
power sanding, sawing, grinding,
drilling, and other construction
activities co.ins
chemicals known to
the State of California
to cause
ora surfaceedge.
, The label on your tool may include the
following symbols.
V .............. votts
A .............. amperes
cancer,
birth defects or other reproductive
harm. Some examples of these
W ............ watts
min .......... minutes
chemicals are:
• lead from/eaoLbased
paints,
• crystalline silica from bricks and cement
and other masonry product;s, and
• arsenic and chromium from
chemical/y-treated
lumber.
Your risk from these exposures varies,
depending on how o#en you do this type
of work. To reduce your e;q_osure to these
chemicals: work in a we# venti/a_ad area,
and work with _
safety
such as #'_ose dust masks that am specially
d_
to filter out rni_
parScles.
. Avoid prolonged
contact with dust
from power sanding, sawing,
grinding, drilling, and other
construction
activities,
Wear
protective clothing and wash exposed
areas with soap and water. Allowing
dust to get into you[ mouth, eyes, or lay
on the skin may promote absorption of
"_ ............ alternating current
----- ........ direct current
no ............ no load speed
m ............ Class II Construction
...!rain ...... revolutions or reciprocation
per minute
............ earthing terminal
_i,............ safety alert symbOl
EXTENSION CORDS
Wher_ using an extensiort co_l, be sure to
use one heavy enough to carry the current
your product wiJ,
J,draw. An undersized cord
wilt cause a drop in _ine voltage resulting
in Joss of power and overheating. The
following table shows the correct size to
use depending on cord length and
nameplate ampere rating. If in doubt, use
the next heavier gage. The smaller the
gauge number, the heavier the cord.
-& WARNING: Use of this tool can
generate and/or disperse dust, which
may cause serious and permanent
respiratory or other injury. Always use
NIOSH/OSHA approved respiratory
protection appropriate for the dust
exposure. L_'racfparticles away from face
antibody
A WARNING: Always wear proper
personal
conforms
_
120V
0-25
Lexj_¢Co_ bF_
_
51-100
i01-150
pTa_) F_is3_ (l_Am) m4_Tm)
240V
060
_s2nl
_Ralng
hearing protection
that
to ANSI $12.6 (S3.19) during
FRxe Not
TrlanM_le
Than
0
-6
18
use. Under some conditions and duration
of use, noise from this product may
contribute to hearing loss.
6
10
12
6
-10
-12
-16
18
16
14
51-100
!01-;300
(__)mA_grn)_Am
3)1-3:10
e canw, eGauge
16
16
16
12
16
14
14
12
14
12
N01Re0olvllendsd
MOTOR
Place the flange (1t) over the spindle
with the protrusions facing towards the
Uakard,
e sure that the screws are tight and
that the guard can be rotated,
Be sure your power supply agrees with
nameplate marking. 120 Volts AC only
means your too( will operate on stamdard
60 Hz household power, Do nol operate
AC tools on DC.A rating of !20 volts
AC/DC means lhatyour tool will operate
on standard 60 Hz AC or DC power. This
information is printed on thenameplate.
Lower voltage will cause _oss of power and
can result
in over-he_ng. AI Cra_
Evdv
tools are !actory-tested; i! this too&does not
operate, chock the power supply.
AUXIliARY HANDLE (FIG. 1)
An auxiliary handle (5) is furnished with
your grinder and can be screwed into
TIMES to maintain complete control of the
toot, TIGHTEN SECURELY,
STARTING AND STOPPING THE TOOL
To start the too&,slide the ON/OFF switch
forward (1). For contir.JouS operation.
slide the switch(2) fully !orward and press
front end down. To stop the tool. release the
ON/OFF switch. To stop the tool while
punning in continuous mode, press the
rearward part ol the switch.
NOTE: Do nol switch the tool on or off
while under load conditions, Allow the
grinder to runup to fu&¢
speed before
touching the surface to be ground. Lift the
tool !tom,he sudace before turrfing the
tool off. _CALmON:
Allow the tool to
stop be!ore setting down,
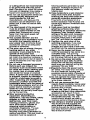
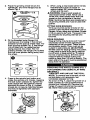
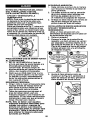
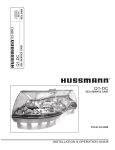
FITTING DEPRESSED CENTER
WHEELS (RGS. 3,4,5,6)
Turn off and unplug the tool.
A CAUTION: Never use any grinding
wheels without the proper guard.
!. Ensure that 1he guard is tilted property.
Place the irmer flange (12) ort the
spindle (9) as shown (Fig. 3). Ensure
that il is located on the two !lats,
@
OVERLOAD
Overloading wig cause damage to the
motor olyour angle gdnder. This can
happen if your angle grinder is subjected
to heavy use !or prolonged periods of time,
Do not in any circumstances, attempt to
exert too much pressure on your angle
grinder to speed up your woek.
The abrasive discs operate more efficiently
when light pressureis exerted,
thus avoiding
a drop in the speed of your angle grinder.
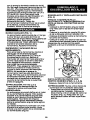
ATTACHING THE WHEEL GUARD (FIG. 2)
Turn off and unplug the tool. NEVER GRIND
OR BRUSH WITHOUT GUARD IN PLACE.
, Place the angle grinder on a table, spindle
(9) lacing up.
• Placing the s_ng washer (8) over the
sp_dle and tocate iton the shoulder (i 0).
, Place the guard onto the toot as shown,
7
Place the grinding wheel (4) on the
spindle_9) and inner flange (!2) as
shown rig. 4.
2,
.
,
When using a depressed-center wheel,
hold the tool so that art angle of
approximately 30° exists between the
wheel and the work.
AWARNING:
Check rated speed on
depressed-center wheel Never use a
wheel with rated speed lower than the
speed on the nameplate of the tool.
No_: Sanding flap discs are considered to
be grindingwheels and must be used with
guards.
FITTING WIRE BRUSHES
Wire cup brushes screw din_ollyon the
spindle of the machine without the use of
flanges. When usingwire brushes, thread
firmly on spindle byhand. The guard may
be removed for brushing with fiat wire
b_'ushes.
EDGE GRINDING
Edge grinding may be done with Type 27
depressed center wheels specifically
designed for this purpose. These wheels
are available loca!ly. They must not be
subject to s_depressure, d]_CAUT!ON:
Wheels used for edge grinding may break
i! they bend or twist while being used tot
cut-off wod_ or deep gnnding. To reduce
the risk of serious injury, limit the use o!
these wheels to shallow cutting and
notching (less than 1/2 _ch in depth). The
open side of the guard must be positioned
away from the operator.
Fit the threaded outer flange (! 4)
making sure it is lacing in the correct
direction for De type of wheel fitted. For
thick grinding wheels Fig. 5, the flange
(14) is fitted with the raised portion
lacing towards the wheel For thin
grinding wheels, the flange (!4) is fitted
with the inner portion lacing away from
the wheel.
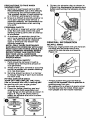
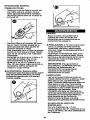
REMOVING THE WHEF-J. GUARD (FIG. 7
FOR SANDING AND USING FLAT WIRE
BRUSHES.)
TURN OFF AND UNPLUG THE TOOL
NOTE: To prevent toss ot conlrot, do not
set tool down until accessorf has
completely stopped turning.
As shown in Fig. 7, place the grinder on a
table, spindle up. Use a screwdriver to
remove the 3 screws (6). Remove the
flange (7), guard (4) and spring washer
(8). Store these parts carelully.
Press in the spindle fock button and
rolate 1he spindle until it locks. Keeping
the k)ck button pressed _, tkjhten the
outer flange with the sparmer wrench
pin,vialed as shown in Fig. 6. Hubbed
wheels do not require mounting flanges
and may be t_ghtenedw_lhstud
wrenches.
8
PRECAUTIONSTO TAKEWHEN
SANDINGPAINT
t. Sandingof lead based paint is NOT
.
RECOMMENDED due to the difficulty
o! controlling the contaminated dust.
The greatest danger of lead poisoning
is to children and pregnant woman,
2. Since it is dif!icutt to identify whether or
not a paint contains lead without a
chemicaJ analysis, we recommend the
following precautions when sanding
any paint:
PERSONAL SAFETY
1. No children or pregnant women should
enter _e work area where the paint
sanding is being done until all cleanup
is completed.
A duslmask or respirator should be
worn byatl persons entering the work
areal The filter shou|d be rel:>Taced
daily or whenever the wearer has
difficulty breathing.
NOTE: ONLY THOSE DUSTMASKS
SUITABLE FOR WORKING WITH LEAD
PAINT DUST AND FUMES SHOULD BE
USED. ORDINARY PAINTING MASKS
DO NOT OFFER THIS PROTECTION.
SEE YOUR LOCAL HARDWARE
DEALER FOR THE NIOSH APPROVED
PROPER MASK,
"r'Kjhtenthe abrasive disc as shown in
Figure 9 by depress_g the spindle !ock
button and fuming the abrasive disc by
hand.
GENERAL
INFORMATION
HELPFUL HINTS
* Hold your angle grinder with one hand on
the body and the other hand firmly
around the side handle as shown in
Figure 10.
@
ENVIRONMENTAL SAFETY
1. Paint should be removed in such a
manner as to minimize Ihe amount ol
dust generated,
2. Areas where paint remova! is occurring
shou_ be sealed with plastic sheeting
of 4 mls thickness.
3, Sanding shoutd be done in a manner
to reduce tracking o! paint dust outside
the work area.
RI-rlNG ABRASIVE DISCS
TURN OFF AND UNPLUG THE TOOL
Use an abrasive disc wilh a backing pad
for sanding with your angle grinder.
1. Remove the guard.
2. Place lhe flange, (backing pad and
abrasive disc sold separately) and
outer flange on the spindle as shown in
Figure 8. Figure 8A shows how to
attach an abrasive disc with a ruiner
backing pad.
• Always positio_ the guard so that as
much ol the exposed disc as possible is
pointing away from you.
• Be prepared for a stream o! sparks when
the disc touches lhe metal, Direct away
from people and fiammable materials.
9
Maintainan angle betweenthe disc and
worksudace (Fig. !! ) Ol approximately
exposed to heat may require more
frequent Iubrication.)This lubrication
shou|d be attempted only by trained power
tool repair specialists such as those at
Sears Service Centers or in other qualilied
service organizatior_s.
30' when grinding and t0°-15 ° when
sanding ( Fig. t2) for best tool control,
material removal, and minimal loading,
A, WARNING: Always wear eye
protection while operating thls power
tool including face end body
protecUon when brushing.
REPLACEMENT
GRINDING
WHEEL
Replace the gdnding wheel with a
Craftsman 4-1/2 inch Type 27, available
at Sears stores and other Craltsrnar_
outlets.
30
®
15
CLEANING
B|owing dust and grit out of the motor
housing using compressed air is a
necessary maintenance procedure.
A CALrlrlON: Dust and grit f_om metal
grinding o!ten accumulate on interior
sudaces and could create an electrical
shock hazard i! not cleaned out,
Use only mild soap and a damp cloth to
clean the tool. Never let any liquid gel
inside the tool; never immerse any part of
the Iool into a liquid.
IMPORTANT: To assure product SAFETY
and RELIABILITY, repairs, maintenance
and adjustment shouid be performed by
Sears Service Centers.
LUBRICATION
Craftsman Evofv tools are propedy
tutxicated at the factory and are ready for
use, Tools shou|d be lutx_cated regularly
every year depending on usage. (Tools
used on heavy duty jobs and tools
10
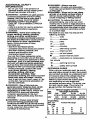
CRAFTSMAN
I
Angle Grinder-
MODEL
NUMBER
900.24543
1
TheModel
ModelNumberwhen
Number wil be
foundon Seers
the NameplAte.AIwsys
the
co_cting
about yourtoot_ mention I
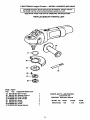
SEE BACK PAGE FOR PARTS ORDERING INSTRUCTIONS
REPLACEMENT
PARTS UST
39-35
_J
ITEM PART
NO.
NO. DESCRIPTION QTY
i6 569176-00 Side Han_tle
35 569197-00 SpannerWnBnch
35 5140005-33 Outer Flange
37 5140005-34 Inner Flange
38 569202-00 Screw
39 569203-00 Flange
40 5140092-62 Guard
47 5140016-99 Sl>dngWasher
I
I
I
1
3
1
1
I
PARTS NOT ILLUSTRATED:
90565294 Instruction
Manuad
11
Model No.
Volts
Amps
RPM
900.24 5430
120
5.5
i0,000
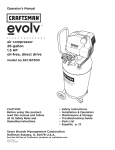
Manual de instrucciones
IRA
MAN°I
iv
TM
Esmeriladora angular de
114 mm (4-_/_pulg
No. modeio 900.24543
A ADVERTENCIA:
• Seguridad
Antes de usar este producto, lea
este manual y siga sus Reglas de
seguridad e Instrucciones de
funcionamiento.
• Operacion
• Mantenimiento
• Lista de piezas
• Espa_ol
Sears Brands Management CorporaUon, Hoffman Estates, IL 60179
www.craftsman,com
13
Mango a_l_
(5)
Disco a_
disco (61
UN A_
DE GARAN'rlA LIM_ADA PAPA LOS PRODUCTOS CRAFTSMAN EVOLV
Este producto est_ garantizado contra todo defecto de materia; o rnano de obra
DURANTE UN AI_O a partir de la techa de cornpr& ,.Rereemplazar/z el producto
delecluoso sin cargo al presentar el comprobante de corlnpra.
Para €onocer detalles sobre la cobertura de la garantia para obtener un reemplazo
gratuitO, v!slte el sltIO Web: www.cmftsman.com
Esta garantia no cubre el disco de esmerilado, que es una I_eza consumible que puede
desgastarse debido a| uso normal dentro del periodo de garantia.
Esta garantia queda nula si el producto se utiliza aJguna vez para proporcionar servicios
comerciakss o si se alquila aotra persona.
Esta garantia ksconcede d_echos legakss especificos yes posible que adem_ usted
tenga otros derechos que varien de un estado a otto.
Sears Brands Management Corporation, Hoffman Estates, IL 60179
b) No opere herramientas
electricas
en atmbsferas
explosivas,
como
amblentes
donde se encuentran
liqu!dos, gases o potvo !nflamables.
Las herramientas el#ctricas originan
chispas que pueden encender el
po/vo o/o6 vapores,
c) Mantenga a los nir3os y espectadores
alejados de la herramienla
el=Jcltrica
en tunclonam!ento.
Las
distracciones pueden provocar la
p6rdida de control.
A ADVERTENCIA: Lea todes las
advertenclas de seguridad •
Instrucc!ones
El incump4imiento de [as
adverlencias e instrucciones puede
provocar descargas electricas, incendios
o lesiones graves.
Conserve todas las advertenclas
Instrucc!ones para futuras
consultas.
•
El termino"herramientaelectric.a"
inc!uidoen las advertencias hace
relerencia a las herramientas
eh;_ctricas
operadas con corriente
((>oncable eli_ctrico)o a las
herramientas electncas operadas
con baterias (ina!&mbricas),
1) Segurided
2) Segurldad eld.t,
ctrica
a) Los enchufes de la herramlenta
el_ctrica deben adaptarse el
tomacorrlente. Nunca mod#lque e!
enchufe de ninguna manera.No
utilice ning_n erichufe adapt,tKIor
con herramlentu
el(_ctrlcas con
COnex!bn a Uerra. Los enchufes no
modilicados y que se adaptan a los
tomacorrientes reducidm el #esgo de
descarga el_ctriceL
en el &tea de trabajo
a) Mantenga
el &rea de trabalo llmpia
y bien |!uminada,/.as
areas
abarroladas y oscuras propician
accidentes.
14
b) Evite e! contacto corpora! con
superficies
pueslas a tlerra, como
por ejemplo tuberias,
radladores,
tangos y refrigeradores.
Ex_ste
mayor desgo de descarga ek_ctrica si
su cuerpo est_l puesto a tierra.
c) NO exponga les _!enlas
el_ldcas
a la lluvla o a corKliciones
de humeded. Si ingresa agua a una
herramienta el_fnca,
aumenta_
el
riesgo de descarga e!_-'b'P_.a.
d) NO maltrate al cable. Nunca utilice
e! cable para transportar,
tlrar o
desenchufar le herramlente _ica.
Mantenga
el cable lejos del calor,
acelte, bordes afllados o plezas
m6vileS. Los cables dafiados o
enredados aumenlan el [iesgo de
descarga eldctrica.
e) AI operar una herramlenta
el_ctrica
en el exterior, utilice un cable
prolongador
adecuado
pera tal uso.
Utilice un cable adecuado para uso
d) Retire las clavljas de ajuste o Ileves
de tuercas antes de encender la
herramlenta
el_ctrica
Una l/ave de
tuercas o una c!avija de ajuste que se
deje conectada a una pieza giratoda
de la herramienta e#Jclrica pueden
provocar lesiortes personales.
e) NO se estire. Conserve
e! equilibrio
adecuado
y mant&ngase
parado
correctamente
en todo momento.
Esto permite un me|or contro! de !a
herramienta e!_ica
en situaciones
f)
Use la veslimenta
adecuada.
No
use ropas holgadas nl joyas.
Mantenga
el cabello, la ropa y los
guantes alejados
de las plezas en
mov!miento.
Las ropas hotgadas, /as
joyas o e! cabel!o largo pueden
quedar atrapados en /as piezas en
movimiento.
g) SI se suminlstran
dispositivos
para
le conexlbn de accesorlos
con
fines de recolecclbn
y extracci6n
de polvo, aseg_rese
de que estdn
conectados
y que se utilicen
correctemente.
El uso de dispositivos
de reco_i_
de poh,o puede reduo'r
en exterioresa finde reducire! riesgo
de descargaetkctrica.
f) Si el uso de una herramlenta
ei_.r;ctrica en un lugar h_medo es
Imposlble
de evitar, uUl!ce un
sumlnlstro
protegido
con un
interruptor
de clrcuito pot falla a
Uerra (GFCl). El uso de un GFCt
!ospe#grosrelacionados
cone!pdvo.
4) Uso y mantenlmlento
herramienta
el_ctrica
reduce
elr esgo
dedescargas
de la
a) No fuerce la herramlenta
el_ctrica.
Utilice la herramienta
el_ctrlca
3) Seguridad
personal
a) Permanezca
alerta, controle loque
est6 hacleftdo
y utilios el sentido
com_n cuando emplee una
herram!enta
el6ctrlca.
No ut#ice una
herramienta e/dctrica si estd cansado
correct==pare el trabajo que resllzam.
La herramienta eldctrica correcta harzt
e! trabajo me|or y rr_s seguro a la
vetocidad para ta que rue diserlada.
b) NO utilice la herramlenta
eldctrica
o bajo el efecto de drogas, alcohol o
medicamenOos. Un momento de
descuido mientras se opera una
sl no puede encenderla o apagarla
con el interruptor. Toda herramienta
e!#ctrica que no puede set conb'olada
mediante e/interruptor es pet_grosa y
debe set reparada.
c) Desconecte e! enchufe de la fuente
de energia y/o e! paquete de
baterias de la herramlenta ektctrlca
antes de realizar ajustes, cambJar
accesor!os o almacenar
herramlentas el_ctricas. Es_as
medJdas de seguridad preventivas
reducen e! riesgo de encender /a
herramienta e!#ctrica en forma
accidental.
o71Guarde las herramlentas el_ctrlcas
que no est_n en uso fuera del
alcance de los nlr3os y no permite
que otras personas no
familiarlzadas con ella o con estas
instrucciones operen la
herramlenta. Las herramientas
ei4)ctricas son pe!igrosas en /as
manos de usuarios no entrenados.
herrarnientae/_rica puedeprovocar
lesiones personales graves.
b) Utilice equipos de protecclbn
personal. Slempre utillce protecclbn
para los ojos. En/as condiciones
adecuadas,
e! uso de equipos de
proteccibn, como mascaras para polvo,
celzado de seguridad antidesfizante,
cascos o proteock_n auditiva, reducir_
las lesiones persona!es.
c) Evite el encendido
por accidente.
Aseg_rese
de que el Interruptor
ester en la pos|cldn de apagado
antes de conectar!o
a la fuente de
energia o paquele de baterias, o
antes de !evantar o transportar
la
herramlenta.
Transpotlar herramientas
et#cfficas con el dedo apoyado en el
interruptor o enchufar herramientas
ekJctricas con el inten'uptor en la
posic_'6n de encendido puede propiciar
15
e) Manlenimiento
herramienta eJ6ctrica no garantiza un
funcionamiento seguro.
c) La velocidad nominal del
accesorlo debe ser equivalente a
la velocidad mdxima Indicada en
la herramlenta ek_ctrica, como
de las herramienlas
trabadas,
piezas rotes y toda otra
situacibn que pueda afectar el
funcionamienlo
de las herram|entas
el_ctricas.
Si encuentra
dar3os,
haga reparar le hen'amienta e_ctrlca
antes de utillzarla.
Se/xoducen
muchos accidentes a cause de/as
herramierrlas e!6ctricas que camcen
de un mantenimiento
adecuado.
pueden romperse y desprenderse.
d) E! d!_metro extemo y e! grosor del
accesorio deben ester dentro del
rango de capacidad de la
herramlenta e!6ctrlca. Los
accesonos de tamafio incorrecto no
ni controlarse
q
Mantenga
las herram|erdas
de
corte afllades y l!mp|as, Las
hErram_entas de _
con rnank_i_
adecuado, con los bordes de corfe
a#lados son rnenos propensas a
_'abarse y son mas _ciles de confrolar.
g) Ut|lice la herram|enta el_,ctrica, los
accesorios
y las brocas de la
herramlenta,
etc. de acuerdo con
estas |nstrucciones
y tenlendo en
cuenta las condiciones
de
trabajo y e! trabajo que debe
reallzarse.
El uso de ia hen'amienta
e/dctrica pare operaciones diferentes
de .z_u_flas pare/as que rue diserlada
e) El tamar_o del eje de los discos,
las bridas, las almohadillas
de
respaldo y cualqu|er
otro
accesorlo
debe adaptarse
correctamente
al eje de la
herramtenta
eliictrica.
Los
podnaonginarunasituaa'_ pelJgrosa.
5) Mantenimlento
a) Haga que una persona de
reparac!ones
califlcada
realice el
mantenimlento
de su herramlenta
el6ctrica y utilice plezas de repuesto
id_,nticas so!emerita. Esto garantizara
accesorios con onficios que no
coincidan con el sisterna de m_taje
de la herramienta el6ctrica se
desequilibrarSn, vibrar_m
excesivamente y podr_tn producir la
p6rdida de control de ia herramienta.
f) No utilice un accesor!o dai_ado.
Inspeccione el accesorto antes de
cada uso; por ejemplo, el disco
abrasivo pare verificar que no
tenga astillas ni grietas; la
almohadilla
de respaldo pare ver
s! hay grietas, desprendimierdos
o
desgaste
excesivo
y e! ceplllo de
alambre
pare vet sl tlene alambres
sue#os o quebrados. Si la herm_ienta
eli_ctr!ca
o e! accesorlo
sufre una
caide, Inspecctone
pare ver si hay
daP, os o instale un accesorto en
ia segurktadde iaherm'nienta
INSTRUCCIONES
DE
SEGURIDAD PARA TODAS LAS
OPERACIONES
Advertencias
de seguridad
comunes
pare todas !as operaciones
de
esmer!lado,
!!jado, cepi!lado con cepil!o
de alambre y pulido, y pare operaclones
de corte y desbaste abrasivo
a) Esta herramlenta
el_,ctrlca est_
dlser'iada pare utlllzarse como
esmerlladora,
lljadora, cepillo de
alambre,
pulidora o desbastadorao
Lea todas las advertenclas
de
seguridad,
instrucciones,
ilustraclones
y especlflcaclones
buen eslado. Despu6s de
inspecdonar
e instalar un
accesorio,
ubiquese y ublque a los
espectadores
lejos del piano del
accesor!o
funcionar
girator!o yhaga
la herramienta a
veloctdad mltxlma sin carga durante
un minuto. Los accesorios
da_ados
genem_nente
se rornpe_n durante
esta prueba.
g) Ut|lice equipos de proteccibn
persona!. Seg_n la aplicacibrk
las instp_ciones enumeradas a
contirtuacibn puede provocar una
descarga e_clrica, un incendio o
lesiones graves.
b) No utilice accesor|os que no est6n
dise_ados y recomendados
especiflcamente
pot e! tabricante
de la herramlenta. El hecho que el
accesotio pueda conectarse a La
protectores
auditivos,
guantes y
de!antal de taller pare protegerse
de los pequet_os fragmentos
abraslvos
y de los fragmentos
de
la pieza de trabajo. La proteccibn
pare los ojos debe ser capaz de
16
delenerlosresiduosvolStikss
que se
ne_anen l'as
difemntesoperaciones.
rr_scarapara polvoo respirad_
debe setcapaz de filtrar
lasparticulas
_aeneradasporelfuncionamientode
herramienla.La exposicibn
l:Xolongada
8.1
ruidointensopuede
provocarp_rdidade laaudicibn.
h) Manlenga a los espectadores
a una
dlstancla segura del 1_Beade
trabajo. Toda persona que Ingrese
al _rea de trabajo debe utlllzar
lrabajo o de un accesono roto
pueden volary p¢ovocar lesiones rn_s
all_ del Nea de operaciones cercana.
i) Cuando reallce una operac!6n en
que e! accesor|o de corte pueda
tocar cables el_ctricos ocuItos o
su proplo cable, sostenga la
herramlenta solamente por las
superficies de agarre alsladas. El
contacto con un cable con "corriente
ei_cVica" har_ que tas parles rnel_licas
expuestas de la herramienta tambi_n
lengan =co_ksnte el_ctrica" y e!
operador sulfa una descarga.
j) Coloque el cable lejos del accesorio
glratorlo. Si pksrdeel control de la
herramienla, el cable puede codarse
o enredarse y jalarks la mano o e|
brazo hacia e_accesorio giratorio.
k) Nunca apoye la herramienta hasta
que el accesorlo se haya detenldo
completamente. E_accesorio
giralorio puede enganchar la
superficksy producir la p_rdida de
control de la herramienta.
!) No haga funclonar la herram!enta
elJJctrica mlentras le carga a su
lack). E_ contacto accidental con el
accesodo g,iratodo !_Jede hacer que
Sste se ksenganche en ta Topa y
lance el accesono hacia su cuerpo.
m)Limple frecuenternente los orlfic!os
de ventllaci6n de la herramlenta
el_._ctrlic&El ventilador del motor
atraer8 el po14odentro de la cubksrta,y
la acumulacibn excesiva de po4vo
pu e pindar gos
n) NO use la herramienta el_ctrica
cerca de mater|ales Inflarnables.
Las chispas pueden encender estos
matedales.
o) No utlllce accesorios que
requleran refr|gerantes liquidos. El
uso de agua u otros refr_gerantes
liquidos puede producir una
eksctrocucibn o descarga ek_ctrica.
p) No utlllca dlscos "npo 11 (copas
c6nicas) an esta herramlenta,
Et uso
de accosorios
inco_ectos puede
produck kssiones.
o.) Slempre utlllce el mango lateral.
Ajuste el mango con flrmeza. Se
debe utilizar sksmpre el mango lateral
aamantener el control de la
mienta en Iodo momenlo.
R) Utilice abrazaderas
u otro me_todo
pr_k:tlco para asegurar
y soslener la
pleza de trabajo en una plataforma
estable. Sostener la pieza de trabajo
con la mano o contra su cuerpo
'ovoca inestabilidad y puede Ilevar a
p6rdida del control,
Causas del retroceso y su prevencibn
por parte del operador
EL retroceso es una reaccibn repentina al
petlizco o atascamiento de un disco
giratorio, una almohadilla de respaldo, un
cepilio o oJalquLer olro accesono. El
pellizco o e! atascamiento hacen clue el
accesodo giralorio se trabe r_pidamente,
lo que a su vez I:xrovocaque la
herramie_ta e_ctrica fuera de controt
vaya en sentido opuesto al giro del
accesorio en e_punto del atascamiento.
Pot ejempio, si la pieza de trabajo
atasca o pellizca el disco abrasivo, el
bon:le del disco que ingresa en ePpunto
de plksgue puede clavarse en {a
supedicie de_ material y provocar que el
disco salte o se desengonche. Ei disco
puede sallar hacia et operador o en
sentido contrar|o, seg0n la direocibn det
movimiento de_ disco en el I:xJntode
pellizco. Los discos abrasivos tambiq_n
se pueden €omper en eslas cond_c_ones,
Et mtmceso es el resu_tado de un real
uso de fa herrarnksnta o de condiciones
o pmcedimientos operativos inconrectos
y se puede evitar tomando las
precauciones apropiadas que se
_ndican a continuacibn:
a) Sostenga
la herramlenta
el_,ctrica
con firmeza y ubique el cuerpo y el
brazo para poder reslstir las fuerzas
de retroceso.
Siempre util|ce el
mango lateral, en caso de lenerlo,
para Iograr el m_ximo control sobm
el retroceso
o la reacck_n de torsi6n
durante e! encendido,
EL operador
puede controtar la reaccibn de torsibn
o las fuerzas de retroceso si toma las
precauciones adecuadas.
b) Nunca coloque la mano cerca del
accesorlo glratorlo, ya que _ste puede
hacer un retroceso so_e la mano.
c) No ubk:lue el cuerpo en el &rea
hacia donde la herramienta
el_ctrlca se desplazar_
si se
produce un retroceso.
E_ reVoceso
tmpulsar_ la herramienta en ta
17
direccibn opuesta el movimiento de!
disco en e! punto de alascamiento.
d) Tenga especial cuidedo el trebajar
en esquirms, bordes f!!osos, etc.
e) No utilice discos desgastados
de
herramlentas el<_,clrlcas m_rm
grandes. Los discos dise_ados para
herramientas el_ctricas rr_s grandes
no son adecuados para ta mayor
velocidad de una herramienta ross
pequef'm y podrian estallar.
f_osos y e_rebote tienden a
enganchar el aocesono giratorio y
ptodudr la p_:lida de control o el
retroceso de la unidad.
e) No conecte una hoja pare
carpinteria pera sierra de cadena ni
una hoja de sierra dentada. Estas
hojas puede producir el retroceso y
la I_rdida de control Irecuentes.
Advertencias de seguddad especificas
para operaciones de lijado
e) No utillce pepel pare disco de
!ijado de tamer3o exce$ivamente
grende. Sige las recomendaclones
de! febrlcante al seiecclonar el
papel de Ilia. Los papeles de lija rr_s
grandes que sobresalen de ta
alrnohadilla de lijado representan un
peligm de laceracibn y pueden
provocar el retroceso o que el disco
se enganche o se rompa.
Advertencias de seguridad especificas
para operac!ones de esrnerilado
a) Utilice s61o los tipos de disco
recomendadco pare su herremienta
ek_ctrica y el protector espec#!co
pare el disco selecclonado, Los
discos para los que la herramienta
el_ctrica no esl_ dise_ada no pueden
protegerse adecuadamenle y son
Advertencles
especiflcas
de seguridad
pare operaclones
de cepillado
met_llco
a) Tenga en cuenta que se
desprenden
cerdes de eiembre
del
cepillo Incluso durante el
funclonamiento
normal. No
sobrecargue
los elambres
al
eplicar
une carge excestve el
cepillo. Las cerdas de alambre
pueden penetrar f,_cilrnenle
en la
ropa delgada ylo la piel,
b) S! me recomlende
e! uso de un
a) Utllice Ontcemente tipos de disco
recomendlados pare su herremlenta
el_;ctrtca y el protector espec#Ico
di_
para el disco sele(x_,
Los discos no diser_ados para la
herramienta e_ctdca no l_Jeden
protegerse adecuadamente y son
mseguros.
b) El protector debe sujetarse
firmemente a ie herramienta
el_-,ctrlca y estar en una postctbn
que brlnde rn&xima seguridad, de
manere que una minima parle del
disco quede expuesta hacla el
operador. RE]
protector ayuda a
resguardar al operador de los
fragrnentos de discos rotos y del
contacto aocidenta_con e| disco.
c) Los discos deben ut!!Izarse
_nlcamente para las apllcaclones
recomendadas. Por ejemplo: no
esmerile con el costado del disco.
Los discos abras;vos est_m disei_ados
para esmerilado perif_rico yes
posibie que Jas fuerzas lat_aJes
apticadas a estos discos _ovoquen
que se rompan.
d) Siempre utllice brides de disco que
no estJJnder3adas y clue tengen le
forma y el temar_o aproplados para
el disco seleccionado, Las bridas de
disco adecuadas bdndan soporte al
disco y as! reducen ta posibilidad de
que el disco se rompa. I.as bridas
para Ios discos de corte pueden ser
distintas de las bddas de discos de
esmerilado.
protector pars el cepiliedo
met&lico, no permita ntngune
Interferencla entre el protector y el
disco o e! cepll!o de alembre, El
disco o el ospillo de alambre pueden
expandk su di_rnetro debido a la
pieza de Irabajo y las fuerzas
centrifugas.
Seguridad
adicional
Informacibn
• No ulilice discos pianos abrasivos o de
diarnanle tipo I sin la proleccibn
adecuada. (La unidad no incluye el
protector),
_I_ADVERTENCIA: SIEMPRE uUlice
anteojos de seguridad. Los anteojos de
uso dia6o NO son anteojos de segu6dad.
Uti!ice tarnbkJnuna m_scara facial o
antipol_ si la operacibn produce poMl/o.
SIEMPRE UTILtCE EQUtPOS DE
SEGURIDAD CERTIFICAOOS:
* Proteoci6n para Io6 ojos ANSfZS7.1
(CAN/CSA ,_94. 3),
* Proteccidn para !os oidos ANS! $!2.6
(s3. 9),
. ProtecckJn para !as Was respiratorias
N!OSWOSHA/MSHA.
18
A PRECAUCI(_N:
Para reduc!r e! r|esgo
de leslones personales, tenga mucho
cuidado ai trabajar en una esquina o
horde, ya que puede producirse un
rnovimiento repentino y violento de la
hen'amienta st el ck'scou otto accesorio
entra en contacto con una supefficie
secundaria o con e/borde de una
A ADVERTENCIA:
Parte dell polvo que
se produce al ,jar, aserrar, esmerilar,
takzdrar y al realizar otras actlvldsdes
de construccibn
contlene productos
uimicos reconocidos
por el Estado de
alifomia como causanles de cttncer,
defectosde nadmbr_ u om:mproblm'u_
reproductivos.
Algunos ejemplos
estos productos
quimlcos son:
• elp, mode
p ras
de
basedep mo,
La etiqueta de la herramienta puede
incluir los siguientes simbolos:
v,.................. vo/t_s
• el ars_nico y el ctomo de ia rnad_a con
tratamiento quire|co.
E! riesgo derivado de estas exposiciones
varia seg_sn!a frecuencia con !a que se
realice este #po de trabajo. Para redudr ia
,4................ amperk)s
/,_ ................ herfzios
W ................ ratios
min .............. m#xttos
"_
.-.=.= ............ corriente direcla
equipos de segutidad aptobados, corno
/as rmJscaras antipolvo especialmente
disefladas
no ................ velooklad sJncarga
para filtrar parliculas
0 ................ construcck_n de Clase II
..Jmin .......... revoluciones o
rnictosc6p,cas.
- Evlte el contacto prolongado
con el
polvo orlginado
a! !|jar, aserrar,
esmerilar,
taladrar y a! realizar otras
actividades
de construccibn.
Ulllice
reciproca_ones por minuto
_) ................ terminal con conexidn a
tiena
l[_ .............. slmbok9 de aterfa segurktad
indumentarla
protectora
y lave las
_reas expuestas
con agua y jabbn. $i
permite que el polvo entre en su boca y
ojos, o que pennanezca
sobre su pie/,
podria provocar !a absorck_n de
AP Oductos quimicos nocivos.
ADVERTENClA:
E! uso de esta
herram|enta
puede generar polvo y/o
dispersarlo,
Io que puede causar
lesiones resplratorlas
graves y
permanentes
u otras. Para ia exposici6n
at potvo, siem/xe utitice pro_ecci(_n
respiratoria aprobada por N/OSH/OSHA.
Oirija /as particu/as /ejos de la cara y e/
CABLES
_uerpo.
ADVERTENCIA:
siempre utilice
Durante
proteccibn
el uso,
Individual
para los oidos adecuada que cumpla
con la norrna ANSI $12.6 ($3.19). Bajo
ciertas circunstancias y seg(m el periodo
de uso, e! ruido producido pot este
producto puede contribuir a/a p#rdida de
audi_i6n.
A ADVERTENCIA: Siempre uUlice
protecc!_)n para !os ojos. Todos/os
usuarios y/as personas a su a/rededor
deben utilizar profeccidr_para los ojos clue
cumpla con/as norrnas ANS! Z87.1,
ADVERTENCIA: Cuando no la utilice,
coloque la esmer|ladora
sobre una
superflcie
estable donde no pueda
moverse de rnanera accidental,
rodar
ni provocar rlesgos de tropezones
caides,
.............. corriente attema
DE EXTENSION
Cuando use un cable de extension,
aseg0rese de usar uno de un calibre
suficie_ntecomo para cargar con Ia
corriente que requedr_, su producto. Un
cable de menor calibre causar_ una
caida en et voitaje de la linea Io que
resultar_ en p_dida de potencia y
sobrecalentamlento. El siguierde cuadro
muestra el tarnafio correcto a utilizar,
dependiendo de| targo dei cabJe y el
amperaje nominal Si tiene dudas sobre
cual, calibre usar, use un calibre mayor.
Mientras menor el nurnem del calibre,
mayor ta capaddad del cable.
Voltiol
Calibre ndnimo parn iu!Igos de r..ablel
Largo total del cable tn metrOI
130V
340v
0.7,e
0-1_
M_s No _
7,s.tS2
_.30__
t5,2-30,4
30,4:_
30A-4s,7
e03:_,4
_
American Wire Gag,=
de de
0
-6
6 -t0
10 -12
12 -16
18
i6
16
18
16
14
t6
16
12
14
12
14
12
No Recomendado
t4
MOTOR
Aseg_rese de que la luente de energia
corlcuerde con Io marcado en la placa de
identificacibn. CA de 120 voltios solamenle
signitica que su herramlenta funcionar8
o
19
con la energia dom_stica est_mdar de 60
Hz, No haga !undonar herramientas de CA
con CC, Una dasificacibn de CA/CC de
! 20 voll_ossignifica que su herramienta
!uncionar_ con energia est_nclar de CA o
CC de 60 Hz. Esta informadbn est_
im._esa en la placa de identilicacibn. Un
vormje menor producir_, p_dida de
potencia y puade provocar
sobrecatentamiento. Todas las
herramientas Craftsman Evolv se prueban
en la !_d:mca;siesta herramienta no
funciona, revise ta fuante de energia.
MANGO AUXILIAR (FIG. 1)
La esmefiladoraesl_provis_de un mayo
la esmedladora. Este mango DEBE
UT!L!ZARSE EN TODO MOMENTO para
mantene_ el conlrol absolulo de la
herramienta, Aj0steio !irmemente.
ENCENDIDO Y APAGADO DE LA
HERRAMIENTA
Para encendef la herramienta, deslice el
interruplor de encendido/apagado
(ON/OFF) hack] adelante (1). Para un
!uncionamiento continuo, deslice el
interruptor (2) tolalmente hada adelante y
opdma hacia abajo el extremo delantero.
Para apagar la herramienta, suelte el
interruplor de encemdido/apagado
(ON/OFF), Para apagar la herramienla
mientras fundona en modo continuo,
optima la parte posterior del interruptor.
NOTA: No endenda ni apague Is
herramienta mientras est_ sometida a
carga, Permita qua la esmefiladora alcance
la veiocidad m_xima antes de ponerla en
contacto con ta supedicie a esmerilar.
Levanle la herramienta de la superficie
antes de apagada.
ESMERILADO Y CEPILLADO METALICO
(FIG. 2)
APAGUE Y DESENCHUFE LA
HERRAMIENTA. NUNCA ESMERILE NI
CEPILLE SIN EL PROTECTOR EN SU
LUGAR.
• Co_oqua laesmeriladora angular sobre
urta mesa con el eje {9) mirando hacia
arriba.
• Coloqua la arandela de resorte (8) sobre
el eje y ubiquala sobre el reborde (10).
• Cotoque el Woteclor sobre la herramienta
tat como se muestra.
• Cotoqua la txtla (11} sobre el eje con las
_otu berandas mirando hacla el protector.
Aseg0rese de que !os Iomitlos est6n
aiustados y de que el protector se puada
g=rar.
INSTALACI_)N DE DISCOS CON
CENTRO HUNDIDO (FIGS. 3, 4, 5, 6)
Apague y desenchufe la herramienta.
_, PRECAUC!_)N: Permita que la
herramienta se detenga antes de
depositarla sobreuna superfide.
SOBRECARGA
La sobrecarga provocar8 d_os en el motor
de su esmeriladora angular. Esto puede
suceder si su esrneriladora angutar est_
sujeta a uso intensivo durante periodos
protongados, No intente en ninguna
circunstancia aplicar demasiada presi6_
sobre la esmefiladora angular para agi!izar
su trabajo,
Los discos abrasivos fundo_ar_n con m&s
e!icacla si se aplica poca wesibn y esto
evitar_ una disminucibn de la veloddad de
su esrnedladora angular.
2O
,P,PRECAUCION: Nunca utilice discos de
esrnerilado sin el proteclor adecuado.
t. Aseg0rese de que el protectm est6
correctarnente instal,ado. Coloque Ia
brida interna (12) en et e_e (9) como set
muestra (Fig. 3). Aseg_rese de que
esl6ubicadosobm ambas superficies
plarlas.
_:_dsta corno se muestra en la Rg, 6,
iscos con cubo no requieren txidas
de rno_taje y se pueden ajustar con
Ilaves est_ndar.
O
12
.
Coloque el disco de esrnerilado (4} en
el eje (9) y ta brida intema (t2) como
se muestra (Fig. 4).
0
3_
14
trab .
_k ADVERTENCIA: Veritique la velocidad
nominal del disco con centro hundido.
Nunca utilice un disco con una velocidad
nomina! menor que la indicada en ta
p4aca de identificacibn de _aherramienta.
NOra: Los discos de lijado con aletas se
consideran discos de esmerilado y
deben utilizarse con I_otectores.
INSTALAC_N DIECF..RLLOS ME'rAucos
Los cepillos _t_lk_os con forma de copa
se e_oscan _rectamente en el eje de la
herramienta sin el uso de bfidas. AI utilizar
cepillos met_.licos, enrbsquelos
manualmente con lirmeza en el eje. Se
puede retirar e! protector para realizar un
cepillado con cepil_osmet.'_licospianos.
Instale ta bdda extema roscada (!4)
asegur_ndose de que est_ odentado
hacia la direccibn cormcta para el t_po
de disco instalado. Para discos de
esmerilado gruesos (Fig. 5), la brida (t4)
se instaJacon la parte elevada orientada
hacia el disco. Para discos de
esrnedlado deigados, La bdda (14) se
instala con la parte intema odentada en
direccibn opuesta aJdisco.
E
4_
5. AI utUiza.run disco con centro hundido,
sostenga ta herramienta de modo que
haya un _u'_guiode aproximadamente 30
grados entre el disco y la pieza de
--
ESMERILADO DE BORDES
El esmerilado de hordes puede realizarse
utJlizandodiscos con centro hundido tipo
27 especificamente disei_ados para este
fin. Estos discos est_ dispordbles
IocaJrnente. No debe_ someterse a
presibn lateral
A PRECAUCI6N: Los discos que se
utilizan para esmerilade de hordes
pueden quebrarse si se doblan o luercen
mientras se utilizan para trabajo de corte
o esmerilado prolundo. Para reduck e_
riesgo de una lesi_ grave, limite el uso
de estos discos para cortes poco
_ofundos y muescas (menores de 12,7
mm (112 pulgada] de prolundidad). El lado
abierto del protector debe ubicarse lejos
del operador.
-J=
Optima e! bol_x_de b!oqueod_ e_ey
gireel eje hasta que se bloquee.Con el
botbnde t_oqueoo_mido, ajuste ta
bridaextema con la Ilavede tuercas
21
SEGURIDAD
1.
RETIRO DEL PROTECTOR
DEL DISCO
(FIG. 7 PARA UJADO Y USO DE
CEPILLOS
METALICOS
PLANOS.)
APAGUE
Y DESENCHUFE
AMB|ENTAL
polvo generada,
Las 8reas donde se realiza remocibn
de pintura deben estar selladas con
t_minas de pl_tico de 0,t0 mm
(4 mil_simas de pulgada) de espesor.
3. E! lijado se debe reaJizar de manera de
reducir los vestigios de polvo de
pintura tuera del _trea de Irabajo.
2.
LA
NOTA: Papa evitar la p_dida de| control,
no deposite _ahetramienta sobre una
supedicie hasta que el accesorio haya
dejado de girar pot completo,
Como se muestra en la Fig. 7, coloque la
esmedtadora sobre uaa mesa con el eje
hacia arriba. Utilice un destomillador para
relirar los 3 tomiilos (6). Retire la brida (7),
el protector (4) y la arandela de resorte (8).
Guarde eslas piezas con cuidado.
INSTALACI(_N DE DISCOS ABRASIVOS
APAGUE Y DESENCHUFE LA
HERRAMIENTA,
Utilice un disco abrasivo con una
almohadilla de respaldo para el Iijado con
su esmeriladora angular,
!. Retire el protector,
2. Cotoque la brida (ta almohadilla de
respaldo y el disco abrasivo se venden
por separado) y la brida externa en el
e como se muestra en la Figura 8. La
gura 8A muestra la fotma de instalar
el disco abrasivo con una almohadilla
de respaldo de goma,
PRECAUCIONES QUE SE DEBEN TOMAR
AL LIJAR PINTURA
1. NO SE RECOMIENDA el lijado de
pintura con base de piomo debido a la
dificultad para conlrotar el polvo
contaminado. El mayor pehg'ro de
envenenarniento pot p_ornoes para los
n_os y las mujeres embarazadas.
2. Daclo que es di!icil determinar si una
pintura convene plomo o no sin hacer
un an_lisis quimico, recomendamos
lornar las siguientes precauciones a]
lijar cualquier pintura:
SEGURIDAD PERSONAL
I. Ningun ni_,o ni mujer embarazada debe
itx:jresar al _.rea de trabajo donde se
est_ fijando la pifltura basra que se
haya terrninado toda _a |impieza.
2. Todas las personas que ingresen al
_rea de trabajo deben usar una
m&scara anlipolvo o una mascarilla de
respiracibn, El filtro debe reemplazarse
diariamenle o cada vez que el usuado
lenga dificultad para respirar.
NOTA: $61o se deben usar aquellas
mliscaras antipolvo adecuadlas para
.
para obtener la m&scara adlecuada
aprobada par NIOSH,
22
Ajuste el disco abrasivo como se
muestra en la Figura 9, oprimiendo el
bot_xt de btoqueo del eje y girando el
disco abrasivo en forma manual.
INFORMACI6N GENERAL
CONSEJOSUTILES
• Soslengasu esrnedladora angular con
una mano sobre launidady laotra
marK) apoyada nrrr_mente alrededor
del mango lateral como se muestra en
la Figura 10
LIMPIEZA
cornmmido es un procedimientode
manlenimientonecesario
•
•
•
Sk)mpre coloque el protector de modo
que J,amayor cantidad pos_ble de fa
parle expuesta del disco apunte en
direccibr_opuesta a usted
Est_ preparado para un !lujo de cNspas
cuando el disco loque el melal Dirijalo
k)jos de ras personas y los materiates
intlamab|es
Manteno_ un _nguto enlre el disco y la
superfic_e de trabajo (Fig. !1) de
aproximadamente 30 grados al
esmerilary de t0 a 15 _rados al fijar
(Fig ! 2) para lograr mejo¢ control de la
herramie_ta, 6plima remocibn de
mateda| y carga minima
_t, PRECAUCI(_N: A rnenudo se acumulan
polvo y suck)dad de me_al sobre las
supedicies interiores y estos pueden
provocar riesgo de descarga ei_clrica si
no se eliminan
Pare limpiar la herramienla, sblo utilice
jabbn suave y un patio h_medo. Nunca
permita que penetre liquido dentro de la
he_ramk)nta; nunca surnerja r_nguna
p_eza en un liquido
IMPORTANTE: Paragaranlizar la
SEGURIDAD y CONFIABILIDAD del
producto, las reparaciones, e_
ADVERTENCIA:
Siempre ulilice
protecci6n
para los ojos cuando opere
esta herramienta
el6ctrica, incluida
protecc!6n
para la cara y e! cuerpo
cuando ceptlle.
Manlenimiento de Sears
LUBRICACI(_N
Las herramientas Crallsman Evoiv se
lubdcan debidamente eft la f_brica y est_m
lislas
parasu uso. Las he_ramientas
deben lubricameperibdicamenletodoslos
ai_os seg0n su uso. (Las herramientas
utilizadas
en Irabajos pesados y aqu_dlas
expuestas at calor pueden necesitar una
lubdcacibn n_s fmcuerde). Esta
lubricacibn sblo debe ser realizada pot
personas capacitadas especialistas en ia
reparacibn de herramientas ei6ctricas,
corno aqu_llas de los Centros de
Mantenimienlo de Sears o de otras
mganizacionescaJ_
de manle_imiento
@
30 °
REEMPLACE EL DISCO DE
ESMERILADO
Con uno Crallsman de 114 mm
(4-1/2 putgadas) lipo 27, dispoeibk) en las
tiendas de Sears y an otms disldbuidores
de Craltsman
23
Get it fixed, at your home or ours
Your Home
For troubleshooting,product manuals and expert advice:
managemylife
www,matzagemylile.com
For repair in your home
ol all major brand appliances,
lawn and garden equipment, or heating and cooling systems,
no matter who made it, no matter who sold it
For the replacement parts, accessories and
owner s manuals that you need to do-it-yoursell.
For Sears prolessional installation of home appliances
and items like garage door openers and water heaters.
! -800-4-MY-HOME
(1.8oo-4e_.4663)
www.sears.com
Call anytime, (Jay or night
(U.S.A.andCanada)
www+sesrS.ca
Our Home
For repair of carry-in items like vacuums, lawn equipment,
and electronics, call anytime for the location ol the nearest
Sears Parts
Repair Service Center
=r
1-800-488-1222
(u.s.A.)
WWW.SeSr$,COlrll
1-800-469-4663
(Canada)
www.sears.ca
To purchase a protectionagreementon a productservicedby Sears:
1-800-827-6655 (usA)
Para pedir servido de
a dorrtdlio, y para ordenar piezas:
1.888-$U4-1OGAR
1.800-361-6665 (ca-a:la)
Au Canada pourservi_ en fran
1-800-LE-FOYER Mc
(l.eoo.,_3.s_P,
www.sears.ca
www.se_.com
-Sea/rs
Regiete_edTrademark 1_" Trademark of KCD IPoLLC in the Lk_#edStales, or Seers BrandS,LLC in 0(l'mrCO,
unMeS
Mar,"AFlegietradaI TM l_trca de F_brta de KCO IP, LLC err EsladOeUnldos,o Seem B_ands,LLC in olxo=pelses
uc Me4_CLUe
de €ommeeceIV=>1,4mqued,_
de Seer'=Brsn,dn,LLC