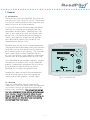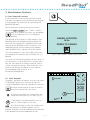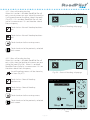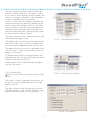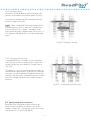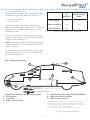
1
Issue 1.7 20/07/2006
OWNER’S MANUAL
RoadPilot Limited
43 Riverside 2
Sir Thomas Longley Road
Rochester, Kent ME2 4DP
Tel - 0870 2401702
Fax - 0870 2401704
Email Sales - [email protected]
Email Info - [email protected]
Email Tech Support - [email protected]
Web - www.roadpilot.com
© 2005 RoadPilot Ltd
RoadPilotTM and RoadPilot ProTM are a registered trade marks of RoadPilot Ltd.
The technical data, information and illustrations contained in this publication were to the best of our knowledge correct at the time of going to
print. We reserve the right to change specifications, equipment, installation and maintenance instructions without notice as part of our policy of
continuous development and improvement.
No part of this publication may be reproduced, stored in a retrieval system or transmitted in any form, electronic or otherwise without prior permission from RoadPilot Ltd.
No liability can be accepted for any inaccuracies or omissions in the publication, although every care has been taken to make it as complete and
accurate as possible.
CONTENTS
1.
General
1.1 Introduction . . . . . . . . . . . . . . . . . . . . . . . . . . . . . . . . . . . . . . . . . . . . . . . . . . . . . . . . . . 5
1.2 Warning . . . . . . . . . . . . . . . . . . . . . . . . . . . . . . . . . . . . . . . . . . . . . . . . . . . . . . . . . . . . . 5
1.3 How it works . . . . . . . . . . . . . . . . . . . . . . . . . . . . . . . . . . . . . . . . . . . . . . . . . . . . . . . . . 6
2.
Operation
2.1 RoadPilot Pro display . . . . . . . . . . . . . . . . . . . . . . . . . . . . . . . . . . . . . . . . . . . . . . . . . . 7
2.1.1 Proximity indicator . . . . . . . . . . . . . . . . . . . . . . . . . . . . . . . . . . . . . . . . . . . . . . . . . . 7
2.1.2 Information display . . . . . . . . . . . . . . . . . . . . . . . . . . . . . . . . . . . . . . . . . . . . . . . . . . 8
2.1.3 Warnings given . . . . . . . . . . . . . . . . . . . . . . . . . . . . . . . . . . . . . . . . . . . . . . . . . . . . . 8
2.1.4 Multifunction display . . . . . . . . . . . . . . . . . . . . . . . . . . . . . . . . . . . . . . . . . . . . . . . . 9
2.2 Satellite status page . . . . . . . . . . . . . . . . . . . . . . . . . . . . . . . . . . . . . . . . . . . . . . . . . 10
2.3 Speedo page . . . . . . . . . . . . . . . . . . . . . . . . . . . . . . . . . . . . . . . . . . . . . . . . . . . . . . . . 11
2.4 Tracking page . . . . . . . . . . . . . . . . . . . . . . . . . . . . . . . . . . . . . . . . . . . . . . . . . . . . . . . 12
2.5 GPS page . . . . . . . . . . . . . . . . . . . . . . . . . . . . . . . . . . . . . . . . . . . . . . . . . . . . . . . . . . . 13
2.6 Camera page . . . . . . . . . . . . . . . . . . . . . . . . . . . . . . . . . . . . . . . . . . . . . . . . . . . . . . . 14
3.
Miscellaneous Features
3.1 User reported locations . . . . . . . . . . . . . . . . . . . . . . . . . . . . . . . . . . . . . . . . . . . . . . 15
3.2 Store waypoint . . . . . . . . . . . . . . . . . . . . . . . . . . . . . . . . . . . . . . . . . . . . . . . . . . . . . . 15
3.3 Delete location . . . . . . . . . . . . . . . . . . . . . . . . . . . . . . . . . . . . . . . . . . . . . . . . . . . . . . 16
3.4 Mileage Summary . . . . . . . . . . . . . . . . . . . . . . . . . . . . . . . . . . . . . . . . . . . . . . . . . . . 16
3.5 Laserpilot . . . . . . . . . . . . . . . . . . . . . . . . . . . . . . . . . . . . . . . . . . . . . . . . . . . . . . . . . . . .17
3.5.1 How it Works . . . . . . . . . . . . . . . . . . . . . . . . . . . . . . . . . . . . . . . . . . . . . . . . . . . . . . 17
3.5.2 Operation . . . . . . . . . . . . . . . . . . . . . . . . . . . . . . . . . . . . . . . . . . . . . . . . . . . . . . . . 17
4.
Calibration & Setup
4.1 General setup . . . . . . . . . . . . . . . . . . . . . . . . . . . . . . . . . . . . . . . . . . . . . . . . . . . . . . . . 18
4.1.1 Volume . . . . . . . . . . . . . . . . . . . . . . . . . . . . . . . . . . . . . . . . . . . . . . . . . . . . . . . . . . 18
4.1.2 Contrast . . . . . . . . . . . . . . . . . . . . . . . . . . . . . . . . . . . . . . . . . . . . . . . . . . . . . . . . . 19
4.1.3 Units . . . . . . . . . . . . . . . . . . . . . . . . . . . . . . . . . . . . . . . . . . . . . . . . . . . . . . . . . . . . 19
4.1.4 Speedo type . . . . . . . . . . . . . . . . . . . . . . . . . . . . . . . . . . . . . . . . . . . . . . . . . . . . . . 20
4.1.5 Set Voice Warning . . . . . . . . . . . . . . . . . . . . . . . . . . . . . . . . . . . . . . . . . . . . . . . . . 20
4.1.6 Set Time . . . . . . . . . . . . . . . . . . . . . . . . . . . . . . . . . . . . . . . . . . . . . . . . . . . . . . . . . 21
4.1.7 Daylight Saving Time . . . . . . . . . . . . . . . . . . . . . . . . . . . . . . . . . . . . . . . . . . . . . . . . 21
4.1.8 Language . . . . . . . . . . . . . . . . . . . . . . . . . . . . . . . . . . . . . . . . . . . . . . . . . . . . . . . . 22
4.1.9 Country . . . . . . . . . . . . . . . . . . . . . . . . . . . . . . . . . . . . . . . . . . . . . . . . . . . . . . . . . 22
4.1.10 Information . . . . . . . . . . . . . . . . . . . . . . . . . . . . . . . . . . . . . . . . . . . . . . . . . . . . . . 23
4.1.11 Mode . . . . . . . . . . . . . . . . . . . . . . . . . . . . . . . . . . . . . . . . . . . . . . . . . . . . . . . . . . . 23
4.2 Warnings . . . . . . . . . . . . . . . . . . . . . . . . . . . . . . . . . . . . . . . . . . . . . . . . . . . . . . . . . . . 24
4.2.1 Range . . . . . . . . . . . . . . . . . . . . . . . . . . . . . . . . . . . . . . . . . . . . . . . . . . . . . . . . . . 24
4.2.2 Warn off heading location . . . . . . . . . . . . . . . . . . . . . . . . . . . . . . . . . . . . . . . . . . . 25
4.2.3 Show off heading location . . . . . . . . . . . . . . . . . . . . . . . . . . . . . . . . . . . . . . . . . . . 25
4.2.4 Auto range . . . . . . . . . . . . . . . . . . . . . . . . . . . . . . . . . . . . . . . . . . . . . . . . . . . . . . 26
4.2.5 Speed sensitive . . . . . . . . . . . . . . . . . . . . . . . . . . . . . . . . . . . . . . . . . . . . . . . . . . . 26
4.2.6 Early warning . . . . . . . . . . . . . . . . . . . . . . . . . . . . . . . . . . . . . . . . . . . . . . . . . . . . 27
4.2.7 Early warning speed sensitive . . . . . . . . . . . . . . . . . . . . . . . . . . . . . . . . . . . . . . . . 27
4.2.8 Show location type . . . . . . . . . . . . . . . . . . . . . . . . . . . . . . . . . . . . . . . . . . . . . . . . 27
4.3 Laser . . . . . . . . . . . . . . . . . . . . . . . . . . . . . . . . . . . . . . . . . . . . . . . . . . . . . . . . . . . . . . 28
4.3.1 Laser Warning Enable . . . . . . . . . . . . . . . . . . . . . . . . . . . . . . . . . . . . . . . . . . . . . . 28
4.3.2 Laser Mute Speed . . . . . . . . . . . . . . . . . . . . . . . . . . . . . . . . . . . . . . . . . . . . . . . . . 28
4.3.3 Laser Stealth Speed . . . . . . . . . . . . . . . . . . . . . . . . . . . . . . . . . . . . . . . . . . . . . . . 28
4.3.4 Laser Warning Time . . . . . . . . . . . . . . . . . . . . . . . . . . . . . . . . . . . . . . . . . . . . . . . 29
4.3.5 Laser Warn When GPS Offline . . . . . . . . . . . . . . . . . . . . . . . . . . . . . . . . . . . . . . . 29
4.4 Mileage Manager . . . . . . . . . . . . . . . . . . . . . . . . . . . . . . . . . . . . . . . . . . . . . . . . . . . 30
4.4.1 Mileage data length . . . . . . . . . . . . . . . . . . . . . . . . . . . . . . . . . . . . . . . . . . . . . . . . .31
-ctd
CONTENTS ctd
4.5 Radar . . . . . . . . . . . . . . . . . . . . . . . . . . . . . . . . . . . . . . . . . . . . . . . . . . . . . . . . . . . . . . 32
4.5.1 Radar enable . . . . . . . . . . . . . . . . . . . . . . . . . . . . . . . . . . . . . . . . . . . . . . . . . . . . . 32
4.5.2 Radar mute speed . . . . . . . . . . . . . . . . . . . . . . . . . . . . . . . . . . . . . . . . . . . . . . . . . 33
4.5.3 Radar stealth speed . . . . . . . . . . . . . . . . . . . . . . . . . . . . . . . . . . . . . . . . . . . . . . . . 33
4.5.4 Warn when GPS offline . . . . . . . . . . . . . . . . . . . . . . . . . . . . . . . . . . . . . . . . . . . . . 34
4.5.5 X Band sensitivity . . . . . . . . . . . . . . . . . . . . . . . . . . . . . . . . . . . . . . . . . . . . . . . . . 34
4.5.6 K Band sensitivity . . . . . . . . . . . . . . . . . . . . . . . . . . . . . . . . . . . . . . . . . . . . . . . . . 34
4.5.7 Ka Band sensitivity . . . . . . . . . . . . . . . . . . . . . . . . . . . . . . . . . . . . . . . . . . . . . . . . . 34
5.
PC Software Operation
5.1
5.2
5.3
5.4
System requirements . . . . . . . . . . . . . . . . . . . . . . . . . . . . . . . . . . . . . . . . . . . . . . . . 35
Installing software . . . . . . . . . . . . . . . . . . . . . . . . . . . . . . . . . . . . . . . . . . . . . . . . . . . 35
Connecting to RoadPilot Database . . . . . . . . . . . . . . . . . . . . . . . . . . . . . . . . . . . . 36
Mileage Manager . . . . . . . . . . . . . . . . . . . . . . . . . . . . . . . . . . . . . . . . . . . . . . . . . . . . 36
5.4.1 User interface . . . . . . . . . . . . . . . . . . . . . . . . . . . . . . . . . . . . . . . . . . . . . . . . . . . . 36
5.4.2 Using the filter . . . . . . . . . . . . . . . . . . . . . . . . . . . . . . . . . . . . . . . . . . . . . . . . . . . . 37
5.4.3 Totals . . . . . . . . . . . . . . . . . . . . . . . . . . . . . . . . . . . . . . . . . . . . . . . . . . . . . . . . . . 38
5.4.4 Export journeys . . . . . . . . . . . . . . . . . . . . . . . . . . . . . . . . . . . . . . . . . . . . . . . . . . . 38
5.4.5 Options . . . . . . . . . . . . . . . . . . . . . . . . . . . . . . . . . . . . . . . . . . . . . . . . . . . . . . . . . 38
5.4.6 Find addresses for journeys . . . . . . . . . . . . . . . . . . . . . . . . . . . . . . . . . . . . . . . . . . 39
5.4.7 Download data from RoadPilot Pro . . . . . . . . . . . . . . . . . . . . . . . . . . . . . . . . . . . . 39
5.4.8 Export points of a journey . . . . . . . . . . . . . . . . . . . . . . . . . . . . . . . . . . . . . . . . . . . 39
5.4.9 Show map for a selected point . . . . . . . . . . . . . . . . . . . . . . . . . . . . . . . . . . . . . . . 40
5.4.10 Editing journeys . . . . . . . . . . . . . . . . . . . . . . . . . . . . . . . . . . . . . . . . . . . . . . . . . . 40
5.4.11 Deleting journey . . . . . . . . . . . . . . . . . . . . . . . . . . . . . . . . . . . . . . . . . . . . . . . . . . 41
5.4.12 Changing journey type . . . . . . . . . . . . . . . . . . . . . . . . . . . . . . . . . . . . . . . . . . . . . . 41
5.5 Downloading other Databases . . . . . . . . . . . . . . . . . . . . . . . . . . . . . . . . . . . . . . . . . 41
6.
Installation
6.1 Installing RoadPilot Pro . . . . . . . . . . . . . . . . . . . . . . . . . . . . . . . . . . . . . . . . . . . . . . . 42
6.1.1 Fitting the display unit . . . . . . . . . . . . . . . . . . . . . . . . . . . . . . . . . . . . . . . . . . . . . . . 42
6.1.2 Positioning the GPS antenna . . . . . . . . . . . . . . . . . . . . . . . . . . . . . . . . . . . . . . . . . 42
6.1.3 Electrical installation . . . . . . . . . . . . . . . . . . . . . . . . . . . . . . . . . . . . . . . . . . . . . . . 43
6.2 LaserPilot Installation . . . . . . . . . . . . . . . . . . . . . . . . . . . . . . . . . . . . . . . . . . . . . . . . 44
6.2.1 Optimum locations for the LaserPilot . . . . . . . . . . . . . . . . . . . . . . . . . . . . . . . . . . 44
6.2.2 Exterior mounting . . . . . . . . . . . . . . . . . . . . . . . . . . . . . . . . . . . . . . . . . . . . . . . . . 44
6.2.3 Interior mounting . . . . . . . . . . . . . . . . . . . . . . . . . . . . . . . . . . . . . . . . . . . . . . . . . 45
6.2.4 Multiple LaserPilots . . . . . . . . . . . . . . . . . . . . . . . . . . . . . . . . . . . . . . . . . . . . . . . . 45
6.3 Radar installation . . . . . . . . . . . . . . . . . . . . . . . . . . . . . . . . . . . . . . . . . . . . . . . . . . . 46
6.3.1 Installation . . . . . . . . . . . . . . . . . . . . . . . . . . . . . . . . . . . . . . . . . . . . . . . . . . . . . . 46
6.3.2 Additional functions . . . . . . . . . . . . . . . . . . . . . . . . . . . . . . . . . . . . . . . . . . . . . . . . 47
6.4 Installation summary . . . . . . . . . . . . . . . . . . . . . . . . . . . . . . . . . . . . . . . . . . . . . . . . 47
6.5 Limitations of operation . . . . . . . . . . . . . . . . . . . . . . . . . . . . . . . . . . . . . . . . . . . . . 48
7.
Appendix
7.1 GPS - how does it work . . . . . . . . . . . . . . . . . . . . . . . . . . . . . . . . . . . . . . . . . . . . . . . 49
7.2 Types of camera . . . . . . . . . . . . . . . . . . . . . . . . . . . . . . . . . . . . . . . . . . . . . . . . . . . . 50
7.3 Update pricing . . . . . . . . . . . . . . . . . . . . . . . . . . . . . . . . . . . . . . . . . . . . . . . . . . . . . . 50
7.4 Use in more than one country . . . . . . . . . . . . . . . . . . . . . . . . . . . . . . . . . . . . . . . . 50
7.5 Trouble shooting . . . . . . . . . . . . . . . . . . . . . . . . . . . . . . . . . . . . . . . . . . . . . . . . . . . . . 51
7.6 Technical support . . . . . . . . . . . . . . . . . . . . . . . . . . . . . . . . . . . . . . . . . . . . . . . . . . . 52
7.7 Specification . . . . . . . . . . . . . . . . . . . . . . . . . . . . . . . . . . . . . . . . . . . . . . . . . . . . . . . . 52
7.8 Spares & accessories . . . . . . . . . . . . . . . . . . . . . . . . . . . . . . . . . . . . . . . . . . . . . . . . 52
7.9 Care & Maintenance . . . . . . . . . . . . . . . . . . . . . . . . . . . . . . . . . . . . . . . . . . . . . . . . . 53
7.10 Warranty . . . . . . . . . . . . . . . . . . . . . . . . . . . . . . . . . . . . . . . . . . . . . . . . . . . . . . . . . . . 53
7.11 Registration . . . . . . . . . . . . . . . . . . . . . . . . . . . . . . . . . . . . . . . . . . . . . . . . . . . . . . . . . 54
7.12 Index . . . . . . . . . . . . . . . . . . . . . . . . . . . . . . . . . . . . . . . . . . . . . . . . . . . . . . . . . . . . . . 56
1. General
1.1 Introduction
Thank you for purchasing RoadPilot Pro, which will
give you many years of quality service. Please read
this manual carefully before use or installation and
keep this manual for future reference.
In an era of innovation and technology, RoadPilot
leads the way allowing you to benefit from high
technology solutions today. RoadPilot Pro is the
latest in our range of accurate and reliable safety
devices that use satellite location technology to
identify your proximity to collision hot spot locations identified by road traffic authorities with
speed detection devices (SDD).
RoadPilot Pro uses the latest in second generation
satellite positioning technology along with the most
up to date and accurate database of the positions
of all speed cameras in the country. The advanced
touch screen display makes RoadPilot Pro very
easy to use and gives useful additional information
to make your driving experience easier and safer.
We at RoadPilot do not condone speeding. Anyone
who commits an offense whilst using a RoadPilot
product is deemed to have broken the law and will
have no recourse, legal or otherwise against
RoadPilot Ltd, its agents or representatives.
We operate a policy of continuous development
and reserve the right to alter and improve the
specification of their products without notice.
Fig 1.1 - RoadPilot Pro
1.2 Warning
Once set up, RoadPilot Pro will automatically
inform you visually and audibly when you approach
any cameras, leaving you free to concentrate on
driving safely and legally. The unit will not permit
any user adjustment of the settings while the vehi cle is moving. Do not attempt to adjust any set tings on your RoadPilot Pro while driving along, as
this will distract you from the road, endangering
yourself and other road users.
Page 5
1.3 How it works
Unlike speed camera detectors which work by detecting the radar or laser signal from the cameras,
RoadPilot Pro works by using the latest GPS (Global Positioning System) satellite technology, which pinpoints the position of your vehicle with incredible accuracy - typically within 15 metres. RoadPilot Pro
then correlates this position with it’s inbuilt database of camera positions across the country. If it detects
that you are approaching a camera and your vehicle is exceeding the speed limit, it will alert you both
audibly and visually, giving you sufficient time to reduce your speed.
The RoadPilot central database is updated daily with the latest speed camera positions. The CD-ROM
packaged with RoadPilot Pro contains easy to use software which allows RoadPilot Pro to be updated
with the latest information simply by connecting it to an internet-enabled PC. Refer to section 5 for
installation and operating instructions for the software.
In addition, if you come across a camera that is not currently on the database, you can update it with a
simple touch of the screen. When you next update your RoadPilot Pro , this information will be transferred to the RoadPilot central database.
1. RoadPilot Pro accurately
calculates the position of the
vehicle using GPS satellites
2. It cross-refers the
vehicle’s position with the
location of any cameras nearby,
stored in its inbuilt database
3. If the vehicle is approaching a
camera, and is exceeding the camera’s
trigger speed, RoadPilot Pro warns
the driver, giving adequate time to
reduce speed safely.
Fig 1.2 - How RoadPilot Pro works
Page 6
2. Operation
The very first time RoadPilot Pro is powered up, it
may take up to 45 minutes to initialise and to come
online. This is because it must try and locate
enough satellites (at least 4) in order to fix the
position of the vehicle. This is what is referred to
as the “cold start”. After this, it should only take a
few seconds to come online every time it is powered up (referred to as a “warm start”).
We recommend that you update the database
before you take RoadPilot Pro out on the road.
If the Mileage Manager function is active, the first
screen will invite you to select the mileage category (see section 4.3) before proceeding.
2.1 RoadPilot Pro Display
RoadPilot Pro display (Fig 2.1) is divided into three
sections - the multifunction display area (1), the
proximity indicator (2) and the information display
(3).
Fig 2.1 - RoadPilot Pro display
The multifunction display area can show a variety
of user selectable information pages, which are
explored later in this section.
2.1.1 Proximity Indicator
The proximity indicator (Fig 2.2) is a series of bars
along the top of the display which show how close
the vehicle is to a speed camera. You can specify
the proximity alert range - i.e, how far from a camera the vehicle must be before RoadPilot Pro will initiate an alarm (see section 4.2.1). The ten proximity
bars are fractions of that distance • One bar indicates that you are 1/10th of the way
from the proximity alert range to the camera
• Two bars indicate that you are 2/10th of the way
to the camera etc.
• All bars filled indicate that you are passing the
camera location.
Fig 2.2 - Proximity indicator
(Assumes proximity alert range is selected at 1000
yards)
Page 7
2.1.2 Information Display
The information display area on the right of the
screen (Fig 2.3) shows • Current compass bearing. The vehicle will need
to be moving in order for the unit to calculate the
bearing. If RoadPilot Pro has not yet achieved a
satellite position fix, the display will show OFFLINE.
• Range to nearest camera or waypoint. This is in
kilometres/metres or miles/yards depending on
the units selected (see section 4.1.3).
30
Compass bearing
RANGE
700
yards
This will change to show the speed limit
when the vehicle approaches a camera.
• The bearing to the nearest camera, indicated by
an arrow.
Range to nearest camera
Camera bearing
11:36:19
GPS time
Fig 2.3 - Information display
This will change to the Audio mute button
when the vehicle approaches a camera.
Touch this to silence the audible alarm.
• The current time (information supplied by the
satellites).
2.1.3 Warnings given
RoadPilot Pro features a voice synthesiser, enabling
it to give audible as well as visual warnings of
approaching alert situations. If this is disabled in
the Set Voice Warning option (see section 4.1.5), the
audio alert will be a sequence of beeps instead.
NOTE - Whether RoadPilot Pro alerts you to an
approaching camera will depend on the unit’s settings (see section 4.2). However, the display will
always switch to the Camera page (see section 2.6)
when approaching a camera, waypoint or reported
location, regardless of whether the settings specify
an alert to be given in that situation or not.
If you are approaching a camera and RoadPilot Pro
does not switch to the camera page, it is probably a
new camera, and should be saved as a reported
location (see section 3.1).
A summary is shown in Fig 2.4.
See section 2.6 - Camera Page for more information on visual alerts given.
Page 8
Location
Type
Audio Alert
(Voice)
On Screen
Alert
Audio Alert
(Beep)†
Speed
Camera
Goes to camera
page :
icon
shown relative to
car. Camera speed
limit displayed.
A series of high
beeps at 5/10 distance, increasing
in regularity as
range closes.
Waypoint
Goes to camera
page :
icon
shown relative to
car.
A series of “chirps” “Warning.
Waypoint.”
at 5/10 distance,
increasing in regularity as range
closes.
Reported
Location
Goes to camera
page :
icon
shown relative to
car.
A series of low
“Warning.
beeps at 5/10 dis- Reported location.”
tance, increasing
in regularity as
range closes.
Radar
Device*
Goes to camera
page. Bar graph
shows radar
signal strength.
A series of high
“Radar.”
beeps at 5/10 distance, increasing
in regularity as
range closes.
“Warning.
Speed camera.
Speed limit x.
Slow down.”
* Optional Radar module must be fitted
† If voice alert is disabled
Fig 2.4 - RoadPilot Pro alert summary
2.1.3 Multifunction Display
To select a page on the multifunction display, simply touch the screen to bring up the main menu
(Fig 2.5).
NOTE - As a safety feature, the vehicle must be stationary before RoadPilot Pro will allow access to
any of the setup functions.
Touch the appropriate icon on the screen to select
the required pageSatellite status page (section 2.2)
Speedo page (section 2.3)
Tracking page (section 2.4)
Fig 2.5 - Main menu
GPS page (section 2.5)
Camera page (section 2.6)
Setup page* (section 4)
Exit to previous page
Store new camera location† (section 3.1)
Store waypoint† (section 3.2)
Delete camera/location¥ (section 3.3)
Mileage Summary (section 3.4)
* Will only appear when the vehicle is stationary.
† Will only appear when RoadPilot Pro is online.
¥ Will only appear when near to a camera or reported location
Page 9
2.2 Satellite status page
To select the Satellite status page, touch
this icon on the main menu.
3D Fix
The satellite status page (Fig 2.6) shows visually
the number of satellites visible relative to your current position.
RANGE
An accurate 3d position fix requires at least four
satellites to be visible in a good spread across the
sky. The radar-style display shows the visible satellites and their positions relative to the vehicle.
Each satellite has an unique ID code, shown in the
centre of each satellite icon. The bars along the
bottom of the display show the signal strengths of
each satellite. The solid black bars indicate the
satellites being used for the position fix.
- satellites being used for the position
fix.
- satellites with a signal too weak to be used
for the position fix but known to be in view.
- satellites for which no signal is being
received but are known to be in view.
The display will also indicate the position fix mode
it is using • No Nav -No satellites are being detected.
• Dead Reckon - used for a short while to estimate the position of the vehicle when no satellites are visible.
• 1, 2 and 3 Sat Track - position fix using the stated
number of satellites. RoadPilot Pro resorts to
these modes if it is online then loses a satellite.
Altitude is still shown, but this is estimated.
• Least Sq 2d & 3d - Used during startup to
enable a position fix prior to full online mode.
• 3d Fix - At least four satellites are being used,
giving a 3D position fix (including altitude). This is
the most accurate position fix.
The large bar on the right of the display shows the
total signal strength. When selecting a location for
the antenna it is worth referring to this to ensure
that the location chosen receives the best signal.
Page 10
700
yards
11:36:19
Fig 2.6 - Satellite status page
2.3 Speedo page
To select the Speedo page, touch this icon
on the main menu.
35
This page shows the following information • The speed of the vehicle
• Odometer (Mileometer)
• Resettable trip meter
ODO
The information can either be shown digitally (Fig
2.7), or as a traditional “car” style analogue display
(Fig 2.8). This can be selected on the Setup page
(see section 4.1.4).
TRIP
mph
RANGE
700
yards
000527
0062. 8
11:36:19
Fig 2.7 - Speedo page (digital)
To reset the trip meter, touch the reset
icon. The Odometer is not resettable using
RoadPilot Pro, but may be adjusted using
RoadPilot Pro settings program.
NOTE - The speed shown is calculated using GPS
data, which tracks how fast the vehicle is moving
across the ground (referred to as Speed Over
Ground), not from the vehicle’s speedometer. This
is more accurate than your car’s speedometer and
therefore there may be a slight difference between
the speed shown on RoadPilot Pro and on the vehicle’s speedometer, and there may be a slight lag in
adjusting if the speed of the vehicle changes suddenly.
35
mph
RANGE
700
yards
ODO
TRIP
000527
0062. 8
11:36:19
Fig 2.8 - Speedo page (analogue)
Page 11
2.4 Tracking page
To select the Tracking page, touch this icon
on the main menu.
0
3.0miles
This page allows you to visually track the route
your vehicle has taken and retrace it if necessary very useful if you have got lost!
RANGE
700
The display shows your vehicle as the triangle in
the centre (Fig 2.9). The route taken is shown as a
trail behind the triangle.
yards
Note that the top of the screen represents the
direction that the car is travelling, so the trail will
orient itself as appropriate.
11:36:19
Touch this icon, to zoom in.
Fig 2.9 - Tracking page
Touch this icon to zoom out.
Touch this icon to clear the track.
The currently selected scale is shown at the top of
the display.
Page 12
2.5 GPS page
To select the GPS page, touch this icon on
the main menu.
Latitude
N 51.37445º
The GPS page is a summary page which shows the
following information (Fig 2.10) -
Longitude
E001.42790º
Heading
320º
• The vehicle’s current position as Latitude and
Longitude
Mode
• The current heading
Speed
35mph
Height
318ft
3D Fix
Accuracy
28ft
Date
Time
RANGE
700
yards
6 - OCT - 2002 11:36:19
• The vehicle’s speed
• The altitude
11:36:19
• The position fix mode (see section 2.2)
Fig 2.10 - GPS page
• The accuracy of the fix in ft/metres
• The date and time
All this information is calculated using
position data from the GPS satellites without integrating with any of the vehicle’s systems (apart
from power).
Page 13
2.6 Camera page
To select the Camera page, touch this icon
on the main menu. RoadPilot Pro also automatically selects this page when the vehicle
is approaching a camera location.
WAYPOINT
SPECS
The camera page visually shows the location of any
cameras relative to the vehicle’s position (Fig 2.11).
The vehicle is indicated by the square at the bottom of the display.
GATSO
USER
The target camera is shown on the screen
as an icon, relative to the position of the car.
30
SPECS
K
Any additional cameras within range are
indicated by this icon.
35mph
If the Show Off Heading Location function is
activated (see section 4.2.3), any Off
Heading cameras will be shown by this icon.
70 yards
11:36:19
Radar versions only
Fig 2.11 - Camera page
The position of any stored
waypoints (see section 3.2) will be indicated by these icons.
The position of any reported locations
will be indicated by these icons.
SPECS cameras work in pairs - the time taken for the
vehicle to travel between the two cameras is used to
work out the speed. RoadPilot Pro shows SPECS
cameras with a line linking the partner cameras.
LONDON CONGESTION
CHARGE ZONE
If the “Show Location Type” option is selected (section 4.2.8), the camera type will be shown next to
the camera icon eg “Gatso”, “Truvelo” etc.
RANGE
The display also shows the speed the vehicle is travelling and the range to the target camera / waypoint at the bottom of the screen.
yards
Versions fitted with the Radar module (see Fig 2.11)
- if a camera with Radar emission is detected, the
bar on the left of the display shows the strength of
the signal detected. This is not shown on nonRadar models.
London Congestion Charge Zone - RoadPilot Pro
can detect when you are close to the Zone (Fig
2.12) and will show the range in the main portion of
the screen (the information display will continue to
show the range of the nearest camera). When
approaching the edge of the zone the display will
show “Zone Boundary”. While inside the zone the
display will show “Inside Zone”.
Page 14
500
Press button to
cancel warnings.
RANGE
700
yards
11:36:19
Fig 2.12 - London Congestion Zone
3. Miscellaneous Features
3.1 User Reported Locations
If you encounter a new camera position, or one
that does not appear on the database, the position
can be logged and automatically relayed to the
RoadPilot Network.
Touch the display to bring up the main menu.
Touch the Store Location icon. There is a countdown of 5 seconds that gives you the opportunity of aborting if this was incorrectly
selected.
SAVING LOCATION
IN 5s
The location of the camera will be stored in your
RoadPilot Pro and uploaded to the Network the
next time you update your RoadPilot Pro by connecting to the RoadPilot Central Database. The
reported location will be automatically deleted
from RoadPilot Pro's memory after the upload.
PRESS TO CANCEL
You will be alerted visually and audibly each time
you approach the location you've stored until it is
deleted.
Fig 3.1 - New camera added to database
Our team will validate the position of the camera. If
you are the first user to identify this camera position, we will credit your account to offset against
future subscription charges. Please contact us to
confirm the location by phone, via our website
(www.roadpilot.com) or email us at
[email protected].
3.2 Store Waypoint
Waypoints are points of interest that you can store
in RoadPilot Pro and can also view on your PC
using the RoadPilot software supplied with the unit.
WAYPOINT
RANGE
300
To store the location of an item of interest,
touch this icon on the main menu.
yards
The position marked will subsequently be
shown on the display by this icon (Fig 3.2).
WAYPOINT
35mph
If the vehicle is heading towards the waypoint, it will be shown as this icon.
11:36:19
Fig 3.2 - Camera page showing waypoints
Note - You will be alerted visually and audibly each
time you approach a stored waypoint until it is
deleted. Waypoints are not uploaded to the Network
and therefore can only be deleted manually.
Page 15
3.3 Delete Location
This icon will only appear on the main menu when
the vehicle is close to a camera location, a User
Reported Location or a Waypoint. It is used to
delete the location from RoadPilot Pro's memory,
for example if a camera is no longer there or if you
wish to delete a User Reported Location or
Waypoint.
Touch this icon when passing the location
to delete it from RoadPilot Pro’s database
(Fig 3.3). There is a countdown of 5 seconds that gives you the opportunity of
aborting if this was incorrectly selected.
Note - Please inform us if a camera is no longer in
a position indicated by the RoadPilot database, so
that we can keep it up to date. Otherwise the location will be reinstated when your RoadPilot Pro is
next updated.
DELETING LOCATION
IN 5s
PRESS TO CANCEL
Fig 3.3 - Deleting a camera/waypoint
3.4 Mileage Summary
Touching this icon will bring up a Mileage
Summary page showing the mileages
recorded, categorised as Business, Private,
Commuting and Total Mileage (Fig 3.4).
BUSINESS MILEAGE
008752miles
Touch to return to the main menu.
PRIVATE MILEAGE
Touch to return to the previously selected
data screen.
002824miles
COMMUTING MILEAGE
Touch to reset respective mileage to zero.
005472miles
TOTAL MILEAGE
017048miles
Fig 3.4 - Mileage Summary page
Page 16
3.5 LaserPilot
The LaserPilot is a compact weatherproof module
that can detect laser emissions from hand held and
mobile speed detection devices (SDDs), further
increasing the capability of your RoadPilot Pro.
It features front and rear sensor windows, enabling
it to detect laser emissions from SDDs coming
from the front and rear of the vehicle.
Note - The front sensor is the side with the fixing
screw. For optimum coverage ensure this side is
always pointing forward.
LASER!
35
ODO
TRIP
3.5.1 How it works
A laser SDD emits a narrow, focussed laser beam
consisting of a series of pulses which are reflected
back from the target vehicle. The times for these
pulses to return are measured and from these the
speed of the vehicle can be calculated.
mph
RANGE
700
yards
000527
0062. 8
11:36:19
Fig 3.5 - Laser alert
Because the beam is so narrow, it allows the traffic
officer to target a specific part of the car - this
makes optimum positioning of the LaserPilot essential to ensure adequate coverage. Refer to the
installation instructions (section 5) for advice on
positioning of the LaserPilot to give the best results.
3.5.2 Operation
With a LaserPilot fitted, RoadPilot Pro will alert you
if it detects a laser SDD by flashing LASER! on the
screen (Fig 3.5). If voice alert is enabled, it will also
say “Laser!”, otherwise it will beep.
To acknowledge and cancel the alert, touch
the Mute icon on the screen.
Note - RoadPilot Pro will not necessarily trigger an
alert every time it passes a laser SDD position - the
traffic officer will normally not target you unless he
feels that you are exceeding the speed limit.
Page 17
4. Setup
To select the Setup page, touch this icon on
the main menu.
The display will show five options The General setup menu
(section 4.1)
The Warnings setup menu
(section 4.2)
The Laser setup menu
(section 4.3)
Mileage manager
(section 4.4)
Fig 4.1 - Setup page
The Radar setup menu*
(section 4.5)
Touch to return to the main menu.
Touch to return to the previously selected
data screen.
* Will only appear if the optional Radar module is connected.
4.1 General setup
Touch this icon on the Setup menu to
select the General setup page.
Touch to scroll through the options.
Touch to return to the setup menu.
Touch to return to the previously selected
data screen.
VOLUME
4.1.1 Volume
This function sets the volume of the audible alarms
(Fig 4.2).
50
%
Touch to adjust the volume.
Fig 4.2 - Volume setup page
Touch to return to the setup menu.
Touch to return to the previously selected
data screen.
Page 18
4.1.2 Contrast
This function sets the contrast of the display (Fig
4.3).
CONTRAST
50
%
Touch to adjust the contrast.
Touch to return to the setup menu.
Fig 4.3 - Contrast setup page
Touch to return to the previously selected
data screen.
Note - for most conditions, 50% contrast will be
optimal (factory default).
4.1.3 Units
Speed and distance can be displayed in miles/
yards or kilometres/metres (Fig 4.4).
UNITS
Touch to select miles/yards.
Touch to select kilometres/metres.
Fig 4.4 - Units setup page
Touch to return to the setup menu.
Touch to return to the previously selected
data screen.
Page 19
4.1.4 Speedo type
This function selects the speedo style digital or “traditional” analogue (Fig 4.5).
SPEEDO TYPE
Touch to select digital style.
Touch to select analogue style.
Fig 4.5 - Speedo type setup page
Touch to return to the setup menu.
Touch to return to the previously selected
data screen.
4.1.5 Set Voice Warning
This function is to turn the audible voice warning
off or on. (Fig 4.6).
VOICE WARNING
Touch to turn Voice Warning on.
Touch to turn Voice Warning off.
Fig 4.6 - Voice Warning setup page
Touch to return to the setup menu.
Touch to return to the previously selected
data screen.
Note - If Voice Warning is turned off, audible warnings will be given in beeps instead.
Page 20
4.1.6 Set Time
The time transmitted by the satellites is UTC (formerly known as GMT). This feature
(Fig 4.7) allows you to adjust the time shown on
RoadPilot Pro so that it matches your local time.
SET TIME
11:36:19
Touch to adjust the time in hours.
Fig 4.7 - Setting local time
Touch to return to the setup menu.
Touch to return to the previously selected
data screen.
Note - Daylight Saving Time is set by a separate
function (see section 4.1.7).
4.1.7 Daylight Saving Time
Use this function to turn Daylight Saving Time on
and off (Fig 4.8).
DAYLIGHT SAVING
11:36:19
Touch to turn DST on.
Touch to turn DST off.
Fig 4.8 - Daylight Saving Time
Touch to return to the setup menu.
Touch to return to the previously selected
data screen.
Page 21
4.1.8 Language
This function selects the language for the displays
and audible alarms (Fig 4.9). At present, RoadPilot
Pro supports English and Dutch - other languages
will be available in due course.
LANGUAGE
English
Touch to scroll through the
available languages.
Fig 4.9 - Language setup page
Touch to return to the setup menu.
Touch to return to the previously selected
data screen.
Note - The selected language will only become
active once you have exited this page.
4.1.9 Country
Use this function to select database for the country
that RoadPilot Pro is to be used in (Fig 4.10). A
Benelux database is currently available at an additional charge. Check www.roadpilot.com regularly
for the latest information on new countries covered by RoadPilot.
COUNTRY
UK
Touch to scroll through the
available country databases.
Fig 4.10 - Country setup page
Touch to return to the setup menu.
Touch to return to the previously selected
data screen.
See section 7.4 for further details.
Page 22
4.1.10 Information
This page contains useful data on RoadPilot Pro
including the serial number of the unit, the date
and time the database was last updated and the
operating temperature of the unit (Fig 4.11).
INFORMATION
NOTE - If you are contacting the RoadPilot Help
Desk regarding any queries or problems you are
having with your RoadPilot Pro the technician may
ask for the serial number - it will help us assist you
more effectively if you have this information
already noted down when you call us.
RoadPilot Version 1.2
Serial No. RO1412345
Database 02/01/2004 20:38:32
Temperature 35ºC
Fig 4.11 - Information page
Touch to return to the setup menu.
Touch to return to the previously selected
data screen.
4.1.11 Mode
This option allows you to select a demo mode
which simulates the normal operation of RoadPilot
Pro when out on the road (Fig 4.12).
MODE
Choose Normal to select normal operation.
NORMAL
Choose Demo to enter simulation mode.
Choose Demo+Radar to enter radar simulation
mode.
Fig 4.12 - Mode setup page
Touch to scroll through the
available modes.
Touch to return to the setup menu.
Touch to return to the previously selected
data screen.
Note - Ensure that Demo mode is not selected
when using RoadPilot Pro on the road!
Page 23
4.2 Warnings
The Warnings setup section is used to adjust the
visual and audible warnings given by RoadPilot Pro.
Touch this icon on the Setup menu to
select the Warnings setup page (Fig
4.13).
Touch to scroll through the options.
(Will only appear if the
optional Radar module is
connected)
Touch to return to the setup menu.
Touch to return to the previously selected
data screen.
Fig 4.13 - Setup page
4.2.1 Range
This function adjusts the range of the proximity
alert - i.e the distance from a camera the vehicle
must be before a warning is given (Fig 4.14).
RANGE
1.0
miles
Touch to increase the range in 0.1 increments (max 2 miles / 3.2 km).
.
Fig 4.14 - Contrast setup page
Touch to decrease the range in 0.1 decrements (min 0.2 miles / 0.3 km).
Touch to return to the warnings menu.
Touch to return to the previously selected
data screen.
Note - The factory default setting is 1 mile / 1.6 km.
Page 24
4.2.2 Warn off heading location
When this function is disabled, RoadPilot Pro will
only warn of cameras on your side of the road (i.e
it will ignore those on the other side of the road)
(Fig 4.15). If it is enabled, RoadPilot Pro will alert
you of a camera even if it is on the other side of
the carriageway.
WARN OFF HEADING LOCATIONS
Fig 4.15 - Warn off heading setup page
Touch to turn Warn off heading locations
on.
Touch to turn Warn off heading locations
off.
Touch to return to the warnings menu.
Touch to return to the previously selected
data screen.
4.2.3 Show off heading location
When this function is disabled, RoadPilot Pro will
only visibly show the location of cameras on your
side of the road (Fig 4.16). When it is enabled,
RoadPilot Pro will display a camera even if it is on
the other side of the carriageway.
Any off heading cameras will be shown by
this icon (Fig 4.17).
SHOW OFF HEADING LOCATIONS
Fig 4.16 - Show off heading setup page
Touch to turn Show off heading
locations on.
Touch to turn Show off heading
locations off.
GATSO
GA
Touch to return to the warnings menu.
30
GATSO
Touch to return to the previously selected
data screen.
35mph
70 yards
11:36:19
Fig 4.17 - Camera page showing Off Heading locations
Page 25
4.2.4 Auto range
Auto range (Fig 4.18) automatically adjusts the
range of the proximity alert to suit the speed of the
vehicle - so if driving at high speed on a Motorway,
the proximity range is increased and it is then
decreased when driving more slowly in built up
areas. This means RoadPilot Pro always gives you
adequate warning of an approaching camera.
AUTO RANGE
Fig 4.18 - Auto range setup page
Touch to turn Auto range on.
Touch to turn Auto range off.
Touch to return to the warnings menu.
Touch to return to the previously selected
data screen.
4.2.5 Speed sensitive
This feature (Fig 4.19) checks the speed of the vehicle when approaching a camera and will only give a
proximity warning if the vehicle is travelling faster
than the camera’s trigger speed.
SPEED SENSITIVE
Touch to turn Speed sensitivity on.
Touch to turn Speed sensitivity off.
Fig 4.19 - Speed sensitivity setup page
Touch to return to the warnings menu.
Touch to return to the previously selected
data screen.
Page 26
4.2.6 Early Warning
If this function is enabled, RoadPilot Pro will give an
audible warning as soon as a camera comes within
range, rather than after the scale reaches 5/10th
distance as normal (see section 2.1).
EARLY WARNING
Touch to turn Early Warning On.
Fig 4.20 - Early Warning setup page
Touch to turn Early Warning Off.
Touch to return to the warnings menu.
Touch to return to the previously selected
data screen.
4.2.7 Early Warning Speed Sensitive
If this function is enabled, RoadPilot Pro will give an
audible warning as soon as a camera comes within
range and over the speed limit (Fig 4.21).
EARLY WARNING SPEED SENSITIVE
Touch to turn Early Warning Speed
Sensitivity on.
Touch to turn Early Warning Speed
Sensitivity off.
Touch to return to the warnings menu.
Fig 4.21 - Early Warning Speed Sensitive setup page
Touch to return to the previously selected
data screen.
4.2.8 Show Location Type
This option enables the type of camera to be indicated next to the relevant symbol on the Camera
page i.e Gatso, Truvelo etc (Fig 4.22).
SHOW LOCATION TYPE
Touch to show location type
Touch to hide location type
Fig 4.22 - Show Location Type page
Touch to return to the warnings menu.
Touch to return to the previously selected
data screen.
Page 27
4.3 Laser
If a LaserPilot is connected, an additional
option will appear on the setup menu
screen -
LASER WARNING ENABLE
Touch to select Laser setup.
4.3.1 Laser warning enable
This toggles laser detection off/on (Fig 4.23). If ON,
RoadPilot Pro will alert you of laser emissions from
mobile SDDs in addition to GPS/database alerts.
When OFF, the unit will not detect laser emissions.
Fig 4.23 - Laser Warning Enable page
Touch to turn Laser on.
Touch to turn Laser off.
Touch to return to the setup menu.
Touch to return to the previously selected
data screen.
4.3.2 Laser mute speed
This sets the speed below which audible laser
warnings are not given (Fig 4.24), reducing unnecessary laser warnings (normally reflected from
other vehicles) when travelling below the speed
limit. The default setting is 0mph / 0km/h
LASER MUTE SPEED
0
mph
Fig 4.24 - Laser mute speed
Note - Only active when RoadPilot Pro is online.
Touch to adjust the laser mute speed
in 10mph/km/h steps.
Touch to return to the setup menu.
Touch to return to the previously selected
data screen.
Selectable range is 20 - 70mph/120km/h.
LASER STEALTH SPEED
To disable Laser Mute, select 0mph/km/h
0
4.3.3 Laser stealth speed
This sets the speed below which Laser emission
detection will be ignored (Fig 4.25). No warning,
audible or visual will be given when travelling below
this speed. The default setting is 0mph / 0km/h.
Note - Only active when RoadPilot Pro is online.
Page 28
mph
Fig 4.25 - Laser stealth speed
Touch to adjust the laser stealth
speed in 1mph/km/h steps.
LASER WARNING TIME
Touch to return to the setup menu.
Touch to return to the previously selected
data screen.
To disable Laser Stealth Speed, select 0mph/km/h.
1s
Fig 4.26 - Laser warning time
4.3.4 Laser warning time
This sets the minimum time that a laser warning
will last (Fig 4.26). The default setting is 1 second this is to allow the device to give a complete warning i.e to finish the word “laser”.
Touch to adjust the laser warning
time in 1 second steps.
Touch to return to the setup menu.
Touch to return to the previously selected
data screen.
LASER WARN WHEN GPS OFFLINE
Selectable range is 1 - 10 seconds.
4.3.5 Laser Warn when GPS offline
If this option (Fig 4.27) is turned ON, RoadPilot Pro
will alert you even if the GPS position fix is lost, i.e
when in or immediately exiting a tunnel. If it is OFF,
no laser warnings will be given unless the GPS is
online. The default setting is ON.
Touch to turn offline warning on.
Touch to turn offline warning off.
Touch to return to the setup menu.
Touch to return to the previously selected
data screen.
Note - If this option is enabled and the GPS is
offline, the vehicle speed will not be available, so if
a laser emission is detected a warning will be given
regardless of the speed you are travelling.
Page 29
Fig 4.27 - Warn even when GPS is offline
4.4 Mileage Manager
Mileage Manager gives you the ability to record all
journeys travelled with your RoadPilot Pro. These
journeys can be categorised as business, personal
or commuting.
MILEAGE MANAGER
Touch this icon on the Setup menu to
select Mileage Manager (Fig 4.28).
Fig 4.28 - Mileage Manager page
Touch to turn Mileage Manager on.
Touch to turn Mileage Manager off.
Touch to return to the setup menu.
Touch to select Mileage Data Length
option (section 4.4.1).
Touch to return to the previously selected
data screen.
RoadPilot Pro records all journeys taken whenever
it is online. When Mileage Manager is enabled, you
must select the mileage type each time you turn
RoadPilot Pro on (Fig 4.29)
Touch to select Business mileage
SELECT JOURNEY TYPE
Touch to select Commuting mileage
Touch to select Personal mileage
Touching this icon from the main menu will
display a summary of the mileage travelled.
To get the most accurate results from Mileage
Manager, ensure that RoadPilot Pro is online before
commencing your journey.
The Mileage Manager PC software allows you to
upload the recorded journeys to your PC so they
can be used to produce mileage reports - see section 5.4 for further details.
Page 30
Fig 4.29 - Mileage type select
4.4.1 Mileage data length
This function allows you to select the frequency
that data is recorded for Mileage Manager - for
example selecting '1 second' will make the unit
record your position every second and allows a
total of 3.4 hours of tracking time. Decreasing the
logging frequency increases the overall tracking
length/time. When the memory is full, the oldest
data will be overwritten, so ensure you upload the
data to your PC before this happens.
MILEAGE DATA LENGTH
34.1 10
hours seconds
.
Fig 4.30 - Mileage data length
Touch to increase the data length
(max 4 mins).
Touch to decrease the data length (min 1
second).
Touch to return to the setup menu.
Touch to return to the previously selected
data screen.
Note - The factory default setting is 10 seconds
(34.1 hours tracking time).
Page 31
4.5 Radar
This section covers the setup options for RoadPilot Pro’s fitted with the optional Radar module.
These options will not be shown if this module is not installed.
Radar is used as a method of measuring a vehicle's speed by both fixed (Gatso) and mobile (handheld)
police speed detection devices which transmit a radio signal at the vehicle and use the reflected signal to
calculate speed. In the UK, these devices use signals in the X, K or Ka bands. Generally X band is used on
older types of fixed speed camera, with K band and Ka band being used on newer devices.
False detections can be a problem with all Radar detectors because to maximise the Radar warning distance, detectors need to be sensitive to the signals in the appropriate bands. The Radar bands are also
used for applications other than speed detection and may also be emitted by other radio transmission
equipment. In the UK, X band is usually the commonest cause for false alarms because of its use in automatic door systems.
RoadPilot Pro gives you full control over the Radar warnings you receive by allowing you to set the alarm
sensitivity on each of the Radar bands individually. This allows you to reduce false alarms whilst optimising
the warning distance of Radar.
4.5.1 Radar enable
This option (Fig 4.31) toggles Radar detection off
and on. If it is turned ON, RoadPilot Pro will alert
you of camera Radar emissions and GPS/database
information in addition to alerting you of mobile
speed detection devices. When Radar Enable is
OFF, the unit will operate as a standard RoadPilot
Pro and will not detect Radar emissions.
RADAR ENABLE
Touch to turn Radar on.
Touch to turn Radar off.
Fig 4.31 - Radar Enable page
Touch to return to the setup menu.
Touch to return to the previously selected
data screen.
Page 32
4.5.2 Radar mute speed
This function sets the speed below which audible
Radar warnings are not given (Fig 4.32), reducing
unnecessary Radar warnings when travelling below
the speed limit. NOTE - This function will only work
when RoadPilot Pro is online.
Touch to adjust the radar mute speed
in 10mph/km/h increments.
RADAR MUTE SPEED
20
mph
Fig 4.32 - Radar mute speed
Touch to return to the setup menu.
Touch to return to the previously selected
data screen.
The minimum speed that can be selected is 20
mph/km/h, and the maximum speed is
70 mph/120km/h.
To disable Radar Mute, select 0mph/km/h
NOTE - Factory default setting is 20mph/30km/h.
4.5.3 Radar stealth speed
This function sets the speed below which Radar
emission detection will be ignored (Fig 4.33). No
warning, audible or visual will be given when travelling below this speed. NOTE - This function will
only work when RoadPilot Pro is online.
Touch to adjust the radar stealth
speed in 1mph/km/h increments.
RADAR STEALTH SPEED
5
mph
Fig 4.33 - Radar stealth speed
Touch to return to the setup menu.
Touch to return to the previously selected
data screen.
To disable Stealth Speed, select 0mph/km/h
NOTE - Factory default setting is 5mph/10km/h.
Page 33
4.5.4 Warn when GPS offline
If this option (Fig 4.34) is turned ON, RoadPilot Pro
will alert you if your GPS position is lost, so cameras
will only be pinpointed by their Radar emissions.
RADAR WARN WHEN GPS OFFLINE
Touch to turn offline warning on.
Fig 4.34 - Warn when GPS is offline
Touch to turn offline warning off.
Touch to return to the setup menu.
Touch to return to the previously selected
data screen.
NOTE - Factory default setting is OFF.
4.5.5 X Band sensitivity
This function allows you to adjust the sensitivity to
emissions in the X Band range (Fig 4.35).
Touch to adjust the X Band sensitivity
in 10% increments.
Touch to return to the setup menu.
Touch to return to the previously selected
data screen.
NOTE - Factory default setting is 80%.
4.5.6 K Band sensitivity
This allows you to adjust the sensitivity of
RoadPilot Pro to emissions in the K Band range and
is adjusted in the same way as the X Band sensitivity - see above.
NOTE - Factory default setting is 100%. At this setting, radar false alerts are likely. After initial use,
we recommend reducing the sensitivity to around
70% - adjust as you feel necessary. A very low
sensitivity setting may reduce your warning range.
4.5.7 Ka Band sensitivity
This allows you to adjust the sensitivity of
RoadPilot Pro to emissions in the Ka Band range
and is adjusted in the same way as the X Band sensitivity - see above.
NOTE - See note above regarding factory default
settings for K and Ka Bands.
Page 34
RADAR X BAND SENSITIVITY
80
%
Fig 4.35 - Radar sensitivity
5.
PC Software Operation
5.1 System Requirements
RoadPilot Pro’s database can be updated via the
internet using a PC and the desktop USB interface
unit supplied (Fig 5.1). The software supplied on the
disk is very straightforward to install and use.
PC
Internet
RoadPilot Pro
USB Port
To install RoadPilot Pro software, the following
hardware and software are required • An IBM PC-compatible computer with a 386 or
faster microprocessor*
• A CD-ROM drive
• A USB port
• Windows 98, ME, 2000 or XP
• An internet connection
USB interface unit
Fig 5.1 - Database update connections
* RoadPilot Pro software is not available for Apple
Macintosh or other non-Windows environment
computers. If you are using a Mac, or a PC running
Linux, we recommend running a Windows emulator
such as Virtual PC or SoftWindows. We do not
offer support if our software is run on machines
using these operating systems.
5.2 Installing Software
IMPORTANT - Do not plug the USB interface unit
into your PC until you have completed the software
installation.
Insert the CD-ROM and browse to the
SETUP.EXE application. Follow the setup
instructions.
Now connect the USB interface unit to your PC.
Follow the “Found New Device” installation instructions and select “Search for Drivers”.
When prompted for the path to the drivers, browse
to this folder C:\Program Files\RoadPilot\RoadPilotSync\Drivers
Once the driver installation is complete, restart the
computer.
NOTE - When installed, the software runs as an
icon on the taskbar only - it will not be shown as a
desktop icon or in the programs list.
Page 35
Fig 5.2 - Installation wizard
5.3 Connecting to the RoadPilot Database
Plug the interface unit into a spare USB port on the
computer (Fig 5.3) and place RoadPilot Pro onto
the USB interface. The software will open automatically on the PC.
Your RoadPilot Pro must be updated at least once
every 3 months. After this time, a message will
appear on screen prompting you to perform a new
database update on your PC and will not function
until this is done. To ensure correct and accurate
operation, please ensure the database is updated
regularly.
PC
Internet
RoadPilot
USB Port
USB interface unit
Fig 5.3 - Connecting RoadPilot to PC
NOTE - RoadPilot Pro touch screen will not operate
while it is connected to your PC. The first time you
update the database it may take some time
depending on your connection speed; subsequent
downloads will be much quicker.
5.4 Mileage Manager
NOTE - Mileage Manager is installed by default as
part of the RoadPilot Synchronization software.
However, if the default installation settings were
modified during installation, Mileage Manager may
not have been installed and the installation should
be performed again to install Mileage Manager.
Mileage Manager can be run with or without
RoadPilot Pro being connected to your PC. If
RoadPilot Pro is connected, simply select Mileage
Manager in the Tools menu of the RoadPilot
Synchronisation Program (Fig 5.4). This will read
the latest mileage data from RoadPilot Pro and
then automatically open Mileage Manager.
Fig 5.4 - Selecting Mileage Manager
If RoadPilot Pro is not connected to the PC, use the
shortcut created during installation in the Windows
Start menu of the PC. The application will ask for the
serial number of the unit - this is because the
Mileage Manager software can be used with several
RoadPilot Pros. If RoadPilot Pro is not connected to
the PC, Mileage Manager will only display the data
that has been previously downloaded onto your PC.
5.4.1 User interface
The left column (Fig 5.5) shows the main journey
categories. These can be expanded to show the
individual journeys within each category. To expand
a category, left click on the + next to the category
or double click the category. Each journey is identified by its start date and time within the list.
Page 36
Fig 5.5 - Mileage Manager interface
The right side of the window shows the detail of
the item currently selected. If a category is selected, a summary of the journeys of that category are
shown. If a journey is selected it shows the individual points recorded within that journey.
Columns can be shown or hidden by right-clicking
the column header and selecting/ deselecting the
columns to be shown/hidden (Fig 5.6). The width
of each column can be adjusted by clicking on the
edge of the column header and dragging the column to the required width. The data can be sorted
by left-clicking the column headers.
These view settings will be saved and used the next
time Mileage Manager is used.
Fig 5.6 - Showing/hiding columns
The bottom right hand corner of the screen shows
the current status view. It indicates whether the filter is on or off, the odometer offset and the units.
The toolbar and the status bar can be hidden using
the View menu - if they cannot be seen, check the
options in View menu.
In addition some actions can be performed using
the contextual menu by right clicking on journey or
the date in the left view (Fig 5.7).
Further options are available through the toolbar
and the Tools menu -
5.4.2 Using the filter
Click this icon in the main window to select Filter
options.
Fig 5.7 - Contextual menu options
Filter allows a specific selection of the journeys to
be shown using any combination of the available
options (Fig 5.8).
The filter settings will be saved for the next time
Mileage Manager is used. To see a different range
of data, the filter settings must be adjusted.
Fig 5.8 - Filter options
Page 37
5.4.3 Totals
Click this icon in the main window to select Totals.
The totals window shows statistics of the journeys
currently shown in the Mileage Manager main window (Fig 5.9).
Fig 5.9 - Totals window
5.4.4 Export journeys
Click this icon in the main window to select
Export Journeys (Fig 5.10).
The Export function allows the currently filtered
journeys to be exported as a text file.
This text contains data delimited by the Tab character and the first line contains column names. This
format of file is widely supported by many programs such as Microsoft Excel.
Fig 5.10 - Export journeys window
5.4.5 Options
Click this icon in the main window to select
Options (Fig 5.11).
Units - Select imperial (miles & mph) or metric (km
& km/h).
Odometer Offset - Match Mileage Manager to the
car’s current mileage. Set this to the car odometer
reading when Mileage Manager was first used.
Page 38
Fig 5.11 - Options window
5.4.6 Find addresses for journeys
Click this icon in the main window to select Find
Addresses for Journeys.
This option is available only if Microsoft MapPoint is
installed. No other programs are supported.
This converts all empty address fields of the start
and end of journeys to known addresses using
Microsoft MapPoint (Fig 5.12). It will give the nearest
address of the start and end of each journey.
However, it may also return no known address for
some journeys. When this happens, the address
field will be set to a question mark (‘?’). There is the
option to manually edit/correct these address fields.
Fig 5.12 - Finding addresses
NOTE - Depending on the Mileage Manager file
size, running this option may take some time to
complete.
5.4.7 Download data from the RoadPilot
Click this icon in the main window to download
data from RoadPilot Pro to your PC.
This will manually upload mileage data from the
connected RoadPilot Pro. The program will be automatically started by the RoadPilot Synchronisation
program when new data is detected.
Fig 5.13 - Exporting points of a journey
5.4.8 Export points of a journey
RoadPilot Pro stores journeys as a series of positions stored at intervals. This data set is then use to
calculate distance travelled, average speed etc.
These positions can be imported into many third
party mapping software products (e.g. Microsoft
MapPoint, Microsoft AutoRoute) and plotted on a
map. To export the positions, right-click on the relevant journey and select Export points (Fig 5.13).
Select the columns to export using the checkboxes
(Fig 5.14) then click Export. The text file contains
columns delimited by Tab and the first line contains
column names.
NOTE - Latitude and longitude must be included in
the exported data to be able to import this data to
third party mapping software.
Page 39
Fig 5.14 - Export points options
5.4.9 Show map for a selected point
A map for a selected point can be shown using the
www.mapquest.com website.
Right-click on the point and select Show (Fig 5.15).
Fig 5.15 - Selecting point for map
The internet browser will automatically open and
show the map for the area around the journey
point (Fig 5.16)
Fig 5.16 - Outputted map
5.4.10 Editing journeys
The Edit window can be opened by right-clicking on
the journey and selecting Edit (Fig 5.17).
This allows the start and end addresses of the journey to be edited and also allows notes to be added
to the journey.
Fig 5.17 - Editing journeys
Page 40
5.4.11 Deleting journey
Journeys can be deleted by right-clicking on the
journey and choosing the Delete option (Fig 5.18).
Any journeys deleted are only removed from the
database stored on the PC.
NOTE - When a RoadPilot Pro is connected, the PC
will download any data is sees that is newer than
the last journey it has stored. Therefore, if the
most recent journey is deleted from the PC but it is
still stored on RoadPilot Pro, it will be downloaded
again.
Fig 5.18 - Deleting a journey
5.4.12 Changing journey type
A recorded journey’s category can be amended
manually (e.g. business to personal) by right-clicking on the journey and selecting Change type to
(Fig 5.19).
This option is useful if the wrong journey type was
selected when commencing a journey or if Mileage
Manager was not enabled on RoadPilot Pro for the
journeys already made - undefined journeys can be
manually categorised to business, commuting or
personal.
Fig 5.19 - Changing the journey type
5.5 Downloading other Databases
RoadPilot Pro is designed to give warnings on
other hazards or points of interest such as low
bridges, schools etc. Commercial users are invited
to enquire with us for further details.
Page 41
6.
Installation
6.1 Installing RoadPilot Pro
6.1.1 Fitting the display unit
The mounting arm is fitted with a suction cup so it
can be attached to the windscreen. The windscreen
must be free from dust or grease. Lift the release
clamp on the suction cup assembly, press the cup
firmly against the windscreen and then push the
release clamp down (Fig 6.1).
Lift clamp
Note - To avoid damaging the suction cup, we recommend that you bend the arm to the appropriate
angle before attaching it to the windscreen.
Lock clamp
To remove, lift the release clamp and then pull on
the small tab attached to the edge of the suction
cup to break the seal with the windscreen.
Attach display
Warning - Do not fit RoadPilot Pro, antenna or
wires where they may interfere with the safe operation of your vehicle controls or instruments, or
where it will obstruct your view of the road. Since
RoadPilot Pro gives verbal warnings of your proximity to any cameras, it is not necessary to have
the unit fitted in your direct line of sight.
An adaptor plate is supplied for mounting the unit
to the dashboard or where the suction cup cannot
be used. Ensure the chosen location is clean and
free from dust or grease. Remove the backing
paper from the adaptor and press down firmly. The
suction cup can then be fitted to the adaptor plate.
Fig 6.1 - Attaching to windscreen
6.1.2 Positioning the GPS antenna
To work effectively, the antenna must have a clear
view of at least four GPS satellites. Therefore, the
more sky it can see, the better the performance.
The antenna should be fitted wherever the best
signal can be picked up - on the dashboard, the
rear parcel shelf or outside the car.
If dash-mounting the antenna, place it as far forward
as possible (Fig 6.2). Do not position it too close to
the A-pillars as this may reduce the field of view.
Find the optimum position by moving the antenna
around while referring to the signal strength bar on
the Satellite page (see section 2.2).
The best place to externally fit the antenna is just
under the air intake vent on the bonnet or the trim
near the windscreen wipers. Ensure these are
Page 42
Antenna
Fig 6.2 - Positioning the antenna
made of plastic (most are), otherwise it will prevent
the signal being received. Mount it as high as possible - if the antenna is too low down it will not get
a clear view of the sky. The magnetic base will also
allow mounting directly onto metal bodywork.
DO NOT CUT OR SHORTEN THE ANTENNA CABLE
6.1.3 Electrical installation
Wiring RoadPilot Pro is straightforward - all peripherals link together in a chain (the GPS antenna
cable is permanently wired to the mounting arm)
and these can be connected together in any order,
although the Radar horn must be the last item in
the chain if fitted (Fig 6.3). Use the plastic end cap
supplied to cover the open end of the plug and
socket arrangement if a Radar horn is not fitted.
If the cables supplied with peripherals are not long
enough, extension cables are available in 1m, 2m
and 3m lengths (part nos. EXC100:1M, EXC100:2M
and EXC100:3M respectively). These can also be
linked together to create longer extension cables.
The power cable is fitted with a standard car cigarette lighter adaptor - simply plug it into your car’s
cigarette lighter. RoadPilot Pro is designed to work
from a 12v supply only. Vehicles with a 24v system
should use an appropriate converter.
GPS antenna
(hard wired)
Power lead
LaserPilot
Additional
LaserPilots
(option)
Radar horn
(option)
End cap
(fit if Radar horn not used)
Fig 6.3 - Wiring chain
NOTE - Ensure that RoadPilot Pro is disconnected
from the power when connecting any peripherals
such as the LaserPilot or a Radar horn.
NOTE - Interference can be experienced from
some mobile phones. A properly installed phone
using an in-car kit grounded to earth usually helps
eradicate this.
To wire directly to the vehicle’s electrical system,
we recommend it is connected to the ignition
switch using the fused direct wire power cable
(part no. PC100:DW). The RED cable must be wired
to 12v (positive/+) and the BLACK to ground (negative –). It is strongly recommended that permanent
connection to your vehicle’s electrical system is
carried out by a professional auto electrician.
WARNING - Any product used outside of its design
parameters or altered in any way, including the cutting of wires will render the guarantee null and void.
Please check the wiring specifications carefully
before installation. There will be no exception to this
instruction and is an expressed condition of sale.
Page 43
12v
Gnd
Fuse
Fig 6.4 - Hard wiring to vehicle’s
electrical system
6.2 LaserPilot Installation
The LaserPilot (Fig 6.5) is a compact weatherproof
module that can detect laser emissions from hand
held and mobile speed detection devices (SDDs),
further increasing the capability of your RoadPilot
Pro.
Mounting point (with suction
cup fitting attached)
Rear sensor window
Rotates up
to 350º for
optimum
coverage
It features front and rear sensor windows, enabling
it to detect laser emissions from SDDs coming
from the front and rear of the vehicle.
Front sensor window
NOTE - The front sensor is the side with the fixing
screw. For optimum coverage ensure this side is
always pointing forward.
6.2.1 Optimum locations for the LaserPilot
The LaserPilot is supplied with fixing accessories
enabling it to be fitted inside the windscreen or
externally mounted. The best location is where it
will give optimum coverage at most ranges - the
beam of a laser SDD is very narrow, but it widens
out as the range increases. This means that at
long range, the LaserPilot will detect the beam
from most locations (Fig 6.6). However, at shorter
ranges the beam is much more focussed and will
be targeted at a specific spot on the car (Fig 6.7).
Generally the traffic officer will target the most vertical and reflective part of the car, which is the front
licence plate. The ideal location for the LaserPilot is
either low down in the centre of the windscreen or for the best results - attached to the front of the car
just below the licence plate (Fig 6.8).
Screw head
Fig 6.5 - LaserPilot
typically 800-1000m
Fig 6.6 - Laser detection at long range
typically 200-300m
Fig 6.7 - Laser detection at short range
The LaserPilot is supplied with two mounting
accessories - a mounting bracket for external
installation and a suction cup fitting for interior
mounting.
WARNING - To avoid possible damage to the
LaserPilot the correct mounting accessory must
always be used depending on where it is to be fitted.
Fig 6.8 - Optimum locations for LaserPilot
Screw points
Depress tab to release
bracket
6.2.2 Exterior mounting
The LaserPilot is fully weatherproofed and can be fitted externally using the mounting bracket supplied.
The bracket clips onto the base of the LaserPilot
(Fig 6.9). Ensure that the parts engage fully with
a “click”. To remove, use a screwdriver to depress
the locking tab as shown and slide the mounting
bracket out.
The mounting bracket can be attached to the car
Page 44
Cable tie slots
Fig 6.9 - Mounting bracket
using the self adhesive pad or mounting screws. If
attaching to the grille it is recommended that the
cable tie option is used (Fig 6.10).
Grille
Once it is securely attached, rotate the LaserPilot
so that the front sensor window is pointing directly
forward (the front is the side with the screw head).
NOTE - If using the cables ties or mounting screws
it is recommended that the self-adhesive pad is left
in place to provide additional cushioning.
If mounting externally, the sensor window will
require periodic cleaning.
Cut off excess
cable tie
Fig 6.10 - Attaching bracket using cable ties
Depress tab to release
bracket
6.2.3 Interior mounting
To fit the LaserPilot inside the car, use the suction
cup fitting to attach it to the windscreen.
The suction cup clips onto the mounting point on
the base of the LaserPilot in the same way as the
mounting bracket (Fig 6.11). Ensure that the parts
engage fully with a “click”. To remove, use a
screwdriver to depress the locking tab as shown
and slide the mounting bracket out.
For best results, position the LaserPilot low down in
the centre of the windscreen (Fig 6.12). Windscreen
fitting will give better results than mounting it on
the dashboard.
Suction cup
Rotate so screw head
is pointing forward
Fig 6.11- Suction cup fitting
Once it is securely attached, rotate the LaserPilot
so that the front sensor window is pointing directly
forward (the front sensor is the side with the screw
head).
Although fitting the LaserPilot to the windscreen
will not give as good coverage as externally mounting it, this does offer the added advantage that it
can also detect laser emissions directed at the rear
of the car. Rotate the LaserPilot so that the sensor
windows have the best field of view to the front
and rear as possible.
Fig 6.12 - Optimum location for windscreen
mounting
Long range
6.2.4 Multiple LaserPilots
RoadPilot Pro is capable of supporting multiple
LaserPilot detectors - for maximum performance fit
a second LaserPilot (part no. L100) to the rear windscreen or below the rear licence plate (Fig 6.13). If
fitting inside the car, use the suction cup to attach
the second LaserPilot low down in the centre of the
rear window.
Page 45
✗ Single LaserPilot
✗
Second LaserPilot
Fig 6.13 - Optimum locations for rear detection
6.3 Radar Installation
The RoadPilot Radar kit (optional extra part no.
RO48) is supplied with the following additional
accessories (Fig 6.14) 1. Radar Horn
2. Universal mounting kit
3. Deflector plate
This top-of-the-range discreet Radar Horn upgrade
covers all Radar bands. When combined with
RoadPilot Pro’s intelligent GPS system, it provides
the perfect solution without the usual problems
and annoyances associated with conventional
Radar detectors.
6.3.1 Installation
The radar horn must be installed using the mounting kit facing towards the arrow on the horn and
must be pointing forwards. For optimum performance it should also be mounted vertically as shown
(Fig 6.15).
Fig 6.14 - Radar version additional accessories
Fig 6.15 - Note direction horn must face
The radar horn will operate efficiently from behind
any non-metal substance including plastic, fibreglass and carbon fibre. The best place for the horn
is behind the front grille or bumper, if it is plastic
(Fig 6.16).
If it is not practical to mount the radar horn pointing forward due to space limitations or other factors, it can be fitted at a 90º angle (i.e parallel to
the grille/bumper using the deflector plate supplied
(Fig 6.17).
RoadPilot Pro mounting arm supplied with the kit
has an additional lead for the radar horn - connect
the radar horn cable to the mounting arm and connect to the car power supply as normal.
Fig 6.16 - Best locations for Radar Horn
Front of car (top down view)
Radar
horn
Radar
signal
Deflector
plate
Fig 6.17 - Using the deflector plate
Page 46
6.3.2 Additional functions
By connecting the Radar kit to a RoadPilot Pro the
following new functions appear on the menu -
Radar Speed Trap Detected
by
RoadPilot
• Radar configuration
• Radar warning
Radar devices operated at the roadside by the
police and special speed camera units, as well as all
fixed cameras – whether hidden or not - will be
detected (Fig 6.18).
Detected by
RoadPilot with
Radar
MULTINOVA
No
Yes
Police Handheld
No
Yes
Police Vehicle
No
Yes
Fig 6.18 - Additional Radar detection
The unit will provide a clear warning of all speed
cameras but in a more accurate manner than conventional “Radar detectors”.
NOTE - the Radar version of RoadPilot Pro can be
used in countries that are not covered by the GPS
camera database.
Standard versions of RoadPilot Pro can be upgraded to the Radar version - visit www.roadpilot.com
for further information.
6.4 Installation Summary
2
1
*
3
5
6
4
7
Ideal location (for optimum reception/coverage)
Other suggested locations*
1.
2.
3.
4.
RoadPilot Pro display and mounting bracket
GPS antenna
LaserPilot
Power cable (12v DC)**
5. Optional extension cable EXC100:1M/2M/3M
6. Optional second LaserPilot
7. Optional radar horn***
* When mounting the GPS antenna externally, a good alternative is
to fit under the bonnet beneath the air intake (must be plastic).
** For hardwiring to the vehicle’s ignition system, order the fused
direct wire power cable, part no. PC100:DW.
*** The radar horn must be added at the end of the chain.
Fig 6.19 - Installation summary
Page 47
6.5 Limitations of operation
Because RoadPilot Pro uses satellites to pinpoint
the vehicle’s location, there are certain limitations
inherent with this system which you should be
aware of when installing and using RoadPilot Pro.
In order to pick up the satellite signals, the antenna
must have a clear view of at least four satellites therefore, the more sky it can see, the better the
performance. If the antenna is mounted on the
dashboard, it will only be able to pick up satellites
within its Field of View - the scope of the windscreen (Fig 6.20). See section 6.1 for further information on antenna positioning.
Other factors such as Urban Tunnelling (Fig 6.21)
can also affect the performance of the GPS, as it
limits the viewable sky area, and a similar effect
can be witnessed with heavy forestation adjacent
to the road.
Out of view
In view
Antenna
Fig 6.20 - Example of Field of View limits
Since the antenna needs a clear view of the sky, it
is likely that it will temporarily lose the signal if you
are driving through a road tunnel, although under
normal circumstances it will re-acquire the position
as soon as the vehicle leaves the tunnel.
Some car windscreens with UV shielding have been
found to adversely affect the performance of the
antenna, as the metallic particles in the glass interfere with the incoming signals. The following vehicles may or are known (depending on age/registration to have windscreens that prevent a signal
being received Heated Screens (GPS reception may be intermittent and weak)
Ford Mondeo*, Focus*, new Fiesta* and some other Ford models*.
Jaguar (various models).
Range Rover and Land Rover (various models).
*Optional extra.
UV/Solar Reflective/Metal Oxide/”Comfort” Screens
(minimal to zero reception)
Peugeot 206*, 306*, 406* and some other new models*.
Citroen C5 and other new models.
Renault Clio, Scenic, Laguna, Espace and other new models.
Vauxhall Zafira Elegance (standard) and other new models*.
Audi RS6, possibly other new models.
Most recent BMWs and Mercedes, often appears as light grey tint to
glass.
Volkswagen*
Subaru Impreza UK Sti (2003 models and later)
*Only on certain trim models or is an optional extra
If you have problems getting an adequate signal
through the windscreen, try relocating the antenna see section 6.1.2 for advice on alternative locations.
Fig 6.21 - Urban Tunnelling
Page 48
7.
Appendix
7.1 GPS - how does it work
The Global Positioning System is a navigation system consisting of a network of 24 orbiting satellites
(Fig 7.1) at an altitude of 11,000 miles in 6 different
orbital paths. The satellites orbit around the Earth
roughly every 12 hours. The first GPS satellite was
launched back in February, 1978.
The orbits of the satellites take them between
roughly 60ºN and 60ºS latitudes. This means that
satellite signals can be received anywhere in the
world, at any time, in all weather conditions.
The GPS signal contains a PRN code, ephemeris
and almanac data. The PRN code (a number from
1 to 32) identifies which satellite is transmitting this is the number shown on each of the satellite
icons on the satellite status page. Ephemeris data
contains information such as the status of the
satellite, current date, and time. Almanac data tells
RoadPilot Pro where each satellite should be at any
time of the day.
Each satellite transmits a message, essentially saying, "I'm satellite #X, my position is currently Y, and
this message was sent at time Z." To determine
your position RoadPilot Pro compares the time a
signal was transmitted by a satellite with the time it
was received by RoadPilot Pro. The time difference
tells the RoadPilot how far away that particular
satellite is. By measuring the distance from other
satellites, RoadPilot Pro can triangulate the position
of the vehicle.
With a minimum of three satellites, RoadPilot Pro
can determine a 2D position fix - latitude and longitude. With four or more satellites a 3D position latitude, longitude and altitude can be calculated.
By continuously monitoring the difference between
each position fix, RoadPilot Pro can also accurately
provide speed and direction of travel - referred to
as Speed and Course Over Ground.
Page 49
Fig 7.1 - GPS satellite network
7.2 Types of camera
RoadPilot Pro works with the following types of
camera • GatsoTM (Fig 7.2)
• SPECSTM Infrared (Fig 7.3)
• TruveloTM (Fig 7.4)
Fig 7.2 - GatsoTM camera
• TraffipaxTM (Fig 7.5)
• DS2TM
• SpeedCurbTM
The following are not speed cameras and are not
covered by RoadPilot Pro • Redlight cameras (used to record Red
Light jumping)
• Traffic Masters (attached to Motorway
overpasses - used to monitor traffic flow)
Fig 7.3 - SPECSTM camera
7.3 Update pricing
After you buy your RoadPilot Pro, database
updates are free for the first six months.
Subsequently the updates are charged on an annual subscription basis - refer to www.roadpilot.com
for details on current prices.
Note - If you do not keep your RoadPilot Pro updated it will eventually stop working.
Fig 7.4 - TruveloTM camera
7.4 Using RoadPilot Pro in other countries
RoadPilot Pro is supplied complete with a database
covering the country of sale. Databases for other
countries are available for an additional fee. At the
time of going to press, the database for Benelux
(Belgium/Netherlands /Luxembourg) and Norway
is also available. Details are available by logging on
to www.roadpilot.com or telephoning us on 0870
2401702.
Fig 7.5 - TraffipaxTM camera
Page 50
7.5 Trouble shooting
If you have any problems with the operation of your RoadPilot Pro, please refer to this troubleshooting
guide before contacting us (see section 7.6).
Problem
The RoadPilot shows Nav Off and
doesn’t get a position fix
I can’t connect to the RoadPilot
Database to update my RoadPilot
I’ve just passed a speed camera and
wasn’t warned about it by my
RoadPilot
The Mileage Manager shows no
journeys or doesn’t show all the
journeys I expect
I’m updating the database and the
display shows “BOOTLOADER”.
Possible cause
Solution
1. If this is the first time the unit has
been used, then it may take up to
15 minutes to get a first fix (see
Cold Start)
1. Allow at least 15-20 minutes for
the RoadPilot GPS to cold start
2. The antenna is positioned where
it cannot get an adequate view of
the sky
2. Reposition the antenna - check
the signal strength bar on the satellite status screen to get the best
position for maximum reception
3. The antenna is fitted on the
dashboard and the vehicle has a UV
filtered windscreen (the metallic
particles in tinted windscreens can
sometimes interfere with the satellite signals)
3. The antenna is magnetised and
can be attached to the roof of the
vehicle if necessary
4. Antenna is upside down
4. Ensure the antenna is fitted the
right way up, with the domed surface pointing vertically.
1. You’re not connected to the internet
1. Check your internet connections
and consult with your ISP if necessary.
2. The RoadPilot Database server is
offline for maintenance
2. Call the Help Desk
3. The RoadPilot software is not
compatible with your computer
3. Software is for IBM compatible
PCs only
1. You have speed sensitivity
switched on and your vehicle was
not exceeding the camera’s trigger
speed
1. Turn speed sensitivity off if you
want to be alerted of any cameras
around you
2. It is a new camera that is not on
the database yet
2. Press STORE LOCATION on the
main menu to log the position of
the camera
3. Off Heading warnings are off
and the camera is on the opposite
carriageway.
3. Turn Off Heading warnings on
(see sections 4.2.2, 4.2.3)
1. You haven’t downloaded your
journey data from the RoadPilot
1. Run Mileage Manager using the
RoadPilot Synchronization
program to download data
2. Filter settings are activated
2. Switch off filter
The database update has been
interrupted.
Remove the RoadPilot, re-attach
and retry the update process/
Page 51
7.6 Technical Support
If you have any queries, the unit doesn’t appear to be working properly, or you are unhappy with the performance of your RoadPilot Pro, please contact the RoadPilot Information Help Line on 0870 2401702.
If you have any comments or testimonies about your RoadPilot Pro, please email us with them at
[email protected] and we may publish them on our website.
7.7 Specification
Voltage Range
6-14 Volts
Memory backup
Rechargeable internal Li-Ion battery
Operating Temperature
0-50ºC
GPS Engine
Second generation, 12 parallel channel
Shock Resistance
To 16g
Memory Size
Up to 50,000 locations
Database Update Time
Typically < 1 minute (warm start)
7.8 Spares & Accessories
The following accessories are available for your RoadPilot Pro • Antennae with varying length cables
• Extension cables
• Additional Mounting Arms / Power Clips
• Radar Detector
• Additional LaserPilots
Call us or log on to www.roadpilot.com for details of the full range of accessories
Page 52
7.9 Care and Maintenance
Your RoadPilot Pro is designed and constructed to the highest standards, but in order to enjoy this product for many years to come it should be treated with care.
• Keep the unit and its peripheral parts out of the reach of small children.
• Do not expose the unit to extremes of temperature for long periods of time. We recommend that the
unit is stored in the glove compartment of your car or taken inside when not in use, particularly during
winter months where prolonged exposure to moisture could damage the unit.
• Do not drop, knock or shake the unit. The touch screen display is a precision component and hard
impacts could permanently damage it.
• Do not use harsh chemicals, cleaning solvents or strong detergents to clean RoadPilot Pro. Do not submerge it in any liquid - it is not waterproof. If it needs cleaning, wipe it with a soft cloth dampened with a
mild soap and water solution.
• Your RoadPilot Pro is a valuable piece of equipment and therefore we recommend that you remove it
from your vehicle when left unattended to prevent theft.
7.10 Warranty
RoadPilot Pro is guaranteed against defects in materials and construction. RoadPilot Pro is covered by a
one year warranty from the date of purchase, which covers normal use in accordance with the operating
instructions.
If your RoadPilot Pro is found to be defective within the terms of the warranty it will be repaired or
replaced at our discretion without charge. We will make every effort to replace or return units within 48
hours if possible. We can only send a replacement unit if all parts of the suspect unit are returned.
Address all returns to The Returns Department at the address on page 2 of this manual.
Before returning your unit to us, please contact our Customer Service department on 0870 2401702,
who will give you a returns reference number, which must be included with the returned unit. Failure to
comply with this procedure may result in your unit being returned to you without being investigated by
us.
In order to qualify for this guarantee you must have registered your unit with us.
WARNING - RoadPilot Pro contains no user serviceable parts - in the event of a fault, please contact the
RoadPilot Technical Team. Any product used outside of its design parameters or altered in any way,
including opening the unit, the cutting of wires, cigarette adaptors, extension antenna wires and the
radar horn will render the guarantee invalid. Please check the wiring specifications carefully before
installation
Our guarantee is in addition to and does not affect your statutory rights as a consumer.
Page 53
7.11 Registration
RoadPilot Pro is shipped with the most up to date
version of the database and can be used straight
from the box. However we recommend that the
database is updated before the unit is used for the
first time (see section 5.3).
The first time you connect to the network, you
must fill in a short registration form, which is necessary if you are to be able to update the database
in your RoadPilot Pro.
The first page of the Registration form displays the
registration number of your RoadPilot Pro (Fig 7.6).
You have the option to register later by clicking the
box marked Remind me later, but we recommend
you register immediately if possible.
Fig 7.6 - Registration page 1
Click Next to move on to the next page.
Page two asks you to enter your personal details
such as name, address, contact numbers and additional information to enable us to better tailor our
service to your requirements (Fig 7.7)
Click Next to move on to the next page, or Back to
return to the previous page.
Page 54
Fig 7.7 - Registration page 2
Page 3 (Fig 7.8) asks you to enter the details of the
vehicle that RoadPilot Pro is to be used on, the
type of driving the vehicle is used for, your average
annual mileage and details of any advanced driving
courses taken.
Again, this information is used to tailor our service
to suit you, so we ask that you fill in as much detail
as possible.
Click Next to move on to the next page, or Back to
return to the previous page.
Fig 7.8 - Registration page 3
Page 4 requests information on the date, method
and reason for purchase along with other related
information (Fig 7.9).
Click Finish to complete the registration process
and start using your RoadPilot Pro.
Fig 7.9 - Registration page 4
Page 55
3d position fix 10
Odometer 11, 38
Off Heading 14
Off heading location 25
Offset 38
Online 7
Accessories 52
Accuracy 13
Addresses 39
Altitude 13
Analogue 11
Antenna 10, 48
Audio mute 8
Auto range 26
AutoRoute 39
PC 6, 35, 36
Position fix 13
Proximity alert 24, 26
Proximity alert range 7
Proximity indicator 7
Benelux 22, 50
Auilt up area 26
Radar 6, 32, 33, 46, 47
Radar enable 32
Radar mute speed 33
Radar stealth speed 33
Range 8, 14, 24, 27
Redlight camera 50
Registration 54
Camera 6, 14, 26
Camera page 9, 14
Category 41
Clear track 12
Cold start 7
Compass bearing 8
Contrast 19
Country 22
Sat Track 10
Satellite 6, 7, 10, 49
Satellite status page 9, 10
SDD 5
Sensitivity 34
Serial number 23
Set Time 21
Setup 18
Setup page 9
Show Off Heading Location 14, 25
Signal strength 10
Spares 52
Specification 52
SPECS 50
Speed 13
speed camera 47
Speed camera detector 6
Speed detection device 5
Speed limit 6, 8
Speed Over Ground 11, 49
Speed sensitive 26
Speeding 5
Speedo page 9, 11
Speedo type 20
Store Location 15
Store Waypoint 15
Dashboard 42, 48
Database 6, 7, 23, 36, 41, 50
Daylight Saving Time 21
Dead Reckon 10
Delete Location 16
Deleting 41
Digital 11
Download 39, 41
Early Warning 27
Editing 40
Export 38, 39
False detection 32
Filter 37
Gatso 50
General 18
Global Positioning System 6, 49
GMT 21
GPS 6, 34, 46, 49
GPS page 9, 13
Hard wiring 43
Heading 13
Help Line 23, 52
Target 14
Technical Support 52
Temperature 23
Time 21
Totals 38
Tracking page 9, 12
Traffic Master 50
Traffipax 50
Trip meter 11
Trouble shooting 51
TRUVELO 50
Types of camera 50
Information 23
Information display 7, 8
Installation 42
Internet 6
Journey 36, 37, 38, 40, 41
K band 32, 34
Ka band 32, 34
Language 22
Laser 6
Latitude 13
Least Sq 2d 10
Least Sq 3d 10
Limitations 48
Longitude 13
Units 19
Update pricing 50
Urban Tunnelling 48
UTC 21
UV shielding 48
Maintenance 53
Map 40
Mapping 39
MapPoint 39
Mileage category 7
Mileage Manager 7, 18, 30, 36, 37, 38
Mileage Summary 9, 16
Mileometer 11
Motorway 26
Multifunction display 7, 9
Volume 18
Warm start 7
Warn off heading location 25
Warnings 18, 24
Warranty 53
Waypoint 9, 14, 15
Windscreen 48
X band 32, 34
Zoom 12
New camera location 9, 15
No Nav 10
Page 56
RoadPilot Limited
43 Riverside 2
Sir Thomas Longley Road
Rochester, Kent ME2 4DP
Tel 0870 2401702
Fax 0870 2401704
Email [email protected]
Web www.roadpilot.com