1
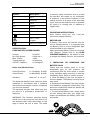
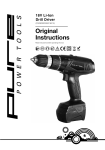
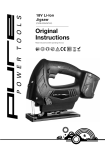
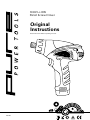
10.8V Li-ION
Pistol Screw Driver
Original
Instructions
Read instructions before operating this tool.
H10100
PURE SCREWDRIVER
EC - DECLARATION OF CONFORMITY
TABLE OF CONTENTS
We, the importer
Evolution Power Tools Ltd.
Venture One
Longacre Close
Sheffield
S20 3FR
EC - Declaration of Conformity
Important Information
12 Month Limited Warranty
02
General Safety Rules
Additional Specific Safety Rules
04
Labels and Symbols
06
Driver Overview
07
Specification
07
Operation
08
Maintenance
09
Environmental Protection
09
Service Parts Lists
09
03
03
05
Declare that the product
Part numbers: PUREDRIVER10
Evolution: Pure
Battery Screwdriver
Complies with the essential requirements
of the following European Directives:
2006/42/EC – Machine Directive
2006/95/EC – Low Voltage Directive
2004/108/EC – EMC Directive
2002/95/EC – Restriction of the use
of Certain Hazardous Substances in
Electrical and Electric Equipment
Standards and Technical specifications
referred to:EN
EN
EN
EN
EN
61000-6-3:2007
55014-1:2006
55014-2+A1:2001
60745-1:2006
60745-2-2+A12:2009
All documentation is held on file at the
above address and is available, on request
for review.
Authorized Signatory
Date: 29/8/2010
Name: Mr Matthew J Gavins
Position: Managing Director
Year of Manufacture: 2010
2
10.8V Li-ION
Pistol Screwdriver
IMPORTANT
Please read these operating and safety
instructions carefully and completely. For
your own safety, before using this equipment
check that the voltage is correct and that all
handles and parts are firmly secured. If you
are uncertain about any aspect of using this
equipment, please contact our Technical
Helpline.
Technical Helpline UK 0870 609 2297
Technical Helpline USA 1-866-EVO-TOOL
PURE COMPACT 10.8V SCREWDRIVER
Congratulations on your purchase of
an Evolution Power Tools Pure 10.8V
Compact Screwdriver. Please complete
your product registration on line to validate
your machine’s warranty period and ensure
prompt service if needed. We sincerely
thank you for selecting a product from
Evolution Power Tools.
12
MONTH
LIMITED
WARRANTY.
Evolution power tools reserves the right to
make improvements and modifications to
design without prior notice.
Evolution Power Tools will, within twelve (12)
months from the original date of purchase,
repair or replace any goods found to be
defective in materials or workmanship. This
warranty is void if the tool being returned has
been used beyond the recommendations in
the Instruction Manual or if the machine
has been damaged by accident, neglect,
or improper service. This warranty does not
apply to machines and / or components which
have been altered, changed, or modified
in any way, or subjected to use beyond
recommended capacities and specifications.
Electrical components are subject to
respective manufacturers’ warranties. All
goods returned defective shall be returned
prepaid freight to Evolution Power Tools.
Evolution Power Tools reserves the right to
optionally repair or replace it with the same
or equivalent item. There is no warranty –
written or verbal – for drill bits. In no event
shall Evolution Power Tools be liable for loss
or damage resulting directly or indirectly
from the use of our merchandise or from any
other cause. Evolution Power Tools is not
liable for any costs incurred on such goods
or consequential damages. No officer,
employee or agent of Evolution Power Tools
is authorized to make oral representations
of fitness or to waive any of the foregoing
terms of sale and none shall be binding on
Evolution Power Tools. Questions relating
to this limited warranty should be directed
to the company’s head office, or call the
appropriate Helpline number.
GENERAL SAFETY RULES
WARNING
When using electric tools, basic safety
precautions should always be followed to
reduce the risk of fire, electric shock and
personal injury.
Please read all of these instructions before
attempting to operate this machine. Save
this manual for future reference.
1. Keep work area clear. Cluttered work
areas invite accidents.
2. Consider work area environment. Do
not expose tools to rain. Do not use tools in
damp or wet locations. Keep work area well
lit. Never use tools near flammable liquids
or gases.
3. Protect yourself against electric shock.
Avoid body contact with earthed or grounded
surfaces.
3
4. Keep other people away. Do not let others,
especially children, come close to the work,
and touch the tool or the extension lead.
Keep them away from the work area.
5. Store idle tools. When not in use, tools
should be stored in a dry locked-up place,
out of children’s reach.
6. Never force the tools. Your tools will be
more efficient and safer when used at the
rate for which they were intended.
7. Use the right tool. Do not force small tools
to do the job of a heavy duty tool. Do not use
tools for purposes not intended; for example
do not use circular saws to cut tree limbs
or logs.
8. Dress properly. Do not wear loose clothing
or jewellery which may get caught in moving
parts. Non-skid footwear is recommended
when working outdoors. If you have long
hair, tie it back and wear protective hair
covering.
9. Use protective equipment. Use safety
glasses. Use face or dust mask if cutting
operations create dust.
10. Connect dust extraction equipment. If
the machines have a connection for dust
extraction equipment, ensure these are
connected and properly used.
11. Do not damage the cable. Never pull
the power cable to disconnect the machine.
Keep the cable away from heat, oil and
sharp edges.
12. Secure workpiece. Where possible,
use clamps or a vice to hold the workpiece.
It’s much safer than using your hands.
13. Don’t over reach. Keep proper footing
and balance at all times.
14. Maintain tools in good working condition.
Keep cutting tools sharp and clean for better
performance and optimum safety. Follow
instructions for lubricating and changing
accessories. Inspect power cables regularly
and, if damaged, have them replaced by an
authorised service centre. Inspect extension
cables regularly and replace immediately if
damaged. Keep handles dry, clean and free
from oil and grease at all times.
4
15. Disconnect tools. Disconnect tools from
the power supply when not in use, before
any maintenance operation and when
changing accessories such as blades, bits,
cutters, etc.
16. Remove adjusting keys and spanners.
Get into the habit of checking that adjusting
keys and spanners have been removed from
the machine before turning it on.
17. Avoid unintentional starting. Ensure
switch is in “off” position before plugging in
the machine.
18. Use proper extension leads. When the
tool is used outdoors, use only extension
leads intended for outdoor use and labelled
as such.
19. Stay alert. Concentrate on what you
are doing, use common sense and do not
operate the tool when you are tired.
20. Check that no part is damaged. Before
using a tool, make sure that it is in good
working order. Check the alignment and
condition of moving parts, mounting and any
other aspect that may affect its operation. A
guard or other part that is damaged should
be properly repaired or replaced by an
authorised service centre unless otherwise
indicated in this instruction manual. Do not
use the tool if the switch does not turn on
and off.
21. Warning. The use of any accessory or
attachment other than one recommended in
this instruction manual may present a risk of
personal injury.
22. Have your tool repaired at an authorised
service centre. This electric tool complies
with current safety rules. Repairs should
only be carried out by an authorised service
centre using original spare parts. Failing
this, the user could expose themselves to
considerable danger.
10.8V Li-ION
Pistol Screwdriver
HEALTH ADVICE
Warning! When drilling, sanding, sawing or
grinding, dust particles will be produced. In
some instances, depending on the materials
you are working with, this dust can be
particularly harmful to you (e.g. lead from
old gloss paint).You are advised to consider
the risks associated with the materials you
are working with and to reduce the risk of
exposure.
You should:
-Work in a well-ventilated area.
-Work with approved safety equipment, such
as dust masks that are specially designed to
filter microscopic particles.
ADDITIONAL SAFETY RULES FOR YOUR
PURE SCREWDRIVER
1. Do not expose to rain or water.
2. Do not drop, shake or strike the battery.
3. Wear hearing protection when necessary.
Exposure to noise can cause hearing loss.
4. Cutting/scraping blades and accessories
can become very hot. Take care when
changing or handling any bits or accessories.
5. Recharge the battery only with the
charger specified by the manufacturer.
A charger that is suitable for one type of
battery pack may create a risk of fire when
used with another battery pack.
6. Use this power tool only with specially
designated battery packs. Use of any
other battery packs may create a risk of
injury and fire.
7. When the battery pack is not in use,
keep it away from other metal objects like
paper clips, coins, keys, nails, screws or
other small metal objects that can make a
connection from one terminal to another.
Shorting the battery terminals together may
cause burns or a fire.
8. Under extreme conditions electrolyte
may be leak from the battery.
If contact accidentally occurs, flush your
skin with water. If electrolyte contacts
your eyes, additionally seek medical help.
Electrolyte from the battery may cause
irritation or burns.
9. Hold the tool by the insulated gripping
surfaces, especially when performing an
operation where the bit may contact hidden
wiring. If the bit contacts a ‘live’ wire, exposed
metal parts of the power tool could become
‘live’ and give the operator an electric shock.
10. If possible, use clamps or a vice to hold
your work.
11. When driving screws into walls, floors or
similar areas, make sure, as far as possible,
that there are no services (gas or water
pipes, electric cables etc) in the path of
the screw. Striking hidden services could
cause injury to the user and damage to the
property.
WARNING
This machine is not intended for use by
persons (including children) with reduced
physical, sensory or mental capabilities,
or lack of experience and knowledge,
unless they have been given supervision or
instruction concerning the safe use of the
machine by a person responsible for their
safety.
Children should be supervised to ensure
that they do not have access to, and are not
allowed to play with, this machine.
SAFETY LABELS & SYMBOLS
WARNING!
Do not operate machine if warning and / or
instruction labels are missing or damaged.
Contact Evolution Power Tools for replacement
labels.
5
Annotated photograph of Screw Driver
2
1
6
5
3
4
8
7
1. ¼” HEX TOOL-LESS COLLET
2. TORQUE ADJUSTMENT RING
3. FORWARD/REVERSE SELECTION LEVER
4. SOFT GRIP HANDLE
5. ON/OFF TRIGGER SWITCH
6. LED LIGHT
7. INSERTED BATTERY PACK
8. BATTERY PACK LOCKING TAB
6
10.8V Li-ION
Pistol Screwdriver
Symbol
Description
V
Volts
A
Amperes
Hz
Hertz
Min
Speed
~
Alternating Current
No
No Load Speed
-1
Double Insulated
Wear Safety
Goggles
Wear Ear Protection
SPECIFICATION
PURE BATTERY SCREW DRIVER
Voltage:
No Load Speed:
Max. Torque:
Torque settings;
COLLET Capacity:
10.8V-DC
0-500 min-1
10Nm
24 positions
¼” HexagonT
Noise and Vibration Data
Sound Pressure:
Sound Power:
LPA 74.8dB(A) K=3dB
LWA 85.8dB(A) K=3dB
Vibration:
1.394 m/s2 K 1.5 m/s2
The declared vibration total value has been
measured in accordance with a standard
test method and may be used for comparing
one tool with another.
The declared vibration total value may also
be used in a preliminary assessment of
exposure.
WARNING: The vibration emission during
actual use of the power tool can differ from
the declared total value depending on the
ways in which the tool is used. The need
to identify safety measures and to protect
the operator are based on an estimation
of exposure in the actual conditions of use
(taking account of all parts of the operating
cycle, such as the times the tool is switched
off, when it is running idle, in addition to
trigger time)
OPERATING INSTRUCTIONS
Note: Before using this tool, read the
instruction manual carefully.
BEFORE USE
A Battery Pack must be inserted into the
tool as detailed below. It is important that
the Battery Pack is of the designated type
recommended for this machine.
Newly purchased Battery Packs do not come
fully charged. Please refer to the PURE
CHARGER MANUAL for full details on how
to charge the Battery Pack for this machine
1. INSTALLING OR REMOVING THE
BATTERY PACK
Check that the battery pack is of the
designated type for this machine. We
recommend that the slide switch is locked
in the t position when removing or inserting
the Battery Pack. Refer to section 2 below.
a. Slide the Battery Pack into the base of
the tools handle. The Battery can only fit one
way round.
b. Gently push the Battery Pack fully into the
tools handle to engage the locking tabs. The
electrical connections inside the handle will
be made automatically.
c. To remove the Battery Pack, simply press
the two locking tabs with your finger and
thumb and withdraw the Battery Pack from
the handle.
7
2. ON/OFF TRIGGER SWITCH
This tool is fitted with a variable speed
trigger switch that delivers higher speed and
torque as the trigger pressure is increased.
The trigger switch is also fitted with a brake
function which stops the chuck immediately
when you quickly release the trigger.
3. TRIGGER SWITCH LOCK
To lock the trigger switch in the OFF position,
slide the forward/reverse selection control to
its central position.
4. FORWARD/REVERSE SELECTION
For screwdriving use the forward rotation
marked ► on the selection lever. Push the
lever fully to the right.
For reverse rotation, necessary when
removing screws etc, push the selection
lever fully to the left. Marked ◄ on the
selection lever.
Only operate the selection lever when the
screwdriver is at a complete stop.
5. COLLET OPERATION
This screwdriver is equipped ¼” Hex Tool-Less
Collet Chuck.
a. To open the collet pull the collet sleeve forwards.
b. Insert the required screwdriver bit into the
open collet chuck and push fully home.
c. Release the collet sleeve. Check that the
screwdriver bit is being held by the collet chuck.
6. TORQUE ADJUSTMENT
Torque is the rotary force that the screwdriver
can deliver. This screwdriver has a 24
position torque adjustment ring.
The higher the number the torque
adjustment ring is set at, the greater the
torque delivered by the screwdriver.
For guidance:
1-4 for driving small screws
5-9 for driving screws into soft material
10-15 for driving screws into soft and hard
materials
16-24 for driving screws into hard materials
and for maximum torque.
8
We recommend that the operator trials any
torque application by starting with a low
setting. Progressively increase the torque
setting until the desired outcome is achieved.
7. THE LED LIGHT
The LED light works automatically when the
trigger switch is depressed. This feature is
useful when using the screwdriver in lowlight
situations (e.g. in a cupboard or cabinet)
8. DRIVING/LOOSENING
SCREWS OR BOLTS
Always select the correct screwdriver bit
i.e. a Phillips driver bit for a Phillips headed
screw. If possible, try to determine the
torque setting required by having a practice
run on a spare piece of material
1. Ensure that the screwdriver bit is fully
engaged in the screw to be driven and is the
correct size and type.
2. Hold the screwdriver ‘in line’ (axially) with the screw.
3. Apply pressure to the trigger switch so
that the screwdriver bit starts to slowly
rotate in the required direction.
4. Exert forward pressure on the bit to the
extent that it always remains engaged with
the screw, as the screw is either driven in or
removed from the workpiece.
5. Adjust the trigger pressure to increase the
speed of rotation.
9. MAINTENANCE
Your Pure Screwdriver requires no
additional lubrication or maintenance. There
are no user serviceable parts in your Pure
Screwdriver.
Keep the tool clean, but do not use chemical
cleaners which may damage the plastic
parts. Clean with a dry cloth. Ensure that the
motor ventilation slots are kept clean.
ENVIRONMENTAL PROTECTION
Waste electrical products should not be
disposed of with household waste. Please
recycle where facilities exist. Check with your
Local Authority or retailer for recycling advice.
10.8V Li-ION
Pistol Screwdriver
Notes
9
Notes
10
10.8V Li-ION
Pistol Screwdriver
Notes
11