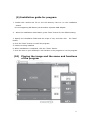
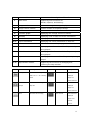
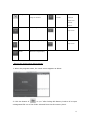
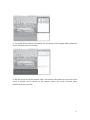
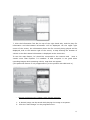
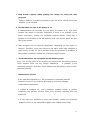
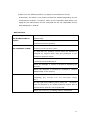
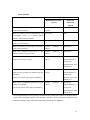
1
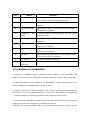
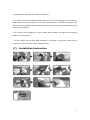
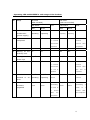
Black Box for Vehicle (Driving recorder)
* Before you start…
Thank you for choosing Caidrox (HD-2000/HD-2100)!
In order to use this product more conveniently, please read the information
contained in this user’s guide carefully.
Please read the installation instructions and operating guidelines as well as cautions
contained in this user’s guide carefully.
●
(HD-2000/HD-2100) is the brand of CHA Bio & Diostech Co.,
Ltd.(hereinafter to be called Product).
● All rights of the design and S/W of
(HD-2000/HD-2100) belong
to CHA Bio & Diostech Co., Ltd and are protected by Copyrights.
● The changes in
(HD-2000/HD-2100) to improve its performance
can be done without prior notice to the users.
● This user’s guide was made based on the present time and there could be
technical and editorial errors or omissions.
● This user’s guide can be amended without prior notice to the users.
Contents
1. Components
2. Names and function of components
3. Cautions in installation
4. Cautions in using the Product
5. Cautions in using SD memory card
6. Cautions about GPS
7. Installation instructions
8. Instructions for use
9. Installation guide for program
10. Instructions for use of program
1
11. Product Specifications
12. Upgrading firmware
13. Product specifications
14. Before you inquire for A/S
15. Maintenance service
16. Warranty
(1) Components
Power Cable
Fix Clip (8EA)
Adhesive Tape
User guide Manual
Mount
Set screw (2EA)
SD Memory Card
(2) Names and function of components
2
No.
Name
1
Function
GPS
Receiving GPS information as location, time, speed,
etc. (only for the model supporting GPS)
2
Camera lens
Shooting images, 1.3 M Pixels CMOS Digital sensors
applied.
3
Power connection
When power cable is connected, electric power is
automatically supplied.
4
5
Emergency
REC
Press this button in case that you want to record
button
image manually.
Supporting frame
Jointing part of the main body and mount fixed with
setscrews.
6
Setscrew
Screw that prevents relative motion after direction
(lens angle) is aligned.
7
LED Indicator
Blinks when the power is connected or image
recording is proceeding.
8
GPS LED
Blinks when GPS (HD-2000) is connected or electric
power (HD-2100) is connected.
9
Microphone
For input of audio information.
10
SD Memory
Used when SD Memory Card is inserted or removed.
Card SLOT
(3) Cautions in installation
1. Read the installation guide completely before beginning the installation and
attach the Product on the appropriate location inside the vehicle in the correct way.
2. Make sure that the power cable is not damaged or broken. And also take care
that the cable is not damaged when wiring is done.
3. Make sure that the Product attached on any surface will not drop when operating
the vehicle. If it is not attached properly, it may cause the Product not functioning
in a good condition or interfering with the safe operation of the vehicle
4. Take care that installation location chosen will not cause the Product to interfere
with the driver’s line of sight when operating the vehicle.
Especially, fix the power cable with the included clips to make sure that it will not
3
interfere with the driver’s line of sight or the operation of the vehicle.
5. Before attaching the Product to any surface, make sure to clean the surface
thoroughly. Adhesion may be reduced due to foreign substances.
(4) Cautions in using the Product
1. Please read cautions and warnings contained in this user’s guide carefully to
assure proper and safe use of the Product. We are not responsible to indemnify for
any accidents which occur due to the user’s failure of complying with such cautions
and warnings.
2. Do not use this Product for any other purposes than specified in this user’s guide.
3. Use the correct power cable and accessories only authenticated by us. We are
not responsible for the damage of the Product and its consequent results which
occur due to using the incorrect power cable and accessories.
4. For the safety reason, do not adjust the Product when operating the vehicle. This
may be the cause of the accident.
5. Protect from mechanical shock, which can cause the damage or malfunction of
the Product.
6. Do not remove the power cable when the Product is functioning, which can cause
the damage of the Product.
7. Do not use under a voltage other than the rated voltage, which can cause the
damage of the Product or a fire. Caidrox (HD-2000/HD-2100) uses the voltage of
DV 12V~DV 24V.
8. Do not leave the Product in a place under high temperature or low temperature
for a long time. If the Product is exposed to sunlight for a long time in summer time,
or left in a place where the temperature is too low, it can cause deformation or
malfunction of the Product.
4
9. Do not put any foreign substances in the Product, which can cause the damage
of the Product, a fire or an electric shock.
10. Do not touch the part of electric power on the Product with wet hands, and take
care that water does not get into the inside of the Product, which can cause the
malfunction of the Product, a fire or an electric shock.
11. Do not use water, cleaning chemicals, detergents, or any liquid to clean the
Product, but use a dry, soft cloth.
12. Never disassemble or attempt to alter the Product. Unauthorized disassemble or
attempted alteration will void the warranty. For checking or repair, contact our
company.
13. If you suspect a problem with the Product, or if there is a functional problem in
it, stop using the product immediately and contact our Customer Support Center.
14. Take care that dust or dirt will not be stuck in the area of camera lenses...
15. Using the Product for a long time in standing-by state of the vehicle after the
engine is stopped (start switch is ACC, ON state) can cause the electric discharge of
the battery.
(5) Cautions in using SD memory card
1. Note that only SD Memory Card specialized for Caidrox (HD-2000/HD-2100) can
be used. Therefore, contact our Customer Support Center if it is lost or damaged.
2. Do not remove the SD Memory Card when using the Product, which can cause an
operational problem and the malfunction of SD Memory Card or the Product. Before
removing the SD Memory Card, make sure to terminate the operation of the
Product.
3. Do not use SD Memory Card with other products (navigation, digital camera,
MP3, PMP, etc.) alongside with Caidrox (HD-2000/HD-2100).
4. If any damage on SD Memory Card is found during the warranty period, contact
5
where you purchased it or our Customer Support Center to exchange with another
SD Memory Card. In case that you purchase a new SD Memory Card after the
warranty period is terminated, you are highly recommended to choose our SD
Memory Card which is of the best quality as we guarantee.
5. Using a broken or a low quality SD Memory Card can cause such problem as
degradation of recording speed and damage the recorded image.
6. Do not put SD Memory Card near magnets or magnetic fields, which can erase
the data in it and even can damage the card itself.
7. Keep SD Memory Card not within the reach of children. They can destroy or
swallow it.
8. If there is not enough storage space for the recorded image, it is recorded in
sequential order. Therefore, the images which you need to keep permanently had
better be saved in your PC separately.
9. Check if SD Memory Card is write-protected (locked) before you start to use the
Product. It does not work if SD Memory Card is write-protected.
(6)
Cautions about GPS
1. If the Product is used for the first time, or has not been used for a long-time (3
days or more), it may take a long time to search the current location (initial
reception time).
2. The reception of GPS signal may drop by the effects of climate such as rain and
fog or the interference of electromagnetic wave due to its nature
3. Note that the proper temperature for GPS receiver’s function is 0~60˚C. In a hot
summer or cold winter day, the temperature inside the car is higher or lower than
the outside temperature. Therefore, take care that the proper temperature is
maintained for GPS receiver.
4. Reception condition may be poor under the overpass, tunnel, or in the buildings
6
congested area because of reception hindrance
5. In some vehicles with special glass coating or sun-proof coating on the windows,
GPS receiver may not function in a normal condition due to unstable reception. And
also the electromagnetic wave emanating from the various vehicle instruments may
cause such problems.
6. In vicinity of tall buildings or high voltage power cables, the signal may become
weaker or interrupted.
7. If the vehicle moves while GPS reception is not good, it may take more time to
search the current location than standstill state.
(7)
Installation Instruction
7
1. Combine the Mount with the Main Body.
2. Fix firmly the Main Body and the Mount using Setscrews.
3. Adjust the installation angle to align the Main Body vertically.
4. When the angle is properly adjusted, tighten the Setscrew using a coin.
5. Insert the SD Memory Card into the Main Body.
6. Connect the Power Cable Jack to the Main Body.
7. Remove the backing from the adhesive mounting tape
8. Locate the system in the middle of windshield
9. Use the fix clip to fix the cables.
10. When the angle and cables are properly adjusted, connect the power cable to
cigar jack
(8) Instructions for use
-
Operating the product
1. First, check whether SD Memory Card is inserted in the Main Body.
2. If the vehicle engine gets started, the power will be automatically supplied.
3. Once power is supplied, the initialization of the Product will proceed, and the red
LED and blue LED will flash repeatedly.
※ If SD Memory Card is not inserted or an error occurs, red/blue LED blink
repeatedly and beep will sound continuously until SD Memory Card is
inserted or the Product is powered off.
4. When the initialization is completed, red LED will flash on after beep sounds five
times.
※ In case of the Product without GPS built in (HD-2100), both red/blue LEDs
will blink at the same time after the completion of the initialization.
5. Video recording proceeds normally when operating the vehicle.
1) Image recording in an ordinary mode setting
After power is supplied, video recording is being done in 5 minutes process time
unit. In case that an event occurs, the exact location where the event occurs at the
particular time will be stored.
8
2) Image recording in an event mode setting
When the Product detects a shock of more than the regular value, the images
before and after the event occurs will be recorded. The storing time of image before
and after the event occurs can be set arbitrarily by the user within the range from
10 seconds (min.) to 30 seconds (max.).
3) Image recording by the emergency REC function
The emergency REC function is available only when the event mode is set. By
pressing the Emergency REC Button, the image before and after pressing the
button can be recorded. The time of recording can be set arbitrarily by the user
within the range from 10 seconds (min.) to 30 seconds (max.).
.
6. Blue LED will flash on after receipt of GPS (a few seconds ~a few minutes).
※ applied only to the products with GPS built in (HD-2000).
7. All the features of the Product operate normally.
* If there is not enough storage space for the recorded image, it is recorded in
sequential order. Therefore, the images which you need to keep permanently had
better be saved in your PC separately.
- Stopping the operation of the Product
When the engine of the vehicle is stopped, the main body of the Product is also
powered off.
Follow the steps below to remove the SD Memory Card.
1. Turn off the engine of the vehicle, and make sure that the start up key is pulled
out of the vehicle.
2. When the operation of the Product is stopped, both red LED and blue LED will be
turned off after the beep sounds five times. LED light fades away slowly.
3. When all LEDs are turned off normally, remove the SD Memory Card.
* If you remove the SD Memory Card before the operation of the Product is
stopped, an error can occur in the recorded images. Remove the SD Memory Card
after the operation of the Product is completely stopped.
9
- Operating LED and BUZZER in each stage of the Product
No
Stage
.
HD-2000
HD-2100
(GPS included)
(GPS not included)
BUZ
LED status
1
RED
BLUE
Product
On/off
On/off
Initialization
repeating
repeating
on
off
BUZ
LED status
-
RED
BLUE
On/off
On/off
repeating
repeating
On
on
-
(power supply)
2
Initialization
completed
5
times
in
5 times in 0.5
0.5 seconds
seconds
interval after
interval
completion
completion
after
3
GPS connected
on
on
-
-
-
-
4
Storing
the
on
on
-
On
On
-
the
On/off
on
once
On/off
On
once
Off
off
5
off
off
5 times in 0.5
at
ordinary time
5
Storing
at
event time
6
Power off
times
in
0.5 seconds
seconds
interval after
interval
the
the
end
of
operation
7
SD
Card
inserted
or
not
an
after
end
of
operation
On/off
On/off
0.5 seconds
repeating
repeating
interval
On/off
On/off
When
once
once
On/off
On/off
0.5
seconds
interval
error
8
When
firmware
upgraded
the
On/off
On/off
When
once
once
proceeding,
4
4 times at
times
1
1
second
proceeding,
after
second
the
at
after
the completion
completion
10
(9) Installation guide for program
1. Double-click caidrox.msi file on the SD Memory Card to run the installation
wizard.
※ PC not supporting SD Memory Card needs a separate USB adapter.
2.
When the installation wizard starts, press "Next" button for the default setting.
3. Specify the installation folder and the scope of use, and then click
the "Next"
button.
4, Click the "Next" button to install the program.
5. Caidrox is being installed
6. When installation is completed, click the "Close" button.
7. Click the icon on your desktop or click Caidrox in the program to run the program.
(10) Playing the image and the name and functions
of the program
11
No.
1
Name
Main menu
Description of functions
Supporting such functions as
Outcall, Capture, and Setting..
2
Image window
Window showing the image display
3
Image control console
Control console for displayed image
4
Volume control
Volume modulation
5
G-sensor graph.
Displaying the change value of G-sensor
6
RECORD
Displaying a list of files and event information.
6-1
List of files
Displaying the list of files stored.
6-2
Event information
Displaying the event information in each file.
Information
File information and Displaying GPS information.
File information
Displaying the information of the file presently
7
7-1
being played.
7-2
GPS information
Displaying GSP information of the file presently
being played.
7-3
Map window
Displaying the location of the file presently being
played.
7-4
Map window console
Supporting the functions of enlarging and
reducing the Map window.
Button
Function
Description
File Open
Open an existing image
Button
Function
Description
Rewind
Rewind the
data file in SD Memory
displayed
Card.
image at 1
second interval.
Save
Save the active image in a
Image
bmp file
Fast Forward
Wind the
displayed
image at 1
second interval.
Print
Print the active image,
Fast Rewind
Rewind fast the
displayed
image at 10
seconds
interval.
12
Configuration
Set the configuration for
Very
using the Product
Forward
Fast
Wind fast the
displayed
image at 10
seconds
interval.
Play
Play a image
Zoom in
Zoom
in
the
map screen
Stop
Stop the image display
Zoom out
Zoom our the
map screen
Pause
Pause the image display
- Playing the image using play program.
1. When the program starts, the initial screen appears as below.
2. Click the button of “
file open”
after linking SD Memory Card to PC to open
a designated file out of the folder selected from the SD memory Card.
13
* File will be saved in the Always Movie folder on a regular mode, in the Event Mode
folder on a event mode.
3. Once a file is called out, the file index (save mode, time information, file names)
will align on the top of the right hand side.
4. Double click your desired file, and the image will be displayed on the top of the
left hand side on the main screen.
14
5. The graph at the bottom left display the sensitivity of the impact before/after the
event, vertically and horizontally.
6. On the event list at the bottom right, the location information at the time of the
event is stored. And it moves to the location where the event occurred when
double-click the event file.
15
7. Click the Information Tab On the top of the right hand side, and the play file
information and GPS-related information will be displayed. On the upper right
corner of the screen, the information about the file currently being played will be
displayed, and on the bottom right of the screen, a map showing the location of
vehicle in the GPS-related information is displayed at the same time.
To use this map feature, PC should be connected to the internet and
have a
version more than Explorer 7.0 installed. If GPS reception is not good when
recording images while operating vehicle, map does not appear.
(This particular feature is only supported only to the product with GPS built in.)
-
Storing and printing the images using playing program
1. A desired image can be saved while playing the image or at pause.
2. Click the “Save Image” on the programs menu.
16
3. Press "
Save" after input of the storage location and file name, and
the image is saved.
1. A desired image can be printed while playing the image or at pause.
2. Click the “Print Image” on the programs menu.
3. Press “Confirm” after the working printer is selected, and the image will be
printed.
-
Configuration
User
can
change
the
Product’s
configured
value
arbitrarily
by
using
the
“Configuration” in the program
(if SD Memory Card is formatted, the configured value is automatically changes to
the default value.)
17
1. Run the play program after connecting the SD Memory Card to PC.
2. Click “
Configuration” in the program menu on the top of play program, and
the configuration window as below will be displayed.
No.
1
Function
Storing Mode
Description
● Setting the ordinary (always) mode: Video
recording is being done in 5 minutes process
time unit. In case that an event occurs, the
exact location where the event occurs at the
particular time will be separately stored.
● Setting the event mode: When the Product
detects a shock of more than the regular value,
the images before and after the event occurs will
be recorded.
2
Setting the storing time of
● Setting the storing time of image before and
the event mode.
after the event.
● The storing time of image before and after the
event: It can be set arbitrarily by the user within
the range from 10 seconds (min.) to 30 seconds
(max.).
18
3
Setting the sensitivity of
● The sensitivity of G-Sensor can be set within
G-Sensor
the
range
from
level
1
to
level
5(basic
value=sensitivity level 3).
Insensible
sensible
Sensibility level 1
Sensibility level 5
(X:0.60, Y:0.60, Z:1.0)
(X:0.40, Y:0.40, Z:0.6)
● The sensitivity of G-Sensor can be set
arbitrarily by the user within the range from
level 1 to level 5(it is possible to put W, Y, Z
values for each sensitivity level).
Setting Audio
● Setting whether the audio recording function is
used
√
Setting Buzzer
audio recording supported
Setting whether the Buzzer function is used in
case of an event.
√ `Buzzer will operate when an event occurs.
- Upgrading firmware
Upgrading the firmware of HD-2000/HD-2100 and changing the setting value of
equipments are all done through the SD Memory Card.
Firmware can be downloaded in Caidrox homepage:
http://www.caidrox.com
1.
Remove the SD Memory Card from the Main Body after turning off the
power.
2.
Connect SD Memory Card to PC.
3.
Back up the files saved so far into the PC.
4.
Format the SD Memory Card.
(It is safe to upgrade the firmware in the SD Memory Card formatted. Make
sure to back up the saved images into the PC.)
5.
Download the file upgraded in the home page into the SD Memory Card.
6.
Insert SD Memory Card to the Main Body and turn on the power, firmware
19
upgrading will proceed automatically(when updating, red and blue LEDs
blink in 0.5 seconds interval at the same time and initialization will proceed
after the completion of updating).
* Upgrade process requires a stable power supply. If the power is off during
the upgrade process, it can cause a problem to the Product.
(11) Product Specifications
Contents
Spec.
Camera
Built-in Digital camera,1.3M pixel CMOS
View angle
142.5°
Resolution
640*480(VGA) upto 30fps
Sensor
Built-in 3D shock sensor against concussion, sudden break/step up
Data Storage
SD/SDHC memory card(2GB by default,16GB in max supportable)
Audio
Built-in Mic.
GPS
Built-in GPS(only for the model supporting GPS [HD-2000])
Rated Voltage
DC12V~DC24V
Operation
DC8V~DC38V
Voltage
Current
125mA(at DC12V)
Consumption
Operation
-10° C ~ -80° C
Temperature
Reserved
-20° C ~ -80° C
Temperature
Size(W*H*D)
60*107*19
Weight
100g
- Before you inquire for A/S
If you find any trouble in the Product, follow the action items as below to check first
if there is any failure.
If problems continue, contact seller or our Customer Support Center.
1. Power is not supplied to the product.
First, check once again whether the power cable is connected correctly. If
the problem continues, contact our Customer Support Center.
20
2. Map doesn’t appear when playing the image by using the play
program.
Check if internet is properly provided to your PC and a version more than
Explorer 7.0 is installed.
3. No LED flash on even if the power is on.
If LEDs(red/blue) do not flash on even when the power is on, first check
whether the power is correctly connected. If there is no problem in the
power connection, contact our Customer Support Center. There may a
problem in the Product or the SD Memory Card. Our service agent will take
care of the matter.
4. GPS reception can be blocked temporarily depending on the region or
location. Therefore, move the vehicle to the place where GPS reception is
good and try to wait for 3 to 5 minutes to see the condition of reception. If
the problem continues, contact our Customer Support Center.
5. The Product does not recognize the SD Memory Card.
First, turn off the power of the Product and remove the SD Memory Card to
check whether there are any foreign substances
or problem in the
connecting terminal. And also, check whether the SD Memory Card is writeprotected (locked).
-
Maintenance service
● Our CHA Bio & Diostech Co., Ltd. provides our customers with the
warranty service on our Products according to consumer damage
compensation regulations.
● CHABio & Diostech Co., Ltd.'s Customer Support Center or partner
companies will provide services when they received requests from the
customers.
● If you have any questions in using the Product, contact our Customer
Support Center, or use maintenance Q&A in the Caidrox home page.
21
● Make sure the following before you apply for maintenance service.
Sometimes, the data in the Product should be deleted depending on the
maintenance situation. Therefore, back up the important data before you
apply for the maintenance service. Note that we are not responsible for the
data damaged or deleted.
- Paid services
Service requested on
When adjusted simply with user’s guide and without
the Product with no
disassembly.
failure.
When
dust
and
foreign
substances
cleaned
and
removed inside the product.
Malfunction caused by
When the problem is caused by consumer’s careless
the consumer’s fault.
treatment and improper repair.
In case that the problem occurs when the Product is
repaired by anyone other than the personnel in our
Customer Support Center.
When the failure is caused by using supplies or option
products not provided by us.
When the damage or failure is caused by dropping the
Product.
When the problem is caused by consumer’s random
disassembly of the Product.
Other cases
When the problem occurs due to the natural disasters
(lightning, fire, damage from sea wind/water, flood,
etc.).
In case that the problem occurs when the
consumer
uses the Product in an unsafe electricity source due to
voltage shock that can not be protected.
When the durability of wasting parts is exhausted.
22
-
Free service
Types of damage
Contents of Compensation
Within the warranty
After the
period
warranty
period
When
a
major
problem
occurs
within
10days after purchase
Product
exchange
or
N/A
refund
When the problem on the performance and
Free repair
N/A
Free repair
Paid repair
functionality occurs in a normal status
within 1 month after purchase.
When the problem occurs due to the same
cause over three times.
When the problem occurs due to the same
Product
cause over four times.
refund
When
the
problem
occurs
due
to
the
Product
different causes over five times.
refund
When the servicing company loses the
Product
Product requested for repair.
refund
exchange
or
Paid repair
exchange
or
Paid repair
exchange
or
Refund the
depreciated price
of the sold
Products with 10%
added on it.
When the Product on a problem cannot be
Product
repaired even though the related parts are
refund
exchange
or
Refund the
depreciated price
available.
of the sold
(within the period of the parts’ availability )
Products with 10%
added on it.
When repair is impossible because no repair
parts are available.
Product
exchange
or
refund
(within the period of the parts’ availability )
Refund the
depreciated price
of the sold
Products with 10%
added on it.
* Free maintenance service can be provided only when the Product is broken within
1 year after purchase (within the warranty period). If the Product is used for any
business purpose, only half of the warranty period will be applied.
23