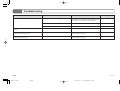
1
USER’S GUIDE
P
英
LD80-E-2
LD80_E_cover.p65
Page 1
02.10.31, 14:18
Adobe PageMaker 6.5J/PPC
GUIDELINES LAID DOWN BY FCC RULES FOR USE OF THE UNIT IN THE U.S.A. (not applicable to other areas).
NOTICE
This equipment has been tested and found to comply with the limits for a Class B digital device, pursuant to Part 15
of the FCC Rules. These limits are designed to provide reasonable protection against harmful interference in a
residential installation. This equipment generates, uses and can radiate radio frequency energy and, if not installed
and used in accordance with the instructions, may cause harmful interference to radio communications. However,
there is no guarantee that interference will not occur in a particular installation. If this equipment does cause harmful
interference to radio or television reception, which can be determined by turning the equipment off and on, the user
is encouraged to try to correct the interference by one or more of the following measures:
• Reorient or relocate the receiving antenna.
• Increase the separation between the equipment and receiver.
• Connect the equipment into an outlet on a circuit different from that to which the receiver is connected.
• Consult the dealer or an experienced radio/TV technician for help.
FCC WARNING
Changes or modifications not expressly approved by the party responsible for compliance could void the user’s
authority to operate the equipment.
273A-E-002A
LD80_E_cover.p65
Page 2
02.10.31, 14:18
Adobe PageMaker 6.5J/PPC
Welcome...
To the happy family of satisfied CASIO electronic musical instrument owners! To get the most out of the many features and functions of this musical instrument, be sure to carefully read this
manual and keep it on hand for future reference.
• The AC adaptor is not a toy.
• Be sure to disconnect the AC adaptor before cleaning the
product.
Important!
Please note the following important information before using this
product.
• Before using the optional AD-12 AC Adaptor to power the
unit, be sure to check the AC adaptor for any damage first.
Carefully check the power cord for breakage, cuts, exposed
wire and other serious damage. Never let children use an AC
adaptor that is seriously damaged.
• Never attempt to recharge batteries.
• Do not use rechargeable batteries.
• Never mix old batteries with new ones.
• Use recommended batteries or equivalent types.
• Always make sure that positive (+) and negative (–) poles are
facing correctly as indicated near the battery compartment.
• Replace batteries as soon as possible after any sign they are
getting weak.
• Do not short-circuit the battery terminals.
• The product is not intended for children under 3 years.
• Use only the following CASIO AC adaptor: AD-12.
CASIO ELECTRONICS CO., LTD.
Unit 6, 1000
North Circular Road
London NW2 7JD, U.K.
This mark is valid in the EU countries only.
Please keep all information for future reference.
E-1
273A-E-003A
LD80_E_01-07.p65
Page 1
02.10.31, 14:18
Adobe PageMaker 6.5J/PPC
Main Features
❐ LIGHTING GUIDE SYSTEM
A light on each pad and the pedal indicators flash to let you
know when it’s time to strike the pad or press the pedal.
❐ Touch Response
The volume and timbre of the sound produced is varied in
accordance with how hard you strike a pad. This makes it
possible to add a wide range of nuances to your percussion
play.
❐ Super Bass
The press of a button enhances low range sounds, making
them more powerful and realistic.
❐ Recording function
You can record up to 300 notes in memory for later playback.
❐ Metronome
Select either a simulated human voice or click sound as a
reference beat.
❐ 7 pads
Select from among 20 different drum sets or specify a particular drum sound you want to assign to a pad.
❐ 100 versatile rhythms
❐ Foot pedals
A pair of foot pedals provides realistic hi-hat and bass drum
play.
Select from among 100 different preset rhythms, including
rock, jazz, and much more.
❐ Informative display screen
An easy-to-understand display screen provides you with a
wealth of information about the Digital Drum’s operations.
E-2
LD80_E_01-07.p65
273A-E-004A
Page 2
02.10.31, 14:18
Adobe PageMaker 6.5J/PPC
Safety Precautions
Symbols
DANGER
Various symbols are used in this user’s guide and on the product itself to ensure
that the product is used safely and correctly, and to prevent injury to the user
and other persons as well as damage to property. Those symbols along with
their meanings are shown below.
DANGER
Alkaline Batteries
Perform the following steps immediately if fluid leaking from alkaline batteries ever gets into your eyes.
1. Do not rub your eyes! Rinse them with water.
2. Contact your physician immediately.
Leaving alkaline battery fluid in your eyes can lead to loss of sight.
This symbol indicates information that, if ignored or applied incorrectly,
creates the danger of death or serious personal injury.
WARNING
WARNING
This indication stipulates matters that have the risk of causing death or
serious injury if the product is operated incorrectly while ignoring this indication.
CAUTION
This indication stipulates matters that have the risk of causing injury as well
as matters for which there is the likelihood of occurrence of physical damage
only if the product is operated incorrectly while ignoring this indication.
Symbol Examples
This triangle symbol ( ) means that the user should be careful.
(The example at left indicates electrical shock caution.)
This circle with a line through it ( ) means that the indicated
action must not be performed. Indications within or nearby this
symbol are specifically prohibited. (The example at left indicates
that disassembly is prohibited.)
Smoke, Strange Odor, Overheating
Continued use of the product while it is emitting smoke, a strange
odor, or heat creates the risk of fire and electric shock. Take the
following steps immediately.
1. Turn off power.
2. If you are using the AC adaptor for power, unplug it from the wall
outlet.
3. Contact your original retailer or an authorized CASIO Service
Provider.
AC Adaptor
Misuse of the AC adaptor creates the risk of fire and electric shock.
Always make sure you observe the following precautions.
• Be sure to use only the AC adaptor that is specified for this product.
• Use only a power source whose voltage is within the rating marked
on the AC adaptor.
• Do not overload electrical outlets and extension cords.
The black dot ( ) means that the indicated action must be performed. Indications within this symbol are actions that are specifically instructed to be performed. (The example at left indicates
that the power plug must be unplugged from the electrical socket.)
E-3
273A-E-005A
LD80_E_01-07.p65
Page 3
02.10.31, 14:18
Adobe PageMaker 6.5J/PPC
AC Adaptor
Misuse of the AC adaptor’s electric cord can damage or break it,
creating the risk of fire and electric shock. Always make sure you
observe the following precautions.
• Never place heavy objects on the cord or subject it to heat.
• Never try to modify the cord or subject it to excessive bending.
• Never twist or stretch the cord.
• Should the electric cord or plug become damaged, contact your
original retailer or authorized CASIO Service Provider.
AC Adaptor
Never touch the AC adaptor while your hands are wet.
Doing so creates the risk of electric shock.
Batteries
Misuse of batteries can cause them to leak, resulting in damage to
nearby objects, or to explode, creating the risk of fire and personal
injury. Always make sure you observe the following precautions.
• Never try to take batteries apart or allow them to become shorted.
• Never expose batteries to heat or dispose of them by incineration.
• Never mix old batteries with new ones.
• Never mix batteries of different types.
• Do not charge the batteries.
• Make sure the positive (+) and negative (–) ends of the batteries
are facing correctly.
Do not incinerate the product.
Never throw the product into fire.
Doing so can cause it to explode, creating the risk of fire and personal
injury.
3. Contact your original retailer or an authorized CASIO Service
Provider.
Disassembly and Modification
Never try to take this product apart or modify it in any way. Doing so
creates the risk of electric shock, burn injury, or other personal injury.
Leave all internal inspection, adjustment, and maintenance up to
your original retailer or authorized CASIO Service Provider.
Dropping and Impact
Continued use of this product after it has been damaged by dropping
or subjecting it to strong impact creates the risk of fire and electric
shock. Take the following steps immediately.
1. Turn off power.
2. If you are using the AC adaptor for power, unplug it from the wall
outlet.
3. Contact your original retailer or an authorized CASIO Service
Provider.
Plastic Bags
Never place the plastic bag the product comes in over your head or in
your mouth. Doing so creates the risk of suffocation.
Particular care concerning this precaution is required where small
children are present.
Location
Avoid locating the product on an unstable stand, on an uneven
surface, or any other unstable location. An unstable location can
cause the product to fall over, creating the risk of personal injury.
Water and Foreign Matter
Water, other liquids, and foreign matter (such as pieces of metal)
getting into the product create the risk of fire and electric shock. Take
the following steps immediately.
1. Turn off power.
2. If you are using the AC adaptor for power, unplug it from the wall
outlet.
E-4
LD80_E_01-07.p65
273A-E-006A
Page 4
02.10.31, 14:18
Adobe PageMaker 6.5J/PPC
CAUTION
AC Adaptor
Misuse of the AC adaptor creates the risk of fire and electric shock.
Always make sure you observe the following precautions.
• Do not locate the electric cord near a stove or other sources of heat.
• Never pull on the cord when unplugging from the electrical outlet.
Always grasp the AC adaptor when unplugging.
AC Adaptor
Misuse of the AC adaptor creates the risk of fire and electric shock.
Always make sure you observe the following precautions.
• Insert the AC adaptor into the wall outlet as far as it will go.
• Unplug the AC adaptor from the wall outlet during lightening
storms or before leaving on a trip or other long-term absence.
• At least once a year, unplug the AC adaptor from the wall outlet
and wipe away any dust that is built up in the area around the
prongs of the plug.
Relocating the Product
Before relocating the product, always unplug the AC adaptor from
the wall outlet and disconnect all other cables and connecting cords.
Leaving cords connected creates the risk of damage to the cords, fire,
and electric shock.
Connectors
Connect only the specified devices and equipment to the product’s
connectors. Connection of a non-specified device or equipment creates the risk of fire and electric shock.
Location
Avoid the following locations for this product. Such locations create
the risk of fire and electric shock.
• Areas subject to high humidity or large amounts of dust
• In food preparation areas or other areas subject to oil smoke
• Near air conditioning equipment, on a heated carpet, in areas
exposed to direct sunlight, inside of a vehicle parked in the sun, or
any other area that subjects the product to high temperatures
Sound Volume
Do not listen to music at very loud volumes for long periods. Particular care concerning this precaution is required when using headphones. High volume settings can damage your hearing.
Heavy Objects
Never place heavy object on top of the product.
Doing so can make the product top heavy, causing the product to tip
over or the object to fall from it, creating the risk of personal injury.
Cleaning
Before cleaning the product, always unplug the AC adaptor from the
wall outlet first. Leaving the AC adaptor plugged in creates the risk
of damage to the AC adaptor, fire, and electric shock.
Batteries
Misuse of batteries can cause them to leak, resulting in damage to
nearby objects, or to explode, creating the risk of fire and personal
injury. Always make sure you observe the following precautions.
• Use only batteries that are specified for use with this product.
• Remove batteries from the product if you do not plan to use it for a
long time.
E-5
273A-E-007A
LD80_E_01-07.p65
Page 5
02.10.31, 14:18
Adobe PageMaker 6.5J/PPC
Care of your Instrument
Avoid heat, humidity or direct sunlight.
Important!
Do not overexpose the instrument to direct sunlight, or place it near an air
conditioner, or in any extremely hot place.
When using batteries, be sure to replace them or shift to one of the alternate
power sources whenever you notice any of the following symptoms.
Do not use near a TV or radio.
This instrument can cause video or audio interference with TV and radio
reception. If this happens, move the instrument away from the TV or radio.
Do not use lacquer, thinner or similar chemicals for cleaning.
•
•
•
•
•
•
•
•
•
Instrument does not turn on
Dim, difficult to read display
Abnormally low speaker/headphone volume
Distortion of sound output
Occasional interruption of sound when playing at high volume
Sudden power failure when playing at high volume
Dimming of the display when playing at high volume
Abnormal rhythm pattern and demo tune play
Dimming of digital drum lights when notes sound
Clean the instrument with a soft cloth dampened in a weak solution of
water and a neutral detergent. Soak the cloth in the solution and squeeze
until it is almost dry.
Avoid use in areas subjected to temperature extremes.
E-6
LD80_E_01-07.p65
273A-E-008A
Page 6
02.10.31, 14:18
Adobe PageMaker 6.5J/PPC
Contents
Welcome... ...................................................................... E-1
Using Rhythms ............................................................. E-18
Important! ................................................................................................... E-1
Safety Precautions ......................................................... E-3
Selecting a Rhythm ..................................................................................E-18
Starting and Stopping Rhythm Play ......................................................... E-18
Adjusting Accomp volume ........................................................................ E-19
Adjusting the Rhythm Tempo ...................................................................E-19
Turning Rhythm Parts On and Off ...........................................................E-19
Care of your Instrument ................................................ E-6
Other Settings .............................................................. E-20
Main Features ................................................................. E-2
Contents .......................................................................... E-7
General Guide ................................................................. E-8
Rear Panel ................................................................................................. E-8
Control Panel ............................................................................................. E-9
Connections ................................................................. E-10
Phones/Output Jack .................................................................................E-10
Accessories and Options ......................................................................... E-10
Connecting the Foot Pedals .................................................................... E-11
Power Supply ............................................................... E-12
Using Batteries .........................................................................................E-12
Using the AC Adaptor .............................................................................. E-13
Using Reverb ........................................................................................... E-20
Using Super Bass .................................................................................... E-20
Using the Metronome ............................................................................... E-20
Using the LIGHTING GUIDE SYSTEM ........................ E-21
Recording ..................................................................... E-22
MIDI ................................................................................ E-23
What is MIDI? ........................................................................................... E-23
MIDI Terminals .........................................................................................E-23
What you can do with MIDI ...................................................................... E-23
Troubleshooting ........................................................... E-24
Specifications ............................................................... E-25
Basic Operations .......................................................... E-14
Adjusting Main volume ............................................................................. E-14
Playing the Demo Tune ...........................................................................E-14
Playing the Drum Pads ................................................ E-15
Initial Default Setup ..................................................................................E-15
Selecting a Drum Set ............................................................................... E-16
Configuring a Custom Drum Set ..............................................................E-16
Reference ....................................................................... A-1
Percussion Sound List ............................................................................... A-1
Drum Set List ............................................................................................. A-2
Rhythm List ................................................................................................ A-3
MIDI Implementation Chart
E-7
273A-E-009A
LD80_E_01-07.p65
Page 7
02.10.31, 14:18
Adobe PageMaker 6.5J/PPC
General Guide
• Names of keys, buttons, and other items are indicated in the text of this manual using bold type.
■ Rear Panel
Drum pads
PEDAL 1 jack
PEDAL 2 jack
Drum pad light
PHONES/OUTPUT jack
DC 12V (AC adaptor) jack
MIDI IN/OUT terminals
Control panel
E-8
LD80_E_08-14.p65
273A-E-010A
Page 8
02.10.31, 14:18
Adobe PageMaker 6.5J/PPC
■ Control Panel
Foot Pedal indicators
Rhythm Part Buttons
Display
DRUM button
BASS button
• The display shows rhythm numbers, tempo
setting values, and other information.
RECORD button
PERC. button
CHORD button
PLAY/STOP button
POWER switch
DEMO button
MAIN VOLUME dial
LESSON button
REVERB button
ACCOMP VOL. buttons
TEMPO buttons
START/STOP button
METRONOME button
Number keypad
SUPER BASS button
DRUM SET button
RHYTHM button
ASSIGN button
E-9
273A-E-011A
LD80_E_08-14.p65
Page 9
02.10.31, 14:18
Adobe PageMaker 6.5J/PPC
Connections
The following describes how to connect external equipment to the Digital
Drum’s PHONES/OUTPUT jack. See “MIDI” on page E-23 for information
about connecting to another MIDI device.
• Make sure you turn off all equipment before making any connections.
■ Phones/Output Jack
Before connecting headphones or other external equipment, be sure to first
turn down the volume settings of the digital drum and the connected
equipment. You can then adjust volume to the desired level after connections are complete.
Audio Equipment (2)
Connect the digital drum to an audio equipment using a commercially
available connecting cord with a standard plug on one end and two PIN
plugs on the other end. In this configuration, you normally set the input
selector of the audio equipment to the terminal (usually marked AUX IN or
something similar) where the cord from the digital drum is connected. See
the user documentation that comes with your audio equipment for full
details.
Musical Instrument Amplifier (3)
Use a commercially available connecting cord to connect the digital drum to
a musical instrument amplifier.
Rear Panel
❚ NOTE
• Be sure to use a connecting cord that has standard plugs on the ends you
connect to the digital drum and amplifier.
PHONES/OUTPUT jack
Connection Example
1
Standard plug
To digital drum’s
PHONES/OUTPUT
jack
3
INPUT
Standard plug
Keyboard amp,
guitar amp,etc.
White
2
Red
PIN plug
Keyboard or guitar amp
LEFT RIGHT
AUX IN or similar terminal
of audio amplifier
■ Accessories and Options
Connecting Headphones (1)
Connecting headphones cuts off output from the digital drum’s built-in
speakers, so you can play even late at night without disturbing anyone.
Use only the accessories and options specified for this digital drum. Use of
non-authorized items creates the danger of fire, electrical shock, and personal injury.
E-10
LD80_E_08-14.p65
273A-E-012A
Page 10
02.10.31, 14:18
Adobe PageMaker 6.5J/PPC
■ Connecting the Foot Pedals
Your Digital Drum comes with two foot pedals that you can connect to the
PEDAL 1 and PEDAL 2 jacks.
PEDAL 2 jack
Important!
• Turn off power before connecting the foot pedals.
• Do not hold down either of the foot pedals while connecting them to the
Digital Drum.
PEDAL 1 jack
• See “Foot Pedal Assignments” on page E-15 for information about how to
use the foot pedals while playing the Digital Drum.
E-11
273A-E-013A
LD80_E_08-14.p65
Page 11
02.10.31, 14:18
Adobe PageMaker 6.5J/PPC
Power Supply
Your Digital Drum can run under battery power or under power supplied
by an optional AC adaptor.
■ Using Batteries
Always make sure you turn off the Digital Drum before loading or replacing
batteries.
To load batteries
1.
2.
Carefully turn over the Digital Drum, and remove the battery compartment cover.
Load six C-size (LR14) batteries into the battery compartment.
• Make sure that the positive (+) and negative (–) ends of the batteries are
facing correctly.
Important Battery Information
● The following shows the approximate battery life provided by different
battery types.
• Standard battery life: Approximately 5 hours (LR14)
The above value is standard battery life at normal temperature, with the
digital drum volume at a medium setting. Temperature extremes or
playing at very loud volume settings can shorten battery life.
● Any of the following symptoms indicate low battery power. Replace
batteries as soon as possible whenever any of the following occurs.
• Instrument does not turn on
• Dim, difficult to read display
• Abnormally low speaker/headphone volume
• Distortion of sound output
• Occasional interruption of sound when playing at high volume
• Sudden power failure when playing at high volume
• Dimming of the display when playing at high volume
• Abnormal rhythm pattern and demo tune play
• Dimming of digital drum lights when notes sound
Caution!
•
•
3.
Insert the tabs of the battery compartment cover into the holes provided
and close the cover.
• The Digital Drum may not function correctly if you load or replace
batteries with power turned on. If this happens, turning the Digital
Drum off and then back on again should return functions back to normal.
•
•
•
•
•
Improper handling of batteries can cause them to burst and leak, which
creates the danger of personal injury or damage due to contact with battery
acid. Be sure to note the following important precautions.
Always make sure that the positive (+) and negative (–) poles are facing
correctly as indicated inside the battery compartment.
To avoid damage caused by leaking batteries, be sure to remove batteries
from the Digital Drum whenever you leave it unattended for long periods
(such as when leaving on a trip).
Never mix batteries of different types.
Never mix old batteries with new ones.
Never discard batteries by incinerating them, do not allow their poles to be
shorted (connected to each other), never take batteries apart, and do not
expose batteries to direct heat.
Replace batteries as soon as possible after any sign they are getting weak.
Never attempt to recharge batteries.
E-12
LD80_E_08-14.p65
273A-E-014A
Page 12
02.10.31, 14:18
Adobe PageMaker 6.5J/PPC
■ Using the AC Adaptor
Important!
Make sure you use only the AC adaptor specified for this Digital Drum.
Specified AC Adaptor: AD-12
Also note the following important warnings and precautions when using
the AC adaptor.
DC 12V jack
• Make sure that the digital drum is turned off before connecting or disconnecting the AC adaptor.
• Using the AC adaptor for a long time can cause it to become warm to the
touch. This is normal and does not indicate malfunction.
❚ NOTE
• Output volume under battery power may be lower than volume under AC
adaptor power. If you feel that output volume under battery power is too
low, switch to AC adaptor power.
AC adaptor AD-12
AC outlet
Warning!
• Take care to avoid any damage to or breakage of the power cord. Never place
any heavy objects on the power cord or expose it to direct heat. Doing so
creates the danger of power cord damage, fire, and electrical shock.
• Use only the specified AC adaptor. Use of another type of adaptor creates the
danger of fire and electrical shock.
Caution!
• For safety sake, be sure to unplug the AC adaptor from the wall outlet
whenever leaving the digital drum unattended for a long time (such as when
leaving on a trip).
• Always turn off the digital drum and unplug the AC adaptor from the wall
outlet when you are not using the digital drum.
E-13
273A-E-015A
LD80_E_08-14.p65
Page 13
02.10.31, 14:19
Adobe PageMaker 6.5J/PPC
Basic Operations
This section provides the most basic information you need to get your
Digital Drum running.
To turn power on and off
Slide the POWER switch up and down to turn power ON and OFF.
■ Adjusting Main volume
Rotate the MAIN VOLUME dial to adjust overall volume, including nondrum sounds, rhythms, metronome, etc.
• Rotate the MAIN VOLUME dial left to decrease main volume, or right to
increase it.
■ Playing the Demo Tune
The demo tune provides you with a demonstration of the various capabilities of your Digital Drum.
To start and stop demo tune play
Press the DEMO button to start and stop demo tune play. You can also stop
demo tune play by pressing the START/STOP button.
• You can use the TEMPO buttons to adjust the speed of the demo tune
while it is playing. Stopping demo tune play returns the demo tune to its
initial default tempo.
• You can use the rhythm part buttons to turn the DRUM, PERC., BASS, and
CHORD parts of the demo tune off or on while it is playing.
E-14
LD80_E_08-14.p65
273A-E-016A
Page 14
02.10.31, 14:19
Adobe PageMaker 6.5J/PPC
Playing the Drum Pads
You can select from among 20 different drum sets for the seven pads and
two pedals. Strike a pad to play the percussion sound assigned to it.
The volume of the sound produced when you strike a drum pad depends on
how much force you use, and the area of the drum pad that you strike.
Foot Pedal Assignments (Drum set 001)
■ Initial Default Setup
Drum set 001 is always selected whenever you first turn on the Digital
Drum. The following shows the particular percussion sounds that are assigned to each drum pad with Drum set 001.
Drum Assignments (Drum set 001)
Pad 1
Pad 4
Sound Number
43: Ride Cymbal
Pad 2
Pedal 2
Press to sound “1: Bass Drum Low.”
• Striking the pad with the foot pedal depressed produces a closed hi-hat sound.
• Striking the pad with the foot pedal not pressed produces an open hi-hat sound.
• Pressing the foot pedal without striking the pad produces a hi-hat pedal sound.
Pad Number
41: Crash
Cymbal 1
Pedal 1
Pedal Released: Hi-hat open
Pedal Pressed: Hi-hat closed
• See “Drum Set List” on page A-2 for a list of available drum sets and their
contents.
Pad 3
18: Mid Tom 1
16: High Tom 1
Sound Name
Pad 6
Pad 5
7: Snare Drum High
40: Hi-Hat
Open/Close
(Pedal 2 Off/On)
Pad 7
20: Low Tom 1
• Example: Drum Set 001 Standard 1
E-15
273A-E-017A
LD80_E_15-22.p65
Page 15
02.10.31, 14:19
Adobe PageMaker 6.5J/PPC
■ Selecting a Drum Set
■ Configuring a Custom Drum Set
The percussion sounds that make up the drum set you select are assigned to
the seven drum pads and two foot pedals. See “Drum Set List” on page A-2
for a list of available drum sets and their contents.
Your Digital Drum comes with 76 high-quality percussion sounds that you
can assign to any one of the seven drum pads and two foot pedals. This way
you can configure your own custom drum set that consists of the percussion sounds you want.
• See “Percussion Sound List” on page A-1 for more information about
percussion sounds.
To select a drum set
1.
Press the DRUM SET button.
• The DRUM SET indicator lights and the currently selected drum set’s
number appears on the display.
Drum set number
001
To configure a custom drum set
1.
Select the drum set you want to start from.
• See “To select a drum set” on this page.
2.
Press the ASSIGN button.
DRUM SET indicator
2.
Percussion sound number
Use the number pad to input the number of the drum set you want to use.
• Input a two-digit number. To specify Drum Set 08, for example, press [0]
and then [8].
• You can also use the (+) and (–) keys to scroll through numbers on the
display. Scrolling past drum set number 020 displays “CU,” which indicates the custom drum set. Holding down (+) or (–) scrolls at high speed.
• Make sure you always input a two-digit number in the range of 01 to 20.
041
ASSIGN indicator
• The first percussion sound number that appears is the sound currently
assigned to Pad 1. The Pad 1 light is lit at this time.
3.
Strike the pad or press the pedal to which you want to assign a new
sound.
• To change the percussion sound assigned to Pad 7, for example, strike
Pad 7. This causes the pad’s light to light, and the percussion sound
currently assigned to the pad appears on the display.
• The foot pedal indicator lights in the case of the foot pedal.
E-16
LD80_E_15-22.p65
273A-E-018A
Page 16
02.10.31, 14:19
Adobe PageMaker 6.5J/PPC
4.
5.
6.
Use either of the following techniques to assign the percussion sound you
want to the pad you selected in step 3 (Pad 7 in our example).
To select the custom drum set
• Strike the drum pad to scroll through percussion sounds sequentially.
Each strike advances to the next sound and plays it.
• Use the number pad to input a two-digit sound number. You can also use
the (+) and (–) keys to scroll through numbers on the display. Holding
down (+) or (–) scrolls at high speed.
• See “Percussion Sound List” on page A-1 for information on the percussion sounds you can assign to a drum pad or pedal.
1.
Repeat steps 3 through 4 for another pad or pedal, if you want.
❚ NOTE
• The custom drum set remains in memory even when the Digital Drum is
turned off.
• The default data assigned to the custom drum set is the same as drum set 001.
After all the assignments are the way you want, press the DRUM SET
button to store your custom drum set.
CU
2.
Perform the procedure under “To select a drum set” on page E-16.
In step 2, use the (+) and (–) keys to scroll through the drum set numbers
until “CU” (CUSTOM) appears on the display.
• “CU” is located between drum set number 020 and drum set number 001
(... 019 ↔ 020 ↔ CU ↔ 001 ↔ ...).
Custom Drum set indicator
DRUM SET indicator
7.
Play your new custom drum set.
E-17
273A-E-019A
LD80_E_15-22.p65
Page 17
02.10.31, 14:19
Adobe PageMaker 6.5J/PPC
Using Rhythms
This section explains how to select accompaniment rhythms and control
their playback.
■ Selecting a Rhythm
Use the following procedure to select from among the 100 rhythm patterns
built into your Digital Drum.
• See “Rhythm List” on page A-3 for a list of available rhythms and their
rhythm numbers.
About rhythm types
• There are two types of rhythms: looped rhythms and fixed-length rhythms.
Looped rhythms (rhythm numbers 00 to 79) keep playing in an endless loop
until you stop them. Fixed-length rhythms (rhythm numbers 80 to 99) stop
playing automatically when they reach their end.
■ Starting and Stopping Rhythm Play
Perform the following steps to start and stop rhythm play.
❚ NOTE
• The initial default rhythm setting is 00 after you turn on Digital Drum power.
To start and stop rhythm play
To select a rhythm
1.
Select the rhythm you want to play.
• See “Selecting a Rhythm” on this page.
1.
Press the RHYTHM button.
• The RHYTHM indicator lights and the currently selected rhythm’s number
appears on the display.
001
Use the number pad to input the number of the rhythm you want to use.
• You can input a two-digit rhythm number, or use the (+) and (–) keys to
scroll through numbers on the display. Holding down (+) or (–) scrolls at
high speed.
• Make sure you always input a two-digit number in the range of 00 to 99.
Press the START/STOP button to start rhythm play.
• After a count that sounds like two drum sticks hitting together, the
rhythm starts to play
• The beat count value increments with each beat, cycling back to 1 each
time the rhythm pattern restarts.
• The ASSIGN indicator flashes for each beat. The RHYTHM, DRUM SET,
and ASSIGN indicators all flash for the first beat of each measure.
Rhythm number
RHYTHM indicator
2.
2.
3.
4.
If you want, you can use the number pad to change the rhythm number
while rhythm play is in progress. See “To select a rhythm” on this page.
To stop rhythm play, press START/STOP.
E-18
LD80_E_15-22.p65
273A-E-020A
Page 18
02.10.31, 14:19
Adobe PageMaker 6.5J/PPC
■ Adjusting Accomp volume
■ Adjusting the Rhythm Tempo
The ACCOMP VOL. buttons control the volume level of the rhythm only.
They do not affect the volume of sounds you play on the drum pads, so you
can adjust Accomp volume to obtain good balance between your drum play
and accompaniments.
• Note that the Accomp volume setting also affects the metronome (page E20).
Perform the following steps to change the tempo (speed) of the rhythm. This
setting also affects demo play (page E-14).
To adjust the rhythm tempo
Press the TEMP button to display the current tempo setting.
To adjust Accomp volume
Press the upper ACCOMP VOL. button to increase Accomp volume, or the
lower button to decrease it.
• As soon as you press an ACCOMP VOL. button, the display changes to
show the current Accomp volume setting as a value in the range of 0
(muted) to 9 (maximum).
• You can adjust Accomp volume while rhythm play is ongoing or stopped.
• Holding down either ACCOMP VOL. button changes the setting at high
speed.
125
Current tempo setting
• Press the upper TEMPO button to increase rhythm tempo, or the lower
button to decrease it.
• As soon as you press a TEMPO button, the display changes to show the
current tempo setting as a value in the range of 40 to 240.
• You can adjust tempo while rhythm play is ongoing or stopped.
• Holding down either TEMPO button changes the setting at high speed.
■ Turning Rhythm Parts On and Off
Rhythm parts are made up of four named DRUM (main drum track), PERC.
(main percussion track), BASS (bass track), and CHORD (main chord track).
You can turn off (mute) one or more part and play along with the remaining
parts.
To turn rhythm parts on and off
Use the DRUM, PERC., BASS, and CHORD buttons to toggle the corresponding part (button indicator lit) and off (button indicator not lit).
• You can turn parts on and off while rhythm play is ongoing or stopped.
E-19
273A-E-021A
LD80_E_15-22.p65
Page 19
02.10.31, 14:19
Adobe PageMaker 6.5J/PPC
Other Settings
This section describes other settings you can use to make your Digital Drum
play more enjoyable and realistic.
on
■ Using Reverb
You can select from among four different reverb depth levels to help make
percussion sounds and rhythm play sound more dynamic.
To select a reverb depth
1.
• The initial default setting after you turn on the Digital Drum is Super
Bass on.
2.
Current reverb depth setting
• The initial default reverb depth setting after you turn on the Digital
Drum is r2.
• You need to perform step 2 within about three seconds after pressing the
REVERB button.
■ Using the Metronome
The metronome gives you a reference beat you can use while practicing or
playing. You can choose between two different metronome sounds: simulated human voice or click sound.
❚ NOTE
• The metronome sound is not recorded when you perform a record operation
(page E-22).
Use the number pad to specify the reverb depth you want to use.
• You can input a one-digit number, or use the (+) and (–) keys to scroll
through numbers on the display.
• You can specify a depth in the range of r0 (reverb off) through r3 (maximum reverb).
To start and stop the metronome
1.
❚ NOTE
• Reverb depth data is not sent or received as MIDI data.
■ Using Super Bass
2.
Press the METRONOME button a second time to change to a click sound.
• You can change the speed of the metronome sound using the TEMPO
buttons.
• You can adjust the volume of the metronome sound using the ACCOMP
VOL. buttons.
To turn Super Bass on and off
Press the SUPER BASS button.
Press the METRONOME button once to start the simulated human voice
metronome.
• Beats are counted by a voice that says, “1-2-3-4.”
Super Bass makes the sounds produced by the Digital Drum deeper and
more powerful.
1.
Press the SUPER BASS button again to turn Super Bass off.
Press the REVERB button.
r-2
2.
Current Super Bass on/off setting
3.
To stop the metronome, press the METRONOME button a third time.
E-20
LD80_E_15-22.p65
273A-E-022A
Page 20
02.10.31, 14:19
Adobe PageMaker 6.5J/PPC
Using the LIGHTING GUIDE SYSTEM
The LIGHTING GUIDE SYSTEM of your Digital Drum provides you with a
valuable Lesson tool that you can use to learn and play along with the preset
rhythms.
To use the LIGHTING GUIDE SYSTEM
1.
Select the rhythm you want to practice.
• See “Using Rhythms” on page E-18.
2.
Press the LESSON button so the indicator lamp above it is lit.
• This automatically turns off the drum part.
3.
4.
5.
Press the START/STOP button to start rhythm play.
Strike the pad in accordance with the lighting of their lights. Press the foot
pedal when the foot pedal indicator lights.
To end the practice session, press the LESSON button.
• This causes the indicator lamp above the button to turn off.
❚ NOTE
• You can turn off rhythm parts during Lighting Guide practice, if you want.
See “Turning Rhythm Parts On and Off” on page E-19.
• See “Using Rhythms” for information about making other rhythm settings
(Accomp volume, tempo, etc.).
• You can not change the drum set selection or a custom drum set configuration
while the indicator above the LESSON button is lit.
E-21
273A-E-023A
LD80_E_15-22.p65
Page 21
02.10.31, 14:19
Adobe PageMaker 6.5J/PPC
Recording
You can use the RECORD mode to record up to 300 notes in Digital Drum
memory for later playback. The following is the type of data you can record
in the RECORD mode.
• Drum pad and pedal operation data
• Rhythm (You cannot change rhythms while in the RECORD mode.)
• Rhythm part on/off settings
• Tempo setting (You cannot change the tempo setting while in the RECORD
mode.)
• Accomp volume setting
• Reverb on/off setting
3.
Strike a pad or press the START/STOP button to start recording.
• The indicator lamp above the RECORD button stops flashing to indicate
that recording is in progress.
• The metronome is turned on and sounds (but is not recorded) when you
start recording. If you want to turn off the metronome, press the
METRONOME button.
4.
To stop recording, press the START/STOP or RECORD button.
• This causes the indicator lamp above the RECORD button to turn off.
• The message “FL” appears on the display and recording stops when
memory becomes full.
❚ NOTE
• You cannot record MIDI data to memory.
To play back a recording
To record
Important!
• Recording causes anything already in memory to be replaced by the new
recording.
• Data remains in memory even when you turn off the Digital Drum.
1.
1.
Press the PLAY/STOP button to play back data that is in memory.
2.
Press PLAY/STOP again to stop playback.
Set up the Digital Drum for recording.
• Select the rhythm and drum set you want to use, and make the tempo,
part on/off, and reverb settings you want.
2.
Press the RECORD button to enter the RECORD mode.
• This causes the indicator lamp above the RECORD button to flash, indicating that the Digital Drum is in RECORD standby. To exit RECORD
standby without recording anything at this point, press the RECORD
button again.
E-22
LD80_E_15-22.p65
273A-E-024A
Page 22
02.10.31, 14:19
Adobe PageMaker 6.5J/PPC
MIDI
The MIDI IN and MIDI OUT terminals on the back of the Digital Drum
provide expanded musical potential through the use of MIDI.
■ What you can do with MIDI
Connect the Digital Drum’s MIDI OUT terminal to a MIDI
keyboard’s MIDI IN terminal.
■ What is MIDI?
The letters “MIDI” stand for “Musical Instrument Digital Interface.” MIDI is
a worldwide standard for digital signals and connectors that makes it possible for musical instruments and computers (devices) produced by different
manufacturers to communicate with each other. For example, you could
connect a MIDI tone generator to the Digital Drum’s MIDI OUT terminal and
play the tone generator’s voices using the Digital Drum’s pads and pedals.
This setup lets you use the Digital Drum’s pads and pedals to control the
keyboard.
See NOTE, below, for details.
Connect the Digital Drum’s MIDI IN terminal to a MIDI
keyboard’s MIDI OUT terminal.
With this setup, the Digital Drum acts as a tone generator played by keyboard operations.
■ MIDI Terminals
The MIDI terminals of your Digital Drum are located on its rear panel.
MIDI IN
Connect the Digital Drum’s MIDI OUT terminal to a MIDI
sequencer’s MIDI IN terminal.
Data transmitted from the MIDI OUT terminal of another MIDI device is
received at this terminal.
You can use this configuration to record output from the Digital Drum on an
external MIDI sequencer.
MIDI OUT
Digital Drum data can be transmitted form this terminal to the MIDI IN
terminal of another MIDI device.
Connect the Digital Drum’s MIDI IN terminal to a MIDI
sequencer’s MIDI OUT terminal.
This configuration makes it possible to use sequencer data to drive the
Digital Drum.
MIDI IN
MIDI OUT
MIDI IN MIDI OUT
MUSICAL INFORMATION SYSTEM
TONE
RHYTHM
CHORD
BOOK
SONG
BANK
TONE
TEMPO
TRANSPOSE/
TUNE/MIDI
RHYTHM
MAIN
VOLUME
SONGBANK
ACCOMP
VOLUME
POWER / MODE
MAIN VOLUME
M
ON / OFF
START / STOP
+
7
m
8
M7
ON
FINGERED
CASIO CHORD
NORMAL
–
TEMPO
REW
OFF
STOP
FF
4
CLEAR
7
9
dim
5
sus4
aug
LEFT
RIGHT
0
1
2
BACKLIGHT LCD
SONG BANK CONTROLLER
6
-5
MUSICAL INFORMATION SYSTEM
add9
PLAY/PAUSE
SYNCHRO/
FILL-IN
3
100 SONG BANK KEYBOARD
Keyboard, MIDI sequencer, etc.
❚ NOTE
• Drum pad lights do not light when MIDI data is played on the Digital Drum.
• You can use the pads and pedals to play the 76 percussion sounds* built
into this keyboard. The percussion sounds have program change* and note
numbers* assigned to them, which means that a message is sent from the
keyboard’s MIDI terminal when you operate a pad or pedal.
* See the “Percussion Sound List” on page A-1 for details.
E-23
273A-E-025C
LD80_E_23-25.p65
Page 23
02.10.31, 14:19
Adobe PageMaker 6.5J/PPC
Troubleshooting
If this happens:
It could mean this:
No sound is produced when I strike a pad.
So you should do this:
See page
The Digital Drum is not being supplied power.
Check that batteries are loaded correctly, or that the
AC adaptor is connected properly and plugged into
an electrical outlet. Check for dead batteries.
Pages E-12,13
Digital Drum power is not turned on.
Use the POWER switch to turn on power.
Page E-14
Main volume setting is too low.
Adjust the main volume setting.
Page E-14
The Digital Drum does not produce any rhythm
sound.
Accomp volume setting is too low.
Adjust the accomp volume setting.
Page E-19
The Digital Drum emits a loud sound and then stops
working (under battery power).
Battery power is low.
Replace batteries with a full set of new ones, or use
the AC adaptor for power.
Pages E-12, 13
Display screen characters are dim and difficult to
read (under battery power).
Battery power is low.
Replace batteries with a full set of new ones, or use
the AC adaptor for power.
Pages E-12, 13
E-24
LD80_E_23-25.p65
273A-E-026B
Page 24
02.10.31, 14:19
Adobe PageMaker 6.5J/PPC
Specifications
Model:
LD-80
Drum Pads:
7, with Touch Response
Lighting Guide System:
Lights indicate pad play during rhythm playback
Sounds:
76 PCM drum voices
Control Panel:
POWER; MAIN VOLUME; ACCOMP VOL.; TEMPO; START/STOP; number keypad; RHYTHM; DRUM SET; ASSIGN; LESSON; SUPER BASS;
RECORD; PLAY/STOP; METRONOME; REVERB; DEMO; Rhythm Part buttons (DRUM, PERC., BASS, CHORD)
Rhythms:
100
Demos:
1
Drum Sets:
20 preset + 1 Custom
Tempo:
40 to 240
Reverb:
4 depths r0 (off) to r3 (maximum)
MIDI:
16 multi-timbre receive
Speakers:
12 cm diameter x 2 (Output: 5W+5W)
Terminals:
MIDI Terminals:
Power Supply Terminal:
IN, OUT
DC 12V jack
Headphones/Output Terminal: Stereo standard jack
[output impedance: 100액, output voltage: 7.0V (RMS) MAX]
Foot Pedal Terminals:
Standard jack x 2
2-way AC/DC power sources;
Batteries:
Battery life:
AC adaptor:
Power Supply:
6 C-size
approximately 5 hours on LR14 alkaline batteries
AD-12
Power Consumption:
12 V
18 W
Dimensions:
60.0 x 38.5 x 13.0 cm (23 5/8" x 15 3/16" x 5 1/8")
Weight:
Approximately 3.5 kg (7.7 lbs) (without batteries)
* Designs and specifications are subject to change without notice.
E-25
273A-E-027B
LD80_E_23-25.p65
Page 25
02.10.31, 14:19
Adobe PageMaker 6.5J/PPC
Reference
This section contains percussion sound lists, specifications, and other useful reference information.
Percussion Sound List
Percussion
Sound No.
Sound Name
Program
Change
Note
No.
Percussion
Sound No.
Sound Name
Program
Change
Note
No.
Percussion
Sound No.
1
2
3
4
5
6
7
8
9
10
11
12
13
14
15
16
17
18
19
20
21
22
23
24
25
26
27
28
29
30
Kick Drum 2
Kick Drum 1
Power Kick
Electronic Bass Drum
Synth Bass Drum
Snare Drum 1
Snare Drum 2
Gated Snare Drum
Electronic Snare Drum Low
Electronic Snare Drum High
Synth Snare Drum
Brush Tap
Brush Swirl
Side Stick
Sticks
High Tom
High Mid Tom
Low Mid Tom
Low Tom
High Floor Tom
Low Floor Tom
Rock High Tom 1
Rock High Tom 2
Rock Mid Tom 1
Rock Mid Tom 2
Rock Low Tom 1
Rock Low Tom 2
Electronic High Tom 1
Electronic High Tom 2
Electronic Mid Tom 1
0
0
16
24
25
0
0
16
24
24
25
40
40
0
0
0
0
0
0
0
0
16
16
16
16
16
16
24
24
24
35
36
36
36
36
38
40
38
38
40
38
38
40
37
31
50
48
47
45
43
41
50
48
47
45
43
41
50
48
47
31
32
33
34
35
36
37
38
39
40
41
42
43
44
45
46
47
48
49
50
51
52
53
54
55
56
57
58
59
60
Electronic Mid Tom 2
Electronic Low Tom 1
Electronic Low Tom 2
Synth High Tom 1
Synth High Tom 2
Synth Mid Tom 1
Synth Mid Tom 2
Synth Low Tom 1
Synth Low Tom 2
*Hi-Hat Open/Closed
Crash Cymbal 1
Crash Cymbal 2
Ride Cymbal
Ride Bell
Chinese Cymbal
Splash Cymbal
Vibra-slap
Hand Clap
Tambourine
Cowbell
Synth Cowbell
Mute High Conga
Open High Conga
Low Conga
High Bongo
Low Bongo
High Timbale
Low Timbale
High Agogo
Low Agogo
24
24
24
25
25
25
25
25
25
0
0
25
0
0
0
0
0
0
0
0
26
0
0
0
0
0
0
0
0
0
45
43
41
50
48
47
45
43
41
42
49
49
51
53
52
55
58
39
54
56
56
62
63
64
60
61
65
66
67
68
61
62
63
64
65
66
67
68
69
70
71
72
73
74
75
76
Sound Name
Cabasa
Shaker
Claves
Mute Triangle
Open Triangle
Short Guiro
Long Guiro
Mute Cuica
Open Cuica
Mute Surdo
Open Surdo
Maracas
High-Q
Slap
Scratch Pull
Scratch Push
Note
No.
0
0
0
0
0
0
0
0
0
0
0
0
0
0
0
0
69
82
75
80
81
73
74
78
79
86
87
70
27
28
29
30
* Assigning “40: Hi-Hat Open/Closed” to both a pad
and pedal makes it possible for this sound to be
controlled by the foot pedals as described below.
• Striking the pad with the foot pedal depressed
produces a closed hi-hat sound. (Program
Change=0, Note No.=46)
• Striking the pad with the foot pedal not pressed
produces an open hi-hat sound. (Program
Change=0, Note No.=42)
• Pressing the foot pedal without striking the pad
produces a hi-hat pedal sound. (Program
Change=0, Note No.=44)
A-1
LD80_E_reference.p65
Program
Change
273A-E-028C
Page 2
02.10.31, 14:19
Adobe PageMaker 6.5J/PPC
Drum Set List
Pad 1
Drum
Set No.
001
002
003
004
005
006
007
008
009
010
011
012
013
014
015
016
017
018
019
020
Name
Standard 1
Standard 2
Standard 3
Standard 4
Standard 5
Standard 6
Standard 7
Standard 8
Rock
Heavy Metal
Dance 1
Dance 2
Samba Perc.
Timbales
Conga
Synth
Brush
Jazz
Ballad Perc.
Cymbal
41
40
41
40
41
46
40
40
41
41
40
45
68
41
55
42
43
40
62
40
Sound Name
Crash Cymbal 1
HH Open/Closed
Crash Cymbal 1
HH Open/Closed
Crash Cymbal 1
Splash Cymbal
HH Open/Closed
HH Open/Closed
Crash Cymbal 1
Crash Cymbal 1
HH Open/Closed
Chinese Cymbal
Mute Cuica
Crash Cymbal 1
High Bongo
Crash Cymbal 2
Ride Cymbal
HH Open/Closed
Shaker
HH Open/Closed
Pad 2
Name
Standard 1
Standard 2
Standard 3
Standard 4
Standard 5
Standard 6
Standard 7
Standard 8
Rock
Heavy Metal
Dance 1
Dance 2
Samba Perc.
Timbales
Conga
Synth
Brush
Jazz
Ballad Perc.
Cymbal
Sound
No.
40
50
40
14
40
40
41
41
40
40
48
40
61
50
58
40
40
62
46
46
Sound Name
HH Open/Closed
Cowbell
HH Open/Closed
Side Stick
HH Open/Closed
HH Open/Closed
Crash Cymbal 1
Crash Cymbal 1
HH Open/Closed
HH Open/Closed
Hand Clap
HH Open/Closed
Cabasa
Cowbell
Low Timbale
HH Open/Closed
HH Open/Closed
Shaker
Splash Cymbal
Splash Cymbal
Pad 3
Sound
No.
Sound Name
Sound
No.
16
17
16
16
17
17
16
14
22
23
28
29
59
46
52
34
17
16
63
41
High Tom 1
High Tom 2
High Tom 1
High Tom 1
High Tom 2
High Tom 2
High Tom 1
Side Stick
Rock High Tom 1
Rock High Tom 2
Electronic High Tom 1
Electronic High Tom 2
High Agogo
Splash Cymbal
Mute High Conga
Synth High Tom 1
High Tom 2
High Tom 1
Claves
Crash Cymbal 1
18
19
18
18
19
19
18
18
24
25
30
31
60
72
53
36
19
18
49
43
Pad 6
Drum
Set No.
001
002
003
004
005
006
007
008
009
010
011
012
013
014
015
016
017
018
019
020
Sound
No.
Pad 7
Sound
No.
20
21
20
20
21
21
20
20
26
27
32
33
71
57
54
38
14
20
65
45
Sound Name
Low Tom 1
Low Tom 2
Low Tom 1
Low Tom 1
Low Tom 2
Low Tom 2
Low Tom 1
Low Tom 1
Rock Low Tom 1
Rock Low Tom 2
Electronic Low Tom 1
Electronic Low Tom 2
Open Surdo
High Triangle
Low Conga
Synth Low Tom 1
Side Stick
Low Tom 1
Open Triangle
Chinese Cymbal
Pad 4
Sound Name
Sound
No.
Mid Tom 1
Mid Tom 2
Mid Tom 1
Mid Tom 1
Mid Tom 2
Mid Tom 2
Mid Tom 1
Mid Tom 1
Rock Mid Tom 1
Rock Mid Tom 2
Electronic Mid Tom 1
Electronic Mid Tom 2
Low Agogo
Maracas
Open High Conga
Synth Mid Tom 1
Mid Tom 2
Mid Tom 1
Tambourine
Ride Cymbal
43
41
50
41
50
49
43
44
49
50
46
73
69
7
56
51
41
43
61
44
Ride Cymbal
Crash Cymbal 1
Cowbell
Crash Cymbal 1
Cowbell
Tambourine
Ride Cymbal
Ride Bell
Tambourine
Cowbell
Splash Cymbal
High-Q
Open Cuica
Snare Drum High
Low Bongo
Synth Cowbell
Crash Cymbal 1
Ride Cymbal
Cabasa
Ride Bell
Pedal 2
Sound
No.
1
1
2
1
1
1
1
1
2
3
4
4
50
1
1
5
1
1
50
1
Sound Name
Sound Name
7
6
7
7
7
7
6
6
7
8
10
9
70
58
7
11
12
13
64
7
Snare Drum High
Snare Drum Low
Snare Drum High
Snare Drum High
Snare Drum High
Snare Drum High
Snare Drum Low
Snare Drum Low
Snare Drum High
Gated Snare Drum
Electronic Snare Drum High
Electronic Snare Drum Low
Mute Surdo
Low Timbale
Snare Drum High
Synth Snare Drum
Brush Tap
Brush Swirl
Mute Triangle
Snare Drum High
Pedal 1
Sound Name
Bass Drum Low
Bass Drum Low
Bass Drum High
Bass Drum Low
Bass Drum Low
Bass Drum Low
Bass Drum Low
Bass Drum Low
Bass Drum High
MONDO Bass Drum
Electronic Bass Drum
Electronic Bass Drum
Cowbell
Bass Drum Low
Bass Drum Low
Synth Bass Drum
Bass Drum Low
Bass Drum Low
Cowbell
Bass Drum Low
Sound
No.
40
40
40
40
40
40
40
40
40
40
40
40
49
63
50
40
40
40
74
40
Sound Name
HH Pedal
HH Pedal
HH Pedal
HH Pedal
HH Pedal
HH Pedal
HH Pedal
HH Pedal
HH Pedal
HH Pedal
HH Pedal
HH Pedal
Tambourine
Claves
Cowbell
HH Pedal
HH Pedal
HH Pedal
Slap
HH Pedal
A-2
273A-E-029A
LD80_E_reference.p65
Pad 5
Sound
No.
Page 3
02.10.31, 14:19
Adobe PageMaker 6.5J/PPC
Rhythm List
Looped rhythms
Rhythm No.
00
01
02
03
04
05
06
07
08
09
10
11
12
13
14
15
16
17
18
19
20
21
22
23
24
25
26
27
Rhythm Name
8 Beat
8 Beat 1
8 Beat 2
8 Beat 3
8 Beat 4
8 Beat 5
8 Beat Ballad 1
8 Beat Ballad 2
8 Beat Ballad 3
Soft Rock
Rock 1
Rock 2
Rock 3
Rock 4
Rock 5
Hard Rock 1
Hard Rock 2
16 Beat
16 Beat 1
16 Beat 2
16 Beat 3
16 Beat 4
16 Beat 5
16 Beat 6
16 Beat 7
16 Beat Ballad 1
16 Beat Ballad 2
16 Beat Ballad 3
16 Beat Ballad 4
16 Beat Ballad 5
Rhythm No.
28
29
30
31
32
33
34
35
36
37
38
39
40
41
42
43
44
45
46
47
48
49
50
51
52
Rhythm Name
16 Beat Funk 1
16 Beat Funk 2
Dance
Dance 1
Dance 2
Dance 3
Dance 4
Dance 5
Dance 6
Rap
Rap 1
Rap 2
Rap 3
Bounce
Bounce 1
Bounce 2
Bounce 3
Shuffle
Shuffle 1
Shuffle 2
Shuffle 3
Shuffle 4
Shuffle 5
Shuffle 6
Shuffle 7
Slow Rock
Slow Rock 1
Slow Rock 2
Slow Rock 3
Slow Rock 4
Fixed-length rhythms
Rhythm No.
53
54
55
56
57
58
59
60
61
62
63
64
65
66
67
68
69
70
71
72
73
74
75
76
77
78
79
Rhythm Name
Rhythm No.
Latin
Reggae 1
Reggae 2
Bossa Nova 1
Bossa Nova 2
Samba
Salsa
Latin Rock
Cha-Cha
Mambo
Rhumba 1
Rhumba 2
Afro Cuban
Tango
Swing
Swing 1
Swing 2
Swing 3
Others
Waltz
3/4 Ballad
Swing Blues
Blues
March 1
March 2
R&B
Hip-Hop
Funk
Country
Big Band
A-3
LD80_E_reference.p65
80
81
82
83
84
85
86
87
88
89
90
91
92
93
94
95
96
97
98
99
Rhythm Name
8 Beat
8 Beat 1
8 Beat 2
Ballad
Hard Rock 1
Hard Rock 2
Hard Rock 3
Pop Dance 1
Pop Dance 2
R&B
16 Beat
16 Beat
Fusion
Funk
Funk 1
Funk 2
Shuffle
Shuffle 1
Shuffle 2
16 Beat Shuffle
16 Beat Triplet
Others
Reggae
Bossa Nova
Big Band
273A-E-030B
Page 4
02.10.31, 14:19
Adobe PageMaker 6.5J/PPC
273A-E-031A
LD80_E_reference.p65
Page 5
02.10.31, 14:19
Adobe PageMaker 6.5J/PPC
X
X
O
O
O
O
O
O
O
O
O
O
O
O
O
O
O
X
X
X
X
X
X
X
X
X
X
X
X
X
X
X
X
X
True #
: Clock
: Commands
System
Real Time
Mode 1 : OMNI ON, POLY
Mode 3 : OMNI OFF, POLY
: Local ON/OFF
: All notes OFF
Messages : Active Sense
: Reset
Aux
: Song Pos
: Song Sel
: Tune
1
7
10
11
64
66
67
80
81
91
93
120
121
123
System
Common
System Exclusive
Program
Change :
Control
Change
Pitch Bender
Key's
Ch's
After
Touch
X
O
O
O
X
X
X
X
Mode 2 : OMNI ON, MONO
Mode 4 : OMNI OFF, MONO
X
X
X
X
X
X
X
X
X
X
X
X
O
❊❊❊❊❊❊❊❊❊❊❊❊❊❊
O
X
O
X
Note ON
Note OFF
Velocity
O
❊❊❊❊❊❊❊❊❊❊❊❊❊❊
1-127
1-127
27-87
❊❊❊❊❊❊❊❊❊❊❊❊❊❊
True voice
Mode 3
Mode 3
❊❊❊❊❊❊❊❊❊❊❊❊❊❊
X
X
❊❊❊❊❊❊❊❊❊❊❊❊❊❊
Default
Messages
Altered
Mode
Note
Number:
1-16
1-16
Recognized
10
10
Transmitted
MIDI Implementation Chart
Default
Changed
Function ...
LD-80
Basic
Channel
Model
O : Yes
X : No
Modulation
Volume
Pan
Expression
Hold1
Sostenuto
Soft pedal
Reverb Program
Chorus Program
Reverb send
Chorus send
All sound off
Reset all controller
All notes off
Remarks
Version: 1.0
This recycle mark indicates that the packaging conforms to
the environmental protection legislation in Germany.
P
CASIO COMPUTER CO.,LTD.
6-2, Hon-machi 1-chome
Shibuya-ku, Tokyo 151-8543, Japan
LD80_E_cover.p65
Page 3
MA0111-C 英 Printed in China
LD80-E-2
02.10.31, 14:18
Adobe PageMaker 6.5J/PPC