1
Easygifts Kiosk v2.1.0
User manual
Rev. 1.4
CONTENTS
1.1
DESCRIPTION .................................................................................................................. 8
1.2
MAIN SERVICES .............................................................................................................. 8
1.3
IMAGE RETOUCHING FUNCTIONS ............................................................................... 9
1.4
KIOSK MODELS ............................................................................................................... 9
1.5
SYSTEM USERS ............................................................................................................ 10
1.6
TERMINOLOGY .............................................................................................................. 10
1.7
KIOSK OPERATING MODES BASED ON THE WORKFLOW ...................................... 11
1.7.1
Stand-alone mode................................................................................................ 11
1.7.2
Order Terminal (OT) mode .................................................................................. 11
1.7.3
Combined mode ................................................................................................... 11
1.7.4
Kiosk Isle mode .................................................................................................... 12
1.8
INITIAL START-UP: USER-BASED OPERATING MODE ............................................. 12
3.1
GENERAL SETTINGS .................................................................................................... 16
3.1.1
Store details ......................................................................................................... 17
3.1.2
General parameters ............................................................................................. 17
3.1.3
Languages ........................................................................................................... 21
3.1.4
Devices ................................................................................................................ 22
3.1.5
Users .................................................................................................................... 29
3.1.6
Additional taxes .................................................................................................... 30
4.1
SCREEN SAVER ............................................................................................................ 31
4.2
MAIN SCREEN ............................................................................................................... 32
4.3
TERMS AND CONDITIONS ........................................................................................... 33
4.4
CHOOSING THE PHOTO SOURCE .............................................................................. 33
4.4.1
Specific flow for photographs obtained from social networks. ............................. 35
4.5
PHOTO LOADING OPTIONS ......................................................................................... 38
4.6
SERVICE PROCESSING ............................................................................................... 40
4.7
IMAGE RETOUCHING ................................................................................................... 40
4.7.1
Red eye reduction ................................................................................................ 41
4.7.2
Brightness and contrast ....................................................................................... 42
4.7.3
Sepia and black & white....................................................................................... 42
4.7.4
Automatic level ..................................................................................................... 44
4.7.5
Zoom and Crop. ................................................................................................... 44
4.8
AUTOMATIC IMAGE ENHANCEMENT ......................................................................... 45
4.9
CHOOSING THE FINISH ................................................................................................ 46
4.10
ORDER SUMMARY ........................................................................................................ 46
4.11
COPY OF FILES AND RENDERING OF SERVICE ....................................................... 47
4.12
REMOVING THE DEVICE .............................................................................................. 48
4.13
PRINTING OF RECEIPT TICKET AND VALIDATION SCREEN ................................... 48
3
4.14
PRODUCTION OF ORDER ............................................................................................ 49
4.15
GOODBYE MESSAGE ................................................................................................... 51
5.1
‘PRINTS’ SERVICE ......................................................................................................... 52
5.1.1
‘Prints’ service: work flow ..................................................................................... 53
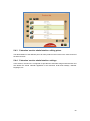
5.1.2
‘Prints’ service administration: product creation .................................................. 55
5.1.3
‘Prints’ service administration: editing prices ....................................................... 58
5.1.4
‘Copies’ service administration: general configuration ........................................ 59
5.2
INSTANT PHOTO ALBUM.............................................................................................. 60
5.2.1
‘Instant Photo Album’ service: work flow ............................................................. 60
5.2.2
‘Instant Photo Album’: working with DPSLAB and MITSUBISHI ELECTRIC
M.A.P. printer....................................................................................................................... 69
5.2.3
‘Instant Photo Album’ service administration: initial steps ................................... 71
5.2.4
‘Instant Photo Album’ service administration: creating and editing products ...... 74
5.2.5
‘Instant Photo Album’ service administration: editing prices ................................ 76
5.2.6
‘Instant Photo Album’ service administration: general configuration ................... 76
5.3
‘EASYGIFTS ALBUM’ SERVICE .................................................................................... 77
5.3.1
‘EasyGifts Album’ service: work flow ................................................................... 78
5.3.2
‘EasyGifts Album’ service administration: editing prices ..................................... 80
5.3.3
‘EasyGifts Album’ service administration: general configuration ......................... 80
5.4
‘CALENDARS’ SERVICE ................................................................................................ 81
5.4.1
Calendars: work flow ............................................................................................ 81
5.4.2
‘Calendars’ service administration: product creation ........................................... 83
5.4.3
‘Calendars’ service administration: editing prices ................................................ 84
5.4.4
‘Calendars’ service administration: settings ......................................................... 84
5.5
DVD/CD BURNING ......................................................................................................... 85
5.5.1
DVD/CD burning: work flow ................................................................................. 85
5.5.2
‘DVD/CD burning’ service administration: product creation ................................. 86
5.5.3
‘DVD/CD burning’ service administration: editing prices ..................................... 86
5.6
GREETING CARDS ........................................................................................................ 87
5.6.1
Greeting cards: work flow .................................................................................... 87
5.6.2
‘Greeting cards’ service administration: product creation .................................... 92
5.6.3
93
5.6.4
‘Frames and Greeting cards’ service administration: editing prices .................... 94
5.6.5
‘Frames and Greeting cards’ service administration: settings ............................. 95
5.7
‘ONLINE KIOSKGIFTS’ SERVICE .................................................................................. 96
5.7.1
‘Online Kioskgifts’ service: work flow ................................................................... 96
5.7.2
‘Online Kioskgifts’ service administration: product creation and price editing ..... 98
5.7.3
When an order is not possible in the ‘Online Kioskgifts’ service: error codes ..... 98
5.8
‘PENDING ORDERS’ SERVICE ................................................................................... 100
5.8.1
‘Pending orders’ service: work flow ................................................................... 101
5.8.2
'Pending orders' service administration: general settings. ................................. 102
5.9
CUSTOMISED PRODUCTS ......................................................................................... 103
5.9.1
Customised service: work flow .......................................................................... 104
5.9.2
‘Customised’ service administration: creation of products and prices ............... 106
6.1
INTRODUCTION ........................................................................................................... 107
4
6.2
PHOTO ID PHOTOGRAPHS ........................................................................................ 107
6.2.1
‘Photo ID’ photographs workflow ....................................................................... 108
6.2.2
‘Photo ID’ service administration: product creation ........................................... 110
6.2.3
‘Photo ID’ service administration: editing prices ................................................ 110
6.2.4
‘Photo ID’ service administration: general settings. ........................................... 110
5
ANNEX - Dispatcher
ANNEX - Monitor
ANNEX - PrintServer
ANNEX - CD Burning
6
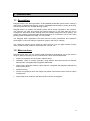
1 Introduction
1.1 Description
Easygifts Kiosk is the latest generation of MITSUBISHI ELECTRIC photo kiosks, offering a
wide variety of digital image printing services. MITSUBISHI ELECTRIC's printing technology
means its kiosks are fast, versatile and high quality.
Easygifts Kiosk is a reliable, user-friendly system that is directly operated by the customer.
The customer can order and receive the products while he or she waits when the unit is
configured in stand-alone mode, although there are multiple settings and set-up options. The
system also enables several Easygifts Kiosk terminals to be connected to one or more main
printing systems installed in the store or in remote labs.
The Easygifts Kiosk applications use state-of-the-art screen presentation and interaction
technologies, so the user finds the experience dynamic and easy to manage.
The customer’s images can be read from varied sources, such as digital camera memory
cards, mobile devices, DVD/CD, network devices, Internet, etc.
1.2 Main services
Easygifts Kiosk does not only provide digital photograph development, but it also offers a
range of digital photography services and functions, which are described below:
Copies: photographs can be printed in different sizes.
Calendars: yearly or monthly calendars, using different decorative themes as calendar
backgrounds. Compatible with EasygiGifts Calendar®
Photo books: automatic creation of photo albums. Compatible with EasyGifts Album® and
Instant Photo Album.
DVD/CD burning.
Frames and greetings cards: the images are placed in decorative frames, with the option
of adding text.
Customised Photo Products: gifts that include customer photographs.
8
1.3 Image retouching functions
Crop: the photograph can be cropped to remove unwanted sections, or an area of the
image can be selected for printing.
Rotate: the photograph can be rotated a pre-set number of degrees so that it can be
viewed better on screen.
Red-eye reduction: the red-eye effect in photographs can automatically be removed.
Brightness and contrast adjustment.
Automatic level adjustments: to automatically improve dark images or ones with low
contrast.
Black & white and sepia effects.
1.4 Kiosk models
There are various hardware models that support the Easygifts Kiosk software. The
differences between them are shown in the catalogues of each product. Specifications may
vary without prior notice from the manufacturer.
PT7000EX (only versions of hardware 4 or above):
Other OEM systems
9
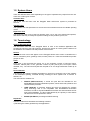
1.5 System Users
There are different Kiosk users depending on the type of operation they require from the unit.
There are 3 main types of users:
Customer User
This is the end user who uses the Easygifts Kiosk self-service system to purchase its
services.
Operator User
The operator user has permission to access the unit’s maintenance and can validate pending
orders.
Supervisor User
The supervisor user is one of the five operator users. He or she is an experienced operator,
and has the authority to modify the system's settings, active products, prices, etc.
1.6 Terminology
Kiosk or Easygifts Kiosk
This document uses the term ‘Easygifts Kiosk’ to refer to the software application that
provides the service to the end Customer, and the term ‘Kiosk’ as a more generic reference to
the hardware and software unit that provides such services.
Service
Each of the main icons that appear on the Easygifts Kiosk main screen is identified as a
service: calendars, prints, greetings cards, mosaic poster, etc. These are the different product
groups on offer.
Order
Every time a user accesses the Kiosk, he or she requests a series of services (prints,
calendars, albums) that, in turn, generate a series of jobs (10x15 print, 13x18 print, 15x20
calendar, etc.). The services and jobs that are paid for in one single transaction make up an
order.
Service Module
This refers to any software module specialising in carrying out a specific type of job, whether
it be sublimation printing, DVD/CD burning, sending to other systems via a network or
Internet, etc.
The main service modules are:
PRINTS (DPSPrintserver). It sends the jobs that are intended for the
MITSUBISHI ELECTRIC sublimation printers, which share many features and
communication protocols.
LABS (DPSLab). It manages printing jobs that are intended for systems
using technology that is not compatible with MITSUBISHI ELECTRIC
machines, as well as any MITSUBISHI ELECTRIC unit whose features do not
meet usual standards. It is also characterised by its capacity to send orders
via Internet to remote production centres.
BURNS (DPSBurns) It manages DVD/CD burning
Dispatcher
Software module that centralises the following activities:
1) Receiving the orders generated by the applications.
10
2) Validating the orders in order to add them to the queue. This validation takes place, for
instance, when the operator enters the password before processing an order, or when the
end customer selects the 'Pending Orders' service on the main screen and enters the
validation code.
3) Informing of the progress and status of orders being processed.
4) Informing of the status of the different service modules, which in turn manage the output
devices (printers, DVD burner, etc.).
In the Kiosk, this module is transparent to the end user. The operator can access it if he or
she needs to solve any problems with the orders or peripherals that are being processed.
When Kiosk is configured in OT mode, there is no active Dispatcher in the machine itself. All
the OTs share the same Dispatcher that is located in the production machine.
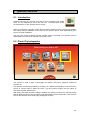
1.7 Kiosk operating modes based on the workflow
As a terminal, the Kiosk can be configured in 4 different modes: stand-alone (with its own
printers), order terminal OT (sends the jobs to a main printing system in the store), combined
(a combination of the two previous modes) and Kiosk isle mode, where one of the Kiosks (the
production Kiosk) is capable of producing the orders coming from all the other units.
1.7.1 Stand-alone mode
A Kiosk in stand-alone mode is a machine that requires no attention from staff. It has its own
dispatcher and therefore its own printers.
In this case, when the customer confirms the order, a validation screen appears (numerical
code entry) which unblocks the order production in the Kiosk Dispatcher.
1.7.2 Order Terminal (OT) mode
In this mode, the machine has no means of production. These are found in a production
machine within the store and networked to the terminal that enables the services to be
processed exactly as with the stand-alone mode, except that there is no step for validating the
order and no production phase: the terminal is left free for the next customer.
The order must be validated at the production machine, whether it be a Click5000 or a standalone Kiosk with its own production means (in isle mode).
1.7.3 Combined mode
In the combined mode, the Kiosk basically acts as it would in the stand-alone mode but
extends its output options to another additional production machine.
In this mode, the Kiosk machine sends its orders to 2 dispatchers at the same time: one
internal and one external.
In this case, since there are external production machines, it is considered that the order (or
sub-orders) will be validated in each of the Dispatchers, including the Kiosk itself, where the
operator must validate the order manually in the Dispatcher Admin. Screen.
In no case is the validation method displayed on the screen.
This mode is only recommended for special cases or when the store workflow allows just one
order to be validated and executed in different terminals without any problems.
11
1.7.4 Kiosk Isle mode
In Kiosk isle mode, all of the kiosks work as an OT terminal except one, which acts as a
stand-alone terminal and a production centre for the other units at the same time, or just as a
production centre, depending on the configuration.
The installation has the following components:
Several order terminals in the customer area.
A stand-alone terminal in the customer area. With optional barcode reader.
A ticket printer networked to other units and located at the payment counter, in
addition to the ticket printers in each kiosk.
The work flow is as follows:
1) The customer goes to any of the terminals (OT or stand-alone) and creates his or her
order.
2) When it's time to validate the order:
the normal ticket is printed out at the terminal in question, with the order ID
and the amount to pay, among other information.
a validation ticket is also printed out from the printer installed at the payment
counter, with an exclusive ID for that order (in numerical format and in
barcode).
3) The customer goes to the counter to pay for his or her order. Once payment has been
made, the customer will be given the ticket with the order ID. The customer will be told to go
to the stand-alone terminal.
4) First of all the Customer chooses ‘Pending Orders’ on the production machine, if it allows
other types of services to be executed, or directly validates the order using the barcode
scanner or types in the numerical code manually.
(NOTE: no receipt is printed out at this point)
5) The order will automatically start processing.
1.8 Initial start-up: user-based operating mode
When starting up the application for the first time, the usage mode selection screen appears:
‘Kiosk’ mode. This offers the photographic services which can be used by the end
user. It can subsequently be configured in any of the modes described in the
previous chapter.
- ‘Pending Orders’ mode. Only for the Kiosks isle mode. This machine is converted
into an unblocking and order production machine and is also for use by the end
customer.
- ‘Click’ mode. This offers the usual professional photographic services that can be
used by the store operator.
- ‘Dispatcher’ mode. This is used when the machine only receives orders from Kiosks
operating in the ‘Order Terminal’ mode. The store operator uses the machine only to
unblock the production of orders.
12
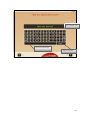
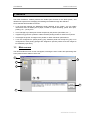
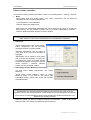
2 Service screen
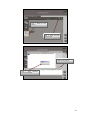
To access the system’s service functions, such as correctly switching off the unit, visualising
the status of orders and the status of the service processing devices that are connected to the
unit, etc., you must use the service screen.
This screen can be accessed by the supervisor user or any of the operator users, without
distinction. To do so, you have to press on the upper left and upper right corners of the main
screen, in this order.
1
2
A numerical keypad will appear on screen for you to type in the password.
The default password in new units is 123 for the supervisor and blank for the operators.
13
It is recommended that you change the operator password to prevent the end customer from
accidentally accessing the service screen, and you should also change the supervisor
password to increase security and prevent different users from changing the system's
configuration, such as the list of active products, their prices, etc.
Settings for
supervisor only
Depending on the identified user, access to the system configuration will also appear
available on the service screen, a function that is reserved for the exclusive use of supervisor
users.
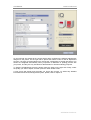
The service screen gives access to the following functions:
Settings (only the supervisor user)
DispatcherControl module for order production and production devices
MonitorModule designed to start applications and other technical functions
Statistics. Remote support. If your installation allows it, using this option will give
technical support access to your machine; consult your dealer for more information.
Operator mode. This option sets the kiosk to operator mode (see the section on
Operator services for more information)
Liveupdate. Remote update module.
Visualisation of the system parameters: software version, current user, SYSTEM_ID,
and Kiosk 'Alias'
Shut-down button
NOTE
To switch off the system, always access this screen and press the shut-down button.
Otherwise, you could damage the equipment’s performance or even its operating system.
14
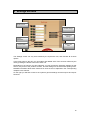
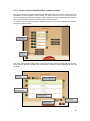
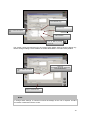
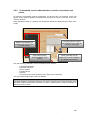
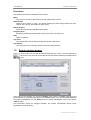
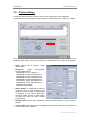
3 Settings screens
Enable service
General settings
Import/export
settings
Service
parameters
Service prices
Service print
sizes
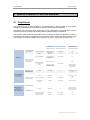
The Settings screen can only be accessed by the supervisor user, and includes all of these
options.
In the main panel on the left, you can enable and disable each of the services offered by the
unit by pressing the button to the left of each one.
Depending on the service you have selected, you may access the particular settings for that
service, the prices of the products it offers, and the settings for the associated printing sizes.
Detailed information about these functions for each service is explained in the corresponding
chapters in this manual.
On the right you will find access to the system's general settings and their import and export
functions.
15
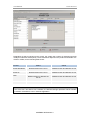
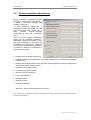
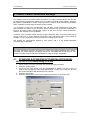
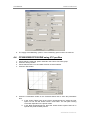
3.1 General settings
When you press the 'General Settings' button, the following screen will appear.
From this page you can configure:
The store details
Other general parameters
Kiosk languages
Devices connected to the Kiosk that are not production mechanisms: digital card
reader, Bluetooth, network folder, DVD/CD, etc.
System users
Additional taxes
16
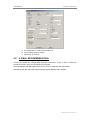
3.1.1 Store details
Here you can change the details that identify the store, such as the name, address, telephone
number, fiscal ID and web page.
You can also change the ‘Easygifts Kiosk’ logo for another that identifies the store or chain.
This logo appears on the ticket that is given to the customer, on the index copy product, and
on the back of the instant photo album product.
The details that appear are the system's default details or those that have been indicated
during the configuration stage, except for the store logo, which can only be changed here.
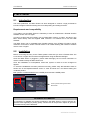
3.1.2 General parameters
17
3.1.2.1 Inactivity control.
Inactivity warning time.
This is the maximum time the customer is allowed without touching the screen. After this time
has passed, the system will assume the customer has left the unit in its current state and a
message will appear on-screen requesting interaction with the Kiosk.
Inactivity countdown.
This is the time given to the customer to respond after the inactivity time has expired. Once
this time has passed, the Kiosk unit will cancel the session and the order that the customer
was preparing, and return to the main screen.
If the customer leaves his or her photo medium in the machine, a message will appear
requesting said medium be removed. In the event there is no reply to this request, the staff
may unlock the unit by pressing on the two top corners of the screen.
3.1.2.2 Order options
First order number
To avoid conflict with other terminals connected to the same production unit, it is important to
set an initial order number that is different for each terminal. This way, the orders in each
terminal will belong to a different range: 10000, 20000, 30000, etc.
The order numbers will be generated cyclically: once they reach 99999 they will go back to
000001.
3.1.2.3 Kiosk isle mode
This option must be marked if the unit forms part of a Kiosk isle. This way, the unit will print
the order validation code on the shared printer located at the payment counter.
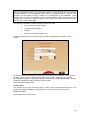
3.1.2.4 Master Formats
The ‘Master Formats’ option, which is related to filtering printing formats, can be activated or
deactivated.
When the Master Formats option is activated, it is not necessary to specify the specific paper
format to be used for each product. Just select a more generic type of format for each product
(such as 10x15, 13x18, 15x23…) without worrying about the different names that these paper
formats may have, depending on the printer model installed or the type of paper being used
(normal, HG, etc…)
The correct procedure for working with master formats is described below:
1) In the formats table published in the printing server, tick only those that are absolutely
necessary.
18
2) In the products associated with each service, select the required printing formats, which
may be any of those shown in the list. The list is formed by a previous selection made in the
printing server. All you need to do is create one product for each different printsize, The
following illustration shows how to assign a printsize for a greetings card product with a size
of 10x15.
Select a format from
among those that are
equivalent to the same
printsize
This way, it will make no difference whether you select 10x15HG or 10x15 for a product, since
both are equivalent to each other. This will also be helpful for automatically reducing the
product lists shown to the end customer for each service.
19
NOTE
IMPORTANT: although the Master Formats are activated, if you create a product with a
specific paper format and that format is then eliminated from the list published in the printing
server (by unchecking it in the following screen), the product will automatically be deactivated
and not be available. In some services, this product will be highlighted in orange in the
maintenance screens, as shown in the following illustration.
3.1.2.5 Taxes and discounts
Tax value
The additional tax values (VAT) that appear on the ticket are entered here. This value is not
used in calculating the ticket: the prices must include their relevant taxes.
When value is ‘0’ , taxes are disabled and no related message will appear in the ticket receipt.
3.1.2.6 Rotary panel options
Refresh time.
This option enables you to vary the time interval for displaying the images belonging to the
advertising banner that is shown in the longer Kiosk processes. It may not be set below a
given value.
3.1.2.7 ‘Silent printing’ mode
If this mode is activated, the services in stand-alone mode take place in the background. So,
for example, while one customer’s services are being printed out, the next customer can be
using the Kiosk to create his or her orders.
This mode requires physical installation that meets certain parameters. It is recommended
that the products that are being printed should be directed towards the operator zone when
they come out in order to respect each customer's privacy and ensure a smooth work flow in
the store.
3.1.2.8 Display validation keyboard
When the validation keyboard is used to unblock an order in the Kiosk, the keyboard can be
hidden on the screen to prevent the incorrect entry of codes by a user who is standing in front
of the Kiosk. This also facilitates the use of wireless keyboards from the administrator or
remote validation stations, since that way there is only one keyboard data entry point.
20
3.1.2.9 Asking about matt finishes
When this parameter is activated, all services offering products that allow for printing with a
matt finish will, at some point in creating the order, ask the user whether he wishes to print
using this printing quality.
NOTE
IMPORTANT: this parameter enables matt printing on a global scale, but the operator is
responsible for checking that the printers and consumables to be used to print the different
products permit this finish. If a matt finish is assigned to a product that is printed out in a
printer that does not allow this, the customer’s selection will be ignored and the printing
quality will be based on the default finish (glossy).
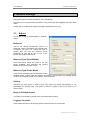
3.1.3 Languages
This screen enables you to set the languages to be used in Easygifts Kiosk. It is split into two
parts to differentiate the language Easygifts Kiosk will use at an operator level (for the
administration screens, default system language, etc.) and the languages available to the
customer.
Top section: The language Kiosk will use for the contents of the operator screens and
for printing tickets will be defined here.
Bottom section: Here you will find a list of the languages that are available to the
customers. The button shown next to the language name enables or disables that
language.
The languages can be listed according to the administrator’s preferences when
displayed on the Kiosk start screen. To do so, select the language that you want to
move by pressing directly onto the name, and then move it up or down by using the
arrows on the left. The language that is placed highest will be the first on the left of
the main screen, and will be the default language for the end customer.
21
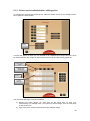
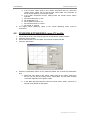
3.1.4 Devices
This is the screen where all the devices that may be personalised by the user can be
configured: network connection, digital photo input sources and ticket printer.
3.1.4.1 Network
Add or remove
machines
In this section you can configure any possible production machines that are going to be used
in Kiosk.
22
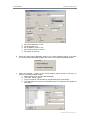
On the left of the screen there is a list of Kiosk production machines. If you click on any of
them you will see the details on the right of the screen: SYSTEM ID, alias and IP address
By using the ‘+’/‘-’ buttons, you can add a new production machine from the list, or remove the
currently selected production machine.
23
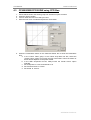
3.1.4.2 Digital photo sources
The photo sources configuration screen allows you to enable or disable sources, and where
necessary, you can set the relative system path.
Button to
enable/disable the
photo source
The disabled photo sources are not shown on the source selection screen in the Kiosk flow.
There are also certain applications that may decide whether or not to accept all the sources or
just some of them.
NOTE
IMPORTANT: The system automatically searches for removable devices, but in the case of
USB devices, certain devices are not detected as such, and are listed as local disk drives. So,
an alternative path is specified by default when a removable device is not found, (‘F:\’).You
may find that in certain equipment, the system uses a different letter in these circumstances.
In this case, you should change the default letter for the one allocated by the system. This is
clearly displayed in the Windows Explorer.
Some devices require a special configuration, as in the case of the ‘Smartphone-wifi’ font. Ask
your dealer for information about how to configure this font.
24
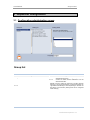
3.1.4.3 Ticket printer
3.1.4.3.1
Print receipt ticket
You can enable or disable the printing of receipt tickets which is executed after validating the
order, just as the order execution starts.
3.1.4.3.2
Ticket type
You can choose the type of ticket you want to use.
NoBarcode: It includes the standard ticket content without showing any kind of barcode.
OrderBarcode: A barcode is added to the basic ticket content, with the order details included.
Application reference
Customisable digits
Amount: Total € order
ProductBarcode: A barcode for each product is added to the Order Barcode content, made
up of:
Product reference
Application reference
Customisable digits
Amount: Total € order
Product Reference: A reference for each product is added to the OrderBarcode content.
It should make up the length of the product reference.
25
3.1.4.3.3
Additional copies
Number of receipt copies desired, regardless of obligatory printing.
3.1.4.3.4
Ticket printer
Selection of the printer where order receipt will be printed. Leave blank in order to not print
receipts.
3.1.4.3.5
Validation ticket
Option to enable/disable print-out of the validation ticket
When you enable this option, the ticket will be sent with a secret validation code to a printer
located at the store counter or checkout.
3.1.4.3.6
Validation ticket printer
Select the printer where you want to print the validation ticket.
3.1.4.3.7
Barcode settings
When this option is pressed a new screen will appear for the configuration of the barcode.
This will vary depending on the type of barcode configured. The following columns are
displayed on all the screens:
Size: for each column, define the number of digits necessary to form the specified
field.
Order: for each column, define the order of appearance of the associated field in the
barcode, from smallest to greatest and displayed from left to right in the barcode.
a) Order barcode.
Only one barcode appears on the ticket, with information about the order
Application reference: parameters (size and location) of the custom application
reference which may appear on all the printed order barcodes. A description of this
parameter is given below. Custom digits: parameters (size and location) of any
potential custom digits you want to add to the barcode. An explanation of this
parameter is set out below.
Amount: parameters (size and location) of the total amount of the order.
Additional digit value: this is optional and can be used for any additional value
required by the store. The length must coincide with the one indicated in the ‘Custom
digits’ parameter.
Application reference value: this is optional and similar to the preceding one, for the
purpose of identifying the global Kiosk concept in the store’s accounting records. The
length must coincide with the one indicated in the ‘Application reference’ parameter.
26
b) Product barcode. The ticket has the same number of barcodes as the products ordered by
the customer.
Product reference: parameters (size and location) of the product reference that may
appear in all the printed product barcodes. Depending on the service, the specific
product reference value is entered in the prices or products configuration screens.
Application reference: parameters (size and location) of the custom application
reference that may appear in all the printed product barcodes. An explanation of this
parameter is given below.
Additional digits: parameters (size and location) of the potential custom digits to be
added to the barcode. An explanation of this parameter is given below.
Amount: parameters (size and location) of the total product amount.
Additional digit value: this is optional and can be used for any additional values
required by the store. The length must coincide with the one indicated in the ‘Custom
digits’ parameter.
Application reference value: this is optional and similar to the preceding one, for
identifying the global Kiosk concept in the store accounting records. The length must
coincide with the one indicated in the ‘Application reference’ parameter.
27
c) Product reference. The ticket contains numerical codes for each product and the order
barcode. The configuration is therefore the same as that of the order barcode, with the added
parameter ‘Product reference’, where the length of this number that appears below each
product in the receipt is specified.
3.1.4.3.8
Ticket preview
Screen showing the ticket preview, exactly as it will appear when printed. The information on
this ticket will vary according to the defined parameters.
28
3.1.5 Users
On this screen, you can enable and disable users and modify their properties.
Modify user button
Enable/disable user
button
29
3.1.5.1 Modify users
The 'modify user' screen allows you to name the user, change the password and select the
user level of security (Supervisor, Operator).
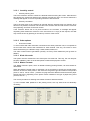
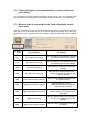
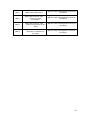
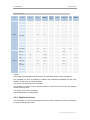
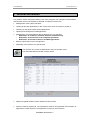
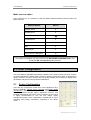
3.1.6 Additional taxes
In this screen, taxes can be set to be applied globally for an order.
You can set the tax in the Service Module that will complete the order (PRINTS/LABS) or at
the media type/service level of DPSLAB. Never do both at the same time. The table below
shows an example.
Service Module
Service Module
enabled / value
DPS PRINTSERVER
Tax
PServer Media Type /
LABS Service
Mediatype Tax /LABS
Service Tax enabled /
value
Yes: 3€
10x15H
No
DPS PRINTSERVER
Yes: 3€
13x18
No
DPS PRINTSERVER
Yes: 3€
15x20_A5
No
DPSLAB
No: 0€
Labs1:
protocol
MITGEN
Yes: 2€
DPSLAB
No: 0€
Labs2:
protocol
MITGEN
Yes: 1€
DPSLAB
No: 0€
Labs3: MAP (MITPBM)
protocol
Yes: 0€
30
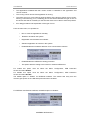
In this case, if the user requests, for example:
2 calendars 10x15H
(x2 sheets)
1 print 10x15H
(x1 sheet)
1 Mosaic Poster 15x20_A5
(x8 sheets)
40 prints to Labs1
(x40 sheets)
The order will apply the following taxes: 3 € for instant printing and 2 € for shipment to the
laboratory by the Service Labs1 LABS (DPSLAB).
The settings screen shows the matrix of possible combinations.
4 Common work flow for the end customer
Although Easygifts Kiosk offers a wide variety of photographic services, and each of those
services can have specific features regarding options and work flow, there are a number of
steps that are common to most services that the end customer may select.
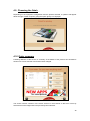
4.1 Screen saver
When the Kiosk is not being used, an animated screen will continually show the basic
services offered, for advertising purposes.
As soon as the screen is touched, the animation will disappear and the main screen will
appear.
31
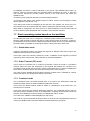
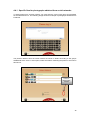
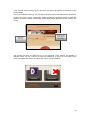
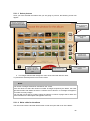
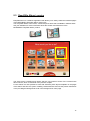
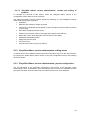
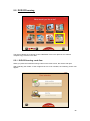
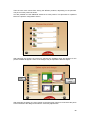
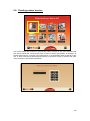
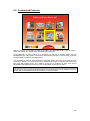
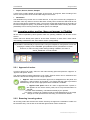
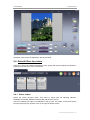
4.2 Main screen
This screen shows the user all the services available from the Easygifts Kiosk.
Fixed
services:
Rotary services
Language selection
Service slide
bar
Price
information
If more than 8 services are installed, the 4 that appear in the top row are permanent, while the
bottom row can be shown in rotation: the user can move the icons using the slide bar below to
see all the available options, and this will also move automatically on a regular basis to show
the availability of other services.
The available languages are shown in the bottom left, represented by flags. The Easygifts
Kiosk default language is shown first.
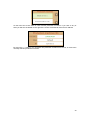
The price information button appears in the bottom right of the screen. When you press the
price button, a screen will appear where you can select each service and find price
information for each product. Depending on the service you select, a price grid may appear,
showing the prices according to the product and different price ranges according to quantity.
In the example given, for the Print service, the prices vary depending on whether you choose
more or less than 10 copies of the selected print size.
32
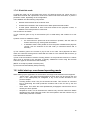
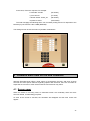
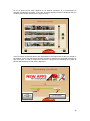
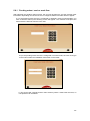
4.3 Terms and conditions
On this screen, the customer can read and accept the terms and conditions of use.
Simultaneously, the application related to the selected service is starting up, and is
transparent to the user. The ‘I accept the conditions’ button will not appear active until the
application has started
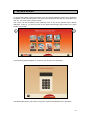
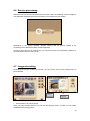
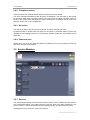
4.4 Choosing the photo source
This screen asks the customer to specify the data source from which the pictures will come.
Depending on the chosen source, the flow of the following screens and the on-screen
instructions may vary.
It is possible to identify two different streams marked by the choice of data source.
-
Standard origins. Each of the possible physical origins in the Kiosk.
Social networks (Facebook, Picasa). The user's photographs are obtained from the
Internet.
33
NOTE
When the files are read from a physical device connected to the system, there’s a process
that controls the premature extraction. When this happens, the user is asked to introduce the
device again. If the user doesn’t respond after some time, the screensaver is activated and
the application goes back to the initial screen. When it’s required to go to first screen
immediately, it’s possible to do by clicking in the top corners of the screen.
NOTE
The different platforms associated with the Internet for obtaining photographic albums belong
to third parties and they may cease to be compatible with the Kiosk software without notice.
The Kiosk software manufacturer declines all liability for the consequences of such changes
with respect to the services provided at any time.
34
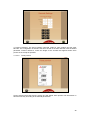
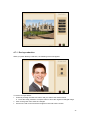
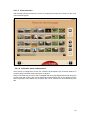
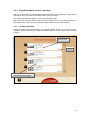
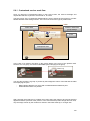
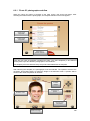
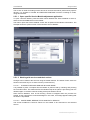
4.4.1 Specific flow for photographs obtained from social networks.
To obtain photos from a social network, you must enter the correct user name and password
for the selected source. The following image shows an example of photographs obtained from
Facebook.
The pictures obtained from the social network are shown in folders according to the groups
established at the source. At this point, select the folders containing the photos to be used in
this service.
Number of
folders/photos
selected
35
As it is a photo source which depends on an internet connection, it is recommended to
optimise the selection of photos; to do this, an image selection screen is displayed with the
contents of the folders selected in the previous step.
In the next step, all selected photos are downloaded in the original size as they are stored on
the network. In the case that a large number of photos is selected, the download process may
take some time. In order to keep users informed, a progress bar indicating the number of
photos downloaded up to that point is displayed.
Photos
downloaded/
Totals
Estimated time required
for downloading
36
If this process is too slow, either due to an excessive number of images or slow internet
connection problems, it is possible to cancel the download from standard access of the
operator screen (by clicking on the two top corners).
37
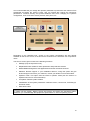
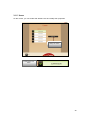
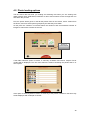
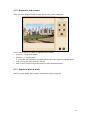
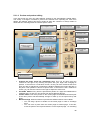
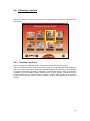
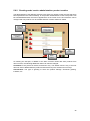
4.5 Photo loading options
The file source filter will save you reading and selecting time when you are working with
digital camera cards, USB drives, DVD/CDs or other sources where access to large files can
slow down the process.
First, the option will be given to read all the photos found on the device, select folders from
the device, and even select photos grouped by the date they were taken.
At this point the customer is informed about the minimum and recommended number of
images he will need to execute the service.
Number of
photos required
If the folder selection option is chosen, a summary of folders found and a sample of their
content will be displayed. The user must select the folders containing the photos that he or
she requires.
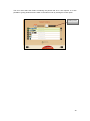
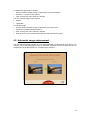
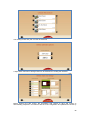
If the option to select by date is chosen, a summary of the photos modified on the same day
will be displayed with a sample of content.
38
The user must select the folders containing the photos that he or she requires. It is also
possible to group photos that were taken in the same month by clicking the month option.
Order by month
39
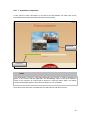
4.6 Service processing
When the user has selected the folders that he or she needs, the following screen will appear.
The application related to the service selected by the customer is now starting.
Depending on the service selected, different screens that are directly related to the
processing of the different products will start appearing.
In order to know the flow of each service, you should access the corresponding chapters for
each individual service in this manual.
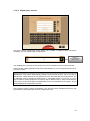
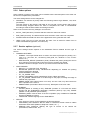
4.7 Image retouching
Depending on the type of service selected, you can retouch some of the images that you
have selected.
Retouch
Retouch
1. Press 'Retouch' to edit the image.
Once you have pressed 'Retouch' you will see the following screen in which you can select
the different retouching options.
40
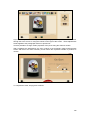
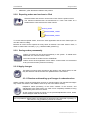
4.7.1 Red eye reduction
When you press 'Red eye reduction', the following screen will appear:
To remove red eye effects:
1. Continue pressing the 'Remove' button until you achieve the desired result.
Press the 'Keep pressed to compare' button to show the original unchanged image.
2. Click on the green tick to save the changes.
Press on the red cross to leave the image as it was and exit the screen.
41
4.7.2 Brightness and contrast
When you press 'Brightness and contrast', the following screen will appear:
To increase or reduce the effects of brightness and contrast:
1. Press the '-/+ brightness' button.
2. Press the '-/+ contrast' button.
Press the 'Keep pressed to compare' button to show the original unchanged image.
3. Click on the green tick to save the changes.
Click on the red cross to leave the image as it was and exit the screen.
4.7.3 Sepia and black & white
When you press 'Sepia, black & white', the following screen will appear:
42
To convert an image into a black & white picture:
1. Press the 'Black and white' button.
Press the 'Keep pressed to compare' button to show the original unchanged image.
2. Click on the green tick to save the changes.
Click on the red cross to leave the image as it was and exit the screen.
To change an image to sepia:
1. Press the 'Sepia' button.
Press the 'Keep pressed to compare' button to show the original unchanged image.
2. Click on the green tick to save the changes.
Click on the red cross to leave the image as it was and exit the screen.
43
4.7.4 Automatic level
When you press 'Automatic level', the following screen will appear:
To automatically improve the image:
1. Press the 'Auto' button.
Press the 'Keep pressed to compare' button to show the original unchanged image.
2. Click on the green tick to save the changes.
Click on the red cross to leave the image as it was and exit the screen.
4.7.5 Zoom and Crop.
When you press 'Zoom and crop', the following screen will appear:
44
To make the image larger or smaller:
1. Use the arrows to select the part of the image you are interested in.
2. Press the '-/+ zoom control' buttons.
3. Click on the green tick to save the changes.
You can crop the images in two formats:
Portrait.
Landscape.
To crop the image:
1. Use the arrows to select the part of the image you wish to crop.
2. Press the 'Portrait/Landscape' buttons.
3. Click on the green tick to save the changes.
Click on the red cross to leave the image as it was and exit the screen.
4.8 Automatic image enhancement
The user can then decide whether or not to apply automatic enhancements to the photos. He
is shown one of the photographs (after an automatic selection process) to allow the user to
compare the result after applying or not applying the changes.
45
4.9 Choosing the finish
Depending on the equipment configuration and the product selected, a question will appear
about the type of finish required, giving the option glossy or matt paper.
4.10 Order summary
Following definition of the service, a summary of the details of the products accumulated is
shown on a screen with their cost and the taxes charged.
This screen informs customer of the active services in the machine so that he or she may
select them for the images that have previously been selected.
46
When you click on any of these services, Easygifts Kiosk will initiate the new service with the
folders that the customer selected at the beginning.
If the customer decides to select new folders with new images for this service, he or she
should finish the current service and then open a new one.
NOTE
The customer may repeat this cycle as many times as he or she needs, although each time
he or she uses a product from a specific service, this product will no longer be available in the
next round.
Some services do not permit products to be accumulated, and so they will not be shown in
this screen if they have already been used in the current order.
Some services do not allow different products to be accumulated in the same order either.
To finish the current service, press 'Next'.
At the bottom of the screen you will see the advertising area that appears at other points of
the program. The time interval between the different adverts can be changed in the
equipment configuration area.
4.11 Copy of files and rendering of service
Then a temporary copy is saved on the disk, with all the images required to execute the
services and the basic pre-production render when this is required by the application.
47
4.12 Removing the device
Once the above process has been completed, the customer is informed that he can remove
the digital image device if one has been used, for instance a memory card, a flash drive, a
DVD/CD device, etc. The system will wait until there is no device inserted and then continue
to the next screen.
This step allows the customer to recover his device before leaving the Kiosk, if payment is
required before validating the order.
4.13 Printing of receipt ticket and validation screen
An order receipt ticket is then printed.
If the equipment is not configured in the stand-alone mode, it will skip all the following steps
until it reaches the last screen.
Otherwise a screen will appear for the operator to enter his/her password.
In this screen the customer is asked to go to the counter and pay for the order, so that the
operator can then validate its execution either remotely through a wireless keyboard or by
going to the equipment and entering his/her password directly using the keyboard on the
screen.
.
48
NOTE
When the asterisk key ‘*’ on the keyboard is pressed, all characters entered up to that time
are deleted. This is particularly useful if using a remote keyboard and wanting to reinitiate the
password entry process.
Depending on the configuration the keyboard can be hidden on the screen to facilitate the use
of a remote keyboard, as shown in the following image. Also see section 3.1.2.8.
Once the correct code is entered, a ticket will be printed out with the details of the order.
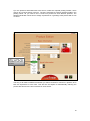
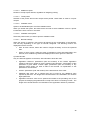
4.14 Production of order
In the stand-alone mode, the equipment will start all the pending processes and issue a report
on the different processes to the end customer in addition to giving an estimate of the time
foreseen for executing those processes.
At the beginning of this process, the receipt ticket will also be printed out with a detail of the
services to be executed. The printing of this receipt is optional and can be avoided using the
configuration.
49
If the services involve printing on the premises, the prints will appear consecutively at the
printer outlets.
In the case of DVD/CD burning, the user will be asked to insert a blank DVD/CD to be burned.
If some kind of error occurs, a message is displayed warning of potential problems. When this
happens, the Kiosk operator should click on the white triangle displayed on the centre of the
screen.
Order error
warning
Hidden access
to dialogue for
the operator
The operator will then be asked for his or her password. Once entered, this displays a
dialogue where you can choose to access the 'Dispatcher' to check the real status of the
order or terminate the session to release the unit for another customer.
50
4.15 Goodbye message
The final screen thanks the customer for using the Kiosk, and in some cases it will indicate
how to collect the services that have been processed.
51
5 Available services
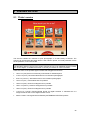
5.1 ‘Prints’ service
This service enables the customer to print photographs in a wide variety of formats. The
pictures can be printed at the Kiosk itself, if it has a built-in printer, at a local production centre
on the premises, or at a remote lab.
NOTE
The laboratory delivery service from 'copies' requires the use of an additional license. Please
refer to the chapter on additional licenses or consult your dealer for more information.
These are some of the possible paper formats that Easygifts Kiosk offers:
10x15 cm (4‘x6‘)The most commonly used format for standard prints
7.5x10 cm (3‘x4‘). Recommended size for low resolution photographs
9x12 cm (3.5‘x4.7‘). Alternative size for low resolution photographs
13x18 cm (5‘x7‘). Intermediate size for portraits
15x20 cm (6‘x8‘). Used for enlargements or portraits
15x21 cm (6‘x8.5‘). Used for enlargements or portraits
15x23 cm (6‘x9‘). Used for enlargements or portraits
11.5x15 cm (4.5‘x6‘). Recommended format for digital cameras. It maintains the 4:3
image format as seen on the digital camera screen.
20x25 / 20x30. The largest format offered by MITSUBISHI ELECTRIC printers
52
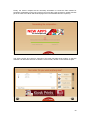
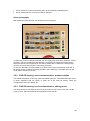
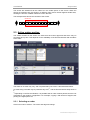
5.1.1 ‘Prints’ service: work flow
After the customer has selected the folders on which the work is to be done, he may examine
the photos and order different print sizes for each photo, rotate them (merely to view them
better, but the result will not be kept permanently in the original file), edit the brightness and
contrast, apply black & white or sepia effects, adjust the colour, etc. by pressing the 'Retouch'
button.
The photos will appear in miniature and in chronological order at the top of the screen. The
selected photo (marked green) will also appear as the main image.
In the panels to the right of the main photo, the customer can add the copies required for
each different printing format. In each print size box, the price per unit, number of copies and
pick-up point are also shown.
The total number of copies for each photo, including the different printing formats, is shown
below each miniature on the top panel.
The accumulated price for this service is shown on the bottom right button. Press this button
to confirm selection and continue the flow.
Ordering
method
Ascending/
descending
order
Number of
miniatures
Printsize, amount
and partial
quantities
Number of
copies of
selected size
Current selection
Cumulative amount
.
53
Finally, the service compiles all the necessary information to create the files needed for
production. Depending on the type of service, this may take a few seconds or several minutes
(as is the case of an album with several pages and a considerable amount of photos).
The service closes and control is returned to the main Easygifts Kiosk module, so that the
customer can add more services or finish the current order, as seen in the relevant chapter.
54
5.1.2 ‘Prints’ service administration: product creation
Due to the vast array of options offered by the Easygifts Kiosk, you need to configure a set of
parameters for each product in each service. So, for the Prints service, for every print size
you must specify the production machine, output module, the consumable paper size, and the
final print format (there may be several for each consumable size).
To configure the print service products, select the 'Prints' service on the settings screen. Next,
press the ‘Products’ button.
Prints service
Products
The list of current products will appear. On the left of each product, marked with a green dot,
those products that are activated, and consequently available to the Easygifts Kiosk user, will
be shown.
Select all
Order of appearance
Enabled product
Add new product
Edit product
Delete product
55
NOTE
Most of the products shown in the equipment when it is first switched on are ‘protected’
products defined by the manufacturer which cannot be deleted; however, some of their
properties can be edited in order to adapt to the configuration of the installation. These
products may no longer be available in future software updates due to the manufacturer’s
requirements, or even new ones may appear. In the event of not wanting to offer them to the
end user, they can be deactivated.
The following information is shown for each product on the list:
Product name (it may be blank)
Product logotype (image)
Printsize
Number of sheets the product has
On pressing ‘Add product’ or ‘Edit product’ the product configuration will appear on the
screen.
All the parameters included under the title ‘Basic information‘ are repeated in all the products
for every type of service. In other products from other services, another group of special
parameters may appear for that type of product under the title ‘Additional information’ (see the
Greetings, Calendars or Album sections of this manual)
‘Basic information’ parameters:
Product name
The product can be given a specific name. In many cases it appears blank, since a lot of
products are already identified by the printsize, as is the case of the ‘Prints’ service.
Reference, Order
These values are for internal use.
56
Number of sheets
The number of sheets the product has.
Matt
The product can be printed in matt when the service is configured for this option.
Product icon
The image that represents the product.
Delivery instructions
A brief description of the product for the end customer. It is shown during the end customer
program flow, associated with the product in question.
Operator delivery instructions
A brief description of the product for the operator. It may appear in product lists displayed on
operator screens. It is not compulsory to complete it.
Destination machine
The production machine to which the product is sent. According to the system settings, more
than one option may appear. These could be the Easygifts Kiosk itself (in stand-alone mode),
another Easygifts Kiosk machine (as is the case in a Kiosk isle), or a Click5000.
Service module
You need to select a module for production. This could be PRINTS or LABS. It would be
pointless to select BURNS (which burns DVD/CDs) for a printing service.
NOTE
It may be that not all the output options are available, depending on the selected service
and/or additional licences required.
The available output modules are those offered by the selected production machine in the
previous step.
Consumable/Output channel.
Depending on which module was selected in the previous step, different options will appear
on this screen.
For example, if you chose ‘PRINTS’, you will now be required to select your preferred
consumable size. The sizes shown here are those announced by the PRINTS service module
of the production machine that was chosen in the first step.
If you chose ‘LABS’, you must now select the output channel from the different channels this
module may offer. The output channels are normally associated with a different production
machine or remote centre.
Print size
In the case of PRINTS, after choosing the consumable size, you also have to set the print
format.
For example, if you chose 15x23HG as your consumable, you can choose between the
following print formats: 15x23, 15x21, 15x20, (10x15)x2, (11.5x15)x2
In the case of LABS, you have to choose an element from the list given by the previously
selected channel. It may also include print formats, but depending on the type of products
offered by the machine or lab for the selected channel, print sizes or other types of elements
will appear (photogifts, etc.).
Printing channel
The output channel (only for PRINTS type output). See the ‘Printserver’ Appendix of this
manual.
57
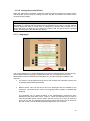
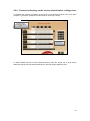
5.1.3 ‘Prints’ service administration: editing prices
To configure the print service product prices, select the 'Prints' service on the settings screen.
Next, press the ‘Prices’ button.
Prices
A screen will appear in which you can activate up to 5 different price ranges and set a price
for each product in each range, as well as the product code for ticket printing (optional).
Active ranges in
green
Editable upper
range limit
Product
Product
reference
The recommended steps would be as follows:
a) Decide how many ranges you want and set the upper limit for each one,
consecutively. For example, from 1 to 9 prints for the first range, from 10 to 99 prints
for the second, etc.
b) Type in the price of each product and for each different range.
58
c) Type in the product reference. This step is optional: it is only useful in those cases
where you are using barcodes or a different numerical code for each product that
appears on the customer ticket.
According to the barcode configuration, the figure will have a set length. If the figure
you type in does not match this specific length, a red square will appear around the
figure.
5.1.4
‘Copies’ service administration: general configuration
The following parameters are allowed in the general configuration of this service:
Automatic image enhancements. There are three options:
1. This service does not include automatic image enhancements.
2. The automatic enhancements are always applied to the user’s images, without
giving him/her any option.
3. The user is asked whether he wants to apply the automatic enhancements to
his/her images.
Multiple photo selection in the image viewer. When this operating mode is selected, it
enables the user to work with groups of images in such a way that copies of a specific size for
printing can be added to the whole block simultaneously, for example.
Title and instructions for instant copies and for deferred services (non-instant). In the
event of purchasing the additional licenses that permit sending to non-instantaneous printing
systems and the configuration of products that use those additional systems, the end user will
see a screen in which to select one or the other. This configuration section permits the
definition of the titles and messages for each of the options.
59
5.2 Instant Photo Album
Instant Photo Album is a software application that allows you to easily create MITSUBISHI
‘Easygifts Instant Photo Albums’. These instant photo albums may have between 10 and 30
sheets with a size of 10x15cm.
The set of images (sheets) generated by the Instant Photo Album application will be ready to
be sent automatically to the MITSUBISHI MAP instant album printing machine which can print
them out and bind them in a very short space of time.
Please ask your distributor for more information about the MITSUBISHI Instant Photo Album
option.
The Instant Photo Album application contains a wide variety of pre-defined combinations or
‘templates’ that automatically distribute the photographs on the pages of the album. It is also
possible to choose from among the photographs themselves or from a large range of
decorative backgrounds to fill in the background on each page, as well as enter a text for the
album title, thus saving the end customer considerable time in designing the album.
5.2.1 ‘Instant Photo Album’ service: work flow
After the customer has chosen the folders with the photos, and by following the application's
instructions, they can create an automatic album in just a few steps. This chapter describes
the different screens and what they mean.
This service has no previous product selection, since it is defined automatically by the number
of pages in the album and this, in turn, depends on the initial number of photos selected by
the customer.
60
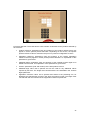
5.2.1.1 Type of background
The user can either use his/her own photos as a background of each page (the program
automatically selects a photo from among the ones on the page) or choose a decorative
background from various possible themes.
5.2.1.2 Selection of themes
If the Customer prefers to use decorative backgrounds for the album pages, he must now
decide on the theme to be used. Each theme has several backgrounds which are applied at
random to each page of the selected product. After pressing each theme, each of the different
backgrounds in that theme are displayed for brief intervals of time.
Choosing a theme
Preview area
61
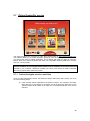
5.2.1.3 Select pictures
Once you have selected the folders that you are going to process, the following screen will
appear:
Minimum and maximum
number of photos to be
selected that are available
Size for viewing the
miniatures
Rotate selected
image
Preview of the
selected image
Number of images
selected, final number
of pages in album and
price
Image selection area
Check/uncheck all the
images
The images selected will change the colour of the lower bar with the name.
To preview the selected picture in full screen mode:
NOTE
The number of images selected is indicated on the screen.
If the user does not select the minimum number of images required by the album, the lower
right-hand button that allows the flow to continue will not function. A message will appear if
you select too many images.
The user will not be able to continue unless he selects a number of pages that is within the
limits indicated in the description that appears at the top.
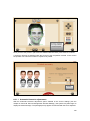
5.2.1.4 Write a title for the album
The user must enter the text that will be shown in both the spine and cover of the album:
62
Text for spine & cover
Upper-case or lower-case
Additional characters
63
5.2.1.5 Cover selection
After the title has been entered, the screen for selecting the image to be shown on the cover
of the book will appear.
5.2.1.6 Automatic photo enhancement
If the service is configured to do this, the customer will be asked in the next step whether he
wants to apply automatic enhancements to his photos.
Keep in mind that this process is fully compatible with the image adjustments made during the
preview step and product edit, but the automatic enhancements will not be applied until the
final composition of the album and, therefore will not be reflected on the screen during the
edit.
64
5.2.1.7 Automatic composition
In this step the initial composition of the album will automatically be made with all the
information that has been furnished during the previous phase.
Preview area
Progress bar
NOTE
If it is impossible to read any of the photo files during the process, a warning message will
appear on the screen and the application will automatically return to the photo selection
screen for the customer to confirm that he wishes to create the album again, but without
including the damaged photos, which will now appear as non-accessible.
Once this process has been completed the user will enter the edit album screen.
65
5.2.1.8 Preview and product editing
In the edit screen the user can make different changes to the automatically-created album.
The variety of changes is limited to prevent the customer from spending too much time
editing, but different options have been studied to allow the customer to always obtain an
album that is to his liking within the shortest space of time.
Page navigation arrows
Border colour of
images
Change background
‘Scramble‘ button
Exchange an image with
another from the album
Rotate the
selected image
Adjust the crop area
of the image
Adjust selected
image
Add or remove text on the
page
Album edit section
Finish editing album
Framing the photo inside the rectangular area. This can be done using the
controls on the right or by touching the photo with your finger and changing its
position. If the screen is a multi-touch screen, not only can it be moved but the zoom
level can also be adjusted by increasing the distance between the fingers that are on
the photo. This operation is known as ‘pinch zoom’. If the screen is not a multi-touch
screen, you can use the controls on the right to adjust the zoom level.
‘Scramble’ button. Every time it is pressed the photos on a page are redistributed in
a different way, so that you can choose from among different layouts.
‘Delete’ button. One of the photos on the current page can be deleted and the layout
of the other photos will automatically change to make up for the space left by that
photo.
Move/exchange. When this button is pressed two different actions can be taken:
o You can drag a photo to another on the same page in order to exchange
them.
o You can move a photo from the current page to another page. To do this,
move the photo to the top and release it on the required page. On releasing
66
it the change will be made and the layout of the photos on the original and
destination pages will also be changed.
Change background.
Change frame.
Rotate. Rotate the selected photo.
Retouch photo.
Add Text. When text is added, additional tools appear for changing its position,
changing the font size, changing the type of lettering and changing the colour.
67
5.2.1.9 Order summary
Once you have approved the product changes, the following screen will appear:
Number of album copies
Price per album copy
Finish creating album.
Total price, not including
any possible additional
taxes
If you have installed a ticket printer, a note will be printed out with the order details.
The next screen shows the selection of additional products so that the customer can add any
other services or finish the current order, as seen in the relevant chapter.
68
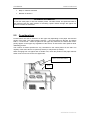
5.2.2 ‘Instant Photo Album’: working with DPSLAB and MITSUBISHI
ELECTRIC M.A.P. printer
In order to produce Instant Photo Album products, it’s required to use the M.A.P.
printer together with the Easygifts Kiosk related applications, available with the basic
software installation package.
Below the different stages of the instant photoalbum production are detailed.
After the Easygifts Kiosk main application has created an album order, this one will be
managed by the DPSLAB application, together with the M.A.P. internal software and
hardware.
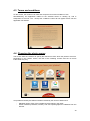
This is the basic workflow of the Instant Photo Album orders:
1. The order is sent to the Dispatcher core application, that keeps the orders
cue and waits for their validation.
2. Once the order is validated (by somebody in the shop or any automatic
process), the DPSLAB software module takes the ‘request’ and processes it.
An order is divided into several ‘requests’ depending on the different services
and products composing this order. The ‘request’ enters the status
‘PROCESSING’, as it can be seen in the Dispatcher interface. Since then, the
order is in batch executing mode (when using the default configuration). This
means that the order will be managed in background, while the system can
handle other tasks, like attending the next customer, for example.
3. Only when M.A.P. is ready and it’s not busy producing another ‘request’,
DPSLAB sends the current ‘request’ to the M.A.P.. The green led located in
front of M.A.P. is blinking when producing an album. The ‘request’ enters the
‘TRANSFERING’ status.
DPSLAB will accept and process simultaneously several Instant Photo Album
‘request’, but only one can be sent simultaneously to the M.A.P. Until this
‘request’ is not finished, the next one won’t be sent.
All the M.A.P orders in batch executing mode show the half progress in the
Dispatcher interface after a while: this means that all their ‘requests’ have
been processed by DPSLAB module, and they are waiting to be printed.
4. When the album is finished, the green led in front of M.A.P. stops blinking. If
any other ‘request’ of M.A.P. was waiting in batch executing mode, it will be
sent to M.A.P. and the new album will start printing.
When a foreseeable incidence occurs in the M.A.P. machine, like when it runs out of
inksheet, paper or glue, the DPSLAB keeps the current ‘request’ in production
continuously, checking its status every 60 seconds. This means that the order
appears in Batch Executing mode in the Dispatcher admin interface: the order doesn’t
change to error status, otherwise when being sent again to the DPSLAB the book
would start from the beginning. The staff of the shop will know about the problem
condition because the yellow led in front of the M.A.P. is blinking: this is the signal for
the operator when the machine requires the current consumable to be replaced by a
new one. When the problem is solved, changing the old media by the new one for
example, the yellow led will stop blinking and the machine will go on producing the
album.
When a major incidence occurs, like paper jam inside the machine, the red led in front
of M.A.P is on. Also in this case, the status in the order at Dispatcher interface
69
remains in batch executing mode. This allows the operator to solve the issue and not
to lose the current album production.
NOTE: during the album production, any error management is done by the internal
M.A.P. software. The status of the order is ok for the DPSLAB software.
70
5.2.3 ‘Instant Photo Album’ service administration: initial steps
Before using the Instant Photo Album, review the laboratory shipping module settings,
DPSLab. To do so, follow the steps below.
Step 1. Enter Dispatcher Admin.
Step 2. Select the Labs service.
Step 3. Pause the Labs service.
71
Step 4. Select the Labs
service.
Step 5. Enter the Labs
options menu.
Step 6. Enter settings.
Step 7. Enter password.
(nothing by default)
72
Print Mitsubishi logo
Print store logo
Step 8. Select the Specific
tab.
IP MAP address
Turn off MAP by turning
off the unit.
The system comes preconfigured for the Instant Photo Album service function without any
need to change settings. The IP address of its Mitsubishi MAP is 192.168.0.50 by default.
Step 9. Select the Others
tab.
Store logo:
D:\KERNEL\SERVICE_MODULES
\DPSLAB\MODULES\
Step 10. Save and exit.
NOTE
To change these settings, a minimum technical knowledge of the unit is required. Contact
your dealer or authorised service centre.
73
Step 12. Restart the
service.
Step 11. Select the Labs
service.
5.2.4 ‘Instant Photo Album’ service administration: creating and editing
products
To configure the Instant Photo Album service products, select the Instant Photo Album
service on the settings screen and then press the ‘Products’ button.
1. Instant Photo Album
service
2. Products
The list of current products will appear. On the left of each product, marked with a green dot,
those products that are activated, and consequently available to the Easygifts Kiosk user, will
be shown.
74
Use the arrow keys on the top at the left to reorder the position of the products in the list
shown to the end user.
Product editing
Activating and deactivating
products
The software is configured in a pre-determined way with all the possible products. This
service does not require you to add or delete products, but just edit some of their properties.
After selecting a product, press the edit button to see the basic common parameters for all the
products, irrespective of the service. These are explained in the previous chapters and the
specific additional information of the products for this service.
The specific properties of these products include the following. It is not advisable to change
these values for this type of product:
Orientation
75
Minimum and maximum number of photos
Layouts file: photograph layouts based on their orientation and the number of photos
on each page.
Decorative background theme routes
Position for moving the content of the page with respect to the fold axis
Size of the covers, which depends on the thickness of the album
Shadowed text (default option)
Spine text direction
Pages with just one photo
Use of the cover
Thickness and colour of the photo frames
5.2.5 ‘Instant Photo Album’ service administration: editing prices
To edit the prices of the different products, proceed in the same way as for the other
services, by selecting the Instant Photo Album service in the main configuration screen
and pressing the ‘Prices’ button.
5.2.6 ‘Instant Photo Album’ service administration: general
configuration
The only parameter to be configured generically for this service is the automatic image
enhancement, which has been explained in previous chapters of this manual. It is
advisable to leave this option activated, since the final result of the album will be much
more attractive.
76
5.3 ‘EasyGifts Album’ service
EasyGifts Album is a software application that allows you to easily create the individual pages
of the MITSUBISHI ‘Easygifts Album’ photo book.
The ‘EasyGifts Album’ is an instant, customised photo book that is available in different sizes.
Ask your distributor for more information about the solution and references of the
MITSUBISHI ‘EasyGifts Album’ product.
This service has a workflow and options that are very similar to those of the Instant Photo
Album service, which is described in the previous chapter.
For this reason it is also possible to work with automatic photo layout templates on the pages
of the album and have the option of adding customised texts and use the photos themselves
or the pre-designed backgrounds to fill in the background on each page.
77
5.3.1 ‘EasyGifts Album’ service: work flow
After the customer has chosen the folders with the photos, and by following the application's
instructions, they can create an automatic album in just a few steps.
This chapter describes the different screens and what they mean.
(Since this service is quite similar to the Instant Photo Album service, the following sections of
this chapter refer to the Instant Photo Album chapter sections that may be identical).
5.3.1.1 Product selection
Unlike the Instant Photo Album product, the ‘Easygifts Album’ allows you to choose the type
of product, based above all on the different printsizes and also in some cases, on the number
of pages.
Product name
Price
Number of printed pages
78
After selecting the product, proceed in the same way as for the Instant Photo Album service:
Choose the type of background
Select the decorative theme, if required
Select the photos to be included in the album
Enter the text that will appear on the first page of the book
Select the photo that will also appear on the first page
Request the automatic correction of the photos
Automatic creation of the album
Album edit screen and
Order summary screen, for the purpose of changing the number of copies of
that album that are to be printed.
79
5.3.1.2 ‘EasyGifts Album’ service administration: creation and editing of
products
To configure the products of this service, select the ‘Easygifts Album’ service in the
configuration screen and then press ‘Products’.
The specific properties of these products include the following. It is not advisable to change
these values for this type of product:
Orientation
Minimum and maximum number of photos
Layouts file: photograph layouts based on their orientation and the number of photos
on each page.
Decorative background theme routes
Position for moving the content of the page with respect to the fold axis
Size of the covers, which depends on the thickness of the album
Shadowed text (default option)
Pages with just one photo
Use of the cover
Thickness and colour of the photo frames
5.3.2 ‘EasyGifts Album’ service administration: editing prices
To edit the prices of the different products proceed in the same way as for the other services,
by selecting the Instant Photo Album service in the main configuration screen and pressing
the ‘Prices’ button.
5.3.3 ‘EasyGifts Album’ service administration: general configuration
The only parameter to be generically configured for this service is the automatic image
enhancement, which is described in previous chapters of this manual. It is advisable to leave
this option activated, since the final result of the album will be much more attractive.
80
5.4 ‘Calendars’ service
This service allows the customer to print his or her photographs in calendars of different sizes
and formats.
5.4.1 Calendars: work flow
When you press the ‘Calendars’ button on the main screen, this service will open.
The most important novelty of this service from version 2.0 of the Easygifts Kiosk software is
that it is no longer necessary to update the calendar designs every year, since the information
for the period selected by the user is calculated in real time each time the service is executed.
In addition, it is now possible to define a different price for each product, considering that the
product is defined by the printsize and the number of pages, among others, and not just by
the printsize as was the case in previous versions. Thus the first step will be to select the
product.
81
The starting month and year can then be selected.
A style and a collection of backgrounds can be selected for creating the calendar.
Before entering the edit screen, the information with respect to days and months is
automatically prepared in accordance with the local configuration and parameters chosen by
82
the user (the initial year and month) and is then painted on each of the backgrounds. This
process may take a few seconds.
In the edit screen, different photos can be assigned to each of the backgrounds.
The size and position of the photo on each calendar leaf can be adjusted, and the photo can
be edited with the habitual retouching tools.
Once the photos have been assigned to all the calendar leaves, the user is taken to the
automatic photo enhancer screen, the summary of the product ordered (where several copies
can be requested of the same calendar), preparation of the product to be printed and lastly
the screen for starting other possible services in the same order.
5.4.2 ‘Calendars’ service administration: product creation
The administration of the different products in this service is the same as the administration of
the 'Prints' service, which has already been explained in this manual.
83
5.4.3 ‘Calendars’ service administration: editing prices
The administration of the different prices for each product in this service is the same as that of
the other services.
5.4.4 ‘Calendars’ service administration: settings
In this section, the service is configured if it provides the automatic image enhancements and
also allows the annual calendar application to be launched: local bank holidays, calendar
languages, etc.
84
5.5 DVD/CD burning
This service allows the customer to burn CDs/DVDs of his or her pictures or to make a
complete copy of all his or her files.
5.5.1 DVD/CD burning: work flow
When you press the 'DVD/CD burning' button on the main screen, this service will open.
After selecting the folders of the images that are to be included, the following screen will
appear:
85
Press ‘Select all’ to save all the files that are in the previously-selected folders.
Press ‘Partial selection’ to select the files for inclusion.
Select photographs
After pressing ‘Partial selection’ the following screen will appear:
To select the pictures or files for inclusion, the user must press each one or press the ‘Select
all’ button. Only the miniatures of files which are recognised as image types will be shown,
and those that are not recognised as such will be shown with a neutral icon, although they
can also be selected for inclusion in the saving operation.
As the user adds files, the space taken up by them in the carrier will be shown in the bar at
the bottom which is used for the saving operation. If the capacity is exceeded, the user will
not be able to add any more files.
5.5.2 ‘DVD/CD burning’ service administration: product creation
The default parameters of the only product available belong to a standard DVD-type carrier.
If carrier capacities that are higher or lower are to be used for saving, select the
corresponding size in the ‘Media’ list.
5.5.3 ‘DVD/CD burning’ service administration: editing prices
The administration of the different prices for each product in this service is the same as the
'Prints' service, which has already been explained in this manual.
86
5.6 Greeting cards
This service allows customers to create different types of products such as Christmas cards,
cards for births and christenings, birthday cards, children’s birthday cards, etc., and add
decorative frames to their photographs and print them out in various formats.
5.6.1 Greeting cards: work flow
When you press the 'Greeting Cards' button on the main screen, this service will start. After
selecting the folders with the photographs, the screen for selecting the type of card will
appear.
87
Then the user must choose from among the different products, depending on the printsize.
The price of each product is shown.
It is also possible to insert additional sentences to each product. This procedure is explained
later in the product configuration section.
After selecting the product, the screen for selecting the available styles and designs for the
product created will appear. Some of the designs may be repeated in different styles.
Styles
Preview of
design
After selecting the design, the user is taken to the edit screen where he must select the photo
to be inserted into the design and make the necessary adjustments.
88
Available
pictures
Text edition
Move
picture
Picture
zooming
Change
design
Some designs may have a specific text such as ‘Happy Christmas’, ‘Happy Holidays’ etc. or a
default text such as ‘Enter your text’. Regardless of the content, the text can always be
changed by the end user.
The position of the photo in the frame area can be changed by dragging your finger over that
part of the screen or using the controls displayed on the right.
To change the current design use the design change button. Every time it is pressed the
design is changed cyclically in the group of designs from the same style. The content of the
text does not change, but the text position or colour does, because this is information
provided by the designer in order to always obtain the most attractive result.
The retouch button allows you to make changes to the image, as already explained in other
sections of this manual.
Press the ‘Edit text’ button to change the lettering, size, colour and shadowing of the font and
the content of the text.
The edit screen has a keyboard at the bottom. As the character are entered, they are shown
in real time on the screen.
The text can be moved by dragging your finger over the design directly or using the arrow
keys on the right.
To rotate the text at small angles, lightly press the rotate button. To rotate at 90, 180 or 270
degrees, keep the button pressed.
Since the text allows for line breaks, 3 different text alignments are also available: left, centred
and right.
89
To accept or cancel the changes made to the text in this screen, press the validation button
on the right at the bottom.
Move
Movetext
text
Move text
Once the image has been inserted and the text defined together with its characteristics, press
‘Next’ to continue.
90
The customer will be asked whether he/she wishes to apply any automatic enhancements to
the photos, if the application is configured in this mode.
Then a summary is shown of the Greeting product ordered. It is also possible to increase the
quantity. For some products which comprise a pack of several cuts of paper (3 or 4
panoramic cards created from consecutive cuts of an A4 sheet, for instance), this quantity
refers to the number of packs and not to the total number of copies.
Quantity
91
5.6.2 ‘Greeting cards’ service administration: product creation
The administration of the different products in this service is similar to other services that have
been explained in this manual already. In the product administration screen each product can
be activated/deactivated, the order of appearance on the screen for the end customer can be
changed and new products can be created and each of them deleted or edited.
Select and
unselect all
products
Change sorting
in the screen
Enable/disable
product
Edit
product
Create
product
Delete
product
On entering the edit part, in addition to the basic common values with other products from
other services, the following additional values can also be changed:
Orientation. If the product is vertical, horizontal or any. The default choice is any, if the user
does not want to differentiate the product and therefore its price, based on this concept.
Classification. The type of greeting to which the product belongs: Christmas greeting,
invitation, etc.
92
If for any reason (changes in the publication of formats by the printing server, for instance), a
product cannot be created, that product will be deactivated on the operator screen and will
appear on an orange background.
5.6.3
93
5.6.4 ‘Frames and Greeting cards’ service administration: editing prices
To facilitate the entering and editing of the prices of the different products, they have been
grouped by printsizes, irrespective of the family to which they belong.
Products being
grouped by printing
size
‘Unfold’ bar
To assign different prices to each individual product, press the ‘unfold’ bar to show all the
different products with the same printsize and in that way assign different prices.
94
5.6.5 ‘Frames and Greeting cards’ service administration: settings
In this part the application is configured in the event that the service has the automatic image
enhancements and also permits the product types to be configured.
Product types. This button is used to access a configuration screen in which the different
Greeting product families or types are activated or deactivated. The order in which they are
shown on the screen can also be changed.
95
5.7 ‘Online Kioskgifts’ service
This service enables the customer to make their orders online at http://www.kioskgifts.com.
This website allows you to create calendars, greetings cards and albums from the comfort of
your own home using an online application. The customer will obtain the order in electronic
format, which he or she must take to the store in a compatible medium (USB drive, memory
card, etc.), to be printed.
NOTE
Services available on the Easygifts Kiosk website may be available on the store Kiosk and
selected by the customer. Wherever possible, the store must inform its usual customers
before they prepare their orders from home.
5.7.1 ‘Online Kioskgifts’ service: work flow
Once you have selected the device onto which the online orders have been saved, you move
on to the following steps:
a) A list of all the orders contained on the device is shown. The customer can select
those that he or she wishes to complete, and at all times the total price of the
selected orders will be visible. If an order can not be performed then it can not be
selected.
96
Selected order
Order not possible
Total price
b) The system will read the order information and create the necessary files for
production. Depending on the amount of orders selected and the number of
pictures in each order, this operation may take a few seconds or several minutes.
c) The service is closed and a summary of the order is displayed. Unlike other
services, you cannot add new products.
97
5.7.2 ‘Online Kioskgifts’ service administration: product creation and
price editing
It is not possible to configure products and prices for this service, since the equivalent local
services and products configuration is used, either Greetings, Calendars or Easygift Album.
5.7.3 When an order is not possible in the ‘Online Kioskgifts’ service:
error codes
There are several reasons why an ONLINE Kioskgifts order may not be possible to complete.
When this occurs in the order itself, an error code will specify the problem. This code is not
designed for the end customer, but for the operator in order to understand what the problem
is.
Error code
(1) Error
code
(2) Description
(3) Solution
(4) 1
(5) Invalid product setting
(6) The product on the website is new and
your software has not been updated
(7) 2
(8) Unknown product ID
(9) The product on the website is new and
your software has not been updated
(10)3
(11) Product disabled
(12) Enable the product from the product
settings
(13)4
(14) Unknown product type
(16)5
(17) Invalid production machine
(18) Correctly configure the product from
the product settings
(19)6
(20) Service module not started
(21) Check that the service
(PRINTS/LABS) associated with the
product has been started
(22)7
(23) Consumable does not exist
(24) Check that the consumable associated
with the product is not excluded in the
format filter
(25)8
(26) Incorrect group
(27) The product setting on the website is
new and your software has not been
updated
(28)9
(29) Incorrect number of pages
(30) The order is damaged and cannot be
processed
(15) The type of product sent from the
website is new and your software has
not been updated
98
(31)10
(32) Incorrect data format
(33) The order is damaged and cannot be
processed
(34)11
(35) Invalid customer order
(there is no order
information)
(36) The order is damaged and cannot be
processed
(37)12
(38) Invalid customer order
(there are no pictures in the
order)
(39) The order is damaged and cannot be
processed
(40)13
(41) Invalid customer order
(there are no miniatures in
the order)
(42) The order is damaged and cannot be
processed
99
5.8 ‘Pending orders’ service
This service allows the customer to process the orders prepared in any of the terminals that
form part of a kiosk isle. There are two ways in which to use this functionality: by offering it as
another Kiosk service, as shown in the image above, or by dedicating Kiosk exclusively to this
use, in which case the keyboard appears directly in the home screen for entering the order
code, as shown in the following illustration.
100
5.8.1 ‘Pending orders’ service: work flow
After selecting the pending orders service, the user will be asked to give the relevant order
information. Depending on how this service is configured, different screens will then appear:
a.1) If the pending orders service is configured in automatic mode (recommended if you
have a barcode scanner) the following screen will appear. The customer must place the
ticket under the barcode scanner to be read.
a.2) If the pending orders service is configured in manual mode, the user must type
in the order number and validation code shown on the ticket.
b) The service will conclude and an order summary shown. Unlike other services, no
new products can be added.
101
5.8.2 'Pending orders' service administration: general settings.
To access the configuration of this service, proceed in the same way as for any other service.
A screen will appear that allows you to set the machine to manual mode. This mode is only
recommended if the barcode scanner is not available.
102
5.9 Customised Products
With this service, it is possible to offer photo gifts in the Easygifts Kiosk, such as mugs, tshirts, key-chains, etc., with a photo selected by the customer.
In the definition of each product, it is specified if it will use a printed image with the
MITSUBISHI dye sub printers or third-party technologies (sending to remote labs or special
printing systems located in the same store.)
It is important to know in advance that the Easygifts Kiosk unit does not provide a list of
products by default. The store must know in advance what type of products are offered and
how they will produce them. The creation of the list of products on offer, and all the
parameters and additional resources, is the responsibility of the store or chain.
NOTE
The laboratory service from the Customised service requires the use of an additional license.
Please refer to the additional licenses chapter for more information.
103
5.9.1 Customised service: work flow
Once you press the 'Customised' button on the home screen, the service will begin and
request the selection of photos to be worked on, as usual.
The first screen of the 'Customised Photoproducts' service shows the first groups or product
families defined at the settings section. The user must choose the type of product here.
'Name' field
'Question' field of the
group settings
Price
'Description' field
In the case of a product, the figure in the picture below is the price of the product itself.
However, if it is a group, it is the most affordable price belonging to the group
You can tell if an item is a group or product by the background colour of the title and the label
accompanying the price.
-
Dark indicates that this is a group and is included with the label and price.
White indicates that it is a product.
After choosing the product to be created, the screen where the image to be used is selected
appears and also a preview of the product. In the event that the preview image does not exist,
only the image chosen by the customer is shown in the band at the top, in a larger size.
104
If you want to adjust the size and position of the photograph in the product, this can be done
through the touch screen or using the controls on the right of the screen. These adjustments
will be applied to the photograph before it is printed out.
It is also possible to change certain properties of the photo using the ‘Retouch’ button.
After completing the adjustments, the user is taken to the automatic image enhancements
screen and then to the order summary screen where the requested number of products is
chosen.
To complete the order, simply press continue.
105
5.9.2
‘Customised’ service administration: creation of products and
prices
On entering ‘Customised’ product configuration for the first time, the following screen will
appear. All the product families, sub-families and products are shown on the left, in the form
of a tree structure.
When selecting a family or a product the configurable details are displayed on the right of the
screen.
Language selector. Allows
the products to be configured
in different languages.
Enables and disables the
customer flow for a product
or product family.
Tree structure of the
products defined in the
system.
Some properties may be
adapted to the local installation.
The others are protected.
Only the following parameters can be changed for each product:
-
Activated/deactivated
Production machine
Service module
Format/channel
Printsize
Price (this service does not allow price ranges to be configured)
The other options/buttons are shown as disabled.
NOTE
The administration of products pertaining to this service requires a thorough knowledge of the
application software and system in general. To edit or create products, contact your dealer or
authorised service centre.
106
6 Operator services
6.1 Introduction
Operator services are services that, due to their complexity and added
value, are not designed for use by the end user. To activate them, press
the mode button on the operator service screen.
When you activate the operator mode, all the functions reserved for the operator are enabled;
this means that the validation of the order by the operator will be done automatically (see
section on Order validation).
The top of the screen indicates that the operator mode is activated. The operator mode is
deactivated when the unit is returned to the main screen.
6.2 Photo ID photographs
This service is used to print a photograph for identity documents, passport, wallet-size
portraits, etc.
The operator will have the possibility of mixing up to 2 different photographs in the same print,
access to various tools to adjust the zoom, crop and restore images, and the option of
automatic biometric adjustments.
With 'apply automatic biometric settings' enabled, the system processes the selected image
and will adapt the face to the biometrics mask associated with the composition. This will save
time for the operator when printing the photograph correctly.
107
6.2.1 ‘Photo ID’ photographs workflow
When the ‘Photo ID’ button is pressed on the main screen, this service will begin. After
selecting the folders with the photographs, the template selection screen will appear.
Single image
composition
Double image
composition
Information on
product collection
NOTE
There are two types of templates: standard and ‘split’. The ‘split’ templates (in two different
colours) allow up to two different photographs to be combined.
The template prices are determined by the product associated with the template.
After selecting the template, the photographs must be selected. The operator will have the
necessary functionality buttons to adapt the image to the biometric mask. A preview will be
shown of the result composition at all times.
Available
images
Controls to fit
picture
Biometric mask
Preview of the
composition.
Rotate the image
108
Control for changing
the image selected
from the template
Once you have the picture in place and are satisfied with the result, press ‘Next’ to continue.
A summary will then be displayed with the preview of the composition created. In this screen
the operator can select the number of copies to be printed.
Quantity
6.2.1.1 Automatic biometric adjustments
With the automatic biometric adjustment option enabled in the service settings (see the
chapter on 'Photo ID’ Service Management: General Settings'), the system may take longer to
display the selected image. The photograph may appear centred and with the zoom adjusted.
109
The 'Photo ID' service applies cutting-edge tools to detect the face of the customer and help
the operator to centre the image on the biometric mask displayed in the centre of the screen.
If it is not possible to properly focus the image, there will be a warning.
This could be caused by one of the following:
The customer's eyes are not clearly visible in the image
The top of the customer's head is too close to the top of the image. This
distance can vary depending on the size of the print rectangle and biometric
mask used.
The customer is wearing glasses and there is a slight glare on them.
Part of the customer's face is not clearly visible
The customer's face is rotated 90 degrees or more in the image.
The image has a low vertical resolution (less than 500 pixels)
In any case, after the automatic detection of the image, it can be adjusted manually.
In some cases, it is possible that the customer's face is not properly set although no error
message appears in the image. This may be normal if the design does not use the size and
aspect ratio for official IDs and passports and it displays a biometric mask. In this case, make
the final adjustments manually.
6.2.2 ‘Photo ID’ service administration: product creation
The administration of the different products in this service is the same as the administration of
the 'Prints' service, which has already been explained in this manual.
6.2.3 ‘Photo ID’ service administration: editing prices
The administration of the different prices for each product in this service is the same as the
'Prints' service, which has already been explained in this manual.
6.2.4 ‘Photo ID’ service administration: general settings.
To access the General Settings screen of the 'Photo ID' service, select the 'Photo ID' service
configuration screen and then press the 'Settings' button.
This screen allows the automatic biometric detection to be activated, questions to be put to
the customer, the definition of the customised adjustments to be applied in creating the
service compositions, the configuration of the template files to be used and the configuration
of an automatic photo source.
110
Activate biometric detection
Configure customised adjustments
Activate questions to customer
Configure templates
Apply customised adjustments
Photo source preferences
On selecting the ‘Configure’ button associated with customised adjustments, the following
screen will appear. In this screen the operator can define the brightness, contrast, saturation
and colour levels he wishes to apply. The operator can print out the image to validate the
result of the adjustments made.
Customised
adjustments
Print image
111
NOTE
In the trial print, the system will randomly select one of the Photo ID service product
destinations that are activated and available with the PRINTS service module.
When the image is sent for printing, the system will give the alias or SYSTEM_ID of the
machine to which the order has been sent. Depending on the Dispatcher configuration, it is
likely that the operator will access it to change the print status (validating the order).
If the system finds no product that fulfills the above requirements, it will inform the operator
that the printing operation cannot be executed.
When the ‘Layouts configuration’ button is pressed, the following screen appears. In this
screen the operator can define which template files he wishes to enable.
Enabled files
NOTE
By default the system will always use the template file associated with the country configured
in the equipment. If no associated file exists, the generic template file ‘compositions.xml’ will
be used.
In this screen the operator has a ‘Clear layout cached icons’ button which must only be used
if the previews of the selected templates are to be updated, usually because changes have
been made in the template files installed in the system.
When selecting the ‘Picture sources configuration’ button, the following screen will appear. In
that screen the operator can define an automatic photo stand and define whether the service
flow must show the folder selection screen.
112
Automatic photo
source
Enable folder selection
NOTE
If the operator selects an automatic photo source, the flow will not show the photo source
selection step. The system will directly ask for the selected type of device to be entered.
If the ‘Allow folder filtering’ option is disabled, it will only be applied to sources that can
function without the folder selection step; for example a flash drive, memory card or DVD/CD.
In some sources, the folder selection step will always be shown, regardless of the value of
this adjustment.
113
Appendix Dispatcher
Rev. 2.1
APPENDIX
Dispatcher
CONTENTS
1.1
APPLICATION STANDARDS ........................................................................................... 3
1.1.1
Status colour coding .............................................................................................. 3
1.1.2
Multiple selection ................................................................................................... 4
1.1.3
Editing, optional fields and of information. ............................................................. 4
2.1
PREVIEW OF THE MAIN SCREEN ................................................................................. 5
2.2
INCOMING ORDERS SECTION (DOES NOT APPEAR IN CLICKLITE) ........................ 7
2.2.1
Approval of orders .................................................................................................. 7
2.2.2
Browsing incoming orders ...................................................................................... 7
2.3
ACTIVE ORDERS SECTION ............................................................................................ 8
2.3.1
Selecting an order .................................................................................................. 8
2.3.2
Services in an order ............................................................................................... 9
2.3.3
Toolbar and status bar ........................................................................................... 9
2.3.4
Details of services ................................................................................................ 11
2.3.5
Order/service options ........................................................................................... 12
2.3.6
Order options ....................................................................................................... 13
2.3.7
Service options (optional) .................................................................................... 13
2.3.8
Exporting orders and services to Click ................................................................ 14
2.3.9
Saving orders permanently .................................................................................. 14
2.3.10 Apply changes ..................................................................................................... 14
2.3.11 Preview and touching up of images in orders/services ....................................... 14
2.4
DEFAULT FILTERS FOR ORDERS ............................................................................... 15
2.4.1
Active orders ........................................................................................................ 15
2.4.2
Completed orders ................................................................................................ 16
2.4.3
All orders .............................................................................................................. 16
2.4.4
Orders to save ..................................................................................................... 16
2.5
SERVICE MODULES ...................................................................................................... 16
2.5.1
Devices ................................................................................................................ 16
2.5.2
Formats ................................................................................................................ 18
3.1
CONFIGURATION ADMINISTRATION SCREEN .......................................................... 19
4.1
PRINT SERVER .............................................................................................................. 21
APPENDIX Dispatcher 2
APPENDIX
Dispatcher
1 Dispatcher concepts and definitions
In a Flexilab system, orders can be made from external devices, which are then processed by
a centralised Dispatcher. This structure makes it possible to connect several Kiosks in Order
Terminal mode.
In a system configured in this way, all the orders from Order Terminal Kiosks are processed
by the Dispatcher. ClickPRO orders are also brought together in the Dispatcher.
As the system operator, it can organise the execution of orders, change settings, review job
records, etc.
The following diagram shows the connectivity of all the modules in the system, and the
information flow.
Dispatcher CORE: This is the main Dispatcher application which must always be
operating. This application processes all the orders and services, keeping control and
managing the queue of pending jobs for the various output devices.
The monitor application starts the dispatcher core motor and makes sure it is constantly
operating.
Dispatcher ADMINISTRATION: This is the interface used by the operator to view and
organise orders and services. It is not necessary for Dispatcher Administration to be open
all the time for jobs to be done correctly. However, its use is recommended with
connected Order Terminal machines as it is the interface which enables the operator to
accept incoming orders that are not approved automatically (pending payment, etc…)
Service Module: Output devices which process the services included in a client's order.
For example, 10 x 15 cm (4 inches x 6 inches) digital photo is printed by the DPS Print
Server Service Module, which chooses the best printer for processing the image.
1.1 Application standards
The application is based on standards to facilitate its use and provide increased client
satisfaction. Some of the guides applicable to the entire system are shown below.
1.1.1 Status colour coding
Dispatcher Administration shows the status of orders and services using coloured circles.
APPENDIX Dispatcher 3
APPENDIX
Dispatcher
- Pending
- Executing
- Paused
- Error
- Done
- Batch executing (can be executed later)
1.1.2 Multiple selection
In the list of incoming orders, several orders can be selected at the same time by checking
each one separately. To deselect an order, check it again.
After several orders have been selected, the same action can be applied to the entire set
(approve, validity with pause or delete).
1.1.3 Editing, optional fields and of information.
The following standard is applied to all fields containing information:
White Background: compulsory fields. The information must be completed or selected.
Light cyan blue background: Optional fields. These can be left blank.
Grey or transparent background: Information fields. These cannot be changed.
APPENDIX Dispatcher 4
APPENDIX
Dispatcher
2 Dispatcher administration interface
Dispatcher Administration is an application which can be started manually from the
Kiosk/Click application. It can be opened and closed without this affecting the work being
done.
2.1 Preview of the main screen
The main screen consists of various sections and tool bars, depending on the objective of
each section.
Incoming orders
pending approval
Tool
bars
Active or
completed orders
Details of orders
(services)
Configuration
and
Click access
All the lists are ordered by priority and time. The left hand side of the list contains higher
priority orders, while those with a lower priority or older ones are on the right. The list of
completed orders is ordered by date of ending (more recent ones are shown first)
High priority
Most recent
Low priority
Oldest
Order and service files
Each order is represented by files containing information as a summary, either about the
services involved, or about the order itself.
Entry of orders pending approval
APPENDIX Dispatcher 5
APPENDIX
Dispatcher
+ Order identifier. A ticket is generated with this identifier in Kiosk or Click (999998)
+ Machine identifier. This identifier is an alias that can be configured at Kiosk or Click level
(K70XAVI)
+ Day and time of order creation (those on the same day will only be shown with a time)
+ Order priority. There are 3 possible priority levels and a change of colour to show top
priority ( "now").
Now!
High
Medium
Low
+ PRICE of the order
+ Order payment indicator. If the order has been paid for at the Order Terminal this image in
the file will appear in the file before it is approved. It shows that it can be approved before
the client comes to collect his/her completed order.
Entry of orders in transfer
+ Order identifier. A ticket is generated with this identifier in Kiosk or Click (500031)
+ Machine identifier. This identifier is an alias that can be configured at Kiosk or Click level
(C5000006)
+ Day and time of order creation (those on the same day will only be shown with a time)
+ Order priority. There are 3 possible priority levels and a change of colour to show top priority
( "now").
Now!
High
Medium
Low
+ File transfer progress bar.
+ PRICE of the order
+ Order payment indicator. If the order has been paid for at the Order Terminal this image in
the file will appear in the file before it is approved. It shows that it can be approved before the
client comes to collect his/her completed order.
Orders approved
+ Order identifier. A ticket is generated with this identifier in Kiosk or Click(100035)
+ Machine identifier. This identifier is an alias that can be configured at Kiosk or Click level
(K7000086)
+ Day and time of order creation (those on the same day will only be shown with a time)
+ Order priority. There are 3 possible priority levels and a change of colour to show top
priority ("now").
Now!
High
Medium
Low
+ Service identifiers. Each order may have several services. This file shows the first 4 with a
short description of the type and format, and the number of copies.
Services
APPENDIX Dispatcher 6
APPENDIX
Dispatcher
Copies, Service, Status, Samples
A service file contains details of the status of the service, its progress, date of ending of the
service, and a preview of the first and last image in the service.
Destination
The destination may contain one or several devices, or may even not have any assigned to it.
This latter case only arises in services that have recently been created and which still do not
have an output device assigned to them. The service module will assign devices according to
its internal assignment policy. It is possible to specify a destination before sending the service
(ClickPRO) to force it to be printed by a certain printer, for example.
2.2 Incoming orders section (does not appear in Clicklite)
All the orders requested by DPS Systems which are pending validation can be seen in this
section.
Orders that have already been paid for at the Order Terminal, or those from a Click will be
automatically transferred to the active orders section (configurable).
NOTE
It is possible to automatically accept all orders, using the Dispatcher configuration screen and
changing the setting of the “ORDERS” group labelled “AUTO_APPROVE” to TRUE.
However, to make incoming orders always pending validation, the value of
“AUTO_APPROVE” must be FALSE.
2.2.1 Approval of orders
In order to approve an order, select it in the main browsing panel and press the “approve” or
“approve with pause” button.
This panel enables multiple selections to be made: Several orders can be selected at the
same time and all of them approved in a single operation.
Approve: After the order has been approved, it disappears from the panel and
reappears in "Active Orders" as "Pending”. This means that the order is processed
automatically as soon as the appropriate Service Module is available.
Approve with pause: When an order is approved with a pause, it
also appears in the “Active orders” panel, but is not processed while it is
“paused”.
This order waits indefinitely, until started manually by an operator.
This option is useful if an operator needs to make adjustments to the image
or to change the order options before executing it in the Service Module.
2.2.2 Browsing incoming orders
All incoming orders are stored in this section until they are approved. Hundreds of orders can
be stored this way. The arrows on the left and right must be used to view them.
APPENDIX Dispatcher 7
APPENDIX
Dispatcher
The arrows are disabled if all the orders fit in the visible space on the screen. When the
arrows are enabled, they are shown in a different colour and a number appears inside them,
showing the amount of hidden elements in each direction.
The example below shows the contents of the arrows.
Visual Area
2
3
2.3 Active orders section
The orders included in this section are those that have been approved and which may be
processed at any time. This depends on the availability of the Service Modules and the status
of the order.
The status of an order may vary, and is represented by the colour codes described above.
(*)
An order being executed may be paused at any time , and the Service Module stops work on
it.
(*)
Depending on the Service Module, it is possible that an order remains paused, due the risk
of damage to the medium or application. For example, copying a CD cannot be stopped, but
printing of a digital photo can.
2.3.1 Selecting an order
Click on an order to select it. The colour and edge will change.
APPENDIX Dispatcher 8
APPENDIX
Dispatcher
When an order is selected the buttons on the toolbar show the possible actions at that point
(change configuration, stop, start, leave in pause mode, delete, etc.).
Some actions are disabled in some order statuses.
2.3.2 Services in an order
Once the order has been selected, its details appear at the bottom of the screen.
Service is deemed to mean: the format, progress, amount of images, output devices and the
first and last image of those selected.
It is also possible to select a service and the toolbar will change according to the actions that
can be taken in each case, which also depend on the status of the service.
2.3.3 Toolbar and status bar
The toolbar consists of various buttons. Each allows different actions to be taken on the
execution of the order or the service.
There are some limitations on the way some actions can be executed. Depending on the
status of an order or service, some actions may not be available.
Some status have certain associated actions. The following list gives details of these actions.
RESUME
If an order has been selected, this action will start all its services with a status of
PENDING,
DONE,
in
ERROR,
or
PAUSE
DELETE
This button only affects an order which is stopped (PAUSED, ERROR or
DONE) and deletes it from the system, although some data are kept internally
for inclusion in statistics.
PAUSE
PAUSE is only applicable to orders or services with a status of IN EXECUTION,
or PENDING. This action stops the execution, or holds up the queue for the
order/ service in question, moving on to the next services in the queue
according to the order of priority.
OPTIONS (not available in Kiosks in Standalone mode)
Enables the options of any element (order/service) to be seen and some of
their settings to be modified, depending on their status. The statuses that allow
modification of the data are those which are “inactive” (DONE, ERROR,
PAUSED).
When this button is pressed, the options window appears, and remains
visible until the button is pressed again.
When editing options, it is possible to change between orders and
services with no need to hide this window.
APPENDIX Dispatcher 9
APPENDIX
Dispatcher
PICTURE ADJUST (not available in Kiosks in Standalone mode)
It is possible to access the adjustments screen from an order or from a service.
If access is from an order, all the images belonging to it will be edited.
RESTRICTIONS
All the orders from a Kiosk in Standalone mode contain which the client's files must be
deleted for legal reasons, as explained in the terms and conditions. For this reason,
Dispatcher deletes all the images of orders from the system once they have been completed.
2.3.3.1 Status of orders
The status of orders changes automatically according to the changes in status of services.
The following list shows the various statuses in which a service may be and how this affects
the final order. The priority is from HIGH to LOW.
PRIORITY
STATUS OF THE ORDERS
ordered by the most restrictive statuses
requiring manual operation
HIGH
ERROR
PAUSED
EXECUTING
.
PENDING
.
.
DONE
LOW
For example, in a pending order with 3 services; if 2 are in EXECUTING and 1 in ERROR, the
status of the order is ERROR because this shows that an operator's attention is required.
Services in EXECUTING continue to be executed until they are completed.
Paused devices are also given a high priority on the list above as they require manual
intervention by the operator.
2.3.3.2 Limitations
If "PAUSED" is activated for an order/service, its execution is paused, but other new orders or
services continue to be executed as normal.
If RESUME is activated for an order/service which is PAUSED, in ERROR or DONE, it is
reactivated, and its status becomes PENDING. The order/ service will not be processed until
the Service Module is free again.
It is possible to “KEEP” an order from a Kiosk or Order Terminal to keep it in the system until
it is permanently deleted manually. This is useful for saving sample orders, some interesting
orders from clients you wish to save for some time, etc.
A service with an ERROR status may continue being executed using the RESUME option.
This enables the service to be resumed at the exact point where it left off.
The table below shows all the possibilities for action for orders and services depending on
their status.
APPENDIX Dispatcher 10
APPENDIX
Dispatcher
Actions Toolbar & options
START
PAUSE
OPTIONS
PENDING
Yes (4)
Yes
Yes
PAUSED
Yes
Yes (5)
ERROR
Yes
Yes (5)
Type
STATE
EXECUTING
(Orders)(2)
Yes
Yes
Yes
Yes
OPTIONS
(Service
Modules)(6)
ADJUSTMENT
KEEP
EXPORT
(2)
(2)
to Click(2)
Yes (7)
Yes
Yes
Yes
Yes
Yes
Yes
Yes
Yes
Yes
Yes (7)
Yes
Yes (7)
Yes
Yes
Yes
DELETE
BATCH_
ORDERS
EXECUTING
DONE
KEEP
TO_APPROVE
Yes
Yes (5)
Yes
Depends on the status of the orders
Yes (validate)
Yes (validate)
Yes
Depends on the status of the orders
Yes
TO_RESUME
Yes
Yes
Yes
PENDING
Yes
Yes
Yes (7)
Yes
PAUSED
Yes
Yes (3) (5)
Yes
Yes
ERROR
Yes
Yes (3) (5)
Yes
Yes
Yes
Yes
Yes (7)
Yes
Yes
EXECUTING
SERVICES
BATCH_
Yes (7)
EXECUTING
DONE
Yes
TO_RESUME
Yes (3) (5)
Yes
Yes
Yes
Yes
Yes
TABLE 1
If the system has eliminated the service files, only the delete-option will be possible on it.
Only activated in a Click. A subfolder is created in the professional workfolder with the order
identifier, so that it can be easily identified.
The priority of a service cannot be modified.
It is possible to restart an order in pending status if an order with “Now” priority has stopped
another incoming order.
The options can be seen and edited.
Shows adjustments in reading mode.
2.3.4 Details of services
The information on a service which appears when an order is selected is useful for monitoring
the steps to take and the status.
APPENDIX Dispatcher 11
APPENDIX
Dispatcher
Copies: The number of images for processing is shown in the first section. When burning
CDs, the number of CDs is normally 1.
Service: Shows the print format (10 x 15) or the type of service for IndexPrint, calendars,
card photos, etc.
Status: Shows a progress bar and the completed / total number of copies.
Destination: Shows the output device/s for the service if it is already being processed. If
these services have not yet been assigned to a device, an “Output device not yet
assigned” message appears.
There is only one case in which the destination is known before assignment of the
Service Module - when a destination device isn determined from the source application.
(E.g. ClickPRO)
This information is useful for collecting jobs after they have been processed, when there
are more than one output device.
For example, a PRINTING service in balanced mode can be printed on all the connected
printers which offer this format. This section shows the “alias” of all the printers which
process this type of service.
First and last images: Shows a thumbnail of the first and last image in the service.
2.3.5 Order/service options
Order and service options can be edited and viewed using the options button on the
toolbar.
This window activates a pop-up window showing the options for the selected element
(order or service) and enables some settings to be modified.
The options for orders and services are not translated as they are internal Dispatcher values.
The meaning of each is listed below.
2.3.5.1 Restrictions
It is not possible to edit options in orders or services if their status is Executing or Pending.
Changes cannot be made in these cases.
It is also not possible to EXPORT TO CLICK for an order which is being processed.
It must first be left "IN PAUSE" in order to be able to make changes.
APPENDIX Dispatcher 12
APPENDIX
Dispatcher
2.3.6 Order options
Some settings or options in the order can be modified. All the internal options in the order can
be seen as complementary information.
The order settings which can be changed are:
PRIORITY: An indicator of priority within the following values: High, Medium, Low, Now!
(Immediate).
The Now priority is the highest, and leads to any job with a lower priority that is being
executed being stopped. When the order is completed the order is reestablished
according to what the other orders were being executed.
Some of the common read only settings in an order are:
INITIAL_TIME (start time): The date and time when the order was created.
END_TIME (end time): The date and time when execution of the order was completed.
SOURCE APPLICATION:The name of the application which generates the order.
USER_TYPE: The type of user executing the order. This is useful for orders from an
Order Terminal/Kiosk (operator, end client, etc.)
2.3.7 Service options (optional)
The service settings shown depend on the destination Service Module and the type of
service.
COMMON SETTINGS:
o FORMAT: The output format which is used in this service (Example for printing: 10 x
15cm or 4 x 6 inches, etc., CD burning: DVD_8Gb, etc., DPSLab: 1 hour, 24 hour
service, etc.)
o DESTINATION_DEVICE (destination printer): Enables the printer printing the service
to be changed. Only the printers using the format in question are offered.
o COPIES: Number of images / CDs etc. processed for the selected service.
PRINT SERVER:
o QUALITY: 1,2,3 (Normal, Fine, Superfine)
o BALANCED (balanced mode): TRUE/FALSE depending on whether the printing
mode is balanced or blocked
o WHITE BORDER: True/False:
o FIT_TO_PAPER: False
o COLOR_OPTIMIZED: Colour optimisation (Colour / Black and white)
o FIT_TO_PAPER: TRUE/FALSE To fit the image to the paper, trimming the image to
maintain the proportions.
o ERROR CODE: (Not visible if there is no error): An error code, only when there has
been a problem in the service.
o ERROR DESC: (Not visible if there is no error): Description of the error code.
CD BURNING:
o ACTION (Result of creating a CD): SUBLIME (creation of a CD with the client's
images and the SUBLIMECD application), BACKUP (back-up copy CD), ERASE
(deletion of CD), QERASE (Quick delete)
o SESSION_NAME: Internal name of the CD compilation (only available for SUBLIME
and the CD BACK-UP COPY)
o LANGUAGE: Default language for the SUBLIMECD.
DPSLAB:
o TAX: Amount of money for tax applied to the Service Module.
o CUSTOMER_ASK: Questions that the Kiosk or ClickPRO will ask clients to obtain
information about them (address, telephone number, etc…)
o SERVICE_ASK: Questions defining the type of service to be carried out
(Colour/B+W, White border, etc.)
APPENDIX Dispatcher 13
APPENDIX
o
Dispatcher
PRODUCT_ASK: Questions related to the product.
2.3.8 Exporting orders and services to Click
Selected orders and services can be sent to Click from the options screen
The selected orders/services are transferred to a Click work folder as a
subfile with the same name as the order number.
Working Folder
DISPATCHER_123456
DISPATCHER_222333
To access these exported orders, access the Click application and the work folder opens to
view the order for editing.
Because an order can be exported as many times as desired, if the order exists in Click, a
folder is created with a number (1), e.g. “DISPATCHER_222333 (1)”
2.3.9 Saving orders permanently
Orders of interest can be saved permanently in the system. To delete them
afterwards, the “Cancel” button is used.
The orders saved are visible from the STORE tab.
Orders can be saved regardless of their status. A saved order can reexecuted
at any time and as many times as necessary.
2.3.10 Apply changes
This button is used to apply changes to the values in the options panel, so that
they are effective and the screens are updated with the new values.
2.3.11 Preview and touching up of images in orders/services
Orders normally consist of photographic services or include images. The first and last images
they contain are shown in the details of services (in the active orders section).
Dispatcher allows previewing of the entire contents of the services, and
adjustments to be made quickly. An order can be completely modified, moving
automatically from service to service.
All the images involved are shown on the preview/adjustments screen, where
all the changes made can be saved.
RESTRICTIONS
It is not possible to adjust images of orders/services which are being executed or pending. In
this case, it is only possible to preview the contents.
APPENDIX Dispatcher 14
APPENDIX
Dispatcher
Operation of this screen is explained in the Click manual.
2.4 Default filters for orders
From here, orders can viewed and filtered to work quickly with those needing most attention,
already processed orders can be recovered.
2.4.1 Active orders
Shows the orders currently active. This refers to orders with the following statuses:
PENDING, IN PAUSE, ERROR, EXECUTING and all their services.
This list is ordered from high to low PRIORITY and by date. The orders on the left of the list
have the highest priority, and the ones on the right the lowest priority.
APPENDIX Dispatcher 15
APPENDIX
Dispatcher
2.4.2 Completed orders
These are those with a DONE status and whose services are also DONE.
This list is ordered backwards by date and time of completion. The first order on the left will
be the last to have been processed, and the one on the right the oldest. The date shown on
the file is the creation date, but when the order is selected, the completion date of each of the
services can be seen on the progress bar.
2.4.3 All orders
This shows all orders, both active and completed, and those marked with SAVE.
Completed orders in SAVE status are shown in the panel of completed orders until the day
specified for the Garbage Collector. From this date onwards, orders are only visible from the
SAVE tab.
2.4.4 Orders to save
Orders which can be in any status but which are marked as SAVE. The operator chooses to
save them from the options panel.
2.5 Service Modules
2.5.1 Devices
This view enables viewing of the physical devices of all the service modules and the services
of the associated orders. The visible services are those which have been assigned by the
service module, or whose destination device is already known. (e.g. specified from Click).
Unassigned services cannot be seen in this section.
APPENDIX Dispatcher 16
APPENDIX
Dispatcher
This screen is useful for finding out the amount of services that will be performed by specific
devices. It is possible to PAUSE and RESTART/CONTINUE services according to needs,
using this interface.
2.5.1.1 Open specific Service Module adjustment application
To open a Service Module, press the button which identifies the Service Module to select it,
and then the OPTIONS button on the toolbar.
This action opens the Service Module screen with its options and extensive information. The
example shows the options screen of the CD Burn Service Module:
2.5.1.2 Working with services and their actions
Changes can be made to the services using the toolbar buttons. The status of each service is
shown in the same way as on other screens (a coloured icon).
2.5.1.2.1
PLACING A SERVICE MODULE IN PAUSE MODE
It is possible to place a complete Service Module in pause mode by selecting and pressing
the “PAUSE” button. This makes the Service Module stop all the jobs it is processing until it is
released again. It will then continue working at the point where it left off.
Some Service Modules, such as CD burning, cannot be stopped when the process has
started, as the output device could be damaged. In this case, a message appears stating that
the action is impossible.
2.5.1.2.2
PAUSE MODE, RESUME, STOP AND EDIT A SERVICE
This screen enables the common actions on the toolbar to be executed on the selected
service.
APPENDIX Dispatcher 17
APPENDIX
Dispatcher
2.5.1.3 Completed services - "DONE”
Completed services appear on this screen, until the execution of a new service in the same
device starts, or until the device is released, if it is in pause mode after processing. This is
useful for identifying the output device for a specific service.
2.5.2 Formats
This screen enables viewing of all the Service Modules classified by output format, regardless
of the amount of devices they support.
The services appearing are those that the Service Module has assigned or those for which
the destination format is already known. For printing services, the formats could be 10 x 15,
13 x 18, etc.
APPENDIX Dispatcher 18
APPENDIX
Dispatcher
3 Dispatcher configuration
3.1 Configuration administration screen
Group list
ORDERS
Setting list
AUTO_APPROVE
3.1.1.2
3.1.1.4
Setting detail
3.1.1.1
3.1.1.3
TRUE: All orders reaching Dispatcher are
automatically approved
FALSE: All orders reaching Dispatcher must be
approved manually.
CHOOSE: Incoming orders are approved or pending approval
depending on the source application. Pre-approved orders can
be generated automatically in Kiosk depending on whether the
client paid for it in that Kiosk. (Although this can be configured
in Kiosk settings)
GARBAGE COLLECTOR
APPENDIX Dispatcher 19
APPENDIX
3.1.1.5
Dispatcher
Old orders are checked for every 24 hours. The configuration of the following settings determines the action to be
taken on orders:
Setting list
3.1.1.6
MAX TIME DONE ORDERS: (default value 1 day)
3.1.1.8
Frequency of cleaning up of completed orders.
Numerical value specified in days.
Setting detail
3.1.1.7
1-9999: shows how many days orders are saved
for.
MAX TIME CANCELLED ORDERS: (default value 1 day)
Frequency of cleaning up of cancelled orders. Numerical value
specified in days.
MAX TIME ERROR ORDERS: (default value 0 days - disabled)
Frequency of cleaning up of error orders. Numerical value
specified in days.
MAX TIME PENDING ORDERS: (default value 0 days disabled)
Frequency of cleaning up of pending orders. Numerical value
specified in days.
MAX TIME TO_APPROVE ORDERS: (default value 0 days disabled)
Frequency of cleaning of orders to be approved. Numerical
value specified in days.
FULL GARBAGE COLLECTOR FRECUENCY: (default value
365 days) Frequency of complete cleaning.
STATISTICS_CLEANUP_TIME: (default value 365 days)
Configuring the system to clean orders over one year old is
recommended. If the value is 0, the statistics data are never
deleted.
Frequency of cleaning of order information from the system.
The statistics data disappears.
TRANSFER
Setting list
Setting detail
LOCAL PATH: Local folder, where incoming orders are stored.
This folder must be writable.
SHARED PATH: This is the shared name for the LOCAL PATH
folder.
In any of the above cases, part of the order data is saved in the system for counting in
statistics.
The following parameter is used to delete these data automatically
APPENDIX Dispatcher 20
APPENDIX
Dispatcher
4 Special Features of Service Modules
4.1 Print Server
The printing service is more complex in a Flexilab system, and the effect of some status
changes on the Dispatcher administration interface warrants special attention.
Print Server can be configured in various ways. The configuration of the application and the
connected printers and their formats may affect the status shown in Dispatcher.
The following table shows all the possible cases changing the status of Dispatcher and as a
consequence is helpful in interpreting the information on the screen and quickly finding areas
which require manual intervention for the recovery of errors in the printers (no paper, etc…)
DISPATCHER
1 Printer ("ANY" balancing
option) or DESTINATION
DEVICE selected
Dispatcher DEVICES status
Automatic balancing
between printers
Printer OK
EXECUTING
OK
n/a
The printer is in ERROR
ERROR - If relaunched, it is
assigned to the same
original printer
DeviceERROR
NO
Printers OK
EXECUTING
OK
n/a
Some printers in ERROR
EXECUTING and the part of
the job assigned to the
printers which have ERROR
have to wait.
Device ERROR
NO
ORDER mode
N Printers ("ANY" balancing
option) or DESTINATION
DEVICE selected
EXECUTING. The job waits
for the change of paper or
solution to the problem.
All the printers in ERROR or it is impossible to
continue
1 initial printer (then other
printers with the same
format can be assigned)
SPEED "MULTIPRINTER"
mode (DESTINATION
DEVICE = ANY)
Several printers assigned
(balanced automatically)
1 Printer (1 with only 1
format) and optionally,
DESTINATION DEVICE
"SINGLE PRINTER" mode
(with or without
DESTINATION DEVICE)
SPEED and ORDER do not
matter
N Printers (balanced option
"ANY")
Print Server
Dispatcher
ORDERS/SERVICES status
NOT automatic (can be
changed from Dispatcher
options)
Device ERROR
No other service can take
priority until the one being
executed is completed.
If all the printers left to finish
printing fail, there is
EXECUTING until the
problem is solved
Yes - If another printer
providing the same format
is free
Printer OK
EXECUTING
OK
The printer is in ERROR
ERROR
Device ERROR
NO
Yes - If another printer
providing the same format
is free
Printers OK
EXECUTING
OK
Some printers in ERROR
EXECUTING
Device ERROR
YES
Device ERROR
n/a - YES, if the job is
relaunched manually.
All the printers in ERROR or it is impossible to
continue
ERROR
Printer OK
EXECUTING
OK
n/a
The printer is in ERROR
ERROR
Device ERROR
NO
Printers OK
EXECUTING
OK
YES - A printer is initially
assigned, and another
cannot be reassigned until
the end of the service
Some printers in ERROR,
but this does not affect the
printer assigned initially.
EXECUTING
Device ERROR
NO
ERROR in my printer
ERROR
Device ERROR
NO
APPENDIX Dispatcher 21
Appendix DPS Monitor
Rev. 2.1
CONTENTS
1
GENERAL INFORMATION.......................................................................... 3
2
BACK-UP AND RECOVERY ....................................................................... 6
3
SELECTING APPLICATIONS TO BE RUN ................................................. 7
APPENDIX
DPS Monitor
1 General information
This module checks the general status of the other programs and manages communications
with the DPS server if the software is ONLINE. Its specific functions are:
Management of the system activation.
Loading all the DPS applications in the correct order when the system is turned on
Checking on the general state of DPS applications
Opening and closing all the DPS applications
Management of communications with the DPS server. This includes:
o Notification of incidences related to hardware malfunctioning
o Notification of the activities of all completed operations
o Notification of the state of devices and DPS applications
Backup copies and recovery management
Restarting of the machine at a specific time.
The operator can access the DPS Monitor from the operator menu
The main DPS Monitor window is shown below.
Display the global software version installed in this machine.
Show the machine System ID. The SystemID is used for the registration and activation of
applications in DPS Systems. The SystemID is unique for each machine.
APPENDIX DPS Monitor 3
APPENDIX
DPS Monitor
The applications installed and their current version is identified in the application and
version columns.
The running column shows if the application is running.
The status and error code columns show the status of the devices (which may be ready,
warning, critical warning, error, initializing) and a code which identifies the type of error in
the device and what is necessary for the technical service to be able to solve the problem.
Error Msg provides a brief explanation of the type of error.
From the main menu, it is possible to:
o
Run or close the applications manually.
o
Restart or shutdown the system.
o
Registration and activation the software..
o
Selection application to execute in the system.
o
Enable/Disable the hardware detection to be connected the machine.
o
Enable/Disable the USB device writing protection.
o
This option allow the writing to the internal or external USB device.
For enable this option must be select the Menu Configuration, USB Protection
section and select Enable.
For disable this option must be select the Menu Configuration, USB Protection
section and select Disable.
The default option is “Enable” for DPSKiosk software. This means that every time the
machine gets power on the USB write protection will be enabled.
For DPSClick and ClickLite software, the default option is “Disable”.
APPENDIX DPS Monitor 4
APPENDIX
DPS Monitor
IMPORTANT
When a USB is inserted in the machine, the parameter of the USB protection assigned for
this device will be selected in that configured in the DPSMonitor en in the insertion moment.
If the USB protection parameter is changed, must will be extract and insert again the device
for apply the new parameter.
Reference:
Mitsubishi Electric DPS Software is based in technology Copyright © 1995-2006, Oracle. (All
rights reserved) for the internal management information.
APPENDIX DPS Monitor 5
APPENDIX
DPS Monitor
2 Back-up and recovery
DPS monitor automatically creates backup copies of critical files of all DPS applications.
These are saved in the folder R:\Backups. These files are the databases related to the
system configuration (Prices, general configuration, etc.) There are two types of backup
copies:
Partial back-up
All the information on databases and images in remote requests are saved providing that
the system is shut down (see section ‘Shut down’).
A maximum of 10 partial backup copies are made at the same time. The previous copies
are deleted from the system and only the last back-up copy is saved if two copies are
executed on the same day.
Total back-up
All the information on the database and all the DPS Application files (except for the
Calendars and Frames) are saved whenever a remote update is executed. A maximum of
3 total backup copies can be executed at the same time and only the last back-up copy is
saved if two copies are executed on the same day.
The operator/ supervisor can execute a back-up copy manually from the main screen of the
DPS Monitor:
1. Push the “Manual backups" button
2. Select the DPS application for which you want to make a back-up copy
3. Choose the type of back-up copy
The operator can restore the information saved manually from the DPS Monitor main screen:
4. Push the “Restores” button
5. Choose the DPS Application to be recovered
6. Choose the back-up copy for which you wish to recover data
APPENDIX DPS Monitor 6
APPENDIX
DPS Monitor
3 Selecting applications to be run
NOTE
Only personnel authorised by the manufacturer can make changes on this screen
It is possible to select the applications that will be run when the machine boots up. System
performance will increase proportionally to the number of applications disabled. Each
application is associated with a series of services and therefore disabling a given service will
stop these services from running. The following table shows the relationship between
applications and services:
Option in Click and Kiosk
Option on Monitor
(interna name)
Services affected if disabled
Activate Monitor Manager
Monitor_Alive
Remote updates, web statistics and
device warnings, Backups,
DVD / CD Burning
DPSBurn
Burning DVD / CD
Labs Laboratory
DPSLab
Laboratory Services
External orders (web)
DPSConnection
Remote updates, web statistics and
device warnings
To access this screen, click the option Running applications in the Configuration menu.
APPENDIX DPS Monitor 7
APPENDIX
DPS Monitor
Regardless of what is selected on this screen, the system has a series of restrictions that will
modify this selection subsequently. These restrictions depend on the product and whether it is
Online or Offline, as the following table shows:
Product
Offline
Online
Kiosk Standalone
DPSConnection are not run
DPSConnection and Monitor are run
Kiosk OT
DPSConnection are not run
DPSConnection and Monitor are run
DPSConnection or Monitor are
not run
DPSConnection and Monitor are run
DPSConnection.
A Click Lite will not be Online
Click
Click Lite
IMPORTANT
From Click v2.6.0 and Kiosk v3.6.0 software, the Monitor Manager aplication will be avaiable
by default in all software, even in ClickLite application.
APPENDIX DPS Monitor 8
Appendix DPS PrintServer
Rev. 2.3
APPENDIX
DPS PrintServer
CONTENTS
1.1
MAIN SCREEN ................................................................................................................. 4
Descriptors
5
1.2
SEARCH PRINTERS SCREEN ........................................................................................ 5
Status messages 6
Supported printers ................................................................................................................. 6
Supported formats ................................................................................................................. 7
Published print sizes ............................................................................................................. 8
Matte overcoat option ............................................................................................................ 9
2.1
COLOUR CONFIGURATION............................................................................................ 9
Classic colour correction ..................................................................................................... 10
Image Quality Management (iQ) ......................................................................................... 11
2.2
PRINTER SETTINGS ..................................................................................................... 13
2.3
PICTURE AUTOMATIC ADJUSTMENTS ...................................................................... 15
2.4
PRINT AREAS ................................................................................................................ 16
3.1
ADJUST .......................................................................................................................... 18
Balanced 18
Balanced Type (Speed Mode) ............................................................................................. 18
Balanced Type (Order Mode) .............................................................................................. 18
Sorting 18
Beep on finished request ..................................................................................................... 18
Logging / No resize ............................................................................................................. 18
Full belt mode
19
Beep on full belt 19
Number of stacks 19
Custom backprint information.............................................................................................. 19
4.1
CP9550DW-S/CP9600DW-S/CP9800DW-S/DP9820DW-S/CP70/CP707/CPK60
USING CPD FILE....................................................................................................................... 20
4.2
CP9550DW-S/CP9600DW-S USING ICC PROFILE ...................................................... 21
4.3
CP9500DWS/CP3020DW USING CPD FILES............................................................... 23
4.4
CP9500DWS/CP3020DW USING ICC PROFILES ........................................................ 24
4.5
A FINAL RECOMMENDATION....................................................................................... 25
5.1
INTRODUCTION ............................................................................................................. 26
Requirements and compatibility .......................................................................................... 26
5.2
INSTALLATION ............................................................................................................... 26
5.3
WORKING MODES ........................................................................................................ 27
Working as a single printer .................................................................................................. 27
Working as a central high production unit ........................................................................... 27
Compatible formats ............................................................................................................. 27
5.4
CONFIGURATION .......................................................................................................... 28
Balanced 28
Sorting 28
APPENDIX PrintServer
APPENDIX
DPS PrintServer
Full belt mode
28
Beep on full belt 28
Number of stacks 28
Custom Backprinting information ........................................................................................ 28
Recommended configuration .............................................................................................. 28
5.5
CONSIDERATIONS ........................................................................................................ 29
APPENDIX PrintServer
APPENDIX
DPS PrintServer
1. General
The DPS PrintServer module performs the instant print function for the DPS system, and
releases the system from managing and sending information through the USB bus.
Some relevant DPS PrintServer issues:
It can find and manage any Mitsubishi printer attached to the system. You can obtain
information about its status (out of paper, number of copies remaining, printer door open,
printing, etc…) at any time.
It can manage any instant print format accepted by the printers (10x15/6x4, etc…)
It applies very good ICC profiles to obtain the best printing results for each kind of printer.
It manages the queue of images to be printed, to obtain maximum performance.
It can be configured for speed printing (any available printer will accept any job) or be
configured for order printing (images are assigned to specific printers for those images to
be ordered by input time).
1.1
Main screen
The DPS PrintServer main screen will appear, showing the list of orders and jobs being sent
to the printer and the status of each one.
1
5
2
3
6
8
7
4
APPENDIX PrintServer
APPENDIX
DPS PrintServer
Descriptors
The following functions are available on this screen.
Menu
Click here for access to different actions and configuration screens.
Pause button
Switches from “pause” to “play”. The button displays the status being switched to when
clicked. Use it to stop and restart the print queue.
Search Printers
This button explores the ONLINE printer status.
Progress panel
Shows the job being processed and the printer to which it is being sent.
Hide
Hides PrintServer.
Log Panel
All communication issues with the printer are shown in this panel.
Log Buttons
The log panel can be cleared or saved to a file from these buttons.
1.2
Search printers screen
Click on this icon to reach the ‘Detected Printers List’ screen. The main purpose of
this screen is to show the connected printers and other important information about
them.
From this list, the operator can check the Model of the printer, the Alias assigned to the
printer (Name for recognising the printer), the Format (Paper size), the remaining Copies of
the printer (if available), and the Status and the internal identification code of the printer
(nSerial code).
This information cannot be changed manually. The system automatically detects these
parameters (except for Alias).
APPENDIX PrintServer
APPENDIX
DPS PrintServer
The “Printers Control Panel” button gives access to the windows printer printing settings for
the printer model CP3800.
The “Special Printer Installer” starts the installation process of CP3800 printers.
For setting up CP3800 printers refer to the installations documentation.
NOTE
Some printers cannot give information about the remaining paper, so “999” will be displayed.
Status messages
The operator will take action according to the status information:
If there is no printer detected (no information can be checked)
Press the ‘Scan Printers’ button to make the DPS PrintServer search for printers. Wait for
10/15 seconds.
If no printer is detected, follow these steps:
1.
2.
3.
4.
Check that LEDs on the front panel of the printer are On and Ready.
Check that the printer is properly connected (USB and power supply cables).
Restart the printer.
Restart the DPS system.
Ink.../Paper.../Cassette.../Jam…/etc..
They are caused by problems with the consumables kit. Remove the paper and/or ink
and make sure it is properly inserted into the printer.
Overheating
The printer is in safe self-pause mode due to head overheating. Wait for 30 seconds and
the printer will start to work again once it has cooled down.
Open door.
The printer door is open.
Wrong Print Size.
The paper media is different to the format chosen. Check that the type of paper media
inserted and the print format are the same.
Supported printers
CP9600 Series
CP9550 Series
CP3020 Series
CP9500 Series
CP9800 Series
CP3800 Series
CP9820 Series
CP70 Series
CP707 SeriesMPU
CPK60 Series
Canon Plotter Series
APPENDIX PrintServer
APPENDIX
DPS PrintServer
Supported formats
CP95XX
Series
CP9600
Series
CP98XX
Series
CP3020
Series
CP3800
Series
Plotter
Series
CP70/707/
K60Series
A4 - 20X25 - 8X10
X
X
X
X
X
X
A4H - 20X25 - 8X10
X
X
X
X
X
X
LA4 - 20X30 - 8X12
X
X
X
X
X
X
LA4H - 20X30H - 8X12H
X
X
X
X
X
X
L - 10X15 - 4X6
X
X
X
LH - 10X15H - 4X6H
X
X
X
X
X
X
LHG - 10X15HG - 4X6HG
X
X
X
X
X
X
M - 9X13 - 3.5X5
X
X
X
MH - 9X13H - 3.5X5H
X
X
X
X
X
X
MHG - 9X13HG - 3.5X5HG
X
X
X
X
X
X
W - 15X23 - 6X9
X
X
X
WH - 15X23H - 6X9H
X
X
X
X
X
X
WHG - 15X23HG - 6X9HG
X
X
X
X
X
X
W10 - 10X15(x2) - 4X6(x2)
X
X
X
W10H - 10X15(x2)H - 4X6(x2)H
X
X
Format name - cm - inches
W10HG - 10X15(x2)HG - 4X6(x2)HG
X
X
X
X
X
X
X
X
X
X
X
X
X
X
X
X
X
X
X
X
X
X
W11 - 11.5X15(x2) - 4.4x6(x2)
W11H - 11.5X15X(x2)H - 4.4x6(x2)H
X
X
W11HG - 11.5X15X(x2)HG - 4.4x6(x2)HG
X
X
W13 - 13X18W - 5X7W
X
X
X
X
W13HG - 13X18WHG - 5X7WHG
X
X
X
X
X
X
W20 - 15X20 - 6X8
X
X
X
W20H - 15X20H - 6X8H
X
X
X
X
X
X
W20HG - 15X20HG - 6X8H
X
X
X
X
X
X
W21 - 15X21 - 6X8.5
X
X
X
X
W21H - 15X21H - 6X8.5H
X
X
X
X
X
X
W21HG - 15X21HG - 6X8.5HG
X
X
X
X
X
X
X - 13X18 - 5X7
X
X
X
XH - 13X18H - 5X7H
X
X
X
X
X
X
XHG - 13X18HG - 5X7HG
X
X
X
X
X
X
PLT - PLOTTER
X
X
X
X
X
X
LLT - 40X60 - 15x24"
X
X
X
X
X
X
NLT - 30X60 - 12x24
X
X
X
X
X
X
RLT - 40X30 - 15x12
X
X
X
X
X
X
W15H - 20X15(x2)H - 8X6(x2)H
X
X
X
X
X
X
WL3H - 20X10(x3)H - 8X4(x3)H
X
X
X
X
X
X
WLH - 20X10(x2)H - 8X4(x2)H
X
X
X
X
X
X
WXLH - 20X13(x2)LH - 8X5(x2)LH
X
X
X
X
X
X
WXH - 20X13(x2)H - 8X5(x2)H
X
X
X
X
X
X
X
X
X
X
X
X
X
X
X
W76 - 15X7.6(x3) - 6X3(x3)
W76HG - 15X7.6(x3)HG - 6X3(x3)HG
X
X
APPENDIX PrintServer
APPENDIX
DPS PrintServer
L51 - 15X5.1(x2) - 6X2(x2)
X
X
X
X
X
L51HG - 15X5.1(x2)HG - 6X2(x2)HG
X
X
X
X
X
X
W55 - 15X5.5(x4) - 6X2.2(x4)
X
X
X
X
X
W55HG - 15X5.5(x4)HG - 6X2.2(x4)HG
X
X
X
X
X
X
A5 - 15X20 - 6X8
X
X
X
X
X
X
W10A5 - 10X15(x2)_A5 - 4X6(x2)_A5
X
X
X
X
X
X
W13A5 - 13X18W_A5 - 5X7W_A5
X
X
X
X
X
X
1
When the printer is an MPU multi-cut formats are not supported.
2
Formats not supported for K60 printer Series.
Published print sizes
It’s possible to enable or disable the print sizes supported by the software. This means that the software only will print
using the resulting list. This chart is available at Menu/Settings/Published Printsizes
The operator can always come back to change any of these parameters.
This helps to minimize the lists that are shown in different places of our applications and also the different related
products, saving time and efforts to configure all of them.
By default, all the formats are enabled. It’s highly recommended to disable entirely some groups if the system is not
going to use them, like HG media, Standard media, CP3020, Plotter, and so on.
IMPORTANT
For enabling the CP9600 exclusive formats, the option “exclusive formats” in the CP9600
printer parameters section of DPSPrintserver must be checked.
NOTE
By default, the Plotter and CP9600 exclusive formats are disabled.
APPENDIX PrintServer
APPENDIX
DPS PrintServer
Matte overcoat option
In the next text box, it is possible to view the relation between different printer models and
Matte overcoat.
PRINTER MODEL
MATTE
CP95XX Series
X
CP9600 Series
X
CP98XX Series
CP3020 Series
X
CP3800 Series
X
MPU
X
Plotter Series
X
CP70 / CP707 / K60 Series
(*)NOTE
This option is compatible only with printers model MITSUBISHI CP9820DW Series, and
format print HG and Superfine quality selected.
2. Printer Configuration
There are different adjustable parameters available on the Search Printers Screen. Printers
are factory-adjusted by default and the system is already configured to obtain a good printing
quality. However, in order to achieve the best quality possible it is necessary to adjust some
parameters and perform some periodical calibrations.
2.1
Colour Configuration
There are two configuration modes which can be applied on each
printer individually: Classic colour correction and Image quality
management. Classic mode allows you to configure standard
printer parameters through legacy adjustment screens. The
available adjustments with classic colour correction are fine, but it
is highly recommended to use the new Image quality
management system, since it represents a forward step in colour
managing and printing consistency comparing to the classic
mode.
APPENDIX PrintServer
APPENDIX
DPS PrintServer
Classic colour correction
Access this screen by pressing the ‘Explore’ button or by selecting Menu > Settings > Printers
Basic
Select Basic and click ‘Colour Setup’. The colour components can be fine-tuned
separately (R,G,B) or together (Brightness)
‘Level’ adjusts the colour saturation
‘Gamma’ adjusts the middle tones
Each printer can be adjusted individually and can be optimised for colour or for black &
white pictures. It’s also possible to define two more custom optimizations: Custom1 /
Custom2. Different profiles can also be saved / loaded.
NOTE
B&W, Custom1 and Custom2 optimisations are not applicable to DPSKiosk
Advanced
Select Advanced and click ‘Colour Setup’.
Colour components can be fine-tuned
separately (R,G,B) or together (RGB)
Separate adjustments can be made at
every point on the curve from shadows to
highlights.
Adjustments can be made for each printer
and each format individually, and they can
be optimised for colour or for black & white
pictures and optimize more options with the
values Custom1 / Custom2. Different
profiles can also be saved / loaded.
ICC Settings (Colour Matching, ICC Profiles)
For best colour quality improvement, use Colour
Matching.
Check ‘Apply Colour Matching’ option in ‘Colour
Matching’ panel. If you want to use picture files
embedded profiles, please also check ‘Use pictures
embedded profile’.
NOTE
Old Mitsubishi ICC profiles from DPS PrintServer versions prior to 5.6 are no longer
supported. Use the new ones provided or contact Support if you had old specific ICC profiles.
From version 5.6. DPS PrintServer allows using standard ICC profiles as well as the new
Mitsubishi ICC Profiles provided.
Select the printer you want to configure. Press the ‘ICC Settings…’ button in the ‘Printer
Settings’ panel. This setting only affects the printer selected.
APPENDIX PrintServer
APPENDIX
DPS PrintServer
ICC Profiles list. With the list on the left, it’s possible to manage the ICC profiles placed in
the DPSPrintServer\ICCs folder. It’s possible to add new profiles to the list by pressing
‘Load ICCs’ and selecting an ICC profile placed in another location. It’s also possible to
delete them from the list by pressing ‘Delete ICCs’.
Media Type. Each media type can be configured with a different ICC profile. Be sure to
configure at least the currently used media type.
Quality. Each print quality has a different colour contrast and intensity. Different ICC
profiles must therefore be used.
Colour – B/W. Colour correction for colour or black & white images can be enabled and
configured separately. Enabling Colour and disabling B/W is recommended. An ICC profile
is assigned to the Colour mode of every media type and every quality by default.
Arrow button. Use this button to assign the selected profile from the ICC profiles list to
Colour or B/W.
Please, refer to chapter 4 for more information about classic colour correction settings.
NOTE
All default ICC profiles will be applied in any new detected printer.
References:
Part of DPS PrintServer (Mitsubishi Electric Europe, B.V.) uses “Colour Science i2e Image Enhancement
Technology”.
Image Quality Management (iQ)
Image Quality Management is a new concept of printer calibration and
adjustment which makes possible to obtain the maximum quality in your
prints.
Access this screen by pressing the ‘Explore’ button or by selecting Menu
> Settings > Printers.
Then select ‘Image quality management’ and click ‘Setup…’ button to
access iQ configuration screen.
APPENDIX PrintServer
APPENDIX
DPS PrintServer
On the left side are placed all the controls which allow configuring the different adjustments
assigned to the printer. On the right side is placed the button to start a new iQ adjustment
process. It is highly recommended not to change the configuration of the left side panel. The
values are configured automatically when you perform a calibration or profiling process with
your printer, and they are only intended for administration or advanced testing purposes.
To start the iQ adjustment process, please, follow the steps on the right side: Firstly, select
the quality you want to adjust, and then press the ‘Start wizard’ button.
A new screen will appear and will guide you trough the process. To obtain fully detailed
information about the iQ management system, please, refer to chapter 5.
APPENDIX PrintServer
APPENDIX
2.2
DPS PrintServer
Printer Settings
Printers are factory-adjusted. However, some working parameters can be adjusted.
Access this screen by pressing the Explore button or by selecting Menu > Settings > Printers.
If you select a printer and then click on “Parameters” you will be able to change some
advanced printer options which can be used to fine tune adjustments or improve print quality.
Alias. Change this to improve printer
identification.
Sharpness.
Detail
improvement.
Recommended values:
CP9500DW-S: User – Manual - 6
CP9550DW-S: Noise:Off Sharpness:4
CP9600DW-S: Noise: Off Sharpness:4
CP9800DW-S: Noise:Off Sharpness:8
CP9820DW-S: Noise:Off Sharpness:8
CP70/CP707: Noise: Off Sharpness: 5
CPK60DW-S: Noise: Off Sharpness: 5
CP3800D: Not available
CP3020D: Not available
Image Quality. The default print mode of
the printer which is being configured. This
quality level is used when no image quality
is specified by the sender application.
Improved quality involves a higher quality
of image and colour, but also a slower
printing speed.
Gamma Colour. Colour depth adjustment. Leave the default values if you are using ICC
profiles.
Colour Tables. The recommended configuration is None-Flat and it is the correct option to
use with ICC profiles (default).
APPENDIX PrintServer
APPENDIX
DPS PrintServer
Number of copies near end will generate an incident when reaching the configured
number.
Save and Exit to apply changes.
Exclusive Formats. Activating this option CP9600DW-S will work with its own formats.
This helps to avoid CP9600DW-S printing standard 10x15 cm (6x4 inc) or 15x23 cm (6x9
inch) sizes when the printer is attached to a system together with other printers like
CP9500DW-S also using that media size. Due to HIGH QUALITY and SLOW SPEED of
CP9600DW-S printer, it is preferable to reserve this printer for special jobs like Studio
pictures, where high quality is a must. When this option is checked and the user wants to
send a request to that printer, special paper size must be chosen from the list of available
paper size 10x15 cm (6x4 inc) or 15x23 cm (6x9 inch).
Mirror Mode. Activating this option the image will be inverted (from left to right), producing
a mirror effect. This option is deactivated by default.
Overcoat. This option enables the printing of an overcoat layer on the picture. It is
activated by default.
White border. This option is used to adjust the position of the picture over the white
border when this option is selected to print pictures. This is useful when the print out of the
printer is slighty shifted respect the upper/lower or right/left edges.
The target is to have the same thickness of white border for all sides. This value is
settable in fractions of 0.1 millimetres and can also be positive or negative.
The default values are usually the best, but the operator can vary these parameters to
improve the performance of the printer on a printer-by-printer basis.
NOTE
Do not change the Colour Table unless ICC profiling applies.
In this case, ‘Flat’ or ‘No tables’ will be automatically selected
NOTE
For CP9550DW (A) choosing FineDeep image quality, will make the printer print in SuperFine
mode
Restrictions:
With the format 10x15x2 based on paper-cut, white edge cannot be implemented.
When a plotter printer is selected, the “Parameters” screen shows special configuration
options that only apply to the plotter.
Advanced interpolation. This option allows resizing the plotter images for the format
PLOTTER. This option is disabled by default.
Max MegaPixels. This option allows specifying how many megapixels will be used when
resizing to format PLOTTER. It is only applied when advanced interpolation is activated.
APPENDIX PrintServer
APPENDIX
2.3
DPS PrintServer
Picture automatic adjustments
Picture automatic adjustments applies
changes to specific parts of the image. It
is useful to enhance highlights and
shadows, colours, etc.
To apply automatic adjustments, a
configuration screen accessible from the
main screen has been created. Go to
Menu - Settings - Picture Automatic
Adjustments to open the configuration
menu.
Each one of the automatic adjustments
options can be individually activated or
deactivated. Moreover the impact of each
one of the parameters on the image can
be modified. The application is configured
to improve the pictures aspect, although it
is possible to adjust the configuration in
order to get best results.
Enable picture automatic adjustments
Adaptative brightness enhancement: This option enables the use of shadow and Highlight
enhancement.
Shadow and highlight enhancement: this option enables highlights correction strength and
Shadows Correction Strength options.
Adaptative colour enhancement
Local sharpness enhancement
Memory colour enhancement
Local noise reduction
Highlight contrast
Shadow Contrast
Shadow desaturation
”DEFAULT” button restores default factory values.
Note: Certain parts of Mitsubishi Electric DPS PrintServer have been created using “Colour-Science i2e Image
Enhancement Technology."
APPENDIX PrintServer
APPENDIX
2.4
DPS PrintServer
Print Areas
In this section is possible to set the default parameters of real print area and white border
White
border
Limits of printable area
Non printable area
Choose printer, format and
quality
Refresh screen
Adjustment of printing
area
Save
changes
Exit
White border
adjustment
Keep proportions
dimensions depending on printer model (and printing quality in some cases).
The final picture data being sent to the printer is always slightly bigger than the real print area
size, in order to compensate possible deviations of the thermal head position respect the
paper position. This helps to ensure that, even when the paper is slightly shifted to one side,
there’s not any edge of the paper without picture information being printed.
By default, the print area is equal to the picture data dimension in terms of pixel size. (width
and height). This data (‘Printable width’, ‘Printable Height’) can be adjusted in this screen.
Also the dimensions of the white frame for white border prints can be adjusted here.
NOTE
It’s possible to adjust different offset per each printer of the same model being installed in the
same system, but not in this screen. It’s required to access to the individual printer parameter
menu and change horizontal and vertical offset. This is useful when printers of the same
model are showing differences between their respective printing position offsets.
IMPORTANT NOTE
Cutting formats (10x15x2, 11’5x15x2) do not support white border
APPENDIX PrintServer
APPENDIX
DPS PrintServer
When printers or format are chosen, changes must be saved or cancelled.
NOTE
If cutting formats are modified (10x15x2 ; 11’5x15x2) the composition file must be modified for
optimal results.
APPENDIX PrintServer
APPENDIX
DPS PrintServer
3. General settings
These parameters control the behaviour of the PrintServer.
There are some of them that are general for every printer and others applied only to the MPU
Sorter.
Please refer to chapter 6 for further information about MPU Sorter unit.
3.1
Adjust
Access this screen by selecting Menu > Settings >
Adjust
Balanced
This is the default configuration used if no
‘Balanced’ mode is specified in the requests sent.
If checked, the jobs in a request are sent to
printers that can print the selected format.
Otherwise, all jobs will be sent to one of the
printers that supports the format.
Balanced Type (Speed Mode)
DPS Print Server sends any order to the first
printer available. This increases the printing
speed, but the printing order is lost.
Balanced Type (Order Mode)
A set of ordered printing jobs are assigned to each
available printer. Instant prints are ordered, but speed is lost (because an available printer
could not be assigned in order to prevent the order being lost).
Sorting
Whenever the print queue is ready to print, this option will reverse (Descending) or not
(Ascending) the printing order. This option is useful for copies to land on the print tray in
reverse order.
Beep on finished request
If checked, a sound will be played when a request finishes printing.
Logging / No resize
These parameters are for technical purposes. Please leave them unchecked.
APPENDIX PrintServer
APPENDIX
DPS PrintServer
Full belt mode
This setting only applies to MPU unit, it indicates what is the action that the application must
do when a stack has reached the end of the belt. The values can be:
STOP: PrintServer will stop printing with MPU till the stack is removed from the belt
by the operator (only the stack over the sensor it’s needed to be removed).
MOVE: PrintServer will move the belt so the first stack will fall at belt tray.
Beep on full belt
This setting only applies to MPU unit, when checked PrintServer will emit a sound when a
stack has reached the belt end.
Number of stacks
This setting only applies to MPU unit. It allows configuring the number of the MPU output
stacks on the belt.
Custom backprint information
See MPU related information in this manual further on.
APPENDIX PrintServer
APPENDIX
DPS PrintServer
4. Classic colour correction settings
This chapter refers to the classic colour corrections. It is highly recommended to use the new
iQ Image quality management system (refer to chapter 5) instead classic settings. However,
the system is predefined in classic colour correction in order to allow backward compatibility
and it is possible to keep using the classic system instead.
It is important to take into consideration that old Easy Colour Adjustments have been
removed from the Classic colour correction options because they have been embedded on
the new iQ Image quality management system as the new concept “Visual Calibration”.
(Please, refer chapter 5 for more details).
In Classic colour correction mode, after the printer is detected, some colour and quality set-up
can be carried out. A choice between using CPD colour adjustment files or ICC profiles is
possible. It is very important to set up the system according to your choice.
ICC profiles are automatically applied to each printer and it is the default Mitsubishi
recommended configuration.
IMPORTANT NOTE – ICC COMPATIBILITY
Now DPS PrintServer supports standard ICC profiles and special Mitsubishi ICC profiles.
Mitsubishi ICC profiles follow a new design and are not compatible with the old ones, so, ICC
profiles from older versions than DPS PrintSever 5.6 are not longer compatible.
4.1 CP9550DW-S/CP9600DW-S/CP9800DW-S/DP9820DWS/CP70/CP707/CPK60 using CPD file
1. Check Colour Correction group has the ‘Advanced’ option checked.
2. Press the ‘Setup’ button.
3. Check that the CPD default curve for CP9550DWS is loaded. The grey curve is a
guide if one is needed to make small adjustments, in order not to stray too far from
the current standard CPD adjustment for the printer.
4. Press the ‘Exit’ button.
5. Press the ‘Parameters’ button on the ‘Detected Printer list’ to show this form.
Load default
APPENDIX PrintServer
APPENDIX
DPS PrintServer
a. In the ‘Colour Table’ group in the ‘Colour’ drop-down list box, select the
‘Printer Colour’ option. Do not use the ‘Flat’ colour table. The convention of
these names depends on the printer model.
b. In the ‘B/W’ drop-down list box, always leave the ‘Printer Colour’ option
selected.
c. Set ‘Noise Reduction’ to ‘off’.
d. Set ‘Sharpness’ to 4.
e. Set ‘Superfine mode’ to ‘off’.
f. Set ‘Gamma Colour’ to ‘Photo’.
g. Set ‘Mode’ to ‘normal’.
6. The ‘Apply Colour Matching’ option in the ‘Colour Matching’ panel must be
unchecked.
4.2
1.
2.
3.
4.
CP9550DW-S/CP9600DW-S using ICC profile
Check that the Colour Correction group has the ‘Advanced’ option checked.
Press the ‘Set-up’ button.
Check that NO CPD curve is loaded. The Flat line must be selected.
Press the ‘Exit’ button.
5. Press the ‘Parameters’ button on the ‘Detected Printer list’ to show the Parameters
form.
a. Select the ‘Flat’ option in the ‘Colour Table’ group in the ‘Colour’ drop-down
list box. Do not use the ‘Printer Colour’ colour table. The full option naming
convention depends on the printer model.
b. In the ‘B/W’ drop-down list box, leave the ‘Printer Colour’ option, if there is no
special colour profile for that option.
APPENDIX PrintServer
APPENDIX
c.
d.
e.
f.
g.
DPS PrintServer
Set ‘Noise Reduction’ to ‘off’.
Set ‘Sharpness’ to 4.
Set ‘Superfine mode’ to ‘off’.
Set ‘Gamma Colour’ to ‘Photo’.
Set ‘Mode’ to ‘normal’.
6. Check the ‘Apply Colour Matching’ option in the ‘Colour Matching’ panel. If you want
to use picture files embedded profiles, also check ‘Use pictures embedded profile’.
7. Press ‘ICC Settings…’ button on the ‘Printer Settings’ panel. On list on the left, you
have the previously loaded profiles.
a. Select ‘Media Type’ and the desired Quality.
b. Check the ‘Colour’ option.
c. The ICC profile on the left must be assigned using the arrow button.
d. The B/W option must be left unchecked if there is no special colour profile for
that option.
APPENDIX PrintServer
APPENDIX
4.3
1.
2.
3.
4.
DPS PrintServer
CP9500DWS/CP3020DW using CPD files
Check that the Colour Correction group has ‘Advanced’ option checked.
Press the ‘Set-up’ button.
Load or ‘draw’ the CPD curve that you need.
Save the new curve if needed and press the ‘Exit’ button.
5. Press the ‘Parameters’ button on the ‘Detected Printer list’ to show the Parameters
form.
a. In the ‘Colour Table’ group, in the ‘Colour’ drop-down list box, select the
‘Printer Colour’ option. Do not use the ‘Flat’ colour table. These convention of
these names depends on the printer model.
b. In the ‘B/W’ drop-down list box, always leave the ‘Printer Colour’ option
selected.
c. Set ‘Sharpness’ to ‘User’ and ‘Manual’ to 6.
d. Set ‘Gamma Colour’ to ‘Photo’.
e. Set ‘Mode’ to ‘normal’.
APPENDIX PrintServer
APPENDIX
DPS PrintServer
6. The ‘Apply ColourMatching’ option in ‘Colour Matching’ panel must be unchecked.
4.4
1.
2.
3.
4.
CP9500DWS/CP3020DW using ICC profiles
Check that the ‘Advanced’ option checked in the Colour Correction group.
Press the ‘Set-up’ button.
Check that NO CPD curve is loaded. Flat line must be selected.
Press the ‘Exit’ button.
5. Press the ‘Parameters’ button on the ‘Detected Printer list’ to show the parameters
form
a. In the ‘Colour Table’ group in the ‘Colour’ drop-down list box, select the ‘Flat’
option. Do not use the ‘Printer Colour’ colour table. The full option naming
convention depends on the printer model.
b. In the ‘B/W’ drop-down list box, leave the ‘Printer Colour’ option if there is no
special ICC profile for B/W pictures.
APPENDIX PrintServer
APPENDIX
DPS PrintServer
c. Set ‘Sharpness’ to ‘User’ and ‘Manual’ to 6.
d. Set ‘Gamma Colour’ to ‘Photo’.
e. Set ‘Mode’ to ‘normal’.
4.5
A FINAL RECOMMENDATION
Current ICC profiles are created using the printer's flat colour curves, in order to start with
neutral corrections. They are not based in any CPD file.
Recommendation: DO NOT MIX Printer Colour curves or CPD files with ICC profiles.
Remember that each print size and print speed require different colour profiles.
APPENDIX PrintServer
APPENDIX
DPS PrintServer
5. MPU Sorter
5.1
Introduction
The mass production unit MPU Sorter has been designed to achieve a high performance
level and a higher easiness working due to its backprinting and sorting functions.
Requirements and compatibility
To be able to use the MPU Sorter it’s mandatory to have an IT5000 with a Flexilab ClickPro
software version 2.5.0 or higher.
In order to achieve the best results, use an IT5000 HW4 version, or higher, and plug in the
MPU Sorter directly with the supplied USB connector. It’s advised not to use and USB
extender.
The MPU Sorter unit is compatible with Flexilab systems using PT6000, PT7000 or MT1E
machines connected in Order Terminal mode to an IT5000 working with ClickPro software
version 2.5.0 or higher.
5.2
Installation
Before connecting the unity to the IT5000, please check that you have a Flexilab Click Pro
2.5.0 version or higher and shut down all applications using the Monitor Manager.
Once the MPU Sorter is plugged in, please read thoroughly the on-screen instructions in
order to install correctly the MPU Sorter unit.
Once the installation is accomplished, reboot the system in order to let the changes be
applied.
To check the installation has been performed correctly, please verify that the MPU Sorter is
shown now in the DispatcherAdmin screen. It must be shown as a red frame framing the
contained printers.
Both printers are differentiated as the UPPER printer and the LOWER printer.
These 2 printers belong to the same
MPU Sorter.
MITSUBISHI RECOMMENDS:
It’s necessary to calibrate the printers contained in the MPU Sorter in order to achieve an
optimum result regarding to printing quality. Please refer to the previous chapter to get more
information about printer calibration.
APPENDIX PrintServer
APPENDIX
5.3
DPS PrintServer
Working modes
A MPU Sorter unit must be always attached to an IT5000. The MPU Sorter is able to print
local Click5000 orders (working as a single printer) and other ones coming from order
terminals (working then as a central high production machine).
Working as a single printer
This working mode is only referred to the orders that are generated locally and printed with
the MPU Sorter.
To generate and order for the MPU Sorter, choose the option labelled as “Sorter” in the field
“Destination” of the Print page in CLICK.
Choose the available paper size and quality in MPU Sorter. Then choose the destination
MPU. In case of having more the one, both will be listed. Otherwise, the MPU Sorter unit will
be the default destination.
The MPU will only print orders sent with the option “Sorter” or, in case of having a printer
inside the MPU Sorter with a specific format, it will also print orders with the options “Multi
printers” or “Single printer”.
Working as a central high production unit
To be able to print with the MPU Sorter using an Order Terminal it is necessary to fulfil the
requirement that at least one printer contained in the MPU Sorter has to be the only printer in
the system with the desired format.
In the case where the MPU doesn’t own exclusively a format, it’s necessary to export the
order to CLICK so as to resend it to the MPU Sorter.
Please refer to the chapter 4.3.5 form the Click application manual to know how to export an
order.
Compatible formats
The MPU unit is compatible with most of the formats supported by the 98xx series printers
except those ones called composition, or multi-cut, formats. Please refer to the formats table
from chapter 1.2.3 for further information about available formats.
NOTE
Composition or multi-cut formats are no available printing with a MPU Sorter.
APPENDIX PrintServer
APPENDIX
5.4
DPS PrintServer
Configuration
The configuration of the MPU Sorter is placed in general settings of PrintServer (see chapter
3). The configuration is applied to every MPU Sorter
attached to the system.
The fields configurable regarding of the MPU Sorter
are the following.
Balanced
This setting is ignored by PrintServer when printing
with an MPU Sorter.
Sorting
This option determines if the MPU Sorter starts
printing the first picture or the last one.
Ascending: The MPU Sorter will start
printing the first picture.
Descending: The MPU Sorter will
start printing the last picture.
Full belt mode
The possible values:
STOP: MPU Sorter will stop printing until the stack is removed from the belt by the
operator (only the stack on the sensor it’s needed to be removed).
MOVE: MPU Sorter will move the belt when it gets full. The first stack will fall in the
belt tray and the MPU Sorter will keep printing.
Beep on full belt
When this option is checked, the IT5000 will beep when the belt gets full.
Number of stacks
This option is used to choose how many stacks are placed on the belt. It’s possible to choose
between 2 or 3 stacks. Depending on this number the capacity of the belt will vary between
110 (2 stacks) or 165 (3 stacks) photos.
Custom Backprinting information
It allows to set a custom short information to be shown in the backprint, like the shopname,
per instance. Maximum length is 19 characters for this field.
Recommended configuration
To achieve an optimum performance, Mitsubishi recommends using the following
configuration of PrintServer:
Full belt mode: MOVE if the MPU Sorter is unattended, otherwise STOP.
APPENDIX PrintServer
APPENDIX
DPS PrintServer
Beep on full belt: Activated
Number of stacks: 2
MITSUBISHI RECOMMENDS:
Do not use used paper or ink from another printer. The MPU Sorter unit performs better if
both printers have the same amount of remaining copies. Please change also paper roll
when ink cassette is exhausted.
5.5
Considerations
Printed orders are sent to the belt or to the upper tray depending on the paper size and the
priority of the order. The orders with the format L – 10x15 are placed on the belt. The orders
with X – 13x18 and W – 15x23 are placed on the upper tray. Moreover, the orders with “Now!”
priority appear on the upper tray regardless of the format, as well as the colour patches while
calibrating printers.
The number of stacks specified it’s only considered in the orders placed on the belt. The
capacity of the belt is about 110 photos (2 stacks) or 165 photos (3 stacks).
When changing from one paper size to another one, check the position of the paper selector
switch is the correct one for the new paper size.
15x23 / 13x18 / Now! Orders
10x15
NUEVO
APPENDIX PrintServer
APPENDIX
DPS PrintServer
References:
Mitsubishi Electric Kiosk&Click software contains portions of imaging code based on proprietary technology
copyrighted by Pegasus Imaging Corporation, Tampa, FL. ALL RIGHTS RESERVED.
APPENDIX PrintServer
Appendix DPS Burns
Rev. 1.1
CONTENTS
1
CD BURNING .................................................................................................... 3
1.1
2
CD BURNING SETTINGS ................................................................................................ 3
ACTIVITY ........................................................................................................... 4
1 CD Burning
CD Burning is a Service Module. It is for burning images onto a CD/DVD. This CD/DVD can
be executed on a computer to show the burned images, with no need to install any
application.
1.1 CD Burning settings
All the configurable parameters of this Service Module can be viewed by pushing this button.
Shop name: This shop name will be shown on the application recorded on the CD/DVD.
URL1: Internet address. This address will be shown on the application recorded on the
CD/DVD.
URL2: Internet address. This address will be shown on the application recorded on the
CD/DVD. This second address is only available for SUBLIME (see SUBLIME).
Proprietary images: proprietary image format. When this option is activated the images
recorded on a CD/DVD can only be viewed on DPS systems.
Do not replace files: when this option is activated, all the files saved in the destination
file beforehand will be protected. If an attempt is made to save an existing file, the one
already saved has priority, while if this option is not activated the new file will overwrite
the previously saved file.
Verify mode: saves onto the CD/DVD with verification. While saving, it checks to see that
it is being done correctly. This increases the CD/DVD saving time.
Buffer underrun: Saving takes place with mistake proofing. Leaving this option activated
is advisable.
Default compilation type: defines what type of application will burn onto the CD/DVD.
o SUBLIMECD: an application allowing saved images to be viewed and printed on a
Mitsubishi printer, the images to be edited and the images to be uploaded to
Mitsubishi Album.
o BACKUP: burning of images onto a CD with no application to view them.
CD/DVD Writer Speed: the speed at which burning takes place can be selected. MAX
defines the maximum speed regardless of the burner model. If errors have taken place
during several burning sessions, we advise selecting 8x as the burning speed.
2 Activity
Shows the current state of the service module.