1
Sartorius Universal.
U 4100, U 4100 S,
U 4800 P, U 6100,
U 5000 D, U 6100 D,
U 6100 S.
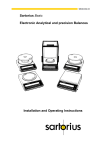
Electronic Precision Balances
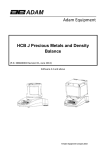
1
Pan
2
Power receptacle for line cord (power lead)
3
Leveling foot
(U 4100, U 6100, U 6100 D only)
4
Menu access switch (for balance operating program)
5
ON/OFF-Taste
6
CAL key
7
PRINT key (functions only if balance has a built-in interface)
8
Tare control
9
Weight display
10
2
Level indicator
(not by U 4100, U 6100, U 6100 D)
Contents.
Page
Equipment Supplied
5
Installation Instructions
5
Startup
6
Operation
7
Calibration
9
Balance Operating Program
10
Troubleshooting Guide
13
Accessories
14
Specifications
15
3
Sartorius Universal
U 4100, U 4100 S,
U 4800 P, U 6100,
U 6100D, U 6100S.
With this Sartorius Balance you have acquired a sophisticated,
top-of-the-line electronic weighing Instrument which will help
lighten your daily work load.
Please read these installation and operating instructions carefully before operating your new balance.
Pursuant to the German Directive for the Implementation of
Regulations for Prevention of Accidents "Elektrische Anlagen und Betriebsmittel (VBG 4)" [Electrical Installations and
Equipment] of April 1986,it is hereby certified that the
equipment delivered, "electronic precision balance, model
U 4100, U 4100 S, U 4800 P, U 6100, U 6100 D or U 6100
S," is manufactured and tested in compliance with the following DIN/VDE regulations
DIN IEC 348/VDE 0411:
Safety requirements for electronic measuring apparatus
DIN IEC 380/VDE 0806:
Safety of electrical y energized Office machines
DIN IEC 601 /VDE 0750:
Safety of medical electrical equipment
When you use electrical equipment in installations and
under ambient conditions requiring higher safety standards
you must comply with the provisions as specified in the
applicable regulations for installation in your country.
4
Equipment Supplied.
Do not miss out on the benefits of our warranty. Please fill out
the warranty card, indicating the date of installation, and return
the card to your Sartorius dealer.
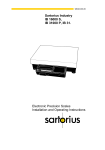
The equipment supplied comprises the components shown on
the left.
Save the packaging material and the box for shipping your balance to prevent any damage caused during transportation.
Installation Instructions.
Choose a suitable place to set up your balance. lt should not be
exposed to the following:
- heat radiation
-aggressive/corrosive substances
-vibrations
-drafts.
Your Sartorius Balance will provide accurate readouts even
when it is exposed to unfavorable conditions. You can adapt it
to your requirements simply by changing the menu code settings of the balance operating program. For this purpose,
please read pages 10 through 12.
After you plug your balance into a wall outlet, allow for at least
30 minutes warmup.
Important Note
Unplug the AC adapter before you connect or disconnect peripherals.
5
Startup.
Attach the dust cover by pressing down on the adhesive disks,
and install the pan (1) on the balance.
Your balance is powered by an AC adapter. Please make sure
that the voltage printed on this unit is identical to your local line
voltage rating.
Plug the line cord into the power receptacle of the balance and
plug the AC adapter into a wall outlet.
Level the balance using the leveling feet (3) such that air bubble
is centered within the circle on the level indicator (10) (not by
U 4100, U 6100 und U 6100 D).
6
Operation.
The weight display shows the following special
Status messages for your Information:
BUSY
The processor is still busy processing a function and will not accept any other commands to perform functions at this time.
STANDBY
The balance has been turned off with the ON/OFF key (5) and
is now in the STANDBY mode and ready to operate without
warmup.
POWER OFF
The balance was disconnected from line power (reconnection to
line power, power failure).
CAL
The calibration function has been called.
In addition to grams, this balance gives you a variety of
other international weight unit options to work with.
Select the weight unit you need from the table of the menu options for the balance operating program, and set the appropriate
code(s) as described in the section "Balance Operating Program."
7
Press the ON/OFF key (5) to switch the balance on or off. You
can also turn on the balance with the tare control (8).
After the adapter has been plugged into a wall outlet, the weight
display will go out when ever you turn off the balance. AII other
electronic circuits will remain energized (STANDBY state).This
means the balance is immediately ready to operate without requiring warmup the next time you switch it on.
After the power is turned on, a test of all essential electronic
functions is run automatically.
The self-test ends with the readout 0.00 g/O.O g (if the program
code setting 51 1 is used).
Now place your sample on the pan (1) to determine the weight.
Read off the weight in the display (9) as soon as the weight unit
(in this case ''g") appears as the stability symbol.
lf you wish to use a Container or if the weight display does not
indicate 0.00 g/O.O g (or the equivalent with the weight unit of
your choice), press the tare control to zero the display.
8
Calibration.
External Calibration:
— Only possible with an accurate calibration weight
(U 4100, U 4100 Sand U 4800 P-2,000 g;
U 5000 D, U 6100, U 6100 D and U 61OO.S -5,000 g)
Please refer to the "Accessories."
Clear the pan and press the CAL key (6) (for the U 6100 S use
the tare control (8)) for at least three seconds until the calibration weight readout appears in the display.
Center the calibration weights on the pan.
Now the weight unit symbol is displayed. An acoustic Signal indicates the end of the calibration procedure.
Internal Calibration:
(onlyfortheU6100S)
Unload the balance and zero the display. Press the CAL key (6)
as soon as the display shows a zero readout. "C" will now be
displayed. lf “CE" is displayed instead, zero the display by
pressing the tare control and press the CAL key again.
After a few seconds, "CC" will be displayed followed by 0.00 g.
An acoustic Signal indicates the end of the calibration procedure.
You can block access to both the internal and external calibration functions-to find these menu codes, refer to the "Balance
Operating Program." These functions are accessible when ever
the balance operating program is unlocked by the menu access
switch (4).
9
Balance Operating Program.
The balance operating program lets you adapt your balance to
various ambient conditions and to different weighing requirements and select the weight unit(s) commonly used in your
country. At the factory we have set the codes for a Standard
program, which is protected by a locking function to prevent accidental changes.
The "code" contains the information of the operating program,
lt consists of three digits: one each for the page the line and the
word.
How to access the menu of the balance operating
program:
With the balance turned off (STANDBY state), hold down the
tare control (8) and simultaneously press the ON/OFF key (5).
Upon completion of the automatic self-test, release the tare
control as soon as "CH 5" is displayed. The Status of the balance operating program will be indicated in the weight display:
"L" Stands for the list mode. In this mode you can check the
menu code settings, but you cannot program new menu codes.
lf you wish to change a program menu code, you must first
unlock the menu access switch to access the menu.
To do so slide the menu access switch (4), located at the front
right of your balance, in the direction of the arrow.
The display will indicate "C", which Stands for the change
mode, meaning you can now proceed to make the necessary
code changes.
10
After the balance operating program has been called the display
will show a continuous numerical sequence from 0 to 5 representing the "page" selection, in addition to the Status code letter
''L" or "C.'' When the code number of your choice for the "page"
appears, press the tare control. The "page" code number now
stops in the display, and a series of numbers for the "lines'' will
begin to cycle. Again, press the tare control to stop the code
number of your choice in the display. Next the numbers for the
"word'' will cycle in the display. Repeat the procedure to enter
the last digit of the code.
The "o" symbol that appears indicates the actual setting.
To change any settings ("C" mode), press the tare control as
soon as the appropriate code appears.
Brief display of BUSY and the "o" symbol confirms your selection, followed by a return to ''zero" representing the "line."
To return to the weighing program:
press the tare control each time a 0 appears in the numerical
sequence (word, line, page). lf you have made code changes
your code entry will be stored as soon as the display returns to
the weighing mode. Lock the balance operating program using
the menu access switch (display ''L") and replace the protective
cap.
Auto Zero
This balance has an automatic zero tracking function, known as
"Auto Zero" (can be turned off by menu code).
Any changes off zero ≤ 0.5 of a digit per second will be set to
zero automatically.
11
C 1 3 1
page
line
word
Menu of the Balance Operating Program
(Active Parameters)
Code
C
C
C
C
1
1
1
1
1
1
1
1
1
1
1
1
1
2
2
2
2
2
2
2
2
2
1
2
3
4
5
6
7
8
9
Statbility Range
0,25 digit
0,5 digit
1
digit
2
digits
4
digits
8
digits
16
digits
32
digits
64
digits
3
3
3
3
1
2
3
4
Display Format
Last decimal ON
Last decimal OFF
Last decimal at stability
All decimals at stability
Code
C
C
C
C
1
1
1
1
(U 4100, U 6100)
1
2
3
4
Code
C
C
C
C
C
C
C
C
C
Very stable
1
1
1
1
Code
C 1 4 1
C 1 4 2
Code
C 1 5 1
C 1 5 2
Code
C 1 6 21
C 1 6 2
Stable
Unstable
Very unstable
Tare Parameter
Without stability
At stability
Auto Zero
ON
OFF
External Calibration
Accessible
Access blocked
Internal Calibration
(U 6100 S only)
Accessible
Access blocked
Code
Ambient Conditions
!
!
C 1 7 1
C 1 7 2
!
Special Information
Code
Program Lock
OFF
C 4 1 1
ON
C 4 1 2
Code
!
!
!
!
!
Acoustic Signal
ON
OFF
C 4 3 1
C 4 3 2
Weight Units
Code
C 5 1
C 5 1
c 5 1
c 5 1
c 5 1
c 5 1
C 5 1
c 5 2
c 5 2
c 5 2
c 5 2
c 5 2
c 5 2
C 5 2
C 5 2
1
2
3
4
5
6
7
1
2
3
4
5
6
7
8
!"
"
"
!"
"
1)
Grams
Kilograms
Carats
Pounds
Ounces
Troy ounces
Parts/pound
Hong Kong taels
Singapur taels
Taiwan taels
Grains
Pennyweights
Mommes
Milligrams
Karats
g
kg
ct
lb
oz
ozt
o
tl
tl
tl
gr
dwt
o
o
o
C 5 2 0
C 5 0
Call program line
Call program page
C 0
End of programming
!
Additional Parameters for the data Output format at the interface port and for calculation programs are available on request.-Please refer to the “Accessories."
1)
You can choose any weight unit as long as it can be displayed in the particular weighing range you selected (for example do not set the code for "kg" when you are using a 0.1 mg balance).
12
Troubleshooting Guide.
Problem ...
No segments appear in the weight
display (9)
Causes ...
- No voltage available
- The AC adapter has not been
plugged in
Remedy
- Check current supply
- Plug in AC adapter
Weight display shows “L” or
“CH 2”
Weight display shows “H”
- The pan (1) is not in place
- Position the pan
- Load exceeds capacity of the
balance
- Unload the balance
The weight readout changes constantly or the special message
“BUSY” does not go out in the
weight display
- Unstable ambient conditions
- Too much vibration or the balance is exposed to a draft
- Set up balance in another area
- Access the menu to adjust the
proper code for the particular type
of weighing environment
- Sample does not have a stable
weight
Weight shows “CE”
The code “CC” does not go out in
the display
- The Cal key (6) was not pressed
when the display read zero
- The balance is loaded
- The balance is not ready to calibrate or is in the warmup phase
- The weighing system is affected
by drafts or vibration
The weight readout is obviously
wrong
- The balance has not been calibrated
- The balance has not been tared
before weighing
- The air bubble of the level indicator is not within the circle
(not by U 4100,U 6100 and
U 6100 D)
- Press the tare control (8)
- Unload the balance
- After plugging the AC adapter
into a wall outlet, allow for at
least 30 minutes´ warmup
- Set the appropriate code by accessing the menu of the operating program
- Calibrate the balance
- Tare before weighing
- Level the balance
13
Accessories (Optional).
Data printer with date/time
and statistics functions
print speed, approx. lines/sec.
Printer housing
(W x D x H) in mm
150 x 138 x 43
Remote display
- LCD, reflective
- for overhead projectors
7371 01 A
7371 02 A
Calibration weights for:
U 4100, U 4100 S, U 4800 P
(2 x 1000 g)
U 5000 D, U 6100, U 6100 D
(1 x 5000 g)
Interface
YDP 02-0D
1,5
7072 08
7072 13
YDO 01 U
“PLUS” Performance Package,
YDI 01 U+
integratable (incl. interface)
- Over/under checkweighing/sorting & classification
- Mass unit conversion – Weight of residue in %/
change in %
- Statistics – Net total/formulation & compounding
- Filling toward “0” – Parts counting
- Animal weighing
- Calculations by a factor
- Calculation of the weight per unit area/division
- Accumulator memory – I.D. no memory
- Communication with computers
YRB 01 Z
External rechargeable battery pack:
hours of operation: approx. 10
(detailed information on additional
options for powering the balance is
availed in hour Service Information
bulletin, no. 15/88
Carrying case
YDB 02 L
14
Antitheft locking device
6087
Dust cover
69 60U360
Specifications.
Model
U 4100
U 4100 S
U 4800 P
800/1600/
3000/4840
0,01/0,02/
0,05/0,1
4840
Capacity
g
4140
4140
Readability
g
0,1
0,01
Tare range (by subtraction))
g
4140
4140
Standard deviation
g
≤±0,05
≤±0,01
Max. linearity
g
≤±0,1
≤±0,02
Stabilization time (typical)
s
2
Display update
Adaptation to ambient conditions
and application requirements
Stability range
s
0,1 – 0,8 (selectable)
d
by selection of 4 optimized filter levels
0,25 ... 64 (selectable)
Ambient temperature range
Sensitivity drift
within 283 ... 303 K
Pan size (W x D)
K
273-313 (0 C ... +40 C)
/K
≤±5∙10 /K
mm
235 x 180
Housing dimensions (W x D x H)
mm
250 x 270 x 65
Net weight
Line voltage (mains;
frequency 50 – 60 Hz
Allowable voltage fluctuation
kg
5
115 V or 230 V, depending on the AC adapter used
Power consumption
VA
Interface (optional)
o
-6/
≤±0,01/0,01/
0,02/0,03
≤±0,02/0,02/
0,03/0,05
o
-6/
≤±2∙10 /K
-6/
≤±3∙10 /K
-20 % … + 15 %
max 7,5 (typical)
RS 232 C/V24 – 28, RS 423/V10; 7-bit;
parity: even, mark, odd, space;
transmission rates 150 ... 9600 Baud
15
Specifications.
Model
U 5000 D
U 6100
U 6100 D
U 6100 S
Capacity
g
500/5050
6100
600/6100
6100
Readability
g
0,01/0,1
0,1
0,01/0,1
0,01
Tare range (by subtraction))
g
5050
6100
6100
6100
Standard deviation
g
≤±0,01/0,05
≤±0,05
≤±0,01/0,05
≤±0,01
Max. linearity
g
≤±0,01/0,1
≤±0,1
≤±0,02/0,1
≤±0,02
Stabilization time (typical)
s
2
Display update
Adaptation to ambient conditions
and application requirements
Stability range
s
0,1 – 0,8 (selectable)
d
by selection of 4 optimized filter levels
0,25 ... 64 (selectable)
Ambient temperature range
Sensitivity drift
within 283 ... 303 K
Pan size (W x D)
K
/K
mm
235 x 180
Housing dimensions (W x D x H)
mm
250 x 270 x 65
Net weight
Line voltage (mains;
frequency 50 – 60 Hz
Allowable voltage fluctuation
kg
Power consumption
VA
Interface (option)
16
o
o
273-313 (0 C ... +40 C)
-6/
≤±5∙10 /K
5
-6/
≤±5∙10 /K
5
-6/
-6/
≤±5∙10 /K
≤±2∙10 /K
5
6
115 V or 230 V, depending on the AC adapter used
-20 % … + 15 %
max 7,5 (typical)
RS 232 C/V24 – 28, RS 423/V10; 7-bit;
parity: even, mark, odd, space;
transmission rates 150 ... 9600 Baud
Sartorius AG
B
P
T
37070 Göttingen
Weender Landstraße 94–108, 37075 Göttingen
(0551) 308-0, F (0551) 308-3289
Internet: http://www.sartorius.com
Copyright by Sartorius AG, Göttingen, Deutschland.
All rights reserved. No part of this publication may be
printed or translated in any form or by any means without
the prior written permission of Sartorius AG.
Sartorius AG reserves the right to make change to the
technology, features, specification and design of the equipment
without notice.