1
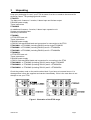
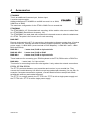
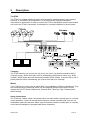
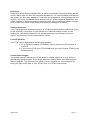
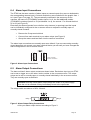
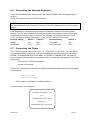
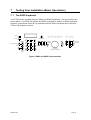
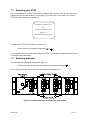
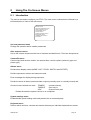
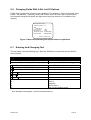
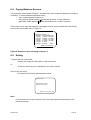
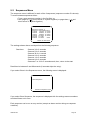
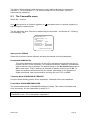
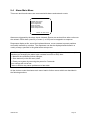
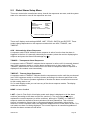
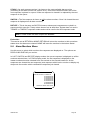
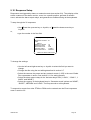
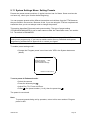
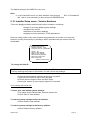
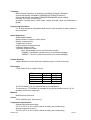
Installation Instructions
ZTX6/8M2, ZTX6/8M2/J
ZTX6/16M4, ZTX6/16M4/J
ZTX6/24M6, ZTX6/24M6/J
ZTX6/32M8, ZTX6/32M8/J
ZTX6/STD
These instructions cover installation for the Installer.
Please read this manual completely before installing your ZTX6
HBZTX6-IN-4
Page 1
BLANK
HBZTX6-IN-4
Page 2
Contents
1 Important Safeguards
1.1
1.2
1.3
1.4
Safety
Damage Requiring Service
Safety and Electromagnetic Compatibility (EMC)
Manufacturer’s Declaration of Conformance
5
6
6
7
7
2 Instruction Manuals
7
3 Unpacking
8
4 Accessories
9
5 Description
10
6 Installation
12
6.1
6.2
6.3
6.4
6.5
6.6
6.7
Assembly
Video Connections - Standard
Video Connections – Loop-through
Alarm Input Connections
Alarm Output Connections
Connecting the Network / Keyboard
Connecting the Power
7 Testing Your Installation (Basic Operations)
7.1
7.2
7.3
7.4
7.5
7.6
7.7
7.8
7.9
The Keyboard
Selecting your ZTX6
Selecting a Monitor
Selecting a Camera
Starting A Sequence On The Current Monitor
To Operate The Telemetry
To Send A Global Auxiliary Command
Selecting a Preset
To Acknowledge an Alarm
8 Using The On-Screen Menus
8.1
8.2
8.3
8.4
8.5
8.6
8.7
8.8
8.9
HBZTX6-IN-4
Introduction
Passwords
Entering The Menu System
Moving Around And Selecting Options
Entering Numbers
Changing Fields With A Set List Of Options
Entering And Changing Text
Paging Between Screens
Exiting
12
12
12
13
13
14
14
16
16
17
17
18
18
18
18
18
18
19
19
20
21
21
21
22
22
23
23
Page 3
9 The Menus
9.1
9.2
9.3
9.4
9.5
9.6
9.7
9.8
9.9
9.10
9.11
9.12
9.13
9.14
9.15
24
Change Password Menu
Sequences Menu
The Camera/Rx menu
Alarm Main Menu
Global Alarm Setup Menu
Alarm Monitors Menu
Alarm Input Senses Menu
Alarm Output Senses Menu
Response Mappings (Alarm Responses, Event Responses)
Response Setup
System Settings Menu: Setting Presets
Display Line Menu: Changing On-Screen Text Position
System Settings Menu: Time and Date Settings
Keyboard Main Menu: Limiting Access Rights
Installer Setup menu - Version Numbers
24
25
26
27
28
29
30
30
31
32
33
34
34
36
37
10
Trouble-Shooting
39
11
ZTX6 Specifications
40
HBZTX6-IN-4
Page 4
1
Important Safeguards
This product is exclusively for use in CCTV applications and has no other purpose.
Read and Retain the Instructions - All the safety and operating instructions should be read
before the unit is operated and should be retained for future reference.
Cleaning – Disconnect the power before cleaning. Do not use liquid cleaners or aerosol
cleaners. Use a damp cloth for cleaning.
Attachments - Do not use attachments which have not been recommended by the product
manufacturer as they may cause hazards.
Water and Moisture - Do not use this unit near water or in any area that is classified as a
wet location.
Accessories - Do not place this unit on an unstable stand, tripod, bracket, or mount. The
unit may fall, causing serious injury to a person and serious damage to the unit. Any
mounting of the unit should follow the manufacturer's instructions, and should use the
mounting accessory recommended by the manufacturer.
Ventilation - Openings in the enclosure, if any, are provided for ventilation to ensure reliable
operation of the unit and to protect it from overheating, these openings must not be blocked
or covered. This unit should not be placed in a built-in installation unless proper ventilation is
provided. Do not place directly on other hot equipment, because this may increase its
operating temperature.
Power Sources - This unit should be operated only from the class 2 isolated power supply
provided.
Plugs – Some equipment in the system may be equipped with a 3-wire grounding-type plug,
a plug having a third (grounding) pin. This plug will only fit into a grounding-type power
outlet. This is a safety feature. If you are unable to insert the plug into the outlet, contact
your electrician to replace your obsolete outlet. Do not defeat the safety purpose of the plug.
Power-cord Protection - Power-supply cords should be routed so that they are not likely to
be walked on or pinched by items placed upon or against them, paying particular attention to
cords at plugs, and the point where they exit from the appliance.
Overloading - Do not overload outlets and extension cords as this can result in a risk of fire
or electric shock.
HBZTX6-IN-4
Page 5
Object and Liquid Entry – This equipment must be protected from the ingress of foreign
materials. Never push objects of any kind into this unit through openings as they may touch
dangerous voltage points or short-out parts that could result in a fire or electric shock. Never
spill liquid of any kind on the unit.
Servicing – There are no user-serviceable parts. Do not remove the covers as this may
expose you to dangerous voltages or other hazards, including moving mechanical parts.
Refer all servicing to qualified service personnel.
Replacement Parts - When replacement parts are required, be sure the service technician
has used the replacement parts specified by the manufacturer. Unauthorised substitutions
may result in fire, electric shock or other hazards.
Safety Check - Upon completion of any service or repairs to this unit, ask the service
technician to perform safety checks to determine that the unit is in proper operating
condition.
Surge Protection – All cables that may be affected by lightning must be surge protected.
1.1
Safety
If you have any problems then contact Baxall Security Ltd.
WARNING
Installation is only to be carried out by competent, qualified and experienced
personnel in accordance with the country of installation’s National Wiring Regulations
Refer to Baxall Security Ltd before using your unit in a medical and/or intrinsically safe
application.
Do not exceed the voltage and temperature limits given in the specification. Only operate the
equipment in a clean, dry, dust-free environment.
1.2
Damage Requiring Service
Unplug the unit from the outlet and refer servicing to qualified service personnel under the
following conditions:
•
When the power-supply cord or plug is damaged.
•
If liquid has been spilled, or objects have fallen into the unit.
•
If the unit has been exposed to rain or water.
•
If the unit does not operate normally by following the operating instructions.
•
If the unit has been dropped or the cabinet has been damaged.
•
When the unit exhibits a distinct change in performance.
•
If the unit has no power even when the power supply appears to operate correctly. If this
is the case then ask a service engineer to test the internal fuse.
HBZTX6-IN-4
Page 6
1.3
Safety and Electromagnetic Compatibility (EMC)
Do not operate the unit outside the voltage and temperature limits given in the specification.
WARNING
To reduce the risk of electrical shock, do not open covers. There are no user
serviceable parts inside. Refer servicing to qualified service personnel.
This product is intended for use in general-purpose CCTV applications in a residential,
commercial or light industrial EMC environment. Refer to your agent before installing or
using the product in medical and/or intrinsically safe applications or in an industrial EMC
environment.
WARNING
This is a Class A product. In a domestic environment this product may cause radio
interference, in which case, the user may be required to take adequate measures.
The product must be installed in accordance with good installation practice, to enable the
product to function as intended and to prevent problems. Refer to your agent for installation
guidance.
Contact your agent to obtain a specification defining the acceptable levels of product
degradation with regard to EMC immunity.
1.4
Manufacturer’s Declaration of Conformance
The manufacturer declares that the product supplied with this document is compliant with the
essential protection requirements of the EMC directive 89/336 and the Low Voltage Directive
LVD 73/23 EEC. Conforming to the requirements of standards EN 55022 for emissions,
IEC801 parts 2, 3 and 4 for immunity and BS415 superseded by EN60950 for Electrical
Equipment safety.
2
Instruction Manuals
These instructions are for installing and setting up the ZTX6. Please read them in
conjunction with the other instructions included with your system:
1) BaxNet and Keyboard Installation Instructions - These instructions are provided
with your Keyboard.
2) The ZTX6/MOD instructions which contain instructions for assembling your ZTX6
HBZTX6-IN-4
Page 7
3
Unpacking
Keep your packaging for use if your ZTX6 is stored for a time or needs to be returned for
whatever reason. The packaging should contain:
ZTX6/STD
The base unit, 8 camera, 2 monitor, 8 alarm-input and 2 alarm-output
PSU4320 power supply
These instructions
ZTX6/MOD
An additional 8 camera, 2 monitor, 8 alarm-input expansion unit
Screws and extension bars
Assembly instructions
ZTX6/8M2
A ZTX6/STD base unit
These Instructions
PSU4320 power supply
A ZKX2/K with associated leads and connectors for connection to the ZTX6
ZTX6/16M4 - a ZTX6/8M2 (including ZKX2/K) and a single ZTX6/MOD
ZTX6/24M6 - a ZTX6/8M2 (including ZKX2/K) and 2 x ZTX6/MODs
ZTX6/32M8 - a ZTX6/8M2 (including ZKX2/K) and 3 x ZTX6/MODs
ZTX6/8M2/J
A ZTX6/STD base unit
These Instructions
PSU4320 power supply
A ZKX2/J with associated leads and connectors for connection to the ZTX6
ZTX6/16M4/J - a ZTX6/8M2 (including ZKX2/J) and a single ZTX6/MOD
ZTX6/24M6/J - a ZTX6/8M2 (including ZKX2/J) and 2 x ZTX6/MODs
ZTX6/32M8/J - a ZTX6/8M2 (including ZKX2/J) and 3 x ZTX6/MODs
Check the product code on the serial number label. If you have an incorrect item or it is
damaged then inform the suppliers and carriers immediately. If this is the case then do not
attempt to use your ZTX6.
Figure 1. Illustration of the ZTX6 range
HBZTX6-IN-4
Page 8
4
Accessories
ZTX6/MOD
This is an additional 8 camera-input, 8 alarm-input,
2 monitor-output module.
Adding subsequent ZTX6/MODs to an 8M2 converts it to a 16M4,
24M6 then a 32M8.
The maximum configuration for the ZTX6 is 32M8. Do not exceed this.
ZTX6/RMA3
The ZTX6/32M8 is 19” 3U standard rack mounting, all the smaller units are not unless fitted
to a ZTX6/RMA3 (Rack Mount Accessory, 3U).
The ZTX6/RMA3 is a steel plate with countersunk holes and screws to allow the attachment
of a ZTX6. The plate is the correct size for rack-mounting.
BAX-RKIT
Remote keyboard wiring KIT, for connecting a keyboard at a distance greater than 10 metres
from the main unit. Can also be used to connect multiple keyboards - includes keyboard
power supply, 2 x BAX-NAP (screw terminal to RJ45 adapters) 1 x BAX-NIL1 and 1 x BAXNILA (see below).
BAX-NIL1
1 metre lead, RJ45 to 6-pin-mini-din
BAX-NIL-2/RJ
2 metre lead, RJ45 to RJ45
BAX-NIL4
4 metre lead, RJ45 to 6-pin-mini-din
BAX-NIL9
9 metre lead, RJ45 to 6-pin-mini-din
These leads are for connecting your ZKX2 keyboard to the ZTX6, ZMX matrix or ZMX Plus.
BAX-NILA
1 metre lead, 2 x 6-pin-mini-din
This lead is for connecting local main-units together. It only makes the network connections.
ZT-TP1, ZT-TP4, ZT-TP8
The ZT-TPs connects between your transmitter and receiver in your coaxial line. They
convert the Coaxial-telemetry into 20mA-current-loop-twisted-pair telemetry (for use with, for
example, free-space transmission systems.) Current Baxall receivers accept both 20mA
twisted-pair telemetry and coaxial-telemetry.
The ZT-TP1 is a single module, the ZT-TP4 is 4 x ZT-TP1s with a single power supply and
the ZT-TP8 is 8 x ZT-TP1s with a single power supply.
HBZTX6-IN-4
Page 9
5
Description
The ZTX6
The ZTX6 is a modular switching matrix which transmits coaxial-telemetry to the camera
positions. It is controlled by a keyboard. You should read the keyboard installation
instructions for information on how to connect the ZTX6 to the BaxNet network (the network
over which the ZTX6 is controlled). A schematic for a simple installation is shown below.
Telemetry
The ZTX6 telemetry can control pan, tilt, focus, iris, zoom, five latching auxiliaries AUX1
(Camera power), AUX3 (Auto-pan), AUX 4 (activated by the Electronic zoom key), AUX5
(Lamps), AUX6 (Wipe) and one momentary auxiliary AUX2 (Wash). It can also set or call 8
preset positions either automatically (as a result of an alarm) or manually.
Menus
Your ZTX6 has on-screen menus which allow it to be adapted to different installations. They
are accessed using a password (which can be changed) and then they can be used to
change the Unit ID, Camera Sequences, Camera titles, Telemetry Type, Password and
Alarm settings.
Alarm Connections
The ZTX6 has 2 alarm output connections which can have either normally-open or normallyclosed operation. It also has a single alarm input per camera input although, they are not
dedicated to particular cameras. Alarm input connections can be normally-open or normallyclosed and are assigned to programmable alarm responses.
HBZTX6-IN-4
Page 10
Responses
Responses define what will happen when an alarm occurs. Many responses can be defined
and any alarm input can have any response allocated to it. An event message received over
the network can also call a response. A response can broadcast an event message onto the
network. In this way, the alarms across several units can operate together. Responses can:
switch cameras to monitors selecting a preset on each; sound a keyboard buzzer; set either,
none or both of the alarm output relays; and display a message on a monitor.
Camera Sequences
Your ZTX6 supports 8 separate sequences of 16 cameras with individual dwell-times (from 1
to 255 seconds). A sequence is a pre-defined list of cameras viewed in order (on the
monitor) for a pre-defined dwell time. All the sequences are user defined in the menu
system. Any sequence can be viewed on any monitor.
Future Expansion
Your ZTX6 can be expanded by the following methods:
1. Fit an expansion module (ZTX6/MOD) up to a maximum of 32 cameras, 8
monitors.
2. If your current ZTX6 is full (ZTX6/32M8) then you may fit further ZTX6s on the
BaxNet network
Coaxial Cable Lengths
The coaxial telemetry used by your ZTX6 allows for coaxial cable runs of up to 600m on
appropriately specified cable. At the longer distances, towards 600m, the video reception
starts to degrade. The ZR-minis have a built-in launch amplifier this can be adjusted by
turning the gain and lift pots on your ZR-mini (see your ZR-mini instructions).
HBZTX6-IN-4
Page 11
6
Installation
6.1
Assembly
Assembling the main unit from a combination of ZTX6/MODs and a ZTX6/8M2 is described
in the ZTX6/MOD instructions included separately with every ZTX6/MOD.
6.2
Video Connections - Standard
All video must be 1 V pk-pk composite via 75 ohm coaxial cable with BNC connectors.
• Connect coaxial cable terminated with BNC connectors from your ZTX6 camera
inputs
to your cameras or receivers (refer to receiver manual).
• Connect coaxial cable terminated with BNC connectors from your ZTX6 monitor
outputs
6.3
to your monitors and VCRs
Video Connections – Loop-through
Loop-through allows you to use a camera input for another application such as a dedicated
monitor or VCR.
To allow you to use the video-signals for other applications the camera inputs have
switchable 75 ohm terminations (Hi-Z represents high-impedance). These are mounted on
the 8-way dip switch between the 2 monitor outputs and the 8 camera inputs. The numbers
on the dip-switch correspond to the camera input numbering.
You can use the video line with more than one application although the line must have 75
ohm termination at the end (and nowhere else). So if you are connecting the video to your
ZTX6 and then on to, for instance, a monitor or a VCR then switch the relevant switch on the
ZTX6 to Hi-Z and ensure the other unit 75-ohm-terminates the line.
If the ZTX6 is at the end of the line and the other unit is connected in first then ensure that
the termination is switched off on the other unit (refer to the unit instructions) and leave the
ZTX6 input 75 ohm terminated.
Note:
A BNC T-piece is not practical here because of the limited space between the BNCs,
a BNC F-piece is preferable.
HBZTX6-IN-4
Page 12
6.4
Alarm Input Connections
The ZTX6 has the same number of alarm inputs as camera inputs (they are not dedicated to
the corresponding camera input). On each module they are numbered on the graphic from 1
to 8 (see Figure 5 on page 17). They are actually numbered in the same way as the
cameras, the base unit (ZTX6/8M2) contains inputs 1 to 8, the first additional module
(ZTX6/MOD) contains inputs 9 to 16 (but labelled 1 to 8), the second 17 to 24 and the third
25 to 32 (see Figure 5).
Electrically the alarms operate from volts-free relay closures (or openings) and the inputs
can be individually configured in the on-screen menus to respond to normally-open or
normally-closed contacts.
•
•
•
Remove the 5-way terminal block
Connect from each terminal to your alarm relays (see Figure 2)
Group the returns and lead them into the common connection
The alarm-input connections are normally-open as a default. If you are connecting normallyclosed alarms do not connect your alarm terminal-blocks yet wait until you have changed the
alarm configuration in the on-screen menus.
1
5
2
6
3
7
4
8
C
C
C is the common
or return connection
Figure 2. Alarm Input Connections
6.5
Alarm Output Connections
The base unit has 2 alarm output contacts as shown below. Each alarm input on your ZTX6
can be set to trigger one or the other, both or neither in the on-screen menus. The output
relays can be set to normally-open or normally-closed individually in the on-screen menus.
They are normally-open as a default.
CAUTION: Normally-closed alarm-output-relays are reliant on a power-supply.
When the unit is switched off they immediately revert to the open state.
The relays switch a maximum of 30V, 2A each.
1
relay 1
2
relay 2
Figure 3. Alarm Output Relay Connections
• Wire your alarm output devices according to Figure 3.
HBZTX6-IN-4
Page 13
6.6
Connecting the Network Keyboard
These are described in the keyboard instructions as are the BAX-RKIT for expanding the
network.
Connect the keyboard using the RJ45 connector.
CAUTION: Each of the modules on your BaxNet network have an address. If two units share
the same address then the network will not work. The ZTX6 address is set in the on-screen
menus.
The keyboard has built in network termination and/or biasing. For most small to medium
sized installations, it should not be necessary to change the switches from their default
settings. Only for large installations should your network require biasing and/or terminating.
Contact Baxall Security Limited for advice. The switches are located on the front of your
ZTX6. The default setting for switches 1, 2 and 3 is OFF. Switch 4 is not used.
Network setting
Switch 1
Switch 2
Network setting
Switch 3
Biased
Not Biased*
ON
OFF*
ON
OFF*
Terminated
Not Terminated*
ON
OFF*
6.7
Connecting the Power
Your ZTX6 is supplied with a 230V ±10%, 47 - 63Hz AC to 12V DC PSU. It is fitted with a
non-removable power cord which must be terminated with a suitable three pin mains plug.
REFER TO WIRING INSTRUCTION LABEL ATTACHED TO MAINS LEAD. Provision for
secure isolation from the mains in accordance with your national wiring regulations must also
be provided.
• Connect your ZTX6 and keyboard
• Switch on the power
For the first 5 seconds after the power is initially connected the keyboard LCD should display
something like:
Baxall Security
ZKX3/K Vx.x 9600
(The number x.x indicates the software version)
And the monitors should display:
ZTX6 MKII VERSION : 1.xx
BY
BAXALL SECURITY LTD
UNIT ID 9
FIRMWARE VER : wwxxyyzz
HBZTX6-IN-4
Page 14
(The number 1.xx indicates the ZTX6 software version, usually different from the ZKX2)
Notice also that the Unit ID for your ZTX6 is displayed here. Make a note of it.
• Check that your connections are correct by running through the tests outlined in
the next section.
HBZTX6-IN-4
Page 15
7
Testing Your Installation (Basic Operations)
7.1
The ZKX2 Keyboard
Your ZTX6 can be operated using the ZKX2 and ZKX2/J keyboards. The key functions are
shown below. Your ZTX6 will operate with ZKB1 keyboards in addition to ZKX2 keyboards.
However, proportional control is only available with the ZKX2/J keyboard when used with
ZTX6 v1.04 software or above.
Menu
Alarm
Acknowledge
Escape
1
Preset
Select
Sequence Select
2
3
4
5
6
7
8
9
1
Focus
Iris
3
A
Telemetry
Auxiliaries
4
Unit Select
2
Telemetry
Enable
5
6
Zoom
Enter
F
Shift
Macro
function
Select
0
Monitor
Select
Camera
Select
Pan and Tilt
(Joystick or Control Disk)
Figure 2 ZKX2 and ZKX2/J key functions
HBZTX6-IN-4
Page 16
7.2
Selecting your ZTX6
If you are installing 2 or more ZTX6s on the network then connect them one at a time and
change the Unit ID (see section 9.15 on page 37) so that they do not clash. The current
ZTX6 Unit ID is displayed on power-up.
ZTX6 MKII VERSION : 1.xx
BY
BAXALL SECURITY LTD
UNIT ID 9
FIRMWARE VER : wwxxyyzz
To select your ZTX6 the first time you power up
• Enter the Unit ID number followed by
+
.
Your keyboard should now be controlling your ZTX6. To change the keyboard Unit ID refer
to the keyboard instructions.
7.3
Selecting a Monitor
The monitors are numbered as shown in Figure 5.
• Select a monitor by entering the monitor number and pressing
This is now the current monitor and all camera selections apply to it.
Figure 4. Camera and monitor numbering convention
HBZTX6-IN-4
Page 17
7.4
Selecting a Camera
The cameras are numbered as shown in Figure 5.
• Select a camera by entering the camera number and pressing
7.5
.
Starting A Sequence On The Current Monitor
Once the sequences have been set up in the menu system.
• Start the sequence by entering the sequence number and pressing
• Stop a sequence by selecting a camera
7.6
To Operate The Telemetry
Select a monitor and a camera as shown above, ensure that a sequence is not running and
press any telemetry key. If telemetry is available on the current camera then the LED should
light. If it does not you may have telemetry disabled in the Camera/Rx menu (see section
9.3).
The telemetry keys are shown in Figure 4 with a description of their functions.
An additional auxiliary, AUX 4, is available on the ZTX6. AUX 4 is activated using the AUX 4
key A .
7.7
To Send A Global Auxiliary Command
• Press and hold the global key
and press the desired auxiliary key
The auxiliary command is sent to every receiver output in turn.
7.8
Selecting a Preset
At this stage the presets have not been set, however, ZR-mini receivers are supplied with
random presets to allow checking.
• Select a preset by entering the preset number and pressing
To set a preset see section 9.11.
7.9
To Acknowledge an Alarm
• Select the monitor which is displaying the alarm
• Press the alarm Alarm Acknowledge key
.
HBZTX6-IN-4
Page 18
8
Using The On-Screen Menus
8.1
Introduction
The menus are used to configure your ZTX6. The main menu is shown below followed by a
brief description of each of the sub-menus.
0 Main menu
Set new password menu
Alter sequence menu
Camera/Rx menu
Alarms menu
System settings menu
Keyboard menu
Installer setup menu
Exit menu
Set new password menu
Change the operator and/or installer passwords.
Alter sequence menu
Set up the camera sequences with lists of cameras and dwell times. There are 8 sequences.
Camera/Rx menu
Camera input and receiver enable, set camera titles, receiver options (telemetry type and
preset type).
Alarms menu
Decide alarm display modes (NONE, LAST, STACK, SWITCH and ROTATE),
Decide responses to alarms and network events,
Enter messages for display during responses,
Decide the sense of alarm inputs and alarm outputs (normally-open or normally-closed) and
Choose how the alarms are reset:
TRANSP.
(contact-closure),
TIMEOUT
(time-out) or
ACK
(manual reset) and
Decide the state the system returns to on completion.
System settings menu
Enable/disable preset setting mode and position the on-screen displays.
Keyboard menu
Defines which monitors, cameras and camera telemetry an individual keyboard can access.
HBZTX6-IN-4
Page 19
Installer setup menu
This menu is only active if you have entered under the installer password. It displays the
software and firm-ware version numbers (also displayed on power-up). It also allows you to
view and set the Unit ID, store and restore user defaults and set the ZTX6 to factory
defaults.
Exit menu
Offers 3 options:
Save and Exit - this saves all your changes and returns to normal operation
Exit without saving - returns to normal operations with original settings
Return to the menus - returns to the menus
Note:
If you choose not to save in the exit menu then the system switches back to the
previous settings.
8.2
Passwords
Each time you enter the menus you require a password. Your ZTX6 has two different
passwords (both of which can be changed) one called the ‘installer password’ which allows
access to installer functions, and a second called the ‘user password’ for end-users.
CAUTION: Your ZTX6 is supplied with the default passwords, we recommend that you
change them immediately to prevent this manual becoming a risk to security.
The passwords can both be changed in the menu system see section 9.1.
The default passwords are as follows:
Initial User password:
,
,
,
Initial Installer password: 1, 6, 9, 2
HBZTX6-IN-4
Page 20
8.3
Entering The Menu System
The menu system is entered using the menu key
and the Shift key
key and the Menu key then enter your 4 digit password at the prompt:
. Press the Shift
Password Validation
****
Enter Password
If your password is incorrect then the following message is displayed.
Password Validation
Enter Password
****
Validation Failed
Hit ENTER to continue
Press the ENTER key and try again.
8.4
Moving Around And Selecting Options
If you are viewing a menu then use the up-arrow and down-arrow to move to the required
option. The current option flashes. Press Enter to accept the option and move to the next
menu.
8.5
Entering Numbers
If you are editing a number,
• Select the field using the up-arrow and down-arrow
• Type in a number using the numeric keypad and the
• Press enter Enter to accept your input
HBZTX6-IN-4
and
keys as spaces
Page 21
8.6
Changing Fields With A Set List Of Options
Fields which contain a list of options are capitalised. For example in Figure 6 the fields ‘Input
preset’, ‘Rx attached’, ‘Telemetry mode’ and ‘Preset mode’ all have a list of options which
are accessed using the left-arrow and right-arrow keys (see section 9.3 for details of the
options).
3 Camera/Rx menu
Camera number :
Title
Camera 19
Input present :
Rx attached
:
Telemetry mode :
Preset mode
:
19
YES
YES
STANDARD
ENHANCED
return to main menu
Figure 5. Menu demonstrating that option fields are capitalised
8.7
Entering And Changing Text
The text editor uses the following keys. Note the ZKX2 has a control disk and the ZKX2/J
has a Joystick.
Key stroke
Action
left-arrow, right-arrow (or left/right Joystick)
move left, move right
up-arrow, down-arrow (or up/down Joystick)
previous, next field (finish editing)
†
and up-arrow (up Joystick)
z to a, Z to A, 9 to 0, comma, space etc.
and down-arrow (down Joystick)
a to z, A to Z, 0 to 9, comma, space etc.
and left/right-arrow (left/right Joystick)
delete character
and
delete whole field
,
<space>
and
home (move to start of field)
Numbers:
0,
7,
8,
9
jump to:
zero 0,
capital A,
lower-case a,
the first punctuation-mark ‘ , ’
†
‘and’ indicates hold together, comma indicates either-or
HBZTX6-IN-4
Page 22
8.8
Paging Between Screens
The sequence menu shown in Figure 7 is different for each sequence (Sequence number 5
is shown). To move between sequences either:
• Type a new sequence number, or,
• Use, page-up (while holding
press the up-arrow, or up Joystick) or
press the down-arrow, or down Joystick)
page-down (while holding
These move to the next/ last sequence and apply to other screens which have this format
such as the Camera/Rx menu in Figure 6.
2 Sequences menu
Sequence number : 5
-Element : camera/dwell time 1:03/02
7:07/ 05 13:13/05
2:05/02
8:08/ 05 14:14/05
3:32/01
9:09/05 15:15/05
4:02/02 10:10/05 16:16/ 05
5:01/05 11:11/05
6:06/02 12:12/05
Clear
Return to main menu
Figure 6. Sequence menu showing sequence 5
8.9
Exiting
To get to the exit menu either:
• Select and accept the Exit option in the main menu
or,
• Press the menu key from elsewhere in the menu system
Once in the exit menu:
• Choose from the three options shown below:
10 Exit menu
Save and exit menus
Exit without saving
Return to previous menu
Note:
If you choose not to save in the exit menu then the system switches back to the
previous settings.
HBZTX6-IN-4
Page 23
9
The Menus
9.1
Change Password Menu
CAUTION: Do not lose or forget your installer password because restoration of your system
may entail a visit by an Engineer.
To change the passwords:
• Select ‘Set new password menu’ using the up-arrow/down-arrow (or joystick) to
highlight then the Enter key to select.
1. Change password menu
Change user password
Change installer password
Return to main menu
• Select either ‘Change user password’ or ‘Change installer password’ using the up-
arrow or down-arrow (or Joystick) to highlight then the Enter key to select.
1.1 Change user password
Current password
New Password
****
Verification
The user can only change their own password. The installer can change their password and
also change the user password without knowing what the current user password is. To do
this:
• enter the current password (this is not required of an installer in the user password
menu)
• enter the new password twice
If the new password and the verification password match then the password changes. If the
password is not accepted:
• Press the Enter key to continue.
HBZTX6-IN-4
Page 24
9.2
Sequences Menu
The sequence menu is different for each of the 8 sequences (sequence number 5 is shown).
To move between sequences either:
• Type a new sequence number in the first field, or,
• Use, page-up, (
and up arrow or Joystick together) or page-down, (
and
down arrow or Joystick together)
2 Sequences menu
Sequence number : 5
-Element : camera/dwell time 1:03/02
7:07/05 13:13/05
2:05/02
8:08/05 14:14/05
3:32/01
9:09/05 15:15/05
4:02/02 10:10/ 05 16:16/ 05
5:01/05 11:11/05
6:06/02 12:12/ 05
Clear
Return to main menu
The settings shown above would perform the following sequence:
Start then:
- Camera 3 for 2 seconds
- Camera 5 for 2 seconds
- Camera 32 for 1 second
- Camera 2 for 2 seconds
- Camera 1 for 5 seconds
- Camera 6 for 2 seconds
- Cameras 7 to 16 for 5 seconds each, then, return to the start
Dwell-time is between 0 and 99 seconds (0 seconds skips the entry).
If you select Clear in the Sequences menu, the following menu is displayed:
2.2 Clear Sequence
Clear Sequence
Return to sequence menu
If you select Clear Sequence, the sequence is displayed with the settings camera numbers
and dwell times set to zero.
Each sequence can be run on any monitor (except an alarm monitor during an response
condition).
HBZTX6-IN-4
Page 25
The factory default setting is with sequences 1 and 2 defined already as, respectively,
cameras 1 – 16 and cameras 17 – 32, all with a dwell time of 5 seconds. The other
sequences are undefined.
9.3
The Camera/Rx menu
Where Rx = receiver.
Use
and up-arrow or Joystick (together) or
step through the camera inputs.
and down-arrow or Joystick (together) to
The line below the word Title can be edited using the text editor - see Section 8.7, Entering
And Changing Text.
3 Camera/Rx menu
Camera number :
Title:
Camera 19
Input present :
Rx attached
:
Telemetry mode :
Preset mode
:
19
YES
AC
STANDARD
ENHANCED
Return to main menu
Input present YES/NO
Select NO to prevent camera selection and stop the channel from being displayed.
Rx attached NONE/AC/DC
This option switches the telemetry on and off for that input, and specifies the type of
receiver (AC/DC) if one is present. If it is selected as AC/DC, telemetry is transmitted
when a telemetry key is pressed. The default setting for the Rx attached parameter is
AC for each input. That is, telemetry is switched on and the receiver type is AC. To
obtain the optimum performance from the system, particularly for the operation of
Global commands, each input should be correctly set to AC, DC or NONE.
Telemetry Mode STANDARD/ALTERNATE
See the trouble shooting section for an explanation. Standard suits most installations.
Preset Mode STANDARD/ENHANCED
The recommended mode is ENHANCED setting of presets. This mode is both faster and
more convenient. Its use is described in section 9.11.
Note: If you have a receiver manufactured before March 1996 then you must use
STANDARD mode. This is described in Appendix A.
HBZTX6-IN-4
Page 26
9.4
Alarm Main Menu
This menu and its sub-menus are concerned with alarms and network events.
4 Alarm main menu
Global alarm setup
Alarm responses
Event responses
Alarm monitors
Alarm input senses
Alarm output senses
Return to main menu
Alarms are triggered by the alarm inputs. Network Events are received from other units over
the network. Each alarm (max 32) or event (1 to 255) can be mapped to a response.
Responses display a title, sound the keyboard buzzer, move cameras to preset positions
and switch cameras to monitors. The responses can also be displayed and cleared in a
variety of ways, specified in the global alarm setup menu.
CAUTION: If you suspect that alarms were active during changes in the alarm menus (this
includes your changing the alarm-input contacts from N/O or N/C) then:
• Make all the necessary further changes,
• Save and exit (in the exit menu) then,
• Reset your system by removing the power for 5 seconds.
Your settings will not be lost.
Failure to do this may cause problems at a later date.
All the choices under the alarms main menu lead to further menus which are described in
the following sections.
HBZTX6-IN-4
Page 27
9.5
Global Alarm Setup Menu
This menu controls the overall alarm setup, how all the responses are reset, and the system
state to be returned to once all the responses are clear.
4.1 Global alarm setup menu
Mode
:SWITCH
Response mode
:ACK
End action
:NONE
Timeout time
:020s
Transp. mode timeout :005s
Return to alarm main menu
There are 5 display mode settings NONE, LAST, STACK, SWITCH and ROTATE. These
modes change dependent on the response modes which are ACK, TRANSP., and
TIMEOUT.
ACK - Acknowledge Alarm Responses
A response mode of ACK indicates that a response is active from the time the alarm is
triggered to the time it is manually cleared by an operator (select the monitor displaying the
).
response and press the Alarm Acknowledge key
TRANSP. - Transparent Alarm Responses
A response mode of TRANSP. indicates that a response is active until it is manually cleared
(as in ACK response mode) or until the alarm contacts return to their resting state. The
‘TRANSP. alarm timeout’ is the minimum time for which a transparent alarm’s response is
displayed if the contacts reset immediately.
TIMEOUT - Timeout Alarm Responses
A response mode of TIMEOUT indicates that the responses are active until they are cleared
(as in ACK response mode) or until they timeout according to the timeout period set in the
same menu. The timeout operates regardless of whether the alarm contacts have returned
to their resting state or not.
So, for each display mode you can have any of the above response modes. The display
modes are as follows:
NONE = alarms disabled
LAST = (Last In First Out) In this display mode each alarm is displayed on all the alarm
monitors (according to the alarm monitor list, section 0). The next response to arrive
replaces the current response (on all the monitors), although in TRANSP. or TIMEOUT
response mode the respective timeout periods must have passed first. This minimum
timeout is intended to ensure that no responses disappear immediately without being
observed. In ACK response mode, the responses disappear when a new alarm arrives. This
can lead to an alarm not being displayed. The current response is cancelled regardless of
whether the alarm contacts are still active.
HBZTX6-IN-4
Page 28
STACK = As each response arrives it is shown on the next available alarm-monitor
(according to the alarm monitor list, section 9.10). Once all the alarm-monitors are full the
next response is placed in a queue. When an response is cleared it is replaced by the next
response in the queue.
SWITCH = The first response is shown on all the alarm monitors. Once it is cleared the next
response is displayed on all alarm monitors.
ROTATE = This is the same as SWITCH however subsequent responses are cycled in a
sequence which uses the ‘Transp. alarm timeout’ as its dwell-time. Rotate does not work in
TRANSP. or TIMEOUT response modes and must be used in the ACK response mode.
Note: in rotate mode the alarm outputs are disabled.
End action
This can be set as RETURN or NONE. RETURN will return the monitors to their pre-alarm
states when the alarms are cleared. NONE will leave the monitors in their alarm states.
9.6
Alarm Monitors Menu
Use this menu to select which monitors the responses are displayed on. The options are
DISPLAY/NO DISPLAY per monitor.
In LAST, SWITCH and ROTATE display modes, the current response is displayed on all the
monitors selected here. In STACK display mode, the first response is displayed on the
lowest numbered monitor selected here, the second on the second lowest etc. As the
responses are cleared the next response (next response which had no monitor to display on)
drops onto the monitor which contained the response just cleared.
4.5 Alarm monitors menu
Monitor number 1: DISPLAY
2: NO DISPLAY
3: NO DISPLAY
4: NO DISPLAY
5: NO DISPLAY
6: NO DISPLAY
7: NO DISPLAY
8: NO DISPLAY
Return to alarm main menu
HBZTX6-IN-4
Page 29
9.7
Alarm Input Senses Menu
• Select between N/O (Normally-Open) and N/C (Normally-Closed).
Note:
The alarms altered here will trigger responses when you exit the menu system.
Cancel them by selecting the relevant monitor and pressing the Alarm Acknowledge
key
.
Observe the caution on triggering alarms whilst adjusting the alarm settings on page 27.
4.6 Alarm input senses menu
Alarm number 01: N/O
02: N/O
03: N/O
04: N/O
05: N/O
06: N/O
07: N/O
08: N/O
Return to alarm main menu
9.8
Alarm Output Senses Menu
CAUTION: Normally-closed alarm-output-relays are reliant on a power-supply. When the unit
is switched off they immediately revert to the open state.
• Select between N/O (Normally-Open) and N/C (Normally-Closed).
4.7 Alarm output senses menu
Relay number 1: N/O
2: N/O
Return to alarm main menu
HBZTX6-IN-4
Page 30
9.9
Response Mappings (Alarm Responses, Event Responses)
Alarms (1 to 32) and network events (1 to 255) are mapped onto the responses in the
following menus. There are 32 responses available (see section 9.10).
An event is a network message received from another unit. Your ZTX6 can also generate
them as part of its response (see section 9.10.).
• Use
and the up-arrow or Joystick; or
step through the alarms/events
and the down-arrow or Joystick to
or,
• type the number in the first field.
4.3 Alarm responses
4.4 Event responses
Alarm:Response
Event:Response
01:005
02:003
03:032
04:002
05:016
06:018
07:015
08:002
Return to alarm main menu
001:022
002:027
003:031
004:035
005:014
006:002
007:008
008:007
Return to main alarm menu
• Use the up-arrow/down-arrow keys or Joystick to select the response you want to
change.
• Use the left-arrow/right-arrow keys or Joystick to position the cursor then type, 0
(zero for no-response), or 1 to 32 (responses 1 to 32).
• Setup the responses according to section 9.10.
HBZTX6-IN-4
Page 31
9.10 Response Setup
Responses are triggered by alarms or network events (see section 9.9). They display a title;
switch a camera to the alarm monitor; move it to a preset position; generate a network
event; activate the alarm-output relays; and generate an audible warning at the keyboards.
To step through the 32 responses:
• Use
and the up-arrow key or Joystick; or
Joystick.
and the down-arrow key or
or,
• type the number in the first field.
4.2 Response setup
Response number
Title:
Alarm 1
Switch to camera
Camera preset
Generate event
Activate relays
Generate sound
:01
:01
:00
:255
:1 ONLY
:SHORT
Return to alarm main menu
To change the settings:
• Use the left-arrow/right-arrow key or Joystick to select the field you want to
change.
• Change the title using the text editing described in section 8.7
• Select the camera, the preset and any network events (1-255) in the next 3 fields.
Zero represents no action. See section 9.11 for setting presets.
• Select the alarm-output relays in the ‘Activate relays’ field (‘1 ONLY’, ‘2 ONLY’, ‘1
AND 2’ and ‘NONE’).
• Select the urgency of the keyboard beep in ‘Generate sound’ options are ‘NONE’,
‘SHORT’, ‘MEDIUM’ and ‘LONG’. The beep sounds on all keyboards.
To respond to events from other ZTX6s or ZMXs on the network see the Event responses
menu in section 9.9.
HBZTX6-IN-4
Page 32
9.11 System Settings Menu: Setting Presets
Presets are preset camera positions. A typical receiver has 8 of these. Some receivers do
not have any, check your receiver before beginning.
You can program presets with a different transmitter and call them from the ZTX6 because
they are stored in the receiver. Because of this, if you are using the ZTX6 as a replacement
transmitter then you do not always need to change the presets.
This section describes Enhanced mode preset setting. The type of preset setting
(STANDARD/ENHANCED) is set for each camera under the Camera/Rx menu, see section
9.3. The default is ENHANCED.
Note: Baxall receivers manufactured before March 1996 are not compatible with Enhanced
mode preset programming. If you have an earlier version then try Standard mode preset
programming as described in Appendix A or contact your Agent.
To enable ‘preset setting mode’:
• Change the ‘Program preset’ menu item to be YES in the System data menu
(below)
5 System settings menu
Program preset : YES
Set title positions
Time and date settings
Return to main menu
To set a preset in Enhanced mode:
• Select the camera
• Press the telemetry key
• Adjust Pan, Tilt, Focus and Zoom
• Press
F
, the preset number (1 to 8), then the preset key
.
The preset is now stored.
Note:
To prevent presets being set by operators, return to this menu and set ‘Program
preset’ to NO.
HBZTX6-IN-4
Page 33
9.12 Display Line Menu: Changing On-Screen Text Position
From menu 5, System settings menu, selecting ‘Set title positions’ to give the menu shown
5.1 Display line menu
Camera title
Messages
Alarm title
Telemetry
Time/Date
Preview display
:
:
:
:
:
LINE 1
LINE 2
LINE 3
LINE 10
LINE 11
Return to setup menu
below:
• Select each field using the up/down-arrow keys or Joystick.
• Change the values using the left/right-arrow keys or Joystick.
• Preview the display position by selecting ‘Preview display of titles’ using the Enter
key, which may look like this:
Camera title here
Messages here
Alarm titles here
T
Time/Date
Exit
• Select Exit to return to the Display line menu again.
The default setting for the Time/Date parameter is OFF.
9.13 System Settings Menu: Time and Date Settings
When the Time and date settings option is selected from the System Settings Menu, the
Time and date menu is displayed:
5.2 Time and date menu
Time format: 12 HRS
Date format: DD/MM/YY
Set time
HH:MM:SS 24HR
02:56:54
Set date
DD/MM/YYYY
01/01/2000
Apply new time and date
Exit
Time format: 12 HRS/24 HRS
This option switches the display format for the time from 12 to 24 hour format.
Note:
Even if this format is set to 12 HRS, the time that is specified in the Set time option in
the same menu must always be 24 hour format.
HBZTX6-IN-4
Page 34
Date format: DD/MM/YY, MM/DD/YY or YY/MM/DD
This option switches the display format for the date between DD/MM/YY, MM/DD/YY or
YY/MM/DD format.
Note:
Even if this format is set to MM/DD/YY or YY/MM/DD, the date that is specified in the
Set date option in the same menu must always be DD/MM/YY format.
Set time
This option sets the system time. Use the up and down arrow keys or joystick to move
between the HH, MM and SS fields. Type in the required numbers as described in section
8.5, remembering that the input format is 24 HRS, HH/MM/SS.
Note:
The internal clock of this unit should be used as a guide only. For total accuracy, the
unit must be used with an external clock.
Set date
This option sets the system date. Use the up and down arrow keys or joystick to move
between the DD, MM and YYYY fields. Type in the required numbers as described in section
8.5, remembering that the input format is DD/MM/YYYY.
Apply new time and date
This option sets the system time and date according to the values specified in the Set time
and Set date options.
HBZTX6-IN-4
Page 35
9.14 Keyboard Main Menu: Limiting Access Rights
Each keyboard can be given access to cameras, monitors and receivers (i.e. camera
movement) on an individual basis.
7 Keyboard main menu
Keyboard - monitor access
Keyboard - camera access
Keyboard - receiver access
Return to main menu
7.1 Keyboard-Monitor Access
7.2 Keyboard-Camera access
Monitor number :1
Keyboard 1 :ALLOWED
Keyboard 2 :BARRED
Keyboard 3 :BARRED
Keyboard 4 :BARRED
Keyboard 5 :BARRED
Keyboard 6 :BARRED
Keyboard 7 :BARRED
Keyboard 8 :BARRED
Return to previous menu
Camera number :01
Keyboard 1 : ALLOWED
Keyboard 2 : BARRED
Keyboard 3 : BARRED
Keyboard 4 : BARRED
Keyboard 5 : BARRED
Keyboard 6 : BARRED
Keyboard 7 : BARRED
Keyboard 8 : BARRED
Return to previous menu
This menu gives access to 3 further menus:
7.3 Keyboard-Rx access
Receiver number : 01
Keyboard 1 :ALLOWED
Keyboard 2 :BARRED
Keyboard 3 :BARRED
Keyboard 4 :BARRED
Keyboard 5 :BARRED
Keyboard 6 :BARRED
Keyboard 7 :BARRED
Keyboard 8 :BARRED
Return to previous menu
•
and the up-arrow key or Joystick; or
and the down-arrow key or Joystick to
Use
step through the monitors/cameras/receivers or type the number in the first field.
•
For each keyboard choose between ALLOWED and BARRED for each
monitor/camera/receiver.
HBZTX6-IN-4
Page 36
The default setting is ALLOWED for every one.
Note:
If, in the Camera/Rx menu you have selected ‘Input present : NO’ or ‘Rx attached
: NO’ then it is not necessary to also set them to BARRED here.
9.15 Installer Setup menu - Version Numbers
This menu displays software and firmware version numbers, and allows
storage of your own default system settings
changes to the Unit ID
restoration of the factory defaults
swapping of zoom buttons for ZTX5 replacement.
Receiver tuning mode is only used in special circumstances. Its function is to leave the
telemetry running continuously by sending a WIPE command once per second until it is
deactivated.
8 Installer Setup menu
Software Version :1234
Firmware Version :56789ABC
Unit ID : 09
Save to user defaults
Restore user defaults
Restore factory defaults
Receiver tuning mode
Zoom swap :NO
Return to main menu
To change the Unit ID:
CAUTION: if you change the Unit ID you must ‘Save and Exit’ the menus then, reset your
ZTX6 by removing the power for 5 seconds. You will not lose any settings.
•
•
•
•
Select the field using the up/down-arrow keys or joystick
Type the new Unit ID on the numeric key-pad
Exit the menus using the ‘Save and Exit’ option
Reset your system by removing the power for 5 seconds
Your settings will not be lost.
To store your own default system settings:
• First setup all the camera titles, monitors, alarms etc.
• Select ‘Save to user defaults’
To restore system settings to the user defaults:
• Select ‘Restore user defaults’
To restore system settings to the factory defaults:
• Select ‘Restore factory defaults’
HBZTX6-IN-4
Page 37
Note:
After restoring to defaults you will have to select your ZTX6 again if the Unit ID has
changed. The Unit ID is displayed on the initial power-up/reset screen.
To select Receiver tuning mode:
• Select Receiver tuning mode. This displays the Tuning mode menu:
• Select the Receiver number option and specify the number of the receiver.
8.4 Tuning mode menu
Receiver number 01
Start tuning mode
Return to setup menu
• Select the Start tuning option to start transmitting the WIPE commands.
To swap the zoom keys:
• Select Zoom swap
• Select YES to change the operation.
HBZTX6-IN-4
Page 38
10
Trouble-Shooting
I get interference on my picture/recording when I operate the telemetry.
If the interference appears when you attempt to move a camera (send telemetry). Then you
may want to use ALTERNATE instead of STANDARD telemetry. STANDARD telemetry can
interfere with the on-screen displays on some equipment.
Telemetry is available in two types which can be changed on individual inputs. STANDARD
which operates on all Baxall receivers and ALTERNATE which only operates on ZR-mini
receivers.
Changing the telemetry type is described in section 9.3.
What happens to my settings when I attach a ZTX6/MOD?
The settings for your ZTX6 are stored in the base module so that attaching the extra
ZTX6/MOD (up to a maximum of 3) does not affect any of the previously saved settings. The
extra 8 camera inputs, alarm inputs and the extra 2 monitors will need setting up in the
menus.
I need to contact my agent for technical support
Always have the versions numbers and purchase dates of all your units to hand when you
phone technical support. It can save time.
The Keyboard version number is displayed on the LCD at power-up.
The ZTX6 version numbers are displayed either in the Installer menu or on the power-up
screen.
8 Installer Setup menu
Software Version :1234
Firmware Version :56789ABC
Unit ID : 09
Save to user defaults
Restore user defaults
Restore factory defaults
Receiver tuning mode
Zoom swap :NO
ZTX6 MKII VERSION : 1.xx
BY
BAXALL SECURITY LTD
UNIT ID 9
FIRMWARE VER : wwxxyyzz
Return to main menu
The numbers ‘1.xx’ and ‘wwyyxxzz’ indicate the ZTX6 software and firmware versions,
(different from the ZKB1).
HBZTX6-IN-4
Page 39
11
ZTX6 Specifications
Product Codes
Code
ZTX6/8M2
Description
8 camera input, 2 monitor output (base module)
ZTX6/16M4
16 camera input, 4 monitor output
ZTX6/24M6
24 camera input, 6 monitor output
ZTX6/32M8
32 camera input, 8 monitor output
ZTX6/STD
base module without a ZKB1
Notes:
1. The ZTX6/8M2 module is the base module. Adding subsequent ZTX6/MODs
to an 8M2 converts it to a 16M4, 24M6 then a 32M8
2. Each camera input is also a coaxial-telemetry output
3. For each camera input there is an alarm input. They are not necessarily
linked.
4. All main units are supplied with a keyboard
Features
Upgradeable in the field in 8 camera 2 monitor steps
Operated by ZKB1, ZKX2/K and ZKX2/J keyboards over the BaxNet Network
On-screen setup menus
Multi-monitor alarm handling
2 levels of password security for system settings
Expandable up to 32 video inputs by 8 video outputs
Responds to and sends network events to other BaxNet modules
The BaxNet Network
This is specified in the manual included with your keyboard
Inputs and Outputs
Video inputs individual enable/disable
8, 16, 24 or 32 video inputs with switchable termination.
2, 4, 6 or 8 video outputs
2 alarm outputs on the base module (individually N/O or N/C)
8 alarm inputs with each 8 camera inputs (individually N/O or N/C)
9 to 15 V DC power supply input
Cables and connectors available as BAX-RKIT
HBZTX6-IN-4
Page 40
Telemetry
Baxall Coaxial Telemetry as defined by the Baxall Telemetry Standard
Outputs individually selectable STANDARD/ALTERNATE telemetry
Outputs individually selectable STANDARD/ENHANCED preset setting
Pan and Tilt, Focus, Iris and Zoom
Auxiliaries: Camera power, Wash, Wipe, Lamps, Auto-pan, AUX 4 (all individual or
global)
Sequencing Operations
8 x 16 step sequences, adjustable dwell time (0 to 99 seconds) for each camera in
each sequence.
Alarm Responses
Global enable/disable
Switch camera to monitor, select preset.
Display a response title
Trigger alarm outputs
Output network message (event)
4 different display modes,
3 different clearance modes
ACK, Acknowledge (active until manually cleared)
TRANSP, Transparent (contact reset or manual acknowledge)
TIMEOUT, Timed-out (active until timed-out or acknowledged)
System Security
4-digit Password, 2 levels plus basic operation gives 3-levels of security.
Dimensions
ZTX6: Depth 50 mm, Height 132 mm
ZTX6 model
8M2
16M4
24M6
32M8
Length:
215 mm
304 mm
393 mm
482 mm
Weight:
0.9 kg
1.4 kg
1.9 kg
2.4 kg
The ZTX6/32M8 is 19” 3U standard rack mount equipment.
The Accessory - ZTX6/RMA3 is available to convert the smaller units to 19” 3U
standard rack mount equipment.
Material
Mild-steel and aluminium
Colour
ZTX6: Graphite-grey, blue lettering
Temperature Specification
Operational temperature limits:-10°C to +50°C at 10% to 80% relative humidity (non-condensing)
Storage temperature limits:-20°C to +60°C at 10% to 95% relative humidity (non-condensing)
HBZTX6-IN-4
Page 41
Electrical Specification
All Video Inputs and Outputs
All video: 1V pk-pk composite video via 75 ohm BNC connectors.
Alarm Inputs
Work with volts-free-relay type alarms.
Individually N/O or N/C switchable in on-screen menus
Alarm Outputs
Volts-free contacts max 30V, max 2A
Network Wiring
This is specified in the manual included with your keyboard
Video Signals
All video 1 V pk-pk composite video via 75ohm coaxial cable with BNC connectors.
Power
Power Consumption: Maximum 11VA between 9 and 15 V DC (ZTX6/32M8 with two
centrally powered keyboards)
Power Supply: 230V ±10% at 47 to 63Hz AC to 12V DC
HBZTX6-IN-4
Page 42
Appendix A
Setting Presets in Standard Mode
Note:
Check that you have a preset camera head and the feedback connections are made,
otherwise presets will not operate.
Note:
The type of preset setting (STANDARD/ENHANCED) is set for each camera under
the Camera/Rx menu, see section 9.3. The default is ENHANCED change this to
STANDARD before following the procedure detailed below.
To enable ‘preset setting mode’:
•
Change the ‘Program preset’ menu item to be YES in the System data menu
(below)
5 System settings menu
Program preset : YES
Set title positions
Time and date settings
Return to main menu
To set presets by the standard method, starting with preset 1:
1. Hold ON the CAMERA-POWER and WASH keys and toggle the WIPE
function 4 times, this calls the first preset (your ZR4-mini has 8 presets.)
2. Pan, Tilt, Focus and Zoom the camera as desired for this preset.
3. If you want to store the position press either IRIS control, if not, go on to step
4.
4. Toggle LAMPS ON and OFF to select the next preset
5. Repeat steps 2, 3 and 4. After preset 8 your ZR4-mini returns to its normal
operating mode.
Note:
To prevent presets being set by operators return to this menu and set ‘Program
preset’ to NO.
Note:
Standard mode is the only mode available to ZR4-mini receivers manufactured before
March ‘96. It is preferable to use Enhanced mode wherever possible as this is a faster
and more convenient method.
HBZTX6-IN-4
Page 43
NOTES
HBZTX6-IN-4
Page 44
%D[DOO/LPLWHG
Stockport, England
Visit our Web site:
http://www.baxall.com
Baxall Security Ltd. Reserve the right to make changes to the product and specification of the
product without prior notice to the customer.
HBZTX6-IN-4
Page 45
11/98