1
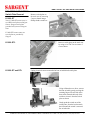
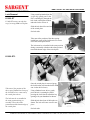
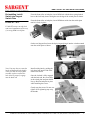
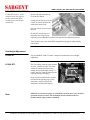
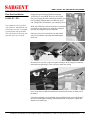
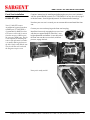
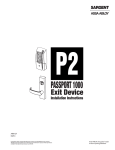
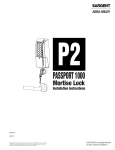
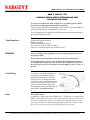
BMW K 1600 GT / GTL SEAT INSTALLATION GUIDE
BMW K 1600 GT / GTL
SARGENT WORLD SPORT PERFORMANCE SEAT
INSTALLATION GUIDE
To protect your heated seats from wiring, lock or key damage, please read all
instructions carefully before beginning this installation.
Your new Sargent Seat has been designed to allow owners to use their OEM keys
on their new Sargent Seat. No additional keys to carry!
These instructions are for installing your OEM heat switch and lock set into your
new Sargent World Sport Seat.
Tools Required
Smooth protected work surface
Phillips screwdriver
Small slot/flathead screwdriver
Size T20 Torx driver (K 1600 GTL only)
Paper clip or similarly shaped tool (K 1600 GT only)
WARNING
Your rear Sargent Seat is supplied to you with a zip tie holding the latch rod
and spring in place.
Do not remove zip tie until instructed to do so later in these instructions.
Do not attempt to use your key in the lock until these installation instructions
are complete and the zip tie has been removed. Any attempt to use your key in
the lock before the zip tie is removed may result in damage to your key and / or
the lock.
Test Fit Key
Note
A test fit key is provided and allows for
installing and test riding the Sargent
World Sport Performance seat on the
motorcycle prior to changing the lockset. The key can be inserted into the open
lock bezel assembly to release the seat
once it has been locked in place, thus
eliminating the need for the OEM key for
seat removal. For limited use only.
Test Key
K 1600 GTL owners
An additional, optional purchase of BMW part #77348520028 is recommended by
BMW for those GTL owners who wish to convert from the one-piece OEM seat to
the two-piece OEM seats. This kit is not required for mounting the seat or safe
operation, but rather it is made to hide a gap between the bike’s body work and
the seat. This kit will also will work with the Sargent two-piece seat.
SARGENT CYCLE PRODUCTS, 1036 HUBBARD STREET, JACKSONVILLE, FL 32206 PH: (904) 354-4531 FAX: (904) 354-7979
1
BMW K 1600 GT / GTL SEAT INSTALLATION GUIDE
Switch Plate Removal
K 1600 GT
Note: K 1600 GT owners may reuse OEM switch plate on Sargent
Seat or Sargent switch plate
provided with your new Sargent
Seat.
Remove switch plate on
the stock seat by removing
5 screws shown using a
Phillips head screwdriver.
K 1600 GTL owners must use
switch plate as provided by
Sargent.
K 1600 GTL
K 1600 GT and GTL
Remove switch plate on the stock seat
by using a size T20 Torx to remove 3
screws shown.
Unplug electrical connector attached to heat switch behind switch plate.
Using a flathead screw driver, remove
the heat switch by gently pressing the
retaining fingers on each side of the
heat switch towards the body of the
switch to release it from the switch
plate as shown.
Gently push the switch out of the
switch plate, from the back towards
the front until the switch is removed.
Set switch aside.
SARGENT CYCLE PRODUCTS, 1036 HUBBARD STREET, JACKSONVILLE, FL 32206 PH: (904) 354-4531 FAX: (904) 354-7979
2
BMW K 1600 GT / GTL SEAT INSTALLATION GUIDE
Lock Removal
K 1600 GT
K 1600 GT owners can skip this
step if re-using OEM switch plate.
Using a small pointed object like
a paper clip, gently press in the
lock’s retaining key through the
hole in the switch plate located
under the lock to release it.
Slide the lock barrel free and out
of the switch plate.
Set lock aside.
Take note of the position of the three springloaded bars on top of the lock barrel as it comes
out of the switch plate shown.
The lock must be re-installed in the same position
during re-assembly with these three bars pointed
toward the bottom edge of the switch plate.
K 1600 GTL
Take note of the position of the
three spring-loaded bars on top of
the lock barrel as it comes out of
the switch plate shown.
The lock must be re-installed in
the same position during reassembly. These three bars
pointed toward the bottom edge of
the switch plate.
Once the switch plate is removed, grasp
the lock bracket (still attached to the OEM
seat via the cable release).
Using a flathead screw driver, gently
press the lock’s retaining key while
pressing the lock’s barrel toward the key
opening with your thumbnail as shown.
Slide the lock barrel out of the bracket as
shown. The lock will come out all in one
piece.
Set lock aside.
SARGENT CYCLE PRODUCTS, 1036 HUBBARD STREET, JACKSONVILLE, FL 32206 PH: (904) 354-4531 FAX: (904) 354-7979
3
BMW K 1600 GT / GTL SEAT INSTALLATION GUIDE
Re-installing Lock &
Switch into Sargent
Switch Plate
K 1600 GT / GTL
From the front of the switch plate, insert OEM lock with the three spring-loaded
bars on the lock body shown facing the curved edge of the switch plate as shown.
From the front of the switch plate, insert OEM heat switch into the switch plate
until it’s firmly in place.
K 1600 GT owners can skip lock
and switch installation of this step
if re-using OEM switch plate.
On the rear Sargent Seat, locate the 4-pin plug and plug it into the switch mounted
onto the switch plate as shown.
Note: You may have to rotate the
latch rod back and forth slightly
while you slide the switch plate
assembly in place to allow the
lock barrel to properly engage
into the latch rod.
Install switch plate by guiding the
lock barrel tab into the end of the
latch rod as shown.
Once the lock tab is fully engaged
with the latch rod, the screw holes
in the switch plate and pan should
line up. Hold switch plate in place
while installing the screws.
Lock barrel (left) fits into the notched latch rod (right).
Gently snug the screws. Do not over
tighten. Over tightening may strip
the threads.
SARGENT CYCLE PRODUCTS, 1036 HUBBARD STREET, JACKSONVILLE, FL 32206 PH: (904) 354-4531 FAX: (904) 354-7979
4
BMW K 1600 GT / GTL SEAT INSTALLATION GUIDE
K 1600 GTL owners , please
continue to the next page for
further instructions about
installing your new Sargent
heated seat.
Remove the red releasable zip
tie in the area shown.
Gently pull out the zip tie by the
“head” or fastener to allow the
latch rod to rotate freely.
It is now safe to use your key in
the lock.
K 1600 GT owners may now
mount the new Sargent seats.
Optional, rear seat thumbscrews have been provided for added convenience.
Your Sargent seats comes with OEM compatible heat plugs for plug and play
convenience.
Seat Height Adjustment
K 1600 GT
See your BMW K 1600 GT owner’s manual for instructions on seat height
adjustment.
K 1600 GTL
The Low setting, with the safety retainer
in place, is shown on right. The safety
retainer will need to be removed to
change the seat to the high setting. To
remove the clip, rotate the bottom to the
right and lift up to disengage.
Retainer Clip
If you elected to purchase the cosmetic
kit listed on the opening page of this
instruction, install it now per the
instructions included with that kit.
Note
Should it ever become necessary to re-install the stock one piece seat , the above
operation must be reversed. The mechanism must be oriented in the low
position and the safety retainer reinstalled.
SARGENT CYCLE PRODUCTS, 1036 HUBBARD STREET, JACKSONVILLE, FL 32206 PH: (904) 354-4531 FAX: (904) 354-7979
5
BMW K 1600 GT / GTL SEAT INSTALLATION GUIDE
Rear Seat Installation
K 1600 GT / GTL
Note: Make sure the 2-pin heat
seat connector, attached near the
front of the rear seat, is extended
out toward the front of the bike.
This will connect to the front seat
after the rear seat is secured.
Sargent now provides Plug and Play heat plugs
specifically for your BMW. However, the way the
two-piece Sargent Seat heat connectors attach to your
bike is slightly different than your OEM one piece
seat. This guide will familiarize you with this process.
With your OEM seat removed, locate the 6-pin master
receptacle on your motorcycle. Plug this receptacle
into your new Sargent rear seat connector.
Once your rear seat is connected, you must install
your rear seat before connecting and installing the
front seat.
Insert the seat, rear first, so the seat captures (flanges on left image) are under the
metal tabs (on right image). Take care not to pinch any wiring.
Next, locate the two OEM threaded inserts located on the frame on either side of
the battery.
Using the two thumb screws included with your Sargent Seat, secure the front of
the rear seat through the bushings into threaded holes on the frame. Tighten the
thumb screws until snug.
SARGENT CYCLE PRODUCTS, 1036 HUBBARD STREET, JACKSONVILLE, FL 32206 PH: (904) 354-4531 FAX: (904) 354-7979
6
BMW K 1600 GT / GTL SEAT INSTALLATION GUIDE
Front Seat Installation
K 1600 GT / GTL
Note: K 1600 GTL owners
An additional, optional purchase
of BMW part #77348520028 is
recommended by BMW for those
GTL owners who wish to convert
from the one-piece OEM seat to
the two-piece OEM seats. This kit
is not required for mounting the
seat or safe operation, but rather
it is made to hide a gap between
the bike’s body work and the seat.
This kit will also will work with
the Sargent two-piece seat.
Complete instructions for installing and adjusting the two-piece seat is included
with the optional BMW cosmetic kit #77348520028. You may also refer to page 5
of this document, “Seat Height Adjustment” for information and warnings.
Now that your rear seat is secured, you can connect the heat and install the front
seat.
Connect your rear seat heat plug to the front seat heat plug.
Install the front seat by engaging the two receivers
with the two support bumpers in the bike’s seat
height adjustment mechanism. Lower the back of
the front seat onto the rear seat latch, with firm
pressure, engage the lock.
Receivers
Bumpers
Rear Seat Latch
Now you’re ready to ride!
SARGENT CYCLE PRODUCTS, 1036 HUBBARD STREET, JACKSONVILLE, FL 32206 PH: (904) 354-4531 FAX: (904) 354-7979
7