1
EN GL I S H
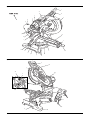
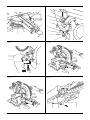
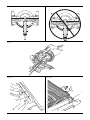
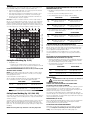
MITRE LOCK ADJUSTMENT (FIG. 1A, 16)
The mitre lock rod (a7) should be adjusted if the table of the saw can be
moved when the mitre lock handle is locked (down).
1. Put the mitre lock handle (u) in the unlocked (up) position.
2. Using a 13 mm (1/2") open end wrench, loosen the lock nut (a8) on
the mitre lock rod.
3. Using a slotted screwdriver, tighten the mitre lock rod by turning it
clockwise as shown in figure 16. Turn the lock rod until it is snug,
then turn counterclockwise one turn.
4. Re-lock the mitre lock to a non-detented measurement on the
mitre scale – for example, 34° – and make sure the table will not
rotate.
5. Tighten lock nut.
Prior to Operation
• Install the appropriate saw blade. Do not use excessively worn
blades. The maximum rotation speed of the tool must not exceed
that of the saw blade. Do not use any abrasive blades.
• ALWAYS MAKE DRY RUNS (UNPOWERED) BEFORE FINISH
CUTS SO THAT YOU CAN CHECK THE PATH OF THE BLADE.
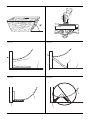
DO NOT CROSS HANDS, AS SHOWN IN FIGURE 17B.
• Keep both feet firmly on the floor and maintain proper balance. As
you move the mitre arm left and right, follow it and stand slightly to
the side of the saw blade.
• Sight through the guard louvers when following a pencil line.
Switching On and Off (fig. 1B)
To turn the saw on, depress the trigger switch (x). To turn the tool off,
release the trigger switch.
Allow the blade to spin up to full operating speed before making the
cut.
Release the trigger switch and allow the brake to stop the blade before
raising the saw head.
A hole is provided in the trigger switch for insertion of a padlock to lock
the saw off.
• Do not attempt to cut excessively small pieces.
SETTING THE VARIABLE SPEED (FIG. 1B)
• Allow the blade to cut freely. Do not force.
The speed control dial (hh) can be used for advance setting of the
required range of speed.
• Allow the motor to reach full speed before cutting.
• Make sure all locking knobs and clamp handles are tight.
• Secure the workpiece.
• Although this saw will cut wood and many nonferrous materials,
these operating instructions refer to the cutting of wood only. The
same guidelines apply to the other materials. Do not cut ferrous
(iron and steel) materials, fibre cement or masonry with this saw!
• Make sure to use the kerf plate. Do not operate the machine if the
kerf slot is wider than 10 mm.
• Turn the speed control dial (hh) to the desired range, which is
indicated by a number.
• Use high speeds for sawing soft materials such as wood.
Use low speeds for sawing metal.
Use of XPSTM LED Worklight System (fig. 1A, 1B)
NOTE: The mitre saw must be connected to a power source.
OPERATION
The XPSTM LED Worklight System is equipped with an on/off switch
(y). The XPSTM LED Worklight System is independent of the mitre saw’s
trigger switch. The light does not need to be on in order to operate the
saw.
Instructions for Use
To cut through an existing pencil line on a piece of wood:
WARNING: Always observe the safety instructions and
applicable regulations.
WARNING: To reduce the risk of injury, turn unit off
and disconnect machine from power source before
installing and removing accessories, before adjusting
or changing set-ups or when making repairs. Be sure
the trigger switch is in the OFF position. An accidental startup can cause injury.
Refer to Saw Blades under Optional Accessories to select the blade
that best fits your needs.
Ensure the machine is placed to satisfy your ergonomic conditions in
terms of table height and stability. The machine site shall be chosen so
that the operator has a good overview and enough free surrounding
space around the machine that allows handling of the workpiece
without any restrictions.
To reduce effects of vibration make sure the environment temperature is
not too cold, the machine and accessories are well maintained and the
workpiece size is suitable for this machine.
1. Turn on the XPSTM system, then pull down on the operating handle
(c) to bring the saw blade close to the wood. The shadow of the
blade will appear on the wood.
2. Align the pencil line with the edge of the blade’s shadow. You may
have to adjust the mitre or bevel angles in order to match the pencil
line exactly.
Basic Saw Cuts (fig. 1A, 1B, 18, 19)
If the slide feature is not used, ensure the saw head is pushed
back as far as possible and the rail lock knob (g) is tightened. This
will prevent the saw from sliding along its rails as the workpiece is
engaged.
Cutting of multiple pieces is not recommended but can be done safely
by ensuring that each piece is held firmly against the table and fence.
STRAIGHT VERTICAL CROSSCUT
1. Set and lock the mitre arm at zero, and hold the wood firmly on the
table (q) and against the fence (n).
The attention of UK users is drawn to the “woodworking machines
regulations 1974” and any subsequent amendments.
2. With the rail lock knob (g) tightened, turn on the saw by squeezing
the trigger switch (x).
Plug the saw into any household 60 Hz power source. Refer to the
nameplate for voltage. Be sure the cord will not interfere with your work.
3. When the saw comes up to speed, lower the arm smoothly and
slowly to cut through the wood. Let the blade come to a full stop
before raising arm.
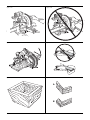
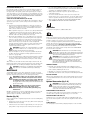
Proper Body and Hand Position (fig. 17A, 17B)
WARNING: To reduce the risk of serious personal injury,
ALWAYS use proper hand position as shown in fig. 17A.
WARNING: To reduce the risk of serious personal injury,
ALWAYS hold securely in anticipation of a sudden reaction.
• Never place hands near cutting area. Place hands no closer than
152 mm (6") from the blade.
• Hold the workpiece tightly to the table and the fence when cutting.
Keep hands in position until the trigger has been released and the
blade has completely stopped.
38
SLIDING CROSSCUT
When cutting anything larger than a 51 x 150 mm (2" x 6" [51 x
105 mm (2" x 4") at 45° mitre]) workpiece, use an out-down-back
motion with the rail lock knob (g) loosened (fig. 18).
Pull the saw out toward you, lower the saw head down toward the
workpiece, and slowly push the saw back to complete the cut.
Do not allow the saw to contact the top of the workpiece while pulling
out. The saw may run toward you, possibly causing personal injury or
damage to the workpiece.