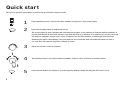
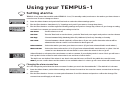
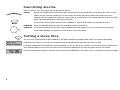
1
Warranty information
Imagination Technologies Ltd. warrants to the end user that this product will be free from defects in materials and workmanship in the course
of normal use for a period of two years from the date of purchase. This guarantee covers breakdowns due to manufacturing or design faults;
it does not apply in cases such as accidental damage, however caused, wear and tear, negligence, adjustment, modification or repair not
authorised by us. Please return your warranty card or visit www.pure.com/register to register your product with us. Should you have a problem
with your unit please contact your supplier or contact PURE Support at the address shown on the rear of this manual.
Copyright
Copyright 2005 by Imagination Technologies Limited. All rights reserved. No part of this publication may be copied or distributed, transmitted,
transcribed, stored in a retrieval system, or translated into any human or computer language, in any form or by any means, electronic,
mechanical, magnetic, manual or otherwise, or disclosed to third parties without the express written permission of Imagination Technologies
Limited.
Disclaimer
Imagination Technologies Limited makes no representation or warranties with respect to the content of this document and specifically disclaims
any implied warranties of merchantability or fitness for any particular purpose. Further, Imagination Technologies Limited reserves the right to
revise this publication and to make changes in it from time to time without obligation of Imagination Technologies Limited to notify any person
or organization of such revisions or changes.
Trademarks
TEMPUS-1, SnoozeHandle, PURE, the PURE logo, PURE Digital, the PURE Digital logo, Imagination Technologies, and the Imagination
Technologies logo are trademarks or registered trademarks of Imagination Technologies Limited. All other product names are trademarks of their
respective companies.
Version 2
April 2005
Controls and Connectors
Front panel
Autotune – press and hold for around two seconds to scan the full range of
digital frequencies in Band III. Press and release to scan UK only Band III.
Standby - press to switch between standby mode and power on
Sleep - press and repeat to set TEMPUS-1 to enter standby in 15, 30, 45, 60
or 90 minutes
Info - press and repeat to change the text shown on the bottom of the
display between scrolling text, clock, time and date, programme type,
multiplex name, channel, mode and signal quality.
Menu - press to access the setup menu, turn the Tune knob to scroll through
and push to select an option. You can also press Menu to exit menus and
menu options.
Preset (1-5) - press and hold for around two seconds to store a station
under that number. Press and release to select and listen to a preset.
Press ( ) first to access presets 6-10.
Tune - turn to scroll through and push to select radio stations and menu
options.
Vol – turn to adjust the volume.
Backlit LCD screen.
SnoozeHandle™ - tap to snooze an alarm, view clock or station/time/date.
In standby - tap to illuminate the clock or hold for full brightness.
Rear panel
USB - connect to a PC for software upgrades
Digital Out - optical S/PDIF - connect to an external amplifier or recorder
Stereo Out - analogue output - connect to an external amplifier or recorder
Headphone - connect to headphones
Aux Speaker - connect to the optional ST-1 speaker for full stereo sound
12V DC - connect to mains adapter
Aerial - connect to the supplied telescopic or other aerial
1
Quick start
This section provides information on how to set up and start using your radio.
1
2
Press the Standby button to switch the unit on.
The screen lights up and a progress bar indicates the progress of an autotune to find the stations available. If
you live outside the UK this local autotune may find very few or no stations. If no stations you see the message
‘No stations available’ and you see a menu of options. Use the Tune knob to scroll through and select the
‘Autotune full’ option. Alternatively if very few stations are found hold down the Autotune button for over 2
seconds. This full autotune may take a minute or more.
3
Adjust the volume control if required.
4
Turn the Tune knob to see all the stations available. Push to select and listen to another station.
5
2
Fully extend the aerial, connect the mains adapter and plug in to your power supply.
Press the Info button and repeat to cycle through the display modes including the full screen clock.
Using your TEMPUS-1
Setting alarms
TEMPUS-1 has three alarms which switch TEMPUS-1 on (if in standby mode) and tune to the station you have chosen or
sound a tone. To set or change an alarm:
1. Press the Menu button and push the Tune knob to select the Alarm settings option.
2. Turn the Tune knob to view Alarm 1/2/3 settings and push if you want to change that alarm.
3. Turn the Tune knob to scroll through the following settings and push to change any of them. If you change a setting
and wait for a moment you move to the next setting on the list.
Set alarm
Set the alarm on or off.
Set time
Turn the Tune knob to set the hours, push the Tune knob, turn again and push to set the minutes.
Set days
Choose between Daily, Weekday (Mon-Fri), Weekend (Sat-Sun), Saturday or Sunday.
Set mode
Choose between a Radio (default) or Tone alarm. If you set a radio alarm the volume will be
whatever the volume control is set at when the alarm goes off.
Select station Select the station you want your alarm to tune to. (If you have selected Radio mode above.)
Alarm volume
Select the alarm volume from 1-20 (if you have selected Radio mode above) or select ‘Use Vol
control’ to use whatever the volume knob is set to when the alarm is due to go off.
When finished, to exit press the menu button or wait a moment. If your display mode is set to Clock you will see a
bell symbol on the screen for each alarm that is set and time of each alarm.
The bell icons are hollow if the alarm is not due in the next 24 hours or filled if due within the next 24 hours.
Note If you set a radio alarm and the station is not available when it is due to go off a tone alarm will sound instead.
Changing the alarm snooze time
You can change the period that the alarm snoozes for when you touch the SnoozeHandle™. The default is 8 minutes.
1. Press the Menu button, select Alarm settings and choose Snooze time. You see the current snooze time at the top of
the screen.
2. Turn the Tune knob to choose a snooze period between 5 and 59 minutes and push to confirm the change. The
snooze time set will apply to all alarms.
3
Cancelling alarms
When a radio or tone alarm goes off you have three options:
Snooze
Tap the SnoozeHandle to snooze the alarm for the period set (the default is 8 minutes). The radio or tone
mutes and you see the snooze icon on the screen. The alarm will repeat when the snooze period has
elapsed. You can repeat the snooze as many times as you want up to 60 minutes after the last snooze. The
alarm will automatically turn off after 60 minutes.
To cancel the snooze push the Tune button. TEMPUS-1 returns to standby and cancels the alarm.
Switch off Press the Standby button to return to standby and cancel the alarm.
Switch on If it is a tone alarm press the Tune button and the radio will switch on. If it is a radio alarm, any button
(other than Standby) will operate as normal plus cancel the alarm.
Setting a sleep time
You can set a sleep time after which TEMPUS-1 will switch itself into standby mode, ideal if you want to fall asleep
listening to the radio. You can also set a Sleep time from standby which will switch the radio on first.
Press the Sleep button and repeat to choose between 15, 30, 45, 60 or 90 minutes or select Off to set no sleep time. If
your display mode is set to Clock you will see the sleep time displayed in the bottom right corner of the screen.
Press the Sleep button again to view the time remaining until TEMPUS-1 will switch off or to change the sleep time again.
4
Recording from your TEMPUS-1
You can record from your TEMPUS-1 using the Stereo Out or Digital Out sockets. You can also set a record timer to
automatically switch your unit on and tune to a particular station at a time of your choosing – this may be useful if you
have a MiniDisc recorder or similar with a synchro-record facility and you use the Digital Out socket. You cannot record
one station and listen to another at the same time. Note The volume level of the recording is at a set level and is not
dependant on the position of the volume knob.
Setting a record timer
The record timer function lets you set times at which your TEMPUS-1 will automatically switch itself on (if in standby
mode) tune to a station for a specified period then automatically switch itself off again. You can set up to nine timers.
1. Press the Menu button and select the Record timer option.
2. Turn the Tune knob to view the nine timers and push to select and change one.
3. Set the station, day, start time and duration you want and also whether you want the speaker on or off. Push the
Tune knob to select and turn to change settings.
These instructions will not set the record time on your recorder. Some recorders can detect when a digital S/PDIF signal
is present (synchro-record) or you may have to set your external recorder to start recording at the same time.
If using a synchro-record method you should check that the Digital out socket is set to Off/Timer so that your recorder
can detect when the recording is to start. To do this, Push the Menu button, select Audio settings and choose Digital
output. Select the Off /Timer option.
When finished, press the Menu button or wait a moment and you’ll return to the idle display mode and the timer will be
set. If your display mode is set to Clock you will see a timer symbol on the screen showing that one or more timers are
set. The timer list will also show ‘Set’ next to those that are currently active.
5
Setup options
Press the Menu button, turn the Tune knob and push to select one of the following setup options.
Station order
Changes the order in which stations appear as you scroll through the station list. Turn the Tune knob to scroll through the
following options and push to select one:
Alphanumeric
Displays all stations in alphanumeric order.
Fav station
Displays your most listened to stations at the top of the station list and the rest below, in alphanumeric
order. Your favourite stations are displayed with a heart (
) next to their names.
Active station
Displays active stations at the top of the service list and inactive ones at the bottom in alphanumeric
order. Inactive stations are those on your station list but not currently available, marked with a ’?’.
Multiplex
Lists stations in groups according to their multiplex. Multiplexes or ensembles are groups of stations
owned and broadcast by a multiplex operator.
♥
Trim station list Removes inactive stations from the station list.
♥ → presets
Available only when Fav station order (above) has been selected. Transfers your favourite stations to the
preset buttons.
Manual tune
Provides a signal level display which you can use to find the best position for your radio and aerial.
1. Turn the Tune knob to scroll through different channels and push to select one. You see a signal level display. The
empty block indicates the minimum required level for reception and the filled blocks indicate the current level.
2. Move your aerial while watching the display and to try to raise the current level to the empty block or beyond. Once
you have a good signal the display will show the multiplex name and add the stations to the station list.
3. Push the Menu button to exit the tuning aid or turn the Tune knob to select another channel.
Note You can also display the signal level for any station you are listening to by pushing the Tune knob.
6
Audio settings
Digital output
The Digital Output setting controls the Digital Out socket on the rear of your radio. Select one of the following options:
On - if you want continuous output to an amplifier or recorder.
Off/Timer - if you want to connect to a recorder with a synchro-record feature.
DRC value
DRC (Dynamic Range Control) value makes the quieter sounds in a broadcast easier to hear. The DRC level of a
broadcast is set by the station and sent with the signal. At the time of writing in the UK only BBC Radio 3 and 4 regularly
use DRC. Turn the Tune knob to scroll through the following options and push to select one:
DRC 0
DRC is switched off. Any DRC level broadcast will be ignored.
DRC ½
DRC level is set to ½ that sent with the broadcast.
DRC 1
Applies the DRC level as sent with the broadcast.
Display settings
Brightness
To change the screen brightness turn the Tune knob to choose between Low, Low/Timeout (turns backlight off after a
timeout) and High and push to select one.
Standby mode
You can choose whether the backlight is on or off when your TEMPUS-1 is in standby mode. If you switch the backlight off
in standby mode a touch on the SnoozeHandle will override this and turn the backlight on for a few seconds to display
the clock, useful for checking the time in the middle of the night. To change the display standby mode turn the Tune knob
to choose between Backlight On and Backlight Off and push to select one.
Sw version
Displays the version number of the software installed in your radio. You may be asked to quote this if you contact
Technical Support.
Sw upgrade
You can upgrade the software in your TEMPUS-1 using a PC connected to the USB connection on the rear panel. To
install an upgrade, select Sw upgrade and follow the instructions provided with the software. Upgrades may be issued
to provide enhanced functions or improve performance. Check our website for details of when software upgrades are
available and instructions on how to install them. To exit the Software upgrade menu press the Menu button again.
7
Hints and tips
This section provides information on advanced DAB features and offers advice if you are having problems with your radio.
(‹‹/››) Secondary services
Secondary services accompany some stations, providing extra information or alternative content and may only be broadcast at certain times. At the time of
writing not many secondary services are available. If a station has one or more secondary services available the display will show ‘>>’ next to the station name
on the station list and the secondary service will appear next to the station as you turn the Tune knob. A secondary service will display ‘<<’ before the service
name on the station list indicating that it belongs to the station preceding it in the list.
(?) Inactive or unavailable stations
Inactive or unavailable stations are stations which appear on the station list but are not currently available because either you are outside the broadcast area,
have lost reception or the station is not currently broadcasting. If the station has ‘?’ before its name in the station list the station is unavailable. If you select a
station which has this symbol, your radio tries to tune to that station. If still unavailable, you will return to the last station you were listening to.
I hear a ‘burbling’ sound on some stations
Although DAB is excellent at providing quality audio from very little signal, the quality can suffer if the signal strength is too low. If that happens, a ‘burbling’
sound can sometimes be heard. To help reduce this, check that your aerial is fully extended and upright. If the problem persists try moving your radio or
repositioning your aerial using manual tuning.
Display says ‘No stations available’
Check that your aerial is fully extended. Use Autotune to search for stations. Try using manual tuning to adjust your aerial or radio position.
My alarm/timer didn’t work
Check that you set the alarm or timer on (If display mode is set to clock you will see a timer or alarm icon on the display).
Check that the station you are tuned to is available – the clock/alarm/timer relies on the time signal broadcast by the multiplexes.
If you are using synchro-record check that you have set the Digital out to Off/Timer this triggers your recorder.
Clock shows the wrong time
This may happen if the multiplex you are tuned to broadcasts an incorrect time signal, try tuning to a station in another multiplex.
I can’t hear anything
If the display is on but you can’t hear anything your TEMPUS-1 may be in standby. If so, you should see a standby indicator on screen.
I can’t see my clock in the dark
Touch the SnoozeHandle to illuminate the display if your unit is in standby.
8
Resetting your radio
Resetting your radio removes all presets, stored stations and favourite station settings and resets all options to
defaults. To select the reset option:
To select the reset option:
1. Press and hold the Menu button for more than two seconds. The display will show ‘Press Tune to confirm reset’.
Release the Menu button.
2. Push the Tune knob to confirm the reset or press no buttons to cancel the reset.
9
www.pure.com
PURE Digital, Imagination Technologies Ltd., Imagination House, Home Park Estate, Kings Langley, Herts, WD4 8LZ, UK
+44 (0)1923 277477 support
+44 (0)1923 277488 sales
12K56
+44 (0)1923 270188
[email protected]
[email protected]