1
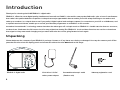
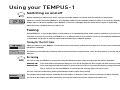
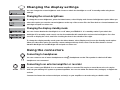
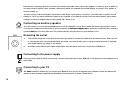
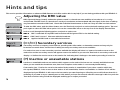
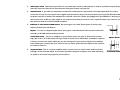
Safety instructions
Keep the radio away from heat sources.
Do not use the radio near water.
Avoid objects or liquids getting into the radio.
Do not remove screws from or open the radio casing.
Copyright
Copyright 2003 by Imagination Technologies Limited. All rights reserved. No part of this publication may be copied or distributed, transmitted, transcribed, stored in a retrieval system, or translated into any human or computer language, in
any form or by any means, electronic, mechanical, magnetic, manual or otherwise, or disclosed to third parties without the express written permission of Imagination Technologies Limited.
Disclaimer
Imagination Technologies Limited makes no representation or warranties with respect to the content of this document and specifically disclaims any implied warranties of merchantability or fitness for any particular purpose. Further,
Imagination Technologies Limited reserves the right to revise this publication and to make changes in it from time to time without obligation of Imagination Technologies Limited to notify any person or organization of such revisions or
changes.
Trademarks
TEMPUS-1, SnoozeHandle, PURE, the PURE logo, PURE Digital, the PURE Digital logo, Imagination Technologies, and the Imagination Technologies logo are trademarks or registered trademarks of Imagination Technologies Limited. All other
product names are trademarks of their respective companies.
Credits
This manual was written by Bruce Murray. It is a product of PURE Digital, Imagination Technologies Ltd., Imagination House, Home Park Estate, Kings Langley, Hertfordshire WD4 8LZ, UK.
Issue 1
October 2003
Contents
Introduction ........................................................4
Unpacking ................................................................................. 4
Overview diagrams ................................................................... 5
Quick start .........................................................6
Using your TEMPUS-1.........................................7
Switching on and off.................................................................. 7
Tuning ....................................................................................... 7
Changing stations ..................................................................... 8
Changing the information displayed ......................................... 9
Storing and selecting presets ................................................. 10
Setting alarms ........................................................................ 10
Cancelling alarms ................................................................... 11
Setting a sleep time ................................................................ 11
Recording from your TEMPUS-1 ............................................. 12
Changing the display settings ................................................. 13
Using the connectors .............................................................. 13
Upgrading your software ........................................................ 15
Hints and tips....................................................16
Adjusting the DRC value.......................................................... 16
(<</>>) Secondary services .................................................... 16
(?) Inactive or unavailable stations ......................................... 16
Troubleshooting ...................................................................... 17
Improving reception ................................................................ 18
Resetting your TEMPUS-1....................................................... 20
Useful addresses .................................................................... 20
Getting help ............................................................................ 20
Accessories ......................................................21
Warranty information .......................................21
Technical specifications ....................................22
3
Introduction
Thank you for choosing the PURE TEMPUS-1 digital radio.
TEMPUS-1 offers the same digital-quality, interference-free audio as EVOKE-1, the world’s most popular DAB radio, plus a host of new features
that make it the perfect bedside companion. A sleep timer and programmable alarms enable you to fall asleep listening to one station and
wake up to another (or a simple alarm tone if you prefer). Digital optical and analogue outputs for connection to your hi-fi as a DAB tuner, and
a sophisticated record timer, enable you to record your favourite programmes to a MiniDisc or CD recorder.
Innovative SnoozeHandle™ technology means that when the alarm goes off a simple touch on TEMPUS-1’s handle sets the alarm to snooze or,
at other times, illuminates the full-screen clock for easy night-time viewing. The TEMPUS-1 clock and date functions are set from a broadcast
time signal so they never need changing and you need never miss the clocks going forward or back again.
Unpacking
Shown below are the contents of your TEMPUS-1 package. Contact us if any items are missing or damaged. You may also want to peel off the
protective film from the LCD display panel and remove the sticker from the Tune knob at this stage.
TEMPUS-1 digital radio
4
230V AC to 12V DC
mains power adapter
Removable telescopic aerial
(fitted to unit)
Warranty registration card
Overview diagrams
Front panel
Autotune button provides one-touch tuning
Standby button switches between standby mode and power on
Sleep button sets TEMPUS-1 to enter standby in 15, 30, 45, 60 or 90
minutes
Info button changes the information shown on the display
Menu button enables access to setup options and alarms
Preset (1-5) buttons and (
) to access presets 6-10
Tune knob enables you to change radio stations and menu options
Vol knob adjusts the volume
LCD backlit graphical LCD display
SnoozeHandle™ sets the alarm to snooze or illuminates the fullscreen clock for easy night-time viewing.
USB socket enables connection to a PC for software upgrades
Rear panel
Digital Out optical S/PDIF digital output for connection to an external
amplifier or recorder
Stereo Out socket (3.5 mm) analogue output for connection to an
external amplifier or recorder
Headphone socket (3.5 mm) for connection to headphones
Aux Speaker socket (3.5 mm) for connection to the optional ST-1
speaker for full stereo output
12V DC for connection to mains adapter
Aerial socket for connection to the supplied telescopic or other aerial
5
Quick start
This section provides information on how to set up and start using your TEMPUS-1.
6
1
Fully extend the telescopic aerial, connect the mains adapter and plug in to your power supply.
2
Set the volume control to low and push the Standby button to switch the unit on. The LCD lights up and the
display shows ‘PURE TEMPUS-1’ and a progress bar on the bottom line indicates the progress of an autotune
to find the stations available in your area. The stations found will be stored in alphanumeric order and the first
station on the list will be selected.
3
4
5
Adjust the volume control if required.
Turn the Tune knob to see all the stations available. Push to select and listen to another station.
Push the Info button and repeat to cycle through the optional display modes including the full screen clock.
Using your TEMPUS-1
Switching on and off
Before switching on, extend your aerial, connect the power adapter and check that the volume is turned down.
When you connect the power, TEMPUS-1 is in standby mode. Push the Standby button to switch it on. Push the Standby
button again to return to standby. If your TEMPUS-1 has been unplugged from the mains there may be a slight delay
while the time is updated when you switch it on.
Tuning
Tuning TEMPUS-1 is very simple. When you first switch on it automatically finds all the stations available in your area. You
may want to re-tune if you move your TEMPUS-1 to a different room or if you want to receive a new multiplex. Multiplexes
or ensembles are groups of stations owned and broadcast by a multiplex operator.
Tuning for the first time
When you switch on your TEMPUS-1 for the first time an autotune is performed. A progress bar on the screen shows that
autotune is underway.
The stations found during the autotune will be stored and listed in alphanumeric order. The first station on the list will be
selected.
Re-tuning
You can re-tune your TEMPUS-1 at any time using the Autotune button. There are two autotune options available:
Autotune UK
Push and release the Autotune button to scan all UK frequencies. This should only take a few seconds.
Autotune full Push and hold the Autotune button for around two seconds to scan the full frequency range in Band III.
This is useful if you use your TEMPUS-1 outside the UK and may take a minute or more.
You can cancel the autotune by pushing the Autotune button again during tuning.
The progress bar shows tuning is underway and the number of stations found is shown on the top line. When finished,
you return to the station you were listening to and any new stations found are added to the station list.
7
Changing stations
You change stations using the Tune knob. If you have assigned stations to presets you can also select them by pushing
the relevant numbered button (1-5) or - .
1. The current station is shown at the top of the screen. Turn the Tune knob until you see the station you want to listen
to on the bottom of the screen.
2. Push and release the Tune knob to change the station.
Changing the station order
To change the order in which stations are listed, push the Menu button, turn the Tune knob and push to select the Station
order option.
The current order is shown at the top of the screen. Turn the Tune knob to scroll through the following options at the
bottom of the screen and push to select one:
Alphanumeric Displays all stations in alphanumeric order. This is the default setting.
Fav station
Active station
Multiplex
Trim stn. list
→ presets
8
Displays your ten most listened to stations first in alphanumeric order and the others after in
alphanumeric order. Your favourite stations then display a
next to the name on the station list.
Displays active stations at the top of the service list and inactive ones at the bottom in alphanumeric
order. Inactive stations are those on your station list but not currently available, marked with a ’?’.
Lists stations in groups according to their multiplex. Multiplexes or ensembles are groups of stations
owned and broadcast by a multiplex operator.
Removes inactive stations from the station list.
Available only when Fav station order (above) has been selected. Transfers your favourite stations to the
preset buttons. See page 10 for information on using presets.
Changing the information displayed
Press the Info button and repeat to cycle through the eight display modes. These modes affect what you see on the
screen when you have not pressed a button for around ten seconds.
Scrolling text
The default mode, displays scrolling text messages which accompany the audio, when broadcast.
Clock
Displays a full screen clock with time obtained from the current multiplex. If your TEMPUS-1 has been
unplugged from the mains there may be a slight delay before the time appears when you switch it on.
Day and date
Displays the day and date obtained from the current multiplex.
Program Type
A description of the type of content being broadcast by the station.
Multiplex name
Displays the name of the multiplex in which the current station is found. Multiplexes or ensembles are
groups of stations owned and broadcast by a multiplex operator.
Channel
Displays the DAB channel and frequency for the station you are listening to.
Mode
Displays whether the current station is stereo or mono and the data rate at which the audio is being
transmitted. This rate is set by the broadcaster to suit the type of material being transmitted.
Signal quality
Displays the signal quality for the station you are tuned to. As a guide, values from 85 to 100
indicate good reception, 70 to 84 borderline reception and 0 to 69 poor reception.
9
Storing and selecting presets
The numbered buttons and
enable you to assign up to ten radio stations to presets for easy one-touch access. You
can also automatically transfer your ten favourite stations to presets, see Changing the station order on page 8.
To store a preset
You can store a station to a preset while listening to it or when you see the station name at the bottom of the screen
while scrolling through the station list. For presets 1-5 press and hold down a numbered button to store the station
button, then hold down a numbered button ( - ).
under that number. For presets 6-10 press and release the
When you save a station as a preset, the station name shows the preset number next to it on the station list.
To select a preset
For presets 1-5 press the relevant numbered button. For presets 6-10 press and release the
numbered button ( - ).
button then press the
Setting alarms
TEMPUS-1 has two alarms which switch TEMPUS-1 on (if in standby mode) and tune to the station you have chosen or
sound a tone. To set or change an alarm:
1. Press the Menu button and push the Tune knob to select the Alarm settings option.
2. Turn the Tune knob to view Alarm 1 or Alarm 2 settings and push if you want to change that alarm.
3. Turn the Tune knob to scroll through the following settings and push to change any of them. If you change a setting
and wait for a moment you move to the next setting on the list.
10
Set alarm
Set the alarm on or off.
Set time
Turn the Tune knob to set the hours, push the Tune knob, turn again and push to set the minutes.
Set days
Choose between Daily, Weekday (Mon-Fri) or Weekend (Sat-Sun).
Set mode
Choose between a Radio (default) or Tone alarm. If you set a radio alarm the volume will be
whatever the volume control is set at when the alarm goes off.
Select station
Select the station you want your alarm to tune to. (If you have selected Radio mode above.)
When finished, press the menu button or wait a moment and you’ll return to your idle display mode. If your display
mode is set to Clock you will see a bell symbol on the screen for each alarm that is set.
Note If you set a radio alarm and the station is not available when it is due to go off a tone alarm will sound instead.
Changing the alarm snooze time
You can change the period that the alarm snoozes for when you touch the SnoozeHandle™. The default is 8 minutes.
1. Press the Menu button, select Alarm settings and choose Snooze time. You see the current snooze time at the top of
the screen.
2. Turn the Tune knob to choose a snooze period between 5 and 30 minutes and push to confirm the change. The
snooze time set will apply to all alarms.
Cancelling alarms
When a radio or tone alarm goes off you have several options:
Snooze
Place your hand on the SnoozeHandle and you will snooze the alarm for the period set (the default is 8
minutes). The radio or tone will go quiet and you see the snooze icon on the screen if the backlight is on.
The alarm will repeat when the snooze period has elapsed. You can repeat the snooze as many times as
you want up to 60 minutes after alarm time. The alarm will automatically turn off after 60 minutes.
To cancel the snooze push the Tune button. TEMPUS-1 returns to standby and cancels the alarm.
Switch off Press the Standby button to return to standby and cancel the alarm.
Switch on If it is a tone alarm push the Tune button and TEMPUS-1 will enter its normal ‘on’ state. If it is a radio alarm
using any button (other than Standby) will operate the radio as normal and cancel the alarm.
Setting a sleep time
You can set a sleep time after which TEMPUS-1 will switch itself into standby mode, ideal if you want to fall asleep
listening to the radio.
Press the Sleep button and repeat to choose between 15, 30, 45, 60 or 90 minutes or select Off to set no sleep time.
Press the Sleep button again to view the time remaining until TEMPUS-1 will switch off or to change the sleep time again.
11
Recording from your TEMPUS-1
You can record from your TEMPUS-1 using the Stereo Out or Digital Out sockets. You can also set a record timer to
automatically switch your unit on and tune to a particular station at a time of your choosing – this may be useful if you
have a MiniDisc recorder or similar with a synchro-record facility and you use the Digital Out socket. See Connecting to
an external amplifier or recorder on page 13 for details. You cannot record one station and listen to another at the same
time. Note The volume level of the recording is at a set level and is not dependant on the position of the volume knob.
Setting a record timer
The record timer function lets you to set times at which your TEMPUS-1 will automatically switch itself on (if in standby
mode) tune to a station for a specified period then automatically switch itself off again. You can set up to nine timers.
1. Press the Menu button and select the Record timer option.
2. Turn the Tune knob to view the nine timers and push to select and change one.
3. Set the station, day, start time and duration you want and also whether you want the speaker on or off. Push the
Tune knob to select and turn to change settings.
These instructions will not set the record time on your recorder. Some recorders can detect when a digital S/PDIF signal
is present (synchro-record) or you may have to set your external recorder to start recording at the same time.
If using a synchro-record method you should check that the Digital out socket is set to Off/Timer so that your recorder
can detect when the recording is to start. To do this, Push the Menu button, select Audio settings and choose Digital
output. Select the Off /Timer option.
When finished, press the Menu button or wait a moment and you’ll return to the idle display mode and the timer will be
set. If your display mode is set to Clock you will see a timer symbol on the screen showing that one or more timers are
set. The timer list will also show ‘Set’ next to those that are currently active.
12
Changing the display settings
You can change the screen brightness and choose to switch the backlight on or off in standby mode using these
settings.
Changing the screen brightness
To change the screen brightness, press the Menu button, select Display and choose the Brightness option. When you
select this option you see the current brightness at the top of the screen. Turn the Tune knob to choose between Low
and High and push to select one.
Changing the display standby mode
You can choose whether the backlight is on or off when your TEMPUS-1 is in standby mode. If you switch the
backlight off in standby mode a touch on the SnoozeHandle will override this and turn the backlight on for a few
seconds to display the clock, useful for checking the time in the middle of the night.
To change the display standby mode, press the Menu button, select Display and choose the Standby mode option.
When you select this option you see the current setting at the top of the screen. Turn the Tune knob to choose
between Backlight On and Backlight Off and push to select one.
Using the connectors
Connecting to headphones
You can connect a set of stereo headphones to the
headphones are connected.
headphones socket. The speaker is switched off when
Connecting to an external amplifier or recorder
You can connect your TEMPUS-1 to an external amplifier or recorder. This may be a stand-alone unit or it may be
built into your existing hi-fi system or powered speakers. You can use either the Stereo Out (analogue) or Digital Out
sockets.
Connect the Stereo Out socket to the input socket(s) on your amplifier or recorder using a suitable cable.
13
Remove the small plugs from the sockets and connect the Digital Out socket to the Digital-in socket on your amplifier or
recorder using an optical cable. Suitable connecting cables are available from PURE Digital, see page 21 for details of
how to contact us.
You also need to switch the Digital Out socket to ‘Off/Timer’ if you want to connect to a recorder with a synchro-record
feature or ‘On’ if you want continuous output to an amplifier or recorder. To do this, Push the Menu button, select Audio
settings and choose Digital output. Select either Off /Timer or On.
Connecting an auxiliary speaker
You can connect a second unpowered speaker to the Aux Speaker socket. This enables full stereo reproduction. Call us
on 01923 277488 to find out more or visit our website at www.pure-digital.com to purchase a matching ST-1 auxiliary
speaker. Note You can also order an ST-1 speaker directly using the form on your warranty card.
Removing the aerial
1.
Unscrew the large nut on the end of the telescopic aerial to remove the aerial from the Aerial socket. Take care not
to unscrew the thin nut behind that holds the aerial connector itself in place. A special aerial spanner is available
from PURE Digital, see page 21 for details.
2.
Screw the aerial plug of your replacement aerial onto the Aerial connector on the rear of TEMPUS-1.
Connecting to the power supply
Once you have made all other connections, connect the power lead to your TEMPUS-1 and plug the power adapter into a
wall outlet.
Connecting to your PC
The USB connector enables you to connect your TEMPUS-1 to your PC to upgrade your software. Check our website for
details of when software upgrades are available and instructions on how to install them.
14
Upgrading your software
You can upgrade the software in your TEMPUS-1 using a PC connected to the USB connection on the rear panel. To
install an upgrade push the Menu button, turn the Tune knob and push to select Sw upgrade and follow the instructions
provided with the software. Upgrades may be issued to provide enhanced functions or improve performance. Check our
website for details of when software upgrades are available and instructions on how to install them.
To exit the Software upgrade menu press the Menu button again.
Viewing your current software version
You can view the version number of the software currently installed in your TEMPUS-1. You should check this before
upgrading software and you may be asked to quote this if you contact Technical Support for advice. This option can only
be viewed, no adjustment is available.
Press the Menu button and select the Sw version option. You see the currently installed software version at the top of the
screen.
15
Hints and tips
This section provides information on advanced DAB features and offers advice which may help if you are having problems with your TEMPUS-1.
Adjusting the DRC value
DRC (Dynamic Range Control) makes the quieter sounds in a broadcast more audible at low volume or in a noisy
environment. The DRC level of a broadcast is set by a broadcaster and transmitted with the signal. At the time of writing
very few stations transmit a DRC level. Check with individual broadcasters to find out if they use DRC on their stations.
To alter the DRC value, push the Menu button, turn the Tune knob and push to select the Audio settings option. Turn and
push again to select the DRC value option. You see the current DRC value on the top line of the display. Turn the Tune
knob to scroll through the following options and push to select one:
DRC 0 DRC is switched off. Any DRC level broadcast will be ignored. This is the default setting.
DRC ½ DRC level is set to ½ that sent with the broadcast.
DRC 1 Applies the DRC level as sent with the broadcast.
(<</>>) Secondary services
Secondary services accompany some stations, providing extra information or alternative content and may only be
broadcast at certain times. At the time of writing not many secondary services are available.
If a station has one or more secondary services available the display will show ‘>>’ next to the station name on the
station list and the secondary service will appear next to the station as you turn the Tune knob. A secondary service will
display ‘<<’ before the service name on the station list indicating that it belongs to the station preceding it in the list.
(?) Inactive or unavailable stations
Inactive or unavailable stations are stations which appear on the station list but are not currently available because
either you are outside the broadcast area, have lost reception or the station is not currently broadcasting.
If the station has ‘?’ before its name in the station list the station is unavailable. If you select a station which has
this symbol, TEMPUS-1 tries to tune to that station. If still unavailable, ‘Station not available’ or ‘Station off-air’ will be
displayed and your TEMPUS-1 will tune to the last station you were listening to. A flashing cursor will indicate that this is
underway. If you want to try to manually tune to this station you have five seconds after the message in which to push the
Tune knob and the tuning aid will be displayed enabling you to adjust your aerial.
16
Troubleshooting
This section gives some of the most likely solutions to problems you might have with your TEMPUS-1.
I can’t hear the station I have selected on the display
The top line of the display shows the currently selected station. To change station you need to scroll the station list displayed on the bottom line
of the display and confirm your selection by pressing the Tune knob.
I hear a ‘burbling’ sound on some stations
Although DAB is excellent at providing quality audio from very little signal, the quality can suffer if the signal strength is too low. If that happens,
a ‘burbling’ sound can sometimes be heard. To help reduce this, check that your aerial is fully extended and upright. If the problem persists try
moving your TEMPUS-1 or repositioning your aerial using the tuning aid. See page 18 for additional advice on aerials.
Display says ‘No stations available’
If you autotune and you see the above message it means that no stations have been found during the search. Check that your aerial is connected
and fully extended. You will be shown a menu of options. Use the Tune knob to scroll through the following options and push it to select one.
Tuning aid – see Using the Tuning aid on page 18 for details of using the tuning aid to improve reception.
Autotune local – scans all UK frequencies. This should only take a few seconds.
Autotune full – scans the full frequency range in Band III. This may take a minute or more.
My alarm/timer didn’t work
Check that you set the alarm or timer on (If display mode is set to clock you will see a timer or alarm icon on the display). See pages 10 to 12.
Check that the station you are tuned to is available – the clock/alarm/timer relies on the time signal broadcast by the multiplexes.
If you are using synchro-record check that you have set the Digital out to Off/Timer this triggers your recorder. See page 12.
Clock shows the wrong time
This may happen if the multiplex you are tuned to broadcasts an incorrect time signal, try tuning to a station in another multiplex.
None of the buttons seem to work
If the display is on but no buttons seem to work your TEMPUS-1 may be in standby with backlight switched on. If so, you should see a standby
indicator on screen. See page 13 for details. Push standby to switch your unit on.
I can’t see my clock in the dark
Touch the SnoozeHandle to illuminate the display if your unit is in standby.
To set the backlight permanently on, change the display standby mode to on. See page 13.
For the latest troubleshooting information visit the support section on our website at www.pure-digital.com.
17
Improving reception
Although DAB is excellent at providing quality audio from very little signal, the quality can suffer if reception is poor.
A number of factors can affect reception including the position of your radio and coverage in your area. The following
sections give advice on how to maximise reception.
Using the Tuning aid
This option provides a signal level display which you can use to find the best position for your radio and aerial.
When you select this option, the bottom line of the display shows the channel and frequency. See page 20 for useful
addresses which you can contact to find the channel for a multiplex you want to receive.
1. Press the Menu button and select the Tuning aid option.
2. Turn the Tune knob to scroll through different channels and push the Tune knob to select one. Note The list includes
all channels, UK stations are in the range 11B to 12D. You see a signal level display. The empty block indicates the
minimum required level for reception and the solid blocks indicate the current level.
3. Move your aerial or radio while watching the display and to try to raise the current level to the empty block or
beyond. The display will change to show the multiplex name on the bottom line of the display once a good signal is
received and the multiplex stations will be added to the station list.
4. Push the Menu button to exit the tuning aid or turn the Tune knob to select another channel.
Note You can also display the signal level at any time for any station you are listening to by pushing the Tuning knob.
Aerial advice
Your TEMPUS-1 is supplied with a telescopic DAB aerial. This is an indoor aerial which is designed to give good reception
in areas with good to moderate DAB signal strength. In areas with poor DAB coverage or poor signal strength you may
want to consider using a loft mounted or external aerial. To find out about coverage in your area contact one of the
organisations listed on page 20.
The following options may help you improve reception. A range of DAB aerials are available from the shop on our website
www.pure-digital.com.
18
1. Telescopic aerial Optimise the position of your telescopic aerial by extending it as high as possible and pointing it
vertically. Use the tuning aid to fine tune the aerial placement, see page 18.
2. TV/FM aerial If you have an externally mounted TV or FM aerial it may provide a stronger signal than an indoor
aerial but as they are not tuned for the digital radio frequency range and are pointed at your local TV/FM transmitter,
reception may be no better. The standard TV or FM RF connector cannot be plugged into your TEMPUS-1 directly, you
will need to use an RF to F-type adapter. You may also find that you need to use a signal booster if you want to use
the aerial for both TV or FM and DAB reception.
3. External or loft mounted DAB aerial Two main types are used. These types of aerials may
require professional installation:
Dipole – for use in marginal signal areas, this type is omnidirectional and should increase the
strength of all DAB stations being received.
4-element aerial – for use in marginal or poor signal areas, this type is directional and has
high gain. Like a TV or FM aerial this type needs to point at the transmitter. Installation requires
someone to move the aerial while you use the tuning aid. If you receive signals from multiple
transmitters you should point your aerial at the one which gives the best signal for the services
you want to listen to.
4. Signal booster This is a signal amplifier which connects into an aerial cable and boosts the
strength of the received signal. If your aerial provides marginal reception, even after adjusting
its position, a booster may improve your reception.
Dipole Aerial
4-element Aerial
19
Resetting your TEMPUS-1
A option is provided to enable you to reset your unit. This removes all presets, stored stations, alarms, record timers and
favourite station settings and resets all options to defaults. Performing an autotune will solve most problems but you may
want to use this option if you want to restore default values to options you have changed.
To select the reset option:
1. Press and hold the Menu button for more than two seconds. The display will show ‘Press Tune to confirm reset’.
Release the Menu button.
2. Press the Tune knob to confirm the reset or press no buttons for around seven seconds to cancel the reset.
Useful addresses
The following addresses provide additional useful information about digital radio including coverage, available services
and usage tips:
Digital Radio Development Bureau
www.digitalradionow.com
BBC Digital Radio
www.bbc.co.uk/digitalradio
Digital One
www.ukdigitalradio.com
Getting help
The Hints and tips section of this manual starting on page 16, provides some advice and lists some of the more likely
reasons for problems you might have with your TEMPUS-1. If you still have a problem with your unit, either visit our
website at www.pure-digital.com or contact us using the details below for the latest support information.
PURE Digital
Imagination Technologies Ltd,
Imagination House,
Home Park Estate,
Kings Langley,
Hertfordshire, WD4 8LZ, UK
20
01923 277477
01923 270188
[email protected]
telephone
fax
e-mail
Accessories
PURE Digital supply a range of accessories and complementary products for your TEMPUS-1 including a matching ST-1
auxiliary speaker for stereo output, aerial removal spanner, external aerials, signal boosters, audio cables and adapters.
Visit the shop section of our website at www.pure-digital.com or call us on 01923 277488 to find out more.
Note You can also order an ST-1 speaker directly using the form on your warranty card.
Warranty information
Imagination Technologies Ltd. warrants to the end user that this product will be free from defects in materials and workmanship in the course
of normal use for a period of two years from the date of purchase. This guarantee covers breakdowns due to manufacturing or design faults;
it does not apply in cases such as accidental damage, however caused, wear and tear, negligence, adjustment, modification or repair not
authorised by us. Please return your warranty card to register your product with us. Should you have a problem with your unit please contact
your supplier or contact PURE Digital Support at the address shown opposite.
21
Technical specifications
General
Stereo digital radio (stereo output requires optional auxiliary speaker, headphones or external amplifier) with full
Band III reception capability, for reception of all UK DAB broadcasts.
Alarm/clock functions
Two alarm settings with separate station or tone selection and optional daily, weekday or weekend settings.
SnoozeHandle™ controls snooze function and clock display. Configurable sleep timer. Nine record timers for use
with a separate recording device.
Speaker
Full-range 3 inch drive unit.
Frequency range
Band III (174 - 240 MHz)
Input connectors
RF F-connector 75Ω for DAB aerial connection (telescopic aerial supplied). 12V DC power adapter socket (230V
adapter supplied). USB connector for software upgrades.
Output connectors
3.5 mm for stereo analogue audio output, headphones and auxiliary speaker. Optical S/PDIF output for stereo
digital audio output.
Controls
Power on/standby, tune/select, autotune, info, menu, volume, sleep, 10 presets.
LCD display
High resolution white on blue graphical LCD display with selectable brightness levels.
Amplifier freq range
80 Hz to 20 kHz
Amplifier power
3.4W RMS @ 10% THD, 2.8W RMS @ 0.1% THD
Power supply
230V AC to 12V DC external power adapter.
Aerial
Telescopic aerial supplied.
Approvals
CE marked. Compliant with the EMC and Low Voltage Directives (89/336/EEC and 73/23/EEC)
Dimensions
210 mm (width) x 175 mm (height) x 110 mm (depth)
22
Please return your registration card to the following address to validate your warranty.
PURE Digital
Imagination Technologies Ltd.,
Imagination House,
Home Park Estate,
Kings Langley, Herts., WD4 8LZ, UK
[email protected]
[email protected]
01923 270188
01923 277488
01923 277477
www.pure-digital.com
12B74
fax
sales
support & service