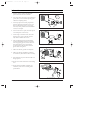
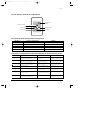
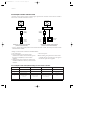
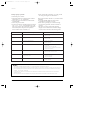
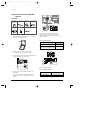
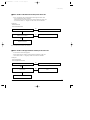
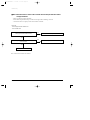
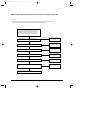
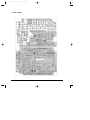
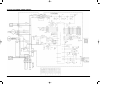
1
Duct-ADH1800E-front
2/15/01 6:26 PM
Page 2
DUCT TYPE AIR CONDITIONER
(Cool and Heat)
TYPE
INDOOR UNIT
OUTDOOR UNIT
ADH1800E
ADH2400E
ADH3200E
DH18ZA1(A2)
DH24ZA1(A2)
DH32ZA1(A2)
IDH1800E
IDH2400E
IDH3200E
DH18ZA1(A2)
DH24ZA1(A2)
DH32ZA1(A2)
UBH1800E
UBH2400E
UDH3200E
DH18ZAX
DH24ZAX
DH32ZAX
SERVICE
Manual
AIR CONDITIONER
CONTENTS
1. Precautions
2. Product Specifications
3. Operating Instructions
4. Installation
5. Disassembly and Reassembly
6. Troubleshooting
7. Exploded Views and Parts List
8. Block Diagrams
9. PCB Diagrams
10. Schematic Diagrams
11. Wiring Diagrams
Duct-ADH1800E-1
6/27/00 10:36 AM
Page 1-1
1. Precautions
da
1. Warning: Prior to repair, disconnect the
power cord from the circuit breaker.
ng
ero
us
2. Use proper parts: Use only exact replacement
parts. (Also, we recommend replacing parts
rather than repairing them.)
3. Use the proper tools: Use the proper tools
and test equipment, and know how to use
them. Using defective tools or test equipment may cause problems later-intermittent
contact, for example.
Fig. 1-1 Avoid Dangerous Contact
4. Power Cord: Prior to repair, check the power
cord and replace it if necessary.
5. Avoid using an extension cord, and avoid
tapping into a power cord. This practice
may result in malfunction or fire.
6. After completing repairs and reassembly,
check the insulation resistance. Procedure:
Prior to applying power, measure the resistance between the power cord and the
ground terminal. The resistance must be
greater than 30 megohms.
Fig. 1-2 No Tapping and No Extension Cords
7. Make sure that the grounds are adequate.
8. Make sure that the installation conditions
are satisfactory. Relocate the unit if necessary.
9. Keep children away from the unit while it is
being repaired.
10. Be sure to clean the unit and its surrounding
area.
Fig. 1-3 No Kids Nearby!
11. Be sure that the installed conditions are
satisfactory and correct according to the
specifications.
Fig. 1-4 Clean the Unit
Samsung Electronics
1-1
Duct-ADH1800E-1
6/27/00 10:36 AM
Page 1-2
MEMO
1-2
Samsung Electronics
Duct-ADH1800E-1
6/27/00 10:36 AM
Page 2-1
2. Product Specifications
2-1 Table of Specifications (Duct Type)
INDOOR UNIT
IDH1800E/DH18ZA1(A2)
IDH2400E/DH24ZA1(A2)
IDH3200E/DH32ZA1(A2)
OUTDOOR UNIT
UBH1800E/DH18ZAX
UBH2400E/DH24ZAX
UDH3200E/DH32ZAX
But/h
17,400
23,000
32,000
W
5,100
6,700
9,350
Btu/h
18,400
24,500
34,900
W
5,400
7,200
10,200
MODEL
Capacity
Cooling
Heating
Power supply
220-240~ 50Hz
Power input
Cooling
kW
1.75
2.30
3.50
Heating
kW
1.65
2.40
3.60
Running
Cooling
A
7.8
10.5
16.0
current
Heating
A
7.3
11.0
16.5
Starting
A
50.0
50.0
60.0
current
A
EER
Indoor
Cooling
W/W
2.8
2.7
2.5
Heating
W/W
2.9
2.8
2.7
H.H
r.p.m.
900
1,080
1,300
Hi
r.p.m.
800
980
1,200
Med
r.p.m.
750
930
1,150
Low
r.p.m.
700
880
1,100
Air
H.H
m /min
17
20
24.0
circulation
Hi
m /min
15
18
22
Med
m /min
14
16
21
Low
m /min
13
15
20
Hi
dB(A)
42
43
53
(Sound
Med
dB(A)
41
42
52
pressure)
Low
dB(A)
40
41
51
Heat
type
D-fin coil
D-fin coil
wave fin coil
2x10x1.7(1100)
2x10x1.7(1100)
3x8x1.4(1100)
Sirocco
Sirocco
Sirocco
Fan speed
unit
Noise Level
exchanger
3
3
3
rowxstagesxfin pitch
type
Fan
motor output
W
70
100
170
H
mm
260
260
260
W
mm
1,340
1,340
1,340
D
mm
600
600
600
Weight
kg
Net/Gross
41/57
41/57
43/59
Fan speed
Hi
r.p.m.
1,000
750
900
Low
r.p.m.
650
400
550
m3/min
35
45
50
dB(A)
55
56
62
Dimensions
Outdoor
3
unit
Air circulation (Hi)
Sound pressure level
Samsung Electronics
2-1
Duct-ADH1800E-1
6/27/00 10:36 AM
Page 2-2
Product Specifications
INDOOR UNIT
IDH1800E/DH18ZA1(A2)
IDH2400E/DH24ZA1(A2)
IDH3200E/DH32ZA1(A2)
OUTDOOR UNIT
UBH1800E/DH18ZAX
UBH2400E/DH24ZAX
UDH3200E/DH32ZAX
propeller
propeller
propeller
35
60
115
scroll
scroll
scroll
ZR22K3-PFJ
ZR28K3-PFJ
ZR42K3-PFJ
1.37
1.74
2.61
Internal
Internal
Internal
MODEL
Outdoor
Fan
Unit
type
motor output
W
Compressor type
model
motor output
kW
protection
Heat
type
wave fin coil
D fin coil
wave fin coil
exchanger
rowxstagesxfin pitch
2x24x1.7(824)
2x24x1.7(896)
2x30x1.7(886)
0.494
0.583
0.665
Capillary
Capillary
Capillary
g
2,000
2,400
2,500
mm
620x787x320
638x880x310
790x880x310
Net/Gross
63/68
67/72
77/83
face area
Refrigerant
control
(R22)charge
Dimensions (HXWXD)
Condition
Piping
m2
Weight
kg
Indoor unit
Cool(DB/WB)
˚C
27/19
27/19
27/19
Heat(DB/WB)
˚C
20/15
20/15
20/15
Outdoor unit Cool(DB/WB)
˚C
35/24
35/24
35/24
Heat(DB/WD)
˚C
7/6
7/6
7/6
Pipe O.D.
Liquid
mm(inch)
9.52(3/8")
9.52(3/8")
9.52(3/8")
size
Gas
mm(inch)
15.88(5/8")
15.88(5/8")
15.88(5/8")
Flare
Flare
Flare
Connection method
Between
2-2
Height
m
Max. 15
Max. 15
Max. 15
Pipe length
m
Max. 30
Max. 30
Max. 30
Samsung Electronics
Duct-ADH1800E-1
6/27/00 10:36 AM
Page 2-3
2-2 Dimensions
2-2-1 Indoor unit
Indoor Unit Dimensions (ADH1800E / 2400E / 3200E)
(DH18ZA1(A2) / DH24ZA1(A2) / DH32ZA1(A2)
Samsung Electronics
2-3
Duct-ADH1800E-1
6/27/00 10:36 AM
Page 2-4
Product Specifications
2-2-2 Outdoor Unit
(a) 18K BTU
(Rear view)
620
(Front view)
582
787
340
(b) 24K BTU
(Rear view)
638
(Front view)
660
878
2-4
Samsung Electronics
Duct-ADH1800E-1
6/27/00 10:36 AM
Page 2-5
Product Specifications
310
(c) 32K BTU
(Rear view)
790
(Front view)
660
880
Samsung Electronics
2-5
Duct-ADH1800E-1
6/27/00 10:36 AM
Page 2-6
Product Specifications
• Wired Remote Controller - Buttons and Display
The wired remote controller is an optional accessory.
The wired remote controller is installed on the wall.
Operating mode
Removing frost indicator
Centralized controller indicator
(In case of installing the Centralized controller)
Communication error indicator
Temperature setting
On Timer setting
Fan speed
Off Timer setting
Filter Sign indicator
Test indicator
On/Off & Timer
Set/Cancel button
Temperature adjustment
buttons
On Timer button
On/Off indicator
Fan speed
adjustment button
Off Timer button
Test button
Filter Reset button
Mode selection button
Note : - Test button is for your installation specialist. You must NOT press it.
- After cleaning the air filter, press the filter reset button, if the filter has been installed.
Then the wired remote controller will display the FILTER SIGN indicator when the time to
clean the air filter; refer to page 30.
2-6
Samsung Electronics
Duct-ADH1800E-1
6/27/00 10:36 AM
Page 2-7
Product Specifications
• Wireless Remote Controller-Buttons and Display
The wireless remote controller is an optional accessory.
Operating mode
Temperature setting
Mode selection button
Temperature adjustment
buttons
Filter Reset button
Fan speed
Fan speed adjustment
button
Timer Cancel button
On Timer setting
Off Timer setting
On Timer button
Off Timer button
Battery discharge indicator
On/Off & Timer
Set/Cancel button
Note : After cleaning the air filter, press the filter reset button, if the filter has been installed.
Samsung Electronics
2-7
Duct-ADH1800E-1
6/27/00 10:36 AM
Page 2-8
Product Specifications
• Centralized Controller
The centralized controller is an optional accessory.
The centralized controller is installed on the wall
Operating lamp
All On button
All Off button
On/Off indicators
On/Off buttons
Index
Note : Operating lamp comes on when at least one air conditioner connected to the centralized
controller is operating.
2-8
Samsung Electronics
Duct-ADH1800E-1
6/27/00 10:36 AM
Page 3-1
3. Operating Instructions
3-1 Display on the wall
The receiver & display unit is installed on the wall.
Removing frost
indicator
Remote control sensor
Timer indicator
On/Off indicator
Samsung Electronics
Filter Sign indicator
On/Off button
3-1
Duct-ADH1800E-1
6/27/00 10:36 AM
Page 3-2
3-2 Name & Functions in Remote Control
3-2-1 Wired Remote Controller-Buttons
NO
NAMED OF KEY
FUNCTION OF KEY
Power On/Off button to start and stop airconditioner or timer set up
1
(UP)
Temp. up button. To increase the temperatute by the pressing
the temperature button
(DOWN)
Temp. down button. To decrease the temperature by the pressing
the temperature button
2
3
Each time you press this button
Mode is changed in the following order
: Auto Mode
: Blowing
: Cooling Mode
: Heat Mode
: Dehumidifying Mode
To complete the installation, checks and tests to ensure that the air conditioner is
operating correctly.
4
When the FILTER SIGN indicator appeard on the remoconscreen, cleaning the air
conditioner filter. After that, press the this button.
5
7
8
3-2
Each time you press this button,
FAN SPEED is changed in the following order.
The ON Timer enables you to switch on the air conditioner automatically
after a given period of time that is from 30 minutes to 24 hours.
To cancel the On Time, press the (Set/Cancel) button.
The Off Timer enables you to switch off the air conditioner automatically
after a given period of time that is from 30 minutes to 24 hours.
To cancel the On Time, press the (Set/Cancel) button.
Samsung Electronics
Duct-ADH1800E-1
6/27/00 10:36 AM
Page 3-3
Operating Instructions
3-2-2 Wireless Remote Controller
NO
FUNCTION OF KEY
NAMED OF KEY
Power On/Off button to start and stop airconditioner or timer set up
1
(UP)
Temp. up button. To increase the temperatute by the pressing
the temperature button
(DOWN)
Temp. down button. To decrease the temperature by the pressing
the temperature button
2
3
Each time you press this button
Mode is changed in the following order
: Auto Mode
: Blowing
: Cooling Mode
: Heat Mode
: Dehumidifying Mode
4
5
When the FILTER SIGN indicator appeard on the remoconscreen, cleaning the air
conditioner filter. After that, press the this button.
Each time you press this button,
FAN SPEED is changed in the following order.
6
To cancel the on Timer.
7
The ON Timer enables you to switch on the air conditioner automatically
after a given period of time that is from 30 minutes to 24 hours.
To cancel the On Time, press the (Set/Cancel) button.
8
The Off Timer enables you to switch off the air conditioner automatically
after a given period of time that is from 30 minutes to 24 hours.
To cancel the On Time, press the (Set/Cancel) button.
Samsung Electronics
3-3
Duct-ADH1800E-1
6/27/00 10:36 AM
Page 3-4
3-3 Control system diagram
Operation
mode
Operating
selection mode
RECEIVE &
DISPLAY UNIT
ON/OFF KEY
* Automatic operation
WIRELESS
REMOTE
CONTROLLER
* Start/Stop, operation mode select, wind volume select,
temperature control, filter reset, reserved operation, up
and down operation(cassette), timer cancel
WIRED
REMOTE
CONTROLLER
* Start/Stop, operation mode select, wind volume select,
temperature control, filter reset, reserved operation, up
and down operation(cassette), timer cancel, startup,
group control setting and disassembly
CENTRALIZED
CONTROLLER
* Centralized control
→ 16 chamber set all on, 16 chamber set all off
→ Each chamber set on/off
→ Centralized control level setting
Automatic
operation
Automatic change over according to the desired
temperature 18˚C ~ 30˚C.
Automatic wind volume control according to the difference between the desired temperature and room temperature
Cooling
operation
Room temperature control according to the desired
temperature (18˚C ~ 30˚C)
Dehumidifying
operation
3-4
Humidity control depending upon the difference
between the desired temperature and the room
temperature (18˚C ~ 30˚C)
Blowing
operation
Indoor fan motor operation only (breeze, weak, strong
wind or weak, strong, turbo)
Heating
operation
Room temperature control according to the desired
temperature (16˚C ~ 30˚C)
Samsung Electronics
Duct-ADH1800E-1
6/27/00 10:36 AM
Page 3-5
Operating Instructions
Wind volume
select mode
Manual 3 steps
Breeze, weak, strong (available at cooling, heating,
blowing)
Wind
volume auto
Auto wind volume control depending on the difference
between the desired temperature and room temperature
Wind flow select
mode
Up and down
rotation
Available by wire and wireless remote controller and
operated only for rotation/stop (cassette type model
dedicated)
Reserved
operation mode
Timer operation
for
30min ~ 24 hours
Selectable by wired & wireless remote controller and
available for start, stop, start/stop reservation
Samsung Electronics
3-5
Duct-ADH1800E-1
6/27/00 10:36 AM
Page 3-6
3-4 Micro Computer Block Diagram
3-4-1 Indoor Unit
3-6
Samsung Electronics
Duct-ADH1800E-1
6/27/00 10:36 AM
Page 3-7
3-4-2 Outdoor Unit
Samsung Electronics
3-7
Duct-ADH1800E-1
6/27/00 10:36 AM
Page 3-8
MEMO
3-8
Samsung Electronics
Duct-ADH1800E-2-1
4/12/00 5:44 PM
Page 4-1
4. Installation
4-1 Operation of the Remote Controller (Wired/Wireless receiving board)
4-1-1 Name and function of each part for the wired remote controller
Operating mode
Centralized Controller indicator
Removing frost indicator
(In case of installing the Centralized controller)
Communication error indicator
Temperature setting
Fan speed
On Timer setting
Off Timer setting
Filter Sign indicator
Test indicator
On/Off & Timer Set/Cancel button
Temperature adjustment buttons
On/Off indicator
On Timer button
Fan speed adjustment button
Off Timer button
Test button
Filter Reset button
Mode selection button
BUTTON NAME
On/OFF & Timer
Set/Cancle
Temperature adujustment
(…, †)
FUNCTION
• Start and stop of operation
- To toggle the operation On and Off.
• When making the reservation
- The reservation time can be set or canceled when pushing the Timer Set/ Cancel button
after adjusting the reservation time with On Timer or Off Timer.
• To increase (…) or decrease (†) the desired temperature.
• One cycle or continuous operation is available.
On Timer
• To increase the On reservation time
• One cycle or continuous operation is available.
Off Timer
• To increase the Off reservation time
• One cycle or continuous operation is available.
Test
Mode Selection
• Pressing the key for more than 3 seconds with the SET off starts the initial operation (forced
cooling operation for 3 minutes).
• To rotate in the order of AUTO → Cooling → Dehumidifying → Blowing → heating.
Filter Reset
• When the filter sign display starts to show the replacement time of filter of indoor unit,
pressing the key after cleaning the filter resets the filter sign.
Fan Speed
• The wind mode to rotate in the order of wind select button, Breeze → Weak → Strong →
Wind auto → Breeze.
Samsung Electronics
4-1
Duct-ADH1800E-2-1
4/12/00 5:44 PM
Page 4-2
Installation
4-1-2 Name and function of each part for the wireless remote controller
Operating mode
Temperature setting
Mode selection button
Temperature adjustment buttons
Filter Reset button
Fan speed
Fan speed adjustment button
Timer Cancel button
On Timer setting
Off Timer setting
On Timer button
Off Timer button
Battery discharge indicator
On/Off & Timer Set/Cancel button
BUTTON NAME
On/OFF & Timer
Set/Cancle
Temperature adujustment
(…, †)
FUNCTION
• Start and stop of operation
- To toggle the operation On and Off.
• When making the reservation
- The reservation time can be set or canceled when pushing the Timer Set/ Cancel button
after adjusting the reservation time with On Timer or Off Timer.
• To increase (…) or decrease (†) the desired temperature.
• One cycle or continuous operation is available.
On Timer
• To increase the On reservation time
• One cycle or continuous operation is available.
Off Timer
• To increase the Off reservation time
• One cycle or continuous operation is available.
Timer Cancle (DUCT)
• To rotate in the order of Auto → Cooling → Dehumidifying → Blowing → Heating
Mode
• When the filter sign display starts to show the replacement time of filter of indoor unit,
pressing the key after cleaning the filter resets the filter sign.
Filter Reset
Fan Speed(
• To cancel the reservation setting (In case of Duct model).
• To swing the top and bottom louver (in case of Cassette model).
)
• The wind mode to rotate in the order of wind select button, Breeze → Weak → Strong →
Wind auto → Breeze.
There is no test key separately assigned to the
wireless remote controller.
<When doing the test operation with wireless remote
controller...>
1. Remove both batteries from the wireless remote
controller.
4-2
2. At the state of simultaneous pressing of On Timer key
and Off Timer key, insert the batteries in the wireless
remote controller.
3. When the wireless remote controller is on the TEST
MODE, press On/Off key to make the SET for the Test
operation.
Samsung Electronics
Duct-ADH1800E-2-1
4/12/00 5:44 PM
Page 4-3
Installation
4-1-3 The Indicators on the Receive & Display Unit
Removing frost
indicator
Remote control sensor
Filter Sign indicator
Timer indicator
On/Off indicator
On/Off button
4-1-4 Opeartion specification of wireless receiving board
PART NAME
SOURCE & OPERATION SPEC.
REMARK
DEFROST LAMP
RED, lamp on during defrost operation
in ERROR DISPLAY : flickering
FILTER SIGN LAMP
Green, display during filter cleaning
in ERROR DISPLAY : filickering
TIMER LAMP
Green, lamp when setting the reserve operation
in ERROR DISPLAY : flickering
ON-OFF LAMT
Red, lamp during operation on
in ERRO DISPLAY : flickerning
ON-OFF BUTTON
On/Off toggle operation
Operated only for automatic mode operation
4-1-5 Wireless receiving board and outdoor unit PCB display specification when error occurs
ERROR MODE
CONTENTS OF ERROR
(OUTDOOR DISPLAY)
WIRELESS RECEIVING BOARD
DISPLAY (INDOOR UNIT)
REMARK
E1
Abnormal on indoor temperature sensor
(4.9[V] and higher, 0.5[V] and lower
Reservation LED flickering
(1Hz period)
Restored when the indoor
temperature sensor is normal
E5
Abnormal on indoor pipe temperature sensor
(4.9[V] and higher, 0.5[V] and lower
Operation LED and reservation
LED flickering (1Hz period)
Restored when the indoor pipe
temperature sensor is normal
E6
Abnormal on outdoor temperature sensor
(4.9[V] and higher, 0.5[V] and lower
Operation LED and filter LED
flickering (1Hz period)
Restored when the outdoor
temperature sensor is normal
Float switch detection
Reservation LED and filter LED
alternating flickering (1Hz period)
Float switch detection
Indoor ↔ outdoor communication defect
Reservation LED and filter LED
flickering (1Hz period)
Re-detecting by operating off
signal after restoring
EC
Indoor unit ↔ wired remote controller
communication defect
Operation LED and reservation
LED alternating flickering (1Hz
period)
Abnormal on outdoor pipe temperature sensor
(4.9[V] and higher, 0.5[V] and lower
Filter LED flickering (1Hz period)
Ed
E9
EA
Samsung Electronics
Restored when outdoor pipe
temperature sensor is normal
4-3
Duct-ADH1800E-2-1
4/12/00 5:44 PM
Page 4-4
Installation
4-1-6 Example of remote controller control
1 chamber wireless wireless remote controller single operation and 1 chamber wireless remote controller +
wired remote controller combination control
Outdoor unit
Outdoor unit
Indoor unit
Indoor unit
Wireless
receiving
board
Wireless
receiving
board
Wireless
remote
controller
Wired remote
controller
Wireless
remote
controller
Example of 1 chamber single operation
(wireless remote controller)
Example of 1 chamber single operation
(wireless + wired remote controller)
* In case of 1 chamber single operation (wireless remote controller+wired remote controller), both setting of wired remote controller
to MASTER/SLAVE is available.
<Setting of wired remote controller to MASTER MODE >
1. Put off the power.
2. For the combined use of wireless remote
controller and wireless remote controller, put on
the option switch(DS01)4 of wired remote
controller.
3. Putting off the option switch 4 of wired remote
controller disables the control by wireless remote
controller.
4. Put on the power.
✽ After resetting the option in the wired remote
controller, be sure to put the power on again so
that the set option can be applied.
4-1-7 PCB option and switch(DS01) setting of wired remote controller
DIP SWITCH NO
OPTION ITEM
SW ON
SW OFF
DEFAULT
1
Basic specification
-
-
Fixed to OFF
2
Indoor unit control
Group control
Indoor unit 1 chamber control
OFF
3
Basic specification
-
-
Fixed to OFF
4
Combined use of
wireless remote
controller
Able to operate of wired
remote controller
(SLAVE MODE)
Disable to operate the
wireless remote controller
(MASTER MODE)
OFF
4-4
Samsung Electronics
Duct-ADH1800E-2-1
4/12/00 5:44 PM
Page 4-5
Installation
4-1-8 Function comparison of wired remote controller vs wireless remote controller
In case of control for the wired remote controller
and wireless remote controller installed
individually, almost similar functions are
performed, and in case of combined use of wired
and wireless remote controllers, Enalbe/Disable
PART NAME
can be set at the wired remote controller for the
wireless remote controller but the 16 chambers
operation can be done only from wired remote
controller.
WIRED REMOTE CONTROLLER
Wireless REMOTE CONTROLLER
Operation ON/OFF
ON/OFF available
ON/OFF available
Wind flow setting
Up and down control available (Cassette model)
Up and down control available (Cassette model)
Wind volume setting
Breeze/Mild/Strong adjustment available
Breeze/Mild/Strong adjustment available
Group operation
16 chamber group operation available
16 chamber group function not available
Test operation
Test operation by test button
Available by combination of button during the
power reset without test button
Operation mode setting
Settable of auto/cooling/
dehumidifying/blowing/heating
Settable of auto/cooling/
dehumidifying/blowing/heating
Reservation function
Start/stop/start-stop reservation available
Start/stop/start-stop reservation available
Timer cancel
Timer cancel button provided (Duct model)
No timer cancel button
Temperature setting
Cooling : 18˚C ~ 30˚C
Heating : 16˚C ~ 30 ˚C settable
Cooling : 18°C ~30°C
Heating : 16°C ~30°C settable
Filter reset
Filter reset button provided
Filter reset button proviced
Centralized control display
Displayed as centralized control
No function
Self-diagnosis among the
group control
To display while scanning the installed set
during reset
No function
Error display
Displayed as 2 digit segment
No function
Master/slave setting
Master/slave settable by PCB option switch
No function
4-1-9 Option and dip switch(SW2) setting of ass'y main in PCB
DIP SWITCH
OPTION ITEM
SW ON
SW OFF
DEFAULT
1
VENTILATOR FAN
Not installed
Not installed
-
2
DRAIN PUMP
Installed
Installed
-
3
FLOAT SWITCH
Installed
Not installed
-
4
FILTER CLEANING PERIOD
1000 Hr
2000 Hr
-
5
INDOOR FAN MOTOR SPEED
NORMAL SPEED
HIGH SPEED
-
Samsung Electronics
4-5
Duct-ADH1800E-2-1
4/12/00 5:44 PM
Page 4-6
4-2 Control of the Remote Controller
4-2-1 Chamber Group Control(Wireless remote controller + Wired remote controller system)
Outdoor unit
Outdoor unit
"A" chamber
Indoor unit
"B" chamber
"O" chamber
"C" ~"N" chamber
"P" chamber
Indoor unit
Wireless
receiving board
Wireless
receiving board
Wireless
receiving board
Wireless
receiving board
Wireless
remote
controller
Wireless
remote
controller
Wireless
remote
controller
Wireless
remote
controller
Wired remote
controller
Wired remote
controller
Wired remote
controller
Wired remote
controller
Figure. 16 Chamber Group Control (Wireless remote controller + wired remote controller) System
• The 16 chamber remote controller operation by wired remote controller can be simultaneously performed
all for 16 chambers through setting the 16 chambers to one group through one wired remote controller.
• While operated in Group, the control by wireless remote controller installed in all chambers (“A” ~ “F”)
is disabled except the wired remote controller installed in the “A” chamber and the simultaneous use
with the option item, the centralized controller is also disabled.
4-2-2 The group operation of 16 chambers and operation method by wired remote controller
1. Setting of indoor unit Main PCB
• Put off all of set power installed in each room.
• Remove the centralized controller if any is used
already.
• Connect the communicating line from “A”
chamber to “F” chamber.(R1<->R1, R3<->R3)
• Connect the “R1”, “R2” and “R3” of indoor
terminal board installed to the “R1”,”R2”,”R3”
of wired remote controller, respectively.
4-6
• Remove CN20 connector and wire of main PCB
of Indoor unit except the one installed in “A”
with reference of the figure.
• Adjust the address of digital switch of indoor
unit PCB in “A” chamber to “0”.
Samsung Electronics
Duct-ADH1800E-2-1
4/12/00 5:44 PM
Page 4-7
Installation
Adjust the address of digital switch of indoor unit PCB in “B” chamber to “1”. In such a way, adjust the
address of digital switch up to chamber “F”.
• Put on the set power installed in each chamber.
Caution :
• During the connection, connect the “R1” of indoor unit terminal board installed in each chamber with “R1”.
• During the connection, connect the “R3” of indoor unit terminal board installed in each chamber with “R3”.
• Do not connect the terminal R2 of indoor unit terminal board from “B” to “F” chamber except A” chamber.
• The option item, centralized controller shall be removed since the simultaneous use with wired remote controller is disable
during the group control.
• Adjust the address of indoor unit digital switch installed in each chamber so that it might not be duplicated.
2. Setting of wired remote controller
• Put off the set power where the wired remote controller is installed.
• Put on the option switch SW(DS01)2 of wired remote controller.
• Put on the set power where the wired remote controller is installed.
Caution :
• The option can be applied when the power is put again after resetting the option of wired remote controller. Be sure to keep the
set power on/off after option setting.
Samsung Electronics
4-7
Duct-ADH1800E-2-1
4/12/00 5:44 PM
Page 4-8
Installation
4-2-3 Operation method of wired remote controller
"A" chamber
"B" chamber
Indoor unit
Indoor unit
R1 R2 R3
"C" ~ "N" chamber
R1 R2 R3
"O" chamber
"P" chamber
Indoor unit
Indoor unit
R1 R2 R3
R1 R2 R3
R1 R2 R3
Wired remote
controller
Figure. 16 Chamber Group Control (Wireless remote controller + wired
remote controller) Connection Diagram
• Press the ON/OFF button of wired remote controller to be on.
At the time, the set installed from A chamber to F chamber is getting on in order with the interval of 2
seconds.
• Select the operation ofauto/cooling/dehumidi-fying/blowing/heating by pressing MODE BUTTON.
• Select breeze/mild/strong wind by pressing the wind volume button.
• Adjust the temperature set button to set the desired temperature.
✽ For reference
• The communication between wired remote
controller and indoor unit is made through the
synchronization with the output signal of zero
cross detect circuit, and when 50Hz power is
used, it has the 50bps transmission speed and
when it has 60Hz power it has 60bps transmission
speed. The transmission data between the wired
remote controller and indoor unit is shown as in
the figure.
RECEIVE MODE
Indoor unit
Wired remote
controller
SEND MODE
Since the communication data between wired remote
controller and indoor unit is consisting of total
10Byte, 2 seconds are required when using 50Hz
power.
• For the communicating time with 16 chambers
during the normal operation, 32 seconds are
required and for the time with 16 chamber during
the reservation operation, 64 seconds are required
due to the increase of communicating data.
4-8
Samsung Electronics
Duct-ADH1800E-2-1
4/12/00 5:44 PM
Page 4-9
Installation
4-2-4 Startup method by wired remote controller
Startup in case of the “A” chamber single
operation
• Put on the set power.
• Adjust the address of digital switch of indoor
unit PCB to “0”.
• Put ON the option switch(DS01) N02 of wired
remote controller PCB.
• Put on the set power.
• Press the test button of wired remote controller
Error Code
for more than 3 seconds.
• The set is operated for 3 minute by the forced
cooling operation and the set is off after 3
minute.
• The error occurring during the test operation is
displayed on the wired remote controller
windows and it shall be referred to the
following table.
Meaning
Checking Area
01
Indoor unit room thermistor error
• Indoor unit thermistor available or not and
disconnected
• Indoor unit PCB
05
Indoor unit pipe thermistor error
• Indoor unit pipe thermistor
• Indoor unit PCB
06
Outdoor unit thermistor error
• Outdoor unit thermistor
• Outdoor unit PCB
09
Float switch open error
• Drain pump, float switch
• Drain system
• Dip SW2 of indoor unit main PCB
(If the drain pump is not installed, SW2 and
SW4 shall be at the Off position.)
0A
Indoor unit ↔ outdoor unit communicating error
• Indoor unit ↔ outdoor unit communicating
error
• Indoor unit ↔ outdoor unit communicating
cable
• Indoor unit PCB, Outdoor unit PCB
0C
Wired remote controller ↔ indoor unit
communication error
• Wired remote controller ↔ indoor unit
communication cable
• Indoor unit main PCB
0D
Outdoor unit pipe thermistor error
• Outdoor unit pipe thermistor
• Outdoor unit PCB
Caution :
• Unless the address of digital switch of indoor unit PCB is set to “0” in case of “A” chamber single operation, the control by the wired
remote controller is disabled.
• The power of SET shall be put on again after the resetting of wired remote controller option so that the the set option can be applied.
Be sure to keep the power on/off of SET before and after the setting.
• The first digit of error code displayed during the single operation and group operation may be different. The first digit(MSB) stands for
the address of the set where the error occurs. Since it is the single operation, the address of SET is “0”.
Samsung Electronics
4-9
Duct-ADH1800E-2-1
4/12/00 5:44 PM
Page 4-10
Installation
• If the current SET of chamber “A” is ON, put the
set off by pressing the ON/OFF button.
Startup of group operation
• Put off the power of SET.
• Adjust the addresses of digital switch of indoor
unit PCB to “0”~”15”, respectively.
• Put on the option switch SW2 of wired remote
controller PCB.
• Put on the power of SET.
• On the wired remote controller display, the digits
“00” → “11” → “22” → are displayed up to “FF”.
After “FF” display, the wired remote controller is
automatically set to the preserved operation
status of indoor unit of chamber “A”.
Error Code
Only at the SET off of chamber “A”, the TEST mode
is enabled.
• Press the TEST BUTTON of wired remote
controller for more than 3 seconds.
• If the SET is operating for 3 minutes through
forced cooling operation, the SET is off after 2
minutes.
• The Error occurring in the TEST operation
displays in the wired remote controller display
window and is referred to the following table.
Meaning
Checking Area
*1
Indoor unit room thermistor error
• Indoor unit thermistor exist or not disconnected
• Indoor unit PCB
*5
Indoor pipe thermistor error
• Indoor unit pipe thermistor
• Indoor unit PCB
*6
Outdoor unit thermistor error
• Outdoor unit thermistor
• Outdoor unit PCB
*9
Float switch open error
• Drain pump, float switch
• Drain system
• Dip SW2 of indoor unit main PCB
(If drain pump is not installed, SW2 and SW4
shall be at OFF position.)
*A
Indoor unit ↔ outdoor unit communication error
• Indoor unit ↔ Outdoor unit communication cable
• Indoor unit PCB, outdoor unit PCB
*C
Wired remote controller ↔ indoor unit
communication error
• Wired remote controller ↔ indoor unit
communication cable
• Indoor unit main PCB
*D
Outdoor unit pipe thermistor error
• Outdoor unit pipe thermistor
• Outdoor unit PCB
Caution :
• Test operation is disabled when the chamber “A” is on after initialization of wired remote controller.
• The communication time between wired remote controller and indoor unit is required for 2 seconds. If any one of set is ON, be sure to
put it off by pressing the ON/OFF button and start the TEST operation after 35 seconds at minimum.(The communication time with all
chambers : 16 x 2 seconds = 32seconds)
• For the reservation operation, the communication time between all 16 chambers is required for 64 seconds due to the increase of
communication data.
• The first digit (MSB) of error code displayed during the group operation stands for the address of SET where the error occurs.
4-10
Samsung Electronics
Duct-ADH1800E-2-1
4/12/00 5:44 PM
Page 4-11
4-3 Centralized Controller
4-3-1 Appearance and characteristics of Centralized Controller
The centralized controller is installed on the wall.
The centralized controller is an optional accessory.
Operating lamp
All On button
All Off button
On/Off indicators
On/Off buttons
Index
NOTE : Operating lamp comes on when at least one air conditioner
connected to the centralized controller is operating.
• Since the centralized controller has the relay
equipment, the option mounted on the indoor
unit, the On/Off can be set for 16 chambers
through the modem communication.
• Linkage of wired remote controller to wired
remote controller is available by 3 kinds of level.
• The maximum extended distance of 1 Km is
possible through modem communication. (the
relay equipment is installed at the option item,
indoor unit)
• The connection by non-polarity method is easy.
BUTTON NAME
FUNCTION
ALL1
• To put on all 16 chambers' set.
ALL0
• To put off all 16 chambers' set.
"01" ~ "16"
Samsung Electronics
• To put on/off set assigned with the number.
4-11
Duct-ADH1800E-2-1
4/12/00 5:44 PM
Page 4-12
Installation
4-3-2 Example of the centralized control system configuration
Outdoor unit
Outdoor unit
"A"
chamber
Outdoor unit
"B"
chamber
Outdoor unit
"0"
chamber
"P"
chamber
"C" ~"N" chamber
Indoor unit
Indoor unit
Indoor unit
Indoor unit
16
chamber
Relay
equipment
Wireless
receiving board
Wireless Wired remote
receiving
controller
controller
Wireless
receiving board
Relay
equipment
Wireless Wired remote
receiving
controller
controller
Wireless
receiving board
Relay
equipment
Wireless Wired remote
receiving
controller
controller
Wireless
receiving board
Relay
equipment
Wireless Wired remote
receiving
controller
controller
Centralized controller
Figure. 16 Chambers Centralized Control (wireless remote controller + wired
remote controller + centralized controller) System
4-3-3 Chambers Cnetralized Control System Connection Diagram
"A" chamber
"B" chamber
Indoor unit
Indoor unit
Indoor unit
Relay
01 02 equipment
Relay
01 02 equipment
Relay
01 02 equipment
"C" ~ "O" chamber
"P" chamber
01 02
4-12
Samsung Electronics
Duct-ADH1800E-2-1
4/12/00 5:44 PM
Page 4-13
Installation
4-3-4 Centralized control operation method
1. Setting of indoor unit
• Put off the set to be installed.
• Put off the power of the centralized controller.
• Mount the transmitter, the option item on the indoor unit set terminal board.
• Adjust the address of digital switch of transmitter mounted. (Adjust the address of transmitter
mounted in chamber “A” to “0” and “B” to “1”... continue the adjustment up to “F” to “F”)
• Connect the terminals O1 and O2 of the terminal board mounted on the centralized controller to the O1
and O2 of the terminal board installed in chamber “A”.
• If the wired remote controller is installed, be sure to put off the SW2(DS01) of PCB option switch.
• Remove the centralized controllers installed at chamber “B” to chamber “F” if any except the A
chamber.
• Adjust the address of digital switch of indoor unit PCB to “0”.
• Connect O1 and 02 of terminal board installed in chamber A to O1 and 02 of terminal board installed in
chamber B.
• Continue to connect O1 and 02 of terminal board mounted on indoor unit in chamber B ~ F to O1 and
O2 of terminal board of centralized controller(recommended).
2. Setting at centralized control side
• Adjust the applicable level of centralized controller with the reference of the table.
3. When the setting is finished at indoor unit and centralized controller,
• Put on the power of installation completed set of each chamber.
• Put on the power of centralized controller.
REMARK
DIP SWITCH
SW1
SW2
SW3
SW4
LEVEL 0
OFF
OFF
OFF
OFF
Set operation according to the final controlled one among the
centralized controller, wire, and wireless
LEVEL 1
OFF
OFF
OFF
ON
When centralized controller OFF : disable to control wired and
wireless
When centralized controller ON : enable to control wired and
wireless
LEVEL 2
OFF
OFF
ON
ON
Enable to control only in the centralized controller
Disable to control the wired and wireless remote controller
Error Code
LED flickering
Meaning
Communication error between indoor unit and
centralized controller
Checking Area
Transmitter, indoor unit, centralized controller
Caution :
• The communication between centralized controller and transmitter is modem method and there is no polarity but connect “O1”
terminal to “O1” terminal and “O2” terminal to “O2”terminal.
• The address of transmitter mounted on each indoor unit shall not be duplicated.
• After the resetting of operation level of centralized controller, it is not necessary to reset the power differently from that of wired
remote controller. In other words, the operation level can be reset even during the operation if required.
Samsung Electronics
4-13
Duct-ADH1800E-2-1
4/12/00 5:44 PM
Page 4-14
Installation
4-3-5 Operation specification of wireless and wired remote controller while using the
centralized controller.
Wired remote
controller
SLAVE
Wired remote controller has the priority of control
over the wireless.
Wired remote controller has not the priority of control
over the wireless.
LEVEL 0
A area : to be operated be the final input of
centralized controller and wired remote controller,
and the wireless remote controller does not work
even through installed.
D area : to be operated by the final input of
centralized controller, wired remote controller and
wireless remote controller.
LEVEL 1
B area : The wired remote controller operates only
when the centralized controller is on but the wireless
remote.
E area : the wired and wireless remote controller
operate only when the centralized controller in on.
LEVEL 2
C area : only the centralized controller operates but
the wired and wireless remote controller do not
work.
F area : only the centralized controller operates but
the wired and wireless remote controller do not
work.
Centralized
controller
4-14
MASTER
Samsung Electronics
Duct-ADH1800E-2-1
4/12/00 5:44 PM
Page 4-15
4-4 Selecting Area for Installation
Select an area for installation that is suitable to
the customer’s needs.
4-4-1 Indoor Unit
1. Make sure that you install the indoor unit in an
area providing good ventilation. It must not be
blocked by an obstacle affecting the airflow near
the air inlet or the air outlet.
2. Make sure that you install the indoor unit in an
area allowing good air handling and endurance
of vibration of the indoor unit.
3. Make sure that you install the indoor unit in an
area where there is no source of heat or vapor
nearby or direct sunlight.
4. Make sure that you install the indoor unit in an
area from which hot or cool air will spread
evenly in the room.
5. Make sure that you install the indoor unit in an
area that provides easy pipe connection with
the outdoor unit, and easy drainage for
condensed water.
6. The ceiling should not be inclined by more than
2 degrees.
7. The distance between the indoor unit and the
outdoor unit should not be longer than 30m.
(recommended distance between two units is 5m.).
and the height difference between the indoor unit
and the outdoor unit should be less than 15m.
8. There should be enough space around the indoor
unit to provide easy installation and service.
10. Please use the given accessories to install the
indoor unit. (set of slings)
• Check that the installed location is strong
enough to hang the indoor unit on.
• The distances of the following should be
limited:
The lengths of refrigerant tube 30 m.
The height difference between indoor and
outdoor unit should be less than 15 m.
,,,,,
,,,,
,,,,
,,,,,
,,,,,
Inspection
access
450X450
270mm min.
1256mm
5mm min.
Electrical component box
250mm
260mm
Space requirement when installing the indoor unit
400mm
165mm
650mm
air outlet duct flange
Refrigerant
connection port
You must have 5mm or more space between the
ceiling and the bottom of indoor unit. Otherwise, the
noice from the vibration of indoor unit may bother
the user.
Space requirement when installing the air filter
Rear of the indoor unit
165mm
165mm
Note : ◆ The air filter can be installed to the bottom or
rear of the indoor unit.
Samsung Electronics
4-15
Duct-ADH1800E-2-1
4/12/00 5:44 PM
Page 4-16
Installation
4-4-2 Outdoor unit
1. Make sure that you install the outdoor unit in
an area not exposed to the rain or direct
sunlight. (Install a separate sunblind if exposed
to direct sunlight.)
2. Make sure that you install the outdoor unit in
an area, not amplifying noise or vibration,
especially to avoid disturbing neighbours. (Fix
the unit firmly if it is mounted on a high place.)
3. Make sure that you install the outdoor unit in
an area providing good ventilation and which is
not dusty. It must not be blocked by any
obstacle affecting the airflow near the air inlet
and the air outlet.
10. If you install the outdoor unit in a location that
has open airflow, you should install the outdoor
unit in a direction that airflow out from the
outdoor unit is perpendicular to the open air
flow direction.
Open Air
Air flow out
Open Air
4. Make sure that you install the outdoor unit in
an area free from animals or plants.
5. Make sure that you install the outdoor unit in
an area not blocking the traffic.
11. Install the oil trap according to the installation
condition. (see the figure)
a. When the indoor unit is above the outdoor unit
6. Make sure that you install the outdoor unit in
area easy to drain condensed water.
7. If installed on a desk, it should not be installed
in a direction that puts open airflow is against
airflow from the outdoor unit. It will make the
air conditioner malfunction.
Indoor unit
Outdoor
unit
8. Do not let hot air flow into the outdoor unit
because the air conditioner will malfunction.
The hot air may come from other near-by the
outdoor unit or heating equipment or itself.
b. When the outdoor unit is above the indoor unit
9. If install the outdoor unit directly against the
wall, the minimum distance between the
outdoor unit and the wall should be 1.5 m.
1.5 m.
Outdoor unit
0.15 m.
Indoor unit
Wall
Building
Radius
5cm
Oil trap
(suction tube)
4-16
Samsung Electronics
Duct-ADH1800E-2-1
4/12/00 5:44 PM
Page 4-17
Installation
12. You should leave spacing around the outdoor
unit at least according to the figure for easy
installation, service and ventilation.
15. In case of hanging the outdoor unit, you should
hang it on a rigid wall area and use right angle
steel thickness of 4 mm. as a holder.
Rigid wall
0.1 m.
Fasten right angle steel by using screws
0.35 m.
0.1 m.
Right angle steel thickness of 4 mm.
13. Install the outdoor unit on a rigid base.
14. Fasten the outdoor unit to the base by using
bolts or nuts.
Samsung Electronics
Caution :
It is harmful to the air conditioner if it is used in the following
environments: greasy areas (including near machines), salty
areas such as coast areas, areas where sulfuric gas is present
such as hot spring areas, large variance in electricity voltage
such as in a factory. Contact your dealer for advice.
4-17
Duct-ADH1800E-2-1
4/12/00 5:44 PM
Page 4-18
Installation
4-4-3. Air Conditioner and Accessories
The following accessories are supplied with the air conditioner. The quantities are indicated in parantheses.
Basic Accessories
Owner’s
Instructions(1)
Installation
Manual(1)
NS
NES
OWNER'S INSTRUCTIO
INSTRUCCIO
MANUAL DE
PER L'USO
ISTRUZIONIINSTRUÇÕES
MANUAL DE
N
MANUEL D'UTILISATIO
ANWEISUNG
GEBRAUCHS
OWNER'S
INSTRUCTIONS
SPLIT-TYPE ROOM
AIR CONDITIONER
Insulation outlet(1)
Insulation inlet(1)
Pattern Sheet(1)
Air ConditionerSplit
Splut-type Room
doméstico sistema
ad unità Separate
Aire acondicionado
d'aria per ambienti
Condizionatorede ar condicionado tipo Split
Aparelho
type séparé
Climatiseur de
Geteilte raumklimaanlage
Insulation Drain
Pipe(1)
Cable-Tie(4)
,,
Insulation
Drain B(1)
Drain Plug(1)
,,,,
,,,,
,,,,
,,,,
,,,, ,,,,
Insulation
Drain A(1)
Insulation
Cover Pipe(2)
Nut(12)
M4 X 12 Tapped
Screw(4)
Optional Accessories
Wired Remote
Controller(1)
KR-H50110
Wireless Remote
Controller(1)
KR-H40100
Receiver & Display
Unit(1)
KRE-H2000
Cable-Tie(2)
Cable Clamp(5)
M4 X 16 Tapped
Screw(7)
Battery(2)
M4 X 16 Tapped
Screw(2)
Remote Controller
Holder(1)
Cable-Tie(2)
Cable Clamp(5)
M4 X 16 Tapped
Screw(7)
Wire Kit KWE-A110
Length : 10m
Centralized
Controller(1)
KR-H60110
Cable-Tie(2)
Cable Clamp(5)
Transmitter(1)
KT-A00
Spacer Support(4)
Cable-Tie(2)
Drain Pump and Float
Switch(1) KDP-075S0
M4 X 12 Tapped
Screw(4)
Cable-Tie(2)
M4 X 16 Tapped
Screw(7)
Cable Clamp(2)
Air Filter(1)
KF-D0B0
Note : Refrigeration pipes and their insulating materials, power cables are not supplied.
4-18
Samsung Electronics
Duct-ADH1800E-2-1
4/12/00 5:44 PM
Page 4-19
Installation
Respect the clearances and maximum lengths indicated in the diagram below when installing the unit.
Liquid Refrigerant tube
Gas Refrigerant tube
,,,,,,,,
,,,,,,,,
,,,,,,,,
,,,,,,,,
“H”metres
maximum
Model
L
H
❊❊18❊❊
❊❊24❊❊
❊❊32❊❊
30
30
30
15
15
15
Drain hose
cm
10
10cm
35cm
cm
15
,,,,,
,,,,
,,,,,
,,,,
,,,,,
1256mm
Inspection
access
450X450
400mm
270mm min.
250mm
5mm min.
Electrical component box
260mm
Space requirement when installing the indoor unit
165mm
650mm
air outlet duct flange
Refrigerant connection port
You must have 5mm or more space between the ceiling and the bottom of indoor
unit. Otherwise, the noice from the vibration
of indoor unit may bother the user.
Space requirement when installing the air filter
Rear of the indoor unit
165mm
165mm
Note : • The air filter can be installed to the
bottom or rear of the indoor unit.
Samsung Electronics
4-19
Duct-ADH1800E-2-1
4/12/00 5:44 PM
Page 4-20
Installation
4-4-4. Deciding on Where to Install the
Air Conditioner
When deciding on the location of the air conditioner
with the owner, the following restrictions must be taken
into account.
General
Do NOT install the air conditioner in a location where it
will come into contact with the following elements:
• Combustible gases
• Saline air
• Machine oil
• Sulphide gas
• Special environmental conditions
If you must install the unit in such conditions, first consult
your dealer.
Indoor Unit
• There must be no obstacles near the air inlet and
outlet.
• Choose a space of ceiling that enables the pipes and
cables to be easily connected to the outdoor unit and
the recommended length of 20 metres to be respected
(“L” metres maximum-“L” indicated in the diagram
on the page opposite). Proper drain hose passage
should also be considered.
• Install the indoor unit on a ceiling that can support its
weight.
• Maintain sufficient clearance around the indoor unit,
as indicated in the diagram on the page opposite.
• Make sure that the water dripping from the drain
hose runs away correctly and safely.
Outdoor Unit
• The outdoor unit must NEVER be placed on its side
or upside down, as the compressor lubrication oil will
run into the cooling circuit and seriously damage the
unit.
• Choose a location that is dry and sunny, but not
exposed to direct sunlight or strong winds.
• Do not block any passageways or thoroughfares.
• Choose a location where the noise of the air
conditioner when running and the discharged air do
not disturb any neighbours.
• Choose a position that enables the pipes and cables to
be easily connected to the indoor unit. Recommended
length between indoor and outdoor unit is 20
metres.(“L” metres maximum)
• Install the outdoor unit on a flat, stable surface that
can support its weight and does not generate any
unnecessary noise and vibration.
• Position the outdoor unit so that the air flow is
directed towards the open area.
• Maintain sufficient clearance around the outdoor unit,
as indicated in the diagram on the page opposite.
• If the outdoor unit is installed at a height, ensure that
its base is firmly fixed in position; the maximum
height difference between indoor and outdoor unit is
“H” metres(“H” indicated in the diagram on the page
opposite.).
• Make sure that the water dripping from the drain
hose runs away correctly and safely.
Caution :
• You have just purchased a duct-type air conditioner and it has to be installed by your installation specialist.
• This device must be installed according to the national electrical rules.
4-20
Samsung Electronics
Duct-ADH1800E-2-1
4/12/00 5:44 PM
Page 4-21
Installation
5. Screw eight nuts to the suspension bolts making
space for hanging the indoor unit.
4-4-5. Indoor Unit Installation
1. Carefully remove the indoor unit from the
packing case and pull out the shipping block on
the motor of the unit.
IMPORTANT : You must install the suspension bolts
more than four when installing the indoor unit.
Shipping
block
2. Place the pattern sheet on the ceiling at the spot
where you want to install the indoor unit.
Note : • Since the diagram is made of paper, it may
shrink or stretch slightly due to temperature or
humidity. For this reason, before drilling the
holes maintain the correct dimensions between
the markings.
3. Insert bolt anchors. Use existing ceiling
supports or construct a suitable support as
shown in figure.
Concrete
Insert
Hole in anchor
Hole in plug
Suspension bolt(M8)-field supply
6. Hang the indoor unit to the suspension bolts
between two nuts.
Note : • Tubing must be laid and connected inside the
ceiling when suspending the unit. If the ceiling
is already constructed, lay the tubing into
position for connection to the unit before
placing the unit inside the ceiling.
7. Screw the nuts to suspend the unit.
8. Adjust level of the unit by using measurement
plate for all 4 sides.
Note : • For proper drainage of condensate, give a
slightly slant to the left or right side of the unit
which will be connected with the drain hose.
But if you would like to install a drain pump,
make the base pan be level with the ceiling.
For proper drainage of condensate,
give a 3mm slant to the left or right
side of the unit which will be
connected with the drain hose, as
shown in the figure. Make a tilt when
you wish to install the drain pump, too.
4. Install the suspension bolts depending on the
ceiling type.
IMPORTANT : Ensure that the ceiling is strong enough
to support the weight of the indoor unit.
Before hanging the unit, test the strength of each
attached suspension bolt.
Ceiling support
When the drain hose is installed to the
right.
3mm
Drain tube outlet
Samsung Electronics
4-21
Duct-ADH1800E-2-1
4/12/00 5:44 PM
Page 4-22
Installation
4-4-6. Purging the Unit
On delivery, the indoor unit is loaded with an inert
nitrogen gas.
All this gas must therefore be purged before connecting
the assembly piping. To purge the inert gas, proceed as
follows.
2. Route the connection cord through the side of
the indoor unit and connect the cable to
terminals.
Note : When connecting the cables, you must pass
them through the cable clamp to fix them
securely.
Unscrew the caps at the end of each pipe.
Result:
All inert gas escapes from the indoor unit.
Note : To prevent dirt or foreign objects from getting into the
pipes during installation, do NOT remove the caps
completely until you are ready to connect the piping.
Cable Clamp
3. Route the other end of the cable to the outdoor
unit through the ceiling & the hole on the wall.
4. Reassemble the electrical component box cover,
carefully tightening the screw.
5. For further details on how to plug the other end
of the connection cord into the outdoor unit.
4-4-7. Connecting the Connection Cord
The indoor unit is powered from the outdoor unit via the
connection cord.
1. Remove the screw on the electrical component
box and remove the cover plate.
4-22
Samsung Electronics
Duct-ADH1800E-2-1
4/12/00 5:44 PM
Page 4-23
Installation
Wiring Diagram
CN20 Connector
DIP Switch
SW2
CN7
Rotary
Digital
Switch
Jumper
Wire
CN9
Receiver &
Display Unit
(Optional)
Indoor Unit
Transmitter
(Optional)
Ventilator
Motor
Power
Float Switch
Wired
Remote
Controller
(Optional)
Centralized
Controller
(Optional)
MAIN POWER
EARTH
Drain Pump
Communication
220-240V~, 50Hz
Outdoor Unit
Float Switch
Drain Pump
(Optional)
MAIN POWER
220-240V~, 50Hz
Cable Specifications
The following electrical characteristics must be respected.
MODEL
Power
Sub switch
Fuse
Min. size of electric Wires
from/to the indoor/outdoor unit
Size of electric input wires
Samsung Electronics
20m or less
50m or less
ADH3200E
ADH1800E/ADH2400E
DH32ZA1(A2)
DH18ZA1(A2)/DH24ZA1(A2)
1Ø, 220V-240V~, 50Hz
30A
30A
H07RN-F, 4G, 1.0mm2
H07RN-F, 4G, 1.0mm2
H07RN-F, 3G, 2.5mm2
H07RN-F, 3G, 4.0mm2
H07RN-F, 3G, 4.0mm2
H07RN-F, 3G, 6.0mm2
Note
The power cables are not
supplied with the air conditioner.
The user should purchase them
separately.
4-23
Duct-ADH1800E-2-1
4/12/00 5:44 PM
Page 4-24
Installation
4-4-8. Connecting the Cables to the Outdoor
Unit
Two electric cables must be connected to the outdoor
unit.
• The connection cord connecting the indoor unit to the
outdoor unit
• The power cable connecting the auxiliary circuit breaker
to the outdoor unit
1. Remove the terminal board cover on the side of
the outdoor unit.
2. Connect the connection cord(N1, L1, C, ) and
power cable(N, L) to terminals as shown in the
diagram.
3. Connect the power cable to the auxiliary circuit
breaker.
An all pole disconnection from the power
supply must be incorporated in the fixed
wiring(≥3mm)
4. Replace the terminal board cover, carefully
tightening the screw.
Indoor Unit
EARTH
Power
Outdoor Unit
Communication
Power Cable
Auxiliary circuit
breaker
Wiring Diagram
Caution :
Keep the power cable and the connection cord in a steel pipe to
protect them against liquids, outside impacts and so on.
4-24
Samsung Electronics
Duct-ADH1800E-2-2
6/27/00 10:37 AM
Page 4-25
Installation
4-4-9. Checking Correct Grounding
3. Finish wrapping insulating tape around the rest
of the pipes leading to the outdoor unit.
If the power distribution circuit does not have an earth
or the ground does not comply with specifications, an
grounding electrode must be installed.
The corresponding accessories are NOT supplied with
the air conditioner.
4. Install a green/yellow coloured grounding wire
(Ø1.6 mm, section 2 mm2 or greater):
• If the grounding wire is too short, connect an
extension lead, in a mechanical way and
wrapping it with insulating tape (do not bury
the connection)
• Secure the grounding wire in position with
staples
1. Select an grounding electrode that complies
with the specifications given in the illustration.
Carbon
plastic
Steel
core
PVC-insulated green/
yellow wire, 2mm2 x 3.5 m
Terminal M4
To
grounding
screw
2. Determine a suitable location for the grounding
electrode:
• In damp hard soil rather than loose sandy or
gravel soil that has a higher grounding
resistance
• Away from underground structures or
facilities, such as gas pipes, water pipes,
telephone lines and underground cables
• At least two metres away from a lightening
conductor grounding electrode and its cable
Note : If the grounding electrode is installed in an area
of heavy traffic, its wire must be connected
securely.
5. Carefully check the installation, by measuring
the grounding resistance with a ground
resistance tester. If the resistance is above
required level, drive the electrode deeper into
the ground or increase the number of grounding
electrodes.
6. Connect the grounding wire to the electrical
component box inside of the outdoor unit.
Note : The grounding wire for the telephone line cannot
be used to ground the air conditioner.
30cm
50cm
Samsung Electronics
4-25
Duct-ADH1800E-2-2
6/27/00 10:37 AM
Page 4-26
Installation
4-4-10. Drain Hose Installation
Care must be taken when installing the drain hose for
the indoor unit to ensure that any condensate water is
correctly drained outside. The drain hose can be
installed to the right or left side of the base pan.
1. Remove the rubber cap located on the side of
the base pan depending on the situation.
2. Install the drain hose so that its length can be as
short as possible.
Internal diameter of the drain hose should be
the same or slightly bigger than the external
diameter.
Note : • Give a slightly slant to the drain hose for proper
drainage of condensate.
Note : • Secure the drain hose with the cable-tie not to
be separated from the unit.
3. Wrap the drain hose with the insulation drain
pipe, the insulation drain A as shown in figure
and secure them. And wrap the other drain tube
outlet with the insulation drain B provided.
Cable-Tie
Insulation
drain pipe
Drain
hose
Cable-Tie
Insulation
drain B
Insulation
drain A
Caution :
• Must fit tightly against
body without any gap.
Caution :
When not installing the drain pump
When installing the drain pump
Do not give the hose and upward gradient
after the connection port.
This will cause water to flow backwards when
the unit is stopped, resulting in water leaks.
If it is necessary to increase the height of the
drain hose somewhat, the portion directly after
75cm. If it is raised higher than 75cm, there
can be water leaks.
,,,
,,,
Upward gradient
75cm or less
Ceiling
,
,,
Ceiling
Do not apply force to the piping on the unit side
when connecting the drain hose. The hose should
not be allowed to hang loose from its connection
to the unit. Fasten the hose to a wall, frame or
other support as close to the unit as possible.
Support pieces
Ceiling
4-26
Samsung Electronics
Duct-ADH1800E-2-2
6/27/00 10:37 AM
Page 4-27
Installation
3. Adjust the DIP switch(SW2) on the main PCB
according to the table below.
Testing the drainage
Prepare a little water about 5 liter.
1. Pour water into the base pan in the indoor unit
as shown in figure.
Switch No.
Switch Position
2
3
ON
ON
Note : Check below if the drain pump has been
installed.
1 The base pan must be level with the ceiling.
2 Wrap the drain tube outlet on the right and left
side of the indoor unit with an insulating
materials.
2. Confirm that the water flows out through the
drain hose.
4-4-11. Drain Pump Installation (Optional)
Care must be taken when installing the drain hose for
the indoor unit to ensure that any condensate water is
correctly drained outside. The drain hose can be
installed to the right or left side of the base pan.
4-4-12. Connecting the Indoor Unit
Assembly Piping
There are two refrigerant pipes of differing diameters:
1. Connect the cable to the electrical component
box as shown in figure.
◆ A smaller one(9.52mm, 3/8") for the liquid refrigerant
◆ A larger one(15.88mm, 5/8") for the gas refrigerant
◆ The thickness of tube should not less than 1.0mm.
◆ The inside of copper tube must be clean & has no dust.
Float
switch
Drain pump
The connection procedure for the refrigerant pipes
varies according to the exit position of the pipes from
the indoor unit, as seen when facing the indoor in the
“A” side.
◆ Liquid refrigerant port
◆ Gas refrigerant port
2. Screw the drain pump to the side of the indoor
unit with two screws.
Note : When installing the drain pump, leave a 7mm
space between the bottom of the drain pan and
the drain pump.
◆ Drain hose tube outlet
Liquid refrigerant port
A
Gas refrigerant
port
Drain pump
Drain tube
outlet
7mm
Bottom of the drain pan
Samsung Electronics
4-27
Duct-ADH1800E-2-2
6/27/00 10:37 AM
Page 4-28
Installation
1. Remove the protection caps on the pipes and
connect the assembly pipes to each pipe,
tightening the nuts, first manually and then
with a wrench, a spaner applying the following
torque.
Outer Diameter
19.52 mm (3/8")
15.88 mm (5/8")
Torque (kgf•cm)
300
750
Note : If the pipes must be shortened.
3. Cut off any excess foam insulation.
4. Be sure that there must be no crack or wave on
the bended area.
5. It would be necessary to double the insulation
thickness to prevent condensation even on the
insulator when if the installed area is warm and
humid.
6. Shape an oil trap as shown in figure the oil trap
must be formed every level difference of 6m.
7. For further details on connecting up to the
outdoor unit and purging the refrigerant circuit.
Note : The pipes will be insulated and fixed
permanantly into position once the whole
installation has been tested for gas leaks.
2. Must use insulator which is thick enough to
cover the refrigerant tube to protect the
condensate water on the outside of pipe falling
onto the floor and the efficiency of the unit will
be better.
Outdoor unit
Oil trap
(Must be installed every 6m)
Radius
5cm
4-4-13. Cutting/Flaring the Pipes
Connect the pipe within 50m and cutting pieces will not
be gone into the pipe as being clean to pipe section.
1. Make sure that you have the
required tools available (pipe
cutter, reamer, flaring tool and
pipe holder).
Indoor unit
Oil trap
(suction tube)
Indoor unit
2. If you wish to shorten the pipes, cut it with a
pipe cutter, taking care to ensure that the cut
edge remains at a 90° angle with the side of the
pipe. Refer to the illustrations below for
examples of edges cut correctly and incorrectly.
O
90
Outdoor unit
4-28
Oblique
Rough
Burr
Oil trap
(Must be installed every 6m)
Samsung Electronics
Duct-ADH1800E-2-2
6/27/00 10:37 AM
Page 4-29
Installation
3. To prevent any gas from leaking out, remove all
burrs at the cut edge of the pipe, using a reamer.
4. Slide a flare nut on to the pipe and modify the
flare.
Outer Diameter(D)
19.52 mm (3/8")
15.88 mm (5/8")
Depth(A)
1.8 mm
2.2 mm
5. Check that the flaring is correct, referring to the
illustrations below for examples of incorrect
flaring.
6. Align the pipes and tighten the flare nuts first
manually and then with a wrench, applying the
following torque.
Outer Diameter(D)
19.52 mm (3/8")
15.88 mm (5/8")
Torque (kgf•cm)
300
750
7. For further details on how to connect up to the
outdoor unit and purge the circuit.
Caution :
In case of welding the pipe, you must weld with nitrogen gas
blowing.
Samsung Electronics
4-29
Duct-ADH1800E-2-2
6/27/00 10:37 AM
Page 4-30
Installation
4-4-14. Connecting the Cables to the
Outdoor Unit
When using the air conditioner in the heating mode, ice
may accumulate. During de-icing, the condensed water
must be drained off safely. Consequently, you must
install a drain hose on the outdoor unit, following the
instructions below.
1. Make space more than 50mm between the
bottom of the outdoor unit and the ground for
installation of the drain hose, as shown in
figure.
4-4-16. Fixing the Unit in Position
The outdoor unit must be installed on a rigid and stable
base to avoid any increase in the noise level and
vibration, particularly if the outdoor unit is to be
installed close to a neighbour. If it is to be installed in a
location exposed to strong winds or at a height, the unit
must be fixed to an appropriate support (wall or ground).
1. Position the outdoor unit so that the air flow is
directed towards the outside.
2. Attach the outdoor unit to the appropriate
support using anchor bolts.
A
B
50mm min.
Capacity
4-4-15. Inserting the drain plug
1. Insert the drain plug into the hole on the
underside of the outdoor unit.
30mm
A
B
UBH1800E, DH18ZAX
582mm
340mm
UBH2400E/UDH3200E
DH24ZAX/DH32ZAX
660mm
340mm
3. If the outdoor unit is exposed to strong winds,
install shield plates around the outdoor unit, so
that the fan can operate correctly.
2. Connect the drain hose to the drain plug [Drain
hose:ID(18mm), Drain plugPOD(18mm)].
3. Ensure that the drained water runs off correctly
and safely.
4-30
Samsung Electronics
Duct-ADH1800E-2-2
6/27/00 10:37 AM
Page 4-31
Installation
• Use the vacuum pump to remove N2 gas or air inside the indoor unit and pipes.
1. Tighten all pipe connections (A, B, C, D)
to prevent any leakage.
Suspension hook
High
pressure
gauge
Hand
wheel
2. Check that the suction and liquid valves are
turned off clockwise to close the outdoor unit.
Finger tight
fittings
Liquid
Valve
3. Remove the cap on the opposite side of the
Suction tube connection (A) and connect a hose
from the pressure guage of which other end is
connected to the vacuum pump.
Suction
Valve
For mounting
other end of
hose when
not in use
Connected to
high pressure
side
Charging
line
3-way valve
Vacuum pump
4. Operate the vacuum pump enough until the
pressure guage indicates “0”.
5. Disconnect the hose from the suction valve
cafully not to break the vacuum.
Indoor Unit
6. Turn on the suction and liquid valves
counterclockwise to open the outdoor unit to the
indoor unit.
Half union
D
C
Liquid
pipe side
Suction(gas)
pipe side
Liquid
valve
Suction(gas)
valve
7. Check the leakage on the connections.
(A, B, C, D)
B
8. Check each valve for leakage.
Samsung Electronics
A
Outdoor Unit
4-31
Duct-ADH1800E-2-2
6/27/00 10:37 AM
Page 4-32
Installation
4-4-17 Refrigerant Refill Procedure
1. Refrigerant Refill
•Refill the air-conditioner with refrigerant when the refrigerant has leaked during the installing or using
1. Turn the suction valve clockwise to close,
connect the pressure gauge(low
pressure side) to the service valve, and
open the suction valve again.
Suspension hook
High
pressure
gauge
2. Connect the tank to refill with Refrigerant
Hand
wheel
3. Set the unit to cool operation mode.
Finger tight
fittings
Liquid
Valve
4. Check the pressure indicated by the
pressure gauge(low pressure side).
*Standard pressure should be
4.5~5.5kg/cm2 in a regular, operation
mode.
Suction For mounting
Valve other and of
hose when
not in use
Connected to
high pressure
side
Charging
line
3-way valve
5. Open the refrigerant tank and fill with
refrigerant until the rated pressure is
reached.
*It is recommended not to pour the
refrigerant in too quickly, but gradually
while operating a pressure valve.
6. Stop operation of the air conditioner.
7. Close the suction valve, disconnect the
pressure gauge, and open the suction
valve again.
8. Close the cap of each valve.
4-32
Samsung Electronics
Duct-ADH1800E-2-2
6/27/00 10:37 AM
Page 4-33
Installation
2. Refrigerant Adjustment (Supplement)
Adding Refrigerant
Refrigerant must be added if the piping measures more than 5 metres in length (maximum of “A” metres). The quantity of
additional refrigerant is variable according to the installation situation. Thus, make sure the outdoor unit situation before adding
refrigerant. This operation can only be performed by a qualified refrigeration specialist.
☛
If you have used...
More than 5 metres
of the pipes
Less than 5 metres
of piping
Then...
B
Type
A
“B”g of refrigerant (R-22)
must be added for each
extra metre.
ADH1800E/DH18ZA1(A2)
ADH2400E/DH24ZA1(A2)
ADH3200E/DH32ZA1(A2)
30
30
30
The purge time is normal.
For details about the installation
situation(a or b)
• Refer to 4-16 page
a
50
50
55
b
40
40
55
4-4-18 “Pump down” Procedure
• ’Pump down’ shall be carried out when an
evaporator replaced or when the unit is relocated in
another area.
Liquid
valve
Suction
valve
1. Remove the caps from the liquid valve and the suction
valve.
Relocation of the Air Conditioner
2. Turn the suction valve clockwise to close and connect
a pressure gauge(low pressure side) to the service
valve, and open the suction valve again.
• Refer to this procedure when the unit is relocated.
1. Carry out the pump down procedure (refer to the
details of ‘pump down’).
2. Remove the power cord.
3. Set the unit to cool operation mode.
(Check if the compressor is operating.)
4. Turn the liquid valve clockwise to close.
5. When the pressure gauge indicates “0” turn the
suction valve clockwise to close.
3. Disconnect the assembly cable from the indoor and
outdoor units.
4. Remove the flare nut connecting the indoor unit
and the pipe.
5. Disconnect the pipe connected to the outdoor unit.
At this time, cover the valve of the outdoor unit
and the other pipe using a cap or vinyl plug to
prevent foreign material from entering.
6. Make sure you do not bend the connection pipes in
the middle and store together with the cables.
6. Stop operation of the air conditioner.
7. Close the cap of each valve.
Samsung Electronics
7. Move the indoor and outdoor units to a new
location.
8. Remove the mounting plate for the indoor unit and
move it to a new location.
4-33
Duct-ADH1800E-2-2
6/27/00 10:37 AM
Page 4-34
Installation
4-4-19. Performing Leak Tests
A
Before completing the installation (insulation of the hose and piping), you
must check that there are no gas leaks.
B
To check for gas leaks on the...
Then, using a leak detector,
check the...
Indoor unit
Flare nuts at the end of sections A
and B.
Outdoor unit
Valves on sections C and D.
D
C
4-4-20. Insulation
Once you have checked that there are no leaks in the system, you can
insulate the piping and hose.
,
,
No gap
1. To avoid condensation problems, place heat-resistant
polyethylene foam separately around each refrigerant pipe.
Note : • Always make the seam of pipes face upwards.
2. Wind insulating tape around the pipes.
3. Finish wrapping insulating tape around the rest of the pipes
leading to the outdoor unit.
,,
Heat resistant polyethylene
foam(Insulation cover pipe)
Body
Insulation
cover pipe
Insulation
inlet/outlet
Be sure to overlap
the insulation
Caution :
Must fit tightly against body
without any gap.
4-34
Samsung Electronics
Duct-ADH1800E-2-2
6/27/00 10:37 AM
Page 4-35
Installation
Connection outlet as per the capacity
• Be sure to connect the round type duct according to our spec.
• When connecting the round type duct, duct shall be used with the rubber material if possible.(When using
A/C and metal families, it cause the noise).
• The outside of the connection side of round type duct shall be insulated. If not insulated, the condensate
may leak from the duct.
Duct Connection hole
ADH1800E, DH18ZA1(A2)
ADH1800E, DH18ZA1(A2)
ADH2400E, DH24ZA1(A2)
ADH3200E, DH32ZA1(A2)
ADH3200E, DH32ZA1(A2)
2
3
4
Duct diameter
ø150 ~ ø200
Shape dimension(mm)
(W x H x D)
1340 x 260 x 600
1340 x 260 x 600
1340 x 260 x 600
example) ADH1800E, DH18ZA1(A2), ADH2400E, DH24ZA1(A2), ADH3200E, DH32ZA1(A2)
(Unit : mm)
Samsung Electronics
Duct quantity
Dimension
2
3
4
“A”
334
189
134
“B”
500
400
300
Remark
4-35
Duct-ADH1800E-2-2
6/27/00 10:37 AM
Page 4-36
Installation
4-4-21. Increasing Fan Speed
If external static pressure is too great(due to long extension of ducts, for example), the air flow volume may drop too
low at each air outlet. This problem can be solved by increasing the fan speed using the following procedure.
1. Remove the screw on the electrical component box and
remove the cover plate.
2. Adjust the DIP switch(SW2) on the main PCB to the “OFF”
position.
Switch No.
Switch Position
Function
5
ON
OFF
Normal speed
High speed
3. Re-install the cover plate and join the removed screw.
How to Read Diagram
1. The vertical axis is the external static pressure(mmAq) while the horizontal axis represents the AIR
FLOW(m3/min).
2. The characteristic curves for ‘HH’, ‘H’, ‘Med’, and ‘Low’ fan speed controller are shown.
3. The nameplate values are shown based on the ‘H’ air flow.
4. In case of model ADH2400E/DH24ZA1(A2), the air flow is 17.4(m3/min), while the external static
pressure is 4mmAq at ‘H’ position.
5. If external static pressure is too great, the air flow volume may drop too low as explained above.
Note : HH : DIP Switch OFF position(High speed)
Air Flow (m3/min)
4-36
ADH3200E, DH32ZA1(A2)
mmAq
ADH2400E, DH24ZA1(A2)
mmAq
mmAq
ADH1800E, DH18ZA1(A2)
H : At shipment(Normal speed)
Air Flow (m3/min)
Air Flow (m3/min)
Samsung Electronics
Duct-ADH1800E-2-2
6/27/00 10:37 AM
Page 4-37
Installation
4-4-22. Cleaning Your Air Conditioner
To get the best possible use out of your air conditioner,
you must clean it regularly to remove the dust that
accumulates on the air filter.
The air filter is an optional accessory.
IMPORTANT : Before cleaning your air conditioner, ensure
that you have switched off the electric circuit
breaker used for the unit.
1. Turn the levers to the right or left not to prevent
pulling out the air filter.
4. Dry the air filter.
5. When you have finished, insert the filter into
the unit.
6. Return the levers.
7. Clean the outdoor unit with a vacuum cleaner
or a brush once a month.
Note : After cleaning the air conditioner, press the Filter
Reset button.
Wired Remote Controller
2. Pull out the air filter depending on your
installation.
Wireless Remote Controller
* The location of the air filter may differ from
this figure depending on your installation.
3. Remove all dust on air filter with a vacuum
cleaner or a brush. In case of serious dust
accumulation, put the air filter in warm
detergent water and shake it vertically.
Samsung Electronics
4-37
Duct-ADH1800E-2-2
6/27/00 10:37 AM
Page 4-38
Installation
4-4-23. Temperature and Humidity Ranges
The following table indicates the temperature and humidity ranges, within which the air conditioner can be used.
If the air conditioner is used at...
Then...
High temperature
The automatic protection feature may be triggered and the air
conditioner stopped.
Low temperature
A water leakage or some other
malfunction may happen if the heat exchanger freezes.
High humidity levels
Water may condense on and drip from the surface of the
indoor unit if it is used for a long periods.
Mode
Outdoor Temperature
Indoor Temperature
Indoor Humidity
Heating
-5°C to 21°C approx.
15°C to 27°C approx.
-
Cooling
-5°C to 43°C approx.
21°C to 32°C approx.
Drying
21°C to 43°C approx.
21°C to 32°C approx.
80% or less
-
❇ If the heating operation is used at below 0°C(outdoor temperature) then, does not a full capacity.
If the cooling operation is used at over 33°C(indoor temperature) then, does not a full capacity.
4-38
Samsung Electronics
Duct-ADH1800E-2-2
6/27/00 10:37 AM
Page 4-39
Installation
4-4-24. Sloving Common Porblems
Before contacting the after-sales service, perform the following simple checks. They may save your time and
expense of an unnecessary call.
Problem
Explanation/Solution
The air conditioner does not
operate at all
◆ Check that the breaker used for the air conditioner is switched on.
Wired Remote Controller
The air conditioner does not
operate with the remote
controller
Wired Remote Controller
When turning on/off the air
conditioner, it is not turned
On/Off immediately.
Wireless Remote Controller
The air conditioner does not
operate with the remote
controller
Wireless Remote Controller
No beep is heard when you
press
(ON/OFF) on the
remote controller
◆
is displayed on the wired remote controller. In this case,
turn the air conditioner off and contact your dealer.
◆ In case of using the wired remote controller for a group, the air
conditioners connected to the remote controller are turned on/off in
order. Thus, it takes some time(up to 32 seconds).
◆ Check that there are no obstacles between you and the remote
control sensor.
◆ Check the wireless remote controller batteries (Refer to page 11).
◆ Check that you are close enough to the remote control sensor.
(seven metres/ yards or less).
◆ Check that you are pointing the remote controller at the remote
control sensor of the receiver & display unit.
◆ Replace the remote controller batteries if necessary.
The air conditioner does
not cool or heat
◆ Check that the correct operating mode has been selected.
◆ The room temperature may be too low or too high.
◆ Dust may be blocking the air filter guard; refer to page 30
for cleaning instructions.
◆ Check that there is no obstacle in front of the outdoor unit.
When heating, the required
room temperature is never
reached and the air
conditioner frequently stops
◆ Check that the required temperature has been set correctly.
◆ Increase the fan speed.
Samsung Electronics
4-39
Duct-ADH1800E-2-2
6/27/00 10:37 AM
Page 4-40
Installation
4-4-25. Setting Up Option Switches
IMPORTANT : Before setting up the option switches, always make sure that you have turned off the main power.
Main PCB in the Indoor Unit
Rotary Digital Switch(SW1)
A user can operate up to sixteen air conditioners by using the wired remote
controller. Before controlling more than one air conditioner, you should
connect the air conditioner each other. And you must assign addresses to the
air conditioners. For further details on connecting air conditioners.
If the user would like to controller only one air conditioner, make sure that
the arrow is at “0” position.
Turn the arrow to the desired position referring to the table below.
Switch No.
Number of
indoor unit(s)
Switch No.
Number of
indoor unit(s)
0
One
8
Nine
1
Two
9
Ten
2
Three
A
Eleven
3
Four
B
Twelve
4
Five
C
Thirteen
5
Six
D
Fourteen
6
Seven
E
Fifteen
7
Eight
F
Sixteen
DIP Switch(SW2)
Adjust the switch to the desired position referring to the table below.
Switch
No.
Option Item
Switch Position
ON
OFF
Note
1
Ventilator Fan
Not installed
Installed
Not supplied
2
Drain Pump
Installed
Not installed
3
Float Switch
Installed
Not installed
Optionally
supplied
4
Filter Cleaning Cycle
1,000 hours
2,000 hours
5
Indoor Fan Motor Speed Normal
High speed
Caution :
• If you do not adjust the switch when not installing the drain pump, "\9" error
will occurs. If this happens, adjust the No.2 and No.3 switches to the "OFF"
position.
4-40
Samsung Electronics
Duct-ADH1800E-2-2
6/27/00 10:37 AM
Page 4-41
Installation
4-4-26. Setting Up Option Switches (Cont.)
Jumper Wire(SW05)
You can adjust the setting temperature for heating. Cut off the SW05,
depending on the situation.
Option Item
Situation of the Switch
Note
Setting temperature +2°C
Short
Preset Position
Setting temperature +5°C
Open
Sub PCB in the Indoor Unit
CN20 Connector
Remove the CN20 connector in the sub PCB, if necessary, referring to the
table below. (This procedure is needed only when the user would like to
control a group by using the wired remote controller.)
Address
Situation of the CN20 Connector
0
Connected
1-F
Removed
Unit A
(Address 0)
CN20 Connector
Unit B
(Address 1)
Unit C
(Address 2)
Note : ◆ Up to 16 air conditioners can be controlled with one wired remote
controller.
Note : ◆ If the user does not want to control a group, do not remove the
CN20 Connector.
Sub PCB in the Indoor Unit
Dip Switch(DS01)
Adjust the DIP switch No.2 and/or No.4 to the desired position referring to
the table below. You must not adjust the switch 1 and 3. They should be in
“OFF” position at all times.
Switch
No.
Option Item
2
Number of air conditioner(s) controlled
by the wired remote controller
4
Using wireless remote controller
Samsung Electronics
Switch Position
ON
OFF
Group
controlling
One indoor unit
controlling
Can be used Cannot be used
4-41
Duct-ADH1800E-2-2
6/27/00 10:37 AM
Page 4-42
Installation
Centralized Controller
DIP Switch(DS01)
Adjust the DIP switch to the desired position referring to the table below.
Switch
No.
1
2
3
4
Meaning
The air conditioner is operated by the controller
OFF OFF OFF OFF adjusted last among the wired remote controller,
wireless remote controller and centralized controller.
Switch
OFF OFF OFF ON
Position
A user can use wired/wireless remote controller when
the centralized controller is switched on.
And he/she cannot use the remote controller(s) when
the centralized controller is switched off.
The air conditioner(s) can be controlled by only the
OFF OFF ON OFF centralized controller. The user cannot use the
wired/wireless remote controller in this case.
Note : You cannot install the centralized controller
when the wired remote controller for a group
has already been installed.
Transmitter
Rotary Digital Switch(DS01)
A user can turn on/off up to sixteen air conditioners by using the centralized controller. To use the controller,
you must assign addresses to the air conditioners. For further details on connecting air conditioners.
If the user would like to controller only one air conditioner, make sure that the arrow is at “0” position.
Turn the arrow to the desired position referring to the table below.
Switch No.
Number of
indoor unit(s)
Switch No.
Number of
indoor unit(s)
0
One
8
Nine
1
Two
9
Ten
2
Three
A
Eleven
3
Four
B
Twelve
4
Five
C
Thirteen
5
Six
D
Fourteen
6
Seven
E
Fifteen
7
Eight
F
Sixteen
Original Position of Option Switches
The option switches are preset by the manufacturer. Refer to the table below, if necessary.
Option Place
Main PCB in the
indoor unit
Component No.
State
Rotary Digital Switch(SW1)
0
DIP Switch(SW2)
ON
Jumper Wire(SW05)
SHORT
Sub PCB in the indoor unit
CN20 Connector
Connected
Wired Remote Controller
DIP Switch(DS01)
OFF
Centralized Controller
DIP Switch(DS01)
OFF
Transmitter
Rotary Digital Switch(DS01)
0
4-42
Note : Before setting up the options, always make sure that you
have switched off the main power.
Note : After adjusting the options, you should supply the power.
Otherwise, the options will not be applied.
Samsung Electronics
Duct-ADH1800E-2-2
6/27/00 10:37 AM
Page 4-43
Installation
4-4-27. Wired Remote Controller Installation
(Optional)
Accessories
Wired Remote
Controller(1)
KR-H50210
Cable-Tie(2)
Cable Clamp(5)
M4 X 16 Tapped
Screw(7)
Caution :
• Do Not keep the wired remote controller cables with a
220V cable because the remote controller cables have
low voltage.
• Do Not input 220V power to the R1, R2 and R3 in the
wired remote controller.
Note : Cable Specifications
Cable type
1. Disassemble the wired remote controller by
using two grooves on the top of it.
Size of cables
Max. length of electric wires from
the indoor unit to the wired remote
controller
Double-insulation, 3G
0.3mm2~0.75mm2
100m
4. Reassemble the wired remote controller.
Caution :
• The optional kits must be installed by an installation
specialist.
2. Secure the rear cover of the wired remote
controller on the wall with two screws.
3. Connect the R1, R2 and R3 terminals in the
wired remote controller to the R1, R2 and R3
terminals on the electrical component box each.
• Before installing the optional kits, ensure that you have
turned off the main power.
• All optional kits cables should be installed according to
the national wiring rules and you must install them in the
wall not to be touched by users.
Wired
Remote
Controller
Samsung Electronics
4-43
Duct-ADH1800E-2-2
6/27/00 10:37 AM
Page 4-44
Installation
4-4-28. Centralized Controller Installation
(Optional)
Accessories
Centralized
Controller(1)
KR-H60110
Cable-Tie(2)
Cable Clamp(5)
M4 X 16 Tapped
Screw(7)
Transmitter(1)
KT-A00
Spacer Support(4)
Cable-Tie(2)
M4 X 16 Tapped
Screw(7)
1. Open the centralized controller cover by using
two grooves on the top of it.
5. Connect the O1 and O2 terminals of the
centralized controller to the O1 and O2
terminals on the electrical component box as
shown in figure.
Note : Cable Specifications
Cable type
Double-insulation,
2G(Shield Cable)
Size of cables
0.75mm2~1.25mm2
Max. length of electric wires from the
indoor unit to the centralized controller
1km
2. Secure the rear cover of the centralized
controller on the wall with two screws.
3. Secure the transmitter with four spacer supports
into the electrical component box.
Centralized
Controller
Electrical component box
Transmitter
6. Connect the power cables.
Note : Cable Specifications
4. Connect the cable from the PCB and to the
transmitter.
And connect another cable from the O1, O2
terminals and to the transmitter as shown in
figure.
4-44
Cable type
Double-insulation, 2G
Size of cables
0.75mm2~1.25mm2
Samsung Electronics
Duct-ADH1800E-2-2
6/27/00 10:38 AM
Page 4-45
Installation
7. Reassemble the centralized controller.
Caution :
•The optional kits must be installed by an installation
specialist.
•Before installing the optional kits, ensure that you have
turned off the main power.
•All optional kits cables should be installed according to
the national wiring rules and you must install them in the
wall not to be touched by users.
4. Close the receiver & display unit.
5. Secure the receiver & display unit on the wall
with two screws.
6. Reassemble the receiver & display unit cover.
Caution :
•The optional kits must be installed by an installation specialist.
•Before installing the optional kits, ensure that you have turned
off the main power.
4-4-29. Wireless Remote Controller
Installation (Optional)
•All optional kits cables should be installed according to the
national wiring rules and you must install them in the wall not
to be touched by users.
Accessories
Wireless Remote
Controller(1)
KR-H40100
Battery(2)
M4 X 16 Tapped
Screw(2)
Remote Controller
Holder(1)
4-4-30. Air Filter Installation (Optional)
The air filter can be installed to the bottom or rear of the
indoor unit depending the situation.
Receiver &
Display Unit(1)
KRE-H2000
Cable-Tie(2)
Cable Clamp(5)
M4 X 16 Tapped
Screw(7)
1. Remove two screws securing on the levers
under the bottom of the indoor unit.
Wire Kit KWE-A110
Length : 10m
1. Remove the receiver & display unit cover by
using the tab on the bottom of it.
2. Open the receiver & display unit.
3. Connect the end of the connector wire to the
receiver & display unit and connect the other
end of the wire to the electrical component box
as shown in figure.
2. Reassemble the levers making the other side
face the indoor unit as shown in figure.
3. Turn the levers not to prevent inserting the air
filter.
Caution :
•Do NOT keep the receiver & display unit cables with a
220V cable because the remote controller cables have
low voltage.
Samsung Electronics
4-45
Duct-ADH1800E-2-2
6/27/00 10:38 AM
Page 4-46
Installation
4. Insert the air filter into the indoor unit
depending on the situation.
Note: When installing to the bottom of the unit...
• Before inserting the air filter, remove the cover
on the bottom of the unit removing the screws.
• Reinstall the cover on the rear of the unit after
turning it 180°.
Installing to the rear
5. Turn the levers to the original position to fix the
air filter securely.
Note : Setting Up Filter Cleaning Cycle
• Adjust the DIP switch(SW2) in the main PCB to
the desired position referring the table below.
Installing to the bottom
Switch No.
Switch Position
Filter Cleaning Cycle
4
ON
OFF
1,000 hours
2,000 hours
Caution :
•The optional kits must be installed by an installation
specialist.
•Before installing the optional kits, ensure that you have
turned off the main power.
•The optional air filter has to be cleaned only by an
authorized person or service agent.
4-46
Samsung Electronics
Duct-ADH1800E-2-2
6/27/00 10:38 AM
Page 4-47
Installation
4-4-31. Controlling a Group
* You should adjust the option switches in the electrical component box or on the PCB of the wired remote controller.
* Before setting up the option switches, always make sure that you have turned off the main power.
* After adjusting the options, you should supply the power. Otherwise, the options will not be applied.
With Wired Remote Controller
A user can operate up to sixteen air conditioners by using the wired remote controller In this case, the air conditioner can
be controlled by only one wired remote controller connected to the indoor unit and cannot be controlled by the others.
1. Connect the R1, R2 and R3 terminals in the wired remote
controller to the R1, R2 and R3 terminals in any indoor unit
“A” each.
2. Connect the R1 and R3 terminals in the indoor unit “A” to the
R1 and R3 terminals in another indoor unit “B”.
Unit A
Unit B
Caution :
When connecting the cables, you must keep these :
• The R1 terminals must be connected to the R1s.
• The R3 terminals must be connected to the R3s.
• Do not connect the R2 terminals to anywhere.
If you connect R2 terminals, the PCB will be damaged.
Unit C
CN20
Connector
3. Connect the R1 and R3 terminals of “B” to any indoor unit
“C” and connect the others as the same way.
4. Remove the CN20 connectors on the sub PCBs except the unit
connected with remote controller(Adress “0”).
Switch No.
Number of
indoor unit(s)
Switch No.
Number of
indoor unit(s)
0
One
8
Nine
1
Two
9
Ten
2
Three
A
Eleven
3
Four
B
Twelve
4
Five
C
Thirteen
5
Six
D
Fourteen
6
Seven
E
Fifteen
7
Eight
F
Sixteen
5. Remove the CN20 connectors on the sub PCBs except the unit
connected with remote controller(Adress “0”).
6. Adjust the DIP switch No. 2 in the wired remote controller to
“ON” position.
Note : You cannot install the centralized controller when the wired
remote controller for a group has already been installed.
Samsung Electronics
4-47
Duct-ADH1800E-2-2
6/27/00 10:38 AM
Page 4-48
Installation
With Centralized Controller
A user can turn on/off up to sixteen air conditioners by using the centralized controller.
In this case, the user can turn on/off all air conditioners or a specific air conditioner connected with the centralized
controller. And each air conditioner can be controlled by its own remote controller(s) depending on the setting.
1. Connect the O1 and O2 terminals in the centralized controller to
the O1 and O2 terminals in the indoor unit “A”.
2. Connect the O1 and O2 terminals in the indoor unit “A” to the
O1 and O2 terminals in another indoor unit “B”.
3. Connect the O1 and O2 terminals of “B” to any indoor unit “C”
and connect the others as the same way.
4. Adjust the DIP switch(DS01) in the centralized controller to the
desired position referring to the table below.
Switch
No.
1
2
3
4
Meaning
The air conditioner is operated by the controller
Centralized
Controller
OFF OFF OFF OFF adjusted last among the wired remote controller,
wireless remote controller and centralized controller.
Switch
OFF OFF OFF ON
Position
OFF OFF ON
A user can use wired/wireless remote controller when
the centralized controller is switched on.
And he/she cannot use the remote controller(s) when
the centralized controller is switched off.
Unit A
Unit B
Unit C
The air conditioner(s) can be controlled by only the
OFF centralized controller. The user cannot use the
wired/wireless remote controller in this case.
5. Adjust the rotary digital switch on the transmitter to the desired
position referring to the table on page 4-40.
Centralized
Controller
Note : You cannot install the centralized controller when the wired remote
controller for a group has already been installed.
4-48
Samsung Electronics
Duct-ADH1800E-2-2
6/27/00 10:38 AM
Page 4-49
Installation
4-4-32. Checking and Testing Operations
Wireless Remote Controller
To complete the installation, perform the following
checks and tests to ensure that the air conditioner is
operating correctly.
Review all the following elements in the installation:
◆ Piping connection tightness to detect any gas
leakages
◆ Connecting wiring
◆ Heat-resistant insulation of the piping
◆ Drainage
◆ Earthing wire connection
◆ Correct operations(follow the steps below)
1. Supply the power and switch on the air conditioner.
Wired Remote Controller
2. Remove the remote controller batteries.
1. Supply the power and switch on the air
conditioner.
3. Insert the batteries pressing the On Timer and
Off Timer buttons at the same time.
4. Stop pressing the buttons after inserting the
batteries.
5. Press the
(ON/OFF) button.
Result: The air conditioner runs in COOL mode
for 3 minutes.
Note : If the error code is displayed, fix the error
referring to page 4-3.
And supply the power, restart testing.
2. Press Test button more than 3 seconds without
selecting any mode.
Result: The air conditioner runs in COOL mode for 3
minutes.
Note : If the error code is displayed, fix the error
referring to page 4-50.
And supply the power, restart testing.
3. Check that user's option(s) and the outdoor unit
operate properly.
6.
Check that user’s option(s) and the outdoor unit operate
properly.
Note : Do not attempt to select the operating mode or
to adjust the temperature. It may switch the
outdoor unit off.
7. The air conditioner will switch it off automatically after 3 minutes.
Note : Do not attempt to select the operating mode or
to adjust the temperature. It may switch the
outdoor unit off.
4. The air conditioner will switch it off automatically after 3 minutes.
Note : If the air conditioner does not work because of
switching off the thermistor sensor caused by the
room temperature, you can operate the air
conditioner by using Test button.
Samsung Electronics
4-49
Duct-ADH1800E-2-2
6/27/00 10:38 AM
Page 4-50
Installation
4-4-33. Troubleshooting
Wired Remote Controller
If the error occurs,
and the error code are displayed on the wired remote controller.
The error code blinks for 5 seconds and it disappears. If you would like to see the error code after disappearing it,
press the Test button.
Meaning of Error Code
The error code is composed of two-digit figures or letters. The first means (∗) an indoor unit address and the second
means an error code.
Error Code
Meaning
∗1
Indoor unit thermistor sensor error
◆ Indoor unit thermistor sensor
◆ PCB of the indoor unit
∗5
Indoor unit pipe sensor error
◆ Indoor unit pipe sensor
◆ PCB of the indoor unit
∗6
Outdoor unit thermistor sensor error
◆ Outdoor unit thermistor sensor
◆ PCB of the outdoor unit
∗9
Float switch error
◆ Drain pump, Float switch
◆ Drain system
◆ DIP switch(SW2) of the indoor unit
(The No.2 and No.4 switches must
be at “ON” postion.)
∗A
A Indoor and Outdoor
communication error
◆ Communication cables of indoor and
outdoor units
◆ PCB of indoor and outdoor units
∗C
Wired remote controller communication
error
◆ Wired remote controller cables, Wired
remote controller
◆ Main/Sub PCB of the indoor unit
∗D
Outdoor pipe sensor error
◆ Outdoor pipe sensor
◆ PCB of the outdoor unit
Checking area
Example : “39” means the address “3” indoor unit has a trouble with a float switch.
4-50
Samsung Electronics
Duct-ADH1800E-2-2
6/27/00 10:38 AM
Page 4-51
Installation
Wireless Remote Controller
If the error occurs, the indicators on the receiver & display unit displays the error.
Meaning of Error Code
Indicators
Timer
▲
Operating
Meaning
▲
▲
▲
▲
: OFF
Checking area
Filter
▲
: Blinking
Indoor unit thermistor sensor error
◆ Indoor unit thermistor sensor
◆ PCB of the indoor unit
Indoor unit pipe sensor error
◆ Indoor unit pipe sensor
◆ PCB of the indoor unit
Outdoor unit thermistor sensor error
◆ Outdoor unit thermistor sensor
◆ PCB of the outdoor unit
Float switch error
◆ Drain pump, Float switch
◆ Drain system
Indoor and Outdoor communication
error
◆ Communication cables of indoor and
outdoor units
◆ PCB of indoor and outdoor units
Wireless remote controller
communication error
◆ Wireless remote controller cables,
Wireless remote controller
◆ Main/Sub PCB of the indoor unit
Outdoor pipe sensor error
◆ Outdoor pipe sensor
◆ PCB of the outdoor unit
▲ ▲ : Blinking at once
: Blinking alternately
4-4-34. Expaining Operations to the Owner
Before leaving the premises on which you have installed the air conditioner, you should explain the following
operations to the owner, making reference to the appropriate pages in the owner’s instruction booklet.
1. How to start and stop the air conditioner.
2. How to select the operating mode and adjust the temperature and fan settings.
3. How to set the timers.
4. How to remove and clean the air filter, if installed.
Once the owner is happy with the basic operations, hand over the owner’s instruction booklet and this installation
manual for storage in a handy and safe place.
Samsung Electronics
4-51
Duct-ADH1800E-2-2
6/27/00 10:38 AM
Page 4-52
MEMO
4-52
Samsung Electronics
Duct-ADH1800E-3
4/12/00 5:47 PM
Page 5-1
5. Disassembly and Reassembly
Stop operation of the air conditioner and remove the power cord before repairing the unit.
Indoor Unit
No.
!
Part name
Filter-pre
Procedures
Picture
! Disassemble two screws of indication part
and then assemble the direction of two
plate-handle places by use of screw as
shown in @.
@ Turn the plate handle by hand when
removing the filter-pre.
# When pulling the filter-pre handle, the
filter-pre can be assembled.
❉ Be sure to remove the cushion on the
★ marked part after initial installation.
(It cause the damage of noise).
@
Ass’y-blower, DUCT
❉ Work is possible after disassembly of
no.! prefilter.
! After disassembling nine places indicating
screws, separate Ass’y cover bottom.
Samsung Electronics
5-1
Duct-ADH1800E-3
4/12/00 5:47 PM
Page 5-2
Disassembly and Reassembly
No.
Part name
Procedures
Picture
@ Disassemble 6 indicating screws.
# Separate the sensor holder from the
Ass’y fan case.
$ Separate from Ass’y control IN the
capacitor connection wire between the
motor-fan in and housing connector.
❉ It is possible under the working status
of # at the time.
5-2
Samsung Electronics
Duct-ADH1800E-3
4/12/00 5:47 PM
Page 5-3
Disassembly and Reassembly
No.
Part name
Procedures
Picture
% Separate the Ass’y blower and duct from
the set.
#
Ass’y-control in
! After disassembling one indicating screw,
separate the cover-control.
@ Separate the motor-fan in and sensor
connector connected to PCB.
Samsung Electronics
5-3
Duct-ADH1800E-3
4/12/00 5:47 PM
Page 5-4
Disassembly and Reassembly
No.
Part name
Procedures
Picture
# Disassemble two indicating screws (arrow
mark).
$ Hold the Ass’y control In by hand to lift up
a little and then release the status of
hanging on the hangign slot.
$
5-4
Ass’y-Drain pan
! Disassemble 4 indicating screws to
separate Ass’y drain pan. (two screws
each at left and right side)
Samsung Electronics
Duct-ADH1800E-3
4/12/00 5:47 PM
Page 5-5
Disassembly and Reassembly
No.
%
Part name
Ass’y-EVAP
Procedures
Picture
❉ Work is possible when disassembling the
ass’y drain pan.
! Disassemble 8 indicating screws (4 each at
left and right side).
@ Disassemble 6 indicating screws.
# Disassemble 5 indicating screws.
❉ It is possible at the status of No.3 Ass’y
control In disassembly at the time.
$ After disassembling 4 indicating screws.
Samsung Electronics
5-5
Duct-ADH1800E-3
4/12/00 5:47 PM
Page 5-6
Disassembly and Reassembly
No.
Part name
Procedures
Picture
% Pull the cabinet-side RH, BH by hand to
disassemble.
^ Seperate 4 indicating screws (2 each at
left and right side).
& Seperate it from the set if the ass’y-evap
pull up.
^
5-6
Ass’y-holder outlet
• When connecting canvas to the discharge
side
! Disassemble 4 indicating screws (two each
at left and right side).
Samsung Electronics
Duct-ADH1800E-3
4/12/00 5:47 PM
Page 5-7
Disassembly and Reassembly
No.
Part name
Procedures
Picture
@ Disassemble 12 indicating screws (6 each
at upper and lower side).
❉ After connecting canvas to the
disassembled Ass’y holder outlet(@),
attach the Ass’y holder outlet to the set in
the reverse order.
Samsung Electronics
5-7
Duct-ADH1800E-3
4/12/00 5:47 PM
Page 5-8
Disassembly and Reassembly
Outdoor Unit
No.
Part name
!
Cabinet
Procedures
Picture
1) Turn off the unit and remove the power
cable
2) Remove the top cover.
3) Remove the control box cover.
4) Unplug the ass'y cable.
5) Remove the cabi-side.
6) Remove the cabi-front.
* When you assemble the parts, check if the
each parts and electric connectors are
fixed firmly.
@
5-8
Fan Motor &
Propeller Fan
1) Do Procedure 1 above.
2) Remove the nut flange.
(Turn to the right to remove as it is a left
turned screw)
3) Disassemble the propeller fan.
Samsung Electronics
Duct-ADH1800E-3
4/12/00 5:47 PM
Page 6-1
6. Trouble Shooting
■ Trouble shooting by outdoor unit error code
ERROR DESCRIPTION
ERROR CODE
REFERENCE PART
E1
Indoor unit room thermistor error
EC01
E5
Indoor unit pipe thermistor error
EC02
E6
Outdoor unit thermistor error
EC03
E9
Float switch open error
EC04
EA
Communication error between indoor unit and outdoor unit
EC05
EC
Communication error between wired remote controller and indoor unit
EC06
ED
Outdoor unit pipe thermistor error
EC07
■ Trouble shooting by indoor unit receive board
ERROR CODE
ERROR CODE
REFERENCE PART
Reservation LED flickering(1Hz period)
Indoor temperature sensor abnormal
EC01
Operation LED and reservation LED flickering
Indoor pipe temperature sensor abnormal
EC02
Operation LED and filter LED flickering (1Hz period)
Outdoor temperature sensor abnormal
EC03
Reservation LED filter LED alternating flickering
Float switch open abnormal
EC04
Indoor and outdoor communication abnormal
EC05
Wired remote controller communication abnormal
EC06
Outdoor pipe temperature sensor abnormal
EC07
(1Hz period)
(1Hz period)
Reservation LED and filter LED flickering
(1Hz period)
Operation LED and reservation LED alternating
flickering (1Hz period)
Filter LED flickering (1Hz period)
■ Trouble shooting by outdoor unit error code
ERROR DESCRIPTION
ERROR CODE
REFERENCE PART
*1
Indoor unit room thermistor error
EC01
*5
Indoor unit pipe thermistor error
EC02
*6
Outdoor unit thermistor error
EC03
*9
Float switch open error
EC04
*A
Communication error between indoor unit and outdoor unit
EC05
*C
Communication error between wired remote controller and indoor unit
EC06
*D
Outdoor unit pipe thermistor error
EC07
✽ The asterisk mark “ * ” + “ERROR” CODE of wired remote controller stands for the set number.
ex) ERROR CODE “39” is the FLOAT SWITCH OPEN ERROR of SET no.3.
Samsung Electronics
6-1
Duct-ADH1800E-3
4/12/00 5:47 PM
Page 6-2
Trouble Shooting
■ Trouble shooting by outdoor unit error cond
ERROR CODE
LED flickering
6-2
ERROR DESCRIPTION
Communication error between indoor unit and centralized controller
REFERENCE PART
EC19
Samsung Electronics
Duct-ADH1800E-3
4/12/00 5:47 PM
Page 6-3
Trouble Shooting
■ EC01 : Trouble on the thermistor related part of indoor unit.
• EC01 : Trouble on the room thermistor related part of indoor unit.
- E1 of outdoor unit PCB 7-segment
- Reservation lamp of wireless receiving board is flickering with 1 Hz.
- Action items when “*1” displays on the wired remote controller.
Check point :
- Defect of indoor unit
- Indoor unit thermistor defect
NO
Indoor unit thermistor installed at CN8?
Indoor the indoor unit thermistor at CN8
YES
Is the vlotage across the thermistor 4.9V and
tabove or 0.5V and lower?
NO
Replace the indoor unit PCB
YES
Replace the thermistor
✽ “*” stands for the indoor unit address.
■ EC02 : Trouble on the pipe thermistor related part of indoor unit.
- E5 of outdoor unit PCB 7-segment.
- Reservation lamp of wireless receiving board is flickering with 1 Hz.
- Action items when “*5” displays on the wired remote controller.
Check point :
- Indoor unit PCB defect
- Indoor unit pipe thermistor defect
NO
Is the indoor unit pipe thermistor installed at CN8?
Install the indoor unit pipe thermistor at CN8
YES
Is the voltage across thermistor 4.9V and higher
or 0.5V lower?
NO
Replace the indoor unit
PCB
YES
Replace the thermistor
Samsung Electronics
6-3
Duct-ADH1800E-3
4/12/00 5:47 PM
Page 6-4
Trouble Shooting
■ EC03 : When the trouble is found on the part related to the outdoor unit thermistor.
- E6 of outdoor unit PCB 7-segment
- Operation lamp and filter lamp of wireless receiving board are flickering with 1Hz.
- Action items when “*6” displays on the wired remote controller.
Check point :
- Defect of indoor unit
- Indoor unit thermistor defect
NO
Is the outdoor unit thermistor installed at CN41?
Install the outdoor unit thermistor at CN41.
YES
Is the voltage across the thermistor 4.9V and
higher or 0.5V and lower?
NO
Replace the outdoor unit PCB
YES
Replace the thermistor
✽ “*” stands for the indoor unit address.
6-4
Samsung Electronics
Duct-ADH1800E-3
4/12/00 5:47 PM
Page 6-5
Trouble Shooting
■ EC04 : When the trouble is found on the drain pump and float switch installed on the
indoor unit.
EC01 : Trouble on the thermistor related part of indoor unit.
- E9 of 7-segment of outdoor unit PCB
- Reservation lamp of wireless receiving board and filter lamp are flickering with 1 Hz.
- Action item when “*9” displays on the wireless remote controller.
Check point :
- Indoor unit defect
- Drain pump, float switch defect
Start
Is available drain
pump?
YES
YES
SW2 ON?
Is available float
SW?
YES
YES
SW3 ON?
Check the
float SW
Replace
indoor unit
PCB
NO
NO
SW2 ON?
Replace PCB
Install float SW
YES
SET SW2 OFF
SET SW3 OFF
SET SW2 OFF
SET SW3 OFF
POWER RESET
✽ “*” stands for the indoor unit address.
Samsung Electronics
6-5
Duct-ADH1800E-3
4/12/00 5:47 PM
Page 6-6
Trouble Shooting
■ EC05 : When the trouble is found in the communication related part between indoor unit
and outdoor unit.
- EA of 7-segment of outdoor unit PCB.
- Reservation lamp and filter lamp of wireless receiving board is flickering with 1 Hz.
- Action item when “*A” displays on the wired remote controller.
Check point :
- Indoor unit ↔ outdoor unit mis-connection
- Indoor unit PCB defect
- Outdoor unit PCB defect
Are the terminals N1,L1,C of indoor unit and outdoor unit
are correctly connected? and is the set power on?
NO
Do connection correctly and check.
YES
Is the LED of PCB flickering with 16Hz for 250ms and
then repeating the on?
YES
Indoor unit communication norma
NO
Is the LED of PCB flickering with 16Hz?
YES
The Micom of outdoor unit is operating normally,
check and replace the communication circuit of
outdoor unit and indoor unit.
NO
Replace the PCB
✽ “*” stands for the indoor unit address.
6-6
Samsung Electronics
Duct-ADH1800E-3
4/12/00 5:47 PM
Page 6-7
Trouble Shooting
■ EC06 : When the trouble is found in the communication related part between indoor unit
and wired remote controller. (during single operation, not group control)
- EC of 7-segment of outdoor unit PCB.
- Wireless receiving board lamp and reservation lamp is flickering with 1Hz.
- Action item when “C” displays on the wired remote controller.
Check point :
- Short circuit or mis-connection of the communication line between indoor unit and wireless remote controller
- Indoor unit PCB defect
- Wired remote controller PCB defect
NO
Are the terminals R1, R2, R3 of indoor unit terminal
board connected correctly to R1, R2, R3 of wired remote
controller?
Connect correctly and check.
YES
Is 7P(RED) of transformer connected to CN11
of indoor unit?
Is the jump wire inserted into CN20 of indoor unit PCB?
NO
Connect correctly and check again
YES
NO
Is the address of PCB digital switch of indoor unit to "0"?
Set address to "0"
YES
NO
Replace the indoor unit PCB
Replace the wired remote controller
✽ “0” stands for the indoor unit address.
Samsung Electronics
6-7
Duct-ADH1800E-3
4/12/00 5:47 PM
Page 6-8
Trouble Shooting
■ EC07 : When the trouble is found in the communication related part between outdoor
unit pipe thermistor.
- ED of 7-segment of outdoor unit PCB.
- Reservation lamp and filter lamp of wireless receiving board is flickering with 1Hz.
- Action item when “D” displays on the wired remote controller.
Check point :
- Indoor unit pipe thermistor available or not
- Indoor unit PCB defect
Is indoor pipe thermistor installed at CN41?
NO
Connect correctly and check.
YES
Is the voltage across the thermistor 4.9V and higher
or 0.5V and lower?
NO
Replace the outdoor PCB
YES
Replace the thermistor
✽ “*” stands for the indoor unit address.
6-8
Samsung Electronics
Duct-ADH1800E-3
4/12/00 5:47 PM
Page 6-9
Trouble Shooting
■ EC08 : When the trouble is found on the part related to the wireless receiving board of
the indoor unit.
Check point :
- Defect of wireless remote controller PCB
- Defect of wireless remote controller receiving board PCB
- Indoor unit PCB defect
YES
Insert correctly
Mis-insertion of CN9?
NO
YES
Wire shorted?
NO
YES
LED direct/reverse direction check?
NO
NO
Check no.1 and no.2 pin of CN9:DC +5V?
YES
Check pin no.1 of CN9 while pressing
SW91 : DC 0V?
NO
Replace the wireless receiving board
YES
Replace after check of indoor unit
main PCB
Samsung Electronics
6-9
Duct-ADH1800E-3
4/12/00 5:47 PM
Page 6-10
Trouble Shooting
■ EC09 : When the trouble is found on the part related to the wired remote controller.
(single operation)
Chec point :
- Defect of communication line between indoor unit and wired remote controller.
- Output of indoor unit Micom
- Defect of wired remote controller PCB
- Indoor unit PCB defect
Is the wired remote
controller energized
when the power is reset?
NO
Is CN20 of indoor
unit main PCB
inserted?
NO
CN20
insertion
Is the wire of CN15 to
indoor unit terminal
board shorted?
YES
YES
NO
Is the on/off button command
of wired remote controller
reflected on the set?
NO
Is the address
of indoor unit "0"
YES
NO
Set to "0"
YES
When the power is applied
again after removing the
power at the operation on,
does the previous status
display on the wired remote
controller display window?
NO
YES
NO
Check the main PCB of
indoor unit and replace it.
6-10
YES
One unit is
installed
Replace the
wiring
NO
YES
Does the error code display?
More than on indoor
unit mounted on the
wired remote
controller?
Are the terminals R1, R2, R3 of wired
remote controlled connected to the R1, R2,
R3 of indoor unit terminal boards?
YES
Check the indoor
unit PCB
NO
Connect correctly the R1, R2, R3
Error correction and recheck
Samsung Electronics
Duct-ADH1800E-3
4/12/00 5:47 PM
Page 6-11
Trouble Shooting
■ EC10 : When the trouble is found on the part related to the fan motor of indoor unit.
Chec point :
- Defect of PCB relay of indoor unit.
- Output of indoor unit Micom
- Indoor fan motor defect
- Defect of PCB IC06 of indoor unit
Is the power source normal? AC220 ~ 240 50Hz
Is the wire harness for motor connection good?
Is the terminal contact of fan motor condenser good?
NO
Check the replay part
and replace
YES
During the wind control, does it change
to breeze, mild and strong wind?
NO
Normal
NO
YES
When changing the wind to breeze,
mild and storing, do RY73, RY74,
RY75 operate?
NO
Check micom and
replace
NO
Is he output pin of micom high when
selecting each wind control mode?
NO
Check micom and
replace
NO
Check micom and
replace
NO
Check IC06 and
replace
YES
When selecting the each wind control
mode, is the voltage across the replay of
indoor unit PCB 12V?
YES
When selecting each wind control of
micom, are the pin 14 and 15 of indoor
unit PCB IC06 low?
YES
Is the voltage across the indoor unit fan
AC220 ~ 240V?
NO
Replace PCB
YES
Check the indoor unit fan motor
and replace
Samsung Electronics
6-11
Duct-ADH1800E-3
4/12/00 5:47 PM
Page 6-12
Trouble Shooting
■ EC11 : When the trouble is found on the part related to the fan motor of outdoor unit.
Check point :
- Outdoor unit PCB relay defect
- Output of outdoor unit micom
- Outdoor unit fan motor defect
- Defect of IC07 of outdoor unit PCB
Is the power source normal? AC220~240 50Hz
Is the wire harness for motor connection good?
Is the terminald contact of fan motor condenser good?
NO
Check and replace
the related part
YES
YES
Does the outdoor fan motor changes to mild
and strong wind during the cooling
operation?
Normal
NO
YES
Do the RY73, RY74 operate?
NO
Is the wind volume output pin of micom high
when each wind control is operation?
NO
Check and replace
the micom
YES
Is the voltage across the PCB relay 12V
when the each wind control of micom
is opeating?
NO
Check and replace
the relay
YES
Are the pins 11 and 12 of IC07 of outdoor
unit PCB low when each wind control mode
micom is operation?
NO
Check and replace
IC07
YES
Is the voltage across the outdoor unit
fan motor AC220~240V?
NO
Replace PCB
YES
Check outdoor unit fan motor and replace
6-12
Samsung Electronics
Duct-ADH1800E-3
4/12/00 5:47 PM
Page 6-13
Trouble Shooting
■ EC12 : When the trouble is found on the part related to comp of outdoor unit.
Check point :
- Indoor unit PCB relay defect
- Output of indoor unit micom
- Comp defect
- Magnet switch defect
Is the power source normal? AC220~240 50Hz
Is there no wrong connection and contact of indoor
and outdoor connection wire?
Is the compressor being delayed for 3 minutes?
Is the desired temperature set higher than the current
one during the cooling operation?
Is the desired temperature set lower than the current
one during the cooling operation?
NO
Check and replace
the related part
YES
Is the RY71 on and compressor operting
when cooling mode operates and indoor unit
PCB is shorted?
Normal
YES
Is the output of outdoor unit micom pin 57
high when the compressor is on?
Check and replace
micom (IC04)
Is the voltage across RY7 coil of
outdoor PCB 12V?
Is the output of NO. 10 of IC05 of outdoor
unit low then the compressor is on?
Check and replace
IC05
Is the voltage AC220V across the terminal
of outdoor unit when the compressor is on?
Replace the magnet
replay
Replace the compressor
Samsung Electronics
6-13
Duct-ADH1800E-3
4/12/00 5:47 PM
Page 6-14
Trouble Shooting
■ EC13 : When the trouble is found on the part related to the up & down swing motor of
indoor unit (cassette model)
Check point :
- Wire short between indoor unit PCB up & down swing motor connector or bad contact.
- Output of indoor unit micom
- Defect of up and down swing motor
After check of the short circuit of harness for
connecting the up and down swing motor, operate the
set in the cooling mode and oeprate the wind direction
up and down, and then perform the test.
NO
Check and replace
the related part
Perform the operation on and do the up & down
swing action on.
Is the up & down control panel norm
ally operationg?
YES
Normal
NO
No short or wrong connection of connection
of connector wire?
YES
Check and replace
wire harness?
NO
Are the voltage of pin no. 1 and 6 of indoor
unit PCB DC 12V?
YES
NO
Is the output of pin no. 2, 3, 4, and 5 of CN 12 and 13
of indoor unit PCB spherical?
NO
YES
Replace up and down swing motor
6-14
Replace indoor unit
PCB
Samsung Electronics
Duct-ADH1800E-3
4/12/00 5:47 PM
Page 6-15
Trouble Shooting
■ EC14 : When the trouble is found on the part related to drain pump of indoor unit.
Check point :
- Indoor unit PCB ↔ Drain pump connector wire, indoor unit Micom No.6 Pin output, IC06 No.6 Pin output.
- Drain pump, RY72, DC12V power, AC220~240V 50Hz power, indoor unit option switch.
Check to confirm whether the wire is connected
correctly between indoor unit and outdoor unit?
After checking of the shortage for the connector wire
between indoor unit and dran pump, operate it for
cooling, and checking compressor and then test it.
NO
Is normal the DC12V, DC5V output of indoor unit?
NO
I switch on the No.2, No.3 option switch of indoor unit?
NO
Is “LOW” the No.6 pin output of IC04?
NO
Is “HIGH” the No.11 pin output of IC06?
Check IC01, IC02 and
replace.
Reset the power
after turn on.
Check IC06 and
replace.
Replace of indoor unit
micom
NO
Is DC12V the relay both voltage of RY72?
Is AC220V~AC240V of the No.1, No3 pin both voltage
of CN5.
Repace the RY72
NO
Replace the indoor
PCB.
Check the drain pump and replace.
Samsung Electronics
6-15
Duct-ADH1800E-3
4/12/00 5:47 PM
Page 6-16
Trouble Shooting
■ EC15 : When the trouble is found on the part related to float switch of indoor unit.
Check point :
- Indoor unit PCB ↔ float switch connector wire, voltage level of indoor unit micom pin no. 55
- Float switch, DC5V power, indoor unit option switch
Is the wire connected correctly between indoor unit and outdoor unit?
After check of short circuit on the wire between indoor unit and connector wire of float switch,
start the cooling operation and then check compressor operation and start the test.
Is the DC5V of indoor unit normal?
NO
Check and replace IC02
YES
Are no.2 and 3 of option swithch of indoor unit on?
NO
Put on and then reset the power
YES
ERROR CODE = “09”
ERROR DISPLAY = FLICKERING
NO
Normal
YES
Is the level of micon pin no.55
“HIGH”
NO
Replace indoor unit PCB
YES
Are no.2 and 3 of option swithch of indoor unit on?
6-16
Samsung Electronics
Duct-ADH1800E-3
4/12/00 5:47 PM
Page 6-17
Trouble Shooting
■ EC16 : When the trouble is found on the part related to ventilator of indoor unit.
Check point :
- Indoor unit PCB ↔ ventilator connector wire, output voltage of indoor unit micom pin No. 5
- Ventilator, DC 12V power, DC5V power, indoor unit option switch.
Is the wire correctly connected between indoor unit and outdoor unit?
after check of shot circuit between indoor unit and ventilator wire, start the wind control and check the
indoor fan and then start the test.
Is the output DC112V, DC5V normal?
NO
Check and replace IC01, IC02
YES
Is the option switch 1 of indoor unit off?
NO
Put off and then reset the power
YES
NO
Is IC06 pin no. 7 “HIGH”?
Replace micom
YES
NO
Is IC06 pin no. 10 “LOW”?
Check and replace IC06
YES
Is the voltage across RY77 normal?
NO
Check and replace RY77
YES
Is the voltage of CN6 no.1 and 3 of indoor unit
AC220V~AC240V?
NO
Replace indoor unit PCB
YES
Check and replace ventilator
Samsung Electronics
6-17
Duct-ADH1800E-3
4/12/00 5:47 PM
Page 6-18
Trouble Shooting
■ EC17 : When the trouble is found on the part related to power system of indoor unit.
Check point :
- Indoor unit AC220V~AC240V input voltage, DC12V output, DC5V output, output voltage of pin no.2 and 3 of CN15.
- Power transformer, F101, F102, F701
After checking the correct connection between
indoor unit and outdoor unit, and check again
NO
Is the voltage of pin no.1 and 3 of CN1
AC220V~AC240V?
Check the connection wire of indoor and outdoor
and then replace indoor unit PCB
YES
NO
No trouble on F101, F102, F701?
Replace fuse
YES
NO
DC12V output?
YES
NO
DC5V output?
Check and replace IC02
YES
Check and replace power
transformer
NO
No trouble on power
transformer AC output?
YES
Check and replace IC101
No trouble on the power system and finish the test
6-18
Samsung Electronics
Duct-ADH1800E-3
4/12/00 5:47 PM
Page 6-19
Trouble Shooting
■ EC18 : When the trouble is found on the part related to power system of output unit.
Check point :
- Outdoor unit AC220V~AC240V input power, DC12V output, DC5V output
- Power transformer, F101, F701
Check to confirm whether the wire is connected
correctly between indoor unit and outdoor unit?
NO
Is the voltage between CN71 pin no. 3 and TB1
AC220V~AC24V?
Check power code and replace PCB
YES
NO
No trouble on F101, F701?
Replace fuse
YES
NO
DC12V output?
YES
NO
DC5V output?
Check and replace IC02
YES
Check and replace power
transformer
NO
No check on power
transformer AC?
YES
Check and replace IC01
No trouble on the outdoor unit power system and
finish the test
Samsung Electronics
6-19
Duct-ADH1800E-3
4/12/00 5:47 PM
Page 6-20
Trouble Shooting
■ EC19 : When the centralized controller lamp is flickering. (during centralized control)
Check point :
- Defect on the address assignment for the relay equipment connected with centralized controller.
- Defect on centralized controller PCB
- Defect on the indoor unit PCB
Is the address of Transmiter installed on the indoor
unit set correct?
NO
Set again in order to avoid the duplicated address
YES
Is the communication line of SET short circuited?
YES
Check and replace the communication line
NO
Reset the power of SET and check the status of
LED1, LED2 of Transmiter
Is the LED1 on after centralized controller on and
off after centralized controller off?
NO
Replace the PCB of relay equipmint
YES
Is the LED2 of relay equipment PCB flickering with
the consistent interval?
NO
Replace the relay equipment PCB
YES
Replace the PCB of centralized controller
6-20
Samsung Electronics
Duct-ADH1800E-3
4/12/00 5:47 PM
Page 6-21
MEMO
Samsung Electronics
6-21
Duct-ADH1800E-4
6/27/00 10:43 AM
Page 2
7. Exploded Views and Part LIst
7-1 Indoor Unit
1
2
5
5-4
5-3
5-5
5-2
5-1
19
8
19-2
17
19-1
19-6
9
19-3
19-4
19-5
7
13
6
4
10
11
14
15
16
7-1
3
Samsung Electronics
Duct-ADH1800E-4
6/27/00 10:43 AM
Page 3
Exploded views and parts list
■ Indoor Unit Parts list
NO
CODE NO
Description
1
2
3
4
DB63 - 00076A
DB63 - 00074A
DB94 - 00022A
DB61 - 00099A
DB61 - 00236A
DB61 - 00237A
DB94 - 00023A
DB94 - 00051A
DB64 - 00071A
DB61 - 00155A
DB90 - 00121A
DB67 - 00046A
DB31 - 00025A
DB31 - 00025C
DB90 - 00117A
DB90 - 00159A
DB90 - 00119A
DB70 - 00026A
DB96 - 00182A
DB96 - 00174A
DB96 - 00183A
DB90 - 00120A
DB90 - 00118A
DB90 - 00158A
DB70 - 00027A
DB64 - 00121A
DB64 - 00183A
DB90 - 00113A
DB90 - 00114A
DB71 - 00019A
DB74 - 00006A
DB63 - 00080A
DB93 - 00249F
DB93 - 00249G
DB93 - 00249H
DB90 - 00116A
PD - DH2400 - 00
PD - DH3200 - 00
DB65 - 00029C
2301 - 001370
2301 - 001368
2301 - 001367
DB26 - 00002A
DB61 - 40291B
COVER-TOP
COVER-CASE DUCT
ASS'Y-DRAIN PAN
CASE-BOTTOM
CASE-BOTTOM
CASE-BOTTOM, B
ASS'Y-BLOWER, DUCT
ASS'Y-BLOWER, DUCT
PANEL-DUCT MOTOR
BRACKET-MOUNT MOTOR
ASS'Y-CASE, FAN
BLOWER
MOTOR-FAN, IN
MOTOR-FAN, IN
ASS'Y-CABI, LF
ASS'Y-CABI, SIDE, LF
ASS'Y-CABI, INLET, LF
PLATE-HANGER, LF
ASS'Y-EVAP
ASS'Y-EVAP
ASS'Y-EVAP
ASS'Y-CABI, INLET, RH
ASS'Y-CABI, SIDE, RH
ASS’Y CABI, SIDE, RH
PLATE-HANGER, RH
CABINET-SIDE, RH, B
CABINET-SIDE, RH, B
ASS'Y-HOLER OUTLET
ASS'Y-COVER, BOTTOM
PLATE-HANDLE
FILTER-PRE
COVER-CONTROL
ASS'Y-CONTROL, IN
ASS'Y-CONTROL, IN
ASS'Y-CONTROL, IN
ASS'Y-CASE, CONTROL
ASS'Y-PCB, PARTS
ASS'Y-PCB, PARTS
TERMINAL BOARD, 15P
CAPACITOR
CAPACITOR
CAPACITOR
TRANS-POWER
HOLDER-WIRE
5
5-1
5-2
5-3
5-4
5-5
6
7
8
9
10
11
12
13
14
15
16
17
18
19
19-1
19-2
19-3
19-4
19-5
19-6
Samsung Electronics
Specification
SGCC-M T0.8
SGCC-M T0.8
ASS'Y, BLK
SGCC-M T0.8
ADH2400E
ADH3200E
SGCC-M T1.2
SGCC-M T2.0
ADH2400E
ASS'Y, SGCC-M, ¢175
OSME-1504 SAC
OSME-1004 SAC
ASS'Y
ADH3200E, DUCT
ASS'Y
SGCC-M T02.0
ADH1800E
ADH2400E
ADH3200E
ASS'Y
ASS'Y
ADH3200E, ASS’Y
SGCC-M T2.0
SGCC-M T0.8
SGCC-M T0.8
ASS'Y
ASS'Y
SGCC-M, T1.2
PE, 36X40
SGCC-M T0.8
ADH1800E, ASS’Y
ADH2400E, ASS’Y
ADH3200E, ASS’Y
ASS'Y
ADH2400E
ADH3200E
250V, 20A, 15P
450V/2.5UF
450V/5.0UF
450V/6.0UF
250V, 50Hz, AC14V
PP, T2.0, BLK
IDH1800E
IDH2400E
IDH3200E
DH18ZA1(A2) DH24ZA1(A2) DH32ZA1(A2)
1
1
1
1
1
1
1
2
2
1
1
1
1
1
1
1
1
1
1
1
2
1
1
1
1
1
1
1
1
2
1
1
1
1
1
1
1
2
2
1
1
1
1
1
1
1
1
1
1
1
2
1
1
1
1
1
1
1
1
2
1
1
1
1
1
1
1
1
2
2
1
1
1
1
1
1
1
1
1
1
1
2
1
1
1
1
1
1
1
1
2
7-2
Duct-ADH1800E-4
6/27/00 10:43 AM
Page 4
7-2 Outdoor Unit
7-2-1 18K
10
8
16
7
9
6
11
13
13-3
12
12-2
4
1
3
5 13
15-5
15-4
15-1
15
15-6
12-1
13-2
15-7
15-3
15-2
13-1
14-3
14
14-1
14-2
2
7-3
Samsung Electronics
Duct-ADH1800E-4
6/27/00 10:43 AM
Page 5
Exploded views and parts list
■ Outdoor Unit Parts list (18K)
Description
Specification
Q'TY
NO
CODE NO
1
DB90-10673C
ASS'Y-CABI, FRONT
AP-4350/5350
1
2
DB90-20160E
ASS'Y-BASE, OUT
UBH1800E
1
3
DB67-50063A
FAN-PROPELLER
AS+G/F20%, D405
1
4
DB60-30020A
NUT-FLANGE
M6, FEFZY, LF
1
5
DB31-00056A
MOTOR-FAN
ASS030AVEA
1
6
DB61-20008C
BASE-MOTOR
SGCC-M, T=1.2
1
7
DB94-50034B
ASS'Y-PARTITION
ASH-1807ER ADD, SEAL
1
8
DB96-00184A
ASS'Y-CONDENSER
2X24 WAVE 1.7
1
9
DB90-40176B
ASS'Y-COVER CONTROL
ABS
1
10
DB90-10671G
ASS'Y-CABI, BACK
AP-4350
1
11
DB90-00074B
ASS’Y-CABI-UP
M-18
1
12
DB95-10057N
ASS’Y-COMP
ZR22K3-PFJ
1
12-1
DB73-10023A
GROMMET COMP
EPDM, T41, BLK
4
12-2
DB60-30028A
NUT-WASHER
HEX, 2C, M8, ZPC
4
13
DB96-00189A
ASS'Y-TUBE 4WAY V/V
ADH1800E, 5/8"
1
13-1
DB62-40055F
VALVE-SERVICE 5/8
5/8"
1
13-2
DB62-40036A
VALVE-4WAY
ASS'Y
1
13-3
DB34-00004A
SWITCH-PRESSURE
ASS'Y
1
14
DB96-00190A
ASS'Y-TUBE, CHECK, V/V
ADH1800E(3/8")
1
14-1
DB62-00218A
TUBE-CAPILLARY CHECK
C1220T-0, ID2.0X500
1
14-2
DB62-00287A
VALVE-SERVICE, 3/8
3/8"
1
14-3
DB62-40105D
VALVE-CHECK
CHV0201
1
15
DB93-00252E
ASS'Y-CONTROL BOX
UDH1800E
1
15-1
DB34-90057C
SWITCH-MAGENT
45CG20ALB
1
15-2
2501-001214
CAPACITOR
40UF/400V, COMP
1
15-3
DB65-40022G
TERMINAL-BLOCK
6P, 600V, 35A
1
15-4
PD-DH2400-S0
ASS'Y-PCB PART
ASS'Y
1
15-5
DB61-00152A
CASE-PCB, OUT
T2.5, ABS, BLK
1
15-6
DB26-10070A
TRANS-POWER
DC17, AC230
1
15-7
2301-001370
CAPACITOR MOTOR
2.5µF, EAF45255
1
16
DB72-00122A
CLOTH-SOUND, COMP
T12, W800, L350
1
Samsung Electronics
Remark
7-4
Duct-ADH1800E-4
6/27/00 10:43 AM
Page 6
Exploded views and parts list
• 24K
6
10
8
9
16
11
13-2
13
5
7
13-3
14
14-3
14-1
12
14-2
15-5
15-4
15-1
15
15-6
12-2
12-1
4
1
3
13-1 15-7
15-3
15-2
2
7-5
Samsung Electronics
Duct-ADH1800E-4
6/27/00 10:43 AM
Page 7
Exploded views and parts list
■ Outdoor Unit Parts list (24K)
Description
Specification
Q'TY
NO
CODE NO
1
DB90 - 10634L
ASS'Y-CABI, FRONT
ASH-3500
1
2
DB90 - 20157L
ASS'Y-BASE, OUT
AP-7650
1
3
DB67 - 50074A
FAN-PROPELLER
AS-1569
1
4
-
BOLT-SPECIAL
M6
1
5
DB31 - 00027A
MOTOR-FAN
OSME-806SRC
1
6
DB95 - 20147A
ASS’Y-MOTOR, B/K
AS-1569, ASSY
1
7
DB94 - 50039C
ASS'Y-PARTITION
ASM-3500A
1
8
DB96 - 00180A
ASS'Y-CONDENSER
2X24, D-5, 1.7mm
1
9
DB90 - 40176B
ASS'Y-COVER CONTROL
AS-126/1210
1
10
DB64 - 60160C
CABINET-SIDE
SECC-P, SC-90073T
1
11
DB90 - 10616D
ASS’Y-CABI, UP
ADH2400E, ASS’Y
1
12
DB95 - 10057G
ASS’Y-COMP, SCROLL
ZR28K3-PFJ
1
12-1
DB73 - 10023A
GROMMET COMP
EPDM, T41, BLK
4
12-2
DB60 - 30028A
NUT-WASHER
HEX, 2C, M8, ZPC
4
13
DB96 - 00177A
ASS'Y-TUBE 4WAY V/V
ADH2400E, 5/8"
1
13-1
DB62 - 40055F
VALVE-SERVICE
5/8"
1
13-2
DB62 - 40036A
VALVE-4WAY
ASS'Y
1
13-3
DB34 - 00004A
SWITCH-PRESSURE
ASS'Y
1
14
DB96 - 00178A
ASS'Y-TUBE, CHECK, V/V
ADH2400E, 3/8"
1
14-1
DB62 - 00217A
TUBE-CAPILLARY CHECK
C1220T-0, ID2.0X700
1
14-2
DB62 - 40011G
VALVE-SERVICE
3/8"
1
14-3
DB62 - 40105D
VALVE-CHECK
CHV0201
1
15
DB93 - 00250G
ASS'Y-CONTROL BOX
ADH2400E, ASS’Y
1
15-1
DB34 - 90057C
SWITCH-MAGENT
45CG20ALB
1
15-2
2501 - 001215
C-OIL
45µF/400V
1
15-3
DB65 - 40022G
TERMINAL-BLOCK
6P, 600V, 35A
1
15-4
PD - DH2400 - S0
ASS'Y-PCB PART
ASS'Y
1
15-5
DB61 - 00152A
CASE-PCB, OUT
T2.5, ABS, BLK
1
15-6
DB26 - 10070A
TRANS-POWER
DC17, AC230
1
15-7
2301 - 001369
CAPACITOR MOTOR
3µF, EAF45305
1
16
DB72 - 00122A
CLOTH-SOUND, COMP
T12, W800, L350
1
Samsung Electronics
Remark
7-6
Duct-ADH1800E-4
6/27/00 10:43 AM
Page 8
Exploded views and parts list
• 32K
6
10
8
9
16
11
13-2
13
5
13-3
7
14
14-3
14-1
12
12-2
12-1
4
1
3
14-2
15-5
15-4
15-1
15
15-6
13-1 15-7
15-3
15-2
2
7-7
Samsung Electronics
Duct-ADH1800E-4
6/27/00 10:43 AM
Page 9
Exploded views and parts list
■ Outdoor Unit Parts list (32K)
Description
Specification
Q'TY
NO
CODE NO
1
DB90 - 00035E
ASS'Y-CABI, OUT
AP-3707BR
1
2
DB90 - 20157L
ASS'Y-BASE, OUT
AP-7650
1
3
DB67 - 50067A
FAN-PROPELLER
AS+G/F20%, D495, 4BLABD
1
4
-
BOLT-SPECIAL
M6
1
5
DB31 - 00058A
MOTOR-FAN
ASS130AVEC
1
6
DB61 - 20093A
BASE MOTOR
SGCC-M, T1.6
1
7
DB94 - 50021D
ASS'Y-PARTITION
KFH28PV2
1
8
DB96 - 00185A
ASS'Y-CONDENSER
2X30, WAVE1.7
1
9
DB90 - 40176B
ASS'Y-COVER CONTROL
ABS
1
10
DB64 - 10672C
ASS'Y-CABI, BACK
AP-7650
1
11
DB90 - 10616D
ASS’Y-CABI, UPP
KRH24SV1
1
12
DB95 - 10057K
ASS’Y-COMP-SCROLL
ZR42K3-PFJ
1
12-1
DB73 - 10023A
GROMMET COMP
EPDM, T41, BLK
4
12-2
DB60 - 30028A
NUT-WASHER
HEX, 2C, M8, ZPC
4
13
DB96 - 00192A
ASS'Y-TUBE 4WAY V/V
ADH3200E
1
13-1
DB62 - 40055F
VALVE-SERVICE 5/8
5/8"
1
13-2
DB62 - 40023A
VALVE-4WAY
ASS'Y
1
13-3
DB34 - 00004A
SWITCH-PRESSURE
ASS'Y
1
14
DB96 - 00191A
ASS’Y-TUBE, CHECK, V/V
ADH3200E
1
14-1
DB62 - 00218A
TUBE-CAPILLARY CHECK
C1220T-0, ID2.0X500
1
14-2
DB62 - 40011G
VALVE-SERVICE, 3/8
3/8"
1
14-3
DB62 - 40105D
VALVE-CHECK
CHV0201
1
15
DB93 - 00253C
ASS'Y-CONTROL BOX
ADH3200E
1
15-1
3501 - 001168
RELAY-POWER
45DG20ALB
1
15-2
2501 - 001213
CAPACITOR
30µF/400V
2
15-3
DB65 - 40022G
TERMINAL-BLOCK 6P
6P, 600V, 35A
1
15-4
PD - DH3200 - S0
ASS'Y-PCB PART
ASS'Y
1
15-5
DB61 - 00152A
CASE-PCB, OUT
T2.5, ABS, BLK
1
15-6
DB26 - 10070A
TRANS-POWER
DC17, AC230
1
15-7
2301 - 001367
CAPACITOR
450V/6.0µF
1
16
DB72 - 00159A
INSULATION-COMP-SOUND
T12, 355, 525
1
Samsung Electronics
Remark
7-8
Duct-ADH1800E-4
6/27/00 10:43 AM
Page 10
MEMO
7-9
Samsung Electronics
Duct-ADH1800E-4
6/27/00 10:43 AM
Page 8-1
8. Block Diagrams
8-1 Refrigerating Cycle Block Diagram
Model : ADH1800E, DH18ZA1(A2)
Indoor Unit
Outdoor Unit
*Allowable pipe length : Max. 30m
*Allowable drop distance : Max. 15m
*Amount of refilling per extension length of 1m;
When extending the pipe length by more than 5m , 40gr(50gr: Outdoor Unit is higher than Indoor Unit) of R-22 refrigerant should be
refilled per extension length of 1m.
Samsung Electronics
8-1
Duct-ADH1800E-4
6/27/00 10:43 AM
Page 8-2
Block Diagram
• Model : ADH2400E, DH24ZA1(A2)
Indoor Unit
Outdoor Unit
*Allowable pipe length : Max. 30m
*Allowable drop distance : Max. 15m
*Amount of refilling per extension length of 1m;
When extending the pipe length by more than 5m, 40gr(50gr: Outdoor Unit is higher than Indoor Unit) of R-22 refrigerant should be
refilled per extension length of 1m.
8-2
Samsung Electronics
Duct-ADH1800E-4
6/27/00 10:43 AM
Page 8-3
Block Diagram
• Model : ADH3200E, DH32ZA1(A2)
Indoor Unit
Outdoor Unit
*Allowable pipe length : Max. 30m
*Allowable drop distance : Max. 15m
*Amount of refilling per extension length of 1m;
When extending the pipe length by more than 5m, 55gr(55gr: Outdoor Unit is higher than Indoor Unit) of R-22 refrigerant should be
refilled per extension length of 1m.
Samsung Electronics
8-3
Duct-ADH1800E-4
6/27/00 10:43 AM
Page 8-4
8-2 THERMISTOR
THERMISTOR MODEL : 103AT
8-4
THMPERATURE
[˚C]
THERMISTOR
[Kohm]
THMPERATURE
[˚C]
THERMISTOR
[Kohm]
70
69
68
67
66
65
64
63
62
61
60
2.229
2.296
2.365
2.437
2.512
2.589
2.669
2.752
2.838
2.928
3.021
29
28
27
26
25
24
23
22
21
20
8.622
8.944
9.281
9.632
10
10.380
10.780
11.200
11.630
12.090
59
58
57
56
55
54
53
52
51
50
3.116
3.216
3.319
3.426
3.537
3.652
3.772
3.897
4.026
4.161
19
18
17
16
15
14
13
12
11
10
12.560
13.060
13.570
14.120
14.680
15.280
15.900
16.550
17.240
17.960
49
48
47
46
45
44
43
42
41
40
4.300
4.444
4.594
4.749
4.912
5.080
5.256
5.439
5.630
5.828
9
8
7
6
5
4
3
2
1
0
18.700
19.480
20.290
21.150
22.050
22.990
23.990
25.030
26.130
27.280
39
38
37
36
35
34
33
32
31
30
6.033
6.246
6.468
6.699
6.941
7.192
7.455
7.729
8.015
8.313
-1
-2
-3
-4
-5
-6
-7
-8
-9
28.470
29.720
31.040
32.430
33.890
35.430
37.050
38.760
40.560
Samsung Electronics
Duct-ADH1800E-4
6/27/00 10:43 AM
Page 9-1
9. PCB Diagrams
9-1 Main PCB
9-1-1 Indoor Unit (18K/24K)
Samsung Electronics
9-1
Duct-ADH1800E-4
6/27/00 10:43 AM
Page 9-2
Parts list
■
Indoor Part List (PCB CODE : PD-DH2400-00)
Mark
J01, J02, J04 - J19,SW05,SW05
IC04
IC06,IC08
IC07
IC05
PC31,PC32,IC10
IC02
IC01
IC11
X501
D101 - D105,D701,D703,D704,D705
ZD701
C/D,HEATER, VENTLATOR,DRAIN PUMP
FLOAT S/W,FILTER,FAN MOTOR,EEPROM
CLEANER,D201-D203
CN18,CN19
CN9
CN11
CN8
CN14
CN7
CN20
CN15
CN5
CN2
CN10
CN1
CN6
Q601
Q201
Q301,Q701,Q302,Q602,Q603
Q202
LED1
LED2
C702,C703
C602
C101,C103,C105,C209,C210,C501,C302,C603
C205-C208,C402-C404,C502,C204,C405
C202,C203
C704
C601
C211
C102
C104
C105
C106
C503,C701
R201,R218,R501-R503,R608,R405,R406,R215
9-2
Parts Name
JUMP WIRE
IC-MCU
IC-LINEAR
IC-EEPROM
IC-RESET
PHOTO-COUPLER
IC-VOLTAGE-REG
IC-VOLTAGE-REG
PHOTO-THYRISTOR
CERAMIC-RESONATOR
DIODE-RECTIFIER
DIODE-ZENER
DIODE-SWITCHING
“
“
CONNECTOR-HEADER
CONNECTOR-HEADER
CONNECTOR-HEADER
CONNECTOR-HEADER
CONNECTOR-HEADER
CONNECTOR-HEADER
CONNECTOR-HEADER
CONNECTOR-HEADER
CONNECTOR HEADER
CONNECTOR HEADER
CONNECTOR HEADER
CONNECTOR HEADER
CONNECTOR HEADER
TR-SMALL
TR-SMALL
TR-DIGITAL
TR-DIGITAL
LED-LAMP
LED-LAMP
C-FILM
C-CERAMIC
C-CERAMIC
C-CERAMIC
C-FILM
C-CERAMIC
C-CERAMIC
C-AL
C-AL
C-AL
C-AL
C-AL
R-CARBON
Specification
PI 0.6 SN T 52MM
UPD780032
KA2657
93LC56B-I/P
KA7533
PC817
KA7805
KA7812
S12MD1V
4MHz CST4MTW TC
1N4007
ZD24
1N4148M,100V
“
“
SMW250-14-WHT
SMW250-11-WHT
SMW250-07-RED
SMW250-04-WHT
SMW250-02-WHT
SMW250-07-WHT
SMW250-02-RED
SMW250-05-WHT
YW396-03AV-WHT
YW396-09AV-WHT
YW396-03AV-YEL
YW396-05AV-WHT
YW396-03AV-BLK
A708,NPN
KSC945,NPN
KSR1002
KSR2002
RED
GREEN
DISK,4.7NF
AXIAL,4.7NF(472)
AXIAL,100NF(104)
AXIAL,10NF(103)
DISK,10NF(103)
AXIAL,101
AXIAL,1NF(102)
1000uF/35V
2200uF/25V
470uF/25V
1uF/16V
100uF/16V
10K-J 1/8W
Samsung Electronics
Duct-ADH1800E-4
6/27/00 10:43 AM
Page 9-3
Parts list
Mark
R212-R214,R607,R610,R407
R302
R203,R204,R301,R217,R216,R609
R202
R209
R207
R210,R208
R211
R601-R605
R403,R404,R606
R401, R402
R611
R205, R205
R703
R706, 701
R702
R704, R705
RY72 ~ RY77
F701
HOLDER
F101
HOLDER
F102
HOLDER
FT71
VA71
Samsung Electronics
Parts Name
R-CARBON
R-CARBON
R-CARBON
R-CARBON
R-CARBON
R-CARBON
R-CARBON
R-CARBON
R-CARBON
R-METAL
R-CARBON
R-CARBON
R-CARBON
R-CARBON
R-CARBON
R-CELENT
RELAY-MANIATURE
FUSE
HOLDER
FUSE
HOLDER
FUSE
HOLDER
NOISE FILTER
VARISTOR
Specification
1K-J 1/4W
1K-J 1/8W
3.3K-J 1/8W
12K-J 1/8W
27K-J 1/4W
2.4K-J 1/4W
330-J 1/4W
330-J 1/2W
330-J 1/8W
6.8K-F 1/8W
100K-J 1/8W
10-J 1/4W
4.7K-J 1/4W
100K-J 2W
100K-J 1/4W
10K-J 5W
JQ1A-12V
T3.15A 250V
FH-51H 7.5A
F2A250V
FH-51M 7.5A
F0.5A 250
FH-51M 7.5A
HP1-P16
1NR14D471
9-3
Duct-ADH1800E-4
6/27/00 10:43 AM
Page 9-4
• Indoor Unit (32K)
9-4
Samsung Electronics
Duct-ADH1800E-4
6/27/00 10:43 AM
Page 9-5
Parts list
■
Indoor Part List (PCB CODE : PD-DH-3200-00)
Mark
J01, J02, J04 - J19,SW05,SW05
IC04
IC06,IC08
IC07
IC05
PC31,PC32,IC10
IC02
IC01
IC11
X501
D101 - D105,D701,D703,D704,D705
ZD701
C/D,HEATER,VENTLATOR,DRAIN PUMP
FLOAT S/W,FILTER,FAN MOTOR, EEPROM
CLEANER,D201-D203
CN18,CN19
CN9
CN11
CN8
CN14
CN7
CN20
CN15
CN5
CN2
CN10
CN1
CN6
Q601
Q201
Q301,Q701,Q302,Q602,Q603
Q202
LED1
LED2
C702,C703
C602
C101,C103,C105,C209,C210,C501,C302,C603
C205-C208,C402-C404,C502,C204,C405
C202,C203
C704
C601
C211
C102
C104
C105
C106
C503,C701
R201,R218,R501-R503,R608,R405,R406,R215
Samsung Electronics
Parts Name
JUMP WIRE
IC-MCU
IC-LINEAR
IC-EEPROM
IC-RESET
PHOTO-COUPLER
IC-VOLTAGE-REG
IC-VOLTAGE-REG
PHOTO-THYRISTOR
CERAMIC-RESONATOR
DIODE-RECTIFIER
DIODE-ZENER
DIODE-SWITCHING
“
“
CONNECTOR-HEADER
CONNECTOR-HEADER
CONNECTOR-HEADER
CONNECTOR-HEADER
CONNECTOR-HEADER
CONNECTOR-HEADER
CONNECTOR-HEADER
CONNECTOR-HEADER
CONNECTOR HEADER
CONNECTOR HEADER
CONNECTOR HEADER
CONNECTOR HEADER
CONNECTOR HEADER
TR-SMALL
TR-SMALL
TR-DIGITAL
TR-DIGITAL
LED-LAMP
LED-LAMP
C-FILM
C-CERAMIC
C-CERAMIC
C-CERAMIC
C-FILM
C-CERAMIC
C-CERAMIC
C-AL
C-AL
C-AL
C-AL
C-AL
R-CARBON
Specification
PI 0.6 SN T 52MM
UPD780032
KA2657
93LC56B-I/P
KA7533
PC817
KA7805
KA7812
S12MD1V
4MHz CST4MTW TC
1N4007
ZD24
1N4148M,100V
“
“
SMW250-14-WHT
SMW250-11-WHT
SMW250-07-RED
SMW250-04-WHT
SMW250-02-WHT
SMW250-07-WHT
SMW250-02-RED
SMW250-05-WHT
YW396-03AV-WHT
YW396-09AV-WHT
YW396-03AV-YEL
YW396-05AV-WHT
YW396-03AV-BLK
A708,NPN
KSC945,NPN
KSR1002
KSR2002
RED
GREEN
DISK,4.7NF
AXIAL,4.7NF(472)
AXIAL,100NF(104)
AXIAL,10NF(103)
DISK,10NF(103)
AXIAL,101
AXIAL,1NF(102)
1000uF/35V
2200uF/25V
470uF/25V
1uF/16V
100uF/16V
10K-J 1/8W
9-5
Duct-ADH1800E-4
6/27/00 10:43 AM
Page 9-6
Parts list
Mark
R212-R214,R607,R610,R407
R302
R203,R204,R301,R217,R216,R609
R202
R209
R207
R210,R208
R211
R601-R605
R403,R404,R606
R401, R402
R611
R205, R205
R703
R706, 701
R702
R704, R705
RY72 ~ RY77
F701
HOLDER
F101
HOLDER
F102
HOLDER
FT71
VA71
9-6
Parts Name
R-CARBON
R-CARBON
R-CARBON
R-CARBON
R-CARBON
R-CARBON
R-CARBON
R-CARBON
R-CARBON
R-METAL
R-CARBON
R-CARBON
R-CARBON
R-CARBON
R-CARBON
R-CELENT
RELAY-MINIATURE
FUSE
HOLDER
FUSE
HOLDER
FUSE
HOLDER
NOISE FILTER
VARISTOR
Specification
1K-J 1/4W
1K-J 1/8W
3.3K-J 1/8W
12K-J 1/8W
27K-J 1/4W
2.4K-J 1/4W
330-J 1/4W
330-J 1/2W
330-J 1/8W
6.8K-F 1/8W
100K-J 1/8W
10-J 1/4W
4.7K-J 1/4W
100K-J 2W
100K-J 1/4W
10K-J 5W
CS11-12SH
T3.15A 250V
FH-51H 7.5A
F2A250V
FH-51M 7.5A
F0.5A 250
FH-51M 7.5A
HP1-P16
1NR14D471
Samsung Electronics
Duct-ADH1800E-4
6/27/00 10:43 AM
Page 9-7
9-1-2 Outdoor Unit (18K/24K)
Samsung Electronics
9-7
Duct-ADH1800E-4
6/27/00 10:43 AM
Page 9-8
Parts list
■
Outdoor Part List (PCB CODE : PD-DH2400-S0)
Mark
J01-J03,J05-J10,OPJ
IC4
IC05-IC07
PC31,PC32
IC03
IC02
IC01
X501
D101-D105,D701
ZD71
Q301,Q302
Q901,Q902
Q201
LED1
C701
C702,C703
C502,C902,C201,C501,C104
C401-C403,C901,C202,C303
C506,C203,C404,C405,C102
C302
C101
C103
C105
R201,R901,R514,R513,R407
R409
R405,R203,R204,R206,R205, R411
R410
R406,R408, R409
R703
R301
R302
R902-R909
R303
R202
R401,R402
R403,R404
R701,R702
RY71-RY74
F101
F701
CR71
VA71
CN73
CN71
CN74
CN41
CN11
CN72
GT1,GT2
TB1,TB2
K1
DISPLAY
DS71
9-8
Parts Name
JUMP WIRE
IC-MCU
IC-LINEAR
PHOTO-COUPLER
IC-RESET
IC-VOLTAGE-REG
IC-VOLTAGE-REG
CERAMIC-RESONATOR
DIODE-RECTIFIER
DIODE-ZENER
TR-DIGITAL
TR-DIGITAL
TR-SIGNAL
LED-LAMP
C-FILM
C-X2
C-CERAMIC
C-CERAMIC
C-AL
C-AL
C-AL
R-CARBON
R-CARBON
R-CARBON
R-CARBON
R-CARBON
R-CARBON
R-CARBON
R-CARBON
R-CARBON
R-CARBON
R-METAL
R-CARBON
RELAY-MINIATURE
FUSE
FUSE
FUSE HOLDER
HEAT SINK
COIL
VARISTOR
CONNECTOR HEADER
CONNECTOR HEADER
CONNECTOR HEADER
CONNECTOR HEADER
CONNECTOR HEADER
CONNECTOR HEADER
GT PIN
TERMINAL
SWITCH
7-SEG
DISCHARGER
Specification
PI 0.6 SN T 52MM
KS88C46
KA2657
PC817
KA7533
KA7805
KA7812
10MHz
1N4007
ZD30
KSR1002
KSR2002
C945Y
RED
DISK,4.7NF
X-CAP,100NF(X2)
AXIAL,100NF(104)
AXIAL,1NF(102)
1000uF/35V
2200uF/25V
470uF/25V
10K-J 1/8W
1K-J 1/8W
3.9K-J 1/8W
4.7K-J 1/4W
620-J 1/8W
470 1/4W
470 1/2W
12K-J 1/8W
3.3K-J 1/8W
330-J 1/8W
18K-F 1/8W
5.6K 2W
JQ1a-12V
FST,250V,2A
FST,250V,3.15A
FH-51H 7.5A
A6063,L30LW23.5
L4460
470V,4500A
YW396-05AV-WHT
YW396-03AV-BLK
YW396-03AV-BLU
SMW250-04-WHT
SMW250-03-RED
YDW236-01-WHT
GTP
1P,TAB
TACT
2-DIGIT
MP-332MA
Samsung Electronics
Duct-ADH1800E-4
6/27/00 10:43 AM
Page 9-9
• Outdoor Unit (32K)
Samsung Electronics
9-9
Duct-ADH1800E-4
6/27/00 10:43 AM
Page 9-10
Parts list
■
Outdoor Part List (PCB CODE : PD-DH3200-S1)
Mark
J01-J03,J05-J10,OPJ
IC4
IC05-IC07
PC31,PC32
IC03
IC02
IC01
X501
D101-D105,D701
ZD71
Q301,Q302
Q901,Q902
Q201
LED1
C701
C702,C703
C502,C902,C201,C501,C104
C401-C403,C901,C202,C303
C506,C203,C404,C405,C102
C302
C101
C103
C105
R201,R901,R514,R513,R407
R409
R405,R203,R204,R206,R205,R411
R410
R406,R408,R409
R703
R301
R302
R902-R909
R303
R202
R401,R402
R403,R404
R701,R702
RY71,RY74
RY72,RY73
F101
F701
CR71
VA71
CN73
CN71
CN74
CN41
CN11
CN72
GT1,GT2
TB1,TB2
K1
DISPLAY
DS71
9-10
Parts Name
JUMP WIRE
IC-MCU
IC-LINEAR
PHOTO-COUPLER
IC-RESET
IC-VOLTAGE-REG
IC-VOLTAGE-REG
CERAMIC-RESONATOR
DIODE-RECTIFIER
DIODE-ZENER
TR-DIGITAL
TR-DIGITAL
TR-SIGNAL
LED-LAMP
C-FILM
C-X2
C-CERAMIC
C-CERAMIC
C-AL
C-AL
C-AL
R-CARBON
R-CARBON
R-CARBON
R-CARBON
R-CARBON
R-CARBON
R-CARBON
R-CARBON
R-CARBON
R-CARBON
R-METAL
R-CARBON
RELAY-MINIATURE
RELAY-MINIATURE
FUSE
FUSE
FUSE HOLDER
HEAT SINK
COIL
VARISTOR
CONNECTOR HEADER
CONNECTOR HEADER
CONNECTOR HEADER
CONNECTOR HEADER
CONNECTOR HEADER
CONNECTOR HEADER
GT PIN
TERMINAL
SWITCH
7-SEG
DISCHARGER
Specification
PI 0.6 SN T 52MM
KS88C46
KA2657
PC817
KA7533
KA7805
KA7812
10MHz
1N4007
ZD30
KSR1002
KSR2002
C945Y
RED
DISK,4.7NF
X-CAP,100NF(X2)
AXIAL,100NF(104)
AXIAL,1NF(102)
1000uF/35V
2200uF/25V
470uF/25V
10K-J 1/8W
1K-J 1/8W
3.9K-J 1/8W
4.7K-J 1/4W
620-J 1/8W
470 1/4W
470 1/2W
12K-J 1/8W
3.3K-J 1/8W
330-J 1/8W
18K-F 1/8W
5.6K 2W
JQ1a-12V
CS11-12SH
FST,250V,2A
FST,250V,3.15A
FH-51H 7.5A
A6063,L30LW23.5
L4460
470V,4500A
YW396-05AV-WHT
YW396-03AV-BLK
YW396-03AV-BLU
SMW250-04-WHT
SMW250-03-RED
YDW236-01-WHT
GTP
1P,TAB
TACT
2-DIGIT
MP-332MA
Samsung Electronics
Duct-ADH1800E-4
6/27/00 10:43 AM
Page 9-11
Parts list
■
Outdoor Part List (PCB CODE : PD-DH3200-S0, Duct)
Mark
J01-J03,J05-J10,OPJ
IC4
IC05-IC07
PC31,PC32, IC51~IC53
IC03
IC02
IC01
X501
D101-D108,D701
ZD71
Q301,Q302
Q901,Q902
Q201
LED1
C701
C702,C703
C502,C902,C201,C501,C104
C401-C403,C901,C202,C303
C506,C203,C404,C405,C102,C503~C505
C302
C101
C103
C105
R201,R901,R514,R513,R407
R409
R405,R203,R204,R206,R205,R411
R410,R405,R408,R409
R411,R410,R406
R703
R301
R302
R902-R909
R303
R501~R503
R202
R401,R402,R504~R506
R403,R404
R701,R702
RY71,RY74
RY72,RY73
CN76
F101
F701
CR71
VA71
CN73
CN71
CN74
CN41
CN11
CN72
RY72,RY73
GT1,GT2
TB1,TB2
K1
DISPLAY
DS71
Samsung Electronics
Parts Name
JUMP WIRE
IC-MCU
IC-LINEAR
PHOTO-COUPLER
IC-RESET
IC-VOLTAGE-REG
IC-VOLTAGE-REG
CERAMIC-RESONATOR
DIODE-RECTIFIER
DIODE-ZENER
TR-DIGITAL
TR-DIGITAL
TR-SIGNAL
LED-LAMP
C-FILM
C-X2
C-CERAMIC
C-CERAMIC
C-AL
C-AL
C-AL
R-CARBON
R-CARBON
R-CARBON
R-CARBON
R-CARBON
R-CARBON
R-CARBON
R-CARBON
R-CARBON
R-CARBON
R-CARBON
R-METAL
R-CARBON
RELAY-MINIATURE
RELAY-MANIATURE
CONNECTOR HEADER
FUSE
FUSE
FUSE HOLDER
HEAT SINK
COIL
VARISTOR
CONNECTOR HEADER
CONNECTOR HEADER
CONNECTOR HEADER
CONNECTOR HEADER
CONNECTOR HEADER
CONNECTOR HEADER
RELAY-MANIATURE
GT PIN
TERMINAL
SWITCH
7-SEG
DISCHARGER
Specification
PI 0.6 SN T 52MM
KS88C46
KA2657
PC817
KA7533
KA7805
KA7812
10MHz
1N4007
ZD30
KSR1002
KSR2002
C945Y
RED
DISK,4.7NF
X-CAP,100NF(X2)
AXIAL,100NF(104)
AXIAL,1NF(102)
1000uF/35V
2200uF/25V
470uF/25V
10K-J 1/8W
1K-J 1/8W
3.9K-J 1/8W
4.7K-J 1/4W
620-J 1/8W
470 1/4W
470 1/2W
12K-J 1/8W
27K-J 1/8W
3.3K-J 1/8W
330-J 1/8W
18K-F 1/8W
5.6K 2W
JQ1a-12V
CS11-12SH
YW396-05AV-YEL
FST,250V,2A
FST,250V,3.15A
FH-51H 7.5A
A6063,L30LW23.5
L4460
470V,4500A
YW396-05AV-WHT
YW396-03AV-BLK
YW396-03AV-BLU
SMW250-04-WHT
SMW250-03-RED
YDW236-01-WHT
CS11-12SH
GTP
1P,TAB
TACT
2-DIGIT
MP-332MA
9-11
Duct-ADH1800E-4
6/27/00 10:43 AM
Page 9-12
MEMO
9-12
Samsung Electronics
Duct-ADH1800E-4
6/27/00 10:43 AM
Page 10-1
10. Wiring Diagrams
10-1 Indoor Unit
DUCT TYPE AIRCONDTIONER
CODE NO : DB68-00865A
Samsung Electronics
10-1
Duct-ADH1800E-4
6/27/00 10:43 AM
Page 10-2
10-2 Outdoor Unit
BUILT-IN AIRCONDITIONER
CODE NO : DB68-00866A
10-2
Samsung Electronics
Duct-ADH1800E-4
6/27/00 10:43 AM
Page 11-1
11. Schematic Diagrams
11-1 Wired Remote Controller
Samsung Electronics
11-1
Duct-ADH1800E-4
6/27/00 10:43 AM
Page 11-2
11-2. Centralized Controller
11-2
Samsung Electronics
Duct-ADH1800E-5
6/27/00 10:53 AM
Page 1
11-3. Indoor Unit (ADH1800E, ADH2400E, ADH3200E)
Samsung Electronics
11-3
Duct-ADH1800E-5
6/27/00 10:53 AM
Page 2
11-4. Outdoor Unit (ADH1800E, ADH2400E, ADH3200E)
11-4
Samsung Electronics
Duct-ADH1800E-4
6/27/00 10:43 AM
Page 11-3
UPDATE LOG SHEET
Application date
Page
Part#
Note(Cause & Solution)
S/Bulletin#
Use this page to keep any special servicing information.(Service Bulletin, etc.)
If only parts number changes, Just change parts number directly on parts list.
And if you need more information, please see the service bulletin
Copyright
Trademarks
© 1995 by Samsung Electronics Co., Ltd.
All rights reserved.
This manual may not, in whole or in part, be
copied, photocopied, reproduced, translated, or
converted to any electronic or machine readable
from without prior written permission of
Samsung Electronics Co., Ltd.
Samsung is a registered trademark and
SyncMaster 17GLi/CMG7387L and MacMaster
Cable Adapter are trademark of Samsung
Electronics Co., Ltd.
SyncMaster 17GLi/CMG7387L Service Manual
First edition June 1995.
Printed in Korea.
Macintosh, Centris, Quadra, Duo Dock, and
Power Macintosh are trademark of Apple
computer, Inc.
All other trademarks are the property of their
respective owners.
Duct-ADH1800E-front
4/12/00 6:01 PM
Page 1
ELECTRONICS
© Samsung Electronics Co., Ltd. Mar. 2000
Printed in Korea.
Code No. DB81-00151A(2)