1
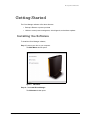
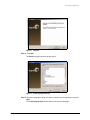
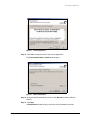
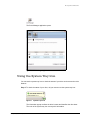
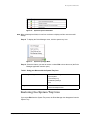
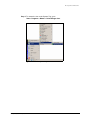
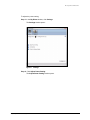
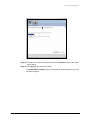
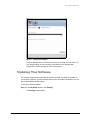
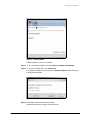
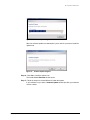
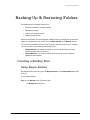
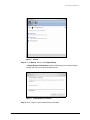
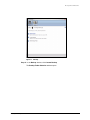
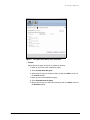
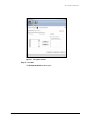
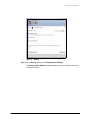
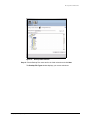
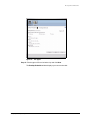
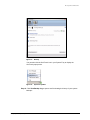
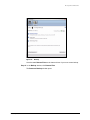
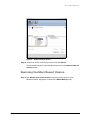
FreeAgent for Windows
Contents
Getting Started.......................................................................................................................... 1
Installing the Software
......................................................................................... 1
.............................................................................. 5
Using the System Tray Icon
Restoring the System Tray Icon
............................................................... 6
Managing Your Drives........................................................................................................ 8
Adjusting the Power Setting
Testing Your Drive
............................................................................ 8
.................................................................................................11
.................................................................................... 14
Updating Your Software
Reading the LED Status Indicators
............................................................. 18
Backing Up & Restoring Folders ............................................................................ 20
Creating a Backup Plan
...................................................................................... 20
Using Simple Backup
.................................................................................... 20
Creating a Custom Backup
Managing Backup Settings
....................................................................... 22
.............................................................................. 29
Editing Backup Settings .............................................................................. 29
Deleting a Backup Plan
................................................................................ 34
Using Scheduled Backup
............................................................................ 36
Turning Off Scheduled Backup
Backing Up Manually
.................................................................................... 37
Viewing the Backup Log
Restoring Files
........................................................ 36
............................................................................ 39
......................................................................................................... 41
Restoring an Historical Version
.............................................................. 43
Restoring the Most Recent Version
..................................................... 44
Index ......................................................................................................................................................i
i
FreeAgent for Windows
Getting Started
The Drive Manager software offers these features:
• Backup & Restore to protect your data
• Utilities to control power management, drive diagnosis, and software updates
Installing the Software
To install the Drive Manager software,
Step 1. Connect your drive to your computer.
The Main Menu window opens:
Figure 1:
Main Menu
Step 2: Click Install Drive Manager.
The Welcome window opens:
Installing the Software
1
FreeAgent for Windows
Figure 2:
Welcome
Step 3: Click Next.
The EULA language selection window opens:
Figure 3:
EULA Language Selection
Step 4: Select the language in which you want to read the License Agreement and click
Next.
The License Agreement window opens in the selected language:
Installing the Software
2
FreeAgent for Windows
Figure 4:
License Agreement
Step 5: Click Yes to accept the terms of the License Agreement.
The Choose Destination Location window opens:
Figure 5:
Select a Destination
Step 6: Accept the default destination location or click Browse to select a different
location.
Step 7: Click Next.
A Setup Status window keeps you informed as the installation proceeds:
Installing the Software
3
FreeAgent for Windows
Figure 6:
Setup Status
When the installation is complete, the InstallShield Wizard Complete window
opens:
Figure 7:
InstallShield Wizard Complete
Step 8: Click Finish.
A Drive Manager icon appears on your desktop:
Installing the Software
4
FreeAgent for Windows
The Drive Manager application opens:
Figure 8:
Drive Manager Application
Using the System Tray Icon
You can use the system tray icon to check the status of your drive and to access the drive
features.
Step 1. To check the status of your drive, roll your mouse over the system tray icon:
Figure 9:
System Tray Icons
The information popup confirms the drive’s status and identifies the drive letter.
The color of the system tray icon conveys this information:
Using the System Tray Icon
5
FreeAgent for Windows
Figure 10:
System Tray Icon Information
Note: When a backup has failed, the red icon continues to display until the next successful
backup.
Step 2: To display the Drive Manager menu, click the system tray icon:
Figure 11:
System Tray Popup Menu
Step 3: Select the feature you want to access or select Exit to close the menu (the Drive
Manager application remains open).
Table 1: Using your Mouse with the System Tray Icon
Click the system tray icon to
• Launch Drive Manager
• Back Up Now
• View Backup Log
• Edit Backup Settings
• Exit
Run your mouse over the icon to show
• Status Information
• Status for Multiple Events
Restoring the System Tray Icon
If you select Exit from the System Tray menu, the Drive Manager icon disappears from the
System Tray.
Using the System Tray Icon
6
FreeAgent for Windows
Step 1. To restore the icon to the System Tray, go to
Start > Programs > Maxtor > Drive Manager Icon
Figure 12:
Using the System Tray Icon
Restore System Tray Icon
7
FreeAgent for Windows
Managing Your Drives
The My Drives window provides a central point from which to manage your drives. It
displays all Seagate and Maxtor drives connected to your computer:
Figure 1:
My Drives
The Command panel across the top of the window allows you to access your drive features
and manage drive utilities.
In the My Drives window,
Step 1. Select a device.
Step 2: Click an option in the Command panel.
Note: External drives are automatically detected and listed in the My Drives window. It can take
a few seconds for the Drive Manager software to detect your devices. If a device doesn’t
appear, make sure it’s properly connected and turned on.
Adjusting the Power Setting
You can choose how long your drive should remain inactive before it goes into powersaving mode.
Adjusting the Power Setting
8
FreeAgent for Windows
To adjust the power setting,
Step 1. In the My Drives window, click Settings.
The Settings window opens:
Figure 2:
Settings
Step 2: Click Adjust Power Setting.
The Adjust Power Setting window opens:
Adjusting the Power Setting
9
FreeAgent for Windows
Figure 3:
Adjust Power Setting
Step 3: Select an interval from the dropdown menu or click Default to return to the default
power setting.
Step 4: Click Apply to save the power setting.
The Adjust Power Setting window confirms that the power setting for your drive
has been changed:
Adjusting the Power Setting
10
FreeAgent for Windows
Figure 4:
Adjust Power Setting Confirmation
Step 5: Click OK to return to the My Drives window.
Testing Your Drive
Test your drive to check the health of your the device. The diagnostic utility performs its
tests without affecting the data on your drive.
To test your drive,
Step 1. In the My Drives window, click Settings.
The Settings window opens:
Testing Your Drive
11
FreeAgent for Windows
Figure 5:
Settings
Step 2: Click Test My Drive.
The Test My Drive window opens:
Testing Your Drive
12
FreeAgent for Windows
Figure 6:
Run Drive Diagnostics
Step 3: Click Test.
A progress bar indicates the progress of the test. When the test is complete, the
results are displayed:
Testing Your Drive
13
FreeAgent for Windows
Figure 7:
Diagnostics Complete
The drive pictured above is functioning normally. If the diagnostic encounters an
error during testing, the serial number of the bad device is displayed with
instructions to contact Seagate for service and support:
Updating Your Software
The Software Update feature automatically informs you when an update is available for
your software. However, you can manually check to see if an update is available or you can
turn off the Software Update feature.
To check for software updates,
Step 1. In the My Drives window, click Settings.
The Settings window opens:
Updating Your Software
14
FreeAgent for Windows
Figure 8:
Settings
Step 2: Click Check for Software Update.
The Software Update window opens:
Updating Your Software
15
FreeAgent for Windows
Figure 9:
Software Update
Software Update is turned on by default.
Step 3: To turn off Software Update, unselect Check for updates automatically.
Step 4: To check for updates now, click Check Now.
If an update is available for your software, a Software Update window allows you
to download the update:
Figure 10:
Software Update Available
Step 5: Click Yes to download the software update.
A window indicates the progress of the download:
Updating Your Software
16
FreeAgent for Windows
Figure 11:
Software Update Progress
When the software update has downloaded, you’re asked if you want to install the
update now.
Figure 12:
Software Update Progress
Step 6: Click Yes to install the update now.
The Install Wizard Welcome window opens.
Step 7: Follow the steps in the Install Wizard to install the update.
If your software is up to date, a Software Update window provides your software
version number:
Updating Your Software
17
FreeAgent for Windows
Figure 13:
Software Up to Date
Step 8: Click OK.
Reading the LED Status Indicators
Your drive has an LED status indicator to keep you informed of the status of the drive:
Figure 14:
Drive LED
Reading the LED Status Indicators
18
FreeAgent for Windows
LED Descriptions
State
Flashing rapidly
Drive fault
Shining steadily/bright
Power on; no data activity
Pulsing slowly
Data activity
Shining steadily/dim
Asleep
Reading the LED Status Indicators
19
FreeAgent for Windows
Backing Up & Restoring Folders
The Backup & Restore feature allows you to
•
•
•
•
Schedule the backup of selected folders
Edit backup settings
Launch an immediate backup
Restore backed up files
After the initial backup, the Drive Manager software backs up changed files in backed up
folders on a schedule you set or when you click Back Up Now in the Backup window.
You can create one Backup Plan for each OneTouch drive connected to your computer.
You can use either of the following two Backup Plans:
• Simple Backup: Pre-configured to back up your XP My Documents or Vista
Documents folder daily at 10:00 p.m.
• Custom Backup: You select the folders to be backed up and set a backup
destination and schedule.
Creating a Backup Plan
Using Simple Backup
Use Simple Backup to back up your XP My Documents or Vista Documents folder daily
at 10 p.m.
To use Simple Backup,
Step 1. Click Backup in the Command panel.
The Backup window opens:
Creating a Backup Plan
20
FreeAgent for Windows
Figure 1:
Backup
Step 2: In the Backup window, click Simple Backup.
A Simple Backup Confirmation window confirms that you’ve selected Simple
Backup and asks you to name this Backup Plan:
Figure 2:
Simple Backup Confirmation
Step 3: Enter a name for your Backup Plan and click OK.
Creating a Backup Plan
21
FreeAgent for Windows
The Backup window now allows you to edit your backup settings and restore
backed up files and describes your Backup Plan and the details of your most
recent backup.
Figure 3:
Backup
Creating a Custom Backup
To select specific folders for backup and set up a backup destination and schedule,
Step 1. Click Backup in the Command panel.
The Backup window opens:
Creating a Backup Plan
22
FreeAgent for Windows
Figure 4:
Backup
Step 2: In the Backup window, click Custom Backup.
The Backup Folder Selection window opens:
Creating a Backup Plan
23
FreeAgent for Windows
Figure 5:
Backup Folder Selection
Step 3: Name your Backup Plan, select the folders to be backed up, and click Next.
The Backup File Types window opens:
Creating a Backup Plan
24
FreeAgent for Windows
Figure 6:
File Types: All Types
Step 4: Select the types of files you want to back up:
• All File Types
• Photos, Music, Videos, Documents.
You can back up any or all of these:
Creating a Backup Plan
25
FreeAgent for Windows
Figure 7:
File Types: Photo, Music, Video, Documents
• Custom
Select specific file types to include or exclude for backup:
– To back up only a few of the available file types,
a. Select Include these file types.
b. Select each file type you do want to back up and click Add to move it to
the Include window.
– To back up most of the available file types,
a. Select Exclude these file types.
b. Select each file type you don’t want to back up and click Add to move it to
the Exclude window.
Creating a Backup Plan
26
FreeAgent for Windows
Figure 8:
File Types: Custom
Step 5: Click Next.
The Backup Schedule window opens:
Creating a Backup Plan
27
FreeAgent for Windows
Figure 9:
Backup Schedule
Step 6: Select the days and time at which you want to back up your folders and click
Finish.
The Backup window now allows you to edit your backup settings and restore
backed up files and describes your Backup Plan.
Creating a Backup Plan
28
FreeAgent for Windows
Figure 10:
Backup
Managing Backup Settings
Editing Backup Settings
To edit the settings for a Backup Plan,
Step 1. Click Backup in the Command panel.
The Backup window opens:
Managing Backup Settings
29
FreeAgent for Windows
Figure 11:
Backup
Step 2: In the Backup window, click Edit My Backup Settings.
The Backup Folder Selection window displays your current Backup Plan name
and folder selection:
Managing Backup Settings
30
FreeAgent for Windows
Figure 12:
Backup Folder Selection
Step 3: Edit the Backup Plan name and/or the folder selection and click Next.
The Backup File Types window displays your current selections:
Managing Backup Settings
31
FreeAgent for Windows
Figure 13:
File Types
Step 4: Edit the types of files to be backed up and click Next.
The Backup Schedule window displays your current schedule:
Managing Backup Settings
32
FreeAgent for Windows
Figure 14:
Backup Schedule
Step 5: Edit the days and/or time you want to back up your folders and click Finish.
The Backup window now displays your edited Backup Plan.
Managing Backup Settings
33
FreeAgent for Windows
Figure 15:
Backup
Deleting a Backup Plan
You can delete the Backup Plan for any Seagate or Maxtor drive connected to your
computer.
To delete a Backup Plan,
Step 1. Click Backup in the Command panel.
The Backup window opens:
Managing Backup Settings
34
FreeAgent for Windows
Figure 16:
Backup
Step 2: In the Backup window, click Delete Backup Plan.
The Delete Backup Plan window opens:
Managing Backup Settings
35
FreeAgent for Windows
Figure 17:
Delete Backup Plans
Listed is the Backup Plan for each drive connected to your computer.
Step 3: Select the Backup Plan you want to delete and click Delete.
The Backup Plan is deleted.
Note: Your backed up files are NOT deleted.
Using Scheduled Backup
Use Scheduled Backup to back up changed files in backed up folders on the days and time
you set. The Scheduled Backup On/Off switch enables or disables the Backup schedule.
By default, Scheduled Backup is turned on.
Turning Off Scheduled Backup
To turn off Scheduled Backup,
• In the Backup window, click the Scheduled Backup Off button.
Managing Backup Settings
36
FreeAgent for Windows
Figure 18:
Scheduled Backup Off
Backing Up Manually
You can back up files manually whenever you like, whether Scheduled Backup is on or off.
You can launch a backup manually in any of these ways:
• Press the OneTouch button if you’ve customized it to back up files.
• Click Back Up Now in the lower right corner of the Backup window.
• Select Back Up Now from the System Tray menu:
A Backup Progress window opens to inform you of the progress of the manual
backup and let you know when the backup is complete:
Managing Backup Settings
37
FreeAgent for Windows
Figure 19:
Manual Backup Complete
Step 4: When the backup is complete, click OK.
Listed in the Backup window beneath Restore Files are the date and time of your
most recent backup:
Managing Backup Settings
38
FreeAgent for Windows
Figure 20:
Backup
Viewing the Backup Log
The Backup Log is a text-based report of your backup history.
To view the Backup Log,
Step 1. Click View Log in the Backup window:
Managing Backup Settings
39
FreeAgent for Windows
Figure 21:
Backup
You can also click the OneTouch icon in your System Tray to display the
OneTouch popup menu:
Figure 22:
System Tray Menu
Step 2: Click View Backup Log to open a text file showing the history of your system
backups:
Managing Backup Settings
40
FreeAgent for Windows
Figure 23:
Backup Log
Restoring Files
When you back up the files stored in selected folders, Drive Manager saves ten (10)
previous, or historical, versions of each revised file stored on your drive. You can restore a
saved historical version of a backed up file based on the date it was last modified or you
can restore the most recent version of a backed up file.
To restore files,
Step 1. Click Backup in the Command panel.
The Backup window opens:
Restoring Files
41
FreeAgent for Windows
Figure 24:
Backup
Listed beneath Restore Files are the date and time of your most recent backup.
Step 2: In the Backup window, click Restore Files.
The Restore a Backup window opens:
Restoring Files
42
FreeAgent for Windows
Figure 25:
Restore a File
Restoring an Historical Version
Step 1. Click Restore historical version of backed up file to restore a previous version
of a file.
The Restore Historical Version window opens:
Restoring Files
43
FreeAgent for Windows
Figure 26:
Restore Historical Version
Step 2: Select a file and file version to be restored and click Restore.
The selected file version is restored to the location noted in the Restore Historical
Version window.
Restoring the Most Recent Version
Step 1. Click Restore most recent version to restore the latest version of a file.
Windows Explorer displays the contents of the Maxtor Backup folder:
Restoring Files
44
FreeAgent for Windows
Figure 27:
Maxtor Backup in Windows Explorer
Step 2: Browse to the desired file and drag it to the location at which you want it restored.
Step 3: Close Windows Explorer.
Restoring Files
45
FreeAgent for Windows
Index
A
Adjusting Power Setting 8
B
Backing Up & Restoring Folders 20
Creating a Backup Plan
Restoring Files 41
20
Backing Up Manually 37
C
Creating a Backup Plan 20
Creating a Custom Backup
Using Simple Backup 20
22
Creating a Custom Backup 22
D
Deleting a Backup Plan 34
E
Editing Backup Settings 29
G
Getting Started 1
Installing the Software 1
Using the System Tray Icon
5
I
Installing the Software 1
M
Managing Backup Settings 29
Backing Up Manually 37
Deleting a Backup Plan 34
Editing Backup Settings 29
Using Scheduled Backup 36
Viewing the Backup Log 39
Managing Your Drives 8
Adjusting Power Setting 8
Testing Your Drive 11
Updating Your Software 14
R
Restoring an Historical Version 43
i
FreeAgent for Windows
Restoring Files 41
Restoring an Historical Version 43
Restoring the Most Recent Version 44
Restoring the Most Recent Version 44
T
Testing Your Drive 11
Turning Off Scheduled Backup 36
U
Updating Your Software 14
Using Scheduled Backup 36
Using Simple Backup 20
Using the System Tray Icon 5
V
Viewing the Backup Log 39
ii