1
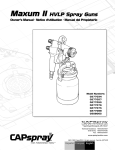
HVLP
TRAINING
MANUAL
High Volume
Low Pressure
Equipment
Form No. 0279612A
Contents
Introduction . . . . . . . . . . . . . . . . . . . . . . . . . . . . . . . . . . . . . . . . . . . . . . . . . . . . . . . 1
Spraying Methods . . . . . . . . . . . . . . . . . . . . . . . . . . . . . . . . . . . . . . . . . . . . . . . . 2-3
When to use HVLP Equipment . . . . . . . . . . . . . . . . . . . . . . . . . . . . . . . . . . . . . . 3
How does HVLP Work? . . . . . . . . . . . . . . . . . . . . . . . . . . . . . . . . . . . . . . . . . . . . 4
How to Acquaint the Painter with HVLP . . . . . . . . . . . . . . . . . . . . . . . . . . . . . . 5
HVLP System Components . . . . . . . . . . . . . . . . . . . . . . . . . . . . . . . . . . . . . . . . 6-8
Maxum I™ HVLP Spray Gun Adjustments . . . . . . . . . . . . . . . . . . . . . . . . . . . . . 9
Maxum I™ Air Cap Adjustments . . . . . . . . . . . . . . . . . . . . . . . . . . . . . . . . . . . . 10
Spray Techniques . . . . . . . . . . . . . . . . . . . . . . . . . . . . . . . . . . . . . . . . . . . . . . 11-13
Choosing a Projector Set . . . . . . . . . . . . . . . . . . . . . . . . . . . . . . . . . . . . . . . . . . . 14
Projector Set Recommendation Chart . . . . . . . . . . . . . . . . . . . . . . . . . . . . . . . . 15
Cleaning Your Equipment . . . . . . . . . . . . . . . . . . . . . . . . . . . . . . . . . . . . . . . . . . 16
HVLP Spray Equipment/Finish Troubleshooting . . . . . . . . . . . . . . . . . . . 17-18
Sherwin-Williams CAPspray 5100 . . . . . . . . . . . . . . . . . . . . . . . . . . . . . . . . . . . 19
Sherwin-Williams CAPspray 8100 . . . . . . . . . . . . . . . . . . . . . . . . . . . . . . . . . . . 20
Sherwin-Williams CAPspray 9100 . . . . . . . . . . . . . . . . . . . . . . . . . . . . . . . . . . . 21
Sherwin-Williams Portable Cart . . . . . . . . . . . . . . . . . . . . . . . . . . . . . . . . . . . . . 22
Mounting Models 5100, 8100 or 9100 . . . . . . . . . . . . . . . . . . . . . . . . . . . . . . . . 23
Sherwin-Williams CAPspray 3100 . . . . . . . . . . . . . . . . . . . . . . . . . . . . . . . . . . . 24
Assistance/Warranty . . . . . . . . . . . . . . . . . . . . . . . . . . . . . . . . . . . . . . . . . . . . . . 25
Notes . . . . . . . . . . . . . . . . . . . . . . . . . . . . . . . . . . . . . . . . . . . . . . . . . . . . . . . . . 26-28
Introduction
The contractor market for HVLP spray systems is the fastest-growing market
segment in the spray equipment industry. As you’ll soon realize, HVLP
sprayers represent a tremendous opportunity to help painters become more
competitive and profitable. Used primarily for finishing work, HVLP sprayers
work hand-in-hand with airless equipment to help contractors reduce the time
and material necessary to complete a job.
The key is minimized overspray. HVLP systems atomize coatings by means
of low air pressure (2-10 PSI) (pounds per square inch) and high air volume
(10-25 CFM) (cubic feet per minute), so the user can expect transfer efficiency
ranging from 65-90 percent. The result is:
• Less time masking and prep work
• Less material waste
• Less time cleaning up
• MORE PROFITS
In addition, the high transfer efficiency of HVLP assists contractors to comply
with new clean air laws designed to reduce volatile organic compounds
(VOC) emissions. HVLP paint sprayers help protect the environment–and
painters–by reducing overspray and bounceback.
This manual will give an overview of HVLP technology and uses; it will also
focus on the specific features and operation of Sherwin-Williams/CAPspray®
HVLP equipment.
TRANSFER EFFICIENCY
Transfer Efficiency %
100
90
80
70
60
Electrostatic
50
Airless Spray
40
Air-Assisted
Airless
30
20
High Volume
Low Pressure
(HVLP)
Air Spray
10
Application Methods–Liquid Coatings
Note: Transfer efficiencies may vary according to the operator and equipment condition.
This chart gives broad ranges only.
1
Spraying Methods
HVLP
Two types of HVLP systems dominate the painting contractor market:
portable turbines and direct hook-up guns. The two systems use completely
different air sources, but atomize material in similar manners.
Portable Turbine
Most commonly found in the painting contractor market for portable
applications, this type of HVLP system uses a centrifugal blower motor as
the air source.
Direct Hook-up Guns
Direct hook-up guns require an air compressor as the air source. The guns
will generally require from 10-25 CFM. These guns are primarily used in
stationary booth applications.
Direct Hook-up High Flow Regulator Guns
High flow regulator guns utilize an attached, high flow regulator, which
increases air flow and reduces air pressure to achieve HVLP results.
Regulators deliver a more precise pressure setting than direct hook-up guns
because the regulator is adjustable right at the gun.
Conventional Air Spray
Airless Sprayers
Conventional air spray atomizes material at high air pressure (35 to 80 PSI)
and moderates air flow. The negative aspect of conventional air spray is
excessive overspray and bounceback that results from high air pressure.
Conventional air spray creates excessive turbulence at the air cap, which
contributes to excess overspray. Bounceback results from the material being
discharged from the nozzle, moving to the substrate at a very high velocity
and bouncing off the substrate. The advantage of this method is ultra-fine
atomization and a high rate of application. Conventional systems are used
on finishing work ranging in size from small jobs to production lines. They
generally are found in stationary applications. Required components are an
air compressor, air hose and conventional spray gun.
Airless sprayers atomize coatings by forcing the paint through a small tip
opening at very high fluid pressure. Working fluid pressures range from
1200 to 3600 PSI. Airless spray transfer efficiency is higher than conventional
air spray (see chart on page 1), and offers the ability to spray the widest
variety of coatings.
Airless sprayers typically are portable with gas, electric and air operated
available. The primary application is production work. These systems are
capable of covering large areas in a short amount of time. When used
properly–correct fluid pressure, hose length and tip size–airless systems
handle the widest range of applications. As a result, it is rare to find a
commercial painting contractor who does not own or need airless
spray equipment.
2
Spraying Methods
Air-Assisted Airless
Electrostatic Spray
Air-assisted airless sprayers offer fine finish capabilities combined with
a medium production rate. Air-assisted technology uses a combination of
airless and air spray. Fluid pressure ranges from 700 to 900 PSI, with air
intermixed at 15 to 30 PSI. The systems typically are found in stationary
and portable fine finish production applications. Transfer efficiency for
air-assisted airless ranges from 40 to 65%.
Electrostatic spray systems charge the paint at the tip. The charged particles
move within the electrostatic field, which is attracted to the grounded object,
forming an even coating on its entire circumference. When used properly, the
result can be high transfer efficiency with uniform mil thickness.
A variety of electrostatic systems are available, including conventional airless
and air-assisted. Applications include chain link fences, wrought iron, lockers,
and metal office furniture.
When to use HVLP Equipment
HVLP equipment is classified as a finishing tool. It is not designed to be used
for covering large, flat surfaces, except when using specialty coatings, such as
multi-spec, or where overspray may be hazardous.
HVLP systems are designed to cut labor time, minimize waste, and improve
the final finish on the substrate. In addition to enhancing profitability, in
many states HVLP is compliant with the most stringent transfer efficiency
requirements. For this reason, you can expect the HVLP sprayer market will
continue to grow at an accelerated pace.
HVLP Applications Include:
Touch-up
Implement equipment
Dentil molding
Six-panel doors
Crown molding
Appliances
Cabinets
Porcelain
Door jambs
Furniture
Elevator doors
Lockers
Frames
Shutters
Bi-fold doors
Dividers
3
HVLP Features:
High transfer efficiency
Minimal bounceback
Sprays most materials
Reduced prep and clean-up
Affordable
Inexpensive to maintain
Controlled spraying
Gutters
General maintenance
Wicker furniture
Shelving
Pipes
Multi-color finishes
Louvered doors
Overhangs
Portability
Reduces material consumption by 40%
Three spray patterns available
Works from 15-amp service
Cuts labor time
Sprays patterns from 1/4" to 12"
Low fluid pressure means low wear
Moisture-free atomizing air
How Does HVLP Work?
A pressure vessel (1-quart cup, 2-quart cup, or pressure pot) supplies
paint to the gun, where a large amount of low pressure air intersects with
the paint stream breaking the paint into small particles. This process is
called atomization.
Air diverted to atomize paint
Low pressure stream of paint
Air diverted to pressurize the cup
High volume of air
in from turbine
Pressure causes paint to flow to spray gun
Since the pressures are much lower, the atomized paint has less bounceback.
This means less overspray, greater transfer efficiency and better control.
Little bounceback, greater control
High volume of
air from turbine
Low pressure paint from container
4
How to Acquaint the Painter with HVLP
The most effective way to show the advantages of HVLP equipment is to
demonstrate it. Contractors will see how they can save labor hours, use less
paint and increase profits.
HVLP sprayers are not for every painter. Be certain they are involved with
the appropriate finishing application. Then match the correct unit size and tip
size to the type of materials they use.
After you have determined the answers to these questions, consider more
specific criteria:
•
Will the system be used in a stationary or portable application?
•
Does the painter need a one-quart cup system, a two-quart,
or a 2 1/ 2 -gallon material capacity for continuous use?
•
Will the painter need extra maneuverability with the gun?
•
Is maximum hose length a consideration?
•
How often will the painter use the sprayer?
The significance of answers to these and other questions are discussed in the
following portion of the handbook. However, the demonstration remains the
most critical component. We can guide you through a demonstration, but you
still must put paint in the cup, be prepared, and be confident. Under those
conditions, the equipment will sell itself.
Before operating a Sherwin-Williams CAPspray HVLP spray system,
please review the owner’s manual. The manual includes all of the
information needed to properly operate and maintain HVLP equipment.
Also keep in mind these basic safety considerations:
5
•
Always spray in a well-ventilated area. Always comply with appropriate local,
state and national codes governing ventilation, fire prevention, and operation.
•
Never spray near sparks, open flames or hot surfaces. Some coating materials
are highly flammable.
•
Before each use, check all material hoses (if you are utilizing them) for cuts,
leaks, abrasions, cover bulging or movement of couplings. If any of these
conditions exist, replace the hose immediately. Never repair a paint hose.
HVLP System Components
As with most sprayers, three distinct components make up an HVLP system:
air source, air hose, and HVLP spray gun. There are several variations of
these components depending upon the manufacturer. We will deal primarily
with Sherwin-Williams CAPspray equipment.
Air Source
The air source is the heart of the system. It provides the CFM and PSI required
to atomize coatings. Depending on the type of gun and the application
requirements, there are two types of air sources–air compressor and turbine.
Air Compressor
Air compressors are used as the air source when using either direct hook-up
guns or high-flow regulator systems. Because of high CFM requirements with
HVLP direct hook-up guns, the minimum compressor size recommended is
5 HP. Due to the overall size and electrical requirements of 5 HP air compressors,
portability is limited. In most cases, direct hook-up guns which require an air
compressor as the air source are confined to stationary applications.
Turbine
The turbine is the most common air source found in the painting contractor
market. A turbine is a high-speed centrifugal blower motor which provides
the gun with high CFM flow at low air pressures. Because of the high
RPM–20,000 RPM in some cases–the air is frictionally heated. This eliminates
all moisture from the atomizing air. The high RPM also increases the atomizing
air temperature by as much as 80 degrees, reducing flash time and helping
to minimize blushing. All CAPspray turbines are commercially rated,
heavy-duty and designed for continuous use.
By-Pass Turbine with Tangential Discharge
The tangential discharge turbine is used in the by-pass configuration, using
separate cooling and intake fans. This turbine comes from the manufacturer
with a built-in air outlet. This type of turbine is found in the 5100, 8100 and
9100 units.
Although there are many variations and uses, the main function of a turbine
in HVLP equipment is to generate a high volume of air at air pressures less
than 10 PSI. A critical element in determining the amount of air pressure that a
turbine can generate is the number of stages. A stage, within a turbine, can be
viewed as an individual compression chamber. The greater the number of
stages within a turbine, the higher the PSI the turbine is able to produce–the
more PSI the turbine produces, the heavier the viscosity of material that can
be sprayed.
2 Stage Turbine
Brush (2)
Cooling Fan
Air Intake
6
Motor
Air Exhaust
HVLP System Components
Please note that while air flow (CFM) and pressure (PSI) are both important
in determining the turbine‘s ability to atomize coatings, pressure is the key.
All manufacturers rate their turbines in the range of 50-170 CFM.
Whether the turbine produces 50 or 170 CFM, it will still have enough air
flow to support the gun. The gun only uses about 25 CFM. Therefore, CFM as
a measure of performance can be misleading. Pressure determines the velocity
of the air moving through the air cap. This creates the turbulence at the
nozzle, and in turn atomizes the coating. The more pressure, the higher the
velocity and the better the ability to break up more viscous coatings.
Air Hose
The air hose often is ignored, but it is a key element of the HVLP system.
Its function–transferring air from the power source to the gun–cannot be
overlooked. The CAPspray hose is specifically designed to withstand heat and
solvents, while remaining lightweight and pliable.
Hose Length
To determine the maximum air hose length with a turbine, use this general
rule of thumb: double the length of hose that comes standard with the
turbine. Example: If 15 feet of hose comes with the turbine, the painter
can use a maximum hose length of 30 feet. Just screw the hoses together to
extend the length.
Maxum I™ HVLP
Spray Gun
The Sherwin-Williams CAPspray® Maxum I™ Non-bleeder Gun is the most
versatile, painter-friendly HVLP gun available on the market.
External packing nut makes
adjustments easy
Stainless steel
needle and nozzle
to minimize wear
Teflon seals are solvent-resistant
for easy cleanup
Optional air inlets
provide non-bleed
to bleed conversion
for greater versatility
Click-in air cap for quick
pattern adjustment –
and no guesswork
Increased internal air
passages for greater
flow, higher pressure
and the ability to handle
heavier coatings
(better atomization)
Composite handle with
patented grip design for
stay -cool operation
Multi-position pick-up tube for longer
use without refill, when spraying at
angles (floors, ceilings)
7
(continued)
HVLP System Components
Maxum I HVLP
Spray Gun
(continued)
HVLP guns differ from conventional air spray guns in two main areas:
One difference is the size of the internal air ports. Conventional gun air
port openings are approximately 1/4''. HVLP guns need more air and use
openings 5/8'' in size. That makes the air ports more than 6 times as large as
those in conventional guns. Keep in mind that HVLP atomizes with a high
volume of air and low pressure.
The second major difference is the manner in which the material is moved
from the cup out of the nozzle. HVLP units pressurize the cup, forcing
material to the nozzle. A conventional gun creates a vacuum to siphon
material to and through the nozzle.
Non-Bleeder Gun
vs. Bleeder Gun
The term non-bleeder means that when the user releases the trigger of the gun,
the air flow stops. With a two-stage trigger, the user will first feel air coming
from the air cap; trigger further and material flow will begin. With a bleeder
gun, air flows continuously; the trigger only starts and stops the paint flow.
Optional Air Inlet
The Maxum I Gun offers two air inlet locations: one on the bottom of the
handle for non-bleeder set up and the second directly behind the air control
valve. To set up the gun in bleeder spray mode, remove the air control knob
and replace it with the air inlet fitting from the bottom of the gun. Close the
air inlet fitting with the plug supplied with the gun. The air hose can now be
attached to the gun. When using this location, the gun becomes a bleeder gun
by always discharging air. This location is particularly helpful spraying inside
lockers or cabinets.
Another area to utilize the top air inlet is to improve atomization with very
heavy materials. This can be done by bypassing the air valve so air is directly
channeled to the air cap.
Patented conversion feature allows you to change
to a bleeder gun if the job requires it.
8
Maxum I HVLP Spray Gun Adjustments
Air Control Valve
To produce the highest-quality finish possible, the spray gun requires the
proper air and material adjustments. You control the air flow with the air
control valve, located at the rear of the gun.
Note the notch that is cast into the control knob on the valve. Air flow is at its
fullest when the knob is set at the 12:00 position. Rotating the valve 180° either
direction cuts off the air.
The air control valve is used when spraying with light viscosity materials or
in confined areas, such as cabinets or lockers. When spraying light material,
full air is not needed. Restrict the valve until you achieve proper atomization
without excess overspray.
Packing Nut
Material Flow
Adjustment
Air control
The amount of paint fed
from the cup out the nozzle
is controlled by the material
adjustment knob located at
Material flow
the heel of the gun, just above
the handle. To decrease paint
flow, turn the fluid
Maximum Air Flow
adjustment knob clockwise.
To increase the paint flow,
turn the knob
Minimum
Minimum
counter-clockwise. A little
Air Flow
Air Flow
experimentation will give
you the correct combination
of paint and air necessary
to achieve the desired finish
and fan size. The material
adjustment can also be used to set a specific trigger pull, so the same pattern
size and material flow are consistently obtained on each pass.
MAX
External Packing Nut
One-Way Valve
9
The external packing nut, located directly in front of the trigger, is used to
adjust the packing so a seal is maintained around the needle.
The one-way valve, or
serviceable check valve, is
designed to allow air into the
cup, putting the material under
pressure, yet not releasing the
cup pressure. CAPspray‘s
one-way valve prevents paint
from seeping up the air tube
into the air passages of the gun.
It also eliminates any delay in
material flow when the gun
is triggered.
CAPspray‘s one-way valve is
easily detached for cleaning purposes. The valve simply rotates to open for
cleaning and contains a disk that can be removed and cleaned with soap and
water for waterborne materials or a compatible solvent for other materials.
Maxum I Air Cap Adjustments
Air Cap
CAPspray‘s exclusively designed guided air cap makes it virtually impossible
for the painting contractor to misalign. This translates to better spray
pattern control.
The air cap determines the spray pattern. It is crucial the air cap remains
clean and free of dried paint.
Spray Pattern
The Sherwin-Williams CAPspray HVLP gun offers a choice of three spray
patterns: horizontal flat, vertical flat and round. To select the desired pattern,
simply rotate the two air cap ”ears” until they click into the desired position.
An up and down position gives you a horizontal pattern. When the ears are
side by side, you will get a vertical pattern. And when the ears are diagonal,
the pattern is round. Never trigger the gun while adjusting the spray pattern.
Diagonal
Round Spray
Cap Position
Pattern
The Fan Size
Horizontal Vertical Spray
Cap Position
Pattern
To change fan size, change the distance from the
surface to the gun nozzle. The closer you are to
the surface, the smaller the pattern becomes.
Moving back increases the fan size.
Trigger pull will also vary the fan size.
The greater the trigger pull, the greater
the material flow and fan size.
Another way to adjust fan size is to move the
air cap in (clockwise) for a larger pattern or out
(counter-clockwise) for a smaller pattern.
When getting started, the air cap should be flush
with the fluid nozzle. This will give you the full
range of pattern size control.
10
Vertical
Cap Position
Horizontal Spray
Pattern
Larger
pattern
Smaller
pattern
Spray pattern width is adjustable
from 1/4'' to 12''.
Spray Techniques
Spraying Techniques
Position the spray gun perpendicular to and 1 to 8 inches from the spray
surface. Spray parallel to the surface and use controlled, smooth passes at an
even speed. Start by applying a thin coat of material on the first pass and
allow it to tac before applying a second, slightly heavier coat.
Correct
How to Make the
Correct Pass
Incorrect
When spraying, trigger the spray gun before starting your pass, and release
trigger before stopping the pass. The best results will occur when making
passes about 20 inches. Keep the gun perpendicular to the surface and overlap
passes approximately 50% to obtain the most consistent, professional finish.
Pull trigger
First pass aimed at edge of panel
Start
pass
here
Finish
pass
here
Start
new
pass
here
Pull trigger
The CAPspray gun is not “all on” or “all off.” With practice, trigger pull
and spraying distance can also be used to change the pattern size. The ideal
distance for HVLP spraying is 1-8 inches from the substrate. Remember, the
closer you stay, the more control you have.
Overlapping
Each Pass
11
The edges of each spray pattern fade slightly. To maintain even coverage,
overlap each stroke.
Spray Techniques
Spraying Large Areas
Spray a long panel or wall in sections. Use horizontal or vertical strokes. Keep
stroke length to 3 feet. Spraying a longer pattern may cause uneven coverage
and excessive overspray. Overlap each section by 4 inches. Narrow panels are
best sprayed using vertical strokes to help prevent too much overlapping.
36"
Spraying the Outside
Edges of Corners
4"
36"
4"
36"
4"
Hold the gun directly facing the corner edge
so that the surfaces which form the corner are
sprayed along the edge.
Spray horizontally for vertical edges,
and spray vertically for horizontal edges.
Spraying the Inside
Edges of Corners
Spraying Slender Work
12
Each surface that forms the corner should be
sprayed separately. Spray one surface
vertically. Spray the other surface with short,
even, horizontal strokes. When spraying each
surface, overlap slightly into corner.
Picket fences are sprayed with single strokes,
made vertically at an angle. This motion will
cover the front and one edge. Spray the other
side of each picket at the opposite angle.
Place a piece of cardboard behind the fence
to catch overspray.
Spray Techniques
Spraying Square
Posts or Steel
Adjust the material adjustment knob to
the desired spray width. Spray two
adjacent surfaces at the same time.
Grills and Wire Fences
Hold the gun at a sharp angle. Deflect the paint
passing through the grill or fence with a flat
surface. This will help coat the other side.
Spraying Round Work
For cylinders up to three feet high or wide, spray vertically. For larger
cylinders, such as storage tanks, spray horizontally. For small pipe work or
tubular furniture, use the round spray pattern set to the proper diameter.
Cutting In
Cutting a line “in” is a technique best explained with an example.
Suppose you are spraying horizontally on a wall, and you are approaching a
door frame. Do not spray horizontally to the edge of the door frame.
LEAVING THE AIR CAP HORNS SET AT HORIZONTAL, CUT IN BY
MOVING THE GUN IN A VERTICAL FASHION.
This hides the pattern created by cutting in. Feather the spray or reduce paint
flow to gun before cutting in. Use horizontally after spraying vertically, leave
air cap horns for vertical spray.
13
Choosing a Projector Set
Projector Set
The projector set determines what materials and viscosities can be sprayed
from the gun. A larger projector set has a larger nozzle opening, allowing you
to spray thicker, heavier materials.
A projector set consists of a needle assembly, fluid nozzle and air cap.
Needle Assembly
Fluid Nozzle
Air Cap
The Maxum I spray gun comes standard with a #3 guided projector set.
You should choose a projector set based on two things: type of material to
be sprayed and finish desired. The chart below will help you make the
correct choice.
Projector
Set Size
Orifice
Size Inches
0276254
#2
.031 in.
Fine Finish
0276227
#3
.051 in.
All-Purpose
0276228
#4
.070 in.
High Output
0276229
#5
.086 in.
Heavy Viscosity Material
0276245
#6
.097 in.
Heavy Viscosity Material
and Texture Finishes
Part Number
14
Type of Coating
Projector Set Recommendation Chart
Material
Percent
Smallest Unit
Reduction Recommended
Projector Set
Recommended
Projector Set
Orifice Size(in.)
Pro Mar 200
10-15%
9100
4 to 5
.070 to .086
Pro Mar 400
10-15%
9100
4 to 5
.070 to .086
Super Paint
5-15%
8100
3 to 4
.051 to .070
Classic 99
5-15%
9100
3 to 4
.051 to .070
Ceiling Paint
5-10%
5100
3 to 4
.051 to .070
DTM Water Base
Acrylic
0-5%
5100
3 to 4
.051 to .070
Chem Lack
2-4%
9100
3 to 4
.051 to .070
Metal Latex
5-10%
9100
4 to 5
.070 to .086
Style Perfect
10-15%
8100
3 to 4
051 to .070
Classic 99 Alkyd
5-15%
5100
3 to 4
.051 to .070
Industrial Enamel
5-15%
5100
3 to 4
.051 to .070
Quick Dry
Enamel
5-15%
5100
3 to 4
.051 to .070
DTM Alkyd
2-5%
5100
3 to 4
.051 to .070
Mfg. Rec.
5100
2 to 3
.031 to .051
5%
9100
3 to 4
.051 to .070
Mfg. Rec.
5100
2 to 3
.031 to .051
Opex Production
Lacquer
10%
5100
3 to 4
.051 to .070
Water White
Lacquer
10%
5100
3 to 4
.051 to .070
Multi Spec
0%
8100
4 to 5
.070 to .086
10-15%
9100
4 to 5
.070 to .086
0%
5100
3 to 4
.051 to .070
Polane
Water Base Epoxy
Nitrocellulous
Lacquer
Tile Clad
Polyurethane
Sealer
0%
5100
3 to 4
.051 to .070
Latex Primer
5-10%
5100
3 to 4
.051 to .070
Incredicoat
5-10%
8100
3 to 4
.051 to .070
Notes: All “water like” coatings require no thinning.
Because of variations in material, recommendations in this chart should be used as
starting points. You may achieve acceptable results using different combinations.
15
Cleaning Your Equipment
Spray Gun
It is important to clean your spray gun thoroughly after each use.
1. Empty the spray material from cup.
2. Pour a small amount of the appropriate solvent in the cup and attach the cup to
the spray gun.
3. Shake and spray the gun in a well-ventilated area. Back-flushing of the system
is not necessary, so do not restrict the nozzle when cleaning.
4. Repeat the steps above until the solvent appears clear.
5. Wipe the exterior of the cup and the spray gun with the appropriate solvent
until it is clean.
6. Make sure the air holes and material passages are completely clean.
Never use metal tools or picks to clean the air cap or nozzle.
7. Thoroughly clean the check valve and hoses. Do not soak check valve hoses in
hot solvents. Failure to clean check valve will result in problems the next time
you use the gun.
It is a good idea to lubricate any threaded parts on
the sprayer with petroleum jelly when you put them
back together. This helps keep them working
properly. However, do not use any lubricants
containing silicone, which can cause problems when
used with some paints.
Cup
Gasket
The cup gasket must be replaced periodically due to
normal wear. It is important to inspect the gasket
during each cleaning.
If material leaks from around or through the packing
nut, tighten the packing nut slightly. Squeeze the
trigger to see if the leaking has stopped. If it has not,
continue to tighten the packing nut until the leaking
stops. Be careful not to over-tighten the packing nut
or the needle will stick in the packing. If adjusting the packing nut does not stop
the leak, replace the packing.
Filter
1. Remove the filter as shown.
2. Use air to blow material residue from the filter,
or tap the particles out. For material that is not
easily blown or knocked loose, try soapy water
or mineral spirits. Allow filter to dry before
placing back in unit. Filters should not be
cleaned with highly flammable solvents. If the
filter does not come clean using these methods,
install a new filter.
16
3. Once the filter is cleaned, insert it back into the
end from which it was removed. Note that the
two-stage filter found on the gun atomizing air
chamber needs to go in with the green side on the inside.
HVLP Spray Equipment Troubleshooting
Problem
Cause
Little or no material out of nozzle.
Out of paint.
Air cap screwed clockwise too far.
Check valve plugged.
Material viscosity too heavy.
Nozzle plugged.
Cup or pot lid is loose.
Pressure Pot System:
Fluid hose clogged.
Regulator not adjusted.
Pot gasket worn.
Pick-up tube bottomed out on gallon can.
No air pressure in pot.
Paint leaking from front of gun.
Needle or nozzle worn.
Needle sticking.
Improper needle or nozzle size.
Loose nozzle.
Loose packing nut.
Needle not closing properly.
Solution
Fill cup or pot with paint.
Adjust air cap.
Clean or replace check valve assembly.
Thin material. Try Paint Mate as an
additive for latex.
Clean nozzle.
Tighten cap lever or pot wing nuts.
Clean by flushing with water or solvent,
or replace hose.
Adjust regulator properly (10-15 psi).
Replace.
Pour paint into pot or shorten tube.
Inspect air tube or pot gasket;
clean or replace.
Replace.
Adjust needle packing; check for
bent needle.
Replace with correct size for material.
Tighten.
Tighten.
Loosen packing nut, replace needle
spring, remove dried paint from needle.
Paint leaking from packing nut.
Packing damaged.
Replace.
Poor spray pattern.
Air holes in air cap ears are clogged.
Nozzle is clogged.
Damaged nozzle or needle.
Air cap screwed in too far.
Gun too far from surface.
Remove and clean air holes.
Clean with appropriate solvent.
Remove and replace.
Adjust air cap to proper setting.
Move gun closer (within 6").
Pulsating spray pattern.
Loose or damaged packing.
Adjust or replace packing.
Pattern off center; heavy to one side.
Air cap holes plugged.
Gun not held perpendicular to surface.
Damaged air cap.
Clean holes in cap.
Position gun correctly.
Replace.
Pattern heavy in the middle.
Too much fluid pressure.
Reduce pressure.
Gun spitting paint.
Check valve not operating properly.
Material too thick.
Clean or replace valve assembly.
Thin material. Try Paint Mate
as an additive for latex.
Paint build-up on air cap.
Improper adjustment of the cap.
Adjust per manual instructions.
Excessive overspray.
Gun too far from surface.
Air pressure too high.
Material too thin.
Move closer.
Reduce air pressure to level that
adequately atomizes coating.
Add unthinned material.
Air control valve turned off.
Air filters clogged.
Adjust air control valve.
Clean or replace filters.
Restricted or no air flow.
17
HVLP Spray Equipment/Finish Troubleshooting
Problem
Cause
Solution
Filter warning light on.
Air filters clogged.
Clean or replace filters.
No trigger pull.
Material adjustment knob too tight.
Turn counter-clockwise.
Unit has no power.
Blown fuse.
Check and replace fuse.
Cup doesn't retain power.
Worn cup gasket.
Cup ears bent.
Replace.
Straighten (do not over-tighten).
Excessive arcing/sparking.
Worn turbine brushes.
Damaged commutator.
Replace brushes.
Replace turbine.
Orange peel.
Paint drying too fast.
Gun too far from surface.
Material too heavy.
Use slower solvent or retarder.
Move closer.
Reduce viscosity. Try Paint Mate
as an additive for latex.
Dry spray with lacquer.
Solvent flash too fast.
Add retarder to slow flash time.
Runs and sags.
Material too thin.
Moving gun too slow.
Too much material.
Add unthinned material.
Speed up passes.
Reduce material flow by adjusting
material adjustment knob.
Pinholing and solvent pops.
Trapped solvents.
Pigment settling.
System contamination.
Apply material in lighter coats allowing
solvents time to evaporate.
Possible bad product. Replace.
Thoroughly clean all parts.
Fish eyes.
Possible silicone contamination.
Use solvent to clean all parts.
Blistering.
Moisture in/on spray surface.
Incompatible topcoats or undercoats.
Dry surface completely.
Ensure coatings’ compatibility.
Lumpy, coarse surface.
Dirt on spray surface.
Thoroughly clean surface.
Mottled surface finish.
Too much thinner.
Poor spray technique.
Reduce thinner.
Always square gun with spray surface.
Finish Troubleshooting:
Note: For fast-drying automotive materials and some lacquers, prepare material to be
sprayed according to manufacturer’s recommendation. The hot air produced by the
turbine quickly dries the solvents required to thin these materials. We recommend
that you thin these materials 5% to 10% more than the recommended instructions
of the manufacturer, or use a retarder.
18
Sherwin-Williams CAPspray 5100 SMIS No. 176-5064
A compact unit for mid-size jobs, the 5100 offers the
painter a great deal of versatility in the type of work,
yet is compact and completely portable. Increased
performance allows the contractor to spray stains,
sealers, lacquers, oil-based and finish-grade latex.
A rugged, two-stage by-pass turbine delivers ample air
pressure and volume to handle higher viscosities better
than any comparable unit. The 5100 features a
lightweight, tough cast and aluminum and steel
housing, center mounted handle for easy carrying, and
an integrated gun/cup holder. Cart mounting is optional.
The 5100 offers the painting contractor many options for
a variety of jobs. For residential work: cabinets, doors
and woodwork, appliances, porcelain, wicker, louvers,
etc. For commercial work: elevators, metal cabinets,
woodwork, equipment, multi-color finishes, dividers,
etc. And for the maintenance painter, the 5100 will make
short work of lockers, metal structures, equipment,
framing, metal dividers, pipes and many more items.
Features:
Maxum I spray gun, which includes a 1-quart cup with multi-position pick-up tube
•
•
15-foot high-flex air hose
•
Two-stage tangential by-pass turbine
•
Portable unit or power pack with carrying handle
•
Integrated cup holder
•
Built-in noise reduction system
Specifications:
• Number 3 guided air cap system for most coatings. Number 3 provides
.051-inch orifice size.
19
•
5 PSI
•
9.0 AMPS (15 AMP circuit, 110V)
•
Weight: 18 lbs.
Sherwin-Williams CAPspray 8100 SMIS No. 176-5072
The 8100 is ideal for jobs that require continuous spraying and the ability to
handle difficult-to-atomize materials. It sprays stains, clear coats, lacquers,
oil-based epoxies and multi-color coatings. Also applies most water-reducible
coatings, including waterborne lacquer and finish-grade latex.
The large or small contractor taking a wide variety of jobs will benefit from
the 8100. Meant for continuous use, the 8100 will become an invaluable
painting partner for residential, commercial or maintenance painting. Meant
for large jobs, the 8100 comes with 30 feet of air hose (can be upgraded to 60
feet) giving the contractor a great deal of maneuverability.
Features:
• Maxum I spray gun, which includes 1-quart cup with
multi-position pick-up tube
•
Filter warning light tells you when to clean or change
air filters
•
30-foot high-flex air hose
•
Three-stage tangential turbine
•
Integrated cup holder
•
Tough metal housing
•
Built-in noise reduction system
•
Optional cart mounting
Specifications:
• Number 3 guided air cap system for most coatings.
Number 3 provides .051-inch orifice size.
20
•
6 PSI
•
10.5 AMPS (15 AMP circuit, 110V)
•
Weight: 22.5 lbs.
Sherwin-Williams CAPspray 9100 SMIS No. 176-5080
The 9100 is the most powerful portable turbine system available. It has an
exclusive, 4-stage tangential turbine that produces the kind of performance
needed to spray continuously and to atomize coatings with a minimal
amount of reduction. Sprays stains, clear coats, lacquers, oil-base, and
multi-color coatings. Also applies most water-reducible coatings, including
waterborne lacquer and finish-grade latex.
The 9100 offers you versatility, since it mounts directly to the Portable Cart
and uses up to 60 feet of air hose. With the quiet, patented, noise-reduction
system, you can use the 9100 in places where other turbine systems would be
too noisy. And the integrated gun holder prevents gun damage when
transporting or storing.
Features:
• Maxum I spray gun, which includes 1-quart cup with multi-position pick-up tube
•
Filter warning light tells you when to clean or change air filters
•
30-foot high-flex air hose
•
Four-stage tangential by-pass turbine
•
Integrated cup holder
•
Built-in noise reduction system
Specifications:
• Number 3 guided air cap system for
most coatings. Number 3 provides
.051-inch orifice size.
21
•
8 PSI
•
12.4 AMPS (15 AMP circuit, 110V)
•
Weight: 23.5 lbs.
Sherwin-Williams Portable Cart SMIS No. 176-5098
The Portable Cart is compatible with the 5100, 8100 or 9100 for complete
mobility around job sites. Built-in air compressor and 2 1/2 -gallon pressure pot
allows fast, continuous spraying for larger jobs. Higher fluid PSI results in
faster application rates with the pressure pot.
Features:
• Lightweight construction
•
Semi-pneumatic tires (no flats)
•
30-foot fluid hose
•
Fold-down handle for storage or transporting
•
Compressor filtered for longer life
•
Wide cart for better stability
Set-up for the Portable Cart is fast and simple.
1. Convert the spray gun from the Maxum I cup gun to a pressure
gun (see cart manual).
2. Mount the cart bracket to the bottom of the turbine as shown in
the diagram on p. 23.
3. Plug turbine power cord into cart outlet.
4. Connect the compressor air hose into the pressure pot inlet.
5. Attach the material hose to the material outlet fitting of
the pressure pot, and to the material inlet of the gun.
6. Attach the turbine air hose to the air outlet fitting of the turbine,
and to the air inlet fitting on the handle of the gun.
7. Place up to 2.5 gallons of paint into the pressure pot.
Note: When using a 1-gallon can in the pressure pot, make sure the pick-up
tube does not bottom out on the can, obstructing the flow of paint to the gun.
In this instance the pick-up tube must be reduced by 1/4''. If using a pot liner,
pour the paint directly into the liner and secure the pressure pot lid.
8. Plug the cart power cord into a 110-volt power supply. Turn
cart and turbine power switches to ON position.
9. Adjust the power regulator to approximately 6 PSI for
light-viscosity materials (lacquers or stains). Use 8 to 15
PSI for heavier paints (enamels to latex).
The correct pressure setting is critical when using the
pressure pot. Always start with the lowest possible
setting depending on your material viscosity.
The fluid pressure is adjusted by the regulator located
on the lid of the pressure pot. Turn clockwise for higher
PSI and counter-clockwise for lower PSI.
Increase
Decrease
22
Material Viscosity
Gauge Setting Fluid Pressure
Light
Medium
Heavy
3-10
6-15
10-25
Mounting Models 5100, 8100 or 9100
Mounting a Turbine
on Your Cart
Your cart mounting hardware includes two spring clips, four screws and a
mounting plate.
Spring Clip
Screw
Mounting Plate
If your turbine looks like this:
you will need to use the
mounting plate only.
Attaching the
Mounting Plate
1. Remove the two screws and foot pads from underneath the turbine exhaust
pipe side of the turbine.
Turbine Exhaust Pipe
Foot Pads
Screws
2. Insert the screws through the foot pads and mounting plate and thread
them into the housing. Tighten securely. Be sure to keep the curved edge of
the plate pointing up.
Mounting Plate
Placing the Turbine
on the Cart
23
1. Insert the curved edge of the mounting plate through the slot on the front
edge of the cart base and set the unit down on the cart.
Sherwin-Williams CAPspray 3100
The 3100 is designed to be used in conjunction with any HVLP unit.
It consists of a compressor, two-quart cup and connecting hoses. A 30-foot air
hose provides air from the compressor to the two-quart cup, and a 6-foot
fluid hose feeds material from the cup to the gun. Air to the gun is supplied
by the host HVLP turbine.
The 3100 doubles the reservoir capacity of standard HVLP guns and reduces
arm and hand fatigue by removing the reservoir from the gun. This also
provides greater freedom to paint inside cabinets and in other areas.
Features:
• 2-quart pressure cup assembly
24
•
30-foot air hose
•
6-foot fluid hose
•
Integrated cup holder
•
Can be used with any HVLP unit
Assistance/Warranty
When a Customer
Needs Help
For ordering, application, technical and service information,
Sherwin-Williams store personnel can speak directly to SprayTech technical
specialists by calling toll free:
1-800-U-CALL-SW (1-800-822-5579)
Contractor customers with questions concerning applications, technical or
service information can call toll free:
1-800-292-4637
Tough Customer™
Guarantee
The Tough Customer™ Guarantee is an exclusive in the spray equipment
industry. This maintenance warranty covers all parts and repairs, including
labor, for one year from the date of purchase. The contractor simply needs to
send in the convenient registration card that accompanies each unit. Store
personnel assist the contractor in completing the Free-Maintenance I.D. card.
Tough Customer™ does not cover unit clean-up, hoses, filters, check valves,
gaskets, projector sets or packings or repairs for misuse or neglect.
CAPspray also offers a one-year limited warranty covering defects in material
or workmanship. See the equipment owner’s manual for details.
25
Notes
26
Notes
27
Notes
28