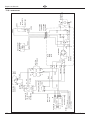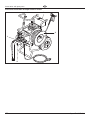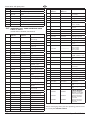
1
Betriebsanleitung Operating manual .................p. 24 Mode d’emploi .......................p. 48 Istruzioni per l’uso .................p. 71 Airless Hochdruck-Spritzgerät Airless high-pressure spraying unit Groupe de projection à haute pression Impianto per la verniciatura a spruzzo ad alta pressione Airless 3 3 4 5 4 5 Super Finish 27 • 31 Ausgabe Edition Edizione 03/2009 0341 855 GB Warning! Attention: Danger of injury by injection! Airless units develop extremely high spraying pressures. Danger 1 Never put your fingers, hands or any other parts of the body into the spray jet! Never point the spray gun at yourself, other persons or animals. Never use the spray gun without safety guard. Do not treat a spraying injury as a harmless cut. In case of injury to the skin through coating materials or solvents, consult a doctor immediately for quick and expert treatment. Inform the doctor about the coating material or solvent used. 2 The operating instructions state that the following points must always be observed before starting up: 1. Faulty units must not be used. 2. Secure WAGNER spray gun using the safety catch on the trigger. 3. Ensure that the unit is properly earthed. The connection must take place through a correctly earthed two-pole and earth socket outlet. 4. Check allowable operating pressure of high-pressure hose and spray gun. 5. Check all connections for leaks. 3 The instructions regarding regular cleaning and maintenance of the unit must be strictly observed. Before any work is done on the unit or for every break in work the following rules must be observed: 1. Release the pressure from spray gun and hose. 2. Secure the WAGNER spray gun using the safety catch on the trigger. 3. Switch off unit. Be safety-conscious! 24 Super Finish 27 • 31 GB Contents 1. Safety regulations for Airless spraying _ ______________________ 26/27 2.General view of application _ _________ 27/28 2.1 Application __________________________________ 27 2.2 Coating materials_ ____________________________ 27 3.Description of unit_ ___________________ 28-30 3.1 Airless process________________________________ 28 3.2 Functioning of the unit_________________________ 28 3.3 Explanatory diagram _ _________________________ 29 – Vertical set-up with suction system – Horizontal set-up with upper hopper 3.4 Technical data Super Finish 27 and 31_____________ 30 3.5 Transport ____________________________________ 30 11.4 11.5 11.6 11.7 11.8 Contents Pressure regulating valve_ ______________________ Relief valve___________________________________ Exchanging diaphragm_________________________ Replace unit connection line_ ___________________ Circuit diagram_ ______________________________ 18 38 39 39 40 12.Accessories and spare parts_ __________ 41-44 12.1 Accessories for Super Finish 27 and 31_ ___________ 41 Accessories illustration for Super Finish 27 and 31_ __ 42 Accessories illustration for Super Finish 27 and 31_ __ 95 12.2 Spare parts list pump head Super Finish 27 and 31_ _ 43 Spare parts diagram pump head Super Finish 27 and 31_ ________________________ 96 12.3 Spare parts list trolley__________________________ 43 Spare parts diagram trolley_____________________ 97 12.4 Spare parts list suction system___________________ 43 Spare parts diagram suction system_ _____________ 97 12.5 Spare parts list upper hopper 5 litres______________ 43 Spare parts diagram upper hopper 5 litres_ ________ 97 12.6 Spare parts list upper hopper 20 litres_____________ 43 Spare parts diagram upper hopper 20 litres_ _______ 97 12.7 Spare parts list pump aggregate Super Finish 27 and 31_ ________________________ 44 Spare parts diagram pump aggregate Super Finish 27 and 31_ ________________________ 98 13.Appendix_ ______________________________ 45-46 13.1 Selection of tip_______________________________ 45 13.2 Servicing and cleaning of Airless hard-metal tips____ 45 13.3 Spray gun accessories__________________________ 45 13.4 Airless tip table_ _____________________________ 46 4. 4.1 4.2 4.3 4.4 4.5 4.6 4.7 4.8 Starting operation ____________________ 30-32 Unit with suction system_ ______________________ 30 Unit with upper hopper (5 litres) ______________ 30/31 High-pressure hose and spray gun________________ 31 Connection to the mains_ ______________________ 31 Cleaning preserving agent when starting-up of operation initially_ ________________ 31 Ventilate unit (hydraulic system) if the sound of the inlet valve is not audible___________ 31/32 Starting operation of unit with coating material_____________________________________ 32 Socket on unit________________________________ 32 5. Spraying technique_ ______________________ 32 CE Declaration of conformity________________ 101 6.Handling the high-pressure hose_________ 32 6.1 High-pressure hose____________________________ 32 Note on disposal_ ____________________________ 101 7. Interruption of work_____________________ 32 8.Cleaning unit (shutting down operation)_ ___________ 33/34 8.1 Cleaning unit from outside______________________ 33 8.2 Suction filter_ ________________________________ 34 8.3 High-pressure filter (accessory)_ _________________ 34 8.4 Cleaning Airless spray gun G 12__________________ 34 Important notes on product liability________ 101 Warranty_________________________________ 101/102 Sales and service companies__________________ 109 9.Remedy in case of disturbance_________ 35/36 10. Servicing__________________________________ 36 10.1 General servicing______________________________ 36 10.2 High-pressure hose____________________________ 36 11.Repairs on the unit_____________________ 37-40 11.1 Inlet valve trigger with Super Finish 31_ ___________ 37 11.2 Inlet valve_ __________________________________ 37 11.3 Outlet valve__________________________________ 37 Super Finish 27 • 31 25 Safety regulations 1. GB Safety regulations for Airless spraying All local regulations in force must be observed. For secure handling of Airless high-pressure spraying units the following safety regulations are to be observed: •Flash point Only use coating materials with a flash point of 21 °C or above without additional heating. The flash point is the lowest temperature at which vapours develop from the coating Danger material. These vapours are sufficient to form an inflammable mixture over the air above the coating material. •Explosion protection Danger Do not use the unit in work places which are covered to the explosion protection regulations. •Danger of explosion and fire through sources of flame during spraying work There may be no sources of flame such as, for example, open fires, smoking of cigarettes, cigars or tobacco pipes, sparks, glowing wires, Danger hot surfaces, etc. in the vicinity. •Danger of injury through the spray jet Danger Caution! Danger of injury through injection! Never point the spray gun at yourself, other persons or animals. Never use the spray gun without spray jet safety guard. The spray jet may not come into contact with any part of the body. In working with Airless spray guns, the high spray pressures arising can cause very dangerous injuries. If contact is made with the spray jet, coating material can be injected into the skin. Do not treat a spray injury as a harmless cut. In the case of injury to the skin through coating material or solvents, consult a doctor for quick and correct treatment. Inform the doctor about the coating material or solvent used. •Secure spray gun against unintended operation Always secure the spray gun when mounting or dismounting the tip and in case of interruption to work. 26 •Recoil of spray gun In case of high operating pressure, pulling the trigger guard can effect a recoil force of up to 15 N. If you are not prepared for this, your hand can be Danger thrust backwards or your balance lost. This can lead to injury. •Respiratory protection for protection against vapours of solvents Wear respiratory protection when spraying. The user must be provided with a breathing mask. •Prevention of occupational illnesses Protective clothing, gloves and possibly skin protection cream are necessary for the protection of the skin. Observe the regulations of the manufacturer concerning coating materials, solvents and cleaning agents in preparation, processing and cleaning units. •Max. operating pressure Max. permissible operating pressure for spray gun, spray gun accessories and high-pressure hose may not fall short of the maximum operating pressure of 250 bar (25 MPa) stated on the unit. •High-pressure hose (safety note) Electrostatic charging of spray guns and the high-pressure hose is discharged through the high-pressure hose. For this reason the electric resistance between the connections of the high-pressure hose must be equal or lower than 1 MΩ. i For reasons of function, safety and durability use only original WAGNER high-pressure hoses. •Electrostatic charging (formation of sparks or flame) Under certain circumstances, electrostatic charging can occur on the unit due to the rate of flow of the coating material when spraying. On dischargDanger ing this can result in the emergence of sparks or fire. It is therefore necessary that the unit is always earthed through the electrical installation. The connection must take place through a correctly earthed two-pole-andearth socket outlet. •Using unit on construction sites Connection to the mains only through a special feed point, e.g. through an error protection installation with INF ≤ 30 mA. •Loading the socket at the unit Do not load the socket with more than 1000 Watt. Unroll any connected cable drum completely. Super Finish 27 • 31 GB •Ventilation when spraying in rooms Adequate ventilation must be guaranteed for the removal of the solvent vapours. Safety regulations / General view of application •Suction installations These are to be set-up by the user of the unit according to local regulations. 3 4 5 •Earthing of the object The object to be coated must be earthed. •Cleaning units with solvents When cleaning the unit with solvents, the solvent should never be sprayed or pumped back into a container with a small opening (bunghole). An explosive gas/air mixture can be produced. The conDanger tainer must be earthed. •Cleaning the unit Danger of short circuit through penetrating water! Never spray down the unit with high-pressure Danger or high-pressure steam cleaners. Socket on unit Only carry out damp cleaning in the area of the socket and the multifunction switch when the mains plug is removed. •Work or repairs on the electrical equipment Only have this work carried out by a qualified electrician. No liability will be taken for incorrect installation. •Working on electrical components Remove the mains plug from the socket for all such works. •Setting-up on uneven surfaces The front side of the unit must point downwards to prevent sliding away. (fig. 1) 2. General view of application 2.1 Application All painting jobs in the workshop and on the building site, small and large-area dispersion work with the spray gun or internally fed Airless roller, corrosion and fire protection. Examples of object of spraying Doors, door frames, balustrades, furniture, wooden cladding, fences, radiators (heating) and steel parts, internal ceilings and walls, and also façades, basement garages, fire and noise protection for steel and wooden construction. 2.2 Coating materials Processible coating materials i Pay attention to the Airless quality of the coating materials to be processed. Dilutable lacquers and paints or those containing solvents, two-component coating materials, dispersions, latex paints, façade paints, roof and attic coatings, fire and corrosion protection material. No other materials should be used for spraying without WAGNER’s approval. Filtering In spite of the suction filter, the insertion filter in the spray gun and the high-pressure filter obtainable as accessory, filtering of the coating material is to be recommended in general. Stir coating material before commencement of work. Super Finish 27 • 31 27 Description of unit GB Attention: Make sure, when stirring up with motor-driven agitators that no air bubbles are stirred in. Air bubbles disturb when spraying and can, in fact , lead to interruption of operation. i Viscosity With this unit it is possible to process highly viscous coating materials of up to around 25.000 mPa·s. If highly viscous coating materials cannot be taken in by suction, they must be diluted in accordance with the manufacturer’s instructions. of the diaphragm. The coating material flows under high pressure through the high-pressure hose to the spray gun. The coating material is atomised when flowing out of the tip. The pressure regulating valve (4) controls the operating pressure and the quantity of the conveyed coating material. 3 Two-component coating material 4 3 4 5 The appropriate processing time must be adhered to exactly. Within this time rinse through and clean the unit meticulously with the appropriate cleaning materials. Coating materials with sharp-edged additional materials These have a strong wear and tear effect on valves, high-pressure hose, spray gun and tip. The durability of these parts cane be reduced appreciably through this. 3. Description of unit 3.1 2 1 Airless process The main areas of application are thick layers of highly viscous coating material for large areas and a high consumption of material. A diaphragm pump takes in the coating material by suction and conveys it to the tip. Pressed through the tip at a pressure of up to a maximum of 250 bar (25 MPa), the coating material is atomised. This high pressure has the effect of micro fine atomisation of the coating material. As no air is used in this process, it is described as an AIRLESS process. This method of spraying has the advantages of finest atomisation, cloudless operation and a smooth, bubblefree surface. As well as these, the advantages of the speed of work and convenience must be mentioned. 3.2 Functioning of the unit In the following there is a short description of the technical construction for better understanding of the function. WAGNER Super Finish 27 and 31 are electrically driven highpressure spraying units. The electric motor (fig. 2, item 1) drives the pump by means of a toothed belt (2). In the pump the diaphragm (3) is moved up and down by means of hydraulic oil. The inlet valve is opened independently through the downward movement of the diaphragm. The outlet valve is opened by means of the upward movement 28 Super Finish 27 • 31 GB 3.3 Description of unit Explanatory diagram Vertical set-up with suction system 19 20 1 2 18 1 2 3 4 5 6 7 3 17 4 5 6 16 3 8 9 10 11 4 5 12 13 8 9 10 15 14 13 12 11 7 14 15 16 17 18 19 20 Spray gun High-pressure hose Outlet valve Socket, max. load 1000 Watt Inlet valve coating material inlet Inlet valve trigger* Connection for cleaning with the spray gun Suction pipe Return pipe Filter, size of mesh 1 mm Oil measuring stick under the oil screw plug Dust protection cap Multifunction switch symbols: (OFF) (ON – circulation) (Spraying) Control lamp shows that the unit is ready for operation Pressure regulating valve Manometer Shaft locking device Extractable shaft Tool box* Eyelet stop for the spray gun * with Super Finish 31 Horizontal set-up with upper hopper 21 22 Upper hopper, capacity 5 litres Return pipe (not positioned parts as in fig. 3) 3 4 5 21 22 Super Finish 27 • 31 29 GB Description of unit / Starting operation 3.4 Technical data Voltage: 230 Volt~,50 Hz Fuse protection: 16 A slow-blow Voltage on multifunction switch: Unit connection line: Socket on unit: Capacity: Max. operating pressure: Max. volume flow: IP 44 IP 54 1.5 kW 1.7 kW 250 bar (25 MPa) Volume flow at 120 bar (12 MPa) with water: 2.5 l/min 3.1 l/min (220 Volt~, 60 Hz) 3.2 l/min Max. size of tip: 0.027 inch – 0.69 mm 0.031 inch – 0.79 mm Max. temperature of the coating material: Hydraulic filling quanitity: Max. tyre pressure: Max. acoustic pressure level: 1 1000 Watt 3.5 l/min Net weight: 4 230 Volt ~,50 Hz 3.0 l/min 3.5 l/min (220 Volt~, 60 Hz) Max. viscosity: 3 24 V 6 m long, 3 x 1.5 mm Max. connection: Type of protection: 5 Super Finish Super Finish 27 31 Unroll high-pressure hose and lay it over the shaft. Secure the unit by means of suitable fastening. 4. Starting operation 43°C 25.000 mPa·s 40 kg Transport in vehicle 43 kg 0.9 Litre, ESSO NUTO H 22 4.1 Unit with suction system 1. Screw off dust protection cap (fig. 6, item 1). 2. Pay attention to clean sealing areas on the connections. Pay attention to the fact that the red inlet (2) is inserted into the coating material inlet. 3. Screw and tighten the union nut (3) on the suction pipe (4) onto the coating material inlet (5) with the accompanying spanner 41 mm. 4. Screw the union nut (6) on the return pipe (7) onto the connection (8). 5 2 bar (0.2 MPa) 74 dB (A)* 3 3 4 5 *Place of measuring: 1 m in distance from the unit and 1.6 m above the floor, 120 bar (12 MPa) operating pressure, reverberant floor 3.5 2 Transport 1 Push or pull unit. Loosen terminal sleeves (fig. 5, item 1) on the shaft ( open). Extract shaft to the desired length. Tighten terminal sleeves again by hand ( closed). 8 6 4 7 4.2 Unit with upper hopper (5 litres) 1. Screw off dust protection cap (fig. 7, item 1). 2. Pay attention to clean sealing areas on the connections. 30 Super Finish 27 • 31 GB Pay attention to the fact that the red inlet (2) is inserted into the coating material inlet. 3. Screw the upper hopper (3) onto the coating material inlet (4). 4. Hang the return pipe (5) into the upper hopper. 5. Screw the union nut (6) on the return pipe (5) onto the connection (7). Starting operation 4.4 Connection to the mains Attention The connection must take place through a correctly earthed two-pole and-earth socket outlet. Before connection to the mains, pay attention to the fact that the mains voltage agrees with the information on the makers’ name plate on the rear of the unit. The green control lamp will light up as soon as the mains plug has been connected. 5 3 2 4 6 7 Cleaning preserving agent when starting-up of operation initially 1. Unit with suction system Submerge suction pipe into a vessel filled with a suitable cleaning agent 2. Unit with upper hopper Fill suitable cleaning agent into the upper hopper. 3. Set multifunction switch (fig. 9, item 1) to (ON– circulation); the unit commences to run. Turn pressure regulation knob (2) to the right until stop. 4. Wait until the cleaning agent flows out at the re-turn pipe. 5. Set multifunction switch (1) to (spray). Pull trigger guard of spray gun. 6. Spray cleaning agent from the unit into an open collection container. 3 4 5 1 4.5 4.3 High-pressure hose and spray gun 3 4 5 1. Screw the high-pressure hose (fig. 8, item 1) onto the hose connection (2). 2. Screw the spray gun (3) with selected tip onto the highpressure hose. 3. Tighten the union nut on high-pressure hose so that no coating material escapes. 2 1 3 4.6 Ventilate unit (hydraulic system) if the sound of the inlet valve is not audible 1. Turn pressure regulating knob (fig. 10, item 1) three revolutions to the left. 2. Set multifunction switch (2) to (ON – circulation). The hydraulic system is ventilated. Leave the unit on for two to three minutes. 3. Then turn the pressure regulating knob (1) to the right until stop. Sound of the inlet valve is audible. 4. If not, repeat points 1 and 3. 1 3 4 5 2 Super Finish 27 • 31 31 GB Starting operation/ Spraying technique Interruption of work Completely unroll a connected cabledrum. 1 2 Attention 3 4 5 So that in switching on the unit the mains fuse protection of 16 A does not react: Always switch on the Super Finish 27 or31 unit first Attention and then the connected unit. 4.7 Starting operation of unit with coating material 1. Super Finish 27 Before mounting suction system or upper hopper, check inlet valve for functionality. Press inlet valve with a soft implement (e.g. a pencil); it must allow Attention movement. 2. Unit with suction system Submerge suction pipe into a container filled with coating material. 3. Unit with upper hopper Fill coating material into the upper hopper. 4. Super Finish 31 Press inlet valve trigger (fig 11, item 1) several times to release possibly clogged inlet valve. 5. Set multifunction switch (2) to (ON - circulation); the unit will start. Turn pressure regulating knob (3) to the right until stop. 6. When the sound of the valves can be heard clearly, the unit is ventilated. 7. Set multifunction switch (2) to (spray). Pull trigger guard of spray gun, then set the desired operating pressure by means of the pressure regulating knob (3). 8. The unit is ready for spraying. 1 5. Spraying technique Guide the spray gun evenly during the spraying process. If this is not observe, an irregular spraying appearance will be the result. Spray with the arm and not with the wrist. Maintain a parallel distance of approx. 30 cm, between the spray gun and object of spraying. The lateral limitation of the spray jet should not to be too distinct. The edge of the spraying should be gradual to facilitate overlapping of the next coat. Always guide the spray gun parallel to and at an angle of 90°to the spraying area; in this way the least paint cloud arises. i 6. If very distinct edge zones appear and streaks in the spray jet – increase operating pressure or dilute coating material. Handling the high-pressure hose Avoid bending or folding the high-pressure hose sharply; smallest bending radius approx. 10 cm. Do not run over the high-pressure hose and protect it from sharp objects and edges. There is danger of injury as a result of a leaking high-pressure hose. Replace high-pressure hose immediately. Attention Never repair the high-pressure hose your-self! 6.1 High-pressure hose 2 The unit is equipped with high-pressure hose specially suited for diaphragm pumps. 4.8 3 4 5 3 Socket on unit It is possible, for example, to connect an agitator, a working lamp etc with a maximum of 1000 Watt. 32 i For reasons of function, safety and durability, only use original WAGNER high-pressure hoses. 7. Interruption of work 1. Switch off unit, set multifunction switch to (pressure relief, circulation), then to (OFF). 2. Secure spray gun, see operating manual for spray gun. 3. If the tip is to be cleaned, see page 45, point 13.2. Super Finish 27 • 31 Cleaning unit (shutting down operation) GB 4. Unit with suction system Leave the suction system submerged in the coating material or submerge it into the appropriate cleaning agent. Suction filter and unit should not dry out. In using quick-drying - or two-component coating material, do not fail to rinse unit through with a suitable cleaning agent during Attention the processing period. 8. Cleaning unit from outside The effect of cleaning is increased if the spray gun is alternately opened and closed. Achtung In case of coating materials diluted with water, warm water improves cleaning. Achtung Cleaning unit (shutting down operation) Cleanliness is the surest guarantee for disturbance-free operation. Always clean the unit after completing spraying work. In no event may residue of the coating material dry and collect in the unit. The cleaning agent used for cleaning (only with a flash point of over 21 °C) must correspond to the coating material. •Secure spray gun, see operating manual for spray gun. Dismount tip and clean, see page 45, point 13.2. Unit with suction system (fig. 12) 1. Remove suction system from the material vessel, e.g. put unit in the horizontal set-up position. 2. Switch on unit, set multifunction switch to (ON– circulation) and further to (spray). 3. Pull the trigger guard on the spray gun in order to pump residue coating material from the suction pipe, the highpressure hose and the spray gun into an open container. • Attention Danger In case of coating material containing solvents, the vessel must be earthed. Caution! Do not pump or spray in container with a small opening (bunghole)! See safety regulations. 4. Submerge suction system in a suitable cleaning agent. 5. Set multifunction switch to (OFF). 6. Screw on spray gun on suction pipe (fig. 12) with the two accompanying spanners 22 mm. 7. Set multifunction switch to (ON – circulation). 8. Pump suitable cleaning agent in the circuit for approx. 1 minute. 9. Pull trigger guard on spray gun and hold with clamp. 10. Set multifunction switch to (spray). 11. Clean suction pipe for about three minutes. 12. Rinse in circuit – set multifunction switch to (ON). 13. Close spray gun. 14. When cleaning with water, repeat procedure for about three minutes with clear water. 15. Switch off unit – set multifunction switch to (OFF). Super Finish 27 • 31 •Unit with upper hopper 1. Fill upper hopper with suitable cleaning agent. 2. Switch on unit, set multifunction switch to (ON circulation). 3. Operate unit for a few minutes in circuit with spray gun closed (without tip). 4. Set multifunction switch to (spray). 5. Pull trigger guard on spray gun. 6. Pump cleaning agent into a separate, open container until the unit is empty. Attention Danger In the case of coating materials containing solvents, the container must be earthed. Caution! Do not pump or spray in container with a small opening (bunghole)! See safety regulations. 7. Switch off unit, set multifunction switch to (OFF). 8.1 Cleaning unit from outside First of all pull out mains plug from socket. Danger 33 GB Cleaning unit from outside Danger Danger of short circuit through penetrating water! Never spray down the unit with highpressure or high-pressure steam cleaners. Wipe down unit externally with a cloth which has been immersed in a suitable cleaning agent. Clean socket and the multifunction switch areas meticulously also. (4) and O-ring (5). 3. Roll in filter insert (3) (for filter insert with 70 mesh this is not necessary) and pull out of supporting part (2). 4. Clean all parts with appropriate cleaning agent. If pressure air is existent – blow through filter insert and supporting part. 5. Remount high-pressure filter. 1 8.2 Suction filter i Clean filters also guarantee the maximum conveyance quantity, constant spraying pressure and faultless function of the unit. 2 •Unit with suction system 3 1. Screw off the filter (fig. 13) from suction pipe. 2. Clean or replace the filter. Carry out cleaning with a hard brush and an appropriate cleaning agent. 4 5 8.4 Cleaning Airless spray gun G 12 •Rinse Airless spray gun with an appropriate cleaning agent. •Clean tip thoroughly with appropriate cleaning agent so that no coating material residue re-mains. Thoroughly clean the outside of the Airless spray gun. • •Unit with upper hopper 1. Release screws with a screwdriver (fig. 14,item 1). 2. Lift (2) and remove filter disk with a screwdriver. 3. Clean or replace the filter disk. Carry out cleaning with a hard brush and an appropriate cleaning agent. 2 1 Intake filter in Airless spray gun Dismounting (fig. 16) 1. Pull protective guard (1) forward vigorously. 2. Screw grip (2) out of the gun housing. Remove intake filter (3). 3. Intake filter congested or defective – replace. Mounting 1. Place intake filter (3) with the long cone into the gun housing. 2. Screw in grip (2) into the gun housing and tighten. 3. Slot in protective guard (1). e in 2 G1 1. Insert open-ended spanner into the groove of the filter housing (fig. 15, item 1) – screw out filter housing. 2. Remove filter housing (1), supporting part (2), centring ring 34 3 . i max00 psr 39 0 ba 27 8.3 High-pressure filter (accessory) •Switch off unit – set multifunction switch to (OFF). •Open high-pressure filter and clean filter insert; in addition: y an rm Ge Mad 1 2 Super Finish 27 • 31 GB Remedy in case of disturbance 9. Remedy in case of disturbance Type of malfunction Possible cause Unit does not start •No voltage. •Check voltage supply Fuse protection has reacted. For example • •First switch on the unit Super finish 27 or an agitator is connected to the socket on the unit. This agitator has not been switched off before switching on the unit Super Finish 27 or 31. The unit switches off automatically in case of overloading. The green control lamp in the multifunction switch extinguishes. The unit does not switch on again independently. • Unit does not exert suction Measure for elimination of malfunction 31 and then, for example, the connected agitator. •The green control light will light up again after 2 - 3 minutes. Then set multifunction switch to (OFF). Switch unit on again (ON – circulation), then set multifunction switch to (spray). Unit with suction system: •Filter extends beyond the liquid level •Refill coating material. and sucks in air. Suction filter congested. Suction pipe not tightened, i.e. the unit sucks in ancillary air. • • •Clean or replace suction filter. •Clean and tighten connections. Device with upper hopper: Filter disk congested. • •Clean or replace filter disk. Super Finish 31: Inlet valve trigger leaks, sucks in ancillary air. • •Replace stripper and O-ring, see page 37, Super Finish 27: Inlet valve is clogged, cannot be pressed down into inlet valve housing. • •Inlet valve must allow movement; test by Super Finish 31: Inlet valve is clogged • • point 11.1. Switch off unit - pressing the inlet valve slightly with a soft implement (e.g. a pencil). Moving the inlet valve back and forth removes impurities from the valve seat. If this does not help, screw the inlet valve out of the paint section and clean it, refer to page 37, point 11.2. Switch off unit - (OFF) Press inlet valve trigger (fig. 17, item 1) several times; this releases the clogged inlet valve. 1 Attention Super Finish 27 • 31 (OFF) Press inlet valve trigger (fig.17, item 1) only by hand -never hit the inlet valve trigger with a hammer. 35 Remedy in case of disturbance/ Servicing GB Type of malfunction Possible cause Unit does not exert suction •Inlet valve does not close as, for •Screw inlet valve out of the paint section • • Unit exerts suction but no buildup of pressure takes place •Air in the hydraulic system •Release air from unit (hydraulic system), Unit exerts pressure and reaches pressure. If the spray gun is removed, the pressure falls appreciably •No tip in the spray gun •Tip too large •Mount tip. •Selection of smaller tip, see page 46, point •Suction filter clogged • • • •Clean and tighten connection points. •Replace outlet valve parts, see page 37, •Relief valve does not close. Coating • •High-pressure hose for diaphragm •Use original WAGNER high-pressure hose. • •Replace outlet valve parts, see page 37, example, the guidance is clogged Outlet valve is clogged material escapes at switch position (spray) from the return pipe. unit not suitable Outlet valve parts worn 10. Servicing and clean, see page 37, point 11.2 Screw the outlet valve out of the paint section and clean, see page 37, point 11.3 i.e. turn pressure regulating valve three revolutions to the left. Allow the unit to run one or two minutes. After that, turn pressure regulating valve to the right to set the desired operating pressure. 13.4. Clean suction filter or replace. Specially for unit with suction system: Suction pipe not tight Outlet valve parts worn Hard pressure jolts and excessive vibration on the spray gun and unit Measure for elimination of malfunction point 11.3. Screw out relief valve from paint section and clean or replace, see page 38, point11.5. point 11.3. 10.1 General servicing Servicing of the unit should be carried out once annually by the WAGNER service. 1. Check high-pressure hoses, unit connection line, plug and socket for damage. 2. Check inlet valve, outlet valve, diaphragm and filter for wear. 3. Check oil level (fig. 18) in the horizontal set-up. max. min. 10.2 High-pressure hose Check high-pressure hose optically for any cuts or bulges in particular at the connection to the fitting. Union nuts must be able to be turned freely. 36 Super Finish 27 • 31 GB 11. Repairs on the unit Danger Repairs on the unit Switch off unit (OFF). Pull mains plug from the socket before all repairs. 2 11.1 Inlet valve trigger (fig. 19) with (SF31) Super Finish 31 1 6 1. Screw out inlet valve trigger with spanner 17mm. 2. Replace stripper (1) and O-ring (2). (SF27) 4 (SF31) 2 1 3 (SF27) 5 7 11.2 Inlet valve (fig. 20) 1. Super Finish 27 Place accompanying spanner 36 mm on the inlet valve housing (1). Super Finish 31 Place accompanying spanner 30 mm on the trigger housing (2). 2. Release inlet valve housing (1) or trigger housing (2) with light blows of a hammer on the end of the spanner. 3. Screw out inlet valve housing or trigger housing with the inlet valve (3) from the paint section. 4. Remove clasp (4) by means of a screwdriver. 5. Place accompanying spanner 30 mm on the inlet valve (3). Withdraw carefully turning the inlet valve. 6. Clean valve seat (5) with cleaning agent and brush. 7. Clean seals (6, 7) and check for damage, replace if necessary. 8. If there are traces of wear in the valve seat, replace inlet valve. Mounting 1. Insert inlet valve (3) into the inlet valve housing (1) or the trigger housing (2) and secure with clasp (4). 2. Screw unit from inlet valve housing or trigger housing and inlet valve into the paint section. 3. Tighten inlet valve housing with spanner 36 mm or trigger housing with spanner 30 mm and tighten with three light blows of the hammer on the end of the spanner. 11.3 Outlet valve (fig. 21) 1. Screw out outlet valve with spanner 22 mm from the paint section. 2. Remove clasp (1) carefully with screwdriver, pressure spring (2) presses parts out 3 to 4. Attention 3. Clean or replace individual parts. 4. Check O-ring (6) for damage. 5. Pay attention to installation position in mounting spring support ring (3), outlet valve seat (4) and seal ring (5), see fig. 21. Super Finish 27 • 31 37 GB Repairs on the unit ! 1 5 1 3 4 2 6 2 11.4 Pressure regulating valve (fig. 22, item 1) Allow pressure regulating valve (1) only to be replaced by the customer service. The max. operating pressure is to be reset by the cusAttention tomer service. 3. Screw out screws (fig. 24, item 3) from the switch housing (4). 4. Remove switch housing (4) from the paint section. 5. Screw relief valve (5) out with the spanner 17mm. 6. Clean valve seat with cleaning agent and brush. 7. Check O-ring (6) for damage, replace if necessary. 5 4 3 4 3 1 11.5 Relief valve 3 Danger Switch off unit (OFF). Pull mains plug from socket before repair. 1. Screw out stop screw (2) from the regulating knob (fig. 23, (spray). item 1) into switch position 2. Remove regulating knob. 38 6 5 Mounting regulating knob (fig. 23, item 1). 1. Place regulating knob first of all onto the axle, turn a little until the regulating knob can be pushed on completely. 2. Turn regulating knob into switch position (spray). Only in this position can the stop screw (fig. 23, item 2) be pushed in by hand and screwed tight. Super Finish 27 • 31 GB 11.6 Exchanging diaphragm 11.7 Replace unit connection line (fig. 26) Switch off unit (OFF). Pull mains plug from the socket before repair. Danger 1. Remove stop screw, regulating knob and switch housing, see under 11.5 relief valve, points 1 to 4. 2. Screw hexagonal screws (fig. 25, item 1) from the flange ring (2) with spanner 19 mm. 3. Remove paint section (3). 4. Remove insert (4) and diaphragm (5). 5. The diaphragm can only be used once. Always replace diaphragm. Before mounting, clean and dry diaphragm, insert and built-in areas on screw flange (6) and on paint section (3). • Repairs on the unit Danger 1. 2. 3. 4. 5. Switch off unit (OFF). Pull mains plug from the socket before repair. Dismount trolley. Screw off housing half with socket and remove. Loosen cable connection (1). Loosen cord in the mains connection terminal (2). Replace unit connection line. 1 Mounting takes place in the reverse order 6. First of all tighten hexagonal screws (1) with 10 Nm, then crosswise with 70 Nm. 1 3 2 4 5 2 6 Super Finish 27 • 31 39 40 socket N L black green yellow blue mounting angle green yellow blue mains plug brown K3 power supply terminal motor with temperature switch RST EB2R8L M I~ K4 K5 blue red K2 C 25 µF 400 V blue K11 K10 light blue K13 120°C CI CI RI IK 2W K2 K2/1 white 470µF 50V grey LED status indicator LO 2500 OHIDI 4 x IN4007 board WK2C 94VO V10567 18V/4VA TI load relay T92P7022-24 light blue K12 black K9 6 KI/2 KI/1 K7 2 K8 8 K6 4 black black UI yellow ZI bimetallic release 1658 10 A V155°C Z2 schwarz U2 K1 green processing capacitor K2/2 K19 K16 0 red K1 K15 red load relay K18 T92P7022-24 09-91-0600 15-04-0219 39-26-3060 08-50-0106 470R G5V2 R2 3W IN4007 D2 K14 yellow brown micro switch1418 brown yellow green green brown Repairs on the unit GB 11.8 Schaltplan Super Finish 27 • 31 GB Accessories and spare parts 12. Accessories and spare parts 12.1 Accessories for Super Finish 27 and 31 Item SuperFinish 27 SuperFinish 31 Description Order no. Order no. Accessories illustration, see page 42 1 0341 705 --------------------- Inlet valve – trigger housing 2 0341 713 --------------------- Tool box 3 0341 910 0341 910 Hose drum (without high-pressure hose) for 30 m high-pressure hose DN 6 mm 4 0070 212 0070 212 0070 317 0070 344 0070 326 0070 317 0070 344 0070 326 High-pressure filter 200 meshes, 0.085 mm mesh width The high-pressure filter is suitable as a fine filter, each tuned to the tip used. Filter insert 200 meshes (tip size under 011/0.28 mm) Filter insert 100 meshes (tip size over 011/0.28 mm) Filter insert 70 meshes (tip size over 015/0.38 mm) Accessories illustration, see page 95 Spray gun accessories and tips, see page 45/46 5 0257 001 0335 002 0257 001 0335 002 Spray gun AG-09 S (stainless steel model) Spray gun G 12 (aluminium model) 6 0096 004 0096 019 0096 005 0096 006 0096 004 0096 019 0096 005 0096 006 Pole gun 30 cm Pole gun 100 cm Pole gun 150 cm Pole gun 270 cm 7 0097 057 0097 057 Injection lance for regeneration of concrete 8 0345 010 0345 010 Inline Roller IR-100 9 9984 510 9984 507 9984 562 9984 510 9984 507 9984 562 High-pressure hose DN 4 mm, 7.5 m with stainless steel nipple High-pressure hose DN 6 mm, 15 m for dispersion High-pressure hose DN 6 mm, 30 m for dispersion 10 0034 030 0034 030 Double socket for coupling high-pressure hoses 11 0341 263 0341 263 Suction system QuickClean, filter mesh width 1 mm 12 0097 531 0097 531 Filter bag, mesh width 0.3 mm 13 0341 265 0341 265 Upper hopper fittings, 5 litres 0097 258 0097 259 0097 258 0097 259 Hopper filling sieve for upper hopper 5 litres. Prevents filling of rough particles from the container. Through this suction problems are avoided. Sieve package (5 pcs) for paint Sieve package (5 pcs) for dispersion 0341 266 0341 266 Upper hopper fittings, 20 litres 0097 260 0097 261 0097 260 0097 261 Hopper filling sieve for upper hopper 20 litres. Prevents filling of rough particles from the container. Through this suction problems are avoided. Sieve package (5 pcs) for paint Sieve package (5 pcs) for dispersion 0034 950 0034 950 0034 952 0034 951 0034 952 0034 951 Metex-Reuse Reuse for pre-filtering of coating material in vessel. Place suction pipe in the reuse. Sieve package (5 pcs) for paint Sieve package (5 pcs) for dispersion 0037 607 0003 756 0037 607 0003 756 Filter disks Upper hopper, 5 litres Filter disk, mesh width 0.8 mm Filter disk, mesh width 0.4 mm 0097 521 0017 408 0097 521 0017 408 Filter disksUpper hopper, 20 litres Filter disk, mesh width 0.8 mm Filter disk, mesh width 0.4 mm 0034 660 0034 660 Suction system (flexible) for paint 14 15 16 17 18 19 20 0034 630 0034 630 Suction system (flexible) for dispersion 0340 720 0340 720 Concrete regeneration set (without diagram) Super Finish 27 • 31 41 Accessories and spare parts GB Accessories illustration for Super Finish 27 and 31 2 3 1 IN m 70 .2 ax UT O W VA bar 4 42 Super Finish 27 • 31 GB 12.2 Spare parts list pump head Super Finish 27 and 31 (spare parts diagram, see page 96) Item SuperFinish 27 Order no. SuperFinish 31 Description Order no. 1 ------------------- 0341 241 Inlet valve trigger 2 ------------------- 0341 316 Stripper 3 ------------------- 9971 486 O-ring 4 x 2 4 0340 339 0340 339 Inlet 5 ------------------- 0341 335 Trigger housing 6 0344 326 ------------------- Inlet valve housing 7 0341 336 0341 336 Clasp 8 0341 331 0341 331 Sealing ring 9 0341 330 0341 330 Sealing ring 10 0341 247 0341 247 Inlet valve 11 9990 865 9990 865 12 0341 322 0341 322 13 0341 248 14 15 Überschrift Item SuperFinish 27 Order no. SuperFinish 31 Description Order no. 43 0341 350 0341 350 0344 337 ------------------- Double socket M 16 x 1.5 Double socket NPSM 1/4 44 9920 204 9920 204 Disk 13 DIN 433 (6) 45 9900 217 9900 217 Hexagonal screw M 12 x 60 DIN 931 (6) 12.3 Spare parts list trolley (spare parts diagram, see page 97) Item SuperFinish 27 SuperFinish 31 Description Order no. Order no. 1 0341 211 0341 211 Trolley 2 9920 701 9920 701 Disk 3 0348 349 0348 349 Wheel, pneumatictyred Dust protection cap 4 9994 902 9994 902 Wheel cap Paint section 5 9920 301 9920 301 Disk 8.4 0341 248 Relief valve 6 9990 866 9990 866 Rubber cap 9974 031 9974 031 O-ring 12 x 1.3 7 ------------------- 9900 106 0341 414 0341 414 Disk Hexagonal screw M 6 x 12 16 0341 242 0341 242 Diaphragm with insert 8 ------------------- 0341 372 Tool box 9 ------------------- 9920 304 Disk 6.4 18 0341 711 0341 710 Screw flange (item 19 –> 23) 10 ------------------- 9910 102 Hexagonal nut M 6 19 0340 361 0340 361 Groove nut 20 0340 368 0340 368 Disk 21 0340 359 0340 359 Rubber disc 22 9971 469 9971 469 O-ring 35 x 2 23 0340 358 0340 358 Ring 24 0341 315 0341 315 Flange ring 25 0340 312 0034 357 Pressure spring 26 0344 327 ------------------- Spring plate 27 0341 482 0341 311 Piston 28 9991 797 9991 797 Manometer 0 - 400 bar (0 - 40 MPa) 29 9970 109 9970 109 Sealing ring 30 0341 702 0341 702 Outlet valve, service set (item 31 –> 37) 12.4 Item Spare parts list suction system (spare parts diagram, see page 97) Order no. Description 0341 263 Suction system QuickClean 1 0341 435 Filter, mesh width 1 mm 2 0253 211 Return pipe 12.5 Spare parts list upper hopper, 5 litres (spare parts diagram, see page 97) Item 1 Order no. Description 0341 265 Upper hopper fittings, 5 litres 0340 901 Cover 2 9902 306 Combination sheet metal screw 3.9 x 13 3 0037 607 Filter disk, mesh width 0.8 mm 4 0340 904 Upper hopper 5 0340 908 Return pipe 31 0341 347 0341 347 Sealing ring 32 0341 327 0341 327 Outlet valve seat 33 9941 501 9941 501 Ball 11 34 0253 405 0253 405 Spring support ring 35 0341 326 0341 326 Pressure spring 36 9971 470 9971 470 O-ring 20 x 2 Item Order no. Description 37 0341 328 0341 328 Clasp 1 0341 266 Upper hopper fittings, 20 litres 39 0341 325 0341 325 Valve guide 2 0097 269 Upper hopper without cover 41 0341 488 0341 488 Anode ring 3 0097 270 Cover 42 9970 103 9970 103 Sealing ring 16 x 20 x 1.5 5 9902 306 Combination sheet metal screw 3.9 x 13 6 0097 521 Filter disk, mesh width 0.8 mm 7 9922 609 Securing ring 37 x 1.5 Super Finish 27 • 31 12.6 Spare parts list upper hopper, 20 litres (spare parts diagram, see page 97) 43 GB Accessories and spare parts Item Order no. Description 9 0037 776 Pressure spring 10 9941 509 Ball 30 Item SuperFinish 27 SuperFinish 31 Description Order no. Order no. 35 9906 007 9906 007 Cylinder head screw M 5 x 45 (6) 13 0097 295 Return pipe 36 0341 348 0341 348 Oil dip-stick 15 0097 271 Container adapter 37 9971 146 9971 146 O-ring 16 x 2 16 0037 756 Valve support 38 0341 349 0341 349 Oil cap screw 17 9971 065 O-ring 44 x 3 39 9953 144 9953 144 19 0097 522 Container acceptance Capacitor 25 MF/400 V (230 V~, 50 Hz) 40 9900 341 9900 341 Cylinder head screw M 8 x 12 41 0341 230 0341 230 Electric bracket 43 0341 351 0341 351 Belt disk SuperFinish 27 SuperFinish 31 Description Order no. Order no. 44 0341 398 0341 398 Ventilator 45 9922 508 9922 508 Securing ring 14 x 1 1 9900 336 9900 336 Cylinder head screw M 6 x 40 (2) 46 0341 397 0341 397 Ventilator hood 3 0340 303 0340 303 Foot (2) 47 9921 504 9921 504 Spring ring 4 4 0341 208 0341 208 Housing 48 9900 737 9900 737 Cylinder head screw M4x6 5 9905 111 9905 111 Oval head screw 5 x 20 (9) 49 0341 201 0341 201 6 9905 112 9905 112 Screw M 6 x 20 (4) 0341 204 ------------------- 7 9950 241 9950 241 Socket Electric motor 230 V~, 50 Hz Electric motor 220 V~, 60 Hz 8 9950 242 9950 242 Seal 51 0340 354 0340 354 Seal 9 9900 408 9900 408 Screw M 6 x 16 53 0261 352 0261 352 Unit connection lineH07RN – F3G 1.5 – 6 m 10 0340 302 0340 302 Connecting plate 54 9951 074 9951 074 11 0341 353 0341 353 Toothed belt Cable screw connection 12 0341 352 0341 352 Belt pulley 55 9951 075 9951 075 Nut 13 0341 706 0341 706 Eccentric shaft, item 14 –> 21 56 0341 235 0341 235 Multifunction switch 57 3050 639 3050 639 14 3056 464 3056 464 Securing ring 72 x 2.5 Cylinder head screw M 4 x 40 (3) 15 9970 532 9970 532 Shaft seal 40 x 72 x 10 58 0341 237 0341 237 Regulating knob 16 0341 324 0341 324 Eccentric shaft 59 0341 413 0341 413 Stop screw 17 9960 151 9960 151 Groove ball bearing 6207 62 9971 365 9971 365 O-ring 9,25 x 1.78 63 0340 222* 0340 222* Regulating unit 18 9922 518 9922 518 Securing ring 35 x 1.5 64 0010 861* 0010 861* Pressure spring 19 9960 431 9960 431 Roller bearing NUTR 25 65 0010 858* 0010 858* Clamp 66 0010 859* 0010 859* Stop sleeve 67 0158 251* 0158 251* Pressure regulating knob 68 0340 223* 0340 223* Pressure regulating valve 9984 510 9984 510 9984 507 9984 507 9984 562 9984 562 12.7 Spare parts list - pump aggregate Super Finish 27 and 31 (spare parts diagram, see page 98) Item 20 9922 506 9922 506 Securing ring 25 x 1.2 21 9960 432 9960 432 Cylinder roller bearing NJ 202 24 9900 315 9900 315 Cylinder head screw M 6 x 25 (4) 25 9920 806 9920 806 Disk 6,4 (4) 26 0341 225 0341 220 Hydraulic housing 27 9993 105 9993 105 Nipple 28 0341 445 0341 445 Return hose 29 0288 317 0288 317 O-ring 6.07 x 1.78 30 0288 309 0288 309 Angle piece 31 0341 446 0341 446 Suction hose 32 0341 307 0341 307 Seal 33 0341 309 0341 309 Cover 34 3050 858 3050 858 Disk 5,3 (6) 44 without diagram High-pressure hose DN 4 mm, 7,5 m with stainless steel nipple High-pressure hose DN 6 mm, 15 m for dispersion High-pressure hose DN 6 mm, 30 m for dispersion *When exchanging these parts the operating pressure must be reset by the customer service. Super Finish 27 • 31 GB Appendix 13. Appendix 13.1 Selection of tip To achieve faultless and rational working, the selection of the tip is of the greatest importance. In many cases the correct tip can only be determined by means of a spraying test. Some rules for this: The spray jet must be even. If streaks appear in the spray jet the spraying pressure is either too low or the viscosity of the coating material to high. Remedy: Increase pressure or dilute coating material. Each pump conveys a certain quantity in proportion to the size of the tip: The following principle is valid: large tip = small tip = There is a large range of tips with various spraying angles. 13.2 low pressure high pressure Servicing and cleaning of Airless hard-metal tips Standard tips If a different tip type has been fitted, then clean it according to manufacturer’s instructions. The tip has a bore processed with the greatest precision. Careful handling is necessary to achieve long durability. Do not forget the fact that the hard-metal insert is brittle! Never throw the tip or handle with sharp metal objects. The following points must be observed to keep the tip clean and ready for use: 1. 2. 3. 4. 5. 6. Switch off unit (OFF). Dismount the tip from the spray gun. Place tip in an appropriate cleaning agent until all coating material residue is dissolved. If there is pressure air, blow out tip. Remove any residue by means of a sharp wooden rod (toothpick). Check the tip with the help of a magnifying glass and, if necessary, repeat points 3 to 5. 13.3 Spray gun accessories Flat jet adjusting tip up to 250 bar (25 MPa) Tip marking Bore mm Spray width at about 30 cm removal of spray object Pressure 100 bar (10 MPa) 15 0,13 - 0,46 5 - 35 cm Paints 0999 057 20 0,18 - 0,48 5 - 50 cm Paints, fillers 0999 053 28 0,28 - 0,66 8 - 55 cm Paints, dispersions 0999 054 41 0,43 - 0,88 10 - 60 cm Rust protection paints - dispersions 0999 055 49 0,53 - 1,37 10 - 40 cm Large-area coats 0999 056 Use Flat jet adjusting tip Order no. Contact protection for the flat jet adjustment tip Order no. 0097 294 Tip extension with slewable knee joint (without tip Length 100 cm Length 200 cm Length 300 cm Super Finish 27 • 31 Tip extension with Order no. 0096 015 Order no. 0096 016 Order no. 0096 017 Length 15 cm Length 30 cm Length 45 cm Length 60 cm Order no. Order no. Order no. Order no. 0999 320 0999 321 0999 322 0999 323 45 GB GB Appendix without tip F thread (11/16 - 16 UN) for Wagner spray guns order no. 0556 042 62 1 wagner professional tip up to 270 bar (27 MPa) without tip G thread (7/8 - 14 UN) for Graco/Titan spray guns order no. 0556 041 62 1 13.4 Airless tip table Airless tip table tip marking Spray angle Bore inch / mm Spraying width mm 1) Order no. natural paints clear paints Oils 407 507 209 309 409 509 609 40° 50° 20° 30° 40° 50° 60° 0.007 / 0.18 0.007 / 0.18 0.009 / 0.23 0.009 / 0.23 0.009 / 0.23 0.009 / 0.23 0.009 / 0.23 160 190 145 160 190 205 220 0552 407 ------------0552 209 0552 309 0552 409 0552 509 0552 609 111 211 311 411 511 611 10° 20° 30° 40° 50° 60° 0.011 / 0.28 0.011 / 0.28 0.011 / 0.28 0.011 / 0.28 0.011 / 0.28 0.011 / 0.28 85 95 125 195 215 265 0552 111 0552 211 0552 311 0552 411 0552 511 0552 611 113 213 313 413 513 613 813 10° 20° 30° 40° 50° 60° 80° 0.013 / 0.33 0.013 / 0.33 0.013 / 0.33 0.013 / 0.33 0.013 / 0.33 0.013 / 0.33 0.013 / 0.33 100 110 135 200 245 275 305 0552 113 0552 213 0552 313 0552 413 0552 513 0552 613 0552 813 115 215 315 415 515 615 715 815 10° 20° 30° 40° 50° 60° 70° 80° 0.015 / 0.38 0.015 / 0.38 0.015 / 0.38 0.015 / 0.38 0.015 / 0.38 0.015 / 0.38 0.015 / 0.38 0.015 / 0.38 90 100 160 200 245 265 290 325 0552 115 0552 215 0552 315 0552 415 0552 515 0552 615 0552 715 0552 815 217 317 417 517 617 717 219 319 419 519 619 719 819 20° 30° 40° 50° 60° 70° 20° 30° 40° 50° 60° 70° 80° 0.017 / 0.43 0.017 / 0.43 0.017 / 0.43 0.017 / 0.43 0.017 / 0.43 0.017 / 0.43 0.019 / 0.48 0.019 / 0.48 0.019 / 0.48 0.019 / 0.48 0.019 / 0.48 0.019 / 0.48 0.019 / 0.48 110 150 180 225 280 325 145 160 185 260 295 320 400 0552 217 0552 317 0552 417 0552 517 0552 617 0552 717 0552 219 0552 319 0552 419 0552 519 0552 619 0552 719 0552 819 221 421 521 621 821 20° 40° 50° 60° 80° 0.021 / 0.53 0.021 / 0.53 0.021 / 0.53 0.021 / 0.53 0.021 / 0.53 145 190 245 290 375 0552 221 0552 421 0552 521 0552 621 0552 821 223 423 523 623 723 823 20° 40° 50° 60° 70° 80° 0.023 / 0.58 0.023 / 0.58 0.023 / 0.58 0.023 / 0.58 0.023 / 0.58 0.023 / 0.58 155 180 245 275 325 345 0552 223 0552 423 0552 523 0552 623 0552 723 0552 823 225 425 525 625 825 227 427 527 627 827 629 231 431 531 631 433 235 435 535 635 839 20° 40° 50° 60° 80° 20° 40° 50° 60° 80° 60° 20° 40° 50° 60° 40° 20° 40° 50° 60° 80° 0.025 / 0.64 0.025 / 0.64 0.025 / 0.64 0.025 / 0.64 0.025 / 0.64 0.027 / 0.69 0.027 / 0.69 0.027 / 0.69 0.027 / 0.69 0.027 / 0.69 0.029 / 0.75 0.031 / 0.79 0.031 / 0.79 0.031 / 0.79 0.031 / 0.79 0.033 / 0.83 0.035 / 0.90 0.035 / 0.90 0.035 / 0.90 0.035 / 0.90 0.039 / 0.99 130 190 230 250 295 160 180 200 265 340 285 155 185 220 270 220 160 195 235 295 480 0552 225 0552 425 0552 525 0552 625 0552 825 0552 227 0552 427 0552 527 0552 627 0552 827 0552 629 0552 231 0552 431 0552 531 0552 631 0552 433 0552 235 0552 435 0552 535 0552 635 ------------- 243 543 552 20° 50° 50° 0.043 / 1.10 0.043 / 1.10 0.052 / 1.30 185 340 350 0552 243 0552 543 0552 552 paints, primers zinc chromate base Fillers Spray gun filter "yellow" Synthetic-resin paints pvc paints Spray gun filter "red" Application Fillers Spray plasters rust protection paints Mica paints zinc dust paints Dispersions rust protection paints Spray gun filter "whIte" Spray plasters rust protection paints red lead latex paints large-area coatings Spray gun filter "green" Dispersions binder, glue and filler paints 1)Spray width at about 30 cm to the object and 100 bar (10 MPa) pressure with synthetic-resin paint 20 DIN seconds. 46 Super Finish 27 • 31 D Zubehörbild I GB Accessories illustration F Illustration des accessoires Figura degli accessori Super Finish 27 • 31 7 6 5 10 11 8 9 12 MAX 250BAR 3600PSI 14 13 17 18 Super Finish 27 • 31 15 16 19 20 95 D Ersatzteilbild I GB Spare parts diagram F Illustration des pièces de rechange Schema pezzi di ricambio 4 Super Finish 27 • 31 D Pumpenkopf 45 1 3 GB Pump head F Tête de pompe I Testa della pompa 2 5 6 (SF31) (SF27) 44 8 7 30 9 43 42 31 34 10 11 41 32 12 13 14 37 39 36 35 33 16 29 28 24 18 19 20 21 22 23 25 26 (SF27) 96 27 Super Finish 27 • 31 D Ersatzteilbild GB Spare parts diagram Illustration des pièces de rechange F Schema pezzi di ricambio I D Wagen D Ansaugsystem GB Trolley GB Suction system F Chariot F Système d’aspiration I Carello I Sistema di aspirazione 2 8 3 2 7 9 10 5 6 1 4 1 D Oberbehälter 5 Liter Oberbehälter 20 Liter D GB Upper hopper, 5 litres GB Upper hopper, 20 litres F Cuve de gravité 5 litres F Cuve de gravité 20 litres I Contenitore superiore da 5 litri I Contenitore superiore da 20 litri 3 1 5 6 7 9 2 1 3 5 10 2 4 15 16 17 13 19 Super Finish 27 • 31 97 D Ersatzteilbild I Spare parts diagram GB Illustration des pièces de rechange F Schema pezzi di ricambio Super Finish 27 • 31 D Pumpen-Aggregat GB F Groupe de pompe I Pump aggregate 59 57 68 65 64 62 1 12 11 25 98 16 15 17 1 3 4 5 6 5 7 14 8 13 18 9 19 24 20 21 10 36 37 38 26 29 30 32 27 31 33 28 3 35 34 39 43 4 6 40 41 49 44 45 63 46 66 67 47 55 56 48 54 51 53 58 Aggregato pompe Super Finish 27 • 31 GB Important notes on product liability As a result of an EC regulation being effective as from January 1, 1990, the manufacturer shall only be liable for his product if all parts come from him or are released by him, and if the devices are properly mounted and operated. If the user applies outside accessories and spare parts, the manufacturer´s liability can fully or partially be inapplicable; in extreme cases usage of the entire device can be prohibited by the competent authorities (employer´s liability insurance association and factory inspectorate division). Only the usage of original WAGNER accessories and spare parts guarantees that all safety regulations are observed. Declaration of conformity Herewith we declare that the supplied version of WAGNER Super Finish 27, 230 V, 50 Hz WAGNER Super Finish 27, 220 V, 60 Hz WAGNER Super Finish 31, 230 V, 50 Hz Complies with the following provisons applying to it: 73/23 EEC, 89/336 EEC and 89/392 EEC. Applied harmonized standards, in particular: EN 292-1/-2, EN 55014, EN 55104, EN 60204-1, EN 6100-3-2 Applied national technical standards and specifications, in particular: VBG 5, BGV D15 Date: 18. 12. 2000 Executive Officer Signature Head of Development Note on disposal In observance of the European Directive 2002/96/EC on waste electrical and electronic equipment and implementation in accordance with national law, this product is not to be disposed of together with household waste material but must be recycled in an environmentally friendly way! Wagner or one of our dealers will take back your used Wagner waste electrical or electronic equipment and will dispose of it for you in an environmentally friendly way. Please ask your local Wagner service centre or dealer for details or contact us direct. Super Finish 27 • 31 Warranty (Status 01.02.2009) 1. Scope of guarantee All Wagner professional colour application devices (hereafter referred to as products) are carefully inspected, tested and are subject to strict checks under Wagner quality assurance. Wagner exclusively issues extended guarantees to commercial or professional users (hereafter referred to as "customer") who have purchased the product in an authorised specialist shop, and which relate to the products listed for that customer on the Internet under www.wagner-group.com/profi-guarantee. The buyer's claim for liability for defects from the purchase agreement with the seller as well as statutory rights are not impaired by this guarantee. We provide a guarantee in that we decide whether to replace or repair the product or individual parts, or take the device back and reimburse the purchase price. The costs for materials and working hours are our responsibility. Replaced products or parts become our property. 2. Guarantee period and registration The guarantee period amounts to 36 months. For industrial use or equal wear, such as shift operations in particular, or in the event of rentals it amounts to 12 months. Systems driven by petrol or air are also guaranteed for a 12 month period. The guarantee period begins with the day of delivery by the authorised specialist shop. The date on the original purchase document is authoritative. For all products bought in authorised specialist shops from 01.02.2009 the guarantee period is extended to 24 months providing the buyer of these devices registers in accordance with the following conditions within 4 weeks of the day of delivery by the authorised specialist shop. Registration can be completed on the Internet under www.wagner-group.com/profi-guarantee. The guarantee certificate is valid as confirmation, as is the original purchase document that carries the date of the purchase. Registration is only possible if the buyer is in agreement with having the data being stored that is entered during registration. When services are carried out under guarantee the guarantee period for the product is neither extended nor renewed. Once the guarantee period has expired, claims made against the guarantee or from the guarantee can no longer be enforced. 3. Handling If defects can be seen in the materials, processing or performance of the device during the guarantee period, guarantee claims must be made immediately, or at the latest within a period of 2 weeks. The authorised specialist shop that delivered the device is entitled to accept guarantee claims. Guarantee claims may also be made to the service centres named in our operating instruc- 101 GB tions. The product has to be sent without charge or presented together with the original purchase document that includes details of the purchase date and the name of the product. In order to claim for an extension to the guarantee, the guarantee certificate must be included. The costs as well as the risk of loss or damage to the product in transit or by the centre that accepts the guarantee claims or who delivers the repaired product, are the responsibility of the customer. the meaning of the German text has priority. J. Wagner GmbH Division Professional Finishing Otto Lilienthal Strasse 18 88677 Markdorf Federal Republic of Germany Subject to modifications · Printed in Germany 4. Exclusion of guarantee Guarantee claims cannot be considered --for parts that are subject to wear and tear due to use or other natural wear and tear, as well as defects in the product that are a result of natural wear and tear, or wear and tear due to use. This includes in particular cables, valves, packaging, jets, cylinders, pistons, means-carrying housing components, filters, pipes, seals, rotors, stators, etc. Damage due to wear and tear that is caused in particular by sanded coating materials, such as dispersions, plaster, putty, adhesives, glazes, quartz foundation. in the event of errors in devices that are due to non-compliance with the operating instructions, unsuitable or unprofessional use, incorrect assembly and/or commissioning by the buyer or by a third party, or utilisation other than is intended, abnormal ambient conditions, unsuitable coating materials, unsuitable operating conditions, operation with the incorrect mains voltage supply/frequency, over-operation or defective servicing or care and/or cleaning. for errors in the device that have been caused by using accessory parts, additional components or spare parts that are not original Wagner parts. for products to which modifications or additions have been carried out. for products where the serial number has been removed or is illegible for products to which attempts at repairs have been carried out by unauthorised persons. for products with slight deviations from the target properties, which are negligible with regard to the value and usability of the device. for products that have been partially or fully taken apart. -- ------- 5. Additional regulations. The above guarantees apply exclusively to products that have been bought by authorised specialist shops in the EU, CIS, Australia and are used within the reference country. If the check shows that the case is not a guarantee case, repairs are carried out at the expense of the buyer. The above regulations manage the legal relationship to us concludingly. Additional claims, in particular for damages and losses of any type, which occur as a result of the product or its use, are excluded from the product liability act except with regard to the area of application. Claims for liability for defects to the specialist trader remain unaffected. German law applies to this guarantee. The contractual language is German. In the event that the meaning of the German and a foreign text of this guarantee deviate from one another, 102 Super Finish 27 • 31