1
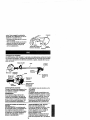
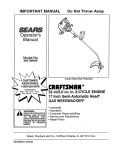
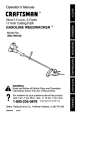
Operator's Manual
CRRFTSMRN°
1.3 cu. in./21cc 2-Cycle
17 Inch Cutting Path / .065 in. Line
GASOLINE WEEDWACKER
®
Model No.
358.796050
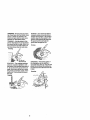
Read and follow all Safety Rules and Operating
WARNING:
Instructions before first use of this product.
--_-Fe
•
r answers-to your-q uestionsabout-this=product:
Call 7 am-7 pm, Mon.-Sat., or 10 am-7 pm, Sun.
1-800-235"5878
(HourslistedareCe.tralTime)
Sears, Roebuck and Co., Hoffman Estates, IL 60179 USA
530-087366
03/02/98
M
Warranty Statement
Safety Rules
Assembly
Operation
Maintenance
Service & Adjustments
2
2
4
5
9
10
Storage
Troubleshooting Chart
Illustrated Parts Ust
Spanish
Parts and Ordering
t
12
13
!6
Back
FULL ONE YEAR WARRANTY ON CRAFTSMAN GAS POWERED
WEEDWACKER_
LINE TRIMMER
Forone yearfrom thedate of purchase,whenthisCraftsmanGas Powered
Weedwacker®Line Trimmer is maintained,lubricated,and tunedup according to
theoperatingand maintenanceinstructionsin the Operator'sManual,Searswill
repair,free ofcharge,any defect in materials or workmanship.
Thiswarrantyexcludesnylon_ine,sparkplug,and air fiiter, whicham expendable
partsand becomewornduringnormaluse.
If thisWeedwacker®LineTrimmer is used for commercialpurposes,thiswarranty appliesfor only 90 daysfrom the date ofpurchase.If thisWeedwacker®Line
Trimmerisused for rentalpurposes,thiswarrantyappliesfor only30 daysfrom
the dateof purchase.Thiswarrantyappliesonlywhilethisproductis in usein the
UnitedStates.
WARRANTY
SERVICEIS,AVAILABLE
BYRETURNING
THE WEEDWACKER®
LINE
TRIMMERTOTHENEARESTSEARSSERVICECENTERIN THE UNITEDSTATES.
Thiswarrantygivesyou specificlegalrights,and you may alsohave otherrights
whichvaryfrom state to state.
Sears, Roebuck and CO,,D/817 WA Hoffman Estates, IL 60179
WARNING: When usinggardening
appliances,basicsafetyprecautions
mustalways be followedto reduce the
riskoffire and seriousinjury. Read and
follow all instructions.
Thispower unitcanbe dangerous!
Operator isresponsiblefor fol!owing
instructions
and wa-mingson unitand
in manual.Read entireOperator's
"_aSafety
info_rmation
onthe unit
DANGER: Never use blades or flailing devices. This unit is designed for
line trimmer use only. Use of any other
accessories or attachments will increase the risk of injury. .....
Manual before using unit! Be thoroughly fami)iar with the controls and the .....
proper use of the unit. Restrict the use
of this unit to persons who have read,
understand, and w_l follow the instructions and warnings on the unit and in
the manual. Never allow children to
operate this unit.
WARNING: Trimmerline throwsobjectsviolently. You and otherscanbe
blinded/injured.
Wear eye and leg
protection.Keep bodyparts clearof
rotatingline. Keep children,bystanders, and animals50 feet (I 5 meters)
2
• Keep othersaway when makingcarburetor adjustments.
• Use only recommendedCraftsman
accessories and replacementparts.
away. If approached stop unit immediately.
Eye Protection
FUEL SAFETY
• Mix and pourfueloutdoors.
• Keep away fromsparksor flames......
• Use a containerapprovedfor fuel.
° Do not smokeor atlowsmokingnear
fuel or the unit.
• Wipe up all fuel spills.
• Move at least 10 feet (3 meters)
away fromfueling site beforestarting
engine.
• Stop engineand allow to coolbefore
removingfuel cap.
If situationsoccurwhichare not
coveredin thismanual,usecare and
goodjudgement.If you need
assistance,contactyourAuthorized
ServiceDealeror call 1-800-235-5878.
OPERATOR SAFETY
• Always wearsafetyeye protection.
• Always wearlong pants,long
sleeves,boots, and gloves.Wearing
safetyleg guardsis recommended.
Do notgo barefootor wear sandals.
Stay clear ofspinningline.
• Secure hairaboveshoulderlength.
Secureor removelooseclothingor
clothingwithlooselyhangingties,
straps,tassels,etc.They can be
caughtin moving parts.
• Do not operatewhenyou are tired,
ill, upset,or undertheinfluenceof
alcohol,drugs,or medication.
* Wear headngprotecti6nif you use
unitfor more than1-1/2 hoursper
day.
• Never startor runinsidea closed
roomor building.Breathingexhaust
fumes can kill.
• Keep handlesfreeof oiland fuel,
UNIT / MAINTENANCE SAFETY
• Disconnectthesparkplugbefore
performingmaintenanceexceptcarburetoradjustments.
• Lookfor and replace damagedor
loosepartsbeforeeach use. Look
for and repairfuel leaksbeforeuse.
Keep.in goodworkingcondition.
• Replacetrimmerhead partsthat are
chipped,cracked,broken,or damaged in any otherway beforeusing
the unit.
. Make sureunitis assembledcorrectly as showninthis manual.
° Make carburetoradjustmentswith
lower end supportedto preventline
from contactinganyobject.
CUTTING SAFETY
• Use only for trimming, mowing, edging, and sweeping. Do not use for
pruning or hedge tdmming.
• Inspect the area before each.use.
Remove objects (rocks, broken
glass, nails, wire, etc.) which can be
thrown by or become entangled in
line. Hard objects can damage the
tdmmer head and be thrown causing
serious inju_.
• Keep firm footing and batance. Do
not overreach.
• Keep all parts of your,body away
from muffler and spinning line. Keep
engine below waist level. A hot muftier can cause serious bums.
• Cutting on left side of the shield will
throw debris away from the operator,
TRANSPORTING
AND STORAG E
* Allow engine to cool; secure unit before stodng or transporting in vehicle.
• Empty the fuel tank before storing or
transporting the unit. Use up fuel left
in the carburetor by startingthe engine and letting it run until it stops.
• Store unit and fuel in area where fuel
vapors cannot reach sparks or open
flames from water heaters, etectdc
motors or switches, furnaces, etc.
• Store unit so line limiter cannot accidentally cause injury. The unit can be
hung by the tube.
. Store unit out of reach of children.
° If situations occur which are not covered in this manual, use care and
good judgment, if you need assistance, call 1-800-235-5878.
3
SPECIAL NOTICE: Thisunitis not
equippedwitha temperaturelimiting
muffler andsparkarrestingscreen
whichmeetsthe requirementsof California Cedes4442 and 444-3.All U.S.
forestlandand tl_estatesof California0
Idaho,Maine,Minnesota,New Jersey,
Oregon,andWashingtonrequireby
lawthatmany internalcombustion engines be equippedwith a spark arrestorscreen.If you operatein a locale
where suchregulations exist,you are
legally responsiblefor installing and
maintaining
the operatingoondiUonof
these pads. Failuretodo so is a violationof thelaw. Referto the MAINTENANCEsectionin thismanual.
SPECIAL NOTICE; Exposureto
vibrationsthroughprolongeduse of
CARTON CONTENTS
Checkcarton contentsagainstthe following list.
Model 358.796050
• Trimmer
• Shield
• Containerof Oil
, Fuel Container
• ExtraSpool
Examinepartsfor damage.Do not use
damagedparts.
NOTE: tf you need assistance or find
partsmissingor damaged, call
1-800-235-5878.
It is normal for the fuel filterto rattle in
the emptyfueltank.
Findingfue! or oil reaidueon muffleris
normaldue tocarburetoradjustments
and testingdone bythe manufacturer.
ASSEMBLY
WARNING; If receivedassembled,
repeatall steps to ensureyour unitis
properlyassembledandall fasteners
gasoline powered handtools could
causeblood vesselor nervedamage
in the fingers, hands, and joints of
peopleproneto circulationdisordersor
abnormalswellings.Prolongeduse in
coldweatherhasbeen linkedto blood
vesseldamagein otherwisehealthy
people.If symptomsoccursuchas
numbness, pain,lossof strength,
changein skincoloror texture,or loss
of feelln9 inthe fingers, hands, or
joints,d_scontlnue
the use ofthis tool
and seek medical attention.An antF
vibration systemdoesnot guarantee
the avoidance of these problems. Users whooperate power tools on a continualand regularbasismustmonitor
closelytheir physicalconditionand the
condition
of thistool.
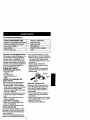
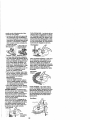
ATTACHING THE SHIELD
WARNING: The shieldmustbe properly installed.The shieldprovidespap
tiai protectionfromthe riskof thrown
objectsto the operatorand othersand
is equippedwith a linelimiter which
cutsexcess line tothe properlength.
The lineIimiter(on undersideof shield)
is sharp andcan cutyou.
• Assemble partsas shown.
• Tightenpads securely.
_NOT_: Remove
washer and wing
nutfromthisbolt;
useforassembling
shield.
are secure.
ADJUSTING THE HANDLE
WARNING: Whenadjusting the handle,be sure it remainsbetween the
triggerand the safetylabel.
t Loosenwingnutor knobon handle.
• Rotatethe handleonthe tube to an
uprightposition;retighten wingnut.
4
\
"Wing Nut
Washer
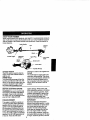
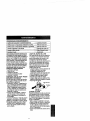
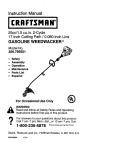
KNOW YOUR TRIMMER
READ THIS OPERATOR'S MANUAL AND SAFETY RULES BEFORE OPERATING "tOUR UNIT, Compare the illustrationswith your unit to familiarize yourself
with the location of the various controls and adjustments, Save this manual for
future reference.
._ssistHandle
Tube
Trimmer
l
Head
Shield ._
:
ThrottleTdgger
ON/STOP
Switch
SparkPlug
Starter
Rope
Line Umiter
Blade
Choke Lever
Primer Bulb
Fuel MixFillCap
ON/STOP SWITCH
The STOPswitchis usedto stop the
engine.Press and hold theswitchto
stopthe unit.
PRIMER BULB
The primerbulbremovesair from the
fuel linesand fills themwithfuel. This
allowsyouto startthe enginewith fewer pullson the starterrope, Activate
the primerbulbby pressingit and
allowing itto return to itsoriginalform.
CHOKE
The chokehelpsto supplyfuel to the
carburetorduring starting.Thisallows
you to starta coldengine.Activate the
chokeby moving the chokeleverto
the Fullposition.After the enginehas
started,movethe choketo the Off
position.
BEFORE
enginedamage. When mixingfuel,
follow instructions printedon container.
Once oilis addedto gasoline,shake
containermomentarilyto assure that
the fuel is thoroughlymixed.Always
read and follow the safetyrules
relatingto fuel beforefueling yourunit.
IMPORTANT
Experienceindicatesthat alcohol
blendedfuels (calledgasoholor using
ethanolor methanol) can attractmoisture whichleadsto separationand
formationof acidsduringstorage.
Acidicgascan damage thefuel system of an enginewhilein storage.
To avoidengineproblems,emptythe
fuelsystembeforestoragefor 30 days
or longer.Drainthe gas tank, startthe
STARTING
ENGINE
WARNING: Be sure to read the fuel
information in the safety rules before
you begin. If you do not understand
the safety rules, do not attempt to fuel
your unit. Call 1-800-235-5878.
FUELING ENGINE
Thisengine is certifiedto operateon
unIeadedgasoline.Beforeoperation,
gasolinemustbe mixedwitha good
quality 2-cycleair-cooledengineoil.
We recommendCraftsmanbrand oil.
Mix gasolineand oil at a ratioof 40:1
(A 40:1 ratiois obtainedby mixing3.2
ouncesof oilwith 1 gallonof unleaded
gasoline).DONOTUSEautomotiveoil
or boat oi!.These oilswillcause
5
engineand let itrununtilthe fuel lines
and carburetor are empty. Use fresh
fuel next season.
Never use engine or carburetorcleaner products in the fuel tank or permanent damagemay occur.
See the STORAGEsectionfor additional information.
NOTE: Ifthe enginesoundsas if it is
tryingto start beforethe 5thpull,go to
the nextstep.
• Move thechokelever to the Half
Chokeposition.
, Pul_starter rope sharply untilengine
runs,but no morethan6 pulls.
NOTE: If theengine has notstarted
after6 pulis(at halfchoke),checkto
make surethe choke leveris in the
properposition.Then, move thechoke
lever to the FullChokepositionand
presstheprimerbulb6 times;squeeze
and holdthethrottlet_ggerand puJt
the starterrope2 moretimes. Move
the chokeleverto Half Chokeand pull
thestarterrope untilthe engineruns,
butno more than6 more pulls.If the
enginestillhasnot started,it is probably flooded. Proceedto "Starting a
Flooded Engine."
* Allow the engine to run 10 seconds,
then movethe choke lever to Off
Choke.Allow the unit to run for 30
more seconds at Off Choke before
releasing the throttle trigger.
NOTE: If enginedies withthe choke
leverat theOff Chokeposition,move
the choke_everto Half Chokeand pull
the ropeunt_engineruns.
STARTING A WARM ENGINE
. Move thechokelever tothe Half
Chokeposition.
. Squeezeand holdthe throttletrigger.
Keep throttle triggerfully squeezed
until the enginerunssmoothly.
• Pullstarterropesharply untilengine
runs,but no morethan 5 pu(Is.
• Allow engineto run 15 seconds,then
movethechokelever to Off Choke.
NOTE"if engine hasnot started,pull
starter rope5 morepulis.If enginestill
does not run,it isprobablyflooded.
DIFFICULT STARTING OR
STARTING A FLOODED ENGINE
STOPPING YOUR ENGINE
* Press and hold the ON/STOP switch
in the STOP position.
* If engine does not stop, move choke
lever to full position.
STARTING YOUR ENGINE
COLD ENGINE OR WARM ENGINE
AFTER RUNNING OUT OF FUEL
WARNING: The tdmmerhead will
turnwhilestartingthe engine.
Avoidany contactwith the muffler.A
hot muffler can causeseriousbums.
• Restengineand shieldon ground,
supportingtrimmerhead offground.
• Slowly pressthe primerbulb6 times.
• Move the chokeleverto the Full
Choke position.
• Squeezeand hoistthe throttletrigger.
Keep throttletriggerfully squeezed
untilthe enginerunssmoothly.
Flooded
engines
can be started by
placing the chokeleverin the Off
Choke position; then, pull the rope to
clear the engine of excess fuel. This
could require pullingthe starter handle
many t_mesdepending on how badly
the unit is flooded.
)f the unit stilt doesn't start, refer to
TROUBLESHOOTINGchartor call
1-_S00-235-5878.
Choke
Lever
• Pull starter rope sharply 5 times.
6
OPERATING
INSTRUCTIONS
OPERATING
POSITION
as concrete or asphalt can cause excessive wear to the trimmer head.
If the line is worn down to 2 in. (5 cm)
or less, more than one tap will be required to obtain the most efficient line
length.
WARNING; Use only .065" (1.6 ram)
diameter line. Other sizes of line will
not advance properly and can cause
serious injury. Do not use other matedals such as wire, stdng, rope, etc. Wire
can break off during cutting and become a dangerous missile that can
cause serious injury.
ALW/_YSWEAR_<_._..._
_
Eye Protection
LongPants"_-t ____
Cut from yourrightto yourleft.
Do not run the engine at a higher
speed than necessary. The cutting line
will cut efficiently when the engine is
run at less than full throttle. At lower
speeds, there is less engine noise and
vibration. The cutting line will last
longer and will be less likely to "weld"
onto the spool.
If the trimmer head does not turn when
the engine is in operation, make sure
the drive shaft housing is properly
seated in engine shroud.
Always release the throtUetrigger and
allow the engine to return to idle speed
when not cutting.
To stop engine:
* Release the throttle trigger.
• Press and hold the ON/STOP switch
in the STOP position.
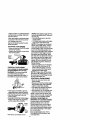
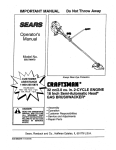
TRIMMER LINE ADVANCE
CUTrlNG
METHODS
WARNING: Use minimum speed and
do not crowd the line when cutting
around hard objects (rock, gravel,
fence posts, etc.), which can damage
the trimmer head, become entangled
in the line, or be thrown causing a serious hazard.
• The tip of the line does the cutting.
You wilt achfeve the best performance and minimum line wear by not
crowding the line into the cutting
area. The right and wrong ways are
shown below.
Tip ofthe Line
I LineCrowdedInto
WorkArea
DoesTh_Cutt_g _'_W"_'I,
The trimmer line will advance approximately 2 in. (5 cm) each time the bottom of the tdmmer head is tapped on
the ground wJthrthe engine running at
full throttle.
The most efficient line length is the
maximum length allowed by the line
limiter.
Always keep the shleld in place when
the tool is being operated.
To Advance Line:
, Operate the engine at full throttle.
, Hold the trimmer head parallel to and
above the grassy area.
. Tap the bottom of the trimmer head
lightlyon the ground one time. Approximately 2 in. (5 cm) of line will be
advanced with each tap.
Always tap the trimmer head on a
grassy area. Tapping on surfaces such
Right
" "_."_gl Wrong
*_" "
, The line will easily remove grass and
weeds from around walls, fences,
trees and flower beds, but it also can
cut the tender bark of trees or shrubs
and scar fences. To help avoid darnage especially to delicate vegetation
or trees with tender bark, shorten line
to 4-5 in. (10-13 cm) and use at less
than full throttle.
• For trimming or scalping, use tess
than full throttle to increase line life
and decrease head wear, especially:
• During light duty cutting.
• Near objects around which the fine
can wrap such as small posts,
trees or fence wire.
• For mowing or sweeping, use full
throttle for a good clean job.
7
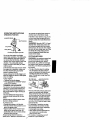
MOWING- Your trimmeris idealfor
mowingin placesconventionallawn
mowers cannotreach. In the mowing
position,keepthe line parallelto the
ground.Avoidpressingthe headinto
thegroundas thiscan scalpthe
groundand damagethe tool.
WARNING: Alwaysweareye protection.Never lean overthe trimmerhead,
Rocksordebris can ricochetor be
thrown intoeyes and face and cause
blindnessor otherseriousinjury.
TRIMMING- Hold thebottomofthe
trimmerhead about3 in. (8 cm) above
theground and at an angle.Allow only
thetip ofthe lineto make contact. Do
notforcetrimmerline into work area.
Mowing
Trimming
mr, nd
SWEEPING- The fanning actionof
therotating linecan be usedfor a
quick and easy clean up, Keep the line
parallel to and abovethe surfacesbeingsweptand movethe toolfrom side
to side.
SCALPING- The scalping technique
removesunwanted vegetation.Hold
thebottom ofthe trimmerhead about3
in. (8 cm) above the groundand at an
angle.Allow thetip ofthe lineto strike
the groundaroundtrees, posts,monuments,etc,Thistechniqueincreases
linewear.
Scalping
Sweeping
8
,
:
,"
MAINTENANCE
SCHEDULE
CARE & MAINTENANCE
TASK
Check for Loose fastenem and parts
Check for damaged orwom parts
Clean unit and labels
Clean air fitter
Replace spark plus
GENERAL RECOMMENDATIONS
The warrantyon thisunitdoes notcover itemsthat havebeen subjectedto
operatorabuse or negligence.Toreceivefull value from the warranty,the
operatormustmaintainunitas instructed in thismanual,Variousadjustments
willneed to be made periodically to
properlymaintainyouruniL
CHECK FOR LOOSE
FASTENERS AND PARTS
• SparkPlugBoot
• AirFilter
• HousingScrews
• AssistHandle Screws
• Shield
CHECK FOR DAMAGED OR
WORN PARTS
"
Refer replacementofdamaged/worn
partsto yourSears ServiceCenter.
• On/StopSwitch- EnsureOn/Stop
switchfunctions properlyby pressing
the switchtothe =Stop"position.
Makesure enginestops;then restart
engineand continue.
• FuelTank- DisconUnueuseof unitif
fuel tankshowssignsofdamageor
leaks.
• Shield- Disconfinueuseof unitif
shieldis damage_
CLEAN UNIT & LABELS
• Cleanthe unitusinga dampcloth
with a milddetergent,
• Wipeoffunitwith a clean drycloth.
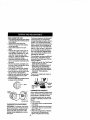
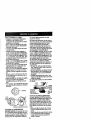
CLEAN AIR FILTER
Do not clean filter in gasolineor other
flammablesolventto avoidcreating a
fire hazardor producingharmfulevaporativeemissions.
A d_rtyair filterdecreasesengineperformanceand increasesfuel consump-
......WHENTO
pERFORM
,,,
Before each use
Before each use
After each use
,
Every 5 hours of operation
Yearly
tion and harmful emissions. Always
clean after every 5 hours of operation,
• Clean the cover and the area around
it to keep dirt from falling into the
carburetor chamber when the cover
is removed.
• Remove parts as illustrated,,
• Wash the filter in soap and water.
• Allow filter to dry.
• Add a few drops of oil to the filter;
squeeze the filter to distribute oil.
• Replace parts,
(_
Z*f"__..d_
,_Rlter
Screws
Cover
REPLACE
SPARK PLUG
Replace the spark plug each year to
ensure the engine starts easier and
runs better. Set spark plug gap at
.025 in. ignition timing is fixed and
nonadjustable.
• Twist, then pull off spark plug boot,
• Remove spark plug from cylinder
and discard.
• Replace with Champion CJ-8Y spark
plug and tighten with a 3/4 in. socket
wrench (10-12 ft.-tbs).
• Reinstatl the spark plug boot.
REPLACING
THELINE
• Push and hold the engine stop switch
in the stop/offposition unti!the unithas
fuUy stopped,
• Discenect the spark plug wire.
• Remove the spool by firmly pulling
on the tap button.
• Clean entire surface of hub and
spool.
• Replace with a pro-wound spool, or
cut a length of 20 feet of .065" (1.6
ram) diameter Craftsman ® Pro Trimtamer line. Never use wire, rope,
stdng, etc., which can break off and
become a dangerous missile.
• Insert one end of the line about 112
inch (1 cm) into the small hole inside
the spool
• Wind the line evenly and tightly onto
the spool, Wind in the direction of the
arrow found on the spool.
° Push the line into the notch, leaving
3 to 5 inches (7 - 12 cm) unwound.
• Insert the line into the exit hole in the
hub as shown in the illustration.
• Align the notch with the line ex'r_hole.
• Push the spool into the hub until it
snaps into place.
• Pullthe line extending.qutside the hub
to release it from the notch.
"_--
Carburetor adjustment is critical and if
done improperly can permanently
damage the engine as well as the carburetor. If you require further assistance or are unsure about performing
this procedure, call our customer assistance help line at 1-800-235-5878.
Old fuel, a dirty air filter, a dirtyfuel filter, or flooding may give the impression of an impmpedy adjusted carburetor.Check these conditions before
adjusting the carburetor.
The carburetor has been carefully set
at the factory. Adjustments may be
necessary if you notice any of the following conditions:
• Engine will not idle. See "Idle Speed"
under adjusting procedure.
• Engine dies or hesitates instead of
accelerating. See "Acceleration
Check" under adjusting procedure.
, Loss of cutting power. See "Mixture
Adjustment" under adjusting
procedure.
There are two adjustment screws on
the carburetor.
Spoor
CARBURETOR
Linein
_
.._----------__-_
J
Lineexit hole
CARBURETOR
ADJUSTMENT
WARNING: The trimmer head will be
spinning dudng most of this procedure.
Wear your protective equipment and
observe all safety precautions. After
making mixture adjustments, recheck
idle speed.
PRESETS
When making carburetor preset adjustments, do not force plastic limiter caps
beyond stops or damage will occur.
tf carburetor presets are not needed,
proceed to "Adjusting Procedure, Idle
Speed."
To adjust presets:
• Turn mixture screw counterclockwise
until it stops.
• Tqrn the idle speed screw clockwise
uqtil it stops. Now turn counterclockwise 4-1/2 turns.
, Start motor, cut grass for 3 minutes,
aqd proceed to the adjustment
section. If engine does notstart,
10
referto troubleshootingchartorcall
1-800-235-5878.
* Ifengine performanceis acceptable
at the presetpositions,nofurther
adjustmentis necessary.
ADJUSTING PROCEDURE
Idle Speed
Allow engineto idle,Adjustspeed until
enginerunswithoutstalling.
* Turnclockwiseto increaseengine
speed ifengine statlsor dies,
• Turncounterclockwise
to decrease
speed.
No further adjustmentsare necessary
ifperformanceissatisfactory.
Mixture Adjustment "H"
DONOToperateengineat full throttle
for prolongedperiodswhilemakingadjustments.Damage to theenginecan
occur.Extend lineto the length allow
by the linelimiterand cutsomegrass.
Prepare unit for storage at end of season or if it will not be used for 30 days
or more.
WARNING:
* Allow engine to cool, and secure the
unit before storing or transporting.
• Store unit and fuel in a._wetlventilated area where fuel vapors cannot
reach sparks or open flames from
water heaters, electdc motors or
switches, furnaces, etc.
• Store unit with all guards in place.
Position unit so that any sharp object
cannot accidentally cause injury.
, Store unit and fuel well out of the
reach of children.
EXTERNAL
SURFACES
If your unit is to be stored for a period
of time, clean it thoroughly before storage. Store in a clean dry area.
. Lightlyoil external metal surfaces.
FUEL SYSTEM
Under Fueling Engine in the Operating
Section of this manual, see message
labeted IMPORTANT regarding the use
of gasohol in your engine.
Fuel stabilizer is an acceptable alternative in minimizing the formation of
fuel gum deposits during storage. Add
Based on performance whilecutting,
turnthe mixtureadjustmentin
t/I 6-turn increments as follows:
• Clockwiseuntilthe enginehasgood
powerwhilecuttingwithno hesitation,
Do notadjust by soundor speed,but
judgeby how wellthe engineperforms whilecutting.
• Countemleckwiseifthe enginehas
speed but dies or lackspowerwhile
cutting.
After completingadjustments,check
for acceleration. Resetif necessary.
Acceleration Check
If enginediesor hesitatesinsteadof
accelerating,turnmixtureadjustment
counterclockwise
untilyou have
smoothacceleration. Recheck and adjust as necessary for acceptableperformance.
stabilizertothe gasolinein thefuet
tank or fuel storage container. Follow
the mix instructions found on stabilizer
container. Run engine at least 5 minutes after adding stabilizer.
CRAFTSMAN40:1, 2-cycle engine oil
(air cooled) is already blended with
fuel stabilizer. If you do not use this
Sears oil, you can add a fuel stabilizer
to your fuel tank.
INTERNAL ENGINE
• Remove spark plug and pour 1 teaspoon of 40:1, 2-cycle engine oil (air
cooled) through the spark plug opening. Slowly pull the starter rope 8 to
10 times to distdbute oil.
• Replace spark plug with new one of
recommended type and heat range.
• Clean air filter.
• Check entire unit for loose screws,
nuts, and bolts. Replace any damaged, broken, or worn parts.
• At the beginning of the next season,
use only fresh fuel having the proper
gasoline to oil ratio.
OTHER
• Do not store gasoline from one season to another.
• Replace your gasoline can if it starts
to rust.
11
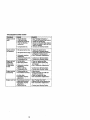
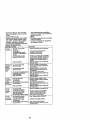
TROUBLESHOOTING
CHART
TROUBLE CAUSE
Engine
w_lnot • Engine flooded.
start,
REMEDY
See "Starting Instructions."
i,
Fill tank with correct fuel mixture.
Sparktank
plugempty.
not firing.
i Fuel
Fuel not reaching
carburetor.
_• Compression low.
!Engine w II not
idle properly.
Engine will not
accelerate,
lacks power,
or dies under
a load.
Engine smokes
excessively.
• Idle speed set too low.
• install new spark plug,
Check for dirty fuel filter; replace.
Check for kinked or spritfuel line;
repair or replace.
° Contact your Service Dealer.
• Acii;Jet
idl speedScrew
clockwise to increase speed,
Idle speed set too high. ° Adjust idle speed screw counterclockwise to reduce speed,
Carburetor requires
° See "Carburetor Adjustments."
adjustment.
• Crankshaft seats worn.
* ContactyourServiceDealer.
• Compression tow.
Contact yourService Dealer.
• Air filter dirty,
• Spark plug fouled,
, Cleanor replaceair filter.
Clean or replacesparkplug
and re-gap.
, See "CarburetorAdjustments."
• Carburetor requires
adjustment,
• Carbon build up.
• Compression low,
b• Contact your Serv_e Dealer,
!• Contact your Service Dealer.
I, Choke partially on.
I, Fuel mixture incorrect.
• Air filterdirty.
• Carburetor requires
adjustment,
Engine runs hot. • FueLrnixtureincorrect.
• • Spark plug incorrect.
° Carburetor requires
adjustment
• Carbon build up.
12
• Adjust choke.
Empty fuel tank and refill with
correct fuel mixture.
Clean or replace air filter.
See "Carburetor Adjustments,"
• See "Fueling Your Unit,"
• Repla._e with correct spark plug,
° See OarburetorAdjustments.
- Contact your Service Dealer.
IHH
"H
I
IIII
IIIII I
I
I
H
I I,I
IIIIII
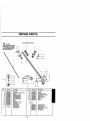
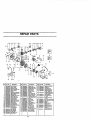
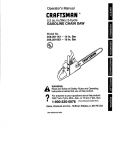
REPAIR PARTS
i
I
,ll ,,ll
[
,,
21
7
R_L
Pert No.
530095391
53001588O
530049107
53006_888
S3O09OSSO
530049898
530015768
530049.901
530015820
53O401992
533OS9O02
530052286
530015880
530069752
3.
4.
5.
6.
7.
&
9.
10,
11,
13,
14,
15_
i
i
Ref.
Osscr_]on
Rex Shaft
Suew_l_roLlle HsgJGearBox
Tdgger
T_ottle Hag. (Rigl_t)
16,
17.
18,
ro_Je
Hag.
O-e_)
20,
2_'.
22,
2;3.
24_
H_dJe-Spool Buddy
Lo<_nut-Ge_rBox
Clamp_AssistHandle
Ban
Wingn_
DdveShaftHag. Ass-y
Li_ Umiter
Screw-L{neLrmlter
ShieldKRAss'y,
(IncL12& 13)
CuttingHe_d Ass*:/,
(Incl. 16,-20)
Part No.
53OO6969O
5_401464
53O401466
530401467
71-85822
S3OOSSS"Z'/
530O162O2
530016129
530016224
2
ill
iiii
24
Jo
Description
HubAss'y
Spring
Clip-Relater-Head
Screww/Washer -I-fs_d
Spoolwilde
GearBox_haft Kit
S_aw
Washer-.-F_!
Screw
Not Shown
530087366
530049'_25
530038675
530O53572
530053673
i
i
13
Oper_t0r Manua_
Sh_t WarningDecal
ShroudDecal
$_art_ngInduction Decal
ShieldDecal
Fan Hag DeCal
, ,,,
,
m,H== ,,,,
REPAIR PARTS
.....
i, ,i
4041
51 8
7 35
39
454244_
47
i
48
36 9
4_
6
32
33
!6
67
14
56
62
63
65
I_--
64
5
49
NO.
Description
1723
66
50
Part No.
1
60
53 52
De_;dpuon
Ref.
Petit No.
53OO42O85 Starter Spring
*
28. 530036577
530015775 ;
Screw-P_e_"
..._" 53C036579
530036602
530027523 Relattzer-_Put]ey
530015934 ;¢reve.,Shrd!Fan H,_g. 31, 5300161 g7
5300L_/569
_.
530047991
530015610 ; Slarter
;crew Handle
530019181
530019233 3asket..,Cy_der."Carb_
34
530069619
Champion
Spark Plug (RCJ-aY)
I 3365
530069769
_ 530016014
5_0019194 3asket-,Garb.
52._015946 RetainerPdng_C'ease
137.
560019223
530O14663 _ad Wire Ass'y.
38.j 530(_9754
530014662 _ound Wire Ass_,
530039149 F_theet As._y.
39, 630052431
530052266 |gn t[cn Module
40. 530038747
530036145 Spacer--_gnit. Module
41. 530049116
! 530015954 Screw-lgniL Modure
42. 53_O15254
43. 530015852
530015826 Wash er--FJat
5300,3_
Drive Coupting
4zL 530015887
530014,532 CeankshaftAss'y.
45. 530036569
530069615 Connecting Rod Aasy,
46, 530036575
5,30036404 Piston Rbtg
47. 530036588
530014861 Craokcase Assy.
48. 530015957
(IneL 23-26)
530032125 Inner Bear_,g
5300321_4 :Outer Bear_r_
5300";9179 C'¢ase Seal
53001594't Rot. Ring_'sh_ft
530036578 Muffler Body
49.
50.
51.
52.
53C0,36744
530049296
530015953
530015814
Dee_lptlon
Muffler Cover
Muffler Baffls-Exlt
Ref.:
MufflerSaffio-.First
Muffler Spr_zg
Roer Shroud
Gaskel-C'case
Cylinder
58.
Cash, Adaptor lot
Screw-.C_rb Adptr,
59,
Gasket-CyJ_ndsr
60.
C_d:,uretor ASS'y. Kit
(IneL LImiter Cap_
61.
Air Box
Choke Plate
62.
Choke Shutter
63.
Washer
[ 64,
Choke
Spacer
I Screw-_.:arbumtor
Filter Plate
A_rFliterFoam
Air F31terCover
Screw-Air BOX
Thro_e Cable Assy
Fuel Tank Ass'¥.
Screw-Cylinder
$orew--Puel Tank
1,€
Part
53. 530016131
54. ] 530069660
55, 530014347
56. i 530014,362
57_ 53006.96'16
w,_aher-Fuel Tank
Muffler Kit
FuelCapAssy,
FuefF_'okupAssy
Eng_e G_sket Kit
{|eel 7,9,33, 37)
530014729
C'¢ase/C'shaftAssy.
(blcl. t0,19,22-25)
5,.'.'.'.'.'.'.'.'._038114
OzVOff Switch
! 530069766
Fan HsgJShroud
Ass'_
530030720
Nose Cone CJamp
Ass'y,
530069247
Fuel L_e-..Ca_WPu_'ge
530069216
Venl Une-TenPJPurg_
63006_32
Rope Kit
L_,_ s_ool_so S_w
66.
530069400
67.
68.
69,
530069380
5300_5162
53006_621
70_ $30_16191
S_tter PuIleyKi_
(IneL 65)
Sp_kA_e=crK_
Piston PIe Retat_er
Piston Kit
(_ncL 21,68 & Pin)
Sptlng Stetter Dog
,,u
i
REPAIR PARTS
Carburetor Assembly Kit WA226-
6
2
i
#530069754
\
3
Ref,
Part No,
12,
53OO69842
530069844
4.
5.
6.
530035296
530035342
530035341
Description
LirnlterGap
CarburetorRepa_'r
Kff
(• Indicates Contents)
Gasket/DiaphragmKit
(KIT= Indicates Contents)
Idte Screw& Spring Kit
Low Speed Spring
Low Speed Needle
15
.
.,,,,ll! i i
Declaraci6nde Garantfa
Regias de Segurldad
Montaje
Uso
Mantenimiento
16
16
18
!9
23
Servioiey Ajustes
Almacenaje
TablaDiagn6stica
Piezas de Repuesto
y Encomiendad
24
25
26
Contrarapa
GARANTIA DE UN AI_I0 COMPLETO PAR_, LA CORTADORA DE LINEA A GASOLINA WEEDWACKEReDE
CRAFTSMAN e
Durante un aSo, a partir de la fecha de compra, siempre que se haga el mantenimiento la Iubricaci6n y los ajustes a esta Cortadora de Lfnea e Gasolina
Weedwacker de Craftsman seg_Jnlas instrucciones de uso y mantenimiento en el
Manual del Usuario, Sears reparar_ cualquier defecto de materiaies o de mano
de obra gratuitamente.
Eeta gamntfa excluye la Ifnea de ni36n, la bujfa y el filtro de aire, qua son piezas
fungibfes que se gastan con el uso normal.
Si se usa esta Cortadora de I[nea Weedwacker de Craftsman para fines comerciales, esta garantfa tendr& validelz
' per s61a 90 dfas a partir de la fecha de compra. Si se usa esta Cortandor de Imea Weedwacker de Craftsman pare fines de
a[quiler, esta garantfa tendr& validez per s61a30 dfas a partir de la fecha de compra. Esta _arantl'a tendrd validez dnicamente mientras se use este producto dentro de losEstados Unidos.
SE OBTENDRASERVIOlOBAJO GARANTJADEVOLVtENDOLA CORTADORADE LINEA
W;CEDWACKERAL CENTRO DE SERVICtOSEARS MASCERCANO EN LOS ESTADQS
UN1DO8.
Esta garantfa confiere derechos legales especfficos al propietario, que tel vez
tenga asimismo otros derechos que varfan entre estados.
Sears, Roebuck and Co., D1817 WA Hoffman Estates, IL 60179
ADVERTENCIA:AI
usar cualquferherramientade fuerza de jardineria, deber'_n
observarse precauciones b_sicas de seguirdad en todo momento pare reducir el
desgo de incendioy graves her;des. Lea y
cumpla con todas las instrucciones.
iEsta herramienta de fuerza puede ser
peligrosa! Cabe al usuario le responsabiJidad de cumplir con todas tas advertencias e instrucciones, iLea et Manual
del Usuario en su-totalidad antes de
usar elaparato! Est_ completamente familiarizado con los controtes y con el
uso cQrrectodel aparato. Umite el uso
de este aparato a aquellas personas
que hayan lefdo y comprendido, y que
vayan a obedecer, todas las advertencias e instrucciones tanto en el aparato
corns en el manual. No permita nunca a
los nifios que usen este aparato.
DE SEGURIDAD
1NFORMACION _._
DELAPARATO
PELIGRO: Nunca usecuchillasni disdPOsitivos
desgmnadores.
El aperato fue
isefiadopareser usadoexclusivamente
comocortadora Ifnea.Etuso de cualquier
otrapiezao accesorio
incrementar&elpeligrode heridas.Esteaparatoha sidodsefiado exclusivamentecorno cortador a
line&
ADVERTENClA" Le t[nea de cortearroja objetosviolentamente.
Ustes,al igual
que otraspersonas,puedequedarciego
o heddo.Use anteojosde seguridady
protecci6nen tas piemas, Mantengatodaslas partesdel cuerpoalejadasde la
lineagirante.
@OQ
Mantenga a los n]fios, los espectadores y
anirnales a una d_stancia mfnima de 15
metros (50 pies). Pare el motor inmediata*
mente si alguien se le acerca.
16
Useanteojosde seguddad
tra en el manual.
sonas s_empre que haga ajustes al
carburador.
• Use exclusivamente los accesorios y
Sears o liarne al 1-800-554-,6723.
SEGURIDAD DEL USUARiO
• Mezcle y vierta el combustible al air°
!ibre.
mientras _ste est_ en uso.
' _gll__:_t'_l
afdect
o
Nencia del alcohol,de drogaso de
rernedios.
=
• Use protecci6n de o6dos si usa el
MANTENIMIENTO
puedan enredar en la linea o que 6sta
pueda arrojar. Los objetos duros pueden dat3arel cabezal y _s.stelos puede
arrojar, causando graves heridas.
antes de cada uso. Retire los objetos
(piedras, vidrio roto, clavos, aJambre,
etc.) queetse
puedan
i hilo,
nspeccione
&rea
a set enredar
cortada en
el cabezal o que i_stepueda arrojar.
Mantenga el equilibrio, con los pies
en una superficie estabie, No se extienda demasiado.
Tq_aNer:r__c_MbrE_`°*
Side_epner_n_n:_ersdee;:_ed/a_j_setransp_`r_
=n ` enc_da
_inea veh"u`
de1"_ iz_un I
aparato.
• Vacfeel tanquede combustible
antes
deguardarel aparatoo de transportarto.Consumatodoel combustible
restanteen el caff_umdorponiendeel
motoren marchay dej_ndoloen marchahastaque le motor se pare solo.
•Guarde el aparato y el combustible
en un lugar donde los vapores del
combustible no puedanalcanzar
chispasni llamas provenientes de
tos termotanques, los motores o in. termptoreseT_'_ctricos,
los calefactotes centrales,etc.
-Guarde el aparatode modo que el
limitadorde Ifnea no pueda causar
heridasaccidentales. Se puede colgar el aparato por la caja el eje de
propuisi6n.
•Guarde el aparato fuera del alcance
de los ni_os.
Si acontece alguna situani6nno provista en este manual, tenga cuidado y
usebuen criterio.Si necesitaayuda,
Ilame al 1-800-554-6723.
AVISO SPECIAL: Su sierrano
vieneequipadaconsilensiador
limitador
de temperaturantcon rejilla antichispa
que cumplalos requisitesde los C6digos de California
4442 y 4443.Todas
las tierrasforestadasf_erates, m_s los
estadosde California,Idaho, Maine,
Minnesota,NuevaJersey,Washingtony
Oreg6n,requiersnporley que muchos
motoresde combusti6nintemaest_n
CONTENICO DE LA CAJA
Use la sigu_ente lista para verificar que
todas la piezas hayan side inclufdas:
Modelo 358.796050
• Cortadora
• Cubierta Protectora
•_
,
equipados
con rejillaantichispa.Si usted
el aparatodondeexistentalesreglao
mento,ustedtJeneta responsabilided
jurfdicade instalary mantenerestaspiezas en correctoestadode funCionamiento.De Io contrario,
estar'&en infracci6nde la ley.
AVISO SPECIAL; El estarexpuestoalas vibracienesa trav_sde|
usoprolongadode herramtentasde
fuerza a gasolinapuedecuasardaSos
a losvasossangufneoso a Ios'nervios
de los dodos,lasmanos y lascoyunturas en aquellaspersonasque tienen
propensidada lostrastomosde la circulaci6no alas h|nchazonesanormales.El usoprolongadoen tiempo
fn'oha sidoasociadocon da.fiosa los
vases snagufneosde personasque
_eOr
otraparts se encuentranen perctoestadode salud.Si ocurren
sfntomastalescomoel entumecimiento, el dolor,la felta de fuerza, loscambios en el coloro la texturade la pielo
faltade sentidoen los dedos,las manos o las coyunturas,deje de usar esta
m_.qutnainmediatamentey procure
atenci6nm6dica. Los sistemasde
anti-vibmci6nno garantizanque se
evifentalesproblemes.Los usuarios
que hacenuso continuoy prolohgando de las herramientasde fuerza deben fiscalizar atentamentesu estado
ffsicoy el estadodel aparato.
asegurarqueel mismose encuantre
correctamente
armadoy que todoslos
fT_adorss
se encuentren
bienajustados.
ADJUSTE DEL MANGO
ADVERTENClA: At ajustarel mango, aseg_reseque se mantenga entre
Recipiente de Ace_te
el gatilloy r6tulode seguridad.
Recipiente de Gasolina
• Afloje latuercamariposa o la perilla
• Bobina
en el mang0.
Examine las piezas para verfficar que
• Gire el mangoen posici6nvertical.
no haya daF,os. No use piezas danaVuelvaa apretarla tuerca madposa
das.
firmemente.,
AVlSO. Si necesita ayuda, si faltan
INSTALACIONDE LA CUBIERI"A
piezas o si hay piezas daSadas, tlame
PROTECTORA
al n0mere 1-800-235-5878.
ADVERTENCIA: La cubiertaprotecEs normal escuchar que si fiitm de corntoradeber_ser instaladacorrectamente.
bustible golpetee en el tanque vacfo.
Estacubiertaprovesprotecsi6n
parsial
Es normal encontrar residuos de ace|to
contra el desgode que objetosarrojao de gasolina en el sifenciador, debido a
dosal airs puedancausaraccidentesal
los ajustes el carburador y alas pmebas
usuar_o
y otraspersonas,y vieneequi*
efectuadas por el fabricante.
padacon unlimitadorde hneaque corta
MONTAJE
el excesode Ifnea.Et limitadorde lfnea
ADVERTENC|A"
Si recibi6 el aparato
.(clue
se encuentraen la partsinferiorde
ya armado, mpita todos los pasos para
la cubiertaprotectora)
es filoso y puede
18
cortar. Para conseguir la orientaci6n
apropiada yea la ilustracidn que se encuentra en la secci6n de Uso.
• Introduzca la m_nsula por la ranura
como se ilustra,
° Gire el protector hasta que el pemo
pase por el orificio en la m_nsula.
• Enrosque ta tuerca rnariposa al
perno y aj_stela bien,
Protector
f
AVISO:
TornlJtodel Protectord_
Tuerca
Mariposa
Desechos(instalado) Arandeta
CONOZCA SU APARATO
LEA ESTE MANUALDEL USUARIO Y/.AS REGLASDE SEGURIDADANTES DE PONER
ELAPARATOEN MARCHA. Compare las itustraciones con su aparato para familiarizarse con la ublcaci6n de _os dwersos controles y ajustes, Guarde este manual
para uso futuro.
Mango Auxiliar
Tubo
Cabezal
de Corte
St_enciador Interruptor
ON/STOP
Arranque
Cubierta
Protectora"_
..,
Bujia
_
Cuchilla del
Limitador de
L_nea
Patanca del
Cebador
Dombeador
_ Gati)lo
Acelerador
Tapade!
Tanque
de Mezclade
Combustible
INTERRUPTORON/STOP
Se usael interruptor
para detenerel motor.Presioney sostengael interrputor
paradetenerel motor.
BOMBEADOR
El bombeador retira el aim de las
tineas decombustibley las Uenade
mezcla de combustible,
permitidndote
ponerel motoren marcha con menos
tironesde la ouerdade arranque. Accloneet bombeadoroprimi_ndoloy
ANTES DE PONER EN MARCHA EL
MOTOR
ADVERTENCIA:
Lea atentamente
la informaci6n sobre el combustible en
laas reglas de seguridad antes de
comenzar.,Si no comprende las reglas
oe seguriaad, no intente abastecer el
aparato de combustible. Llame at
n0mero 1-800-235-5878.
luego dejandoque este recobre su forma original.
CEBADOR
El cebadorayuda a suministrarcombustible al carburadordurantee! arran_ue. Esto permitela puestaen marcha
el motorcuandoestd.frfo, Acione el
cebadorcolocando}apatanca en la
posici6nFull,Despu_sque el motorse
haya puestoen marcha, ponga{a palancadel cebadoren la posiciSnOff.
ABASTECIMIENTO DEL MOTOR
Este motor estd habitttadopara
funcionar con gasolina sin plomo. Antes
de ¢omenzar con el uso, se deberd
mezclar la gasolina con un aceite de
buena calidadpara motores de 2
tiempos enfriados a aim.
Recomendamos et aceite de la marca
Craftsman. Mezcle la gasolina con el
eceite en la pmpo_i6n 40:1. (Se obtiene
19
/
unaproporci6n
de40:1 mezclando 3.2
onzas de acelte con cads galSn de
gasolina sin plomo). NO USE aceite
pars autom6viles ni para barcas. Estos
aceBes daSar_.net motor,
AI mezdar el combustible,siga las
instrucciones impmsas en el recipiente.
Una vez hays aSadido e! aceite a la
gasolina, agite al recipiente brevemente
para asegurar que el combusSble est_
qompletamente mezclado. 8iempre lea
y siga las instrucciones de seguridad
que tienen que ver con el combustible
antes de abastecer el apareto,
tMPORTANTE
La experiencia indica qua los combustible mezclados con alcohol (los llamados gasohof o los que contienen etanolo metanol) pueden atraer la
humedad, Io que puedecausarla separaci6n y la formaoi6nde _cidos durante el atmacenaje. La gasolina _cida
puede daitarel sistemade combustible del motor durante el almacenaje.
podda provocar quemaduras de gra=
vedad si se toca.
_a^
• Apoye el motor y la cubierta
protectors enel suelo, permitiendo
que el csbezal de corte no hags
contactocon el suelo.
• Lentamente,oprimael bombeador6
veces.
• Mueva la palancadel cebadora Is"
posicidn Full.
* Apdetey sostengael gatilloacelerador.Mantengael _latilloacelerador
completamente
opnmidohastaque el
motormarche sin problemas.
Pare evitar problemas con el motor,
_/alanca
de!
deber_ vaciarse el sistema de cornCebador
bustible antes de almacenar el aparato
por 30 dfas o m&s. Vaci'e ef tanque de "
combustible, ponga el motor en mar"
chay d_jelo en marcha hasta que las
"_
h_neasde combustible y el carburador
Bornbeador
queden vacfos. Use combustible fresco pars fa pr6xima temporada.
• Firmemente, tire de la cuerda de
Nunca use productos de limpieza de
arranque 5 veces.
motor o carburador en el tanque de
AVISO, Si el motor parece como si
combustible ya que deTfacerta puede
fuera a arrancar antes del quinto tir6n
provocar daSos permanentes.
de la cuerda de arranque, prosiga con
Veala secci6n de ALMACENAJE para
el paso siguiente.
informaci6n adicional.
• Mueva la palanea de cebador a la
COMO DETENER EL-MOTOR
posici6n Half.
° Firmemente, tire de la cuerda de
• Presione y sostenga el interruptor
arranque hasta que el motor
On/Stop en la posici6n STOP.
° Si el motor no se de_ene, mueva la
arranque, pero no mds de 6 timnes.
AVISO: Si el motor no arranca despalanca del cebador a la posici6n Full.
pu_s del sexto tir6n de la cuerda de
Pafancadet Cebador
arranque (con la palanca del cebador
en la posioi6n Half), aseg_1rese de que
la palanca del cebador se encuentre
en la posici6n corrects+Luego, mueva
la palanca del cebador a la posici6n
Full y optima el bombeador 6 yeses;
apriete y sostenga el gatillo acelerador
y tire de la cuerda de arranque otras 2
COMO PONER EN MARCHA
veces. Mueva lapalanca del cebador
EL MOTOR
a la posiei6n Hairy tire de la cuerda de
MOTOR FRIO O CALIENTE DESPUES
arranque hasta que el motor se ponga
DE QUEDAR SIN COMBUSTIBLE
en marcha, pero no mds de 6 veces.
ADVERTENCIA;
El eabezal de corte
Si el motor no arransa, probablemente
girard mientras se estd intentando
se encuentre ahogado. Proceda con la
poner en marcha el motor. Evite el
secci6n "Arranque de Motor Ahogado".
hater ningtln tipo de contacto con el
• Permits que el motor marche por 10
silenciador. Un silenciador catiente
segundos, entonces mueva la palanca
2O
del cebadoren la p<_ic[6nOff antes
de soltarel gatilloacelemdor.
AVISO: $i el motorse cala con la palanca del cebadoren la posicf6nOff,
mueva la palanca a la posi_i6nHalf y
tire de la cuerdade arranque hasta
que el motor se ponga en marcha.
ARRANOUE DE MOTOR CALIENTE
posici6nHalf.
Opdmay sostenga el gatillo
acelerador.Mantengael gatillo
oprimfdobasraque
i totalmente
ueva lapalancadel
cebadoraelta
motormamhesin pmblemas,
Firmemente,tirede la cuerdade
arranquehasta qua el motorse ponga
en marcha,pete no m_ de 5 tirones.
• Permitaqua el motor matcheper 15
segundos,entoncesmueva lapatanca
del cebadora la posici<_n
Off.
AVISO: Si el motor no arranca, tire de
la cuerda otras 5 veces. Si el motorno
arranca, probablemente est_ ahogado.
ARRANQUE DIFIOIL O ARRANQUE
DE MOTOR AHOGADO
Lorsmotoresahogadospuedenponerseen marcha moviendo la palanca
del cebadora la posici6nOff;luego,
tire de la euerdapara aclararel exceso
de combustible.Estopodr_requerir
que se tire del mangode la cuerda
muchas veces dependiendocuan
ahogado se encuentree! motor.
Si el aparato sigue sin ponerseen
marcha, yea la TABLA]Et,
t-AGNOSTICA
o
Ilame al m3mem1-800-235-5878,
INSTRUCClONES DE use
POSICION DE use
m_s tiempo y tendr& menor probabilidad
de "fundirse" en la bobina.
Si el cabezal de cotte no gira mientras
el motor se encuentra en marcha,
asegt_rese que todas las piezas de la
cortadora se encuentren debidamente
en su lugar.
Siempre que no se haite cortando
suelte el gatillo aceterador y permita
que el motor vuelva a marcha lenta.
Para detener el motor."
suette el gatillo aoelerador.
Presione y sostenga el interrupter
On/Stop tlasta que el motor se haya
detenido per complete.
AVANCE DE LA LfNEA DE CORTE
La ffnea de corte avanza aproximadamente 5 cm (2 pulgadas) cada vez
que se toca el cabezal contra el suelo
con el motor acelerado a fondo.
El largo m&s eficiente de ta ffnea es el
largo mz_=ximopermitldo par el ilmitador
de ffnea,
Siempre mantenga la eubierta pretectora en su lugar siempre que el aparato est_ en use.
Para avanzar la ffnea:
• Aeelere el motor a rondo.
enc_made
un &rea
conc_sped,
_ per
osten_a
el cabezal
paralelo
al suelo,
Toque et cabezal de corte contra el
suelo levemente una vez. Con cada
toque, la ]rhea avanzar& aproximadamente 5 cm (2 puigadas).
AVISO: Toque el cabezal contra el
suelo siempre en un _rea con c_sped.
Si se hate tocar contra superficies
come el cemento o el asfalto, el cabezal podrfa sufrir desgaste excesive.
AVISO: S[ la IJ'nease ha gastado y
SIEMPRE USE: _
cuenta con 5 cm(2 pulgadas) o menos, har_. falta m_s de un toque para
obtener el largo de Iinea m,_seficiente.
Pantolones _j_
IosPmtecci6nqos
par
ADVERTENCIA."
Use dnicamente
I_lnea con dJ&metrode 1.6 mm (.065
Largos _.._
Cottede
de putgada). Las fines de etros diVinez:L'apatos 1__
derechaa
tins no avanzar&n debidarnente y pueGtuesos
den causar graves her/alas. No use
otros materiales, tales, come el
alambrd, el bile, la cuerda, etc. El
alambre se puede quebrar at cortar,
Permita que el motor alcance la velociconvirti_ndose en un misi! muy peligrodad de corte antes de meter el aparato
en el material a cortar.
so y causando heridas de gravedad.
No haga marchar el motor a revoluMETODOS DE CORTE
clones m_s altas qua ]as necesarias.
ADVERTENCIA:
Use la vetocidad
La Ifnea de corte cortar_ de una forma
m.rnima y no acerque el aparato demarr_s eficientesin qua el motor est_ acetsiado af cortar cerca de objetes s6tierado a fondo. A revo/uciones m_ bados (piedra, gravilla, postes, etc.): esjci6as,
habr_ menos ruido y menor vibratos pueden daSar el cabezal, puedan
enredarse en la lfnea o la ffnea los
""="
n de! motor. La i/nea de cotte durar&
e'j,I
PARA ESCALPAR - La t_cnica del ascalpado retira la vegetaoi6n no deseada. Sostenga el cabezal unos 8 cm (3
pulgadas) del suelo y en _ngulo. Deje
que la punta de la lffiea golpee contra
et suelo cerca'de los _dSoles, los postes, los monumentos, etc. Esta t_onica
incrementa el desgaste de la Ifnea.
puede arrojar violentamente al aire,
causando eerie peligro.
• La punta de la Ifnea es la que corta.
Se conseguird meier rendimiento y
el mfnimo desgaste ei no se mete fa
Ifnea dentro del matedal que se est,.
cortando. La ilustraci6n a continuaciSn rnuestra la forma correcta e incorrecta de cortar,
La puntadela Ifneai La Ifneaestfi meti.
as la quecorta
gi
ParaEscalpar..
da dentindelma-
terialde traba|_
In
• La tfnea retira f_.cIlmente el c_sped y
las matas hierbas de alrededorde paredes, cercados, drboles y macizos de
flores; pero tambi_n es capaz de cortar la corteza tiema de drboies y arbustos y de marcar las cercas. Para
evitar dafios, especialmente a la vegetaci6n delicada o a los drboles con
corteza fina,acorte la Ifnea a unos 10
a 13 cm (4 a 5 pulgadas) y use el
aparato sin acelerar a fendo.
° Para recortar o escalpar, use et aparate sin aceierar a fondo, para inerementar la vida _it de la Ifnea y disminuir el desgaste del cabezal,
especialmente:
AI haosr trabajos livianos.
Cerca de ebjetos con los cua_esla
ffnea se puede enter, come son
_ospostes o ,_rboles de poco di&me• troy el alambre de las cercas.
• Para cortar c6sped y barter, acelere
el motor a rondo para Iograr un buen
trabajo de limpieza.
ADVERTENCIA:
Use siempre proteeci6n para !oe ojos. Nunca se incline
per encima del cabezaL La Ifnea
puede arrojar o hacer rebotar piedras
o desechos hacia los ojos y la cara,
pudiendo causar la p(_rdidade la vista
u otras graves heridas.
PARA RECORTAR--- Sostenga el cabezal unos 8 cm (3 pulgadas) del suelo
yen &nguto. Unicamente la punta de la
Ifnea deber_thacerel contactocon el
material a cortar. No meta la h'neadentro del _rea que se est&cortando.
Para Recortar
PARA CORTAR C_SPED - Este parato es ideal para cortar c_sped en _ugares donde las cortadoras convencionales no Ilegan. En posici6n de
cortar c_sped, mantenga la linea paralela al suelo. Evite presionar el cabezal
contra el sueto, ya que de hacerlo
podfia escalpar la vegetaci6n y dafiar
el aparato.
Pars Cortar
C6sped
PARA BARRER - Se puede usar la
acci6n ventiladora de la Irnea girante
para barter r&pida y fz_cilmente un _.rea
determinada. Mantenga la tfnea para]e_aal suelo directamente encima de
las superficies que se quiera barrer y
meuva el aparato de un lade al otro
r&pidamente,
Para Barrer
:..i-:!":f
,..i..'...:'
/ ._*_':
i_:";
8 cm
(3 puigadas)
del suelo
22
CRONOGRAMA
DE MANTENIMIENTO
TAREA DE CUIDADOY MANTENIM]ENTO
, Veriiica,rq_e no h'aya'
plezas"i
fij_doree
suelto8
........
Verifiearque no hayapiezas daffada,s,
o gastadas
L.imP_..
r el aparato y susplacas
Limpiarel f!ltrode aim
.....................
Cambiar a buifa ....
RECOMENDACIONES GENERALES
La garant/a de este aparato no cubre
los artieutos que hart side sometidos al
abuso o a la negligencia por parts del
usuar{o. Para recibir el valor completo
de la garantla, el usuado deberd man.......tener et aparato segSn las instrucclones en este manual. Hard falta hacer varios ajustes peri6dicamente para
mantener el aparato de forma debida.
VERIFIQUE QUE NO HAYA FIJADORES NI PIEZAS SUELTAS
• Cubierta de la Bujl'a
° Filtro de Airs
• Tomillos de la Caja
• Tomillos del Mango Auxiliar
• Cubierta Protectora
VE_IIFIQUE QUE NO HAYA PIEZAS
DANADAS O GASTADAS
Permita que sea el Centro de Servicio
Sears qulen efectSe el eambio de pie*
zas dafiadas o gastadas. "
• Interroptor On/Stop - Asegt_rese de
que el interruptor funcione correctamente sostenidndolo en la posici6n
StOp". Asegdrese de que el motor
se haya detenido per completo, lue*
go, ponga el motor en mamha nuevamente y contin_Je.
• Tanque de Combustible - Deje de
user el aparato si hay seSaies de
dahos o p_rididas en el tanque de
combust=ble.
• Cubierta Protectora-Deje de user el
aparato si el protector estd daSado.
L|MPIE EL APARAI"O Y SUS PLACAS
• Limpie et aparato usando un trapo
, h_rnedo con un dstergente suave.
Seq_Je el aparato usando un trapo
seco y limpio.
CUANDO HACER
.Antesd._,ca_auso
Antes de cada uso
Despu_sde cada uso
Cada 5,horasde u.so
Anualmente
LIMPIE EL RLTRO DEL AIRE
No limpie el filtro de airs con gasolina
ni cualquier otro solbente inflamable
para evitar pefigro de incendio y de
emiciones evaporativas nocivas.
Los filtros de aire sucios disminuyen la
vida titil y el rendirniento del motor e
incrementan el consumo de combustible y de emtciones nocivas. Umpie
siempre el filtro de airs despu_s de
carla 5 horas de uso.
• Limpie ta tapa y.el drea alrededor de
la tapa para evltar qua seiga
suciedad o desechos en el
• carburador cuando se saque la tap&
• Retire las p.iezas come se ilustra.
Limpie el filtro con agua y jab6n.
• Psrmita que el filtro se seque.
• Aplique varias gotas de aceite al fjftro;
• exprima el filtro para disttibuir el aceite.
Reponga las piezas,
CAMBIE LA BUJIA
Deberd cambiarse la bujFa anualmente
_caraasegurar que el motor arranque
ilmente y tenga un mejor rendimeinto, Ajuste ta separaci6n de los electrodos a 0.025 de pulgada. El encendido
es fijo e ina(terable.
: Gire y saque _ cubierta de ta bujl'a,
Retire la bujfa del cillndro y des_he/a,
• C_mbiela por una buifa Champion
C,J-SY y ajuste la bujza nueva con
una Itave de cubo de 3/4 de pulgada
. (10
a 12nuevamente
libras/pie). la cubierta de la
Instale
bujfa.
i
PARA CAMBIAR LA UNEA
• Presione y sosten_]ael interruptor
On/Step en la poslci6n STOP.
Asegurese de qua el motor se haya
detenido pot oompteto.
• Gire y saque la cubierta de la bujfa.
• Retire ta bobina tirando firmemente
del bot6n de toque.
y de ta bobina.
tnstale una bobina pre-cargada o
corte un largo de unoa 6 metros de
Ifnea mama Craftsman con di_,metm
de 1.6 mrn (0 065 de pulgada). Nunuse alambre,
soga,
hilo,del
etc.,
qua
i ca
Limpie
la supefficie
entera
cubo
se pueden romper y convertirse en
p_-oyectilespeligrosos.
Meta 1 cm (1/2 pulgada) de la punta
de la Ifnea por el orificio pequei_o en
el intedor de |a bot_ina.
• Enmsq.ue la Ifnea en la bobina firms
y parelamente en la direcci6n que
indica la flecha en la bobina.
• Fije la Ifnea en la mella en la bobina,
dejando unos 7 a 12 cm (3 a 5 pulgadas) de Ifnea cotgando sin enrosOaF.
• Meta la punta de la linea pot el orificio de saiida en et oubo como se ve
en la ilustraci6n.
• At_neela mafia _
el or_cio de satida.
• Coloque la bobina en el.oubo y
emp6jela hasta qua s_ fije en posiciSn.
• Tire la Ilnea qua sobmsale del cubo
para liberarla de la mella en el intedor
del cubo.
.,t,--...Bobina
la marcha lenta despu6s de cada
ajuste de mezcla.
El ajuste del ¢arburador es de primordial importancia. SI se hace incorrectamente, puede dafiar tanto el motor
como el carburador permanentemente. Si necesita mds ayuda o no
estd seguro de c6mo hacer este pmcedimiento, !lame al ndmero de ayude
al consumidor 1-800-235-5878.
El combustible vencido, el filtm de aire
sue/o, e! fittro combustible sucio o ea
motor ahogado pueden darla impresi6n de carburaci6n desajustada. Verifique estas condiciones antes de ham
er cualquter ajuste al carburador.
E] carburador ha sido ajustado cuidadosamente en la |_.brica, Posiblemente sea necesario hater ajustes si
se nota cualquiera de las aiguientes
condiciones:
• El motor no anda en mamha lenta.
Vea "Marcha Lenta" bajo el procedimiento de ajuste.
* El motor se para o se ahoga cuando
debe acelerar. Vea =Verificaci6n de
AoeteractSn" bajo el procedimiento
de ajuste.
• Pdridida de potencia de core. Vea
"Ajuste de la Mezcla" bajo el procedimiento de ajuste.
El carburador cuenta con dos tomillos
de ajuste.
Tomilto
Tornilfode
i_uste de
ezclacon
TapaUm_tadora
Lenta
Tapadel
Filtrode
Aire
PUNTOSDE PRECALIBRACION
AI hacerajustes no fueme lastapas
Iimttadorasde pldstlcomils alldde los
retenedoreso p..uede
haberdafios.
Si no se necesitanlOSpuntosde precalibraci6n, pase a la secoi6n de "Procedimiento de Ajuste, Marcha Lenta",
Para ajustar los puntos de preoalibraOrific_ode satidade la Ifnea
ci6n::
• Gireet tomflto de ajustede mexc/a
AJUSTED AL CARBURADOR
hacia la izquierda hasta que se deADVERTENCIA:
El cabezal de torte
tenga.
• Gire el tondllo de rnarohalenta hacia
se mantendrfi girando durante la mayor pare de este pmcedimiento. Use su
la derecha hasta que se detenga.
Luego gffelo hacia ta izquierda 4
equipo protector y observe todas las
precauciones de seguridad. Verifique
vieltas y media.
24
Unea
I-..
/-_--_..
J
• Ponga el motoren marcha y corteel
c_spedpor3 minutes,luego
porcedacon la secci6nde ajustes.
Si e! motorno arranos, veal la Tabla
Diagn6stica o Ilame al n_mero
1-800-235-5878.
• Si elfuncionamientodel motor es
aceptablecon las posiciones
prefijadas,no har_.falta hacer m&s
ajustes.
PROCEOIMIENTODE AJUSTE
MarchaLenta
Dejeel motoren marcha Ienta.Ajuste
lasrevolucioneshasteque el motorse
mantenga en mamha sin catarse.
• Gire e}tomiilohaciala derechapars
aumentarlasrevoluciones si el motor se ahoga o se para.
, Gire el tomi}lohactala izquierdapars
reductr lee revoluciones.
No har_felts ningdnotto ajuste si el
funcionamiento es satisfsctorio.
Ajuste de la Mezela "H"
No use el motorconel aoeleradera
fondo pormucho tiempoal hacerlos
ajus_..sya que daros al motor poddan
ocurrir.Extiende la Iineael m_imo
Pdermitido
pot el timitadory corte algo
e c_sped.Bas&ndoseen el rendimiento curante e_corte,ajusteet tbmil*
Io de mezcla porincrementosde s6to
t/16 de vueita,comose detailsa continuaci6n:
•Hacia Is derecha hasteque el motor
tenga buena potencia al cortary sin
titubeos.
No hags los ajustesbasado en e}
sonido ni pot tas revoluciones,sino
juzgue porel buen funcionamientoal
cortar.
• Haste la izquierdasila tiene revo}ucionesalias pete se par o le falls potencia a| cotter.
Despu_s de completarcon los ajustes,
verifiquela aceleraci6n.Ajuste nuevamente si es necesario.
Veriflcact6nde Aceleraci6n
Si et motorse pars o titubeaen lugar
de acelerar, giree! tomiltode ajuste de
mezc/a haciala izquierdehasteque
consigauna aceleraci6npersia. Verifique neuvamentey haga losajustes
neossariospars conseguirun funcJonamientoaceptable.
Prepare e}aparatopars almace.nado
a! final de la temporada o si no iova a
user por m_s de 30 d_as.
ADVERTENCIA:
• Permitsque el motorse enfde y fije
bien el aparatoantesde guardadoo
transpor_arlo.
, Guards el aparatoy el combustible
en un lugarbien ventilado dondelos
vapores del combustibleno puedan
entraren contactoconchispasni tlamas=abiertas
provenientesde clentadotes de agua, motores o interrputotes el6ctncos,calefactores
centra{es,etc,
o Guardset aparatocon todeslosprotectoresen su{ugar y coloquelode
modo que laspiezascortantesno
puedancauserheridaspor accidents.
• Guards el aparatoy el combustible
en ufi tugarcompletamentefuera de1
atcancede los nifios.
SUPERFICIES EXERNAS
Siva a almacenar el aparatodurante
un periodolargo de tiempo, li'mpielo
rigurosamente
antes de guardarlo. AImacene en un _rea limpiey seca.
• Aplique una pequefiacantidadde
aceite a las superficies extemas
met_licas,
SISTEMA DE COMBUSTIBLE
Vea el mensajemarcado como
IMPORTANTE, quese refiereal uso de
combustiblescon mezcla de alcohol
en su aparato,en la secci6n de Uso,
bajoAbastecimientodel Motor.
Los estabilizadores de combustible
son una alternative aceptable pars
minimizer la formaoi6ndedep6sitos
de goma duranteel almacenaje,Ariada estabilizadora 18gasolineen el
tanquede combustibleo en el recipienteparsalmacenar el mismo. Siga
las instrucciones
de mezcia que se encuentranimpresas en el envase. Ponga el motor en marcha y d_jelo en
marcha por unos 5 minutos despu_s
de haberle puestoestabiiizador.
El aceiteCRAFTSMAN
40:1 para mototesa 2 tiempos (enfriadosa sire)
viene mezclado conestabilizadorde
/
combustible.Si no usaeste aceite de
Sears, ustedpodr_aradir estabiliza*
doral tanquede combustible.
INTERIOR DEL MOTOR
olRetirela bujfa y viertauna cucharadits de aceite 40:1 pars motores a 2
tiempes(enfriadosa aim) por la aberturapars _ bujf'a.Lentamente,tire
de la cuerdade arranquede 8 a 10
vecespare distribuirel aceite.
use exclusivamente combustible
fresco con la prcporc_6ncorrecta de
gasoline a aceite.
OTROS
No guarde la f_asolina de una tempoi rada a la pr6xlma_
Cambie el recipients de gasoline sj
se empieza a oxidar.
• Cambie la bujfa per una nueva del
ripe y de la gama de cater recomen.
dodos.
Limpie
eltodo
filtro eldeaparato
airs. para verificar
Examine
que no haya tomillos,tuercas ni pernos sueltos. Cambie lodes la pJezas
dafiadas, quebradas o gastadas.
• AI pr{ncipiode la pr6xima temporada,
TABLA DIAGNOSTICA
SINTOMA CAUSA
Et mOtor • El motorse encuentra
no arranca ahogado.
• El tanquede
combustibleest,, vacfo.
SOLUClON
• Yea las_lnstnJccionesde Arranqus"i
•Llene el tanqueconla mezcla
correctade combustible.
•Instale una bujfanueva.
i ch_spa.
a bujfano est& haoiendo
El combustibleno estd
Ilegando alcarburador.
* Verifiquequa elfittro de combustible
no est_ sucio;cdmbielo.Inspeccione
la Ifnea de combust_le; rspdrelao
c_.mbielasise encuentrapartidao
torcida.
•
Entreen contactoconsu Centrede
* Daiscompres_Sn.
ServicioSeers.
El motor no . La marcha lento estd
, Ajusteel tomillode marcha lento
mantlene
fijada muy baja.
hactala derechapare aumentar los
debidarevoluciones.
mente la
* La marcha lento est&
° Ajuste el tomillo de marcha lento
marcha
fijada muy alto.
haciala izquierdapare reducirlos
lento
revoluciones.
• Vea"Ajustesa| Carbumdor".
, Entreen contactoconsuCentrede
Los.juntasdelcigOe_al
i estan
Elcarbumdor
requiereajuste. ServicioSears.
gastadas.
Baja cempresi6n.
. Entreen contactoconsuCentrede
ServfcioSears.
Filtrode'ai'resu_.
El mOtor
Limpieo cambie"eltiitro deairs.
'
no acelera, I
carbonizada.
la separaci6n.
te faTta
I i a bujfae_t_
impieo cambie{a
bujfay recalibre
)otencia,o I Elcarburadorrequieraajuste. i Vea"Ajustes
al Carbutador".
,
Carbonfzaci6n.
EntreencontactoconsuCentrede
se para
ServicioSears.
bajooarga
, Entreen contacto consuCentrede
. Baja compresi6n.
ServicioSears.
• Et cebaderest_ .....
Ei motor
• Mueva el oebadorala posici6nOff.
humea
pamitamenteaclk,ado.
excestva- . Lamezcla de combus• Vaci'e el tanque de combustible y
manta
116halOcon la mezcla correcta.
tibleestd equivocada.
Limp_eo cambie e! fiitro de aira.
Filtrodeairs
sucio.
El carburadorrequiereajuste. I _ Vea =Ajustes al Carburador".
EJmotor
• La mezola decombusse calienta tibleest,. equivocada.
demasiado • La bujTano es]a qua
corresponds.
• Elcerburadorrequieraajuste.
• Carbonizacidn.
• Vea "Abastecimiento del Motor".
• Cambieperla bujfacormcta.
• Vea "Ajustes al Carburador".
• Entre en contacto con su Centre de
Servicio Sears.
26
For the repair or replacement parts you need
delivered directly to your home
....
Call 7 am - 7 prn, 7 days a week
1-800-366-PART
(1-800-366-7278)
Para ordenar piezas con entrega a
domicilio - 1-800-659-7084
For in-house major brand repair service
Call 24 hours a day, 7 days a week
1-800-4-REPAIR
(1-800-473-7247)
Para pedir servioJo de reparaciSn
domicilio - 1-800-676-5811
a
For the location of a Sears Parts and
Repair Center in your area
Call 24 hours a day, 7 days a week
1-800-488-1222
For information on purchasing a Sears
Maintenance Agreement or to inquire
about an existing Agreement
Call 9 am - 5 pm, Monday--Saturday
1-800-827-6655
When requesting service or ordering
,parts, always provide the following
information:
•
°
Product Type
Model Number
•
*
Part Number
Part Descfiption
America's _epair Specialists