1
i
I
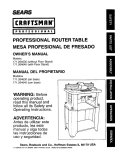
Operator's Manual
CRRFTSMRN
24cc/1.3 cu. in. 2-Cycle
17 Inch Cutting Path / .080 In. Line
GASOLINE WEEDWACKER _
Model No.
358.795310
WARNING:
Read and follow all Safety Rules and Operating
Instructions before first use of this product.
For answers to your questions about this product,
call 7am'7pm,
Mon.-Sat., or 10am-7pm, Sun.
1-800-235-5878
€.ou_,,=od
_oco._o,
_,.._
Sears, Roebuck and Co., Hoffman Estates, IL 60179 USA
530-084638
01/16/98
Warranty Statement
Safety Rules
Assembly
Operation
Maintenance
Service &Adjustments
2
2
4
5
9
10
Storage
Troubleshooting Chart
Parts List
Spanish
Parts and Ordering
11
12
13
16
Back
FULL ONE YEAR WARRANTY ON CRAFTSMAN GAS POWERED
WEEDWACKER _ LINE TRIMMER.
For one year from the date of purchase, when this Craftsman Gas Powered
Weedwaoker® Line Tdmmer ismaintained, lubricated, and tuned up according to
the operating and maintenance instructionsin the Operator's Manual, Sears will
repair, free of charge, any defect in materials or workmanship.
This warranty excludes nylon line, spark plug, and air filter,whtch are expendable
parts and become worn during normal use.
If this Weedwacker® Line Trimmer is used for commercialpurposes, this warranty applies for only 90 days from the date of purchase. If this Weedwacker® Line
Tdmmer is used for rental purposes, thiswarranty applies for only 30 days from
the date of purchase. This warrantyapplies only while this product is in use in the
United States.
WARRANTYSERVICEIS AVAILABLEBY RETURNINGTHE WEEDWACKER®LINE
TRIMMERTO THE NEARESTSEARS SERVICECENTERIN THE UNITEDSTATES.
This warranty gives you specific legal dghts, and you may also have other dghts
whichvary from state to state.
Sears, Roebuck and Co., 01817 WA Hoffman Estates, IL 60179
WARNING: When usinggardening
appliances, basic safety precautions
must always be followedto reducethe
riskof fire and sedous injury.Read and
fellow all instructions.
Safetyinformation
ontheurdt
Thispower un# can be dangerous!
Operator is responsible for following
instructionsand warnings on unitand
in manual. Read entire Operator's
Manual before using unit!Be thoroughlyfamiliar with the controlsand the
properuse of the unit. Restrictthe use
ofthis unit to persons who have read,
understand, and will follow the instructions and wamings on the unit and in
the manual. Never allow children to
operate this uniL
DANGER: Never use blades or flailing devices. This unit is designed for
line tdmmer use only. Use of any other
accessories or attachments will in-,
crease the dsk of injury.
WARNING: Tdmrnerlinethrowsobjectsviolently.Youand othersCanbe
blindedlinjursd.
Wear eye and leg
2
• Make sure unit is a_embled correctly as shown in this manual.
• Make carburetor adjustments with
lower end supported to prevent line
from contacting any object.
• Keep others away when making carburetor adjustments.
• Use only recommended Craftsman
accessories and mptacementparts,
FUEL SAFETY
- Mix and pour fuel outdoors.
• Keep away from sparks or flames.
• Use a container approved for fuel.
• Do notsmoke or allow smoking near
fuet or the ur_
• Wipe up all fuel spills.
• Move at least 10 feet (3 meters)
away from fueling site before starting
engine.
• Stop engine and allow to cool before
removingfuel cap.
CU'I'rlNG SAFETY
, Use on_ for trimming, mowing, and
sweeping. Do not use for pruning or
hedge trimming.
• inspect the area before each use.
Remove objects (rocks, broken
glass, nails, wire, etc.) which can be
thrown by or become entangled in
line. Hard objects can damage the
tdmmer head and be thrown causing
serious injury.
• Keep firm footing and balance. Do
not overreach.
• Keep all parts of your body away
from muffler and spinning line. Keep
en_ne below waist level. A hotmuffler can cause serious bums.
• Cutting on left side of the shield will
throw debris away from the operator.
TRANSPORTING
AND STORAGE
• Allow engine to cool;,secure unit before storing or transporting in vehicle.
• Empty the fuel tank before storing or
transportingthe unit. Use up fuel left
in the carburetor by starting the engine and letting it run until it stops,
• Store unit and fuel in area where fuel
vapors cannot reach sparks or open
flames from water heaters, electric
motors or switches, furnaces, etc_
• Stere unitso line limiter cannot accidentallycause injury. The unit can be
hung by the tube.
° Store unitout of reach of children.
protection.Keep body parts clear of
rotatingline. Keep children,bystanders, and animals 50 feet (15 meters)
away. If approached stop unit immediately.
EyeProtec_on
If situationsoccur which are not
covered in this manual, use care and
goodjudgement. If you need
assistance, contact your Authorized
Service Dealer or call 1-800-235-5878.
OPERATOR SAFETY
• Always wear safety eye protection.
• Always wear long pants, long
sleeves, boots, and gloves. Wearing
safety leg guards is recommended.
Do notgo barefoot or wear sandals.
Stay clear of spinningEne.
• Secure hair above shoulder length.
Secure or remove Jooseclothing or
clothing with loosely hanging ties,
straps,tassels, ets. They can be
caught in moving parts. Beingfully
covered also helps protect youfrom
debris and pieces of toxic plants
thrownby spinning line.
• Do not operate when you are tired,
ill, or under the influence of alcohol,
drugs, or medication.
° Wear hearing protection if you use
unit for more than 1-1./2hourspar
day.
• Never start or run inside a dosed
room or building. Breathingexhaust
fumes can kill.
• Keep handles free of oil and fuel.
UNIT / MAINTENANCE
SAFETY
• Disconnect the spark plug before
performingmaintenance except carburetoradjustments.
• Look for and replace damaged or
loose parts before each use. Look
for end repair fuel leaks before use.
Keep in good working condition.
, Replace trimmer head parts that are
chipped, cracked, broken, or darnaged in any other way before using
the unit.
3
/
• If situations occur which are not covered in this manual, use care and
good judgment, If you need assis.
tance, call 1-800-235_5878.
SPECIAL NOTICE: This unit is not
equipped with a temperature limiting
muffler and spark arresting screen
which meets the requirementsof Call+
fomia Codes 4442 and 4443. All U.S.
forest land and the states of California,
Idaho, Maine, Minnesota, New Jersey,
Oregon, and Washington require by
law that many internal Combustionengines be equipped with a spark arrestor screen. If you operate in a locale
where such regulationsexist, you are
legally responsible for installingand
maintaining the operating conditionof
these parts. Failure to do so is a violation of law. Contact yourAuthorized
Service Dealer for the Corre_ parts,
CARTON CONTENTS
Check carton contentsagainst the following list.
Model 358.795310
• Trimmer
. Shield
• Wing Nut (screwed ontoshield)
• Extra Spool with line
• Gas Tank (1 gal.)
• Container of Oil
Exam;_e parts for damage. Do not use
damaged parts.
NOTE: If you need assistance or find
parts missing or damaged, call
1-800-235-5878.
It is normal for the fuel filterto rattle in
the empty fueltank.
Finding fuel or oil residue on muffler is
normal due to carburetor adjuStments
and teslJngdone bythe manufacturer.
SPECIAL NOTICE: Exposure to
vibrationsthrough _rolonged use of
gasoiine powered hand tools could
cause blood vessel or nerve damage
in the fingers, hands, and joints of
people prone to circulationdisorders or
abnormal swellings. Prolonged use in
cold weather has been linked to blood
vessel damage in otherwise healthy
people, if symptoms occur such as
numbness, pain, loss of strength,
change in skin color or texture, or loss
of feeling in the fingers, hands, or
joints, discontinuethe use of this tool
and seek medical attention. An antivibration system does not guarantee
the avoidance of these problems. Usere who operate power tools on a continual and regular basis must monitor
closely their physical condition and the
condition of this tool,
* Loosen wing nut or knob on handle.
• Rotate the handle on the tube to an
updght position;retightenwing nut,
ATTACHING
SHIELD
WARNING: The shieldmust be properly
installed.The shieldprovidespafdal
protectionfromthe riskof thrownobjects
to the operatorand othersand is
equipped with a line l_miterwhich cuts
excess line to the properlength. The fine
timiter (on undersideof shield) is sharp
and can cut you. For properorientation,
see iliustralionin Operalionsection.
• Remove wing nut from shield.
• insert bracket into slotas shown.
• Pivot shield until bolt passes through
hole in brackeL
• Secure_' tighten wing nut onto bolt.
Slot
ASSEMBLY
WARNING: If received assembled,
repeat all steps to ensureyour unit is
propedy assembled and all fasteners
are secure.
ADJUSTING
THE HANDLE
WARNING: When adjustingthe handle, be sure it remains between the
trigger and the safety label.
Shield
_
cket
KNOWYOURTRIMMER
READ
THIS
OPERATOR'S
MANUAL
AND
SAFETY"
RULES
BEFORE
OPERATING
YOUR
UNIT.
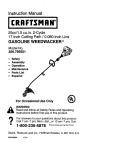
Compare the illustmti0nswith your unit to familiarize yourselfwith the Jocation of the vadous controls and adjustments. Save this manual forfuture reference.
AssistHandle
Trh'nmer
Head
Muffler
ON/STOP
Switch\
Trigger
Starter
Handh
Choke Lever
Shield
PrimerBulb
FuelMix
Fi_ Gap
Line
Lirniter
Blade
ON/STOP SWITCH
The STOPswitch is used to stop engine.
Press and hold _
to stop engine.
PRIMER BULB
The primer bulb removes air from the
fuel lines and fills them with fuel. This
allows you to start the engine with fewer pulls on the starter rope. Activate
the primer bulb by pressing it and
allowing it to return to its origirlalform.
CHOKE
The choke helps to supplyfuel to the
carburetordudngstarling.This allows
you to start a coldengine. Activatethe
choke by movingchoke leverto the Full
position.Afterthe engine has stetted,
move the choke to the Off position.
EDGE GUIDE
The edge guide protectsthe unitfrom
contacting the groundduring edging.
BEFORE STARTING ENGINE
WARNING: Be sure to read the fuel
information in the safety rules before
you begin. If you do not understand
the safety roles,do not attempt to fuel
your unit. Call 1-800-235-5878.
FUELING ENGINE
Once oil is added to gasoline, shake
container momantadly to assure that
the fuel is thoroughly mixed. Always
read and follow the safety rules
relating to fuel before fueling your unit.
IMPORTANT
Experience indlcatas that alcohol
blended fuels (csIted gasohol or using
ethanol or meti_nol) can attract moisture which leads to separationand
formation of acids durfngstorage.
Acidic gas can damage the fuel system of an engine while in storage.
To avoid engine problems,empty the
fuel system before storage for 30 days
or longer. Drain the gas tank, start the
engine and let it rununtilthe fuel lines
and carburetor are empty. Use fresh
fuel next season.
This engine is certified to operate on
unleaded gasoline. Before operation,
gasoline must be mixed with a good
quality 2-cyclo air-cooled engine oil.
We recommend Craftsman brand oil.
Mix gasoline and oilat a ratioof 40:1
(A 40:1 ratio is obtained by mixing 3.2
ounces of oilwith I gallon of unleaded
gasoline). DO NOT USE automotive o_
or boat oil. These oils will cause
engine damage. When mixing fuel,
follow instructionsprinted on container.
5
Never use engine or carburetor cleanor productsin the fuel tank or permanent damage may occur.
See the STORAGE section for additional information.
STOPPING YOUR ENGINE
• Press and hold the On/Stop switch in
the STOP pos_on.
• If engine does not stop, move choke
leverto full position.
ChokeLever
STARTING YOUR ENGINE
COLD ENGINE OR WARM ENGINE
AFTER RUNNING OUT OF FUEL
WARNING: The trimmer head will
turn while staxtingthe engine.
Avoid any contact with the muffler.A
hot muffler can cause serious bums.
• Restengineandshieldon ground,
suppOrting
trimmerheadoffground.
• Movethechokelever tothe Full
Chokepos_on.
• Slowlypresstheprimerbulb6 times.
• Squeezeandholdthethretfle trigger.
Keepthrottletriggerfullysqueezed
untiltheenginerunssmoothly.
_tv
Ch°ke
• Move the choke lever to the Half
Choke position.
• Pull starter rope sharply until engine
runs,but no more than 6 pulis.
NOTE: If the engine has not staded
after 6 pulls (at half choke), check to
make sure the choke lever is in the
proper position.Then, move the choke
lever to the Full Choke position and
press the primer bulb 6 times; squeeze
and holdthe throttle trigger and pull
the starter rope 2 more times. Move
the choke lever to Half Choke and pull
the starter rope untilthe engine runs,
but no morethan 6 more pulls. If the
engine stillhas not started, it is probably flooded. Proceed to "Starting a
Rooded Engine."
• Allow the engine to run 10 seconds,
then move the choke lever to Off
Choke. Allow the unit to run for 30
more seconds at Off Choke before
releasing the throttle trigger.
NOTE: If engine dies with the choke
lever at the Off Choke position,move
the choke lever to Half Choke and pull
the rope until engine runs.
STARTING A WARM ENGINE
• Move the choke lever to the Half
Choke position.
• Squeeze and hold the throttle trigger.
Keep throttle trigger fully squeezed
until the engine runs smoothly.
• Pull starter rope sharply until engine
runs, but no more than 5 pulls.
- Allow engine to run 15 seconds,
then move the choke lever to Off
Choke.
NOTE: If engine has not started, pull
starter rope 5 more pulls. If engine still
does not run, it is probably flooded.
DIFFICULT STARTING OR
STARTING A FLOODED ENGINE
Flooded engines can be started by
placingthe choke lever in the Off
Choke position;then, pull the rope to
¢lsar the engine of excess fuel This
could require pullingthe starter handle
many times depending on how badly
the unitis flooded.
er
• Pullstealer rope sharply 5 times.
NOTE: If the engine sounds as if it is
tryingto start before the 5thpull, go to
the next step.
If the unit still doesn't start, refer to
TROUBLESHOOTING chart or call
1-800-235-5878.
6
OPERATING INSTRUCTIONS
OPERATINGPOSITION
ALWAYS WEAR:
_------_
Eye Protection
To eelvance line, tap bottom of trimmer
head on ground one _me.
Line IJ
proper length,
Long Pants -_
HeavyShoes
Cutfromyourfighttoyourraft.
Bringthe engine to cuttingspeed before enteringthe material to be cut.
Do not runthe engine at a higher
speed than necessary. The cutting line
will cut efficientlywhen the engine is
run at less than full throttle. At lower
speeds, there is less engine noise and
vibration.The cuttingline will last
longerand will be less likely to "weld _
ontothe spool.
If the trimmer head does not turn when
the engine is in operation, make sure
the drive shaft housing is properly
seated in engine shroud.
Always release the throttle trigger and
allow the engine to retum to idle speed
when not cutting.
To stop engine:
• Release the throttletdgger0
• Pushand hold down the oldstop
switch untilthe engine has stopped
completely.
TRIMMER UNE ADVANCE
The trimmer line will advance approximately 2 in. (5 cm) each time the bottom of the trimmer head is tapped on
the ground_
the engine runningat
full throttle.
The most efficientline length is the
maximum length allowed by the line
llmiter.
Always keep the shield in place when
the too) is being operated.
To Advance Line:
• Operate the engine at full throttle.
• Hold the trimmer head paraJletto and
above the grassy area.
• Tap the bottom of the trimmer head
lightlyonthe groundone time. Approximately 2 in. (5 cm) of line will be
advanced with each tap.
Always tap the trimmer head on a
grassy area. Tapping on surfaces such
as concrete or asphalt can cause excsssive wear to the trimmer head.
If the line is worn down to 2 in. (5 cm)
or teas, more than one tap will be required to obtain the most efficient line
length.
WARNING: Use only .080" (2 ram)
diameter line. Other.sizes of line will
notadvance properly and can cause
serious injury. Do not use other materials such as wire, string, rope, etc, Wire
can break off during cuttingand become a dangerous missile that can
cause serious inju_.
CUTTING
METHODS
WARNING: Use minimumspeed and
do not crowd the line when cutting
around hard objects (rock, gravel,
fence posts, etc.), which can damage
the trimmer head, become entangled
in the line, or be thrown causing a sad*
due hazard.
• The tip of the line does the cutting.
YOuwill achieve the best performance and minimum line wear by not
crowding the line into the cutting
area. The right and wrong ways are
shown below,
T_pofthe Une
LineCrowdedInto
DoesTheCutting
Work/Vea
Right
• The line will easily remove grass and
weeds from around walls, fences,
trees and flower beds, but it also can
cut the tender bark of trees or shrubs
and scar fences, To help avoid damage especiallyto delicate vegetation
or trees with tender bark, shorten line
to 4-5 in. (10-13 cm) and use at less
than full throttle.
MOWING - Yourtrimmer is ideal for
mowing in places conventional lawn
mowerscannot reach. In the mowing
pos_on, keep the line parallel to the
ground.Avoidpressing the head into
the ground as thiscan scalp the
ground and damage the tool
• For trimmingor scalping, use less
than fu_ throttle to increase line life
and decrease head wear, especially:
• During light duty cutting.
• Near objects around which the line
can wrap such as small posts,
trees or fence wire.
• For mowing or sweeping, use full
throttle for a good clean job,
WARNING: Always wear eye protection. Never lean over the trimmer head.
Rocks or debds can ricochet or be
thrown into eyes and f_e and cause
blindness or other serious injuly.
TRIMMING - Hold the bottom of the
tdmmer head about 3 in. {8 cm) above
the ground end at an angle. Allow only
the tip of the line to make contact, Do
not force trimmer line into work area.
Trimming
Mowing
8WEENNG - The fanning action of
the rotating linecan be used for a
quick arm easy' clean up, Keep the line
parallel to and above the surfaces being swept and move the tool from side
tO side.
.. o.
EDGING - Your unitcan be used for
edgingsidewalks,patios,driveways, etc,
While edging,_ow the t_pof the Freeto
nt_e contact.Do notforce line. The
edge guardhelps protectthe urfitby
keepingunitfrom contactingthe ground.
Take extra cautionwh_e edgingas objects can be thrown by tdmmer line.
Edging
SCALPING - The scalping technique
removes unwanted vegetation. Hold
the bottom of the trimmer head about 3
in. (8 cm) above the ground and at an
angle. Allow the tip of the line to strike
the ground around trees, posts, monuments, etc. This technique increases
line wear.
Scalpt_
I1
jr ......
8
MAINTENANCE SCHEDULE
CARE & MAINTENANCE TASK
Check for Loose fasteners and parts...........
Check for damaged or worn parts
Clean unitand labels
Clean air filter
Replace spark plug
WHEN TO, PERFORM
Before each use
Before ead_ use _
After eantf use
Every 5 hours of operation
..........
Yeady
.........
I
GENERAL RECOMMENDATIONS
The warranty on this unit does not cover items that have been subjected to
operatorabuse or negligence. To receive full value from the warranty, the
operatormust maintain unitas instructed in this manual. Vadous edju,,%_nents
will need to be made period_callyto
properlymaintain your unit,
CHECK FOR LOOSE
FASTENERS AND PARTS
• Spark Plug Boot
') Air Filter
• HousingScrews
• As_st Handle Screws
• DebrisShield
CHECK FOR DAMAGED
WORN PARTS
CLEAN AIR FILTER
Do not clean filter in gasoline or other
flammable solvent to avoid creating a
fire hazard or producing harmful evaporathte emissions.
A dirty air filter decreases engine performance and increases fuel consumption and harmfulemissions. Always
clean after every 5 hOUrsof operation.
• Clean the cover and the area around
it to keep dirt from Pallinginto the
carburetor chamber when the cover
is removed.
* Remove parts as illustrated.
• Wash the filter in soap and water,
* Altowfilterto drY.
o Replace parts.
OR
Refer replacement of damaged/worn
partsto your Sears Service Center.
• On/Stop Switch - Ensure On/Stop
switchfunctions properly by pressing
andholdingthe switch in the "Stop"
position.Make sure engine stops;
then restart engine and continue.
• FuelTank- Discontinue use of un_if
fueltank shows signs of damage or
leaks.
= Debds Shield- Discontinue use of
unitif debdsshield is damaged.
CLEAN UNIT & LABELS
• Cisan the unit using a daJ'npcloth
with a mild detergent.
• Wipe off unitwith a clean dry cloth.
Cover
REPLACE
SPARK PLUG
Replace the spark plug each year to
ensure the engine starts easier and
runs better. Set spark plug gap at
.025 in. ignitiontiming is fixed and
nonadjustable.
• Twist, then pull off spark plug boot.
• Remove spark plug from cylinder
and discard.
- Replace with Champion RCJ-SY
spark plug and tighten with a 3/4 in.
sockst wrench (10-12 ft.-ibs),
• Reinstallthe spark plug boot.
ADVANCING
THECUTTING
LINE
Advance
line by tapping bottom of cutting head lightlyon the groundwhile
engine is running at full speed. A metal
blade attached to the shield will cut the
line to the proper length.
REPLACING THE LINE
* Press the Iocktabs and removecover.
. Remove the spool.
* Check the indexingteeth on the spool
and hub for wear.
• Usa a clean clothto wipe the inner/outer surfaces of the spool and hub.
, Useonly.O8Oinch(2ram}diamsterline.
. Cuta _ngth ofline about22 feet(6.5 m}.
. Bend the line at the midpoint.
Fs,°t
, Insert the bend intothe slotinthe inner
dm of the spool.
. Wind the line evenly and tighffyonto
the spool;,wind in direction of arrow
found on spool.
, Push the line into the notches,leaving
3-5 inches (8--12 cm) unwound.
o insertline intotineexit hoh_sas shown.
* Align notches with the line exit holes.
, Push the spool into the hub until it
o snaps
place.
Pull theinto
ends
of the line to seat the
Carburetor adjustment is c"nticaland if
done improperly can permanently
damage the engine as well as the cap
buretor. If you require further assistance or are unsure about performing
this procedure, call our customer assistance help line at 1-800-235-5878.
Old fuel, a dirtyair filter, a dirtyfuel filter, or flooding may give the impression of an improperlyadjusted carburetor. Check these conditionsbefore
adjusting the carburetor,
The carburetor has been carefully set
at the factory. Adjustments may be
necessary if you notice any of the followingcond_ons:
* Engine will not idle, See =idle Speed'
under adjustingprocedure.
, Engine dies or hesitates instead of
accelerating. See =Acceleration
Check" underadjusting procedure.
* Loss of cuttingpower. See =Mixture
Adjustment" underadjusting
procedure.
There are two adjustment screws on
the carburetor.
spool in the hub.
• Re-install the cover.
_Umiter
LockTab
TJ
Lineexit hois
!
Une exit hole
Unein
CARBURETOR PRESETS
notches
When making carburetor preset adjustments, do not force plasticlimiter caps
beyond stops or damage will oscur.
If carburetor presets are not needed,
proceed to =Adjusting Procedure, Idle
Speed."
To adjust presets:
• Turn mixture screw counterclockwise
until it stops.
• Turn the idle speed screw clockwise
until it stops. Now turn counterclockwise 4-I/2 rums.
• Start motor, cut grass for 3 minutes,
and proceed to the adjustment
section. If engine does notstart,
refer to troubleshootingchart or call
1-800-235-5878.
!
Cover
CARBURETOR
ADJUSTMENT
WARNING: The trimmer head wigbe
spinning during most of this procedure.
Wear your protective equipment and
observe all safety precautions. After
making mixture adjustments, recheck
idle speed.
10
• if engine performanceis acceptable
at the preset positions,no further
adjustment is necessary.
ADJUSTING PROCEDURE
idle Speed
Allow engine to idle. Adjust speed until
engine runswithoutstalling.
• Turn clockwiseto increase engine
speed if engine stalls or dies.
• Turn counterclockwiseto decrease
speed.
No further adjustments are necessary
if performance issstisfactory.
Mixture Adjustment "H"
DO NOT operate engine at full throttle
for prolonged periodswhile maidng adjustments` Damage to the engine can
occur. Extend line to the length allow
by the line ltmilorand cut some grass,
Based on performancewhile outting,
Prepare unitfor storage at end of season or if it will notbe used for 30 days
or more.
WARNING:
• Allow engine to cool, and secure the
unit before storing or transporting.
• Store unit and fuel in a well ventilated area where fuel vapors cannot
reach sparks or open flames from
water heaters, electro motors or
switches, furnaces, etc.
• Store unit with all guards in place.
Positionunitso that any sharp object
cannot a_identally cause injury,
• Store unit and fuel well out of the
reach of ohildren.
EXTERNAL
SURFACES
If your unit is to be stored for a period
of time, clean it thoroughlybefore stop
age, Store in a clean dry area.
• Lightly oil external metal surfaces.
FUEL SYS_M
Under Fueling Enginein the Operating
Section of this manual, see message
labeled IMPORTANTregarding the use
of gasohol in yourengine,
Fuel stabilizer is an asceptabte alternative in minimizingthe formation of
fuel gum depositsduring storage. Add
turn the mixture adjustment in
1/16-turn inorements as follows:
• Clockwise until the engine has good
power while cuttingwi_ no hesitation,
Do not adjust by sound or speed, but
judge by how well the engine performs white cutting.
• Counterclockwise if the engine has
• speed but dies or Packspower while
cutting.
After completingadjustments, check
for acceleration. Reset if necessary.
Acceleration Check
If engine dies or hesitates instead of
accelerating, turn mixture adjustment
counterclockwise until you have
smooth acceleration. Recheck and adjust as necessary for acceptable performance.
stabilizer tothe gasoline in the fuel
tank or fuel storage container. Follow
the mix instructionsfoundon stabiF=zer
container, Run engine at least 5 minutes after adding stabil[zar.
CRAFTSMAN40:1, 2-cycle engine oil
(air cooled) is already blended with
fuel stabilizer. If you do not use this
Sears oil, you can add a fuel stabilizer
to your fuel tank.
INTERNAL ENGINE
• Remove spark plug and pour 1 teaspoon of 40:1, 2.cycle engine oil (air
cooled) through the spark pJugopening. Slowlypull the starter rope 8 to
10 times to distributeoil.
• Replace spark plug with new one of
recommended type and heat range.
• Clean air filter.
• Check entire unit for loose screws,
nuts, and botts. Replace any damaged, broken, or worn parts.
• At the beginningof the next season,
use only fresh fuel having the proper
gasoline to ell ratio.
OTHER
• Do not store gasolinefrom one season to another.
• Replace your gasoline can if it starts
to rusL
11
T,OUB,ES.OOTSNG
C.A,T
CAUSE
REMEDY
rEnginewilt
ROUS
•"
Engine
flooded.
See "Starting Instructions."
not
start.
Engine will not
idle properly.
Enginewiii not
accelemteo
lacks power,
or dies under
ra load.
• Fuel tank empty.
. Spark plug not firing,
• Fuel not reaching
carburetor.
-"Fill tank with correct fuel mixture.
install new spark plug.
.
." Check for didy fuel rdter; rep=ace.
Check for kinkedor splitfuelline;
repairor replace.
idle speed set too low. I"._djust idle speed screw
........
clockwise to increase speed.
Idle
speed set low.
too high. i°* Adjust
speed
screw
co.unterCompression
Contactidle
your
Service
Dealer.
close
to reduce speea. ,
Carburetor requires
• See Carburetor Adjustments.
adjustment.
i*. Crankshaft seals worn. • Contact your Sewice Dealer.
• Contact your Servic.e...Dealer.
Compress!On tow.
• Air filter dirty.
,, Clean or replace air filter.
• Clean or replace spark plug
• Spark plug fouled.
and re-gap.
• See =carburetor Adjustments."
• Carburetor requires
adjustment.
• Carbon build up.
Contact
Service Dealer.
• Compression low.
Contact your
your Service
Dealer.
,,
,,,,
Engine smokes ° Choke partially on.
° Fuel mixture incorrect.
excessively.
Move choke to offposition.
Empty fuel tank and refillwith
° Air filter dirty.
• Carburetor requires
adjustment.
,_Lu,,
,,,,
Engine runs hot • Fuel mixture incorrecL
• Spark plug incorrect.
• Carburetor requires
• Clean
correctorfurl
mixture.
replace
air filter,
'- See =Carburetor Adjustments."
* See "Fueling %ur Unit."
.....
° Replace with correct spark plug.
* See =Carburetor Adjustments."
adjustment
• Carbon build up.
, Contact your Service Dealer.
12
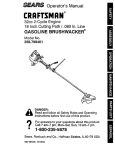
REPAIR PARTS
SEARS
MODEL 358.795310
WARNING
All repairs, adjustments
and
maintenance
not described
in the Operator's
Manual
must be perfprmed by qualb
fled serv,_co personnel
ReL
'
Pa_ No_
1.
2_
8.
4,
5.
6,
7,
8.
9.
10.
11,
12.
1_
_4,
530095176
530015966
530038876
530036515
530036514
530094673
530015820
530094847
530094543
530016152
530095321
530052286
530015814
53O069930
15.
530095604
4
11
5
DeSCription
Ref.
Odve Shaft
S_ew
16.
17.
18.
19,
20.
2!,
22.
Tr_ger
Throttle Hs9. (Right)
T_ro_e Hsg. (Left)
Assist Hencfle
B_t-Handle/Shield
C_amp-HandlB
Dust Cup
W_ngn_t-Handle/S_isld
Drive Shaft Hsg. ASS"]
Line t3miter
Screw-une
U_
Part No.
530069876
530094830
530094827
7185931
530_J5503
530049844
53004.9845
DescdpUon
Hub.a,ss_y{lnds, 20)
Sp_ng
Release _tton
Spo_ w/the
Covar
Edge Guard
C_amp-MountTng
NOt ;hOwn
530084638
530047467
530C4_332
530052325
530_52324
530047500
Shield _ Ass'y=
(ind. 7.10.12 & 13)
Cutting Heed AsS'y,
{fncl,
16-20)
13
Operator Manua_
Shaft Warning Decal
instruction Decal
Fan Hsg. Decal
Sh_erd Decal
Stop Oecal
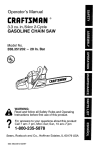
REPAIR PARTS
29
43
31
38
72
I'[
67
15
2
32
54
T
14
New Style
49
53
56
3
1
63
60
62--O
5O
Reh
1.
2,
3.
4.
5.
6.
7.
8,
9,
10,
11.i
12
13
14,
15,
16.
17,
18_
19.
20,
2-[,
22,
23,
24,
25,
26,
27
Part
No.
Description
Ref.
part No.
530029395
29.1 530053500
5300157/5
30. 53005-3499
_crew-Pug_
31.
530027523
:tetatner-FuHey
530015934
_Screw-Shrd/FanHsg,
t 530016197
530027569
Street Handle
530042068
Screw
$2. _530049377
530015810
53_
530019181
5300192.33
Gi_.sket--CyIinde_'/Carb.
34.
_30089909
C_tampbn
SparkPlug {C-J-BY)
65. 530069769
530019194
Gasket-Ca,do.
530015945
36.
5300160-[4
RetainerRing-C'case
37. 530019223
530014663
LeadWire
530014662
Groundw'_'e
38. 530069770
530069886
RywheelAas'y.
530039163
39. 5300158_2
Igni_'onModule
530036145
Spac_-JgniLModute 40, 530038747
530015954
Scmw~lgn_.Module ; 41. 53004,9118
530015828
_asher- Flet
42. 530015254
530027953
3_ive Coupling
4,3, i 560015352
530014532
44. 530015867
3ran!_shaf_ Ass'y.
45.
5300_6569
530069615
[Connecting Rod Assy.
46. 530036575
530049903
PL_on R_ng
47. 530036558
530014861
Crankcase _ssy.
48. _530015966
: (incl.lO & 23-26)
530032125
lanerBeating
49. 536066744
50. 5-30049933
530032124
Outer Bearing
530019179
C'caseSeal
51. 530615953
560015941
ReL RingJC'shaf_
52. 530036793
53. 530069247
530036578
Mufffer P_ody
68;I 56oo_7
Descr;ptton
Muffler B_ffie-Pudt
Muffler _ffle-Rrst
Muffler 5p_ieg
Old Styte
New _yle
Rear Shroud
Gasket--C'case
Ref.
Part
NO.
54,
55,
56.
57.
5300699_9
530071609
i 5300f _47
530014,362
530069616
Cylinder _t
O_'b. Adaptor
58, 5600147'29
Screw-Cerb Adptr,
G_ket-Cyfinder
59, 530038114
Cerbutetor hasy F3t 60.
56006977-[
(incl. Umiter Gap}
6f,
530016072
Screw-Flywtmel
f12. 560015768
ChoY-eRata
! 63. 530069216
Choke Sht_ter
64. 530069262
I Wave Washer
65. 5300t6080
66.
530089400
Cho_e Sp_ce_
5cmw,-Carburet_r
Fil_er Plate
67. !
Air Fll_er Foam
530069360
Air Fd_er Co_.z
530071290
68, 560015'[62
Screw-Air BOX
69. 530069756
Thro_e Cable Assy
Fuel Tank Ass'y,
70,
;30023817
Screw-Cylinder
71.
_30036792
ShroUd tso]etet
L_e Kit-Ca_b_urge
72. 530038582
Muffler Cover
14
l:_scd_lon
Muffler Kit
(Ind. 27-31)
Old Style
NewStyle
Fue_CepAssy.
F_ Rck_pASSy
Engine Gasket K_t
(_n_.7,5,53,67)
C'¢as_/C'shafi Assy.
(in_, 10,1 _1,_-26}
Om_f SW_C_
Fan HsgJShroud Assy
Screw-Pinch Clamp
Locknu_-P;n_ Gl_mp
Fuel Ijne-TanktPrimer
Rope Kit
Screw
Starter Pulley Kit
Spark An'ester Kit
Old SPJle
New _'yte
Piston Pin Retaitter
P_stc_ Kit
(Ind. 21,68 & Pin)
Sprfilg Starter Dog
ISeletot-Ccankcas_
Air Box
REPAIR PARTS
Carburetor
Assembly
Kil Number
#530069770
KIT
2
I
ReL
part No.
_
Description
i
1.
2,
5_04
530069460
3_
5,30069844
Um_t_.r
Carburetor Repair Kit
(KIT = CONTENT_
Gasket/Diaphragm
( i. = CONTENTS)
15
Declarcacibn de Garantfa
Reglas de Seguridad
Montaje
Use
Mantenimiento
Servicio y Ajustes
16
16
t8
20
24
25
Almacenaje
Tabla Diagn_stica
27
28
Lista de Piezas
13
Piezas de Repuesto y Encomlendad
Contratapa
GARANTtA DE UN A_IO COMPLETO PAPA LA CORTADORA DE LINEA A GASOLINA WEEDWACKER DE CRAFTSMAN
Dumnte un a_o, a partir de la fecha de compra, siempm clue se haga el mantenimiento, la lubdcaci6n y los ajustes a esta Cortadora de Unea a Gasolina Weedwacker ®de Craftsman seg_n las instrucciones de uso y mantenimiento en el
Manual del Usuado, Sears reparard cualquier defecto de materia,les o de mano
de obm gratuitamente.
Si se usa esta Cortadora de Li'neaWeedwacker ®de Craftsmanpara fines comerciales, esta garantfa tendr_ validez por s6Io 90 dias a partirde la fecha de cornpra. Sise usa esta Cortadora de Linea a Gasolina Weedwacke_ de Craftsman
para fines de alquiler,esta garantia tendrd una valiclezde s61o30 dies a partirde
la fecha de compra. Esta garantfa tendrd valfdez dnicamente mientras se use
este producto dentro de los Estados Unidos.
SE OBTENDRA SERVICIO BAJO GARANTIA DEVOLVIENDO LA CORTADORA
DE LINEA WEEDWACKER AL CENTRO DE SERVICIO SEARS MAS CERCANO EN LOS ESTADOS UNIDOS.
Esta garanti'a confiere derechoslegales espec[ficos al propietado,que tal vez
tenga asimismo otros demchos que vadan entre estados.
Sears, Roebuck and Co., DI817 WA Hoffman Estates, IL 60179
ADVERTENCIA:
hJ usar cualquier
herramienta de jardinerfa, deberdn observarse precauciones bdsices de segur_daden todo momento para reducir
el riesgo de incendio y de graves heftdes. Lea y siga todas las instrucciones.
como en el manual.No permita nun_
que los ni_os usen este apamto.
Informacidn de seguridaden el
Rt3RrRto
iEsta herramienta de fuerza puede sar
peligrosai Cabe al usuario la responsabilidad de cumplir con todas las advertencies e instruccionesen el aparato yen el manual, iLea el Manual del
Usuario en su totalidad antes de usar
el aparato! Est_ completamente familiadzado con los contmles y con et uso
correcto de/aparato. Limiteel usode
este aparato a aquallas personas que
hayan leido y comprendido, y que vayan a obedecer todas las advedencias
e instruccionestanto en el aparato
PEUGRO:
Nunca use cuchtllasni
dispos_vos desgrenadores. Este aparato ha side disefiado para el uso exclusivode l_nsade code. El uso de cualquier otra pieza o accesodo
incrementard et peligm de herides.
@@@
ADVERTENClA:
La linea de code
arroja objetos af aim violentamente.
Usted, al iguai que otraspersonas
16
podria
perder
lavistaoquedar
her!do.
Useanteojos
deseguridad
y protec-
SEGURIDAD DEL APARATO Y EN EL
MANTENIMIENTO
* Desconecte la bujfa antes de hacer
cualqulermantenimiento,
exceptuandolos ajustes al
sarburador.
• Inspeccione el aparato y cambie las
plezas da_adas o flojas antes de
cada use. Repare toda fuga de
combustibleantes de usar el
aparato. Mantenga el aparato en
buenas condicionesde use.
• Cambie todas les plezas del cabezai
que est_n astillades, quebradas,
mtas o dafiadps de cualquier mode
antes de usar el aparato.
• Asegdrese de que el aparato Pst6
correctamente armado come se
muestra en este manual.
• Haga los ajustes a| carburadorcon
el cabezal apoyado de mode que le
Ifnea de code no pueda entrar en
contactocon ningOnobjetoo
• Mantenga alejadas a tercerps
personas siempre que haga los
ajustes al carburador.
• Use exclusivamentelos accesories y
repuestosCraftsman
recomendades.
SEGURIDAD CON EL
COMBUSTIBLE
• Mezcle y vierta e! combu_'ble al aim
!ibm.
- Mantenga el aparato alejado de
l!amasy chispas.
- Use un recipienteaprobado para el
combustible.
, No fume ni permita que otrosfumen
c_6npara !as piemas. Mantenga a
nifios, espectaderes y ayudantps alejades de la zona de trabajo unos 15
metros (50 pies). Detenga e! aparato
de inmediato si alguien se aproxima.
Protecci6n para los Ojos_.---_._
Z
Si acontece alguna situacidn no
prevista en este manual, tenga
cuidado y use buen critedo. Si
necesita ayuda, entre en contacto con
su Agente Autorizado de Servicle o
/lame al ndmem
1-800-235-5878.
SEGURIDAD DEL USUARIO
• Use siempre protecci6n de
seguddad para los ojos.
* Use siempre pantalones largos,
mangas largas, betas y guantes. Se
recomienda el use de protecci6n
para las plemas. No use el aparato
descalzo ni en sandaltas.
Mant_ngase alejado de le Ifnea
girante.
• Mantenga el cabello per encima de
los hombres, atdndolo a tal efecto si
fuese necesario. No use ropa sueP=a
ni mpa con corbatps, tiras, borlas,
etc. que cuelguen !ibremente, pups
_.staspodrian enredarse en les
plezas en movimiento. E!
permanecer completamente cubierto
tambidn ie protegerd de desechos y
pedazos de plantas t6xicas que
puedan ser arrojados al aire per la
tfnsa girante.
• No haga use del aparato estande
cansade, enferrno, o bajo la
influenciadel alcohol, dmgas u otros
medicamentos.
• Use protecci6n de or'dossi usa el
aparato per mds de una hera y
media per dfa.
• Nunca ponga el aparato en marcha
ni lo deje en mamha dentro de un
recinto cerrado. El respirar los
vapores del combustible le podria
causar la muerte.
• Mantenga !os mangos libresde
aceite y de combustible.
• cerca
combustibley
del apamto.
Limpiedal
rode
el combustible
derramado.
• Aldjese per Io menos 3 metros (10
pies) del Jugar de abastecimiento
antes de poner en marcha el motor.
• Detenga el motory permlta que el
aparato se enfrfeantes de retirar la
tapa del tanque de combustible.
SEGURIDAD AL CORTAR
* Use el aparato exclusivamentepara
recodaropara cortar c_sped, para
cortar hordes y para barrer. No Io
use para podar ni para recortarseto.
- Inspeccioneel drea antes de carla
use. Retire los objetos (piedras,
viddo rote, clavos, alambre, etc.) que
se pueden enreOar en la Ifnea o que
6sta pueda arrojar al aire. Los
objetoss6tidos pueden dafiar el
cabezal y _ste los puede arrojaral
aire causando graves her!alas.
17
• Mantenga el equilibrio, con los pies
en una superficie estable No se
extienda demasiado.
• Mantenga todas las partes dal
cuerpo alejadas del sitenciadory de
la llnea girante Mantenga el motor
per debajo del nivel de la cintura El
sJlenciador puede causar graves
quemaduras si se toca cuando estd
caliente
• Si se corta con la Ifnea del lade
izquierdodel protector, los desechos
saldr&ndespedidos en sentido
opuesto a! del usuado
TRANSPORTE
Y ALMACENAJE
• Permita que el motor se enfffe y fije
bien el aparato antes de guardado o
de transportado en un vehfculo.
• Vacie el tanque del combustible
antes de guardar o de transportar el
aparato Consuma todo el
combustible restante en el
carburador pontendo et motor en
marcha y dejdndo[o en marcha
hasta que el motor se detenga solo
. Guarde el aparato y el combustible
en un lunar donde los vapores del
combustible no puedan elcanzar
chispas ni llamas provenientes de
calentadores de agua, motores o
interruptoresel6ctricos, calefactores
centrales, etc
• Guarde el aparato de mode que el
limitadorde la Iinea no pueda causar
heddas accidentales Se puede
• colgar el aparato per el tube
Guarde el aparato fuera del alcance
de los nifios
• Si acontence alguna situaci6n no
prevista en este manual, tonga
cuidado y use buen criterio Si
necesita ayuda, game
all-800-235-5878.
AVISO ESPECIAL:
Este aparato
no viene equipado con un silenc_ador
lirnffador de temperatura ni con una
rejilla anti--chispa que cumpla con los
CONTENICO DE LA CAJA
Use la siguiente lista para verificar que
todes la piezas hayan side inelufdas:
Modelo 358.795310
- Cortadora
• Cubieda Protectora
• Tuerca I_po Madposa (atomiflada en
la cubierta protectora)
• Bobina con linea Adicional
requisitesde los C0digos de Calffomia
4442 y 4443. Todas las tierras forest
ales en los Estados Unidos y los estadosde California, Idaho, Maine, Minnesota, Nueva Jersey Oreg6n, y
Washington, requieren per ley qua touches motores de combusti6n intema
est_n equipados con rejilla anti-chispa. Si usted usa et aparato donde existen tales reglamentos, usted tJenela
responsabilided jurfdica de instalar y
mantener estas piezas en correctoestado de funcionamiento. De Io contrario,estard en infracci6n de la ley. Entre
en contactocon su Agente de Servicio
Autodzado para informaci6nsobre las
piezes correctas
AVISO ESPECIAL: Estar expuesto
a vibraciones a trav_s de! use protongado de herramientae manuales a gasolina puede causar da,3oen losvases sanguineoe o los nervios de
dedos, manes y coyunturas a personas propensas a los trastomos de la
circulaci6no a/as hinchazones anor
males El use prolongado en tiempo
de clima fifo ha side vinculadoa
dafios en los yeses sangufneos de
personas que per otra parte se encuentran en perfecto estado de salud
Si ecurfieran sfntomas come el entumecimiento, dolor,p6rdida de fuerza,
cambios de color y textura de la piel,
p_rdide del tacto en las manes, dedos
o coyunturas,descontinue el use de
este aparato y busque ayuda m_dica
Un sistema anti-vibratodo no garantizar_ que se eviten tales problemas
Los usuarios que operan herramientas
de fuerza de manera prolongada y
regular,deborah vigilar de cerca su
condici_Sn
fisica y la condici6n de su
aparato
• Recipientede Gasolina
• Reclpiente de Aceite
Examine/as piezas para verificar que
no haya dafios No use piezas dafiadas
AVISO: Si necesita ayuda, si feltan
piezes o si hay piezas dafiadas, Itame
a| ntimero 1-800235-5878
18
Es normal escuchar que el filtro de
combustibtego/petee en el tanque
vacfo.
Es normal encontrar residuos de
aceite o de gasolina en el silenciador,
debido a los ajustes al carburadory a
las pruebas efectuadas por el fabdcante.
MONTAJE
ADVERTENCIA:
8i recibi6 el apara.
to ya arrnado, repita todos los pasos
para asegumr que el mismo seem
cuentre correctamente annado y que
todos los fijadoresse encuentren bien
ajustados.
AJUSTED DEL MANGO
ADVERTENCIA:
A! ajustar el mango, aseg_1reseque se mantenga entre
el gat_lloy r6tulode seguridad.
• Afloje la tuema mariposa o la pedlla
en el mango.
• Gire el mango en posici6n vertical
Vuelva a apretar la tuerca madposa
firmemente.
cial contra el desgo de que objetosarrojados al aim puedan causar accidentesal usuario y otraspersonas; y
viene equipada con un limitador de
I_neaque coda el exceso de Ifnea. El
limitadorde linea (que se encuentra
en la parte inferiorde la cubieda protectora) es filoso y puede cortar. Para
conseguirla orientaci6napmpiada vea
la ilustraci6nque se encuentraen la
secci6n de Uso.
• Remueva la tuerca madposa de la
cubierta protector-a.
-/ntroduzca el soporte dentro de la
ranura comose muestra.
, Haga girar la _ubierta protectora
hasta que el tomillo pase a tray,s
del hueco en el soporte.
• Apriete firmemente la tuema
mariposa en el tomiflo.
Ranura
Cu_e_a
,I
\
INSTALACIONDE LA CUBIERTA
PROTECTORA
ADVERTENCIA:La cubiertaprotectora deber_serinstaladacorrectamente.
Estacubiertaproveeprotecci6n
par-
19
x
Tuerca
)Maripos
CONOZCA SB APARATO
LEA ESTE MANUALDEL USUARIOY LASREGLASDE SEGURIDADANTES
DE PONER ELAPARATOEN MARCHA.Comparelasilustraciones
consuaparatopara familiarlzarseconla ubicaci6nde!os diversoscontrolesy ajustes.
Guardeeste manualpara usofuturo.
MangoAuxiliar
,_
Tubo
Cabezal
de Corte
Gula
Cuchilla del
Lirnitadorde
Li'nea
INTERRUPTOR ON/STOP
CEBADOR
Se usa el interruptorpara detener el
motor. Presione y sostenga el interruptor para detener el motor.
BOMBEADOR
El bombeador retira el aire de las
Ifneas de combustibley las !lena de
mezcla de combustible, permiti_ndole
poner el motor en mamha con menos
tirones de la cuerda de arranque. Accione el bombeador opdmi_ndoloy
luego dejando que este mcobre su forma original
El cebador ayuda a suministrar combustibleal carburador durante el arranque. Esto permite la puesta en marcha
de! motorcuando estz_fr_o. Accione el
cebador colocando la palanca en la
posici6nFull. Despue'.sque el motor se
haya puesto en marcha, ponga ta palanca del cebador en la posici6nOff.
GU|A PARA BORDES
La guia para hordes impedird que el
aparato toque el sue]o al bordear.
J,_,,v,.i
ANTES DE PONER EN MARCHA EL
MOTOR
ADVERTENCIA:
Lea atentamente
la informaci6nsobre el combustible en
las reglas de seguridad antes de
comenzar. Si no comprende las reglas
de segurfdad, no intente abastecer e!
aparato de combustible. Llame al
ndmero 1-800-235-5878.
ABASTEClMIENTO DEL MOTOR
Este motor estd habilitado para
funcionarcon gasolina sin plomo.
Antes de comenzar con el uso, se
deber_,mezciar la gasolina con un
aceite de buena caffdad para motores
de 2 tiempos enfriados a aire.
i
Recomendamos el aceite de la marca
Craftsman, Mezcle la gasolina con el
acelte en la proporcidn 40:1. (Se
obtiene una proporci6n de 40:1
mezclando 3.2 onzas de aceite con
cada gal6n de gasolina sin p!omo). NO
USE aceite para autom6viles ni para
ban;as. Estos aceites da,3ardn el
motor.
AI mezclar el combustible, siga las
instruccionesimpresas en el
recipiente. Una vez haya aSadido el
aceite a la gasolina, agite el recipiente
brevemente para asegurar que e!
combustibleest_ completamente
mezctado. Siempre lea y siga las
2O
instmcciones
de seguddad que tienen
que ver Conel combustible antes de
abastecer el aparato.
podn'aprovocarquemaduras de gravedad si se toca..
IMPORTANTE
La exper_enciaindica que los combustible mezclados con _cohol (los Itarnados gasohol o los que contienan etano! o metanol) pueden atraer la
humedad, Io que puede causar la separaci6n y la formac_6n de dcidos durants el almacenaje. La gasolina dcida
puede dafiar el sistema de combustible del motor durante el almacenaje.
Para evitar pmbfemas con ef motor,
deber_ vaciarse el sistema de combustible antes de almacenar el aparato
per 30 dfas o mds. Vacie el tanque de
combustible, ponga el motor en marcha y ddjelo en marcha basra que las
/rheas de combustible y el carburador
queden vac_os. Use combustible fresco para la pr6xima temporada.
Nunca use productos de timpieza de
motor o carburador en el tanque de
combustible ya que de hacedo puede
provocar da_os permanentes.
Vea la secci6n de ALMACENAJE para
informaci6nadicionaL
COMe DETENER EL MOTOR
• Presione y sostenga el interrupter
OolStop en la posici6n STOP.
- Si el motor no se detiene, mueva fa
palanca del cebador a la posick_n
futl.
lnterrup
_r para
uetener
el Motor
Palanca del Cebader
_._
COMe PONER EN MARCHA EL
MOTOR
MOTOR FRIO O CALIENTE
DESPUES DE QUEDAR SIN
COMBUSTIBLE,
ADVERTENCIA:
E! cabezat de corte
girard mientras se estd intentando
poner en marcha el motor. Evite el
hacer ning0n ripe de contac_ocon e!
silenciador,Un silenciadorcaliente
21
• Apoye el motor y la cubierta
protectoraen el suelo, permitiendo
que el cabezal de corte no haga
contactocon el susie.
• Mueva la palanca del cebador a la
posici6n FULL
• Lentamente, oprima el bombeador 6
voces.
= Apdete y sostenga el gati/lo
aceierador. Mantenga el gafilfo
aceieredor completamente opdmido
basra que el motor marche sin
problemas.
Palanca del Cebador
Bombeador
* Firmemente, tire de la cuerda de
arranque5 veces.
AVISO: Si el motor parece come si
fuera a arrancar antes del quintotirSn
de la cuerda de arranque, prosiga con
el paso siguiante.
* Mueva la palanca de cebador a la
posici6nHALF.
• Firmemente, tire de la cuerda de
arranque hasta que eJmotor
arranque, per<>no mds de 6 tirones.
AVISO: Si el motor no arranca despuds del sexto tir6n de la cuerda de
arranque (con la paJanca del cebador
en la posici6n Half), asegQrese de que
la palanca del cebador se encuentre
en la posici6ncorrecta. Luego, mueva
!a palanca del cebador a la posici6n
Fully opdma e! bombeador 6 veces;
apriete y sostenga e! gati]lo ace!erador
y tire de la cuerda de artanque otras2
veces.
Mueva
lapalanca
delcebader
aiaposici6n
Halfy tire de la cuerda de
INSTRUCCIONES
DE USO
POSICION DE USO
arranque haste que el motor se ponga
SIEMPREUSE J_<-'='_.
en marcha, pero no rodsde 6 veces.
(_jr_
Protec_i6n
Si el motor no arranca, probablemente
_
_L_'_
para los
se encuentm ahogado. Proceda con la
P'antalones_n-t.._
Ojos
secci6n "Arranque de Motor Ahogado."
Largos ---...-_
• Permita que el motor mamhe por 10
segundos, entonces mueva la
Zapates
IIII I! _-_
pelanca del cebador a la posici6n
Gruesos "_M _
Off. Permita que el motor mamhe pot
Co_e de derecha a izquierda
otros 30 segundos con la palanca
del ceb_lor en _apos_6n Off antes
Perm|ta que el motor alcance la
de soltar el gatillo acelerader.
. velocidad de corte antes de meter el
AVlSO: Si el motor se cala con la paaparato en el matedel a cortar.
lanca de] cebador en la posici6nOff,
No haga marcher el motor a
mueva la palanca a la posici6nHalf y
revoluciones mds alms que las
tire de la cuerda de arranque haste
necesarias. La Ifnea de code cortard
que el motor se ponga en marcha.
de una forma rndsefielente sin que el
motor est6 acelerado a fondo. A
ARRANQUE DE MOTOR CAUENTE
revoluciones
m_tsbales, habrd metros
, Mueva la palanCa del cebadof ala
ruido y menor vibraci6n del motor. La
posici6n HALF.
Ifnea de corte durard rods tiempo y
,, Optima y sostenga e! gatillo
tendr& menor probabflidad de
acelerador. Mantenga el g_tillo
"fundime"en la bobina.
totalmente oprimido haste que el
Si el cabezal de corte no gira mientras
motor marche sin pmblemas.
el motorse encuentraen marcha,
• Firmemente, tire de la cuerda de
asegdrese que todas las plezas de ]a
arranque hasta que el motorse
codadora se encuentren debidamente
ponga en marcha, pero no rodS de 5
tirenes.
en su tugar.
Pare detener el motor:.
• Permita queel motor marche por 15
. Suelte el gatillo acelerador.
segundos, entonces mueva la
paJanca del cebador ala posici6n
• Presione y sostenga el interruptor
OFF.
On/Stop hasta que el motor se haya
detenido por completo.
AVISO: Si el motor no arrar_a, tire de
fa cuerda otras 5 veces. Si el motor no
AVANCE DE LA LINEA DE CORTE
arranca, probablemente est_ a hogado.
La ll'nea de code avanza
aproximadame_e 5 cm (2 pulgadas)
ARRANQUE DIFIClL O ARRANQUE
cada vez que se toca et cabezal
DE MOTOR AHOGADO
contra el suelo con el motor acelerado
Losmotores ahogados pueden pona rondo.
erse en marcha moviendo la palanca
El largo m_tseficientede ]a Ifnea es el
del oebador ala posici6nOFF; luego,
largo mdximo perm_do por el limitador
tire de la ouerda p_ra aclarar e! exceso
de I/nee.
de combustible. Esto podrd requerir
Si4mpre mantenga la cubierta
r;luese tire del mango de la cuerda
protectom en su lugar siempre que el
touches veces dependk.=ndo cuan
aparato estd en uso.
ahogado se encuantre el motor.
Para Avanzar la L_nea:
Si el aparato sigue sin ponerse en
• Acelere el motor a fondo.
marcha, yea la TABLA DIAGNOSTICA
• Sostenga el cabezal paraJeloal sueo Ilame al ndmero 1--800-235-5878.
1o,por encima de un _.reacon
c_sped.
22
• Toque el cabezal de code contra el
susie levemente una vez. Con cada
toque, la Ifnea avanzard aproximadamente 5 cm (2 pulgadas).
• Para que la Eneaavancetoqueel cabezal
de cortecontrael sue!ounavez
Etlimitador de lfnea _
cortala Ifnea el largo J_ .
adecuado
Toque el cabezal contra el susie
siempre en un drea con c_sped. S| se
hace tocar contra superficiescome el:
cemento o el as!alto, el cabeza! podria
sufdr desgaste excesivo.
Si la Ifnea se ha gastado y cuenta con
5 cm (2 pulgadas) o menos, har_ falta
rods de un toque para obtener el fargo
de linea rods eficiente.
ADVERTENCiA:
Use dnicamente
lfnea con didmetrode 2 mm (.080 de
pulgada). Las Ifneas de otros didmetros no avanzardn debidamente y pueden causar graves heridas. No use
otros materfales, tales como el
alambm, el hilo, la cuerda, etc. El
alambre ee puede quebrar al cortar,
convirti_ndose en un misilmuy peligroso y causando heddas de gravedad.
METODOS
DE CORTE
ADVERTENCIA:
Use la veIocidad
mfnima y no aeerque el aparato demasiado al cortar cerca de objetos s&lidos (piedra, gravilla, postes, etc.): estos pueden dafiar el cabezal, pueden
enmdarse en la linea ota Ifnea los
puede arrojar violentamente al aire,
causendo serio peligro.
• La punta de la Ifnea es la que coda.
Se conseguird mejor rendimiento y
el mfnimo desgaste si no se mete la
l/nea den!re de! materia! que se estd
cortando. La ilustraci6n a continuaci6n muestTa la forma correcta e incorrecta de cortar.
La puntade la
LaUnea est_ meliLlnea es la que
daden!redel Materi_
Corta
aI de Trabajo
• La Ifnea retira fdcilrnenteel c_spsd y
las malas hierbas de a!rededor de
paredes, corcados, drbotes y macizos de !lores; pero tambi_n es capaz
de cortar la corteza tiema de drboles
y arbustosy de marcar las cercas.
Para evitar dahos, especialmente a
la vegetaci6n delicada o a los
&rboles concodeza fina, acode la
tinea a unos 10 a13 cm (4 a 5 pulgadas) y use el apamto sin acelerar
a rondo,
• Para recortaro escalpar, use el
aparato sin acelemr a fondo, para
incrementar la vida t3tilde la linea y
disminuirel desgaste del cabezal,
especialmente:
oAt hacer trabajos IManos.
• Cerca de objetos conlos cua/es la
lfnea se puede enredar, come son
los postes o drboles de peco
didmetroy el alambre de las corcas.
• Para cortarc6sped y barrer, acelere
el motor a rondopara !ograr un buen
trabajo de limpieza.
ADVERTENCIA:
Use siempre protecci6n para los ojos. Nunca se incline
per encima del cabezal. La lfnea
puede arrojar o hacer rebotarpiedras
o desechos hacia los ojos y la cara,
pudiendo causar la p_rdida de la vista
u otras graves heridas.
PAPA RECORTAR - Sostenga et
cabezal unos 8 cm (3 pulgadas) de!
susie yen &nguio. Unicamente la
punta de JaIfnea deber_ hacer e!
contactocon el material a cortar. No
rneta ta tfnea dentro det _rea que se
estd cortando.
para_o_r
8c
_
das) delSuelo _
/1" "" "
" *"_:
PARA ESCALPAR - La t6eniea del
escatpado retira la vegetaci6n no
deseada. Sestenga el cabeza! unos 8
cm (3 pulgadas) del susie yen dngulo.
Deje que ta punta de la ]inea glopee
contra e! susie coma de los drboles,
los posies, los monumentos,etc. Esta
23
t_cnica incrementa el desgaste de la
ifnea.
y mueva el aparato de un ]ado al otto
rdpidamente.
Barrer __
PARA CORTAR CESPED - Este
parato es ideal para cortarc_sped en
lugares donde las cortadoras
convencionaies no Ilegan. En posici6n
de cortar ¢_.sped, mantenga la Ifnea
paraiela al sueto. Evite presionar el
cabezal contra el suelo, ya que de
hacedo podrfa escalpar la vege_i6n
y dafiar el aparato.
Pare Cortar
¢_sped _
!|
,
. _.
.,._,&'_.__,"
PARA BARRER - Se puede usar la
acci6n ventitadora de la Ifnea girante
para barrer r_pida y f_cilmente un drea
determinada. Mantenga la Ifnea
paralela ai suelo directamente encima
de las superficiesque se quiera barrer
_ :_
PARA BORDEAR - Su aparato puede
ser usado para hacer bordes en
aceras, patios, caminos de entrada,
etc. Mientras se encuentre bordeando,
permita que sea la punta de ta Ifnea la
que haga el contactocon el material a
bordear. No fuerce la lfnea. La gula
para bordes ayudard a proteger el
aparato impidiendo que el aparato
toque el sue;o. Mantenga mdxima
precaucidn al bordear ya que objetos
pueden ser arrojados al aim pot la
linea de corte.
Pare Bordear
})/-'-'-_
CRONOGRAMA DE MANTENIMIENTO
TAREADE CUIDADOY MANTENIMIENTO
Verificar que no haya piezas ni fijadoressuettos
Verificar que no haya piezas daEadas o gastad,as
Limpiar el aparato y sus placas
Umpiar.el fittro,de aire
Cambiar ia buiia
..................
RECOMENDACIONES GENERALES
La garantfa de este aparato no cubm
los articulosque ban sidosometidos al
abuso o a la negligencia por parte de!
usuado. Para recibir el valor completo
de la garantfa, el usuario deber_ mantenet et aparato seg_n las instrucciones en este manual. Har& falta hacer vados ajustes peri6dicamente pare
mantener eI aparato de forma debida.
VERIRQUE QUE NO HAYA FMADORES NI PIEZAS SUELTAS
CUANDO HACER
Antes de cada uso
Antes de cada uso
Despu_s de cada uso
Cada 5 horas de uso
Anualmente
• Cubierta de la Buj_a
• Fittrode Aire
• Tomillos de la Caja
= Tomillosdel Mango Auxiliar
• Cubierta Protectora
VERIRQUE QUE NO HAYA P1EZAS
DA_IADAS 0 GASTADAS
Permita que sea el Cenb'ode Servicio
Sears quien efectde el cambio de piezas danadas o gastadas.
• Intermptor On/Stop- AsegQresede
que el interruptorfuncione correcta24
mente
sosteni6ndoto
enlaposici6n
"Stop". Aseg_rese de que el motor
se haya detenido pot complete, luego, ponga el motor en mamha nuevamente y conttnde.
= Tanque de Combu_ble- Deje de
usar el aparato si hay seSales de
dafios o p_rd!das en el tanque de
combustible.
• Cubierta Protectora - Deje de usar el
aparato si ei protector estd dafiado.
LIMPIE EL APARATO Y SUS PLACAS
• Limpie el aparato usando un trapo
hdmedo con un detergente suave.
• Seque el aparato usando un trapo
seco y limpio.
UMPIE EL FILTRO DEL AIRE
No |impie el filtro de aire con gasolina
ni cualquier otto soivente inftamable
para evitar peligro de incendioy de
emici0nes evaporativas nocivas.
Los flltrosde aim sucios disminuyen la
vida dtily el rendimiento del motor e
incrementan e! consume de combus.
tible y de emiciones noctvas. Limpie
siempte el filtrode aire despu_s de
cacla 5 horas de use.
• Umpie la tapa y el drea alrededor de
la tapa para evitar que caiga
AVANCE DE LA LINEA DE CORTE
Avance la linea de corte tocando la
porte inferior del cabezal de corte levemente contra el sueto mientras el me*
tor est_ acelerado a! mdximo. Una cuchilla de metal unida a la cubierta
protectora c0rtard ia tfnea el largo
apropiado.
PARA REEMPLAZAR LA UNEA DE
CORTE
* Presione las leng_etas
aseguradoras y temueva la tapa.
• Remueva la bobina.
• Inspeccione la bobina y el cube para
verificar desgaste.
• Use un trapo limpio para limpiar la
superficie de dentro y de fuera de la
, bobina
y del cube.
Use dnicarnente
Ifnea de didmetro
de 2 mm (.080 de pulgada).
• Corte un largo de linea de
aproximadamente 6.5 metros
(22 pies).
25
•
*
•
•
suciedad o desechos en el
canburadorcuando se saque fa tapa.
Retire las piezas come se ilustra.
Limpie el filtro con agua y jabSn.
Permita que el filVo se seque.
Reponga las piezas.
de Aim
milles
Tapa del Filtrode Aire
CAMBIE LA BUJIA
Deberd cambiarse la bujfa anualmente
para asegurar que el motorarranque
fdcilmente y tenga un meier rendimeinto. Ajuste la separaci6n de los electrodos a 0.025 de pulgada. El encendido
es fijo e inalterable.
• Gire y saque la cubierta de la bujia.
° Retire la bujfa del cilindroy des_chela.
• C_mbiela per una bujfa Champion
RCJ-SY y ajuste ta bujfa nueva con
una Ilave de cube de 3/4 de pulgade
(t0 a 12 libras/pie).
- instale nuevamente la cubterta de la
bujia.
• Doble la Ifnea en un puntoc_ntrico.
• Introduzca la parte dob_adaper la
ranura en el horde intemo de la
bobina.
• Enrolle ambas partes de la Ifnea de
forrna pareja y ajustadaen la
direcci6n que muestra la flecha que
se encuentra en la bobina.
• Meta la I_neaen las muescasa,
dejando alrededorde 8 a 12 cm (3 a
5 pulgadas) sin enrottar.
• Introduzca la linea en los huecos de
salida en e! cube come se ifustra
• Alinee las muescas conlos huecos
de salida.
• Meta fa bobina dentro del cube hasta
que encaje en su lugar.
• Tire de las puntas de la tinea para
que la bobina quede en su lugar
dentro del cubo,
• Vuelva a insta]ar la tapa.
LengQeta de Cierre
L_nea
Hueco de salida dentro de
de la Enea
las
/
Hueco de salida
de }a linea
!
Tapa
AJUSTES AL CARBURADOR
ADVERTENC|A:
El cabeza] de corte
se mantendrd girandodurante ta mayor parte de este procedimiento. Use su
equipo protector y observe todas ias
precauciones de seguddad. Verffique
la marcha lenta despu_s de cada
ajuste de mezcla.
El ajuste del carburador os de primordial importancia.Si se hace incorrectamonte, puede dafiar tanto el motor
como el carburadorpermanentemente. Sineossita m&s ayuda o no
estd seguro de cbmo hacer este pmcedimiento, I]ame al n_mero de ayuda
ai consumidor1-800--235-5878.
El combustible vencido, el filtro de aim
sucio, el filtrocombustible sucio o el
motor ahogado pueden dar la impresi6n de carburaci6n desajustada. Verb
fique estas condiciones antes de hacer cualquier ajuste al carburador.
El carburador ha side ajustado cuidadosameote en la fdbrica. Posib]emente sea necesado hacer ajustes sl
se noracualquiera de las siguientes
condiclones:
• El motor no anda en marcha lenta.
Vea"Marcha Lenta" bajo ai procedimiento de ajuste.
• El motor se p_ra o se ahoga cuando
debe aeelemr.Vea =Verificaci6nde
Aceleraci_n"bajo el procedimiento
de ajuste.
• P_rdida de potencia de corte. Vea
"Ajustede la Mezcla" bajo el procedimieoto de ajuste,
26
El carburadorcuenta con dos tomi!los
de ajuste.
Marcha
Lenta
Tomillode
Ajustede
._,._Tapadel
Mezclacon
Rltro de
TapaLirn]tadora
Aire
PUNTOS DE PRECALIBRAClON
AI hacer ajustes no fueme las tapas
limitadorasde pld,,_icorods alld de los
retenedoreso puede haber daSos.
Si no se necesitan los puntosde precalibraci6n, pase a la secci6n de "Procedimientode Ajuste, Marcha Lenta".
Para ajustarlos puntos de precafibraci6n:
• Gire el tomil/ode a_uste de mezc]a
haoia la izqulerda hasta que se detenga.
• Gire el tomillo de marcha lenta hacia
la derecha ha_-taque se detenga.
Luego g_relohac]a la izquierda 4
vueltas y media.
• Ponga ef motor en mamha y corte el
c&spedpor 3 minutos, luego
proceda con ]a secci6n de ajustes.
Si el motor no arranca, yea la Tab]a
Diagnbsticao liarne al nSmero
t-800-235-5878.
, Si e] funcionarnientodel motor es
aceptable con ]as pos[ciones
prefijadas,no hard falta hacer rods
ajustes.
PROCEDIMIENTO DE AJUSTE
Marcha Lenta
Deje el motor en mamha lenta. Ajuste
]as revolucioneshasta que el motor se
maotenga en mareha sin ca]ame.
• Gire el tom_lohacia la derecha para
aumeotar }as revolucionessi el motor se ahoga o se para.
• Gire el tomillohacia la izquierda para
reducir las revoluciones,
No hard falta ningdn otto ajuste si el
funcionamieoto es satisfactodo.
Ajuste de la Mezcta "H"
NO use el motorcon el acelerador a
fondopor mucho tiempo al haeer los
ajustes ya que de_os ai motor podrian
ocurrir.Extlenda la Ifnea el mdximo
permitidopor el [imitadory corte aigo
dec_sped.
Bas_indose
en el rendimiento durante el corte, ajuste el tomilIo de rnezcla por incrementos de s6lo
1/16 de vuelta, como se detalla a c0ntinuaci6n:
• Hacia la derecha basra que el motor
tenga buena potencia al cortar y sin
tltubeos.
• No haga los ajustes basado en el
sonido ni por las revofuclonos,sino
juzgue pot el buen funcionamientoal
cortar.
Prepare el aparato para almacenado
al final de la temporada o si no Io va a
usar pot m&sde 30 dias.
ADVERTENCiA:
• Permita que e! motorse enfrle y file
bien el apamto antes de guardado o
transportado.
• Guarde el aparato y el combustible
en un lugar bien ventitado donde los
vapores del combustible no puedan
entrar en contactocon chispas ni llamas abiedas provenientes de clentaderes de agua, motores o interruptotes e]_ctricos, catefactores
centrales, etc.
• Guarde el aparato con todos los protectores en su lugar y coioquelo de
mode que las piezas cortantes no
puedan causar heridas por accidente.
• Guarde ei aparato y el combustible
en un lugar completamente fuera clet
alcance de los niSos.
SUPERFICIES EXERNAS
Siva a almacenar el aparato durante
un periodo targo de tiempo, l/mpielo
rigurosamente antes de guardarlo. AImacene en un drea limpia y seca.
• Aplique una pequeSa cantidad de
aceite alas superficiesextemas
met__ficas.
SlSTEMA DE COMBUSTIBLE
Vea el mensaje marcado como IMPORTANTE. que se refiere at uso de
combuslJblescon mezcla de alcohol
en su aparato, en la secci6n de Uso,
bajo Abastecimiento del Motor.
Los estabilizadores de combustible
son una altemativa aceptable para
minimizar la formaci6n de dep6sitos
27
Despuds de completar con losajustes,
verifique la aceleraci6n. Ajuste nuevamente si es necesario.
Vedficaci6n de Aceleracidn
Si el motorse pare o titubea en lugar
de acelemr, gire el tomi[Iode ajuste de
mezcla hacia la {zquierda hasta que
consiga una aceleraci6n pareja. Vertfique nuevamente y haga losajustes
necesarios para oonseguirun funcfonamiento aceptable.
de goma durarde el almacenaje. Armada estabilizador a la gasolinaen el
tanque de combustible o en el recipiente pare almacenar el misrno.Siga
las instrucciones de mezcla que se encuentran impresas en el envase. Ponga e! motor en marcha y d_jelo en
marcha por unos 5 minuto_ despu_s
de haberle puesto estabilizador.
El aceite CRAFTSMAN 40:1 para mototes a 2 tiempos (enfdadosa aire)
viene mezclado con estabilizadorde
combustible. Si no usa este aceite de
Sears, usted podr_ afiadir estabiliza.
dor al tanque de combustible.
INTERIOR DEL MOTOR
• Retire la bujia y vierta una cucharadita de aceite 40:1 para motores a 2
tiempos (enfdados a aire) por la abertura para la bujfa. Lentamente, tire
de la cuerda de arranquede 8 a 10
veces pare distribuirel aceite.
• Cambie la bujfa por una nueva de!
_po y de la gama de c_lor recomendados.
• Limpie el filtm de aJre.
• Examine todo et aparato para vedflcar que no haya tomillos, tuercas ni
pemos sueltos. Cambie todas la piezas da_adas, quebradas o gastadas.
• AI principtode la pr6xima temporada,
use exclusivamente combustible
fresco con la pmporci6n corrects de
gasolina a aceite.
OTROS
• No guarde la gasoiina de una temporada a la pr6xima.
• Cambie e! recipiente de gasolina si
se empieza a oxidar.
TABLADIAGNOSTICA
SINTOMA CAUSA
!El motor no
arranca,
• El motor se
encuentra ahogado.
! • El tanque de
combustible estd
vacfo.
haciendo
chispa.
La bujfa no
estd
EI combustible no
estd llegando al
carburador.
- Baja compresi6n.
Et motor no
mantiene debidamente la
marcha I_ta.
El motor no
acelera,
re
falta potencia,
o se para bajo
carga.
El motor
humea
exc
esivamente,
!SOLUCION
• Vea las "lnstruccionesde
Arranque".
o Llene el tanque con la mezcla
correcta de combustible.
: tnstale una bujfa nueva.
Verifiqueque el filtrode
combustibleno est6 sucio;
cdmbielo.Inspeccionela linea de
combustible;reparela o cdmbiela
si se encuentm partide o torcide.
• Entreen contactocon su Centro
de Servicio Sears.
• La matcha lenia est,1 • Ajuste el tomillode marcha lenta
fijada muy baja.
hacia la derecha para aumentar
,, La marcha lenta estd
las revofuciones.
fijada muy alta.
• Ajuste el tomiflode marcha lenta
- El carburador requiere
hacia la tzquierda para reducir las
revoluciones.
ajuste.
• Vea "Ajustesal Carburador'.
estdn
gastadas.
Las juntas
dei cigQe_aJ • Entre en contactocon su Centro
de Servicio Sears.
Baja compresi6n.
° Entre en contactocon su Centro
de ServicioSears
• Filtro de aim sucio.
• La bujfa est_
oarbonizada.
• F_.J
carburador
requiere ajuste.
• Carbonizaci6n.
• Baja compresiSn.
° Limpteo cambie el filtro de aire.
• Limpie o cambie la bujia y
recalibre la separaclbn.
° Vea "Ajustes at Carburadof'.
• Entre en contactocon su Centro
de Servicio Sears
• Entreen contactocon su Centro
de Servicio Sears
* El cebador estd
• Uuevael cebad0ra la posici6n_arc_almente activado.
Off.
* .a mezcla de
i° Vacfe el tanque de combustible y
combustible estd,
lldnelo con la mezcla correcta.
equivocada.
: Filtro de aire sucio.
. Limpie o cambie el flltro de aire.
F_J
carburador requiere ° Vea "Ajustesal Carburador".
ajuste.
El motor se
calienta
demasiado.
° La mezcla de
combustible est,.
equivocada.
• La bujfa no es la que
corresponde.
• El carburador
requiem ajuste.
• Carbonizaci6n.
28
• Vea =Abastectmtento del Motor'.
Cambie por la bujfa correcta.
•" Vea "Ajustes al Carburador".
• Entre en contacto con su Centro
de Servicio Seare.
For in-home major brand repair Service:
Call 24 hours a day, 7 days a week
1-800-4-MY-HOME
_' (I-800-469-4663)
Para pedir servieio de reparaci6n a domicilio -- 1-800-676-5811
In Canada for all your service and parts needs call
Au Canada pour tout [e service ou tes pi_ces "" 1-800-665-4455
For the repair or replacement parts you need:
Call 6 am - 11 pm CST, 7 days a week
PartsDirect
1-800-366-PART
(i-80o-366-7278)
Para ordenar piezas con entrega a domicilio -- 1-800-659-7084
For the location of a Sears Parts and Repair Center in your area:
Call 24 hours a day, 7 days a week
1-800-488-1222
For information on purchasing a Sears Maintenance Agreement
or to inquire about an existing Agreement:
Call 9 am - 5 pro, Monday - Saturday
1-800-827-6655
SEARS