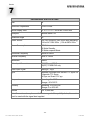
1
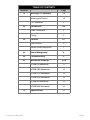
Solutions for Demanding Applications
VarTech Systems Inc.
Industrial CRT and Flat Panel Displays
VT20B
20” Auto Sync Color Monitor 30-64kHz
For Models:
VT20B-C2 · VT20B-CB2 · VT20B-CF2
VT20B-CH2 · VT20B-R2 · VT20B-RN2
User’s Guide
Read these instructions completely before attempting to operate your new Color Display.
20” Fast Scan User Guide
150-030
TABLE OF CONTENTS
Sections
1.0
Page
Warning FCC Statement
1-3
Warning and Caution
1-2
FCC Statement
2.0
3.0
4-5
Video Connectors
4
Timing
5
Controls
6-7
User Controls
6
Screen Control Definitions
7
4.0
Power Management
8
5.0
Troubleshooting
9
6.0
Mechanical Drawings
10-16
VT20B-C2 Mechanical
11
VT20B-CB2 Mechanical
12
VT20B-CF2 Mechanical
13
VT20B-CH2 Mechanical
14
VT20B-R2 Mechanical
15
VT20B-RN2 Mechanical
16
Specifications
17
7.0
20” Fast Scan User Guide
Connections
3
150-030
Section
1
WARNINGS and FCC Statement
WARNING
TO PREVENT FIRE OR SHOCK HAZARD, DO NOT EXPOSE THIS MONITOR TO RAIN OR
MOISTURE.
“HIGH VOLTAGE EXISTS ON THE CATHODE-RAY TUBE ANODE
LEAD OF THIS MONITOR. BEFORE SERVICING, DETERMINE THE PRESENCE OF HIGH
VOLTAGE BY CONNECTING THE H.V. METER BETWEEN THE ANODE OF CRT CAP AND
CHASSIS ONLY.”
CAUTION
1. Keep monitor away from excessive dust, high temperature, moisture or direct sunlight.
2. Use in well ventilated area and do not cover ventilation openings.
3. Unauthorized modifications of this equipment or substitution or attachment of not shielded
connecting cable may cause excessive interference.
4. When the monitor is not in use for a long time, turn off power switch.
RISK OF ELECTRIC SHOCK!
DO NOT OPEN!
WARRANTY VOID IF CASING
IS REMOVED.
CAUTION: To reduce the risk of electric shock, do not remove cover (or back).
No user serviceable parts inside. Refer servicing to qualified technician.
-120” Fast Scan User Guide
150-030
IMPORTANT SAFETY INSTRUCTIONS
Prior to using this product, please ensure that you have carefully followed all the procedures outlined in the
user’s manual for this product.
1.
2.
3.
4.
Read all of these instructions.
Save these instructions for later use.
Follow all warnings and instructions marked on the product.
Unplug this product from the wall outlet before cleaning. Do not use liquid cleaners or aerosol cleaners.
Use a damp cloth for cleaning.
5. Do not use this product near water.
6. Do not place this product on an unstable cart, stand or table. The product may fall causing serious
damage to the product.
7. Slots and openings in the cabinet and the back or bottom are provided for ventilation; to ensure reliable
operation of the product and to protect it from overheating, those openings must not be blocked or
covered. The openings should never be blocked by placing the product on a bed, sofa, rug, or other
similar surface. This product should never be placed near or over a radiator or heat register. This product
should not be placed in a built-in installation unless proper ventilation is provided.
8. This product should be operated from the type of power source indicated on the marketing label. If you
are not sure of the type of power available, consult your dealer or local power company.
9. This product is equipped with a 3-wire grounding type plug, a plug having a third (grounding) pin. This
plug will only fit into a grounding-type power outlet. This is a safety feature. If you are unable to insert the
plug into the outlet, contact your electrician to replace your obsolete outlet. Do not defeat the purpose of
grounding -type plug.
10. Do not allow anything to rest on the power cord. Do not locate this product where persons will walk on the
cord.
11. If an extension cord is used with this product, make sure that the total of the ampere ratings on the
products plugged into the extension cord do not exceed the extension cord ampere rating. Also, make
sure that the total of all products plugged into the wall outlet does not exceed 15 amperes.
12. Never push objects of any kind into this product through cabinet slots as they may touch dangerous
voltage points or short out parts that could result in a risk of fire or electric shock. Never spill liquid of any
kind on the product.
13. Do not attempt to service this product yourself, as opening or removing covers may expose you to
dangerous voltage points or other risks. Refer all servicing to service personnel.
14. Unplug this product from the wall outlet and refer servicing to qualified service personnel under the
following conditions:
A. When the power cord or plug is damaged or frayed.
B. If liquid has been spilled into the product.
C. If the product has been exposed to rain or water.
D. If the product does not operate normally when the operating instructions are followed.
Adjust only those controls that are covered by the operating instructions since improper
adjustment of other controls may result in damage and will often require extensive work by
a qualified technician to restore the product to normal operation.
E. If the product has been dropped or the cabinet has been damaged.
F. If the product exhibits a distinct change in performance, indicating a need for service.
-220” Fast Scan User Guide
150-030
Federal Communications Commission Requirements
The equipment has been tested and found to comply with the limits for a Class A digital device,
pursuant to part 15 of FCC rules. These limits are designed to provide reasonable protection
against harmful interference in an industrial installation. This equipment generates, uses and can
radiate radio frequency energy and, if not installed and used in strict accordance with the
instructions, may cause harmful interference to radio communications. However, there is no
guarantee that interference will not occur in a particular installation. If this equipment does cause
harmful interference to radio or television reception, which can be determined by turning the
equipment off and on, the user is encouraged to try to correct the interference by one or more of
the following measure:
- Reorient or relocate the receiving antenna.
- Increase the separation between the equipment and the receiver.
- Connect the equipment into an outlet on a circuit different from
that to which the receiver is connected.
- Consult the dealer or an experienced radio/TV technician for help.
Shielded interconnected cables and shield power cords must be employed with
this equipment to insure compliance with the pertinent RFD emission limits
governing this device.
Changes or modifications not expressly approved by the manufacturer could void the user's
authority to operate the equipment.
Notice of Compliance with Canadian Interference-causing Equipment Regulations
This Class A digital apparatus meets all requirements of the Canadian Interference-Causing
Equipment Regulations.
-320” Fast Scan User Guide
150-030
Section
2
CONNECTORS
15 Pin D CONNECTOR:
This is an industry standard connector providing easy connection
to VGA type video sources.
Pin
Function
Pin
Function
1
1
Red Video In
8
Blue Return
2
Green Video In
9
+5V
3
Blue Video In
10
Ground
4
GND
11
Ground
5
Self Test
12
SDA
6
Red Return
13
Horizontal sync
7
Green Return
14
Vertical sync
15
SCL
15
HD15 Connector
9 Pin D CONNECTOR: VT20B-CH2 only
Pin
Function
Pin
1
Function
1
Red
6
GND
2
Green
7
GND
3
Blue
8
GND
4
H-Sync
9
GND
5
V-Sync
9
CGA/EGA TTL INPUT
VT20B-CH2 Only
DB9 REMOTE CONTROL CABLE: VT20B-CH2 only
Pin
Function
Pin
Function
1
C-POT
6
B-POT
2
Contrast
7
Degauss
3
C-POT
8
Degauss
4
B-POT
9
GND
5
Brightness
-420” Fast Scan User Guide
150-030
Timings
VGA1 640 X 350
VGA2 720 X 400
VGA3 640 X 480
MAC35k
1
2
3
4
Hor. Freq (kHz)
31.468
31.468
31.468
34.975
Vert. Freq. (Hz)
70.09
70.09
59.94
66.62
Dot Clock (MHz)
25.175
28.322
25.175
31.3344
Hor. Total Time
31.778
31.778
31.778
28.59
Hor. Active Time (us)
26.058
26.058
26.058
20.421
Front Porch (us)
0.318
0.318
0.318
2.553
SYNC Pulse Width (us)
3.81
3.81
3.81
2.042
Back Porch (us)
1.589
1.589
1.589
3.574
Border (us)
0.32
0.32
0.32
0
Vert.Total Time (ms)
14.268
14.268
16.683
15.01
Vert. Active Time (ms)
11.504
13.156
15.762
13.723
Front Porch (ms)
0.985
0.159
0.064
0.086
0.06356
0.06356
0.06356
0.086
Back Porch (ms)
1.716
0.889
0.794
1.115
Border (ms)
0.191
0.222
0.254
0
+,-
-,+
-,-
-,-
Mode
SYNC Pulse Width (ms)
SYNC Polarity (H,V)
Timings
MAC 49.7K
VESA 56.5K
64K
5
6
7
Hor.Freq. (KHz)
49.722
56.476
64.02
Vert. Freq. (Hz)
74.543
70.069
60.00
Dot Clock (MHz)
57.28
75.00
110.00
Hor.Total Time (us)
20.112
17.707
15.625
Hor. Active Time (us)
14.525
13.653
11.625
Front Porch (us)
0.559
0.32
0.300
SYNC Pulse Width (us)
1.117
1.813
1.600
Back Porch (us)
3.911
1.920
2.100
0
0
0
Vert. Total Time (ms)
13.415
14.272
16.670
Vert. Active Time (ms)
12.550
13.599
16.000
Front Porch (ms)
0.02
0.053
0.031
SYNC Pulse Width (ms)
0.06
0.106
0.047
Back Porch (ms)
0.784
0.513
0.594
Border (ms)
0
0
0
SYNC Polarity (H,V)
-,-
-,-
+,+
Mode
Border (us)
-5-720” Fast Scan User Guide
150-030
Section
3
CONTROLS
CONTROL LOCATION
NOTE:
VT20B-CF2, VT20B-CH2, VT20B-C2, VT20B-CB2
All controls are located on the rear of the monitor.
VT20B-R2, VT20B-RN2
All controls are located on the front of the monitor.
VarTech
1
2
3
4
OSD (On Screen Display menu) CONTROLS AND ADJUSTMENTS:
There are four switches on the control panel with Key Function:
Feature
Function
1
MENU
Call the Main-Menu OSD
2
SEL
Select different OSD functions
3
UP
Change the setting of the selected OSD function.
4
DOWN
Change the setting of the selected OSD function.
USER CONTROLS
Power control Push the switch
Power indicator
The power LED is green when the display is in normal operation.
Degauss switch
This monitor is equipped with automatic and manual OSD degaussing. Automatic degaussing is
operativewhen the monitor is cold (after being off for approximately 20 minutes). Therefore, if the monitor is
repositioned while it is warm and discoloration is observed, it is important to remember to turn off the monitor
and let it cool. When powering the monitor back on, it will then degauss automatically and discoloration will
disappear. Manual degaussing is operative by selecting the OSD degauss function.
Caution: Please allow a minimum of 20 minutes to elapse between uses of the degauss function.
-620” Fast Scan User Guide
150-030
SCREEN CONTROL DEFINITIONS
Feature
Function
Brightness
To adjust the overall screen intensity
Contrast
To adjust the intensity difference between the video image and the background
display raster
V-center
To adjust the vertical position of the display image
V-size
To adjust the vertical size of the display image
H-phase
To adjust the horizontal position of the display image
H-size
To adjust the horizontal size of the display image
Pincusion
To adjust the bowing of the display image size
Trapezoid
To adjust the size difference between the top and bottom of the display image
Pin balance
To adjust the ratio of the size pincushion adjustments of the display image
Parallel
To adjust the rectangular shape of the display image
Rotation
To adjust the display image tilt
OSD H-position
To adjust the horizontal position of the OSD control
OSD V-position
To adjust the vertical position of the OSD control
OSD timer
To adjust the time duration of the OSD control until it is turned off
Top corner
To adjust the symmetry of the top two display corners
Bottom corner
To adjust the symmetry of the bottom tow display corners
V-focus
To adjust the vertical focus of the display image
H-focus
To adjust the horizontal focus of the display image
V-linearity
To adjust the vertical linearity of the display image
H-linearity
To adjust the horizontal linearity of the display image
Information
To display input video signal specifications
Recall
To recall a previous stored setup
Degauss
To degauss the CRT in order to correct for image purity
R,G,B user color adjust
To adjust the individual color balances
6500K color select
To select the 6500K color balance
9300K color select
To select the 9300K color balance
OSD Exit
To exit the OSD controls
-720” Fast Scan User Guide
150-030
Section
4
POWER MANAGEMENT
POWER MANAGEMENT FUNCTION
The Power Management function, which is controllable through the required software, provides four
distinct power states:
DISPLAY POWER MANAGEMENT SIGNALING (DPMS)
Mode
Function
On
Normal operation; screen stays on. Power LED is green.
Standby
Screen blanks after preset idle time. Power LED of Display is Yellow.
Suspend
Some electronic circuits go off after a preset idle time.
Power LED is Yellow.
Off
Display power is off after preset idle time or when system is powered off.
Power LED is Amber.
Power Consumption
The following is a description of these power states and the power consumed state:
Mode
H-sync
V-sync
Video
Power Consumption
On
Pulse
Pulse
Active
Pw (maximum)
Standby
No pulse
Pulse
Blanked
<30 Watts
Suspend
Pulse
No pulse
Blanked
<30 Watts
Off
No pulse
No pulse
Blanked
<15 Watts
NOTE:
1. The power management function requires TTL horizontal and vertical sync.
2. This monitor is Energy Star compliant when used with a computer equipped with DPMS.
REINITIALIZING POWER
To reactivate a display that had gone inactive under its Power Management function, do one of the
following:
1. If the display has powered off under its Power Management function due to the system unit being
switched off, you must power up the system unit to reactivate the display.
2. If the display has deactivated under its Power Management function due to exceeding a pre-set
idle time, you may reactivate the display by any one of the following:
- press any key on the keyboard
- move the mouse (if so equipped)
- press any segment on the TouchSelect panel (if so equipped).
-11-820” Fast Scan User Guide
150-030
Section
5
TROUBLESHOOTING
In the event that you experience trouble with your Display, check the following items before
contacting Vartech Systems. The most common problems usually involve an incorrectly
configured Video Card or an incorrect connection from the Video Card to the Display. Do not
exceed the maximum refresh rate recommended for the display.
TROUBLESHOOTING GUIDE
Problem
Troubleshooting Tips
No image on display screen
1. Check that power cord of the Display has been
connected securely into wall outlet or grounded
extension cable or strip.
2. Check that power switch of the Display has been
pressed and LED on front of Display is lit.
3. Check that Video (Signal) Cable from the Display has
been securely and correctly connected to the 15-pin
Video Connector on the rear panel of the Computer.
4. Check that Video Card is firmly seated in card slot of
Computer motherboard.
5. Check that the Brightness and/or the Contrast
adjustments of the Display have not been turned down
to minimum levels.
Picture is small or distorted and
Control Buttons will not correct
Colors of image on screen are
abnormal
1. Check that the video signal being input from the Video
Card falls within the frequency range of the Display.
2. Check that Video (Signal) Cable from the Display has
been securely and correctly connected to the 15-pin
Video Connector on the rear panel of the Computer.
3. If you have used an adapter to convert the 15-pin Video
(Signal) Cable Connector from the Display to fit the
connector on the rear of the Computer, check that the
pin assignment of the adapter matches that of the
15-pin Mini D-Sub pin assignment of the Display.
1. Check that a magnetized item is not nearby.
2. Check that Video (Signal) Cable from the Display has
been securely and correctly connected to the 15-pin
Video Connector on the rear panel of the Computer.
3. If you have used an adapter to convert the 15-pin Video
(Signal) Cable Connector from the Display to fit the
connector on the rear of the Computer, check that the
pin assignment of the adapter matches that of the
15-pin Mini D-Sub pin assignment of the Display.
4. Press and release Degauss button on the Display.
-9-
20” Fast Scan User Guide
150-030
Section
7
MOUNTING INSTRUCTIONS
Mechanical Drawings
Model
Description
Page(s)
VT20B-C2
20” Chassis Mount Mechanical Drawing
11
VT20B-CB2
20” Bailey Configured Mechanical Drawing
12
VT20B-CF2
20” Foxboro Configured Mechanical Drawing
13
VT20B-CH2
20” Honeywell Configured Mechanical Drawing
14
VT20B-R2
20” Rack Mount Mechanical Drawing
15
VT20B-RN2
20” NDC Configured Drawing
16
-1020” Fast Scan User Guide
150-030
Section
7
SPECIFICATIONS
ENGINEERING SPECIFICATIONS
Size
20”
Resolution Capabilities
VGA to SXGA
Active Display Area
15.15” x 11.41” / 384.8 mm x 289.8 mm
Phosphor
Medium Short P22
Deflection Angle
90º
Power Source
120 VAC 60Hz/220 VAC 50Hz (auto switching)
2.0A at AC 120V 60Hz | 1.0A at 220V 50Hz
Power Consumption
130 Watts
30 Watts Standby
15 Watts suspend Mode
Horizontal Frequency
30kHz to 64kHz
Vertical Frequency
50Hz to 120Hz
Bandwidth
65MHz
Video Input Connector
HD15(F) and 5BNC
D9(CF) VT20B-CH2 only
Video Input Signal
Analog 0.7 Vp-p
Sync
Separate Horizontal and Vertical TTL Syncs Or
Composite TTL Syncs
Or Sync on Green 0.3V p-p
Temperature
Operating: 0 to 50ºC
Storage: -20 t0 60ºC
Humidity
Operating: 10 to 90% NC
Storage: 5 to 95% NC
Altitude
0 to 10,000 feet
Note: For continued compliance with Electromagnetic Compatibility limits, this monitor
must be used with the signal lead supplied.
-1720” Fast Scan User Guide
150-030
VARTECH SYSTEMS INC.
HEADQUARTERS
11529 Sun Belt Ct.
Baton Rouge, Louisiana 70809
Toll-Free: 800.223.8050
International Phone: 001.225.298.0300
Fax: 225.297.2440
E-mail: [email protected]
www.vartechsystems.com
20” Fast Scan User Guide
150-030-008
3.1.04
150-030