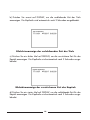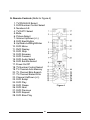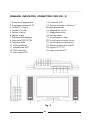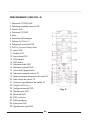
1
D900
TRAGBARER FERNSEHER MIT 9“ LCD-DISPLAY
PORTABLE TV WITH 9“ LCD-DISPLAY
TV PORTATILE CON DISPLAY LCD DA 9”
BEDIENUNGSANLEITUNG/GARANTIEURKUNDE
OWNER´S MANUAL/WARRANTY CARD
MANUALE DELL´UTENTE/SCHEDA DI GARANZIA
3
39
69
INDEX
Einleitung
Wichtige Warn- und Sicherheitshinweise
Lieferumfang
Installation im Haus
Installation im Auto
Bedienelemente
Fernbedienung
DVD-Player
- Tastenfunktionen
- Menü
- Display
S.
S.
S.
S.
S.
S.
S.
5
5
12
12
13
14
15
Wiedergabe von Audio-CDs
SETUP
- Systemeinstellungen
- Passwort
- Präferenzenmenü
S. 22
Wiedergabe von MP3 Discs
Gerätebedienung
Wiedergabe von TV-Programmen
Verwenden von Videospielen & Kopfhörern
Unterstützung von Heimkino
Technische Daten
Garantiebedingungen, Garantiekarte
S. 33
S. 35
S. 36
S. 37
S. 37
S. 38
S. 69
S. 16
S. 17
S. 17
S. 25
S. 28
S. 29
ACHTUNG:
Ein LCD-Display bzw. Videomonitor, der im Sichtfeld des Fahrers im
Fahrzeuginnern angebracht wird, dient vorrangig zum Anzeigen von
Fahrzeugdaten, zur Systemsteuerung, zur Beobachtung des seitlichen und rückwärtigen Verkehrs als auch zur Navigation. Soll zudem der Empfang von
Fernsehprogrammen oder das Abspielen von Videofilmen oder DVDs
ermöglicht werden, so muss das Display bzw. der Monitor so geschaltet sein,
dass diese Zusatzfunktion nur während des Parkens oder bei angezogener
Handbremse zur Verfügung steht.
Sofern ein LCD-Display oder Videomonitor auch während der Fahrt oder bei
nicht angezogener Handbremse für den Empfang von Fernsehprogrammen
sowie das Abspielen von Videokassetten bzw. DVDs gedacht ist, muss das
Gerät im Fahrzeuginnenraum an einer Stelle angebracht werden, an der es die
Sicht des Fahrers weder direkt noch indirekt behindert.
4
EINLEITUNG
Vielen Dank, dass Sie sich für den D900 von Audiovox entschieden haben.
Dieser 9” LCD TV/Monitor und DVD/MP3/CD Player ist auf dem neuesten
Stand der Technik. Er ist dafür gedacht, Ihnen und Ihrer Familie viele Jahre
Freude zu bereiten und Sie unterwegs in den vollen Genuss der Videounter–
haltung bringen. Der D900 ist kompakt und leicht zu installieren, so dass Sie
ihn überall hin mitnehmen können.
Lesen Sie die folgenden Anweisungen bitte aufmerksam durch, um sich mit dem
Produkt vertraut zu machen und Ihr Gerät optimal zu nutzen.
VORSICHTSMAßNAHMEN UND WARNHINWEISE
1. ANLEITUNG LESEN - Vor der Inbetriebnahme des D900 lesen Sie sich bitte
die Bedienungsanleitung sorgfältig durch.
2. ANLEITUNG AUFBEWAHREN - Bitte bewahren sie die Bedienungsanleitung
für spätere Verwendungszwecke auf.
3. BITTE BEACHTEN - Alle Warnhinweise in der Bedienungsanleitung und auf
dem Gerät müssen genau eingehalten werden.
4. BITTE BEFOLGEN - Allen Gebrauchs- und Installationsanweisungen muß
Folge geleistet werden.
5. REINIGUNG - Stellen Sie sicher, dass das Gerät nicht an eine Stromquelle
angeschlossen ist. Bitte benutzen Sie keine flüssigen Reinigungsmittel oder Sprays. Verwenden Sie zum Reinigen der Gehäuseaußenseite
ein mit Wasser angefeuchtetes Tuch.
6. ZUBEHÖR - Bitte benutzen Sie nur Zubehör, das vom Hersteller empfohlenen
wird. Es ist möglich das anderes Zubehör eine Gefahr verursacht.
7. AUFSTELLUNG - Bitte stellen Sie das Gerät nie auf einen instabilen Wagen,
Ständer, Dreifuß, Tisch oder auf auf einer nicht befestigten Konsole ab, damit
5
es nicht herunterfallen und Personen verletzen kann oder zerstört wird.
Benutzen Sie nur Halterungen, die vom Hersteller empfohlen oder mitgeliefert
werden. Jegliche Aufstellung dieses Gerätes sollte gemäß der mitgelieferten
Bedienungsanleitung erfolgen.
8. HITZE - Setzen Sie den D900 keiner Wärmequelle aus, wie z.B. starken
Magnetfeldern, Wärmequellen, Feuer, direktem Sonnenlicht oder anderen
Produkten, die Hitze erzeugen (Verstärker).
9. WASSER – Bitte Halten Sie das Gerät fern von Wasser, bringen Sie es z.B.
nicht in die Nähe von Badewannen, Waschbecken, Abwaschbecken,
Waschbecken, Schwimmbad oder stellen Sie es nicht auf einen nassen
Untergrund.
10. GERÄTEÖFFNUNG – Führen Sie keine Gegenstände durch die
Geräteöffnung ein, und gießen oder sprühen Sie keinerlei Flüssigkeit in das
Gerät, da dies zu Stromschlägen und Bränden führen kann.
1 1. BELÜFTUNG- Sorgen Sie stets dafür, dass das Gerät immer gut belüftet ist
und die Lüftungsschlitze nicht verdeckt sind. Die Schlitze, die Rückseite und der
Boden des Gerätes sind für die Belüftung vorgesehen. Um einen sicheren
Betrieb des Gerätes zu gewährleisten und es vor Überhitzung zu schützen, sollten die Lüftungsschlitze nicht bedeckt oder blockiert sein. Bitte halten Sie einen
Mindestabstand zur Lüftung von 10 cm. Die Geräteöffnungen sollten niemals
durch eine Platzierung auf einem Bett, auf dem Boden oder ähnlichem blockiert
sein. Diese Gerät sollte nur dann z.B. in einem Bücherregal eingebaut werden,
wenn für eine ausreichende Belüftung gesorgt ist.
12. ERDUNG ODER POLARISIERUNG - In manchen Ländern wird dieses Gerät
mit einem Netzkabel ausgeliefert, das über einen Stecker mit zwei unterschiedlich breiten Zungen verfügt. Dieser Stecker kann daher nur auf eine Weise korrekt in die Steckdose gesteckt werden, was als Sicherheitsfunktion dient. Falls
Sie den Stecker nicht gleich sofort vollständig in die Steckdose schieben können, so drehen ihn um. Passt der Stecker auch dann noch nicht in die
Steckdose, lassen Sie diese von einem Elektriker austauschen. Nehmen Sie
keine Veränderungen an einem solchen Sicherheitsstecker vor.
6
13. SCHUTZ DES NETZKABELS - Spannungsversorgungskabel sollten stets so
verlegt werden, dass sie nicht durch abgestellte Gegenstände abgeklemmt werden und dass keine Personen darauf treten. Besonders zu beachtende
Kabelstellen sind hierbei jene am Stecker, an Steckerleisten und am Anschluss
zum Gerät.
14. STROMQUELLEN - Dieses Gerät darf nie mit einer anderen als auf der
Rückseite angegebenen Stromquelle betrieben werden. Falls Ihnen die Daten
Ihres heimischen Stromnetzes nicht genau bekannt sind, wenden Sie sich an
Ihren Händler oder den örtlichen Energieversorger.
15. BLITZSCHLAG - Aus Sicherheitsgründen sollten Sie bei Gewittern oder
während längerer Zeiträume, in denen das Gerät unbenutzt bleibt, den
Netzstecker herausziehen und die Verbindung zur Antennenanlage oder zum
Kabelanschluss trennen. Dies vermeidet mögliche Geräteschäden durch
Blitzeinschläge oder Spannungsspitzen.
16. STROMLEITUNGEN - Eine Außenantennenanlage darf nie in unmittelbarer Nähe zu Hochspannungsleitungen oder anderen elektrischen Leitungen
angebracht werden. Daher muss beim Installieren einer Außenantennenanlage
diesbezüglich besondere Vorsicht walten, da bei Berührung mit derartigen
Stromleitungen höchste Lebensgefahr besteht.
17. ÜBERLASTUNG - Überlasten Sie keine Wandsteckdosen, Verlängerungskabel oder Steckerleisten, da dies die Gefahr von Bränden und Stromschlägen
mit sich bringt.
18. REPERATUR BEI BESCHÄDIGUNG - Ziehen Sie den Netzstecker aus der
Steckdose und lassen Sie nötige Reparatur- oder Wartungsarbeiten von qualifiziertem Servicepersonal durchführen, wenn einer der folgenden Fälle vorliegt:
a. Das Netzkabel oder der Netzstecker ist beschädigt.
b. Flüssigkeit oder ein Fremdkörper ist in das Geräteinnere eingedrungen.
c. Das Gerät war Regen oder Nässe ausgesetzt.
d. Das Gerät arbeitet trotz Einhaltung der Bedienungsanweisungen nicht ordnungsgemäß. Nehmen Sie lediglich die in den Bedienungsanweisungen
erläuterten Geräteeinstellungen vor. Andernfalls könnte es zu beträchtlichen
7
Funktionsstörungen kommen, die sich nur durch umfangreiche Neujustierungen
von qualifiziertem Fachpersonal beheben lassen.
e. Das Gerät ist heruntergefallen oder wurde anderweitig beschädigt.
f. Das weist Gerät einen deutlich erkennbaren Leistungsabfall auf - auch dies
deutet auf eine notwendige Wartung oder Reparatur hin.
19. ERSATZTEILE - Verlangen Sie vom Servicetechniker, dass er bei Reparaturen
ausschließlich Ersatzteile verwendet, wie sie vom Hersteller spezifiziert wurden
oder zumindest dieselben Kenndaten wie die Originalteile aufweisen.
Zuwiderhandlungen können zu Bränden, Stromschlägen und anderweitigen
Schäden führen.
20. SICHERHERHEITSPRÜFUNG - Fordern Sie den Servicetechniker auf, nach
Beendigung von Wartungs- und Reparaturarbeiten das Gerät auf seine einwandfreie Funktion hin zu testen.
21. ACHTUNG - Bei unsachgerechtem Austausch der Batterie besteht
Explosionsgefahr. Wechseln Sie die Batterie nur gegen eine Batterie identischen
oder kompatiblen Typs aus.
22. WICHTIGER HINWEIS zur Verwendung von Videospielen, Computern,
Schrifteinblendungen und anderen Standbildanzeigen
Die übermäßige Verwendung von Standbildern kann auf Dauer so genannte
Schattenbilder verursachen, die dann bei normalen Programmen als schemenhafte Hintergrundgrundbilder sichtbar sind. Diese Art der Bildverschlechterung
ist unumkehrbar, kann jedoch durch Beachtung folgender Punkte weitgehend
vermieden werden:
a. Stellen Sie Helligkeit und Kontrast auf möglichst niedrige Stufen ein.
b. Lassen Sie keine Standbilder über längere Zeiträume anzeigen.
c. Schalten Sie das Gerät bei Nichtgebrauch ab.
23. RECYCLING - Dieses Gerät enthält im Innern Lötzinn und verfügt über eine
Lampe, die eine geringe Menge an Quecksilber enthält. Diese Stoffe müssen
ggf. gemäß örtlicher Umweltverordnungen fachgerecht entsorgt werden.
Weitere Informationen bezüglich Entsorgung und Recycling erhalten bei Ihren
Gemeindebehörden oder bei der Electronics Industries Alliance unter
http://www.eiae.org/.
8
VORSICHT!
NICHT ÖFFNEN!
STROMSCHLAGGEFAHR!
VORSICHT: Zur Vermeidung von Stromschlägen das
Gehäuse nicht öffnen. Reparatur und Wartung des
Geräteinneren nur durch geschultes Personal.
Dieses Dreieck mit Blitz weist den Benutzer darauf hin, dass Innenbauteile unter Spannung stehen und bei unsachgemäßem Umgang die
Gefahr von Stromschlägen besteht.
Dieses Dreieck mit Ausrufezeichen weist den Benutzer darauf hin, dass
wichtige Bedienungs- und Wartungsanweisungen mitgeliefert werden.
25. INFORMATION ZU FCC-BESTIMMUNGEN
Dieses Gerät wurde getestet und entspricht den Bestimmungen für TVEmpfangsgeräte nach Teil 15 der FCC-Bestimmungen. Die vorgeschriebenen
Grenzwerte bieten angemessenen Schutz vor Funkstörungen beim Betrieb des
Geräts in einer Wohngegend. Das Gerät erzeugt und nutzt
Hochfrequenzenergie und kann diese abstrahlen und den Funkverkehr stören,
wenn es nicht anweisungsgemäß installiert und betrieben wird. Sofern das
Gerät von Empfangsstörungen betroffen ist oder selbst verursacht (lässt sich
durch wiederholtes Ein- und Abschalten des Geräts feststellen), kann der
Benutzer die Störung eventuell durch eine oder mehrere der folgenden
Maßnahmen beseitigen:
1.
2.
3.
4.
TV-Antenne neu ausrichten oder versetzen.
Abstand zwischen TV-Gerät und anderen Geräten vergrößern.
TV-Gerät an eine andere Steckdose schließen.
Händler oder erfahrenen Radio/Fernsehtechniker kontaktieren.
9
FCC-Hinweis: Jede Veränderung oder jeder Umbau des Geräts, die/der
nicht ausdrücklich von einem technischen Prüfungsamt zugelassen wird, kann
zu einem Erlöschen der Betriebserlaubnis für das Gerät führen.
26. INSTALLATION
a. EINBAUSTELLE FÜR EMPFÄNGER – Wählen Sie eine Stelle, die eine gute
Sicht bietet. Achten Sie darauf, dass kein Sonnenlicht oder künstliches Licht
direkt auf den Bildschirm strahlen kann. Verschiedene Arten von
Leuchtstofflampen können die Reichweite der Fernbedienung verringern. Damit
keine inneren Gerätekomponenten Schaden nehmen, muss zum einen eine ausreichende Belüftung gegeben sein und zum anderen darf das Gerät nicht in der
Nähe starker Wärmequellen betrieben werden. Magnetfelder, die durch
benachbarte Geräte erzeugt werden, können die Bildqualität herabsetzen.
b. VERWENDETE KABEL – Die Verbindung der Gerätekomponenten zueinander sollte nach Möglichkeit mit abgeschirmten Video- und Audiokabeln
erfolgen. Die beste Geräteleistung wird mit abgeschirmten 75-OhmKoaxialantennenkabeln erzielt. Erforderliche Kabel sind bei Ihrem Händler
oder in Elektronikfachgeschäften erhältlich. Vor dem Kauf müssen Sie sich vergewissern, welche Arten von Anschlussverbindungen für Ihre einzelnen
Gerätekomponenten notwendig sind. Bestimmen Sie zudem auch die nötige
Kabellänge.
c. OPTIMALE BILDQUALITÄT – Schalten Sie die Leuchtstofflampe am LCDBildschirm aus und platzieren Sie das Gerät so, dass kein Außenlicht darauf
fällt.
10
27. DVD - Dieses Gerät besitzt ein Laser System. Um zu eine angemessene Handhabung zu gewährleisten, lesen Sie sich bitte die dazugehörige Bedienungsanleitung durch. Bitte öffnen Sie nie das Gehäuse, um
nicht der Laser Strahlung ausgesetzt zu sein. Diese kann durch unerlaubtes Öffnen des Gehäuses oder durch Zerstörung der Arretierungen austreten. Bitte schauen Sie nie in die Laserstrahlen.
Durch falsche oder eigenmächtige Handhabung kann es zu gefährlichen
Strahleneinwirkungen kommen.
28. REGION EINSTELLUNGEN - Dieser DVD Player entspricht dem
REGIO CODE 2. DVDs die einen anderen Regio Code besitzen können
leider nicht von diesem Gerät abgespielt werden.
Batterie Entsorgung:
Bitte führen Sie das Gerät am Ende seiner
Lebensdauer den zur Verfügung stehenden
Rückgabe- und Sammelsystemen zu.
11
LIEFERUMFANG
1. D900 Fernseher/DVD/CD/MP3-Player mit abnehmbaren Lautsprechern
2. Fernbedienung
3. Steckernetzteil
4. Zigarettenanzünder DC Adapter
5. Tragetasche
6. Bedienungsanleitung
7. RCA AV Anschlusskabel
INSTALLATION IM HAUS (Abbildung 1)
Platzieren Sie das Gerät auf einem Tisch oder einer sonstigen stabilen,
glatten Oberfläche, indem Sie den Metallfuß, der auf der Rückseite befestigt ist öffnen. Stecken Sie das Ende des Steckernetzteils in den DC 12V
Eingang, der sich auf der rechten Seite des Gerätes befindet, schließen
Sie erst dann das Steckernetzteil in Ihre 240V Steckdose.
Abbildung 1
12
INSTALLATION IM AUTO (Abbildung 2)
1) Nehmen Sie einen der mitgelieferten Haltegurte der Tragetasche und verbinden Sie den Karabinerhaken mit einem oberen Metallring der Tasche.
Verbinden Sie nun den „S“-Haken mit dem anderen oberen Metallring und
platzieren Sie die Schlaufe über der Kopstütze. Stellen Sie den Gurt so ein, dass
die Tasche sicher befestigt ist.
2) Nehmen Sie nun die anderen Haltegurte und verbinden Sie die
Karabinerhaken mit einem der unteren Metallringe. Die „S“-Haken verbinden
Sie mit den Sitzbefestigungen links und rechts. Danach ziehen sie die Gurte
fest.
3) Stellen Sie den Gurte so ein, dass die Tasche sicher befestigt ist.
4) Stecken Sie das eine Ende des Zigarettenadapters in den 12V Anschluß des
Gerätes, dann stecken Sie den Adapter in Ihren Zigarettenanzünder.
13
BEDIENELEMENTE (Abbildung 3)
1. Power An/Aus
2. TV Auto Program
3. TV Channel Down
4. TV Channel Up
5. Volume Down
6. Volume Up
7. Picture Select
8. DVD/TV/AV Switch
9. Bildschirmmodus
10. DVD Previous
11. DVD Play
12. DVD Next13. DVD Stop
14. DVD Eject
15. IR Kopfhörer Sensor
/Fernbedienungssensor
16. Linker Lautsprecher
17. Rechter Lautsprecher
18. Kopfhörer Eingang
19. Video Ausgang/ Eingang
20. Linker Audio Ausgang/ Eingang
21. Rechter Audio Ausgang/ Eingang
22. AV Eingang/Ausgang Auswahl
23. DC 12V Eingang
24. TV Antennen Eingang
Abbildung 3
14
FERNBEDIENUNG (Abbildung 4)
1. TV/DVD/AUX Select
2. DVD Number Control Select
3. Zahlen 0-9
4. TV/CATV Select
5. Stummschaltung
6. Picture Select
7. Lautstärke (+/-)
8. DVD Eject Taste
9. Up/Down-Left/Right/Enter
10. DVD Menu
11. DVD Display
12. DVD Stop
13. DVD Reverse
14. DVD Forward
15. DVD Audio Auswahl
16. DVD Untertitel Auswahl
17. Power An/Aus
18. TV Nummer Kontroll Auswahl
19. TV Kanal Auto Memory
20. TV Kanal Skip Search
21. TV Kanal Erase Write
22. Kanal Up/Down (+/-)
23. DVD Setup
24. DVD Play
25. DVD Pause
26. DVD Next
27. DVD Previous
28. DVD Repeat
29. DVD Slow Play
Abbildung 4
15
DVD PLAYER
1. TASTENFUNKTIONEN
POWER
EJECT
PLAY
PAUSE
STOP
NEXT
PREVIOUS
FORWARD SCAN
REVERSE SCAN
SLOW
UP/DOWN/LEFT/RIGHT
ENTER
NUMBERS
MENU
SUBTITLE
AUDIO
DISPLAY
SETUP
Ein- und Ausschalten des Gerätes
Auswerfen und Laden der Disc
Wiedergabe
Standbild
(1x) am aktuellen Wiedergabepunkt stoppen
(2x) die Wiedergabe stoppen
Während der Wiedergabe zum nächsten Kapitel
(Titel bzw. Szene) wechseln
Während der Wiedergabe zum vorherigen Kapitel
(Titel bzw. Szene) wechseln
Vorwärts suchen, mit einer 2-,4-,8-,16- oder
32-fachen Geschwindigkeit
Rückwärts suchen, mit einer 2-4-,8-,16- oder
32-fachen Geschwindigkeit
Wiedergabe mit 1/2, 1/4, 1/8 oder 1/16
Geschwindigkeit
Menünavigation
Option der Einstellung ausführen
Passworteingabe
Hauptmenü der Disc anzeigen
Gewünschte Sprache für die Untertitel auswählen und Untertitel und aktivieren/deaktivieren
Gewünschte Sprache auswählen
Informationen (Titel, Kapitel, Zeiten, usw.) anzeigen
Setup-Menü zur Auswahl der verschiedenen
Optionen und Setup-Menü verlassen.
16
2. MENU
Eine DVD ist in mehrere Abschnitte unterteilt, die als „Titel“ oder „Kapitel“
bezeichnet werden. Beim Starten der DVD-Wiedergabe, wird auf dem
Bildschirm Ihres Fernsehers oder Monitors das Hauptmenü der Disc angezeigt.
Der Inhalt dieses Menüs hängt von der Disc ab. Drücken Sie während der
Wiedergabe auf MENU, um das Menü anzuzeigen, und anschließend auf
ENTER oder PLAY, um mit der Wiedergabe zu beginnen. Bei einigen DVDs
können Sie die Wiedergabeoptionen der Disc nur über das DVD-Menü
auswählen.
3. DISPLAY (Der Inhalt der Anzeige hängt von der Disc ab.)
1) VERSTRICHENEUND VERBLEIBENDE ZEIT
a) Drücken Sie während der Wiedergabe auf DISPLAY, um die aktuelle
Titelnummer (1), die Gesamtanzahl der Titel (2), die aktuelle Kapitelnummer
(3), die Gesamtanzahl der Kapitel (4) und die Wiedergabezeit des Titels (5)
anzuzeigen. Wird drei Sekunden keine Taste gedrückt, wird die Kopfzeile
automatisch ausgeblendet.
Bildschirmanzeige von Titel, Kapitelnummer und Zeiten
17
b) Drücken Sie erneut auf DISPLAY, um die verbleibende Zeit des Titels
anzuzeigen. Die Kopfzeile wird automatisch nach 3 Sekunden ausgeblendet.
Bildschirmanzeige der verbleibenden Zeit des Titels
c) Drücken Sie ein drittes Mal auf DISPLAY, um die verstrichene Zeit für das
Kapitel anzuzeigen. Die Kopfzeile wird automatisch nach 3 Sekunden ausgeblendet.
Bildschirmanzeige der verstrichenen Zeit des Kapitels
d) Drücken Sie ein viertes Mal auf DISPLAY, um die verbleibende Zeit für das
Kapitel anzuzeigen. Die Kopfzeile wird automatisch nach 3 Sekunden ausgeblendet.
18
Bildschirmanzeige der verbleibenden Zeit des Kapitels
2) UNTERTITEL
Drücken Sie während der Wiedergabe auf SUBTITLE, um die gewünschte*
Sprache der Untertitel auszuwählen. Angezeigt werden die Nummer der
aktuellen Sprache (1) und die Gesamtanzahl der verfügbaren Sprachen (2).
Wenn mehrere Sprachen verfügbar sind, drücken Sie erneut auf SUBTITLE, um
eine andere Sprache für den Untertitel auszuwählen. Um die Anzeige von
Untertiteln zu deaktivieren, drücken Sie so lange auf SUBTITLE, bis UNTERTITEL AUS angezeigt wird. Der Untertitel wird automatisch ausgeblendet, wenn
die Taste SUBTITLE nicht innerhalb von 3 Sekunden erneut gedrückt wird.
Bildschirmanzeige für Untertitel
*Bei einigen DVDs kann die Einstellung nur über das DVD-Menü geändert
werden.
19
3) AUDIO
Drücken Sie während der Wiedergabe auf AUDIO, um die gewünschte*
Sprache auszuwählen. Angezeigt werden die aktuelle Audiokanal-Nummer
(1) und die Gesamtanzahl der Audiokanäle (2). Wenn Sie eine andere Sprache
auswählen möchten, drücken Sie erneut auf AUDIO. Die Audio-Anzeige wird
automatisch ausgeblendet, wenn die Taste AUDIO nicht innerhalb von 3
Sekunden erneut gedrückt wird.
Bildschirmanzeige für Sprachen
4) REPEAT
a) Drücken Sie während der Wiedergabe einmal auf REPEAT, um das aktuelle
Kapitel erneut wiederzugeben.
Bildschirmanzeige für die Kapitelwiederholung
b) Drücken Sie während der Wiedergabe ein zweites Mal auf REPEAT, um den
aktuellen Titel erneut wiederzugeben.
20
Bildschirmanzeige für die
Aktivierung der Titelwiederholung
c) Drücken Sie während der Wiedergabe ein drittes Mal auf REPEAT, um
alle Kapitel und Titel zu wiederholen.
Bildschirmanzeige für die
Aktivierung der Titelwiederholung
d) Drücken Sie die Taste REPEAT ein viertes Mal, um die normale Wiedergabe
fortzusetzen. Die Anzeige REPEAT ALL wird automatisch ausgeblendet, wenn
die Taste REPEAT nicht innerhalb von 3 Sekunden erneut gedrückt wird.
Bildschirmanzeige für die Deaktivierung der Wiederholung
21
4. WIEDERGABE VON AUDIO-CDS
Drücken Sie während der Wiedergabe einer Audio-CD auf der
Fernbedienung die Taste DISPLAY, um die DISPLAY-Kopfzeile anzuzeigen. In
den folgenden Abbildungen werden die Optionen angezeigt, die nach
Drücken der Taste DISPLAY auf dem Bildschirm angezeigt werden.
a) Drücken Sie während der Wiedergabe einmal auf DISPLAY.
Anschließend wird AKTUELL ABGELAUFEN zusammen mit dem derzeit
wiedergegebenen Track und der Wiedergabezeit des Tracks angezeigt.
Bildschirmanzeige AKTUELL ABGELAUFEN
b) Drücken Sie ein zweites Mal auf DISPLAY. Anschließend wird AKTUELL
VERBLEIBEND zusammen mit dem derzeit wiedergegebenen Track und der
hierfür verbleibenden Wiedergabezeit angezeigt.
Bildschirmanzeige AKTUELL VERBLEIBEND
22
c) Drücken Sie ein drittes Mal auf DISPLAY. Anschließend wird GESAMT
ABGELAUFEN zusammen mit dem derzeit wiedergegebenen Track und der
gesamten Wiedergabezeit angezeigt.
Bildschirmanzeige GESAMT ABGELAUFEN
Drücken Sie ein viertes Mal auf DISPLAY. Anschließend wird GESAMT
VERBLEIBEND zusammen mit dem derzeit wiedergegebenen Track und der
verbleibenden Wiedergabezeit der CD angezeigt.
Bildschirmanzeige GESAMT VERBLEIBEND
d) Drücken Sie ein fünftes Mal auf DISPLAY. Daraufhin wird kurz DISPLAY
OFF angezeigt. Die CD-Zeitinformationen werden ausgeblendet.
23
e) Verwenden der Funktion REPEAT
Der Standardmodus der REPEAT-Funktion ist OFF. Wenn Sie mehrmals hintereinander auf REPEAT drücken, ändern sich die Optionen dieser Funktion:
– TRACK- wiederholt den derzeit wiedergegebenen Track
– ALL- wiederholt die derzeit wiedergegebene Disc.
– OFF- Wiederholung aus
Beim Durchblättern der Optionen ändert sich die Funktionsweise entsprechend.
Die ausgewählte Option wird wiederholt, bis Sie sie abschalten.
24
SETUP
Drücken Sie auf SETUP, um den Hauptbildschirm des Menüs SETUP aufzurufen. Durch nochmaliges Drücken der Taste SETUP verlassen Sie das SetupMenü.
1) SYSTEMEINSTELLUNGEN
Wählen Sie mit den LEFT/RIGHT-Tasten die Option SYSTEMEINSTELLUNGEN aus, und drücken Sie anschließend auf ENTER, um den
Bildschirm SYSTEMEINSTELLUNGEN aufzurufen.
a) Wählen Sie mit Hilfe der UP- oder DOWN-Taste TV FORMAT aus, und
drücken Sie anschließend auf die RIGHT-Taste, um ins Untermenü zu gelangen. Wählen Sie den TV-Anzeigemodus auf dem Bildschirm mit den Tasten
UP/DOWN aus und drücken Sie auf ENTER, um die Einstellung zu bestätigen. Drücken Sie auf die LEFT-Taste, um zurückzukehren.
* NORMAL/PS: Wenn der Player an einem normalen Fernseher
angeschlossen ist und ein Breitbild im Vollbildschirmmodus angezeigt wird.
* NORMAL/LB: Wenn der Player an einem normalen Fernseher
angeschlossen ist und auf dem Bildschirm ein Breitbild mit schwarzen
Balken am oberen und unteren Bildschirmrand angezeigt wird.
* BREITBILD: Wenn der Player an einem Breitbildschirm-Fernseher
angeschlossen ist und ein Breitbild im Vollbildschirmmodus angezeigt wird.
25
b) Wählen Sie mit Hilfe der UP/DOWN-Taste TV Type aus, und drücken
Sie anschließend auf die RIGHT-Taste, um ins Untermenü zu gelangen.
Wählen Sie bei TV TYPE mit den Tasten UP/DOWN die Option PAL für
Europa aus.
*NTSC - gilt für Amerika
c) Wählen Sie mit Hilfe der UP/DOWN-Taste OSD SPRACHE aus, und
drücken Sie anschließend auf die RIGHT-Taste, um ins Untermenü zu
gelangen. Wählen Sie bei OSD SPRACHE mit den Tasten UP/DOWN
die entsprechende Sprache aus, und drücken Sie anschließend auf
ENTER, um die Einstellung zu bestätigen. Drücken Sie auf die LEFT-Taste,
um zurückzukehren.
26
d) Wählen Sie mit der UP/DOWN-Taste die Option BILDSCHIRMSCHONER aus.
* EIN: Bildschirmschoner aktiviert.
* AUS: Bildschirmschoner deaktiviert.
*Hinweis: Verbleibt ein Standbild 5 Minuten auf dem Bildschirm, schaltet der DVD-Player auf den Bildschirmschonermodus um.
Zum Verlassen der Seite SYSTEMEINSTELLUNGEN drücken Sie auf die Taste
SETUP.
27
2) PASSWORT
Wählen Sie mit den LEFT/RIGHT-Tasten die Option PASSWORT aus und
drücken anschließend auf ENTER, um zur Passwortänderung die Seite
PASSWORT EINSTELLUNGEN aufzurufen.
a) Drücken Sie die RIGHT-Taste, um in das Untermenü für die
Passwortänderung zu gelangen.
Geben Sie das alte (PASSWORT ALT) oder das vorgegebene Passwort, das
neue (PASSWORT NEU) und das neue Passwort zur Bestätigung (PW
BESTÄTIGEN) ein. Drücken Sie auf ENTER, um die Änderung zu bestätigen
Hinweis: Das vorgegebene Passwort lautet 3308. Dieses Passwort bleibt
auch nach Eingabe eines eigenen Passworts und nach der
Passwortänderung gültig. Damit es nicht von anderen Personen verwendet
werden kann, um die Stufen für den Jugendschutz einzustellen und das
Passwort zu ändern, können Sie das vorgegebene Passwort an einer
anderen Stelle notieren und aus dieser Anleitung entfernen. Bei verschiedenen Discs ist es möglich, deren Benutzung anhand der Vergabe eines
Passworts je nach Alter des Benutzers einzuschränken.
28
3) PRÄFERENZEN MENÜ
Wenn im Player keine Disc eingelegt ist, wählen Sie mit den LEFT/RIGHTTasten die Option PRÄFERENZEN-MENÜ aus und drücken anschließend auf
ENTER, um die Seite der Voreinstellungen aufzurufen.
a) Wählen Sie mit Hilfe der UP/DOWN-Taste TON aus, und drücken Sie
anschließend auf die RIGHT-Taste, um ins Untermenü zu gelangen. Wählen
Sie mit den Tasten UP/DOWN die gewünschte Sprache aus, und drücken
Sie anschließend auf ENTER, um die Einstellung zu bestätigen. Drücken Sie
auf die LEFT-Taste, um zurückzukehren.
29
b) Wählen Sie mit der UP/DOWN-Taste UNTERTITEL aus, und drücken Sie
anschießend auf die RIGHT-Taste, um ins Untermenü zu gelangen. Wählen
Sie mit den Tasten UP/DOWN die Sprache des Untertitels aus und drücken
Sie anschließend auf ENTER, um die Einstellung zu bestätigen. Drücken Sie
auf die LEFT-Taste, um zurückzukehren.
c) Wählen Sie mit der UP/DOWN-Taste DISK MENÜ aus, und drücken Sie
anschließend auf die RIGHT-Taste, um ins Untermenü zu gelangen. Wählen
Sie mit den Tasten UP/DOWN die Sprache des Disk-Menüs aus und drücken Sie anschließend auf ENTER, um die Einstellung zu bestätigen. Drücken
Sie auf die LEFT-Taste, um zurückzukehren.
Hinweis: Die Sprache für Wiedergabe und Untertitel können nur bei Discs ausgewählt werden, die in den oben aufgeführten Sprachen aufgezeichnet wurden. Ist
die ausgewählte Sprache nicht verfügbar, erfolgt Wiedergabe und Anzeige der
Untertitel nur in der Originalsprache, die auf der Disc enthalten ist.
30
d) Wählen Sie mit der UP/DOWN-Taste ERWACHSENE aus, und drücken
Sie anschließend auf die RIGHT-Taste, um ins Untermenü zu
gelangen.Wählen Sie mit den Tasten UP/DOWN den gewünschten
Jugendschutz für Discs mit einer Sperrfunktion und mehreren
Einstellungsstufen aus. Die Stufen sind nach ihrem niedrigsten Wert (1 Kind)
bis zu ihrem höchsten Wert (8 Erwachsene) aufgeführt.
Hinweis: Stufe 8 (Erwachsene) entspricht der Standardeinstellung.
Geben Sie ein 4-stelliges Passwort ein, und drücken Sie anschließend auf
ENTER, um die Einstellungsstufe des Jugendschutzes zu bestätigen.
Hinweis: Das Passwort ist werkseitig auf 3308 eingestellt
Wenn Sie die Einstellungen zum Kinderschutz geändert haben, erscheint die
Passwort - Bildschirmdarstellung. Geben Sie nun das vierstellige Passwort
ein und drücken Sie ENTER.
31
*Hinweis: Wenn Sie nun eine DVD einlegen, die nicht mit den
Kinderschutz - Einstellungen übereinstimmt, erscheint folgendes im Display.
Die DVD wird erst nach Eingabe des Passworts abgespielt.
Um den Kinderschutz zu deaktivieren, wählen Sie mit den LEFT/RIGHT
Tasten YES aus und bestätigen diese Eingabe mit ENTER.
Bitte geben Sie nun das vierstellige Passwort ein, um die DVD abzuspielen.
e) Wählen Sie mit der UP/DOWN-Taste VOREINSTELLUNG aus, und
drücken Sie anschließend auf die RIGHT-Taste, um ins Untermenü zu gelangen. Wenn Sie in den werkseitig eingestellten Modus zurückkehren möchten, drücken Sie auf ENTER.
Hinweis: Die Standardfunktion hat keine Auswirkung auf die Einstellung
für den Jugendschutz
32
WIEDERGABE VON MP3-DISCS
MP3 ist ein digitales Audio-Format. Ein Song mit der Qualität einer AudioCD kann im MP3-Format komprimiert werden, um weniger Platz in
Anspruch zu nehmen. Der Qualitätsverlust ist dabei nur sehr gering. Das
System kann CD-R/RW-Disc, die im MP3-Format aufgenommen wurden,
wiedergeben.
Wiedergabearten:
FOLDER (normale Wiedergabe)
SINGLE
REPEAT ONE (Wiederholen der Wiedergabe eines Songs)
REPEAT FOLDER (Wiederholen der Wiedergabe eines bestimmten
Ordners)
Wenn Sie eine MP3 CD einlegen, initialisiert der DVD-Video-Player die Disc
und zeigt anschließend das Ordnerverzeichnis auf dem Monitor an.
Legen Sie eine MP3-Disc in das Gerät ein, wird der Bildschirm MENU
automatisch angezeigt. In diesem Bildschirm können Sie die Ordner und
Songs ändern. Ansonsten gibt das System die Songs in der Reihenfolge
wieder, in der sie auf die CD gebrannt wurden.
33
1. Wählen Sie mit der Taste oder einen Ordner in der Ordnerliste auf
der linken Seite des Bildschirms aus.
2. Drücken Sie ENTER, um die Auswahl des markierten Ordners zu bestätigen. Die in diesem Ordner vorhandenen Songs werden auf der rechten
Seite des Bildschirms angezeigt.
3. Wählen Sie mit der Taste oder einen Song aus der Liste aus.
Drücken Sie ENTER, um die Auswahl zu bestätigen und die Wiedergabe zu
starten.
Überspringen von Songs
Drücken Sie die Taste (NEXT), um zum nächsten Song zu wechseln.
Drücken Sie auf die Taste (PREVIOUS), um zum Anfang des vorhergehenden Titels zu springen.
Verwenden der Funktion REPEAT
Der Standardmodus der REPEAT-Funktion ist OFF. Wenn Sie mehrmals hintereinander auf REPEAT drücken, ändern sich die Optionen dieser Funktion:
–
–
–
–
SINGLE
REPEAT ONE
REPEAT FOLDER
FOLDER
Drücken Sie ein fünftes Mal auf REPEAT, wird die normale Wiedergabe
wieder fortgesetzt. Beim Durchblättern der Optionen ändert sich die
Funktionsweise entsprechend. Die ausgewählte Option wird wiederholt, bis
Sie sie abschalten.
34
Achtung
- In der linken Spalte der oberen Abbildung sind die Ordnernamen aufgelistet. In der rechten Spalte werden dagegen die Songtitel und Unterordner
aufgeführt.
- Wenn das Zeichen eines Ordners vor einem Dateinamen eingeblendet ist,
handelt es sich um einen Ordner und nicht um eine MP3-Datei.
- Wenn “MP3“ vor einem Dateinamen eingeblendet ist, handelt es sich um
eine Datei im MP3-Format. Während der MP3-Wiedergabe können Sie
weder den Wiedergabemodus verändern noch auf Ordner oder Songs
zugreifen.
- Namen von Ordnern oder Songs dürfen maximal aus 11 Zeichen bestehen.
GERÄTEBEDIENUNG
1. Drücken Sie POWER um das Gerät an- bzw. auszuschalten. Die POWER
LED leuchtet rot während der Inbetriebnahme. Das Gerät übernimmt automatisch die letzten Einstellungen.
2. Um in den gewünschten Modus zu gelangen drücken Sie DVD/TV/AUX.
Wenn Sie zwischen den verschiedenen Modi wechseln, fährt der DVDPlayer durch seine Memory Funktion mit der Wiedergabe, der letzten Szene
fort.
3. Für die Lautstärkeregelung benutzen Sie bitte die VOLUME UP/DOWN
Taste. Mithilfe dieser Tasten regulieren Sie ebenso die Bildeinstellungen im
PICTURE Modus.
4. Durch Betätigen der PICTURE Taste, erscheinen im Display Balken für die
Einstellung von KONTRAST, HELLIGKEIT, FARBE, SCHÄRFE, SYSTEM, SPRACHE, RÜCKRUF, die Sie mit den VOLUME UP/DOWN Tasten erhöhen/
mindern können. Die Balken werden nach kurzer Zeit wieder ausgeblendet.
5. Drücken Sie MUTE um den Ton direkt auszuschalten, wenn Sie diese Taste
erneut drücken wird der Ton in der vorherigen Lautstärke wiedergegeben.
35
Sie können den Ton auch mit der VOLUME DOWN Taste ausschalten.
WIEDERGABE VON TV-PROGRAMMEN
1.Verbinden Sie das Antennenkoaxialkabel mit der Antenneneingangsbuchse des D900.
2. Sobald das System mit Strom versorgt wird und der TV-Modus ausgewählt ist, drücken Sie auf die Taste TV/CATV der Fernbedienung. Hiermit
wählen Sie im OSD-Bildschirmmenü den normalen 69-Kanal-TV-Empfang
und den S41-Kanal-Kabel-TV-Empfang (Standard, HRC und IRC) aus.
Hinweis: Bei Ihrem Kabel-TV-Anbieter können Sie erfahren, welcher
Kabel-TV-Standard verwendet wird.
3. Wenn Sie auf die Taste AUTO MEMORY drücken, werden alle TV- und
CATV-Kanäle gesucht und deren Frequenz eingestellt. Bei ausreichend starkem Signal werden sie automatisch gespeichert.
4. Mit der Taste SKIP/SEARCH wechseln Sie zwischen den beiden Modi
SKIP und SEARCH. Im SKIP-Modus werden bei Drücken der Auf- und
Abwärtstasten für die Senderwahl nur die TV-Kanäle aufgerufen, die
gespeichert wurden. Ist der SKIP-Modus deaktiviert (SEARCH-Modus), werden dagegen alle verfügbaren TV-Kanäle aufgerufen.
36
VERWENDEN VON VIDEO-SPIELEN
Verbinden Sie den AV-Ausgang Ihrer Spielekonsole mit der Buchse AV IN
seitlich am Gerät. Verwenden Sie das mitgelieferte AV-Kabel und stecken
Sie die farbcodierten Stecker in die entsprechenden Anschlüsse: gelb
(Video) auf gelb, weiß (Audio links) auf weiß und rot (Audio rechts) auf rot.
Wählen Sie den AV-Modus aus und stellen Sie die Lautstärke und
Bildqualität nach eigenem Wunsch ein.
VERWENDEN VON KOPFHÖRERN
1. Bei diesem Gerätesystem können drahtlose HiFi-Kopfhörer verwendet
werden. Legen Sie einfach Batterien in den Drahtlos-Kopfhörer ein und
schalten Sie ihn ein. Sorgen Sie dafür, dass ein freies Sichtfeld zwischen
dem IR-Sensor des Gerätes zum IR-Sensor des Kopfhörers gegeben ist.
2. Bei diesem Gerätesystem können auch HiFi-Kopfhörer mit Kabel verwendet werden. Schließen Sie den Kopfhörer an beide Kopfhörerbuchsen auf
der linken Seite des Geräts an. Wenn der Kopfhörer an die Buchsen angeschlossen ist, werden beide internen Lautsprecher abgeschaltet.
UNTERSTÜTZUNG VON HEIM-KINO
Schließen Sie die Stecker entsprechend ihrer Farben an die DVD-Buchsen
auf der linken Seite des Geräts an: gelb (Video) auf gelb, weiß (Audio
links) auf weiß und rot (Audio rechts) auf rot.
37
TECHNISCHE DATEN
DISPLAY:
Auflösung
Sichtwinkel
Kontrastverhältnis
Helligkeit
Hintergrundbeleuchtung/
Lebensdauer
Disc-Format
Fernsehnorm
Bildschirm
Bildschirmgröße
Fernbedienung
Antenne
Kanäle
640 x220
Horizontal: 60°,
Vertikal: 50° nach oben
60° nach unten
300:1 (Max.)
300 Cd/m 2 (Max.)
min. 10.000 Stunden
DVD/CD/MP3
NTSC/ PAL
LCD
9 Zoll
Infrarot
Externe Antenne
2-4 (VHF), 5-12 (VHF),
21-69 (UHF), S1-S41 (CATV)
Audioausgang
2W
Frequenzgang
DVD (PCM 96 kHz/24 Bit ):
20 Hz bis 44 kHz
DVD (PCM 48 kHz): 20 Hz bis 22 kHz
CD: 20 Hz bis 20 kHz
Leistungsaufnahme
12 V Gleichstrom, 1,7 A
Stromquelle
10V-240V bei 50/60 Hz
Luftfeuchtigkeit der Betriebsumgebung 10 ~ 75%
Betriebstemperatur
+5 bis +40 °C
Lagertemperatur
-15 bis +60 °C
ABMESSUNGEN:
B x H x T (mit Lautsprechern) 364 x 180 x 60 mm
B x H x T (ohne Lautsprecher) 268 x 180 x 60 mm
Gewicht
1,8 kg
38
CONTENTS
Introduction
p. 41
Cautions and Warnings
p. 41
Contents
p. 48
Indoor Installation
p. 48
Car Installation
p. 49
Remote Control
p. 51
DVD-Player
p. 52
System Operation
p. 66
Watching TV
p. 66
Playing a Video Game
p. 67
Use Headphones
p. 67
Support Home TV
p. 67
Support External Speaker
p. 67
Specifications
p. 68
Guarentee conditions, warranty card
p. 69
Notice:
An LCD panel and/or video monitor may be installed in a motor vehicle
and visible to the driver if the LCD panel or video monitor is used for
vehicle information, system control, rear or side observation or navigation. If the LCD panel or video monitor is used for television reception,
video or DVD play, the LCD panel or video monitor must be installed so
that these features will only function when the vehicle is in “park” or
when the vehicle’s parking brake is applied.
An LCD panel or video monitor used for television reception, video or
DVD play that operates when the vehicle is in gear or when the parking
brake is not applied must be installed to the rear of the driver’s seat
where it will not be visible, directly or indirectly, to the operator of the
motor vehicle.
40
A. Introduction
Congratulation for selecting this multi-media system, which
features a 9” LCD TV/Monitor and DVD/MP3/CD Player. It
utilizes the latest state of the art electronics and is designed for
use in home, offices, hotels and vehicles. The unit is compact
so that you can take it with you anywhere and is designed for
easy installation. Please read all the instructions in this manual
to assure proper installation and best equipment performance.
B. Cautions and Warnings
1. Read Instructions — All the safety and operating instructions should be read before the product is operated.
2. Retain Instructions – The safety and operating instructions
should be retained for future reference.
3. Heed Warnings – All Warnings on the product and in the
operation instructions should be adhered to.
4. Follow Instructions – All Operating and user instructions
should be followed.
5. Cleaning – Unplug this product from the wall outlet before
cleaning. DO NOT use liquid cleaners or aerosol cleaners.
Use damp cloth for cleaning.
6. Attachments – DO NOT use attachments not recommended
by the product manufacturer they may cause hazards.
7. Mounting – DO NOT place this product on an unstable cart,
stand, tripod, bracket, or table. The product may fall, causing
serious injury to a child or adult, and serious damage to the
product. Use only with a cart, stand, tripod, bracket, or table
recommended by the manufacturer or sold with the product.
Any mounting of this product should follow the manufacture’s
instructions, and should use a mounting accessory recommended by the manufacturer.
8. Heat – The Product should be situated away from any
source, such as radiators, heat registers, stoves or other
products (including amplifiers) that produce heat.
41
9. Water – DO NOT use this product near water. For example,
avoid placing it near a bathtub, washbowl, kitchen sink, or
laundry tub, in a wet basement, or near a swimming pool,
etc…
10. Cabinet Slots – NEVER push objects or any kind into the
unit through the cabinet slots as they may touch dangerous
voltage points or short out parts that could result in a fire or
electric shock. NEVER spill liquid of any kind on the product.
11. Ventilation – DO NOT block any ventilation openings.
Install in accordance with manufacturer’s instructions. Slots
and openings in the cabinet and the back and bottom are
provided for ventilation, and to ensure reliable operation of
the product and to protect it from overheating. These openings must NOT be blocked or covered. There should be at
least 10cm of space from these openings. The openings
should never be blocked by placing the unit on a bed, rug or
other similar surface. This product should NOT be placed in
a built-in installation such as a bookcase unless proper
ventilation is provided.
12. Grounding or Polarization – This product may be
equipped with a polarized alternating current line plug (a
plug having one blade wider then the other). This plug will fit
the power outlet only one way. This is a safety feature. If
you are unable to insert the plug fully into the outlet, try reversing the plug. If the plug should still fail to fit, contact your
electrician to replace your obsolete outlet. DO NOT defeat
the safety purpose of the polarized plug.
13. Power – Cord Protection – Power supply cords should
be routed so that they are not likely to be walked on or
pinched by items placed upon or against them. Pay particular attention to cords at plugs, convenience receptacles, and
the point where they exit from the product.
42
14. Power Sources – This product should be operated only
from the type of power source indicated on the rear panel. If
you are not sure of the type of power supply to your home
consult your product dealer or local power company.
15. Lightning – For added protection for this product during a
lightning storm, or when it is left unattended and unused for
a long period of time, unplug it from the outlet and disconnect the antenna or cable system. This will prevent damage
to the product due to lightning and power-line surges.
16. Power Lines – An outside antenna system should not be
located in the vicinity of overhead power lines or other
electric light or power circuits, or where it can fall into such
power lines or circuits. When installing an outside antenna
system, extreme care should be taken to keep from touching such power lines or circuits as contact with them might
be fatal.
17. Overload – DO NOT overload wall outlets, extension cords
or integral convenience receptacles as this can result in a
risk of fire or electric shock.
18. Damages Requiring Service – Unplug this product from
the wall outlet and refer servicing to qualified service personnel under the following conditions.
a. When the power-supply cord or plug is damaged.
b. If liquid has been spilled, or objects have fallen into the
product.
c. If the product has been exposed to rain or water.
d. If the product does not operate normally after following the
operating instructions. Adjust only those controls that are
covered by the operating instructions as an improper
adjustment of other controls may result in damage and will
often require extensive work by a qualified technician to
restore the product to its normal operation.
e. If the product has been dropped or damaged in any way.
f. When the product exhibits a distinct change in performance – this indicates a need for service.
43
19. Replacement parts – When replacement parts are
required, be sure the service technician has used replacement parts specified by the manufacturer or have the same
characteristics as the original part. UNAUTHORIZED
substitution may result in fire, electric shock or other hazards.
20. Safety Check – Upon completion of any service or repair
to this product, ask the service technician to perform safety
checks to determine that the product is in proper operating
condition.
21. CAUTION – There is a danger of explosion if the battery is
incorrectly replaced. Replace only with the same or equivalent type.
22. Important Information Regarding Use of Video Games,
Computer, Captions or other Fixed Image Displays.
The extended use of a fixed image program material can
cause permanent “Shadow Image” on the LCD Panel. The
Background image is viewable on normal programs in the
form of a stationary fixed image. This type of irreversible
LCD panel deterioration can be limited by observing the
following steps:
a. Reduce the brightness/contrast setting to a minimum
viewing level.
b. DO NOT display the fixed image for extended periods of
time.
c. Turn the power off when not in actual use.
23. Recycling – This product utilizes tin-lead solder, and
has a fluorescent lamp containing a small amount of mercury. Disposal of these materials may be regulated in your
community due to environmental considerations. For disposal or recycling information please contact your local
authorities, or the Electronics Industries Alliance: http://
www.eiae.org/
44
24. Safety Caution
The Lightning flash with the arrowhead symbol within an
equilateral triangle is intended to alert the user to the presence of uninsulated “DANGEROUS VOLTAGE” within the
product’s enclosure that may be of sufficient magnitude to
constitute a risk or electric shock to persons.
The Exclamation point within an equilateral triangle is
intended to alert the user to the presence of important
operating and maintenance (servicing instructions in the
literature accompanying the product).
25. Federal Communication Commission Information
(FCC)
This Equipment has been tested and found to comply with
the limits for a TV Broadcast Receiver, pursuant to Part
15 of the FCC Rules. These limits are designed to provide
reasonable protection against harmful interference in a
residential installation. This equipment generates, uses and
can radiate radio frequency energy and, if not installed and
used in accordance with the instructions, may cause harmful
interference to radio communications. If this equipment
does cause or receive interference, which can be deter
mined by turning equipment off and on, the user is encouraged to try to correct the interference by one of the following
measures:
45
1. Reorient or relocate the TV antenna
2. Increase the separation between TV and other
equipment.
3. Connect TV into separate outlet from equipment.
4. Consult the dealer or an experienced radio/TV
technician for help
FCC Caution: Any changes or modifications not expressly approved by the party responsible for compliance could void the
user’s authority to operate this equipment
26. INSTALLATION
a. Receiver Location – Locate for comfortable viewing.
Avoid placing where sunlight or other bright light will fall
on the screen. Use of some types of florescent lighting
can reduce remote control transmitter range.
Adequate ventilation is essential to prevent internal component failure. Keep away from areas of excessive heat.
To ensure optimum picture quality do not position magnetic equipment nearby.
b. Cable Equipment – The Video/Audio connection between components can be made with shielded video and
audio cable. For best performance, antenna cables
should utilize 75 Ohm coaxial shielded wire. Cables are
available from your dealer or electronic supply store.
Before you purchase any cables, be sure you know what
type of output and input connectors your various components require. Also determine the length of cable you’ll
need.
c. Optimum Quality picture – Turn off florescent lamps
near the LCD and place in a location not exposed to
outdoor light.
46
27. DVD CAUTION: This unit employs a laser system. To ensure the proper
use of the unit, read this manual carefully and keep it for future reference. To
prevent direct exposure to the laser radiation, do not open the cabinet. Invisible
laser radiation could be present when the cabinet is opened or the interlocks
are defeated. DO NOT stare into the laser beams. Use of any controls, adjustments, or procedures other than those specified herein may result in hazardous
radiation exposure!
Region Management Information – This Player is designed to respond
to the Region Management Information recorded on DVDs, The region number
of this player is “2”. If the region number described on the DVD does not correspond to the region number of this player, this player cannot play this disc.
Battery disposal:
At the end of the product´s useful life, please dispose of
it at appropriate collection points provided in your
country.
47
C. Contents
1. TV /DVD Combination Unit with Speakers
2. Remote Control
3. AC to DC Adapter
4. Cig. Lighter Adapter
5. Storage Bag and Mounting Bag w/Mounting Straps
6. Owner ’s Manual
7. RCA AV Cable connector
D. Indoor Installation (Refer to Figure 1)
Swing up the rear metal stand and place the unit on a table or
other level surface. Plug one end of the AC to DC adapter into
the DC 12V input on the right side of the main unit, then plug the
other end into the 110V - 240V AC power receptacle.
Figure 1
48
E. Car Installation
Between two seats (Refer to Figure 2)
Figure 2
1. Take one of the supplied straps from the storage bag and
connect the latch to the top metal ring on the mounting bag.
Wrap the strap around the base of one the headrests. Attach
the “S” hook to the same top metal ring. Repeat this process
for the other side (Passenger Seat).
2. Take another strap and connect the latch to the lower metal
ring on the back of the bag. Attach the “S” hook to the same
ring after looping the strap around the rail located beneath
the seat track. Avoid moving parts of the seat mechanism.
Repeat this process for the other side. In some vehicles, it
may be necessary to attach the “S” connector to the rail
directly, as it may not be long enough to reach back to the
ring.
3. Adjust all the straps tightly so that the bag is secure.
4. Plug one end of the cigarette lighter adapter into the DC 12V
input; then plug the other end into the cigarette lighter socket.
49
F. Controls/Indicators/Connectors
1. Power On/Off
2. TV Auto Program
3. TV Channel Down
4. TV Channel Up
5. Volume Down
6. Volume Up
7. Picture Select
8. DVD/TV/AV Switch
9. Wide Select
10. DVD Previous
11. DVD Play
12. DVD Next
13. DVD Stop
1
POWER
2 3 4
PROG.
CHANNEL
(Refer to Figure 3)
14. DVD Eject
15. IR Headphone Sensor
/Remote Sensor
16. Left Speaker
17. Right Speaker
18. Headphone Input
19. Video Output/Input
20. Left Audio Output/Input
21. Right Audio Output/Input
22. AV Input/Output Select
23. DC 12V Input
24. TV Antenna Input
5
6
VOLUME
7 8 9
PICTURE TV/AV
WIDE
PREW
PLAY
10
11
NEXT
STOP
EJECT
12
13
14
18
19
20
21
22
23
24
16
15
50
17
G. Remote Controls (Refer to Figure 4)
1. TV/DVD/AUX Select
2. DVD Number Control Select
3. Numbers 0-9
4. TV/CATV Select
5. Mute
6. Picture Select
7. Volume Up/Down (+/-)
8. DVD Eject Button
9. Up/Down-Left/Right/Enter
10. DVD Menu
11. DVD Display
12. DVD Stop
13. DVD Reverse
14. DVD Forward
15. DVD Audio Select
16. DVD Subtitle Select
17. Power On/Off
18. TV Number Control Select
19. TV Channel Auto Memory
20. TV Channel Skip Search
21. TV Channel Erase Write
22. Channel Up/Down (+/-)
23. DVD Setup
24. DVD Play
25. DVD Pause
26. DVD Next
27. DVD Previous
28. DVD Repeat
29. DVD Slow Play
51
Figure 4
H. DVD Player
1. Basic Operation
POWER
EJECT
PLAY
PAUSE
STOP
NEXT
PREVIOUS
FORWARD SCAN
REVERSE SCAN
SLOW
UP/DOWN/LEFT/RIGHT
ENTER
NUMBERS
MENU
SUBTITLE
AUDIO
DISPLAY
SETUP
Turn the unit ON or OFF
Eject and withdraw the disc
Resume play mode
Go into the standby mode
(1 time) Stops at the present playing
point / (2 times) Stops playing
Go to the next chapter, track or scene
during playback
Go back to the preceding chapter,
track or scene during playback
Scan forward at 2, 4, 6, or 8 times normal
speed
Scan backward at 2, 4, 6, or 8 times normal
speed
Play at 1/2, 1/4, or 1/8 times speed
For Navigating the Setup Menu
Execute item or setting
For entering a password
Display the root menu of the DISC
Select the subtitle language and turn it on/off
Select the audio language
Display information about the DISC
Display the setup menu
52
2. Menu
A DVD is divided into sections called title and chapter. When you
play a DVD, a root menu of the disc will appear on the screen of
your TV or Monitor. The contents of the menu vary from disc to
disc. Press MENU during playing to display the menu, and press
ENTER or PLAY to start playing. Some DVDs allow you to select
disc playback options using the DVD menu.
3. Display (The contents vary from disc to disc.)
1) Playing time and remaining time
a. During playback press DISPLAY to display the current title
number (1), the total number of titles (2), the current chapter
number (3), the total number of chapters (4), and the playing
time for the title (5). The heading will disappear automatically
in about 3 seconds.
b. Press DISPLAY again to display the remaining time for the
title. The heading will disappear automatically in about 3
seconds.
53
c. Press DISPLAY the 3rd time to display the elapsed time for
the chapter. The heading will disappear automatically in
about 3 seconds.
d. Press DISPLAY the 4th time to display the remaining time for
the chapter. The heading will disappear automatically in about
3 seconds.
Press DISPLAY the 5th time to exit.
2) Subtitle
During play press SUBTITLE to select the subtitle language you
desire, with the current subtitle language number (1) and the
total number of subtitle languages (2) displayed. If there are
multiple languages press SUBTITLE again to select another subtitle language. To turn subtitles off, press the subtitle button until
SUBTITLE OFF is displayed. The subtitle display will disappear
automatically if the SUBTITLE button isn’t pressed again for 3
seconds.
54
3) Audio
During playback, press AUDIO to select the audio language you
desire, with the current audio channel number (1) and the total
number of audio channels (2) displayed. Press AUDIO again to
select another audio language. The audio display will disappear
automatically if the AUDIO button isn’t pressed again for 3 seconds.
4) Repeat
a. During playback, press REPEAT to repeatedly play the current chapter.
55
b. During playback, press REPEAT again to repeatedly play the
current title.
c. During playback, press REPEAT again to repeat ALL chapters and titles.
d. During playback, press REPEAT a 4th time to cancel the repeated playing (REPEAT OFF) and resume normal playback.
The repeat display will disappear automatically if the REPEAT button isn’t pressed again for 3 seconds.
56
4. Playing Audio CDs
When playing an audio CD press the DISPLAY button on the remote
to view time information. The options below show you what
information is available using this function.
a. The current track and playing time of that track will be displayed
on the screen.
b. Press ‘DISPLAY’ one time and SINGLE REMAIN appears along
with the current track playing and the amount of time left.
c. Press ‘DISPLAY’ two times and TOTAL ELAPSED appears along
with the current track playing and the total time that the CD has
been playing.
57
d. Press ‘DISPLAY’ three times and TOTAL REMAIN appears along with the current track playing and the amount of time remaining on the CD.
e. Press ‘DISPLAY’ four times and “ DISPLAY OFF ” will appear momentarily
then disappear. The CD time Information will not be displayed.
1) Using the Repeat Feature
The default mode for the Repeat Feature is OFF. Pressing REPEAT consecutively changes the repeat options:
• TRACK - repeats the track that is playing.
• ALL - repeats the disc that is playing.
• OFF
As you toggle through the options, the repeat option changes.
The selected repeat option loops repeatedly until you turn it off.
5. Setup
Press SETUP to display the main page of the setup menu on the screen. Press
SETUP again to exit the SETUP menu and the unit will resume ayback or stop
mode.
1) Press ENTER to enter the general setup page.
58
a. Select TV DISPLAY using UP/DOWN, and then press RIGHT to enter the submenu.
Select the TV display mode on the screen using UP/DOWN, and press ENTER to confirm the setting. Press LEFT to return.
* NORMAL/PS: When the player is connected to a normal TV, and a wide picture is
shown on the full screen, with a portion that may be cut off automatically.
* NORMAL/LB: When the player is connected to a normal TV, and a wide picture is
shown on the screen, with black strip at both top and bottom of the screen.
* WIDE: When the player is connected to a wide screen TV, a wide picture is shown on
the full screen.
b. Select TV TYPE using UP/DOWN, and then press RIGHT to enter the submenu. Select
the TV TYPE mode on the screen using UP/DOWN, and press ENTER to confirm the
setting. Press LEFT to RETURN.
*NTSC: Select this option when the DVD player is connected to an NTSC TV.
*PAL: Select this option when tne DVD player is connected to a PAL TV.
Note: This selection is for DVD Output and not the TV Tuner.
Please note the USA uses NTSC Only. Do not change unless you know what you are
doing.
59
c. Select ‘SCREEN SAVER’ using the UP/DOWN buttons,
*ON: enables screen saver
*OFF: disables screen saver (off)
*Note: The DVD player will enter the Screen Saver mode after approximately 5 minutes if the same image remains on the screen.
Note: MP3 playback contains a counter that prevents the screen saver from
activating.
d. Select General Setup Page by pressing the LEFT button.
Press the LEFT button again to Exit Setup Menu; then press ENTER.
e. To change the password, Select PASSWORD using LEFT/ RIGHT and then
press ENTER to enter the Password Setup Page.
Input the old password/ default password, the new password, and the confirmed new password. Press ENTER (OK) to confirm the change.
60
Note: The default password is 3308 and this password is
always effective whether you’ve changed it to another new
one or not, in case that you forget the new password. To
avoid others using it to set the parental level and change
the password, you may note this default password by
other means and delete it from this manual. Some discs
can be limited depending on the age of users while some
discs can not.
2) When there’s no disc inside the player, press SETUP to enter
the General Setup Page; then press the LEFT button twice to select the Preference Page. Then press ENTER to enter the preference page.
a. Select AUDIO using UP/DOWN, and then press RIGHT to enter the submenu. Select the audio language you desire using
UP/DOWN and then press ENTER to confirm the setting.
Press LEFT to return.
b. Select SUBTITLE using UP/DOWN, and then press RIGHT
to enter the submenu. Select the subtitle language or SUBTITLE OFF you desire using UP/DOWN and then press ENTER to confirm the setting. Press LEFT to return.
61
c. Select DISC MENU using UP/DOWN and then press RIGHT
to enter the submenu. Select the disc menu language you desire using UP/DOWN and then press ENTER to confirm the
setting. Press LEFT to return.
Note: Language selection is only available for discs re
corded in the languages listed in the submenus above.
If not, the player will play and display on the screen the
original recorded language contained in the disc.
d. Select PARENTAL using UP/DOWN and then press
RIGHT to enter the submenu.
Select the parental level you desired using UP/DOWN for
discs with lock-out function or multiple rating levels. It’s listed
from the lowest level (1 Child) to the highest level (8 Adult).
62
Press ENTER. If you have changed the parental level, the
PASSWORD page will be displayed; otherwise it will not.
Input the password in 4 digits, and then press ENTER to
confirm the parental level setting.
Note: After inserting the disc in the player, if the parenal setting does not agree with the rating contained on the disc, the disc will not play when
selected on the main menu.
Select YES using LEFT/RIGHT and press ENTER. Then input
your password in 4 digits or the default password.
63
e. Select DEFAULTS using UP/DOWN and then press RIGHT to
enter the submenu. Press ENTER to make the setting return
to the factory-set mode.
Note: Default Reset will not effect the Parental Control.
f. Select General Setup Page using LEFT/RIGHT; then press
LEFT again to enter theExit Setup Menu. Press ENTER to
return to the DVD logo page.
6. PLAYING MP3 DISCS
MP3 is a format for storing digital audio. An audio CD-quality song is
compressed into the MP3 format with very little loss of audio quality
while taking up much less disc space. CD-R /RW discs that have
been encoded in MP3 format are compatible with this system.
Playback modes:
FOLDER (normal playback)
SINGLE
REPEAT ONE (repeat playback of a song)
REPEAT FOLDER (repeat playback of a specific folder)
Insert an MP3 CD, the DVD player will initialize the disc and the directory
(folder) will be shown on the TV screen.
When an MP3 disc is inserted into the unit, the menu screen appears
automatically. You can use the menu screen to change folders and
songs. The system plays the songs in the order they were burned
onto the disc.
64
MENU Screen Display
1. Press the or button to choose a folder from the folder list
on the left side of the screen.
2. Press ENTER to select the highlighted folder. The songs available under the folder will be listed.
3. Press STOP First, use or button to choose a song from
the list. Press ENTER to select and begin playback of the highlighted song.
Use the
( NEXT ) button to move to the next song. Press the
(PREVIOUS) button to move to the beginning of the previous song.
USING THE REPEAT FEATURE
The default mode for the Repeat feature is OFF. Pressing REPEAT
consecutively changes the repeat options:
• SINGLE
• REPEAT ONE
• REPEAT FOLDER
• FOLDER
Pressing REPEAT the 5TH time will resume normal playback. As you
toggle through the options, the repeat option changes. The selected
repeat option loops repeatedly until you turn it off.
NOTICE
“
“ icon in front of a file name indicates that this is a folder, not an
MP3 file.
“MP3” icon in front of a file name indicates that this is a MP3 file.
65
I. System Operation
1. Press POWER to switch the unit on or off. The switch indicator will light red and the unit will go to the mode last used and
stored in memory.
2. Press DVD/TV/AV to select your desired mode. When switching the mode, the DVD player can memorize the present playing point.
3. Press VOLUME UP/DOWN to raise or lower the sound level
Also used to make picture adjustments in the picture select
mode.
4. Each time PICture is pressed, the on screen picture adjustment display cycles through “adjustment bars for VOLUME,
CONTRAST, BRIGHTNESS, COLOR and TINT. Then
use VOLUME UP/DOWN to raise or lower the level. This display will automatically turn off if no adjustments are made within
about 6 seconds, or if any other button is pressed.
5. Press MUTE to cut off all sound; pressing this button again
restores sound to the previously set level. MUTE may also be
released by pressing the VOLUME UP/DOWN.
J. Watching TV
1. Connect the coax cable into the build in antenna socket.
(Refer to Page 48 Item # 24)
2. With power applied to the system and the TV mode selected,
press TV/CATV on the remote control to select the regular 69channel Broadcast TV and the S41-Channel Cable TV (Standard Cable, HRC Cable, and IRC Cable) with on-screen display.
Note:
Please contact your local cable provider to verify what
cable standard you are on.
66
3. Press AUTO MEMORY; all channels in TV or CATV mode are searched and
tuned and the channels with signals detected are automatically stored.
4. SKIP/SEARCH selects between SKIP and SEARCH mode.
In SKIP mode, the TV only stops on channels that are programmed into memory when the CHANNEL UP/DOWN buttons are used. When SKIP mode is off,
the TV will stop on all active channels.
K. Playing a Video Game
Plug the AV output from your game system into the AV IN jack on the front of
the unit. You can use the attached AV cable to convert the 3.5mm AV jack on
the unit to RCA type AV jacks, and match the color-coded jacks to the appropriate plugs: Yellow (VIDEO) to Yellow, white (AUDIO L) to White, and Red
(AUDIO R) to Red. Select the AV mode and adjust the volume/picture control
to individual preference.
L. Use Headphones
1. Wireless IR Hi-Fi headphones may be used with the system.
Simply place batteries in the wireless headphones and power them up. Make
sure there is a clear line of site to the IR Headphone Sensor.
2. Optional wired Hi-Fi headphones may be used with the system. Simply plug
in the headphone to either headphone jack on the front of the unit. When using
the right headphone jack both internal speakers will be turned off.
M. Support Home TV
Match the color-coded plugs to the appropriate DVD outputs in the rear of the
unit: Yellow (VIDEO) to Yellow, White (AUDIO L) to White, and Red (AUDIO R)
to Red.
N. Support External Speaker
Connect the EXT. SPEAKER output to an external speaker.
67
O. Specifications
Display Specs:
Resolution
Viewing Angle
Contrast Ratio
Brightness
Backlight Life
Disc Format
Color System
Screen type
Screen size
Remote Control
Antenna
Channels
Audio output
Frequency response SP
Power Input
AC Power Source
Operating Humidity
Operating Temperature
Storage temperature
Dimensions (W x H x D)
w x h x d (w/Speakers)
w x h x d (w/o Speakers)
Weight
640 x220
Hor: 60 deg., Vert: Top 50 deg.
300:1 2 (Max)
Bottom 60 deg.
300 Cd/m (Max)
10,000 Hrs (Min)
DVD/CD/MP3
NTSC/ PAL
LCD
9 inches
Infrared rays
Ext antenna
2-4 (VHF), 5-12 (VHF),
21-69 (UHF), S1-S41 (CATV)
2W
DVD (PCM 96 kHz/24 bits ):
20 Hz to 44 kHz
DVD (PCM 48 kHz):
20 Hz to 22 kHz
CD: 20 Hz to 20 kHz
DC 12 V, 1.7 A
AC 110V-240V @ 50/60 Hz
10 ~ 75%
41 ~ 104 degrees Fahrenheit
4 ~ 140 degrees Fahrenheit
14.33” x 7.08” x 2.36”
10.55” x 70.8” x 2.36”
4 pounds
68
INDICE
Introduzione
Avvisi ed Avvertenze
p. 71
p. 72
Indice
p. 79
Installazione in ambienti interni
p. 79
Installazione in autovettura
p. 80
Comandi, indicatori, connettori
p. 81
Telecomandi
p. 82
Lettore DVD
p. 83
Riproduzione di CD Audio
p. 89
Configurazione
p. 92
Riproduzione dei dischi con formato MP3
p. 98
Funzionamento del sistema
p. 100
Funzione TV
p. 100
Utilizzo di videogame
p. 101
Utilizzo di auricolari
p. 101
Funzione Home TV supportata
p. 101
Altoparlanti esterni supportati
p. 101
Specifiche
p. 102
Condizioni e scheda di garanzia
p. 103
Avviso:
Un pannello LCD e/o un monitor video può essere installato su un veicolo a motore ed essere visibile dal guidatore se tale pannello o video
monitor vengono utilizzati per mostrare informazioni relative al veicolo,
al sistema di controllo, per l’osservazione laterale o posteriore o per la
navigazione satellitare. Se il pannello LCD o il video monitor sono utilizzati come ricevitori televisivi o per la visione di video o DVD devono
essere installati in modo da funzionare solo a veicolo fermo o quando il
freno di parcheggio è attivato.
Un pannello LCD o un video monitor utilizzati come ricevitori televisivi o
per la visione di video e DVD in grado di funzionare con il veicolo in
moto o non in condizioni di parcheggio devono essere installati alle
spalle del guidatore in posizione tale da non essere visibili nè direttamente nè indirettamente dal posto di guida del veicolo.
70
Introduzione
Congratulazioni per aver scelto questo sistema multimediale che unisce il televisore con
TV/monitor LCD da 9 pollici al lettore DVD/MP3/CD. Questo apparecchio utilizza tecnologie elettroniche di ultima generazione ed è stato ideato per poter essere usato in
casa, in ufficio, in hotel e in auto. L'unità è compatta, in modo da poter essere
trasportata ovunque, ed è stata progettata per essere facilmente installata. Per garantire la corretta installazione e le migliori prestazioni di funzionamento, si consiglia di
leggere tutte le istruzioni contenute nel presente manuale.
71
AVVISI ED AVVERTENZE
1. Lettura delle istruzioni: prima di utilizzare il prodotto, si consiglia di leggere
tutte le istruzioni relative alla sicurezza e all'uso.
2. Conservazione delle istruzioni: conservare le istruzioni relative alla sicurezza e all'uso per successive consultazioni.
3. Attenzione alle avvertenze: attenersi a tutte le avvertenze riportate sul prodotto e nelle istruzioni per l'uso.
4. Rispetto delle istruzioni: è necessario rispettare tutte le istruzioni relative a uso
e funzionamento.
5. Pulizia: prima di eseguire la pulizia del prodotto è consigliabile scollegarlo dalla
presa di alimentazione a muro. NON usare detergenti liquidi o aerosol. Per la pulizia,
usare un panno umido.
6. Accessori: NON usare accessori non raccomandati dal produttore che potrebbero risultare pericolosi.
7. Montaggio: NON posizionare il prodotto su basi instabili (quali carrelli, cavalletti, treppiedi, mensole o altri supporti portatili). Il prodotto potrebbe infatti cadere e
danneggiarsi e/o procurare lesioni gravi a bambini ed adulti. Utilizzare pertanto il
prodotto in abbinamento a carrelli, cavalletti, treppiedi, mensole o altri supporti portatili raccomandati dal produttore o forniti in dotazione. Il montaggio del prodotto deve
essere condotto secondo le istruzioni del produttore e con l'impiego degli appositi
accessori consigliati dal produttore.
8. Calore: posizionare il prodotto lontano da fonti di calore, quali radiatori, diffusori
di aria calda, stufe o altri prodotti (tra cui gli amplificatori) che producono calore.
9. Acqua: NON utilizzare il prodotto in prossimità dell'acqua. Evitare ad esempio di
tenerlo vicino a vasche da bagno, lavandini, lavelli da cucina o tinozze, in scantinati
umidi o in prossimità di una piscina.
72
10. Fessure dell'intelaiatura: NON introdurre oggetti di alcun tipo attraverso le
fessure dell'intelaiatura perché potrebbero toccare punti di tensione pericolosi o cortocircuitare dei componenti, provocando incendi o scosse elettriche. NON versare liquidi di alcun tipo sul prodotto.
11. Aerazione: NON ostruire le aperture di aerazione. Eseguire l'installazione secondo le istruzioni del produttore. Le parti laterali e inferiore dell'intelaiatura sono
dotate di fessure e aperture per garantire l'aerazione e il corretto funzionamento del
prodotto, evitandone il surriscaldamento. Tali aperture NON devono essere ostruite né
coperte. Lasciare almeno uno spazio di 10 cm da tali aperture. Non ostruire le aperture posizionando l'unità su un letto, tappetino o altra superficie simile. NON
posizionare il prodotto in una struttura incassata (quale una libreria), a meno che questa sia dotata di corretta aerazione.
12. Messa a terra o polarizzazione: il prodotto potrebbe essere dotato di una
spina per corrente alternata polarizzata (spina con una lamella superiore all'altra).
Questo tipo di spina può essere inserito nella presa di alimentazione soltanto in un
verso (si tratta di una misura di sicurezza). Se non risulta possibile inserire completamente la spina nella presa, riprovare ribaltando la spina. Se il problema persiste, rivolgersi al proprio elettricista per far sostituire la presa obsoleta. NON sottovalutare l’utilità dei connettori della spina polarizzata per la sicurezza.
13. Protezione dei cavi dell'alimentazione: disporre i cavi dell'alimentazione
in modo che non vengano calpestati o non rimangano impigliati in altri oggetti. Fare
molta attenzione ai cavi in prossimità dei connettori, o di eventuali prese mobili, e in
prossimità dei punti in cui fuoriescono dal prodotto.
14. Fonti di alimentazione: il prodotto deve essere alimentato esclusivamente dal
tipo di corrente indicato nel pannello posteriore. Se non si è certi del tipo di corrente
in uso, rivolgersi al proprio rivenditore del prodotto o alla società erogatrice della corrente.
73
15. Fulmini: per maggiore sicurezza, in caso di temporali o quando l'apparecchio
viene lasciato incustodito o inutilizzato per un periodo prolungato di tempo, scollegare il cavo di alimentazione e il cavo dell'antenna. In questo modo si evitano danni al
prodotto dovuti a fulmini e sovraccarichi di tensione.
16. Linee elettriche: non posizionare l'eventuale antenna esterna in prossimità di
linee elettriche generali o altri circuiti elettrici o di alimentazione. Durante l'installazione di un'antenna esterna, fare molta attenzione a non toccare tali linee di corrente o
circuiti, perché potrebbe essere fatale.
17. Sovraccarico: NON sovraccaricare prese a muro, prolunghe o prese mobili,
onde evitare il rischio di incendi o scosse elettriche.
18. Danni che richiedono assistenza: qualora si verificassero i casi riportati di
seguito, si consiglia di scollegare il prodotto dalla presa a muro e di rivolgersi a personale qualificato per l'assistenza.
a. Quando il cavo di alimentazione o la spina sono rimaste danneggiate.
b. Quando sul prodotto è stato versato accidentalmente del liquido o sono caduti degli
oggetti.
c. Quando il prodotto è rimasto esposto a pioggia o acqua.
d. Quando il prodotto non funziona regolarmente nonostante il rispetto delle relative
istruzioni. Regolare solo i comandi indicati nelle istruzioni per l'uso, in quanto una
regolazione errata degli altri comandi potrebbe procurare dei danni e richiedere un
complesso intervento di riparazione da parte di personale tecnico qualificato.
e. Quando il prodotto è cascato o è rimasto danneggiato.
f. Quando il prodotto funziona in modo insolito e richiede assistenza.
19. Pezzi di ricambio: nel caso in cui occorrano dei pezzi di ricambio, accertarsi che il tecnico dell'assistenza utilizzi pezzi indicati dal produttore o con le stesse caratteristiche degli originali. La sostituzione con pezzi NON AUTORIZZATI può provocare
incendi, scosse elettriche o altri eventi pericolosi.
20. Controllo di sicurezza: una volta terminate le operazioni di assistenza o riparazione, chiedere al tecnico di eseguire un controllo di sicurezza per determinare se il
prodotto funziona regolarmente.
74
21. ATTENZIONE: se la batteria viene sostituita in modo inappropriato, si corre il
rischio di esplosioni. Sostituire la batteria solo con una dello stesso tipo o di tipo equivalente.
22. Informazioni importanti relative all'utilizzo di videogame, computer, sottotitoli e altre visualizzazioni di immagini fisse L'uso prolungato di
materiale con immagini fisse può dare origine sul display LCD all'effetto "Shadow
Image" (Immagine ombra). L'immagine di sfondo è visibile nei consueti programmi in
forma di immagine fissa stazionaria. Questo tipo di deterioramento irreversibile dello
schermo LCD può essere limitato con i seguenti accorgimenti:
a. ridurre al minimo le impostazioni di luminosità/contrasto;
b. NON visualizzare l'immagine fissa per periodi prolungati;
c. togliere la corrente quando l'apparecchio non è in uso.
23. Riciclaggio: il prodotto è composto da elementi in lega saldata a stagno e da
una lampadina a fluorescenza che contiene una minima quantità di mercurio. Tali
materiali devono essere smaltiti nella propria zona di competenza e nel rispetto
dell'ambiente. Per le informazioni relative allo smaltimento e al riciclaggio dei materiali, consultare le autorità locali competenti o l'ente statunitense Electronics Industries
Alliance: http:// www.eiae.org/
75
ATTENZIONE
NON APRIRE! PERICOLO DI
SCOSSELETTRICHE!
ATTENZIONE:
PER RIDURRE IL RISCHIO DI INCENDI O SCOSSE ELETTRICHE NON RIMUOVERE IL COPERCHIO
(O IL PANNELLO POSTERIORE). ALL'INTERNO NON VI SONO COMPONENTI SOSTITUIBILI O
RIPARABILI DALL’UTENTE.PER EVENTUALI OPERAZIONI DI MANUTENZIONE, RIVOLGERSI AL
PERSONALE QUALIFICATO.
Il simbolo con la freccia a forma di fulmine all’interno di un triangolo equilatero segnala
la presenza nel prodotto di “TENSIONE PERICOLOSA” non isolata, di intensità tale da
poter provocare scosse elettriche.
Il simbolo del punto esclamativo all'interno di un triangolo equilatero segnala l'esistenza di importanti informazioni relative al funzionamento e alla manutenzione del prodotto all'interno della relativa documentazione.
25. Informazioni della Federal Communication Commission (FCC)
Questo apparecchio è stato sottoposto a test affinché sia conforme ai limiti di un ricevitore televisivo ai sensi della sezione 15 delle norme FCC. Tali limiti garantiscono una
forma ragionevole di protezione contro le interferenze nocive in ambienti residenziali.
L'apparecchio genera, utilizza e può irradiare energia in radiofrequenza; pertanto, se
non è stato installato e utilizzato secondo le istruzioni, può provocare interferenze dannose per le comunicazioni radiofoniche. Se l'apparecchio causa o riceve interferenze
determinabili spegnendolo e riaccendendolo, si consiglia di risolvere il problema in
uno dei seguenti modi:
1. orientare diversamente o spostare l'antenna TV;
2. aumentare la distanza tra TV e altri apparecchi;
3. collegare la TV a una presa diversa da quella utilizzata per gli altri apparecchi;
4. rivolgersi al proprio rivenditore o a un tecnico per radio e TV.
76
Avvertenza FCC: qualunque cambiamento o modifica condotto senza il consenso
della casa produttrice potrebbe impedire all’utente di far funzionare l’apparecchiatura.
26. INSTALLAZIONE
a. Posizione del ricevitore: individuare un luogo con buona visibilità. Non posizionare il ricevitore in un punto in cui il monitor venga colpito dai raggi del sole o da
altra fonte luminosa. L'uso di luce a fluorescenza può limitare il funzionamento del telecomando. Per evitare di danneggiare i componenti interni, si consiglia di garantire
un'adeguata aerazione. Tenere l'apparecchio lontano da fonti di calore elevato. Per
garantire la qualità delle immagini, si consiglia di tenere l'apparecchio distante da
strumenti magnetici.
b. Cavi: eseguire il collegamento video/audio tra i vari componenti utilizzando cavi
video e audio schermati. Per garantire delle buone prestazioni, il cavo dell'antenna
deve essere composto da un cavo schermato coassiale a 75 Ohm. Tali cavi sono reperibili presso il proprio rivenditore o nelle rivendite di materiale elettrico. Prima di
acquistare un cavo, verificare il tipo esatto di connettori (in ingresso e in uscita) necessari ai vari componenti. Determinare anche la lunghezza necessaria del cavo.
c. Ottimizzazione della qualità dell'immagine: spegnere le lampade a fluorescenza in prossimità dell'LCD e porre l'apparecchio in un punto non esposto alla luce
esterna.
77
27. AVVERTENZA RELATIVA AL DVD: l'unità utilizza un dispositivo laser. Per utilizzare in modo appropriato l'unità, si consiglia di leggere attentamente il presente
manuale e di conservarlo per future consultazioni. Per evitare l'esposizione accidentale ai raggi laser emessi, tenere chiusa e sigillata l'intelaiatura dell'apparecchio. Infatti,
se questa viene aperta o se i dispositivi di bloccaggio vengono allentati, si rischia che
fuoriescano radiazioni laser non necessariamente visibili. NON rivolgere lo sguardo
direttamente verso i raggi laser visibili. L'utilizzo di comandi, regolazioni o procedure
diverso da quelli specificati nel presente manuale può causare pericolo di esposizione
alle radiazioni.
Informazioni relative alla gestione delle zone: il lettore è stato progettato
per soddisfare i requisiti dei formati DVD della Zona 2. Se il numero relativo alla zona
riportato su un DVD non corrisponde a quello del lettore, quest'ultimo non è in grado
di leggere tale supporto.
Batteria eliminazione:
Onde tutelare l`ambiente, non buttate l`apparecchio tra i
normali rifiuti al termine della sua vita utile, ma portatelo
presso i punti di raccolta specifici per questi rifiuti previsti
dalla normativa vigente.
78
Indice
1.
2.
3.
4.
5.
6.
7.
Unità combinata TV/DVD con altoparlanti
Telecomando
Adattatore CA/CC
Adattatore per accendisigari
Sacca da trasporto e supporto di montaggio con relative fascette
Manuale per l’utente
Connettore cavo AV RCA
Installazione in ambienti interni (vedi fig. 1)
Ruotare verso l'alto il supporto di metallo posteriore e porre l'unità sul tavolo o altra
superficie piana. Inserire un'estremità dell'adattatore CA/CC nell'ingresso a corrente
continua da 12 V a destra dell'unità principale, quindi inserire l'altra estremità nella
presa di corrente alternata da 110 - 240 V.
Fig. 1
79
Installazione in autovettura
Tra due sedili (vedi fig. 2)
Fig. 2
1) Estrarre dalla sacca da trasporto una delle fascette in dotazione e collegare il dispositivo di aggancio all'anello di metallo superiore del supporto di montaggio.
Arrotolare la fascetta intorno alla base del poggiatesta di uno dei sedili. Attaccare il
gancio a "S" allo stesso anello di metallo. Ripetere l'operazione sull'altro lato (sedile
del passeggero).
2) Prendere un'altra fascetta e collegare il dispositivo di aggancio all'anello metallico
inferiore della parte posteriore del supporto. Attaccare il gancio a "S" allo stesso anello dopo aver avvolto la fascetta intorno alla sbarra che si trova dietro alla rotaia del
sedile. Non spostare alcun componente del meccanismo del sedile. Ripetere l'operazione sull'altro lato. In alcune vetture, può essere necessario attaccare il gancio a "S"
direttamente alla rotaia perché potrebbe non essere lungo a sufficienza per raggiungere l'anello.
3) Serrare tutte le fascette in modo da rendere stabile e sicuro il supporto.
4) Inserire un'estremità dell'adattatore per accendisigari all'ingresso a corrente continua da 12 V e l'altra estremità alla presa dell'accendisigari.
80
COMANDI, INDICATORI, CONNETTORI (VEDI FIG. 3)
1. Accensione/Spegnimento
2. Programma automatico TV
3. Canale TV in basso
4. Canale TV in alto
5. Volume in basso
6. Volume in alto
7. Selezione dell’immagine
8. Interruttore DVD/TV/AV
9. Selezione Wide
10. DVD precedente
11. Riproduzione DVD
12. DVD successivo
13. Interruzione DVD
14. Estrazione DVD
15. Sensore auricolari a infrarossi /
Sensore telecomando
16. Altoparlante sinistro
17. Altoparlante destro
18. Jack auricolari
19. Uscita/ingresso video
20. Uscita/ingresso audio sinistro
21. Uscita/ingresso audio destro
22. Selezione ingresso/uscita AV
23. Ingresso CC 12 V
24. Ingresso antenna TV
Fig. 3
81
TELECOMANDO (VEDI FIG. 4)
1. Selezione TV/DVD/AUX
2. Selezione comando numero DVD
3. Numeri (0-9)
4. Selezione TV/CATV
5. Mute
6. Selezione dell’immagine
7. Volume Su/Giù (+/-)
8. Pulsante di estrazione DVD
9. Su/Giù, Sinistro/Destro/Enter
10. Menu DVD
11. Display DVD
12. Interruzione DVD
13. DVD Indietro
14. DVD Avanti
15. Selezione audio DVD
16. Selezione sottotitoli DVD
17. Accensione/Spegnimento
18. Selezione comando numero TV
19. Memorizzazione automatica dei canali TV
20. Salto ricerca dei canali TV
21. Scrittura e cancellazione dei canali TV
22. Canale Su/Giù (+/-)
23. Configurazione del DVD
Fig. 4
24. Riproduzione DVD
25. Pausa del DVD
26. DVD successivo
27. DVD precedente
28. Ripetizione DVD
29. Riproduzione lenta DVD
82
Lettore DVD
1. Funzioni principali
POWER (ALIMENTAZIONE)
EJECT (ESTRAI)
PLAY (RIPRODUCI)
PAUSE (PAUSA)
STOP
NEXT (SUCCESSIVO)
PREVIOUS (PRECEDENTE)
FORWARD SCAN (SCORRERE
IN AVANTI)
REVERSE SCAN (SCORRERE
INDIETRO)
SLOW (RALLENTATO)
UP/DOWN/LEFT/RIGHT
(SU/GIÙ, SINISTRO/DESTRO)
ENTER (INVIO)
NUMBERS (NUMERI)
MENU
SUBTITLE (SOTTOTITOLI)
AUDIO
DISPLAY
SETUP
Consente di accendere o spegnere l'unità.
Consente di estrarre e togliere il disco.
Consente di avviare la riproduzione.
Consente di passare alla modalità di attesa.
1 volta: consente di interrompere la riproduzione nel
punto corrente 2 volte: consente di interrompere definitivamente la riproduzione
Consente di passare al capitolo, traccia o scena successivi durante la riproduzione.
Consente di tornare al capitolo, traccia o scena precedenti durante la riproduzione.
Consente di scorrere velocemente in avanti a 2, 4, 6 o
8 volte la velocità normale.
Consente di scorrere velocemente indietro a 2, 4, 6 o 8
volte la velocità normale.
Riproduce il DVD a, 1/4 o 1/8 della velocità normale.
Consente di sfogliare nelle varie direzioni le voci del
menu di configurazione.
Consente di eseguire la voce o l'impostazione.
Serve per immettere una password.
Consente di visualizzare il menu principale del disco.
Consente di selezionare la lingua dei sottotitoli e di attivarla o disattivarla.
Consente di selezionare la lingua dell'audio.
Consente di visualizzare le informazioni relative al
disco.
Consente di visualizzare il menu di configurazione.
83
2. Menu
Un DVD è diviso solitamente in varie sezioni chiamate titoli e capitoli. Quando il DVD
viene riprodotto sul lettore, sullo schermo della TV o del monitor viene visualizzato il
relativo menu principale. I contenuti del menu possono variare in base al disco.
Premere MENU durante la riproduzione per visualizzare il menu, quindi premere
ENTER (INVIO) o PLAY (RIPRODUCI) per dare inizio alla riproduzione. Alcuni DVD
consentono di selezionare le opzioni di riproduzione mediante il relativo menu.
3. Visualizzazione (i contenuti variano in base al disco)
1) Tempo di riproduzione e tempo residuo
a. Durante la riproduzione, premere DISPLAY per visualizzare il numero del titolo in
corso (1), il numero totale di titoli (2), il numero del capitolo in corso (3), il numero
totale di capitoli (4) e il tempo di riproduzione del titolo (5). La scritta visualizzata
scompare dopo 3 secondi.
84
b. Premere di nuovo DISPLAY per visualizzare il tempo residuo per il determinato titolo. La scritta visualizzata scompare dopo 3 secondi.
seconds.
c. Premere DISPLAY una terza volta per visualizzare il tempo trascorso per il capitolo.
La scritta visualizzata scompare dopo 3 secondi.
85
d. Premere DISPLAY una quarta volta per visualizzare il tempo residuo per il capitolo.
La scritta visualizzata scompare dopo 3 secondi.
Premere DISPLAY per la quinta volta per uscire da questa opzione.
2) Sottotitoli
Durante la riproduzione, premere SUBTITLE (SOTTOTITOLI) per selezionare la lingua dei
sottotitoli desiderata, avendo visualizzati il numero della lingua dei sottotitoli in corso (1)
e il numero totale delle lingue dei sottotitoli (2). Se sono previste varie lingue, premere di
nuovo SUBTITLE per selezionare una lingua per i sottotitoli diversa. Per disattivare i sottotitoli, premere il relativo pulsante fino a quando viene visualizzata la scritta SUBTITLE OFF
(SOTTOTITOLI DISATTIVATI). Se il pulsante SUBTITLE non viene premuto di nuovo per 3
secondi, la visualizzazione relativa ai sottotitoli scompare automaticamente.
86
3) Audio
Durante la riproduzione, premere AUDIO per selezionare la lingua dell'audio desiderata, avendo visualizzati il numero del canale audio in uso (1) e il numero totale dei
canali audio (2). Premere di nuovo AUDIO per selezionare una lingua per l'audio
diversa. Se il pulsante AUDIO non viene premuto di nuovo per 3 secondi, la visualizzazione relativa all'audio scompare automaticamente.
4) Ripetizione
a. Durante la riproduzione, premere REPEAT (RIPETI) per riprodurre ripetutamente il
capitolo in corso.
b. Durante la riproduzione, premere di nuovo REPEAT (RIPETI) per riprodurre ripetutamente il titolo in corso.
87
c. Durante la riproduzione, premere di nuovo REPEAT (RIPETI) per riprodurre ripetutamente tutti i titoli e capitoli.
d. Durante la riproduzione, premere REPEAT (RIPETI) una quarta volta per annullare la
ripetizione (REPEAT OFF, RIPETIZIONE DISATTIVATA) e ripristinare la riproduzione normale. Se il pulsante REPEAT non viene premuto di nuovo per 3 secondi, la visualizzazione relativa alla ripetizione scompare automaticamente.
88
Riproduzione di CD Audio
Durante la riproduzione di un CD audio, per visualizzare le informazioni sul tempo,
premere sul telecomando il pulsante DISPLAY. Le opzioni riportate di seguito mostrano
le informazioni disponibili mediante questa funzione.
a. Sullo schermo viene visualizzata la traccia attuale e il tempo di esecuzione della traccia.
b. Premere una volta “DISPLAY”: oltre alla traccia in esecuzione e al tempo residuo,
viene visualizzata anche la scritta SINGLE REMAIN (TEMPO RESIDUO SINGOLO
BRANO).
89
c. Premere due volte “DISPLAY”: oltre alla traccia corrente in esecuzione e al tempo
complessivo di esecuzione del CD, viene visualizzata anche la scritta TOTAL ELAPSED
(TEMPO TOTALE TRASCORSO).
d. Premere tre volte “DISPLAY”: oltre alla traccia in esecuzione e al tempo residuo di
tutto il CD, viene visualizzata anche la scritta TOTAL REMAIN (TEMPO RESIDUO
TOTALE).
e. Premere quattro volte “DISPLAY”: viene temporaneamente visualizzata la scritta
"DISPLAY OFF" (DISPLAY DISATTIVATO). Le informazioni relative al tempo del CD non
vengono visualizzate.
90
1) Utilizzo della funzione Repeat (Ripeti)
Per impostazione predefinita, la funzione Repeat (Ripeti) è disattivata. Premere più
volte di seguito REPEAT (RIPETI) per modificare le opzioni di ripetizione.
• TRACK (TRACCIA): viene ripetuta la traccia in esecuzione.
• ALL (TUTTO): viene ripetuto il CD in esecuzione.
• OFF (DISATTIVATO)
Passando da un’opzione all’altra, si possono modificare le opzioni di ripetizione.
L'opzione selezionata continua a funzionare fino a quando non viene disattivata.
91
CONFIGURAZIONE
Premere “SETUP” (CONFIGURA) per visualizzare sullo schermo la pagina principale
del menu di configurazione. Premere nuovamente SETUP (CONFIGURA) per uscire dal
relativo menu e ripristinare la modalità di riproduzione o stop.
1) Premere ENTER (INVIO) per accedere alla pagina di configurazione general.
a. Mediante i pulsanti SU/GIÙ, selezionare TV DISPLAY (DISPLAY TV) e quindi premere
il pulsante di DESTRA per accedere al menu secondario. Utilizzare i pulsanti SU/GIÙ
per selezionare sullo schermo la modalità di visualizzazione TV e quindi premere
ENTER (INVIO) per confermare l’impostazione. Premere il pulsante di SINISTRA per
tornare indietro.
* NORMAL/PS (NORMALE/PS): selezionare questa opzione se il lettore è collegato ad
una normale TV e sullo schermo intero viene visualizzata un'immagine larga con una
porzione tagliata automaticamente.
* NORMAL/LB (NORMALE/LB): selezionare questa opzione se il lettore è collegato ad
una normale TV e sullo schermo intero viene visualizzata un'immagine larga con una
striscia nera nella parte superiore e inferiore dello schermo.
* WIDE (LARGA): selezionare questa opzione se il lettore è collegato ad una TV a
schermo panoramico e sullo schermo intero viene visualizzata un'immagine panoramica.
92
b. Mediante i pulsanti SU/GIÙ, selezionare TV TYPE (TIPO TV) e quindi premere il pulsante di DESTRA per accedere al menu secondario. Utilizzare i pulsanti SU/GIÙ per
selezionare sullo schermo la modalità relativa al tipo di TV e quindi premere ENTER
(INVIO) per confermare l’impostazione. Premere il pulsante di SINISTRA per tornare
indietro.
*NTSC: selezionare questa opzione se il lettore DVD è collegato ad una TV NTSC.
*PAL: selezionare questa opzione se il lettore DVD è collegato ad una TV PAL.
Nota: la selezione riguarda l’uscita del DVD e non il sintonizzatore TV. Si ricorda che
negli USA viene utilizzato esclusivamente il sistema NTSC. Nel dubbio, non modificare l’opzione.
c. Utilizzare i pulsanti SU/GIÙ per selezionare “SCREEN SAVER” (SALVASCHERMO).
*ON (ACCESO): il salvaschermo viene attivato.
*OFF (DISATTIVATO): il salvaschermo viene disattivato (spento).
*Nota: se la stessa immagine rimane fissa sullo schermo per almeno 5 minuti, allora
il lettore DVD entra in modalità Screen Saver (Salvaschermo).
Nota: la riproduzione di MP3 è dotata di un contatore che impedisce l’attivazione del
salvaschermo.
93
d. Premere il pulsante di SINISTRA per selezionare General Setup Page (Pagina di configurazione generale). Premere nuovamente il pulsante di SINISTRA per uscire dal
menu di configurazione; quindi premere ENTER (INVIO).
e. Per modificare la password, utilizzare i pulsanti SINISTRA/DESTRA e selezionare
PASSWORD; quindi premere il pulsante ENTER (INVIO) per accedere a Password
Setup Page (Pagina configurazione password).
Immettere la vecchia password o la password predefinita, quella nuova e la relativa
conferma. Premere ENTER (INVIO) per confermare la modifica.
Nota: la password predefinita è 3308 e rimane attiva anche se è stata modificata,
così da poterla utilizzare qualora si dovesse dimenticare la nuova password. Per
evitare che terzi possano utilizzare la password predefinita per impostare il livello dei
contenuti non autorizzati e modificare la password, si consiglia di annotare altrove la
password predefinita e cancellarla dal presente manuale. Alcuni dischi possono essere
vietati a seconda dell’età dell’utente.
2) Se nel lettore non è presente alcun disco, premere SETUP (CONFIGURA) per accedere a General Setup Page (Pagina di configurazione generale); quindi premere due
volte il pulsante di SINISTRA per selezionare Preference Page (Pagina preferenze).
Premere quindi ENTER (INVIO) per accedere alla pagina delle preferenze.
a. Mediante i pulsanti SU/GIÙ, selezionare AUDIO e quindi premere il pulsante di
DESTRA per accedere al menu secondario. Utilizzare i pulsanti SU/GIÙ per selezionare la lingua desiderata e quindi premere ENTER (INVIO) per confermare l’impostazione. Premere il pulsante di SINISTRA per tornare indietro.
94
b. Mediante i pulsanti SU/GIÙ, selezionare SUBTITLE (SOTTOTITOLI) e quindi premere il pulsante di DESTRA per accedere al menu secondario. Utilizzare i pulsanti
SU/GIÙ per selezionare la lingua dei sottotitoli o l’opzione SUBTITLE OFF (SOTTOTITOLI DISATTIVATI) e quindi premere ENTER (INVIO) per confermare l’impostazione.
Premere il pulsante di SINISTRA per tornare indietro.
c. Mediante i pulsanti SU/GIÙ, selezionare DISC MENU (MENU DISCO) e quindi premere il pulsante di DESTRA per accedere al menu secondario. Utilizzare i pulsanti
SU/GIÙ per selezionare la lingua del menu del disco e quindi premere ENTER (INVIO)
per confermare l’impostazione. Premere il pulsante di SINISTRA per tornare indietro.
Nota: la selezione della lingua è disponibile esclusivamente per i dischi registrati
nelle lingue elencate nei precedenti menu secondari. In caso contrario, il lettore riproduce e visualizza sullo schermo la lingua di registrazione originale contenuta nel disco.
d. Mediante i pulsanti SU/GIÙ, selezionare PARENTAL (CONTENUTI NON AUTORIZZATI) e quindi premere il pulsante di DESTRA per accedere al menu secondario
95
Selezionare mediante i pulsanti SU/GIÙ il livello desiderato dei contenuti non autorizzati per i dischi dotati di funzione di blocco o di più livelli. L’elenco parte dal livello
inferiore (1, Child) (Minori) a quello più elevato (8, Adult) (Adulti).
Premere ENTER (INVIO). La pagina PASSWORD viene visualizzata esclusivamente se
è stato modificato il livello dei contenuti non autorizzati.
Immettere la password a 4 cifre, quindi premere ENTER (INVIO) per confermare l’impostazione del livello di contenuti non autorizzati.
Nota: dopo aver inserito il disco nel lettore, se l’impostazione dei contenuti non autorizzati non combacia con quanto contenuto sul disco, quest'ultimo non viene riprodotto anche se è stato selezionato dal menu principale.
Selezionare YES (SÌ) mediante i pulsanti SINISTRA/DESTRA e premere ENTER (INVIO).
Quindi immettere la password a 4 cifre o la password predefinita.
96
Selezionare YES (SÌ) mediante i pulsanti SINISTRA/DESTRA e premere ENTER (INVIO).
Quindi immettere la password a 4 cifre o la password predefinita.
e. Mediante i pulsanti SU/GIÙ, selezionare DEFAULTS (VALORI PREDEFINITI) e quindi
premere il pulsante di DESTRA per accedere al menu secondario. Premere ENTER
(INVIO) per ripristinare le impostazioni predefinite di fabbrica.
Nota: il ripristino delle impostazioni predefinite non influisce sul controllo dei contenuti non autorizzati.
f. Mediante i pulsanti SINISTRA/DESTRA selezionare General Setup Page (Pagina di
configurazione generale); quindi premere nuovamente il pulsante di SINISTRA per uscire dal menu di configurazione. Premere ENTER (INVIO) per tornare alla pagina con il
logo DVD.
97
RIPRODUZIONE DEI DISCHI CON FORMATO MP3
Il formato MP3 viene utilizzato per memorizzare l’audio digitale. Un brano audio con
qualità da CD viene compresso nel formato MP3: questo consente di perdere pochissimo in termini di qualità audio e di guadagnare molto in termini di spazio su disco. I
dischi CD-R/RW codificati in formato MP3 sono compatibili con questo sistema.
Modalità di riproduzione:
FOLDER (CARTELLA) (riproduzione normale)
SINGLE (BRANO SINGOLO)
REPEAT ONE (RIPETI UNA VOLTA) (ripetizione della riproduzione di un brano)
REPEAT FOLDER (RIPETI CARTELLA) (ripetizione della riproduzione di una cartella specifica)
Una volta inserito un CD MP3, il lettore DVD inizializza il disco e sullo schermo TV
viene visualizzata la directory (cartella).
Quando nell’unità viene inserito un disco MP3, viene visualizzata automaticamente la
schermata del menu. Essa consente di modificare cartelle e brani. Il sistema riproduce
i brani nell’ordine in cui sono stati masterizzati sul disco.
98
Display della schermata del MENU
1. Premere il pulsante o per selezionare una cartella dal relativo evento nella
parte sinistra dello schermo.
2. Premere ENTER (INVIO) per selezionare la cartella evidenziata. Vengono elencati i
brani disponibili nella cartella.
3. Premere prima STOP, quindi utilizzare il pulsante o per selezionare un brano
dall’elenco. Premere ENTER (INVIO) per selezionare e iniziare a riprodurre il brano
evidenziato.
Utilizzare il pulsante ( SUCCESSIVO) per passare al brano successivo. Utilizzare il
pulsante ( PRECEDENTE) per spostarsi all’inizio del brano successivo.
UTILIZZO DELLA FUNZIONE REPEAT (RIPETI)
Per impostazione predefinita, la funzione Repeat (Ripeti) è disattivata. Premere più
volte di seguito REPEAT (RIPETI) per modificare le opzioni di ripetizione.
• SINGLE (BRANO SINGOLO)
• REPEAT ONE (RIPETI UNA VOLTA)
• REPEAT FOLDER (RIPETI CARTELLA)
• FOLDER (CARTELLA)
Se si preme REPEAT (RIPETI) per la quinta volta, si torna alla riproduzione normale.
Passando da un’opzione all’altra, si possono modificare le opzioni di ripetizione.
L'opzione selezionata continua a funzionare fino a quando non viene disattivata.
AVVISO
L’icona davanti al nome di un file indica che si tratta di una cartella e non di un file
MP3.
L’icona “MP3” davanti al nome di un file indica che si tratta di un file MP3
99
FUNZIONAMENTO DEL SISTEMA
1. Premere POWER (ACCENSIONE) per accendere o spegnere l’apparecchio.
L’indicatore dell’interruttore si illumina di rosso e l’unità si attiva nell’ultima modalità utilizzata e memorizzata.
2. Premere DVD/TV/AV per selezionare la modalità desiderata. Quando si cambia
modalità, il lettore DVD è in grado di memorizzare il punto di riproduzione attuale.
3. Premere i pulsanti per aumentare/abbassare il volume e regolare a piacere il livello sonoro. I pulsanti servono anche per effettuare regolazioni all’immagine in modalità di selezione dell’immagine.
4. Ogni volta che si preme PICTURE (IMMAGINE), sullo schermo vengono visualizzate
ciclicamente le regolazioni per l’immagine; le barre di regolazione disponibili sono
VOLUME (VOLUME), CONTRAST (CONTRASTO), BRIGHTNESS (LUMINOSITÀ),
COLOR (COLOR) e TINT (SFUMATURA). Utilizzare quindi i comandi del volume per
aumentare o ridurre il livello. Se non vengono effettuate regolazioni o non si premono
altri pulsanti entro circa 6 secondi, lo schermo si spegne automaticamente.
5. Premere MUTE (MUTO) per togliere il sonoro e premerlo nuovamente per ripristinare il livello precedentemente impostato. È possibile ripristinare il sonoro anche utilizzando i tasti del volume.
Funzione TV
1. Collegare il cavo coassiale alla presa dell’antenna incorporata.
2. Quando si accende il sistema e si seleziona la modalità TV, premere sul telecomando TV/CATV per selezionare la normale trasmissione TV a 69 canali oppure la TV via
cavo con canali S41 (cavo standard, cavo HRC e cavo IRC).
Nota: per verificare qual è il cavo standard rivolgersi al fornitore di cavi locale.
3. Premere AUTO MEMORY (MEMORIA AUTOMATICA); viene effettuata la ricerca e
la sintonizzazione di tutti i canali TV o CATV. I segnali dei canali individuati vengono
memorizzati automaticamente.
100
4. La funzione SKIP/SEARCH (SALTA/CERCA) consente di scegliere le rispettive modalità. In modalità SKIP (SALTA), quando si utilizzano i pulsanti per passare da un canale all’altro, la TV si blocca soltanto sui canali programmati nella memoria. Se la modalità SKIP (SALTA) è disattivata, la TV si blocca su tutti i canali attivi.
Utilizzo di videogame
Collegare l’uscita AV del sistema per videogiochi al jack AV IN nella parte anteriore
dell’unità. È possibile utilizzare il cavo AV collegato per convertire il jack AV dell’unità
da 3,5 mm in jack AV di tipo RCA; quindi abbinare i jack codificati con i colori alle
spine appropriate: giallo (VIDEO) con giallo, bianco (AUDIO L, sinistra) con bianco e
rosso (AUDIO R, destra) con rosso. Selezionare la modalità AV e regolare il volume
e/o l’immagine in base alle proprie preferenze.
Utilizzo di auricolari
1. Con questo sistema è possibile utilizzare auricolari Hi-Fi a infrarossi (senza fili).
Inserire le batterie negli auricolari senza fili e accendere questi ultimi. Verificare che lo
spazio verso il sensore degli auricolari agli infrarossi sia libero da ostacoli.
2. Con questo sistema è anche possibile utilizzare auricolari Hi-Fi opzionali dotati di
filo. Inserire il jack degli auricolari nella relativa presa nella parte anteriore dell’unità.
Quando si utilizza il jack per auricolari di destra, entrambi gli altoparlanti interni si disattivano.
Funzione Home TV supportata
Abbinare le spine codificate con i colori alle uscite DVD appropriate situate nella parte
posteriore dell’unità: giallo (VIDEO) con giallo, bianco (AUDIO L, sinistra) con bianco
e rosso (AUDIO R, destra) con rosso.
Altoparlanti esterni supportati
Collegare l’uscita EXT. SPEAKER (ALTOPARLANTE ESTERNO) ad un altoparlante interno.
101
SPECIFICHE
SPECIFICHE DEL DISPLAY
Risoluzione
Angolo visivo
Rapporto di contrasto
Luminosità
Durata backlight
Formato disco
Sistema di colori
Tipo di schermo
Misura schermo
Telecomando
Antenna
Canali
Alimentazione
Alimentazione c.a.
Umidità di esercizio
Temperatura di esercizio
Temperatura di conservazione
640 x220
Orizz: 60°, Vert.: superiore 50°
300:1 (max) -> Inferiore 60°
300 Cd/m 2 (max)
10.000 ore (min.)
DVD/CD/MP3
NTSC/PAL
LCD
9 pollici
Raggi infrarossi
Antenna esterna
2-4 (VHF), 5-12 (VHF),
21-69 (UHF), S1-S41 (CATV)
2W
DVD (PCM 96 kHz/24 Bit ):
da 20 Hz a 44 kHz
DVD (PCM a 48 kHz): da 20 Hz a 22 kHz
CD: da 20 Hz a 20 kHz
12 V c. c., 1,7 A
10V-240V c.a. a50/60 Hz
10 ~ 75%
5 ~ 40 °C (41 ~ 104 °F)
-15 ~ 60 °C (4 ~ 140 °F)
Dimensioni (L x A x P)
lxaxp (con altoparlanti)
lxaxp (senza altoparlanti)
Peso
14.33" x 7.08" x 2.36"
10.55" x 70.8" x 2.36"
ca. 2 kg (4 libbre)
Uscita audio
Risposta frequenza SP
102
La Vostra garanzia
Gentile Cliente,
grazie per aver acquistato questo prodotto Audiovox, prodotto studiato secondo i più
elevati standard di qualità e sottoposto a test rigorosi. Se utilizzato correttamente, esso
funzionerà perfettamente per molti anni.
La garanzia copre la sostituzione gratuita dei ricambi e la prestazione di manodopera
per tutti i prodotti Audiovox di elettronica di consumo venduti in Italia.
La responsabilità legale di soddisfare le richieste di servizi di garanzia per il Vostro
prodotto è del rivenditore dal quale avete acquistato il prodotto : se il rivenditore non
fosse abilitato alle riparazioni, questi si può rivolgere per qualsiasi lavoro ad un Centro
Assistenza Autorizzato.
La garanzia è valida per un periodo di 24 mesi dalla data di acquisto, purché il
prodotto sia trattato in modo appropriato secondo le istruzioni d’uso, dietro presentazione
del documento fiscale originale indicante la data d’acquisto e il nome del rivenditore con
la descrizione del prodotto (modello e numero di matricola).
La garanzia Audiovox non è valida nei seguenti casi :
i documenti sono stati alterati o resi illeggibili.
il modello e/o il numero di matricola del prodotto sono stati alterati, cancellati,
rimossi o resi illeggibili.
la riparazione è stata effettuata da personale non autorizzato.
per negligenza o trascuratezza nell’uso (mancata osservanza delle istruzioni per il
corretto funzionamento dell’apparecchio), errata installazione, danni da trasporto
ovvero di circostanze che, comunque, non possono farsi risalire a difetti di
fabbricazione dell’apparecchio.
non sono inoltre coperti dalla garanzia i prodotti modificati o adattati per la ricezione
di trasmissioni al di fuori del paese per il quale sono stati progettati e costruiti,
approvati e/o autorizzati o per qualsiasi danno provocato da queste modifiche.
Si raccomanda di leggere attentamente le istruzioni d’uso prima di interpellare il
Centro Assistenza Autorizzato.
Audiovox è un marchio distribuito per l’Italia da :
Siemens VDO Trading srl
Via Vialba 50
20026 Novate Milanese (MI)
Servizio Tecnico
Tel. 02 35 680 403
D
Wir gratulieren Ihnen! Durch Ihre kluge Wahl sind Sie Besitzer eines Audiovox Mobile Video-Produktes geworden. Audiovox Mobile Video-Produkte erfreuen sich aufgrund der hohen Qualität eines ausgezeichneten Rufes weltweit. Dieser hohe Qualitätsstandard ermöglicht es für Audiovox Mobile Video-Produkte 2 Jahre Garantie zu gewähren.
Die Produkte werden während des gesamten Fertigungsvorganges laufend kontrolliert und geprüft. Im Servicefall beachten Sie bitte folgendes:
1. Die 2-jährige Garantiezeit beginnt mit dem Kauf des Produktes und gilt nur für den Erstbesitzer.
2. Während der Garantiezeit beseitigen wir etwaige Mängel, die nachweislich auf Material- oder Fabrikationsfehler beruhen, nach
unserer Wahl durch Austausch oder Nachbesserung der defekten Teile. Weitergehende Ansprüche, insbesondere auf Minderung,
Wandlung, Schadenersatz oder Folgeschäden sind ausgeschlossen. Die Garantiezeit wird von einer Garantieleistung durch uns nicht berührt.
3. Am Produkt dürfen keine unsachgemäßen Eingriffe vorgenommen worden sein.
4. Bei Inanspruchnahme der Garantie wenden Sie sich bitte zunächst an Ihren Fachhändler. Sollte es sich als notwendig erweisen,
das Produkt an uns einzuschicken, so sorgen Sie bitte dafür, daß • das Produkt in einwandfreier Originalverpackung verschickt wird,
• die Kontrollkarte ausgefüllt dem Produkt beiliegt, • die Kaufquittung beigefügt ist.
5. Von der Garantie ausgenommen sind: • Leuchtmittel • Verschleißteile • Transportschäden, sichtbar oder unsichtbar (Reklamationen für solche Schäden müssen umgehend bei der Transportfirma, Bahn oder Post eingereicht werden.) • Kratzer in Metallteilen, Frontabdeckungen u.s.w.
(Diese Defekte müssen innerhalb von 5 Tagen nach Kauf direkt bei Ihrem Händler reklamiert werden.) • Fehler, die durch fehlerhafte Aufstellung, falschen Anschluß, unsachgemäße Bedienung (siehe Bedienungsanleitung), Beanspruchung oder äußere gewaltsame Einwirkung entstanden sind. • Unsachgemäß reparierte oder geänderte Geräte, die von anderer Seite als von uns geöffnet wurden. • Folgeschäden an fremden
Geräten • Kostenerstattung bei Schadensbehebung durch Dritte ohne unser vorheriges Einverständnis • Batterien und Akkus.
GB
Congratulations! You have made a wise selection in becoming the owner of a Audiovox Mobile Video equipment. Due to high
quality Audiovox products have earned an excellent reputation through the western world. And this high quality standard enables us to grant
a 2-years warranty for Audiovox Mobile Video products.
The equipments are checked and tested continously during the entire production process. In case you have problems with your
Audiovox Mobile Video equipment, kindly observe the following:
1. The 2-years guarantee period commences with the purchase of the component and is applicable only to the original owner.
2. During the guarantee period we will rectify any defects due to faulty material or workmanship by replacing or repairing the defective part at
our discretion. Further claims, and in particular those for price reduction, cancellation of sale, compensation for damages or
subsequential damages, are excluded. The guarantee period is not altered by the fact that we have carried out guarantee work.
3. Unauthorized tampering with the equipment will invalidate this guarantee.
4. Consult your authorized dealer first, if guarantee service is needed. Should it prove necessary to return the component to the factory, please insure that • the component is packed in original factory packing in good condition • the quality control card has been filled out and enclosed with the component, • your enclose your receipt as proof of purchase.
5. Excluded from the guarantee are: • Illuminates • Wear parts • Shipping damages, either readily apparent or concealed (claims for such damages must be lodged immediately with forwarding agent, the railway express office or post office). • Scratches in cases, metal components,
front panels, etc. (You must notify your dealer directly of such defects within three days of purchase.) • Defects caused by incorrect installation or connection, by operation errors (see operating instructions), by overloading or by external force. • Equipments which have beenrepaired
incorrectly or modified or where the case has been opened by persons other than us. • Consoquential damages to other equipments. • Reimbursement of cools, without our prior consent, when repairing damages by third parties • batteries and battery packs.
F
Toutes nos félicitations! Vouz avez bien choisi et êtes le propriétaire heureux d’un produit Audiovox. Les produits Audiovox ont
une excellente réputation pour leur bonne qualité. Pour cette raison, nous accordons 2 ans de garantie sur tous les produits Audiovox.
Les appareils sont soumis pendant toutes les opérations de fabrications à des contrôles et vérifications constants. Si, pourtant, vous
rencontrez des difficulés avec votre appareil Audiovox veuillez tenir compte de ce qui suit:
1. La garantie débute avec l’achat de l’appareil et est valable uniquement pour le premier propriétaire.
2. Pendant la période de garantie nous réparons les dommages provenant des défauts de matériel ou de fabrication et nous procédons, à
notre guise, à l’échange ou à la réparation des pièces défectueuses.
3. Aucune réparation impropre ne doit avoir été effectuée à l’appareil.
4. Lors d’une demande de garantie, veuillez vous adresser en premier lieu à votre distributeur. Si ce dernier décide que l’appareil doit nous être
retourné, veuillez tenir compte que: • l’appareil soit expédié dans son ermballage d’origine, • la carte de contrôle dûment remplie soit jointe, •
le bon d’achat soit joint.
5. Ne sont pas compris dans la garantie: • Matériel d’éclairage • Pièces d’usure • Avaries de transport, visibles ou non (de telles réclamations doivent être faites immédiatement auprès du transporteur, du chermin de fer ou de la poste). • Des rayures sur le boîtier, pièces métalliques, couvercles etc. (ces dommages doivent être signalés directement à votre distributeur dans les trois jours suivant l’achat). • Dommages
résultant d’un raccordement incorrect, maniement incorrect (voir instructions de service), surcharge ou application de force extérieure. • Appareils réparés non conformément ou modifiés et qui ont été ouverts par une personne autre que nous. • Dommages ultérieurs à d’autres appareils. • Remboursement des frais à des tiers ayant effectué les réparations sans notre accord préalable • Accus et batteries.
G ARANTIEKARTE
WARRANTY C ARD
Typ/ Type
Serien-Nr./Serial-No.
Name und Anschrift des Händlers /Stempel
Name and address of the dealer/stamp
Käufer/Customer
Name/Name
Straße/Street
PLZ, Ort /City
Land /Country
Kaufdatum / buying date
Nur gültig in Verbindung mit Ihrer Kaufquittung!
No warranty without receipt!
Audiovox Audio Produkte GmbH
Lise-Meitner-Str. 9 · 50259 Pulheim
Tel.: +49 2234/807-0 · Fax: + 49 2234/807-399
www.audiovox-germany.de