1
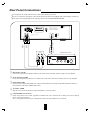
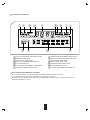
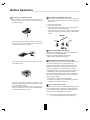
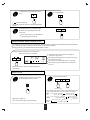
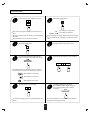
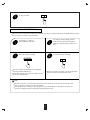
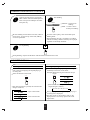
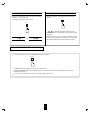
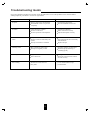
Introduction
READ THIS BEFORE OPERATING YOUR UNIT
This symbol is intended to alert the user to the
presence of uninsulated "dangerous voltage" within
the product's enclosure that may be of sufficient
magnitude to constitute a risk of electric shock to
persons.
CAUTION
: TO REDUCE THE RISK OF ELECTRIC
SHOCK, DO NOT REMOVE COVER (OR
BACK). NO USER-SERVICEABLE PARTS
INSIDE. REFER SERVICING TO QUALIFIED
SERVICE PERSONNEL.
This symbol is intended to alert the user to the
presence of important operating and maintenance
(servicing) instructions in the literature accompanying
the appliance.
WARNING : TO REDUCE THE RISK OF FIRE OR ELECTRIC SHOCK,
DO NOT EXPOSE THIS APPLIANCE TO RAIN OR MOISTURE.
FCC INFORMATION
This equipment has been tested and found to comply with the limits for a Class B digital device,
pursuant to Part 15 of the FCC Rules. These limits are designed to provide reasonable protection
against harmful interference in a residential installation. This equipment generates, uses and can radiate
radio frequency energy and, if not installed and used in accordance with the instructions, may cause
harmful interference to radio communications. However, there is no guarantee that interference will not
occur in a particular installation. If this equipment does cause harmful interference to radio or television
reception, which can be determined by turning the equipment off and on, the user is encouraged to try to
correct the interference by one or more of the following measures:
Reorient or relocate the receiving antenna.
Increase the separation between the equipment and receiver.
Connect the equipment into an outlet on a circuit different from that to which the receiver is connected.
Consult the dealer or an experienced radio/TV technician for help.
Caution : Any changes or modifications in construction of this device which are not expressly approved
by the party responsible for compliance could void the the user’s authority to operate the
equipment.
FOR YOUR SAFETY
Units shipped to the U.S.A and Canada are designed for operation on 120 V AC only.
Safety precaution with use of a polarized AC plug.
However, some products may be supplied with a nonpolarized plug.
U.S.A
CANADA
120 V
CAUTION
: To prevent electric shock, match wide blade of plug to wide slot, fully
insert.
: Pour éviter chocs électriques, introduire la lame la plus large de la
fiche dans la borne correspondante de la prise et pousser jusqu’ au
fond.
ATTENTION
•
•
•
•
•
•
•
•
Avoid high temperatures. Allow for sufficient heat dispersion when installed on a rack.
Keep the set free from moisture, water, and dust.
Do not let foreign objects in the set.
Handle the power cord carefully. Hold the plug when unplugging the cord.
Unplug the power cord when not using the set for long periods of time.
Do not obstruct the ventilation holes.
Do not let insecticides, benzene, and thinner come in contact wth the set.
Never disassemble or modify the set in any way.
2
SAFETY INSTRUCTIONS
1. Read Instructions - All the safety and operating instructions should
be read before the product is operated.
2. Retain instructions - The safety and operating instructions should
be retained for future reference.
3. Heed Warnings - All warnings on the product and in the operating
instructions should be adhered to.
4. Follow Insturctions - All operating and use instuctions should be
followed.
5. Cleaning - Unplug this product from the wall outlet before cleaning.
Do not use liquid cleaners or aerosol cleaners. Use a damp cloth for
cleaning.
6. Attachments - Do not use attachments not recommended by the
product manufacturer as they may cause hazards.
7. Water and Moisture - Do not use this product near water - for
example, near a bath tub, wash bowl, kitchen sink, or laundry tub; in
a wet basement, or near a swimming pool; and the like.
8. Accessories - Do not place this product on an unstable cart, stand,
tripod, bracket, or table. The product may fall, causing serious injury
to a child or adult, and serious damage to the product. Use only with
a cart, stand, tripod, bracket, or table recommended by the
manufacturer, or sold with the product. Any mounting of the product
should follow the manufacturer’s insturctions, and should use a
mounting accessory recommended by the manufacturer.
9. A product and cart combinaion should be moved with care. Quick
stops, excessive force, and uneven surfaces may cause the product
and cart combination to overturn.
10. Ventilation - Slots and openings in
the cabinet are provided for
ventilation and to ensure reliable
operation of the product and to
protect it from overheating, and
these openings must not be
blocked or covered. The openings
should never be blocked by placing PORTABLE CART WARNING
the product on a bed, sofa, rug, or other similar surface. This
product should not be placed in a built-in installation such as a
bookcase or rack unless proper ventilation is provided or the
manufacturer’s intructions have been adhered to.
11. Power Sources - This product should be operated only from the
type of power source indicated on the marking label. If you are not
sure of the type of power supply to your home, consult your product
dealer or local power company. For porducts intended to operate
from battery power, or other sources, refer to the operating
instructions.
12. Grounding or Polarization - This product may be equipped with a
polarized alternating-current line plug (a plug having one blade
wider than the other). This plug will fit into the power outlet only one
way. This is a safety feature. If you are unable to insert the plug
fully into the outlet, try reversing the plug. If the plug should still fail
to fit, contact your electrician to replae your obsolete outlet. Do not
defeat the safety purpose of the polarized plug.
Alternate Warnings - This product is equipped with a three-wire
grounding-type plug, a plug having a third(grounding) pin. This plug
will only fit into a grounding-type power outlet. this is a safety
feature. If you are unable to insert the plug into the outlet, contact
your electrician to replace your obsolete outlet. Do not defeat the
safety purpose of the gronding-type plug.
13. Power-Cord Protection - Power-supply cords should be routed so
that they are not likely to be walked on or pinched by items placed
upon or against them, paying particlar attention to cords at plugs,
convenience receptacles, and the point where they exit from the
product.
14. Outdoor Antenna Grounding - If an outside antenna or cable
system is connected to the product, be sure the antenna or cable
system is grounded so as to provide some protection against
voltage surges and built-up static charges. Article 810 of the
National Electrical Code, ANSI/NFPA 70, provides information with
regard to proper grounding of the mast and supporting structure,
grounding of the lead-in wire to an antenna discharge unit, size of
grounding conductors, location of antenna-discharge unit,
connection to grounding electrodes, and requirements for the
grounding electrode. See Figure 1.
Figure 1
Example of antenna grounding as per
National Electrical Code, ANSI/NFPA 70
15. Lightning - For added protection for this product during a lightning
storm, or when it is left unattended and unused for long periods of
time, unplug it from the wall outlet and disconnect the antenna or
cable system. This will prevent damage to the product due to
lightning and power-line surges.
16. Power Lines - An outside antenna system should not be located in
the vicinity of overhead power lines or other electric light or power
circuits, or where it can fall into such power lines or circuits. When
installing an outside antenna system, extreme care should be taken
to keep from touching such power lines or circuits as contact with
them might be fatal.
17. Overloading - Do not overload wall outlets, extension cords, or
integral convenience receptacles as this can result in a risk of fire
or electric shock.
18. Object and Liquid Entry - Never push objects of any kind into this
product through openings as they may touch dangerous voltage
points or short-out parts that could result in a fire or electric shock.
Never spill liquid of any kind on the product.
19. Servicing - Do not attempt to service this product yourself as
opening or removing covers may expose you to dangerous voltage
or other hazards. Refer all servicing to qualified service personnel.
20. Damage Requiring Service - Unplug this product form the wall
outlet and refer servicing to qualified service personnel under the
following conditions:
a) When the power-supply cord or plug is damaged,
b) If liquid has been spilled, or objects have fallen into the
product,
c) If the product has been exposed to rain or water,
d) If the product does not operate normally by following the
operating instructions. Adjust only those controls that are
covered by the operating instructions as an improper
adjustment of other controls may result in damage and will
often require extensive work by a qualified technician to
restore the product to its normal operation.
e) If the product has been dropped or damaged in any way, and
f) When the product exhibits a distinct change in performance this indicates a need for service.
21. Replacement Parts - When replacement parts are required, be
sure the service technician has used replacement parts specified
by the manufacturer or have the same characteristics as the
original part. Unauthorized substitutions may result in fire, electric
shock, or other hazards.
22. Safety Check - Upon completion of any service or repairs to this
product, ask the service technician to perform safety checks to
determine that the product is in proper operating condition.
23. Wall or Ceiling Mounting - The product should be mounted to a
wall or ceiling only as recommended by the manufacturer.
24. Heat - The product should be situated away from heat sources
such as radiators, heat registers, stoves, or other products
(including amplifiers) that produce heat.
3
CONTENTS
Introduction
READ THIS BEFORE OPERATING YOUR UNIT
2
SAFETY INSTRUCTIONS
3
Rear Panel Connections
5
Front Panel Controls
6
Before Operation
9
Operations
PLAYING BACK TAPES
AMS(Automatic Music Search) PLAY
10
11
RELAY PLAY
RECORDING
CD SYNCHRO RECORDING
DUBBING FROM DECK B TO DECK A
COUNTER DISPLAY
MEMORIZING THE SPECIFIC POINT
11
12
13
14
14
15
Troubleshooting Guide
16
Specifications
17
4
Rear Panel Connections
Do not plug the AC input cord into the AC outlet when making connections.
Be sure to connect the white plugs to the L(Left) and the red plugs to the R(Right) jacks when making connections.
Refer to the connecting diagram in the operating instructions of AMPLIFIER/RECEIVER.
AC INPUT
120V~60Hz
14W
THIS DEVICE COMPLIES WITH PART 15 OF THE FCC RULES.
OPERATION IS SUBJECT TO THE FOLLOWING TWO CONDITIONS:
(1)THIS DEVICE MAY NOT CAUSE HARMFUL INTERFERENCE, AND
(2)THIS DEVICE MUST ACCEPT ANY INTERFERENCE RECEIVED,
INCLUDING INTERFERENCE THAT MAY CAUSE UNDESIRED OPERATION.
MODEL NO. DD-6200
DOUBLE CASSETTE DECK
MADE IN KOREA
DESIGNED IN USA
SER. NO
AC OUTLET
LINE
DIGI-LINK
L
Manufactured under license from Dolby Laboratories.
"Dolby" and the double-D symbol are trademarks of
Dolby Laboratories.
R
REC
IN
UNSWITCHED
120V~60Hz
1A MAX 100W
PLAY
OUT
DIGI LINK
TAPE 2
MONITOR
AMPLIFIER/RECEIVER
L
STEREO INTEGRATED AMPLIFIER AX-5090R
R
POWER
ON/OFF
IN
OUT
TUNER
CD
REMOTE SENSOR
TAPE 1/MD
PHONO
TAPE 2 MONITER
VOLUME
SPEAKER
A
TREBLE
BASS
BALANCE
DIRECT
B
LOUDNESS
PHONES
-10
10+
-10
10+
-10
10+
MIN
MAX
REC INPUT JACKS
Connect the cords between the REC INPUT jacks of this unit and the REC OUTPUT jacks of your amplifier.
PLAY OUTPUT JACKS
Connect the cords between the PLAY OUTPUT jacks of this unit and the PLAY INPUT jacks of your amplifier.
DIGI LINK JACKS
Connect this jack to the DIGI LINK jack of Sherwood amplifier/receiver bearing the DIGI LINK III or II logo to
control this unit remotely by DIGI LINK system.
AC INPUT CORD
Plug this cord into the switched AC outlet of amplifier or a wall AC outlet.
UNSWITCHED AC OUTLET
Power always flows to this outlet, regardless of whether this unit is switched ON or OFF if power flows through
the AC input cord of this unit.
Note : The equipment whose power consumption exceeds 100 watts should not be connected.
5
Front Panel Controls
DOUBLE CASSETTE DECK DD-6200
COUNTER
MODE
RESET
MEMORY
A/B
NR B/OFF
RELAY PLAY
DUBBING
REVERSE
TAPE SIZE
CD SYN REC
AUTO REVERSE
NORMAL
HIGH
AMS
PLAY
AMS
B
A
POWER
ON/OFF
RECORD & PLAY
PHONES
POWER SWITCH
Press this switch to turn the power on and press again to turn the power off.
For system operation, plug the AC input cord into the switched AC outlet on amplifier or receiver, keep the POWER
switch ON and control power ON/OFF with the power operation on the amplifier or receiver.
HEADPHONE JACK
Stereo headphones with a standard 1/4 inch plug can be plugged into this jack for private listening.
CASSETTE DOOR
Press the EJECT button of the corresponding DECK to open the cassette door when the deck is in the stop mode.
Number 3 ~8 buttons will function for Deck B operation only and Number 9 ~ 16 buttons for Deck A operation only.
EJECT BUTTON(
)
Press this button to open the cassette door.
To close the cassette door, push the door gently until it clicks.
FAST FORWARD and REWIND BUTTONS(
and
)
Press the button to advance or rewind the tape rapidly.
For the AMS (Automatic Music Search) function, press the button during playback.
STOP BUTTON(
)
Press this button to stop playing or recording, etc..
FORWARD PLAY BUTTON(
)
Press this button to play back the front side of the tape.
26
PAUSE BUTTON(
)
Press this button to temporarily stop playing back or recording.
To restart, press the PLAY button.
REVERSE PLAY BUTTON(
)
Press this button to play back the back side of the tape.
FAST FORWARD and REWIND BUTTONS(
STOP BUTTON(
)
)
FORWARD PLAY BUTTON(
EJECT BUTTON(
and
)
)
CASSETTE DOOR
DECK A/B COUNTER SELECTOR BUTTON
Press this button to select the deck to be counted.
MEMORY BUTTON
Press this button to memorize the specific point on the tape.
COUNTER MODE BUTTON
Press this button to select the tape or time counter mode.
COUNTER RESET BUTTON
Press this button to reset the counter to “0000” or “00 min. 00 sec.”.
NORMAL SPEED DUBBING BUTTON
Press this button to set to normal speed dubbing mode.
HIGH SPEED DUBBING BUTTON
Press this button to set to high speed dubbing mode.
CD SYNCHRO RECORDING BUTTON
Press this button to use the CD SYNCHRO RECORDING function.
RECORD/RECORD MUTE BUTTON(
) (DECK A only)
Press this button to enter the recording pause mode. To start recording, press the FORWARD PLAY or REVERSE
PLAY button.
NR B/OFF BUTTON
Press this button to select the Dolby B NR or the Dolby NR OFF mode while playing back or recording.
REVERSE MODE BUTTON
Press this button to select the desired reverse mode while playing back or recording.
TAPE SIZE BUTTON
Press this button to select the tape length for displaying the elapsed time while playing back or recording.
RELAY PLAY BUTTON
Press this button to continue to play from Deck A to Deck B or vice versa.
Use this function with the REVERSE MODE button.
7
FLUORESCENT DISPLAY
DECK B TAPE DETECTION INDICATOR
MEMORY INDICATOR
RELAY PLAY INDICATOR
DECK B TAPE DIRECTION DISPLAY
COUNTER DISPLAY
CD SYNCHRO RECORDING INDICATOR
HI SPEED DUBBING INDICATOR
NORMAL SPEED DUBBING INDICATOR
DECK A TAPE DETECTION INDICATOR
RECORDING INDICATOR
DOLBY B NR INDICATOR
REVERSE MODE INDICATOR
LEVEL METER DISPLAY
DECK A TAPE DIRECTION DISPLAY
DIGI LINK SYSTEM REMOTE CONTROL
This unit can be remotely controlled with Sherwood DIGI LINK III amplifier or receiver.
For available functions, refer to the compatible unit’s operating instructions.
To listen to tapes by DIGI LINK system, first make DIGI LINK connection between this unit and Sherwood
compatible amplifier or receiver.
8
Before Operation
NOTES ON CASSETTE TAPE
Before loading a cassette tape, take up the slack in
the tape to prevent it from becoming entangled
around the capstan.
CLEANING THE HEAD SECTION
For the best condition of the deck, always keep the
head (recording/playback/erase), capstan and pinch
roller clean.
To clean them as follows;
1. Open the cassette door.
2. Clean the heads with the cotton swab dipped in
commercially available head cleaner.
3. Clean the capstan and pinch roller with another
cotton swab dipped in commercially available rubber
cleaner.
After the recording has been finished, remove the
tab to prevent the recorded contents from being
erased or recorded on accidently.
DEMAGNETIZING THE HEAD
When the recording/playback head is magnetized, the
sound quality will be deteriorated.
In this case, demagnetize the head using a
commercially available demagnetizer.
PRINCIPLE OF DOLBY B NR SYSTEM
The Dolby NR system functions so that it automatically
increases recording levels of medium and high
frequencies when the recording signal level is lower
than the specified level(encoding), and automatically
reduces the output level to the normal level during
playback(decoding). In this way, the tape hissing noise
is remarkably reduced without affecting the sound
quality. The Dolby B NR system used in your Cassette
Deck improves S/N ratio by about 5 dB at 1 kHz and
about 10 dB at 10 kHz.
Manufactured under license from Dolby
Laboratories. “Dolby” and the double-D symbol are
trademarks of Dolby Laboratories.
To rerecord after tabs have been removed, cover
with adhesive tape.
Do not store the tapes in direct sunlight or near
equipment that generates heat. Keep the tapes away
from any magnetic fields.
Do not touch the tape surface and store the tapes in
their cases after use. Dust can cause contamination
of the heads resulting in noise.
AUTO TAPE SELECTOR
The type of tape loaded is detected automatically by the
auto tape selector and recording bias and equalization
are set automatically according to the characteristic of
that tape such as NORMAL or CrO2 tape.
Note : Do not use the metal tapes because these tapes
are not played back and recorded correctly.
9
Operations
PLAYING BACK TAPES
Note : Do not use the metal tapes because these are not played back and recorded correctly.
POWER
ON/OFF
Press the POWER swith to turn the power on.
1
Do not turn the power off while operating the unit. In this case, the tape door may not be opened.
2
Load the tape with the bottom side up
and to close the cassette door, push the
door gently until it clicks.
3
In case of the tape recorded with Dolby B
NR, select the Dolby B NR mode.
NR B/OFF
Each time this button is pressed, Dolby B NR or
Dolby NR OFF mode is selected as follows;
Only in the stop mode, the door can be opened.
According to the type of the tape loaded, the
corresponding type is shown by the auto tape selector
as follows (Deck A only) ;
“NOR” : Normal tape.
“CR” : Chrome(CrO2) tape.
Dolby B NR
:“
” lights up.
Dolby NR OFF : “
” goes off.
For details, refer to “AUTO TAPE SELECTOR” on
page 9.
Select the desired reverse mode.
4
Start playback.
5
REVERSE
Each time this button is pressed, the reverse mode is
selected as follows ;
Front side
Back side
(Deck A only)
: Playback of a single side
Deck A tape detection
indicator
Tape counter
: Playback of both sides
(Front side
Back side)
: Repeat playback of both sides
Back side )
( Front side
L
dB
R
On the Deck B, the front side can be played back
regardless of the reverse mode.
20
Dolby B NR Reverse mode
indicator
10
10
6
3
0
Level meter
3
6
Playback mode
6
To temporarily stop playback.(Deck A
only)
To stop playback.
7
“
” indicator lights up.
To restart playback, press the corresponding PLAY
button.
AMS
8
To rapidly advance or rewind the tape,
press the corresponding button in the
stop mode.
At the desired point, press the STOP or
corresponding PLAY button.
AMS(Automatic Music Search) PLAY
The automatic music search function automatically skips other musics, finds and starts playback from the desired music.
Up to 20th music before or after the current music can be searched quickly.
During playback, press the button the desired number of times.
Example) When listening to the second music
before or after the current music.
AMS
L
dB
R
20
10
6
3
0
3
6
Automatic music search function might not
operates as expected if :
The length of the blank space between two musics
is less than 4 seconds.
The noise level of the blank space is very high.
The overall recorded volume level of a music is
very low.
The second music can be searched quickly and
played back.
RELAY PLAY
1
Press the PLAY button.
Load the tapes into Deck A and B and
press the RELAY PLAY button.
2
RELAY PLAY
(Deck A only)
According to the PLAY button on the selected deck and
the reverse mode, the relay play performs as follows ;
: Deck A (Front or Back side)
Deck B (Front side)
or
Deck B (Front side)
Deck A (Front side)
Back side) or
: Deck A (Front side
Deck B (Front side)
“RELAY P” lights up.
To cancel the relay play, press this button.
:
11
Deck A (Front side
Back side)
Deck B (Front side)
Deck B (Front side)
Deck A (Front side
Back side)
RECORDING
Load a tape to be recorded into deck A.
Select the reverse mode.
1
2
: Recording of a single side.
Be sure the erase-protection taps on the tape are in
place.
The type of tape(normal or chrome) is automatically
detected.
The metal tapes are not recorded correctely.
3
5
REVERSE
,
: Recording of both side.
When selecting recording of both sides and recording
first on the back side, recording is made only on that
side.
When recording with Dolby B NR, select
the Dolby B NR mode.
4
NR B/OFF
Press the RECORD/RECORD MUTE
button to enter the recording pause mode
Select the program source to be recorded.
Example) When selecting the tuner.
Press the PLAY button to start recording.
6
According as there are the erase-protection taps or
not, the PLAY indicators are flickering as follows ;
: Recordable on both sides.
: Recordable on front side.
: Recordable on back side.
To temporarily stop recording.
7
8
To restart recording, press the corresponding PLAY
button.
To make a blank space, press the
RECORD/RECORD MUTE button in
the recording pause mode or during
recording.
The unit will make a 4 second blank space and then
enter the recording pause mode.
12
To stop recording.
9
CD SYNCHRO RECORDING
When this unit is connected to a Sherwood compatible CD player controlled remotely by the DIGI LINK III system,
the CD synchro recording can be performed.
1
3
Do the steps 1, 2 and 3 in
“RECORDING” procedure.
2
Start CD synchro recording.
4
CD SYN REC
The CD is selected automatically on the amplifier
bearing the DIGI LINK III logo.
If 8 seconds elapses after starting recording, the CD
player starts automatically.
According to the tape length, edit the
tracks to be recorded on the CD player
referring to the operating instructions of
that.
To stop CD synchro recording.
During CD synchro recording, only the STOP button
of the Deck A function buttons does work.
Notes
Because CD synchro recording starts from the front side, if there is not the erase-protection tap on that
side, CD synchro recording can not be performed.
During CD synchro recording, if other program source on the amplifier is selected, the unit stops CD
synchro recording and starts recording the selected program source.
13
DUBBING FROM DECK B TO DECK A
1
Open the cassette door by pressing the
EJECT button and load a blank tape into
Deck A and prerecorded tape into Deck
B respectively.
Start dubbing.
2
DUBBING
NORMAL
Because dubbing starts from the front side, if there is
not the erase - protection tap on that side, dubbing
can not be performed.
NORMAL : Normal speed
dubbing.
HIGH : 1.5 times as fast as
normal speed dubbing.
HIGH
For better sound quality, select the normal speed
dubbing mode.
During dubbing, the tape is recorded in accordance
with the recording condition of the tape to be played
regardless of the Dolby NR mode.
To stop dubbing.
3
During dubbing, only the STOP button of the deck function buttons does work.
COUNTER DISPLAY
Selecting a tape length
Selecting a counter mode
There are two kinds of counter mode : tape counter,
time counter for displaying the elapsed playing or
recording time.
Select the desired counter mode.
Select the corresponding tape length according to the
loaded tape in the time counter mode.
Example) When selecting the 60 minutes as tape
length.
TAPE SIZE
MODE
Each time this button is pressed, the tape
length changes as follows ;
Each time this button is pressed, the counter mode
changes as follows ;
C-60
C-90
C 120
During playing or recording, the elapsed playing or
recording time is displayed.
The time counter is not actually a clock, so the
displayed time is not exactly equal to the actual
elapsed time.
: Tape counter mode
: Time counter mode
14
Selecting the desired deck counter mode
Resetting the counter
n each counter mode, you can reset the counter to
“0000” or “00 min. 00 sec.”.
Example) In the tape counter mode.
Select the Deck A or the Deck B counter mode as
desired.
A/B
RESET
“
” of the selected deck is flickering for 3
seconds and the corresponding deck counter mode is
displayed.
When the unit is in the stop mode displaying a deck
counter mode, playing or recording, etc. on the other
deck changes the deck counter mode to the other.
MEMORIZING THE SPECIFIC POINT
This function is helpful to listen to the specific passage.
At the desired point, press the MEMORY button to memorize.
MEMORY
“ MEMO” lights up and the specific point is memorized.
If the FAST FORWARD or the REWIND button is pressed in the stop mode, winding the tape stops at
the memorized point.
To cancel, press this button or open the corresponding cassette door.
15
Troubleshooting Guide
If your unit should not perform as expected, consult the table below to see if the problem can be corrected before
seeking help from your dealer or our service organization.
PROBLEM
POSSIBLE CAUSE
REMEDY
No power
The AC input cord is disconnected.
The POWER switch is not pressed
completely.
Connect the cord securely.
Press the POWER switch to ON.
No sound
Unrecorded tape is loaded.
Incorrect connections.
Incorrect operation of the amplifier.
Load the recorded tape.
Make connections correctly.
Operate the amplifier correctly.
Distorted or abnormal
sound
Dirty head.
Incorrect selection of the Dolby NR
system.
The tape is stretched or wrinkled.
Clean the head.
Select the Dolby B NR or the Dolby
NR OFF mode.
Replace the tape.
Vibrating sound
Dirty capstans or pinch rollers.
The tape is irregularly wound.
Clean the capstans or pinch rollers.
Wind the tape by advancing or
rewinding rapidly.
Too noisy
Magnetized head.
Poor connections.
Demagnetize the head.
Check the connections and connect
all cords securely.
Not recording
The tabs have been removed.
Dirty head.
Cover with the adhesive tape.
Clean the head.
2
16
Specifications
TYPE
Stereo full logic double cassette deck with Dolby B NR system.
Track system
4-track, 2-channel stereo
Recording system
AC bias system (bias frequency : 105 kHz)
Erasing system
AC system
Tape speed
4.76 cm/sec. (1-7/8 ips)
Heads
Deck A
1 erasing head and 1 recording / playback head (rotating)
Deck B
1 playback head
Wow and flutter, unweighted CCIR/ARM
0.3 %
Frequency response, - 20 dB recording / playback, Dolby NR OFF
Normal
40 Hz ~ 12 kHz, 3 dB
Chrome
40 Hz ~ 13 kHz, 3 dB
Signal to noise ratio, weighted CCIR/ARM
Dolby NR OFF, normal/chrome
43 / 45 dB
Dolby B NR, normal/chrome
53 / 55 dB
Line input sensitivity/impedance
400 mV / 63 k
Line output level/impedance
500 mV / 1.5 k
Total harmonic distortion, 333 Hz, 0 dB recording
Normal
2%
Channel separation
40 dB
GENERAL
Power supply
Power consumption
Unswitched AC outlet
Dimensions (W x H x D)
120 V~60 Hz
14 W
Total 100 W, 1A max.
440 x 141 x 250 mm
(17-3/8x5-1/2x9-13/16 inches)
4.0 Kg (8.8 lbs)
Weight(Net)
Note : Design and specifications are subject to change without notice for improvements.
17