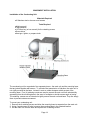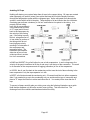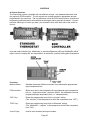
1
GLACIER BAY, INC
Micro HPS
tm
Micro Hybrid Plate System
Installation Guide
and
Owner’s Manual
Updated: December 4, 2006
© 2006 Glacier Bay, Inc.
All rights reserved
Glacier Bay, Inc.
2845 Chapman Street
Oakland, CA 94601
(510) 437-9100 (Phone)
(510) 437-9200 (Fax)
www.glacierbay.com
INSTALLATION AND OWNER’S MANUAL
TABLE OF CONTENTS
General Information and safety warnings
Warranty
Installation
4
6
Most Common Installation Mistakes
8
System Components
9
Selecting Locations For Major Components
Condensing Unit
Raw Water Pump
Control “T” Assembly
Thermostat/ ECM Controller
Trimlinetm Evaporator Plate(s)
9
9
10
10
11
12
Component Installation
Condensing Unit
Zinc Holder
Trimlinetm Evaporator Plate(s)
Plate Mounts
14
14
15
16
17
Running The Copper Tubing
Tube Connection Basics
Installing Ball Valves
Planning Your Tubing Runs
Installing Check Valves
Installing the Correct Plate
Avoiding Oil Traps
P-Traps, U-Traps and Condensing Unit Locations
An Ideal Tubing Layout (examples)
Bad Tubing Layout (example)
Sensing Bulb Placement and Attachment
Tubing Sizes
Making Soldered Connections
Soldering Technique
Insulating the Suction Lines
17
18
18
18
19
19
20
21
22
24
24
25
25
26
26
“Arctic Air” Air Conditioning (optional)
Locating The Blower Unit
Physical Location
Ducted vs Non-Ducted Installation
Running Copper Tubing to Arctic Air
Arctic Air Controls
Maximum Current Draw
27
27
27
28
30
31
31
Page 2
Making The Electrical Connections
Wiring the Electrical Connections
Extending the Temperature Probe
Engine Drive Signal Input (ECM Only)
Maximum Current Draw for Components
Basic Electrical Wiring
Wire Size
Wire Size Table
AWG to Metric Wire Conversion Table
Leak Checking, Evacuating, And Charging
Pressure/Temperature Chart for 404A
Handling Refrigerants And High-Pressure Gas
Rotalock Valves
Connecting The Gauge Set
Leak Checking
Tools of the Trade
Common Leak Check Methods
Finishing Up the Leak Check
Evacuating
Begin Evacuating
Completing Evacuation and Charging
Removing the Gauge Set
31
32
32
32
31
33
33
34
34
35
35
35
35
36
37
37
38
40
40
40
41
41
System Operation And Maintenance
System Controls and Operation
Basic Operation of System Priority
Circuit Breakers
High Pressure cutout
Low Pressure cutout
Determining The State of The Plate
42
42
43
43
43
43
Controls
Control Overview
ECM Controller
ECM Control Settings
Status Indicator Light
Box temperature Monitor
Re-Programming To Factory Default
Standard Thermostat and ECM Control Settings
Adjusting the Setpoint and Differential
Control Error Codes
Optimizing Settings for Maximum Efficiency
How Long Should the System Run?
Effects of Mis-Adjustment
Superheat
Appendix 1 - Troubleshooting
Appendix 2 - Cold box design and insulation
45
45
46
46
46
46
47
47
48
50
50
51
53
54
56
58
Page 3
GENERAL INFORMATION
Congratulations on your purchase of the finest marine refrigeration system in the world.
Your Glacier Bay system has been carefully engineered to provide you with many years
of trouble-free, energy efficient operation. To take full advantage of your system's
advanced design it is important that the installation and adjustment procedures outlined
in this guide are carefully followed. Many owners choose to install their new Glacier Bay
system themselves rather than hire a professional. One advantage in doing so, in
addition to the obvious one of saving money, is that they will increase their familiarity
with the system's design and operation. Glacier Bay has kept the owner/installer in
mind when writing the Installation Manual. Those doing their own installation are likely to
find the process easier than they expected with only a minimal number of inexpensive
tools required.
Warranty Activation - The Glacier Bay “System Startup Form”
Included in the sleeve of this manual binder. Throughout this manual you will see certain items
identified as “(This is a Prestart Checkout Item)”. This identification denotes that this particular
installation point is included in the prestart checklist of the System Startup Form. While all
high-performance refrigeration systems have very similar installation and startup requirements, it
is a fact that installation quality can vary widely from installer to installer. It is in the best interest
of the end user, the installer and Glacier Bay to be certain that proper procedures are followed
during installation and system start-up. To this end we make the completion and submission of
our “System Startup Form” a requirement for warranty activation. This form must be
completed and returned to us within 15 days of system startup for your warranty to be
valid. For more information on your warranty, see the GLACIER BAY, INC. LIMITED THREE
YEAR WARRANTY on the following page.
A Note About Your HFC-404a System
WARNING - THIS SYSTEM IS PRE-CHARGED WITH 3.5 LBS OF REFRIGERANT.
DO NOT OPEN THE Rotalock VALVES UNTIL ALL TUBING IS ATTACHED, LEAKCHECKED AND FULLY EVACUATED.
Your Glacier Bay Micro HPS is designed to use HFC-404a refrigerant gas. The best
energy efficiency, overall performance and equipment life will be obtained by using
HFC-404a. The Dupont trade name for this gas is SUVA HP62. HFC-404a gas is the
industry standard non-ozone depleting replacement for R-502. It is very common in
commercial refrigeration applications. If are having trouble locating a source for
refrigerant try contacting a service company that specializes in commercial refrigeration.
The following refrigerants are very similar in performance and pressure and can be
substituted if the need arises.
R-502, R-507, Suva HP-80, Klea 407B
WARNING - DO NOT USE ANY REFRIGERANT WHICH IS NOT ON THE ABOVE
LIST. DOING SO WILL VOID THE WARRANTY AND CAN RESULT IN
DANGEROUSLY HIGH PRESSURES.
Page 4
On the top of the compressor is a warning: STOP READ WARNING LABEL. This label
on the side of the compressor may not be visible. Below is the warning on the label:
WARNING!
IMMEDIATELY GET AWAY if you hear sounds of arcing inside the compressor (sizzling,
sputtering or popping). Burns from compressor terminal venting with ignition may result.
Improper servicing can lead to fire, electrocution, or explosion. Never service, repair or
troubleshoot a system unless you are a professional service person.
NOTICE: THERMALLY PROTECTED COMPRESSOR EQUIPPED WITH A THERMAL
PROTECTOR. ALLOW TIME TO RESET.
Also note:
WARNING!
! DANGER
!
Do not install the Micro HPStm
condensing unit or solenoids in
explosive atmospheres such as in
spaces containing:
gasoline engines, tanks or fuel
line fittings, or compressed fuel
cylinders, regulators, or valves.
Improper installation could result
in injury or death.
Page 5
GLACIER BAY, INC.
LIMITED THREE YEAR WARRANTY
Validating Your Warranty Coverage
Your Micro HPS refrigeration system Installation and Owners Manual contains a System Startup Form
which must be completed and returned to us within 15 days of system startup for your warranty to be
activated. Failure to submit this form within this time limit will invalidate all warranty coverage. Completed
forms may be submitted by any one of the following methods (including on-line) at:
Mail - Glacier Bay, Inc., Attn: Warranty Activation, 2845 Chapman St., Oakland, CA 94601
Fax - (510) 437-9200
Internet - submit the form on-line at www.glacierbay.com/micro_hps_warranty_form.htm
Please request an acknowledgment that your form has been received. Glacier Bay is not responsible for
forms lost in the mail.
Micro HPS Refrigeration System Warranty Coverage
Glacier Bay refrigeration systems are warranted with the following conditions:
The warranty covers defects in materials and workmanship causing a system failure or serious malfunction
for a period of three (3) years from the date of purchase. The warranty is limited to the actual cost of the
defective component(s) and does not include coverage for any labor cost incurred in the removal or
reinstallation of such component(s). Shipping costs are not included. Warranted components shall be
repaired or replaced at the sole discretion of the manufacturer. This warranty does not include failure due
to:
●improper installation
●damage from lightning or other sources of excessive voltage
●abuse, misuse or improper maintenance/service
●rust/corrosion due to water exposure
Expressly excluded from this warranty is:
●cost for any independent service, repair or troubleshooting
●shipping expenses including loss or damage
●sea water pump
Glacier Bay, Inc. shall not be liable for consequential damages resulting from the use of this product.
Coverage for any incidental damage to vessel, equipment or supplies caused, either directly or indirectly,
by the failure of any Glacier Bay component is specifically excluded. This warranty is valid only for
complete systems and does not include Glacier Bay equipment used in conjunction with system
components supplied by other manufacturers. The coverage herein described constitutes the whole, no
other warranty written or verbal is authorized.
Your Rights Under this Warranty
Customers seeking coverage under this warranty have the right to choose one of the following:
Option 1 - “Repair” of the customer’s equipment at a factory authorized service center.
With the “Repair” option, your original equipment is repaired at the factory or a factory authorized service
Page 6
center and returned to you upon completion. You, or an agent you appoint, remove the equipment from
the vessel and return it to us prepaid and fully insured. (Note - Glacier Bay is not liable for shipping loss or
damage). After the equipment is examined and tested, you will be notified of the cause of the problem and
a finding of whether the cost of the repair is covered under the terms of this warranty. If warranty coverage
is authorized, the cost of all in-house service labor and parts will be covered. If warranty coverage is
declined, a quotation will be provided and you may choose to have the unit repaired at your expense or
returned to you unrepaired. Whether or not the unit is repaired under this warranty, you will be responsible
for the cost of removal and replacement of the equipment on your vessel.
Option 2 - “Replacement” with a functionally identical new or factory-refurbished system.
The “Replacement” option offers you the opportunity to get up and running without waiting for equipment
repair. In this option, a functionally identical new or factory-refurbished (at Glacier Bay’s sole option) will
be shipped directly to you before you remove your defective component. Because no determination of
warranty coverage has yet been made, you will be asked to sign a purchase agreement and authorize a
charge to your credit card for up to the retail purchase price of the component plus shipping costs. The
card will only be charged for shipping costs. The value of the component will not be charged for 15 days
(or longer if prior arrangement is made). Upon receipt of the new component, you or your appointed
agent, swap out the problematic component for the new one. You then return the old component to us
prepaid and fully insured (Note - Glacier Bay is not liable for shipping loss or damage).
Upon receiving the old equipment, it will be examined and tested. You will be notified of the cause of the
problem and a finding of whether the cost of the repair is covered under the terms of this warranty. If
warranty coverage is authorized, there will be no additional charges to your credit card and the matter
considered closed. If warranty coverage is declined, a quotation will be provided and your credit card
charged to bring the refurbished unit to “like-new” standards. Whether or not warranty coverage is found,
additional cost may be incurred to improve the appearance of the unit if it has suffered cosmetic damage.
In all cases, you will be responsible for all shipping costs and the removal and replacement of the
equipment on your vessel.
To Obtain Warranty Service:
Decide which of the two options you prefer. Contact Glacier Bay for an RMA number by calling the sales
department at 510-437-9100 or emailing [email protected]. Do not return anything to us without
our RMA number clearly written on the outside of the shipping container. Once the RMA number is
obtained, return the defective component(s), properly packaged and postage paid to Glacier Bay, Inc.,
2845 Chapman St, Oakland, CA 94601. Glacier Bay is not responsible for loss or incidental damage
during shipping. Write the RMA number on the outside of the box. When obtaining an RMA number you
will need to provide the purchase date, model and serial number, detailed explanation of the problem
(reason for return), place of purchase along with your name address and telephone number.
The issuance of an RMA number or an agreement to accept a product for return does not
constitute a decision or commitment to provide warranty coverage.
Page 7
MOST COMMON INSTALLATION MISTAKES
Pay attention - don’t make these common installation mistakes.
Mistakes marked (1) will destroy your system.
Mistakes marked (2) will make your system always function poorly.
Mistakes marked (3) will make your system maintenance frequent and/or problematic.
Component Locating Mistakes
●
Mounting the condensing unit in such a tight space that there is no room for service
access. (3)
●
Mounting condensing unit in an area that is too hot or has too little ventilation. (2)
●
Mounting the water pump on a resonating platform. (2)
●
Failure to mount freezer plates such that no point in the box is greater than 18" away from
the plate. (2)
Tubing Run Mistakes
●
Incorrectly routing the suction (return) line and connecting the “T’s” so that oil
traps are created. (1)
●
Using high-temperature braze (“Silfoss” or “Phosbronze”) rather than Stay-Brite #8.
solder to make the tubing connections. (2,3)
●
Failure to allow sufficient room on the suction tubing to properly mount the expansion
valve sensing bulbs. (2)
●
Improperly positioning and/or insufficiently tightening the expansion valve sensing bulbs.
●
Overheating joints and using too much solder or flux. (2)
●
Using “flare” fittings instead of soldered connections. (3)
Electrical Connection Mistakes
●
Making poor quality connections when lengthening the temperature probe wires. (2)
●
Failure to connect the “Engine Start Input” wire on ECM control installations. (2)
●
Failure to run the wire between thermostatic/ECM controls on multi-zone systems. (2)
●
Failure to properly crimp ring terminals. (2,3)
System Startup Mistakes
●
Opening the Rotalock valves on the condensing unit before the rest of the tubing has
been properly leak checked and evacuated. (2,3)
●
Failure to understand Glacier Bay’s sequential box pull-down (freezer first, then
refrigerator, etc) and thinking there is a problem because “the freezer is cooling but the
refrigerator isn’t”.
Page 8
SYSTEM COMPONENTS
Every Microtm HPS includes:
Condensing unit, Trimlinetm Spidercoiltm evaporator plate(s), digital thermostat, 12 or 24V Whale
sea water pump (MH12PS or MH24 PS) and installation supplies and fittings.
You may also have one of more options including;
Control “T” solenoid assembly (for cooling multiple zones), ECM controls (replacing standard
digital thermostats) and Arctic Airtm air conditioning blower.
The installation supplies and fittings include an assortment of helpful connectors, clamps and
fittings. Also included is a length of Stay-Brite #8 solder and a compatible flux. (Stay-Brite #8 is
the only type of solder you should use when making your piping connections.) Because every
installation is different, it is very possible that you will need to purchase additional fittings beyond
those included in your installation kit. Also, you will need to purchase copper refrigeration tubing,
electrical wire, a circuit breaker, 1/2" water hose and possibly a sea water strainer.
We strongly recommend that you read this manual in its entirety before beginning your
installation. Should you have any questions at all, please contact the Glacier Bay sales
department at (510) 437-9100 or by email at [email protected].
SELECTING LOCATIONS FOR THE MAJOR COMPONENTS
A successful installation requires planning and forethought. Following are some things to keep in
mind as you decide where you want to mount each component.
Condensing Unit
Page 9
1. Mount it level - The condensing unit must be mounted so that it is level when the boat is at
rest. It can be mounted either fore/aft or athwart ships and can operate for extended periods of
time at full heel when mounted to be level at rest. Also be sure to mount it on a non-resonating
platform. (This is a Prestart Checkout Item)
2. Ventilate it - Ensure that the area is reasonably well ventilated particularly if the space is
small. Even though your system is water-cooled, the compressor and electronics can generate a
significant amount of heat. Small, unventilated spaces (< 5 cubic feet) do not permit the heat to
be properly dissipated. In these spaces it is important to have a means to permit heated air to
flow out of the cabinet. On systems incorporating the Arctic Air option a greater amount of air
circulation is required since it is assumed they will be running for longer periods of time. Engine
room locations are not advised unless it is very well ventilated. The temperature in the
compartment must not rise above 130 degrees F (55 C) (This is a Prestart Checkout Item)
3. Service it - Ensure access to those areas of the compressor unit which will require periodic
maintenance. At a bare minimum this means access to the front for the circuit breakers, wiring,
sight glass, Rotalock valves, zinc and seawater tubing and some access to both sides to provide
access to the base retention screws (see diagram below). It is also a very good idea to have
enough access to the cover screws. To reach the condenser you need to have good access to
the back and right sides with an allen key (3/32" hex wrench).
Raw Water Pump
1. Intake water access can be obtained by teeing into almost any existing raw water intake lines
including head, galley, engine, water maker or deck wash. If the engine intake is used the tee
should be made as close to the thru-hull as possible. The Micro HPS is designed to use ½ “
water hose.
2. Leave room for a suitable seawater strainer. If one does not already exist it will have to be
added. The strainer will need to be checked for periodic cleaning so make sure you can get to it.
(This is a Prestart Checkout Item)
3. The supplied Whale pump may be mounted above or below the waterline. It is adjusted to
the minimum pressure setting.
4. The pump does create vibration when running. Do not mount it to any bulkhead or platform
which may amplify pump noise into the cabin interior. (This is a Prestart Checkout Item)
5. Route water discharge above the waterline so that water flow can be observed, but not so
high that it splashes.
Control "T" Solenoid Assembly
1. The control “T” assembly is included on systems with more than one zone. It may be
mounted in any position.
2. Control “T” assemblies may be secured into position using tube mounting connectors
(available from most hardware stores) over the tubing. Depending on the mounting location, it is
usually necessary to first screw (or epoxy) a wooden mounting block in place to which you may
attach the control "T" assembly.
Page 10
Digital Thermostat/ECM Controller
1. The standard digital thermostat or (optional) ECM digital controller may be mounted any
distance from the refrigerator/freezer box(es). These controls are of the flush-mount type. For
panel (or bulkhead) mounted installations it will be necessary to cut a rectangular hole into which
the control is mounted. When such a hole is not desired (or possible), a box can be constructed
to hold the control out from the surface.
Page 11
2. A “well” is provided at the bottom of each holding plate for the temperature probe. The probe
must be fully inserted into the well and the hole sealed with putty, caulk or foam. If a single box
(ie. “zone”) has multiple holding
plates, the probe should go into
the largest of them. If the holding
plates are all the same size, the
one nearest the wire entry point
can be used.
(This is a Prestart Checkout
Item)
3. If you purchased the optional
box temperature probes, you
should know that they are
identical to, and interchangeable
with, plate temperature probes.
They will just be wired to different
connectors on the control. You
will want to mount your box
temperature probes as near as
possible to mid-point in the box. Choosing the “best” location to measure box temperature is
always problematic due to a common lack of an out-of-the-way place to secure the probes.
Compromises usually have to be made. Probes mounted at the top of the box generally
measure temperatures above the “average” while probes mounted at the bottom may read lower
than the box average. While you may want to secure the probe wire to the side of the box, make
certain that the actual probe itself rests at least 1/2" (12mm) away from the wall and is exposed
to free air circulation.
(This is a Prestart Checkout Item)
4. The standard wire length for all temperature probes is 59" (1500 mm). The wire can be
lengthened to any distance required with regular marine 18 AWG to 22 AWG wire. When
lengthening the wire all connections must be soldered and sealed with glue-lined heat-shrink
tubing. Securely fasten the wire inside the box so that it is out of the way and cannot come loose
to pull the probe from inside the plate. (This is a Prestart Checkout Item)
Trimlinetm Evaporator Plates
The size and number of Trimlinetm Spider-coiltm evaporator plates in a zone is determined by your
box size and quality of insulation. If you have web access you can use the box heat load
calculator on our web site at: http://www.glacierbay.com/Heatload_calculator/heatload.htm
to determine the expected daily heat load on a 90 degree F (32 degree C) average day. Divide
the daily heat load by 24 to get the hourly heat influx in your box in BTUs.
The heat removal capacity of each plate is determined by plate surface area and is the same for
both reefer and freezer plates.
The heat capacities are as follows:
(S.A. is plate surface area in square feet. L” includes 4" for the valve and tubing.)
Page 12
plate #
W”
L”
S.A. sq ft.
ref & frz btu/ hr.
plates x 2
M1
11
16
2.6
51
102
M2
11
20
3.3
66
132
M3
13
24
4.6
93
186
M4
15
19
4.1
81
163
Select the size and number of plates that will fit in the box and provide sufficient BTU/hr capacity.
If none of the standard choices will work, custom sized plates are available.
The maximum number of plates in any one zone is two. If a box has an hourly heat load of more
than 186 BTUs per hour, this can be handled by installing multiple zones in the same box. This
situation would be unlikely except in the case of a very large, possibly poorly insulated freezer.
If you can afford the space, over plating is preferable in a freezer. Under plating will result in
unsatisfactory box performance.
In a reefer, significant over plating can result in a box that runs too cold, but this can be easily
corrected by covering part of the plate surface area with foam insulating tape.
1. Keep your tubing connections in mind - Makes certain you have sufficient room to prevent oil
traps (see the evaporator plate installation section for more detail). (This is a Prestart
Checkout Item)
2. Plates may be mounted in any position, except upside down with the valve at the bottom.
3. The holding plates should be mounted on the side(s) of the box as high on the box wall as
possible. This is to take advantage of the convection currents which form as the air cools and
sinks down towards the bottom of the box. Having the plate(s) located near the top of the box
will help maintain even temperatures throughout the box. Although it may seem counter-intuitive,
mounting the plate(s) on the roof of the box will not provide as good an air circulation.
4. In the case of freezer holding plates attention must also be paid to the spacing of the plates
and the distance to other areas of the box. To ensure proper freezer temperatures under all
conditions, no point in the freezer box should be further than 18" ( about 450mm) from a
Trimlinetm Spider-coiltm plate.
Arctic Airtm Air Conditioning
Please read the section on the Arctic Airtm installation on page 26 before selecting a location for
your blower.
Page 13
COMPONENT INSTALLATION
Installation of the Condensing Unit
Materials Required
●6 Stainless steel or bronze wood screws
Tools Required
●Marking pencil
●Tape measure
●1/8" Allen key (or hex wrench) for the retaining screws
●Screw driver
●Heat gun, lighter, or propane torch
The condensing unit is comprised of two separate pieces - the main unit and the mounting base,
that are joined together with screws. To minimize the transmission of vibration, the main unit is
not rigidly mounted to the base. Instead, it rests on rubber bumpers which are part of the
mounting base. Four (4) retaining screws are used to prevent the main unit from substantially
separating from the mounting base in the event of a capsize or similar severe angle or jarring.
The retaining screws are not intended to tightly secure the main unit and base. They are simply
there to prevent extreme movement.
To mount your condensing unit:
1. Remove the 4 retaining screws and allow the mounting base to separate from the main unit.
2. Using 6 wood screws or bolts to secure the mounting base in the selected location.
3. Set the main unit onto the base and replace the 4 retaining screws.
Page 14
To Install your cooling water zinc holder:
Your Micro HPS system is supplied with a zinc to protect the cupronickel
seawater condenser from electrolysis in case there are stray electrical
currents present in the water. The zinc holder consists of a “y” shaped tube
with a zinc in one arm of the Y and a ground wire that attaches to a screw
on the condensing unit mounting base.
The Y shaped zinc holder needs to be installed in the seawater intake line for the Micro HPS
condensing unit, using the supplied heat shrink hose clamps and a short piece of water hose.
The part of the Y containing the zinc must be horizontal or below, so that it will not dry out when
the pump is not running.
No!
(180º horizontal)
O.K.
The head of the zinc can be facing towards or away from the Micro HPS, but it will probably be
easier to service in the future if it facing away. Leave room for
future zinc replacement.
When you are ready to install the zinc holder, the heat shrink
hose clamp should be removed from the cardboard ring by
crushing the ring with your fingers.
The clamp can then be removed from the ring and slipped over
the Micro HPS intake tube.
The short piece of hose should extend over the intake tube far enough that the clamp has copper
beneath it and not bare hose.
Shrink the clamp in place with a heat source such
as a heat gun or the flame from a lighter or
propane torch. Be sure to use enough heat to
evenly shrink the clamp, especially on the top.
The second supplied heat shrink clamp should be used to hold the Y zinc holder to the other end
of the short piece of water hose. Connect the end of your intake water hose to the zinc holder
with a standard stainless hose clamp
or another heat shrink clamp (not
supplied).
Once the zinc holder is in place, the
ring terminal on the ground wire
should be attached to the neighboring
screw per the picture, using the 1/8"
Allen key or hex wrench.
Spare zincs with nut are available
under GB part number MHZINC. The
pencil zinc is 3/8” x 2” with a 1/4”
thread.
Page 15
Installation of the TrimlineTM SpidercoilTM Evaporator Plates
Materials Required (conventionally insulated boxes)
●
Stainless steel or bronze wood screws
Materials Required (BARRIER Ultra-Rtm Boxes)
●
BARRIER plate mounts (set) or 1/4" fiberglass sheet and flat-head screws
Tools Required
●
Marking pencil
●
Tape measure
●
Screw driver
●
Drill and bit
●
Wood blocks to position and support plate during installation
WARNING: Read and understand the next section “Running The Copper Tubing” before
mounting your plates. Make certain that you have sufficient room to properly route the tubing.
Oil traps MUST be avoided and you must leave enough room to properly clamp the expansion
valve sensing bulbs and accommodate check valves.
Refrigeration Plates and Freezer Plates
Refrigeration plates and freezer plates are identical except for the eutectic solution inside and the
corresponding temperature rating engraved on the back of the plate. The standard freezer
solution (TSS -8) is rated at -80 F (-220 C) and the refrigeration solution TSS+26 at +260 F (-30
C). These temperature ratings reflect the eutectic point (freeze/thaw temperature) of the
solution. The plates are not interchangeable and cannot be used outside their intended functions
without an extreme loss in efficiency and holdover.
Mounting Positions
The evaporator plates rely on convective circulation to absorb heat from the air in the box. They
work best when mounted high in the box on the side walls. Mounting the plates on the top
(ceiling) of the box is not generally recommended. The plates can be mounted either vertically or
horizontally so long as the thermal expansion valve is not facing down and that proper tubing
connections are maintained (see the section on “Running the Copper Tubing”). Be sure and
mount freezer plates so that no area of the box is further than 18" from a plate.
Installing Plate(s) - With Standard Foam Insulation
Position all holding plate(s) and support them in place with suitable wooden blocks. After
ensuring that all positioning is correct, use a pencil to mark the location of all eight holes in each
holding plate mounting flange. Remove the plates and pre-drill the screw holes with a suitable
size bit. Re-install the holding plate(s) using at least four (4) bronze or stainless steel screws on
#1 and #2 plates and eight (8) on #3 and #4 plates.
Page 16
Installing Plate(s) - With BARRIER Ultra-Rtm vacuum insulation
If your box is equipped with BARRIER Ultra-Rtm vacuum insulation panels you must not drill or
screw through the interior fiberglass liner. To mount the holding plate it is therefore necessary to
devise another method of attachment. One method is to bond strips of wood (with fiberglass and
epoxy) to the inside of the box and screw into the wood rather than the fiberglass liner. The
disadvantage of this method is that the thickness of the wood causes the holding plate to
protrude further into the box space.
Plate Mounts
An alternative method is to construct
(or purchase from Glacier Bay),
holding plate mounting brackets.
These brackets are constructed by
countersinking flat-head stainless
steel screws into a 1/4" thick strip of
pultruded (or pressure-molded)
fiberglass sheet. By epoxying this
sheet to the fiberglass liner, the
plates can then be attached directly
to the screws extending from the
surface. Don’t forget to thoroughly sand the mounting brackets and the area on the liner where
they will be attached to promote good adhesion of the epoxy.
Leave the expansion valve capillary tube and sensing bulb neatly coiled until after the copper
tubing is run.
RUNNING THE COPPER TUBING
Materials Required
●
1/4" and 1/2" soft copper refrigeration tubing
●
Harris “Stay-Brite #8" solder (included in the installation kit)
●
Compatible flux such as Harris “Stay-Clean” (included in the installation kit)
●
“Leak-Lock” refrigeration flare sealant (included in the installation kit)
●
Assorted solder fittings (as required, some included in the installation kit)
●
Check Valves (included in the installation)
●
Ball Valves (included in the installation)
Tools Required
●
Drill with assorted bits and/or hole saws
●
Marking pencil
●
Tape measure
●
Tubing cutter
●
Tube flaring tool
●
#11 X-Acto knife (or similar) for de-burring
●
1/4" and 1/2" spring or lever type (preferred) tube benders
Page 17
Tube connection basics
Now that you have installed all the major components you are ready to make your copper tubing
runs. Running the copper tubing correctly is key to achieving not only a professional-looking
installation, but one that permits your system to operate efficiently and reliably for many years.
Be sure to read and understand this section BEFORE starting to bend your tubing. Once you do
get started, patience (and extra tubing) is the key to success. Remember that once the tubing is
bent it "work hardens" and will resist any further manipulation. If tubing is improperly bent or
kinked during installation you will be far better off to remove it and start again with new tubing
than to try to "make do" with the old piece.
The Micro HPS is designed to be installed using soldered connections. Soldering is both faster
and more reliable then flare and compression connections. Additionally, soldered connections
permit the tubing to be run more tightly next to corners and surfaces since no wrench access is
required. (Surfaces can be temporarily protected from heat with a wet rag.) A very limited
number of “flare” connections are maintained to enable the filter/dryer and expansion valve(s) to
be easily replaced in the field should the need ever arise. Installers are cautioned to:
1. Use only Harris Stay-Brite #8 solder on all connections. DO NOT USE ANY
SOLDER/BRAZE WHICH REQUIRES THE USE OF AN ACETYLENE TORCH. An acetylene
torch should never be used to install a Glacier Bay system. (Exception - Canadian and some
European jurisdictions may require the use of high temperature braze materials).
(This is a Prestart Checkout Item)
2. Never add flare or compression (“Swagelok”) fittings in the middle of tubing runs. Experience
has shown that these often start leaking over time and can end up being a headache for years to
come. (This is a Prestart Checkout Item)
3. Read and follow instructions on making “T” connections to ensure that no oil-traps are
created. (This is a Prestart Checkout Item)
Installing Ball Valves
Ball valves are included in your installation kit.
They are installed in order to isolate the
condensing unit from the system in case you
need to swap out the system. The ball valves
are soldered onto the ½" suction and 1/4"
discharge refrigerant tubes coming out of the
condensing unit. The discharge ball valve is
3/8" and connects with the two 3/8 x 1/4 fitting
reducers. Since they are biflow valves,
direction does not matter. They should be
installed as close to the condensing unit as
possible. Refer to the Troubleshooting
section at the end of this manual for more
information.
Planning your tubing runs
The Micro HPS accommodates many different box configurations and layouts. It is impractical to
Page 18
try to show every possible combination here. However, no matter what the layout or how many
different “zones” a system has, the same logic and rules apply. The following illustration shows a
simplified diagram of a three zone system which consists of one refrigerator box, one freezer box
and one Arctic Airtm air conditioning zone. In this example only one plate is shown in each zone.
However, if there is more that one plate in a single zone, the liquid line is split and routed to each
valve separately. After the evaporators, all outlets are connected to a common suction (return)
tube.
Installing Check Valves
A check valve is used on the 1/2" suction line of the refrigerator and freezer zones so there is no
box interaction. A check valve is not required on any Arctic Airtm air conditioning zone, nor when
there is only one refrigerator or freezer zone. The check valves can be installed in any position
horizontally or vertically as long as the direction arrow is observed. There are examples in the
“Avoiding Oil Traps” section below that further illustrate check valve location.
Installing the Correct Plate
Each plate is labeled on the back if it is a freezer or a refrigerator holding plate. The refrigerator
plate is also notched ONCE on the front face in the upper right of the flange. The freezer plate is
notched TWICE on the front face in the upper right of the flange.
Refrigerator
Freezer
Page 19
Avoiding Oil Traps
Nothing will destroy your system faster than oil traps in the copper tubing. Oil traps are created
when improperly run suction (return) lines collect and trap the oil which naturally circulates
through the refrigeration system with the refrigerant gas. As the refrigerant flows through the
system it carries with it small oil droplets. These droplets of oil are heavier than the circulation
circulating gas and have a tendency to “fall out” and collect at low points in the tubing. In a
properly laid out tubing
runs, the oil accumulates in
a few small areas (such as
oil “P” traps) and is forced
back to the compressor by
the velocity of the flowing
gas. If the tubing is poorly
laid out, a large amount of
oil can collect in portions of
the tubing which do not
have high gas velocity
resulting in oil starvation of
the compressor and
premature failure. The
illustration here shows a
side view of how oil can
collect and flow in suction
line “tee” connections.
In BAD! and WORST!, the oil will collect in one or both evaporators. In such a large area, the
velocity of the gas is insufficient to lift the oil and carry it out the top of the connection. The result
is oil starvation of the compressor and oil-logging (saturation) of one of the evaporators.
In GOOD!, the oil can flow back to the condensing unit but runs the risk of also collecting in the
lower evaporator if only the top evaporator is in use.
In BEST!, all oil drains toward the condensing unit. Oil cannot back-flow into either evaporator.
Also, if you needed to go up to the condensing unit you would use this type of connection and
place a “P” trap at the bottom to collect and return the oil. You would put the riser after the P
trap.
To prevent oil traps, carefully plan your tubing runs using the following illustrations as a guide.
Note that the diagrams only show the suction (return) tubing. This the critical line. The
discharge line is more obvious and has been omitted for clarity.
Page 20
The following two images show configurations for when the condensing unit is mounted above
and below the holding plates. The check valve can be mounted to flow upward (pointed up) or
horizontally, not downward. When the condensing unit is above the plates, p-traps are installed
in each holding plate zone to get the oil to flow upward. If you have a long horizontal suction
tubing run, including u-traps every eight (8) feet will aid in oil return. U-traps are necessary when
you have a slight incline in a long horizontal run. In the images below, notice the check valves
(arrows pointing away from plates towards condensing unit), p-traps, and u-traps.
Condensing Unit Above Plates
Page 21
Condensing Unit Below Plates
In the image where the condensing unit is mounted below the plates, notice the flow of oil is
always downward.
The following images are close ups of holding plates in two zones, each zone has a separate
check valve. The first two are “ideal layouts” for when the condensing unit is above and below
the plates. The third is a “bad layout”. Plates can be mounted vertically or horizontally, but not
thermal expansion valve facing downward.
Ideal Layout for Condensing Unit Above Plates
Page 22
Ideal Layout for Condensing Unit Below Plates
Ideal Tubing Layout
The illustrations above represent the ideal tubing layout. It shows all of the most important
considerations taken into account. In the first ideal layout, the suction tube exits at the top of the
box above the plates to get back to the condensing unit mounted above. To “lift” the oil up the
tube and transport it back to the condensing unit, a “P” trap is placed immediately at the bottom
of the upward run. All of the oil leaving the evaporators collects into this point. As the trap fills
with oil the velocity of the gas passing through it increases. The fast flowing gas lifts and carries
the oil back to the condensing unit.
In the second ideal layout, the P trap is not needed since there is a downward flow back to the
condensing unit. If you have a long horizontal run, it is good to use a P-trap at the exit of the
plate and U-traps every 8 feet.
Coming out of each plate, you have a small dip to prevent back flow of oil to the evaporator.
Where any two lines meet, the correct “tee” should be made. You can see that the “GOOD” and
“BEST” methods are used at all tees in these examples.
Another important advantage of the ideal layout is that the expansion valve sensing bulbs are
located well back from the common tubing. This ensures that they will sense only the
temperature of the gas coming from the evaporator they are feeding and not those of nearby
plates.
Also note that the check valves are installed such that the arrow points in the direction of the flow
forward, that is away from the plate and towards the condensing unit.
In the next illustration you will see examples of the kind of connections that you need to avoid.
Page 23
Bad Layout
Proper Expansion Valve Sensing Bulb Placement
As shown in the previous illustrations, consideration has to be given to expansion valve sensing
bulb attachment. Space must be made in the area immediately after the holding plate for this
bulb to be securely attached to the tube (see Attaching the expansion valve sensing bulb below).
This location must not be less that 2" (50mm) from a “T” connection and made in such a way that
gas flowing from another plate will not effect the temperature it reads. From proper operation it
is imperative that each sensing bulb only responds to the temperature of the gas exiting that
holding plate and not other plates “upstream”.
Attaching the Expansion Valve Sensing Bulb
Carefully uncoil the expansion valve capillary tube and sensing bulb so that it can be secured to
the suction line exiting the plate. Use the perforated metal strap provided or a small hose clamp
to secure the bulb to a horizontal run of the 1/2" suction tubing at the 10:00 or 2:00 position. Do
not use nylon “wire ties” as they do not provide sufficient clamping pressure.
12:00 position
12:00 position
2:00 position
2:00 position
Be sure that the bulb rests flat on the tube to ensure good thermal contact between the bulb and
suction line. When properly attached the bulb should be tight enough to be difficult to twist by
hand. (This is a Prestart Checkout Item)
Page 24
Tubing sizes
All tubing used in the installation should be clean/dehydrated soft copper refrigeration tubing.
This tubing is available from any refrigeration equipment supplier and most industrial supply
houses or directly from Glacier Bay. Do not use copper tubing designed for fuel or water - there
is a difference. Copper fittings from the local plumbing store can be used but will be referred to
as one size smaller than the refrigeration fittings (ie. a 1/2" refrigeration fitting is a 3/8" plumbing
fitting). Refrigeration tubing is sized by the outside diameter. Installation of your Glacier Bay
system requires the use of two sizes of refrigeration copper tubing - 1/4" and 1/2".
O.D.
1/4"
1/4"
1/2"
Tubing Function
Discharge - Liquid
Discharge - Liquid
Suction - Gas
Pressure
High
High
Low
From
Condensing Unit
Control "T"
Evaporator Plate
To
Control "T" Assembly
Expansion Valves
Condensing Unit
Making Soldered Connections
There is little doubt that soldering connections is the preferred method among experienced
refrigeration system installers. Once the technique is developed, soldering is both fast and
extremely reliable. If you are not confident in your soldering ability, buy 10 or so extra fittings of
various sizes from the hardware store and practice your technique. To ensure good solder
connections observe the following recommendations:
●
De-burr the ends of the tubing in the same manner described for flared connections so
that refrigerant will flow smoothly through it. Ensure that the mating surfaces are clean
and free of oxidation by cleaning them with steel wool before applying flux.
●
To prevent flux from entering the system, always apply flux to
the outside of the
male half of the connection only never the female half.
●
Use the proper solder and flux. DO NOT USE HIGH TEMPERATURE BRAZE
MATERIALS.* Also, avoid using solder from a plumbing supply store as these alloys are
not designed to withstand the operating pressures of your refrigeration system. The
recommended solder is a low temperature silver solder manufactured by the Harris
Company and called “Stay-Brite #8". The compatible paste flux for copper to copper
connections is called “Stay-Clean”. (JW Harris Company, 800-773-4533, Intl 937-7788515 or www.jwharris.com) Alternate solders can be used but must contain 2% to 4%
silver and/or nickel. These make considerably stronger joints than do common “50/50"
and “95/5" solders. Flux should be of the non-acid paste type. Do not use liquid acidbased fluxes. (*Exception - Canadian and some European jurisdictions may require the
use of high temperature braze materials. If a high temperature solder is used, be sure to
purge the system with nitrogen first.)
(This is a Prestart Checkout Item)
●
All soldering should be done with a propane torch. DO NOT USE ACETYLENE*. Protect
surrounding cabinetry and sensitive components from heat damage by covering them
with a wet (not just moist) heavy cotton rag. Be sure to cover everything near the joint to
be soldered as proper soldering technique requires that the joint be heated all the way
around. To protect overhead areas (such as the top of the ice box) place a wet rag
behind a piece of sheet metal which can, in turn, then be wedged into place. (*Exception
- Canadian and some European jurisdictions may require the use of high temperature
braze materials)
Page 25
Soldering Technique
Caution - Do not overheat the joint as too much heat will burn the flux. If the flux burns, the joint
must be disassembled and thoroughly cleaned or it will be impossible to solder. The flux itself is
a good temperature guide. Heat the tube until the flux passes the "bubbling" temperature range
and becomes completely fluid and transparent.
1. Start heating the tube, first applying the flame at a point just adjacent to the fitting. Work the
flame alternately around the tube and fitting until both reach soldering temperature (as
indicated by the flux becoming clear and fluid) before applying the solder.
2. Move the flame to the fitting and apply solder with a “wiping
action” directly on the connection to ensure that it flows evenly
into the joint. The molten solder should be spread evenly
around the entire fitting. Do not keep adding solder and heat in
an attempt to “fill the joint” as this can allow liquid solder to flow
into the system. (Indeed, we have seen solenoid valves
completely filled with solder by well intended installers trying to
ensure a good connection.) A properly soldered joint requires
very little solder.
3. Sweep the flame back and forth along the axis of assembled joint...tube and fitting...to achieve
uniform heat in both parts.
4. After the joint is soldered, with the tube still warm, throughly clean joint of all excess flux using
water and a rag.
Insulating the suction lines
The suction (return) lines from the holding plate to the Micro Condensing Unit assembly will
sweat in humid weather unless they are insulated. All 1/2" suction (return) lines outside the box
should be covered with a “slip on” neoprene foam pipe insulation to prevent unwanted
condensation. It is not necessary to insulate the 1/4" liquid lines. Slip-on foam tube insulation
can be purchased from some hardware stores and all plumbing and refrigeration equipment
supply stores. This insulation is also available with a split for installation on existing tubing runs.
When installing the insulation DO NOT leave gaps between sections. Insulation sleeves should
be bonded (and sealed) together with rubber cement. Leaving gaps, cracks or other openings in
the insulation will cause condensate (water) to collect along the length of the tube and run out
these openings in surprisingly large quantity.
Page 26
INSTALLATION OF THE ARCTIC AIR OPTION
Introduction
This is your guide to installing the ARCTIC AIR air conditioning option package to your Glacier
Bay refrigeration system.
The addition of ARCTIC AIR to your system allows your refrigeration system components to
automatically serve "double duty" as an efficient air conditioner for the 22-23 (average) hours per
day when they aren't needed for refrigeration. Because of our innovative thermal storage
technology and outstanding efficiency, a Glacier Bay refrigeration system generally needs to run
only about 1/2 to 2 hours per day to handle your boat's refrigeration needs. This means that the
compressor and other major components of the system are "off" up to 97% of the day. It is
during this "off" time that the ARCTIC AIR option automatically puts the refrigeration system back
to work to provide air conditioning for the cabin.
Far from just a convenient add-on, the ARCTIC AIR system is a powerful, reliable and unusually
efficient air conditioning system.
Locating the Blower Unit(s)
The ARCTIC AIR blower units are designed primarily to be used in non-ducted type installations.
However, where required, a limited amount of ducting can be used to route either the intake or
discharge (fan reversed) air flow.
Physical location
There are two theories on the placement of AC blowers on board. Conventional wisdom points
out that, since hot air rises, it is usually desirable to try to mount the blower (intake and
discharge) as high in the boat as possible. However, some experienced installers point out that
most boats have a great deal of natural air circulation at the top of the cabin and the blowers
placed high become very inefficient. In our experience there is truth in both of these positions
and it really comes down to the layout of the particular vessel. Many times an “ideal” position
simply isn’t possible due to space limitations. While many owners prefer to adapt existing
cabinets and storage spaces, don't rule out the construction of custom enclosures for your
system. This can expand your options when it comes to blower placement.
The illustration one the following page suggests some possible locations on a typical vessel.
Remember to consider the following items when choosing your location:
1. Tubing runs - You will want to route your copper tubing in an aesthetically pleasing manner.
2. Blower adjustment access - The blowers on multi-blower systems have an access cover
(square with four screws) on the top left side (as viewed from the front). Allow at least 5"
clearance to access the adjustment under this plate. Note that the blowers on single blower
systems do not have or require this adjustment.
3. Condensate drain - Condensation can produce several quarts of water per hour. Most
owners of fiberglass vessels route the condensate tubes directly into the bilge. Some owners,
particularly those with wooden and metal boats, will want to use a separate, easily emptied
container.
4. Air throw - ARCTIC AIR blowers have an average air throw of 12 ft. in most non-ducted
installations.
Page 27
= ARCTIC AIR A/C blower
TYPICAL PLACEMENT LOCATIONS FOR A/C BLOWERS
Ducted vs Non-ducted Installation
In their standard configuration ARCTIC AIR blower units intake air through the back of the fan
and blow it through the evaporator coil before discharging it out the front of the unit. In this
configuration the unit is ready for direct discharge past the discharge grill into a cooled room.
The air intake may be ducted or non-ducted as required. Since even a short length of ducting
can significantly reduce air flow (and cooling capacity) a non-ducted installation is always
preferred when possible.
If the need arises, it is possible to reverse the air flow direction of the unit by removing the fans
and flipping them (do not try to reverse the current to the fans). Air is now pulled in the front of
the unit and passes over the evaporator coil before being discharged out the back. In this
configuration ducting can be added to the fan and the discharge routed to remote locations if
desired.
The illustrations on the following page give general ideas for how the blower unit may be
installed in ducted and non-ducted applications. Obviously, this is just a guideline as every boat
and requirement is different. With a little ingenuity, you’ll find the ARCTIC AIR blowers to be very
flexible and permit many mounting options.
Page 28
TYPICAL NON-DUCTED INSTALLATION
Blower
Unit
Discharge
Grill
Intake
Grill
Bilge
Condensate Tube
Bulkhead
or
Cabinet
Refrigeration
Suction
Cool
Discharge
Air
Air
Flow
Refrigeration
Liquid
Line
Discharge
Grill
Condensate Drain Tube
TYPICAL DUCTED INSTALLATION
Discharge Grill
Flexible Duct
Intake Grill
Blower Unit
Condensate Drain
Flexible
Duct
Reversed
Fan
Mounting
Cool
Discharge
Air
Bulkhead
or
Cabinet
Air
Flow
Condensate Drain
Page 29
Running the Copper Tubing to Arctic AirTM
Like your Glacier Bay holding plates, the ARCTIC AIR blower units are connected to the
compressor components by two copper tubes, a 1/4" liquid supply line and a 1/2" suction line.
1/4" liquid supply line
The 1/4" liquid line will be run directly from the solenoid valve assembly and connected to the
small line at the back of the blower unit. If you are using two blower units which will operate
simultaneously you will need to split this supply line with a 1/4" “T” connector and feed both
blowers in parallel. On multiple zone systems, each zone (comprised of one or more blowers)
will be fed from a separate solenoid valve.
1/2" suction line
The 1/2" suction line is run from all blower units and "T"’d into the suction line coming from the
holding plates. This connection may be made at any point between the holding plate and the
compressor/condensor assembly.
IMPORTANT: Care and consideration must be given to the detail of how this "T" connection is
made. If improperly connected the line can act as an "oil separator" and eventually starve the
compressor of oil causing it to fail prematurely. Use the following side view illustrations as
guidelines for making your "T".
(This is a Prestart Checkout Item)
Page 30
Arctic AirTM System Controls
Introduction
The unit controls are designed so that the refrigerator and freezer always have "priority" over air
conditioning. If either the refrigerator or freezer should require cooling while the air conditioner is
activated the A/C will automatically switch off while the refrigerator/freezer holdover-plates are
re-frozen. Once cooling is no longer needed by the refrigerator, the unit automatically returns to
air conditioning duty. See “Basic Operation of System Priority” for further information.
Standard Control - Timer
The standard control is a mechanical timer. Cruisers on a strict energy "diet" find that this control
allows them to closely monitor the amount of energy devoted to air conditioning. The timer
control does not respond to air temperature. To activate ARCTIC AIR simply turn the knob to the
number of hours you wish to run the system. For continuous operation, turn the knob to the
"hold" setting.
Optional Digital Thermostat
The optional digital thermostat controls air conditioner operation based on the ambient air
temperature. The choice of sensor location is important in obtaining an accurate average cabin
air temperature. By extending the wires running between the sensor and the control, the sensor
may be located anywhere in the cabin. The best location is often found to be near the ARCTIC
AIR intake grill. Setting the digital thermostat is identical to that of the standard thermostat on
the refrigerator/freezer system. A description of the control programming procedure can be
found in the Controls section starting on page 45.
Maximum Continous Current Draws
System
Micro HPS
Micro HPS
Current (Includes water pump)
45 Amps
23 Amps
12 vdc
24 vdc
MAKING THE ELECTRICAL CONNECTIONS
Materials Required
●Tinned copper wire
●Rosin core solder
●Heat shrink tubing
●Cable ties w/screws
Tools Required
●Screw driver
●Wire cutters/strippers
●Soldering iron
●Lighter or heat gun
Page 31
Introduction
With all components mounted and the copper tubing run, it is now time to make the electrical
connections. Included in this manual is the wiring schematic for your particular system
configuration. Also read the section below on “Basic Operation of System Priority” to understand
that freezer takes priority over refrigerator, which takes priority over air conditioning. All wire
sizes are given in “American Wire Gage” (AWG). Longer runs (always use the combined length
of the positive and negative wire) will require heavier wire. Installers outside the US are
reminded that this is not the same as metric wire sizes which are given in mm. To retain the
reliability inherent in your Glacier Bay system it is important that all connections are done in
proper fashion using a high strand count 100% tinned marine-grade wire.
(This is a Prestart Checkout Item)
Wiring the Electrical Connections
When wiring the electrical connections it is important to ensure that all wires are fully inserted
into their proper terminal locations. Strands from frayed wires can create electrical shorts and
poor contacts. Tinned wire is less prone to corrosion and less likely to loosen up over time.
(This is a Prestart Checkout Item)
NOTE: The maximum size wire which can be accommodated by the terminal block is #4 AWG.
If your system requires the use of heavier gage wire, you will need to “step-down” to #4 just
before entering the control box. It may be convenient to install a second terminal block just
outside the condensing unit to provide a voltage test point and make it easier to service the unit
in the future.
Extending the Temperature Probe Wire
The temperature probes used to monitor the holding plate and box are identical and
interchangeable. The probes come with a 59" (150cm) length of wire attached. This can be
extended to any length using #18 AWG tinned wire. If the wire is extended, the connections
MUST be soldered and sealed with heat shrink tubing.
(This is a Prestart Checkout Item)
Engine-Drive Signal Input (ECM Controllers only)
The optional ECM controller provides an automatic holding plate “top-off” mode of operation
whenever extra power is available. This system does not operate from a change in voltage but,
rather, from a distinct and separate input. All systems which include the ECM controllers option
require that an additional wire be run to notify the system that the auxiliary engine has been
started and that additional power is available. This wire should be taken from a location which is
“HOT” with a positive DC current only when the engine (and/or generator) is running. The key
start switch is one obvious choice. Alternately, on some engines it may be possible to use the oil
pressure safety system, however, this must be of the “make on pressure rise” type. The current
load on this wire is very low with a draw of only a few milliamps.
On some vessels it may be desirable to also connect this wire to a toggle switch (for manual
activation) and/or to the generator or other secondary power source. When activating the
“engine-drive” mode from several different sources (such as both and engine and generator), be
sure to use a diode in each wire to prevent back-feeding the other input devices.
Maximum Current Draw for Individual Components
The wiring diagram and accompanying text information for your system (included in this manual)
provides recommended wire sizes and circuit breaker capacities for your system configuration.
Page 32
The wire sizes given are suitable for a 15' (4.6 meter) “round trip” length. In certain installations
the wire lengths to certain component parts may exceed this. If this is the case in your
installation find the maximum current draw from the list below and use the wire sizing table
shown on the next page to identify the correct wire size. The Micro HPS draws 28 amps at 12 V
while the refrigerator or freezer is running, and 45 amps at 12 V while the air conditioning is
running. Remember, the wire length is always considered to be the total distance from the
power source to the device and back again. The table below gives the current draws which
should be considered when sizing the wire runs. The DC is rated at 12 volts and the AC at 110
volts. Multiply by .5 for 24v and 220v.
(This is a Prestart Checkout Item)
●
Micro HPS
(DC) - 50 amps
●
Solenoid Coil (ea) - 2 amps
●
Water Pump (DC) - 10 amps
●
Arctic Air Fan (ea) - 2 amps
Basic Electrical Wiring
Closely follow the wiring schematic and written identifications of the wiring connections which are
included in the sleeve of this manual. In planning your wiring remember:
1. Use only 100% tinned stranded copper wire of the recommended AWG size.
2. Always use the recommended size circuit breaker on the main power line.
3. Butt splices should be crimped and sealed with heat shrink tubing.
4. When making connections to the terminal block, be sure to tighten the clamping screws firmly.
(All high-power connections should also be rechecked for tightness at regular intervals)
Wire Size
In addition to using the right type of wire, it is also important to use the correct wire size. While
this is important for both AC and DC systems, it is in high-current DC systems that installers tend
to underestimate the size of wire needed. Refer to the tables on the following pages for a
general reference when selecting a wire size as a function of length and current. The Glacier
Bay wiring diagram calls out wire size by AWG gages. AWG is used in the United States while
Metric diameter is used in the rest of the world. For convenience, an AWG - Metric conversion
table is also provided.
Page 33
REQUIRED WIRE SIZE BY RUN LENGTH & CURRENT (AWG)
AMPS
WIRE LENGTH - SOURCE TO LOAD AND RETURN FEET (METERS)
10 (3.0)
20 (6.1)
30 (9.1)
40 (12.2)
50 (15.2)
60 (18.3)
70 (21.3)
5
18
14
12
10
10
10
8
10
14
10
10
8
6
6
6
15
12
10
8
6
4
4
2
20
10
8
6
6
4
4
2
30
10
6
4
4
2
2
1
40
8
6
4
2
2
1
1/0
50
6
4
2
2
1
1/0
2/0
60
6
4
2
1
1/0
2/0
3/0
70
6
2
1
1/0
2/0
3/0
3/0
80
6
2
1
1/0
3/0
3/0
4/0
AWG TO METRIC WIRE SIZES
AWG
Ga.
METRIC
(MM2)
AWG
Ga.
METRIC
(MM2)
0000 (4/0)
11.7
8
3.3
000 (3/0)
10.4
10
2.6
00 (2/0)
9.2
12
2.1
0 (1/0)
8.3
14
1.6
2
6.5
16
1.4
4
5.2
18
1.0
6
4.1
Page 34
LEAK CHECKING, EVACUATING, AND CHARGING
Pressure / Temperature Chart for 404a
Temp
Pressure
Temp
Pressure
°F
PSI
°F
PSI
-50
0.6
-45
2.7
55
114.7
-40
5
60
125.3
-35
7.6
65
136.6
-30
10.4
70
148.6
-25
13.4
75
161.2
-20
16.8
80
174.6
-15
20.5
85
188.8
-10
24.5
90
203.7
-5
28.8
95
219.4
0
33.5
100
235.9
+5
38.6
105
253.4
10
44
110
271.7
15
49.9
115
290.9
20
56.2
120
311.1
25
63
125
332.3
30
70.3
130
354.5
35
78.1
135
377.8
40
86.4
140
402.2
45
95.2
145
427.7
50
104.7
150
454.4
Handling Precautions for refrigerants and high-pressure gases
This refrigeration system contains 3.5 lbs of pressurized R-404a refrigerant gas and liquid. At a
temperature of 850 F the pressure is 189 PSI. As with any refrigerant gas, certain safety
precautions should be followed when handling R-404a. Bare skin exposed to liquid refrigerant
may suffer severe frostbite. Additionally, although R-404a is non-toxic it is heavier than air and
therefore displaces oxygen. Always provide proper ventilation when working in enclosed areas.
In the event of a massive refrigerant leak, get out of the area immediately. Never refill containers
with R-404a or subject any container to temperatures exceeding 1200 F (500 C.).
R-404a produces hazardous and toxic byproducts if exposed to open flame or heating elements.
The presence of these by-products will be apparent by an acrid odor. Should an acrid odor be
detected when working near R-404a remove all persons from the area immediately. NEVER
USE A FLAME TYPE LEAK DETECTOR WITH R-404A.
When leak checking your system do not pressurize the tubing to greater than 250 psi. If you are
Page 35
using a high pressure nitrogen cylinder you MUST use a step-down pressure regulator. Never
attach the high pressure cylinder directly to the refrigeration system. The internal volume of the
tubing is very small - you not will not be able to regulate the pressure using only the cylinder shut
off valve.
How the Rotalock valves on the MICRO HPS Condensing Unit work
Your system is delivered to you with a full charge of refrigerant contained in the receiver. This
charge is isolated and retained in the condensing unit by the two Rotalock valves located at the
front of the unit. These valves are three-way and while very simple in operation, can be
somewhat confusing for those not familiar with them. It is imperative that the installer understand
how these valves work before proceeding to the final steps of the installation.
The valves have three ports - inboard, outboard and access port. For the sake for consistency
we will always refer to the “outboard” as the port to which the installer solders their connection.
The “inboard” port is the one which is hidden from view and connected internally to the Micro
HPS Condensing Unit. The “access port” is the 1/4" male flare port which is covered with the
hex acorn cap nut. A black plastic cap covers and protects the valve “stem”. It does not perform
any sealing function and does not effect the valve port opening. Removing the black plastic cap
provides access to the valve stem which (when turned) will open and close the valve. It is the
valve stem which opens the valve not the black plastic cap.
Stem Position
Communicating Ports
Front-Seated (all the way in)
Outboard & Access
Service (centered)
All Ports
Back-Seated (all the way out)Outboard & Inboard
Sealed Ports
Inboard
None
Access
The photo to the right shows the
Rotalock valves with the black
plastic caps and hex acorn caps
removed and tubing soldered to the
outboard ports.
The valve stems are in the “front
seated” position. In this position the
“inboard” port (to the condensing
unit) is sealed off while the outboard
port and the access port remain
open. This position permits hoses
to be attached to the access ports
to pressurize and evacuate the
copper tubing which is connected to
the outboard ports without effecting
the charge in the condensing unit.
Connecting The Gauge Set
Your Micro HPS does not require a unique or dedicated refrigerant gauge set. It uses industrystandard 1/4" males flare connections for the refrigeration access ports. These are the type of
access ports used in nearly all small and mid-sized refrigeration and air conditioning systems
using R-12, 22, 502, 134a, 507 and others. (Note: These are not the same connections used for
“automotive type” R-134a..)
When connecting and disconnecting hoses from your Micro HPS remember that the access ports
Page 36
DO NOT HAVE SCHRADER TYPE VALVE INSERTS. The access ports are isolated only when
the valve stem is in the fully back-seated position.
Facing the front of the condensing unit, the discharge (high pressure) valve has a hexagonal
body and is located to the left of the square bodied suction (low pressure) valve. Your gauge set
will probably have color coded hoses. If so, connect the blue hose to the suction valve and the
red hose to the discharge valve. The center (white) hose is used to attach a refrigerant bottle,
recovery machine or vacuum pump.
With your hoses attached to the Rotalock valve access ports, you are now ready to begin leak
checking,
Leak Checking
Before evacuating the system and opening the Rotalock valves on the condensing unit, it is
important to be absolutely certain that the tubing you have run is 100% leak-free. If you have
followed our soldering guidelines closely you may well find that your system has no leaks at all.
However, soldering on a boat can be tough so it is worth taking time now to be verify the quality
of your joints. Finding major leaks is generally quite easy. Small leaks on the other hand can be
very difficult to find even for professionals. This section will provide some pointers on how to find
out whether or not your system is leaking and help you avoid some common pitfalls of leak
detection.
If you have more than one holding plate zone (freezer and refrigerator), then check valves are
installed in the suction refrigerant lines (refer to the “Running the Copper Tubing” section). Since
the solenoid valves are normally closed, it is important that you energize all of the freezer and
refrigerator solenoid valves at the control tee prior to beginning your leak checking procedure
(Note: air conditioning is not affected). Opening the solenoid valves creates access to leak check
the area between the solenoid valves and the check valves. To energize the solenoids, you need
to apply power to both sides of the solenoid leads. The polarity is not important, positive and
negative may be connected in either order. Once you have the solenoids energized, leave them
powered up throughout your leak checking and evacuation process. When you are done leak
checking and evacuating, you need to remove the direct power and connect the solenoid power
leads to their appropriate system connections.
Tools of the Trade
There is really no one approach that works “best” for finding leaks. Most experienced
professionals use a combination of tools including:
●
Electronic Gas Detectors - These are electronic meters (typically hand-held) that sense
the presence of very small amounts of specific refrigerant gas.
Advantage - About the only way to find a “hidden” leak which is out of visual range or
direct access.
Disadvantage - They are extremely sensitive and can be influenced by other common
gases (such as that found near some foams and adhesives). Interpreting the results can
be frustrating on very small leaks.
●
Bubble Detectors - This is the age old soap bubble trick. The reliability of this method
depends on having the correct viscosity in your soap/water mixture and your ability to see
100% of the soldered area. This last one can be a challenge on a boat.
Advantage - Low tech, low cost and surprising effective if you are very careful and
patient.
Disadvantage - Easy to miss tiny leaks and completely useless if you can’t actually see
ALL parts of the joint.
Page 37
●
Electronic Acoustic Detectors - Not as common as the gas sensing type, these detectors
use a tiny microphone to pick up and amplify the “hiss” of even the smallest of leaks. If
you know what to listen for and have clear direct access to all of the connections they can
be one of the best detection methods.
Advantage - Properly used they are one of the most accurate of all leak detectors. Often
used to confirm the confusing results given by a gas sensor type detector on very small
leaks.
Disadvantage - Experience is helpful in interpreting the results. You need to be able to
place the tip of the sensor (microphone) very near all parts of the joint.
●
Observation Of Pressure - In this method, a refrigeration gauge set is attached and the
system pressure is elevated by the addition of refrigerant and/or nitrogen gas (NEVER
USE OXYGEN!). The system is allowed to stabilized and the pressure is noted. After a
period of time (typically 12 to 24 hours) the pressure is checked again. If the system
pressure is constant, there is assumed to be no leak.
Advantage - I thorough way to check for large/moderate leaks in the complete system at
one time.
Disadvantage - Too many variables (ambient temperature, hose quality, Rotalock packing
seal quality, oil/gas absorption, etc.) to reliably check for small leaks. This test can be
helpful but don’t put too much faith in the results.
●
Fluorescent Dye - Widely promoted by automobile air conditioning service people, this
dye is sometimes used to find persistent leaks in operating systems. The dye is added to
the refrigerant and glows when exposed to a UV light. DO NOT USE THESE
PRODUCTS. PUTTING FLUORESCENT LEAK DETECTION DYE INTO ANY GLACIER
BAY SYSTEM WILL VOID THE WARRANTY.
Common Leak Checking Methods and Potential Pitfalls
To check for leaks it will be necessary to temporarily elevate the pressure of all of the tubing
which you have run. This can be done by using refrigerant (preferably a high pressure
refrigerant such as R-404a or R-22 but R-134a will also work), dry nitrogen or a combination of
the two. NEVER USE OXYGEN. Obviously, the higher the internal pressure, the easier it will be
to find a leak. However, DO NOT EXCEED 250 PSI when leak checking. If you are going to use
dry nitrogen you will need to use a regulator to limit the pressure to no more than 250 psi.
NOTE: THE ROTALOCK VALVES ON YOUR CONDENSING UNIT SHOULD REMAIN
CLOSED (FRONT-SEATED) DURING THE ENTIRE LEAK CHECKING PROCESS. Do not use
the refrigerant charge in your condensing unit for leak checking. Doing so will leave your system
undercharged and contaminated with air.
Be aware that even among professional refrigeration installers, there exists a surprising amount
of confusion over the seemingly simple process of checking a system for leaks. This confusion
is generated by a lack of understanding of the physical processes which impact the two most
common leak checking methods.
Method #1
This is the most popular professional method of leak checking and is even described and
recommended by the EPA. In Method #1, a small amount of HFC-404a, R-22 or other
refrigerant gas is added to the system. The reason the refrigerant gas is used is to provide an
agent which can be detected by an electronic gas detector. To raise the internal pressure and
make small leaks more apparent, a “back-charge” of nitrogen gas is added which is sufficient to
elevate the internal tubing pressure to 250 PSI. The electronic gas detector is then used to
search for leaks around the joints and connections.
Page 38
Problem with Method #1
As the nitrogen is added to the system the pressure
increases above the liquefaction point of the
refrigerant. The refrigerant gas turns to liquid,
separates from the nitrogen and flows to the low
points in the tubing. Since electronic refrigerant gas
detectors are not sensitive to nitrogen, leaks which
are located at the high points (above the level of the
liquified refrigerant) cannot be detected.
Solution for Method #1
Elevating the pressure in a system above that which
would be obtained with refrigerant alone can be
helpful in locating leaks. However, the only reliable
way to identify leaks in a system which is “backcharged” with nitrogen is to use a soapy bubble
solution or electronic acoustic detector. If you
intend to use only an electronic gas detector you must be careful not to raise the internal
pressure above the condensing point of the gas and temperature with which you are working.
Method #2
This method often used in conjunction with method #1 (described above) but may also be used
with refrigerant alone. The idea here is to attach a gauge set to the system and add refrigerant,
nitrogen (or both) to the system to raise the internal pressure. A note is taken of what that
pressure is. The system is left for a period of time (possibly overnight) and the gauges are then
checked to see if the pressure has dropped.
Problem with Method #2
The fact is, that the pressure indicated on the gauges will generally change somewhat whether
or not the tubing connections are leaking. Most technicians know this, so they end up making a
“best guess” as to whether the amount of the change is severe enough to indicate a problem.
Where is the gas going? Indeed, the gas may be lost through a leak in a joint. However, it is just
a likely to be lost through a leak in a charge hose (all charge hoses have slow leaks) or a
Rotalock service valve (Rotalock valves do not completely seal unless they are fully backseated). Neither of these leaks would be a problem once the change hoses are removed and
the Rotalock valves are fully back-seated for normal operation. In some case the pressure will
actually rise. This is due to a change (increase) in the ambient temperature. If the system has
been previously run or the vales are open to the compressor, the “back-charge” gas may be
slowly absorbed by the compressor oil itself. This is analogous to the carbon dioxide gas which
is absorbed into the liquid in a can of soda. As the gas is absorbed, the pressure in the system
falls. How much gas will be absorbed and how long it will take varies depending on the type and
quantity of compressor oil, system pressure and temperature.
Note: A variation on the gas/oil absorption problem can occur when the technician tries to
evacuate the system. As the pressure is reduced (by the vacuum pump) the gas which has been
absorbed by the oil begins to boil off (just at the carbon dioxide comes out of your soda when
you open the top). This greatly extends the time it takes pull the system pressure down to an
acceptable level and gives the technician the impression that he may be pulling air into the
system through a leak.
Page 39
Solution for Method #2
The bottom line is that it is not possible to reliably detect small system leaks by only looking for a
change in system pressure over time. Monitoring pressure drop can be helpful in identifying
leaks - particularly large ones but DO NOT use this as your only leak checking method.
Finishing Up
When you are confident that there are no leaks in the system, slowly release the pressure.
Again this done from both the high and low side simultaneously. Leave the gauge set in place as
it will be used to evacuate the system.
Evacuating And Charging
Once the system has been thoroughly leak checked, it is time to evacuate the system. This
process removes not only air (and residual nitrogen) from the system, but moisture as well. It is
important to use a high-quality two-stage refrigeration vacuum pump and to ensure that the
pump has clean, fresh oil. Old and/or contaminated oil in a vacuum pump prevents the pump
from achieving the high level of vacuum required to properly dehydrate the system. The pump
should be capable of evacuating to a level of 150 microns or greater.
Begin Evacuating
At this point, you should have the gauge set connected to the access ports on both discharge
and suction Rotalock valves. EVACUATION MUST BE DONE FROM BOTH THE SUCTION
AND DISCHARGE PORT SIMULTANEOUSLY. The valve stems on the Rotalock valve should
still be in the fully front-seated position and will remain there for the duration of the evacuation.
Fully open both hand valves on the gauge set and turn on the vacuum pump. You should see
the needles on both gauges quickly pull below "0" and, with continued evacuating soon indicate
29 - 30 inches. Failure to reach this vacuum indicates either a defective vacuum pump or a
severe system leak.
To completely dehydrate the system the vacuum pump must be left running for an extended
period of time. How long depends on the ambient temperature since heat tends to “boil off”
moisture more quickly. The following table assumes use of a high-quality two-stage vacuum
pump.
Ambient Temperature
Recommended Evacuation Time
90o F / 320 C
o
15 minutes
0
80 F / 27 C
30 minutes
70o F / 210 C
1 Hour
o
0
2 Hour
o
0
60 F / 15 C
4 Hours
50o F / 100 C
8 Hours
65 F / 18 C
If a system must be evacuated at temperatures below 50o F/100 C, it is helpful to heat up the
tubing and components. Use a safe and gentle heat source such as incandescent lamps and/or
electric room heaters.
Page 40
Completing The Evacuation and Charging
Once the vacuum pump has run for the required period of time, the system is assumed to be fully
evacuated. With the vacuum pump still running, tightly close both hand valves on the gauge set.
Once both hand valves are closed you can turn off the pump and use a 1/4 inch wrench to turn
the condensing unit Rotalock valve stems counterclockwise. Open both the Rotalock valves. As
you open the valves you will hear refrigerant rush into the rest of the system. Continue to open
the valves until they are fully back-seated (i.e. all the way out).
At this point you may wish to monitor the pressures of the system when you start it up. If so, turn
both valve stems in approximately 1/2 a turn. This allows the system pressure to travel into the
hoses while the system runs.
Removing The Gauge Set
When you are ready to remove the gauge set, turn the Rotalock valve stems counterclockwise
as far as they will go. This is the fully back-seated position. This position uses a metal-to-metal
seat to seal off the access port and the packing area around the valve stem. The valve is
designed to be firmly back-seated to ensure that the access port and stem do not leak. Use a
twisting force of approximately 5 foot-lbs. Replace the black plastic caps which cover the stems.
The gauge set is now isolated from the rest of the system. However, there is still a charge of
refrigerant in the hoses. You may use a recovery machine to remove this refrigerant or release it
into the atmosphere (legally permitted as a de-minimus release). To safely release the gas,
disconnect the white (center) hose from the vacuum pump and point it away from you. Slowly
open each hand valve and release the charge in that hose. Once the gas is out of the hose,
disconnect the gauge set from the Rotalock access ports and replace the hex acorn caps.
Your system is now fully charged and ready for use.
Page 41
System Operation and Maintenance
SYSTEM CONTROLS AND OPERATION
Every installation is different. Your Glacier Bay system is delivered to you with the controls preadjusted to “approximate” settings. These settings will generally give acceptable results but are
not optimized to achieve maximum efficiency. Optimizing control settings can only be done by
monitoring the system operation for an extended period of time. Therefore, it is the responsibility
of the owner to optimize these settings.
Introduction
Before undertaking adjustment of the controls, it is important to recognize that your Glacier Bay
holding plate system works very differently from a common “non-holding plate” system such as
your home refrigerator. In your home refrigerator, the compressor is turned on and off based on
the temperature of the air in the box. In your Glacier Bay system, the compressor is turned on
and off based on the state of the holding plate (ie. frozen or thawed). The temperature of the air
in the box is determined indirectly at the time the system is designed by the eutectic temperature
and surface area of the holding plates.
While this may seem a minor distinction at first glance, it is important that the owner does not
attempt to adjust the controls to achieve a particular box air temperature. In a properly
adjusted system, the compressor runs just long enough to freeze the holding plate(s)
completely solid then turns off until the plate(s) is completely thawed. The control system
is improperly adjusted if the compressor turns off before the plate(s) is 100% frozen or, if it
continues to run after it is 100% frozen. Similarly, the control system is maladjusted if it turns on
before the plate(s) is 100% thawed or, fails to turn on after it is 100% thawed.
An incorrectly adjusted system will often operate fine and maintain very acceptable box
temperatures. However, it will generally use more energy that one which is properly adjusted.
Basic Operation of System Priority
The Glacier Bay control system consists of the control board, digital thermostat(s) and highpressure cut-out.
Note: In multi-zone systems (ie. separate refrigerator and freezer compartments), the zones do
not pull-down simultaneously. Instead, the individual zones operate sequentially by priority with
the freezer plates freezing first and the refrigerator afterward.
A typical 3 zone system has the freezer as zone 1 (first priority), then the refrigerator as zone 2
(second priority), then the air conditioning as zone 3 (third priority). Another scenario might be
Freezer (zone 1), Freezer (zone 2), Refrigerator (zone 3), Air (zone 4). Be sure to use the
appropriate wiring diagram that was selected for your particular system’s configuration. The
wiring diagram is accompanied in the sleeve pocket of this manual.
Toggle switches are provided on the digital controls to enable the operator to turn individual
zones on and off. For example, if all of the food in the freezer is used up but you wish to
continue to run the refrigerator, simply switch the digital control for the Freezer to the “off”, or
down position. The refrigerator will continue to operate normally but the freezer will be allowed
to warm up thereby saving a considerable amount of energy.
Page 42
By flipping the switches ON and OFF it is possible to activate and de-activate either box
independently of the other. To shut down a box, move the toggle switch down to the OFF
position. The digital display for this box will go dark.
When all switches are in the "OFF" position the compressor will not be turned on even when the
temperature of the plate has risen. This may serve as a safety mechanism when working on or
near the compressor unit.
The System Circuit Breakers
There are two (2) 10 amp circuit breakers in the base of the unit. They are of the manually resettable type and are visible on the right side of the base. The left side circuit breaker provides
safety to the control circuitry current. The right side circuit breaker controls the seawater pump.
Tripplng the water pump circuit breaker will result in the pump shutting down, which in turn, will
cause the HP cut-out to trip (see trouble shooting). Tripping the left side circuit breaker will cause
the control circuitry to lose power and the entire system to shut down immediately.
The High-Pressure (H-P) Cut-Out
The H-P cut-out is a safety switch which automatically shuts down the system in an overpressure (above 400 psi) situation. Generally, an over-pressure condition occurs due to loss of
cooling water from a failure of sea water pump or loss-of-prime (centrifugal type pumps only).
However, the H-P cut-out will also trip if the system has been severely overcharged with
refrigerant, if air was accidentally introduced into the system during service or (in older systems)
the condenser has not been cleaned.
Note: If the H-P cut-out activates, the system will typically run for a minute or two then shut off for
5-15 minutes until the pressure bleeds down to 300 psi, then repeat the cycle until the problem is
corrected. Each time the system shuts off the digital displays on all controllers will go dark.
The Low-Pressure (L-P) Cut-Out This will shut down the system if the pressure falls below 5
psi. This can happen if refrigerant is lost due to a leak or if the system has run long enough to
pull the plates so cold that the gas pressure falls below the shutdown point. If the system is out
of gas, it won’t cool the plates. If there is still refrigerant in the system, when the pressure rises
above 20 psi, the low pressure cutout will reset and the system can restart.
Determining the state (frozen or thawed) of the Holding Plate
The Glacier Bay system uses a true eutectic holding solution in the holding plates. The term
“true eutectic” means that the solution freezes and thaws at a single temperature (For example,
water at 320 F/00 C for example). Our TSS +26 refrigerator solution changes state at +260 F (-30
C). Our TSS -8 freezer solution changes state at -80 F (-220 C). Knowing that, one would think
that it would be a simple matter to know if the plate is frozen or thawed by simply measuring
whether the plate temperature is above or below the eutectic point (ie. freeze/thaw temperature).
Unfortunately, it is not possible to measure the actual eutectic temperature from outside the
holding plate.
When the compressor is running (and the holding plate is freezing down) the temperature probe
is actually reading a combination of the eutectic solution temperature and the (much colder)
evaporator coils inside the holding plate. Consequently, the holding plate temperature measured
while the compressor is running will always be colder than the eutectic solution itself. Exactly
how much colder varies several degrees between different systems and installations.
Page 43
Once the compressor stops running (and the plate starts thawing out), another measurement
error is introduced. Since we are only able to measure temperature from the outside of the plate,
the surface temperature of the plate will slowly rise during the thawing period even though the
temperature of the core remains constant. This is because the heat entering the plate from the
outside creates a fully melted layer of solution which acts as an insulator to slow heat ingress
into the frozen “core”. The temperature difference (between the exterior surface and the core)
will vary between systems and installations.
Given these measurement variances, it is apparent that the correct compressor “turn on” and
“turn off” temperatures will be some number of degrees above and below the eutectic point of the
holding plate solution. It is also apparent that the precise number of degrees will vary from
system to system and from installation to installation.
Therefore, the purpose of this section is to describe a method which can be used to determine
the exact freeze and thaw points for every system and installation.
Page 44
CONTROLS
A Control Overview
The Glacier Bay system is available with two different controls - the “standard thermostat” and
the (optional) “ECM controller”. The two controls are virtually identical in appearance and are
programmed in the same way. The only difference is that the ECM Control offers a second level
programming which becomes active whenever the engine and/or generator is started. If you do
not know which type of control you have, you will need to look at the back side of the control to
find out.
The front face of the controls are identical and feature a green LED digital display, programming
keys and mode indicator light. Additionally, a second temperature probe can be added to either
type of control to display the “box temperature” as well as the (normal) holding plate temperature.
Functions
Mode Indicator -
Standard thermostat: Blinks once when it has reached the programmed
upper temperature limit.
ECM controller -
Blinks once when it has reached the first programmed upper temperature
limit (i.e. “engine-drive mode”) and twice when it has reached the second
programmed upper temperature limit (i.e. “standard mode”).
“SEL” Key -
Enters the programming mode for the “set point” setting
(The “set point” is the temperature at which the compressor turns “OFF”)
“PRG” Key -
Enters the programming mode for the “differential” setting.
(The “differential” + “setpoint” is the temperature at which the compressor
turns “ON”)
“Arrow” Keys -
Used to scroll numbers and input numbers.
Page 45
ECM Controller
The ECM controller replaces the standard thermostat and is very similar in appearance and
operation. The difference is that the ECM controller regulates the system operation based on
two sets of parameters rather than just one. This feature enables the control system to know
when the engine and/or generator is running and use the additional power being generated to
“top-off” the holding plate without over-cooling it.
The ECM controller recognizes the presence of additional power (ie. a running auxiliary or
generator) when a positive DC current is applied to the proper terminal in the Control Box via the
key switch or oil pressure switch. It does not respond to a rise in buss voltage. Therefore, it is
not activated by a shore-power charger, wind generator or solar panels. During normal operation
the system is governed by the values programmed in the first set of parameters. When the
engine is started, the system begins operating from the second set of parameters.
Programming the ECM is identical to the digital thermostat. However, as you program you will
notice that two “setpoints” (St1, St 2) and two “differentials” (P 1, P 2) are given rather than one.
The first “setpoint” (St 1) and “differential” (P 1) are active in the “normal” mode and control the
system when the engine (or generator) is not running. The second set of parameters (St 2 and P
2) take over whenever the engine or generator is started and control the system in “engine-drive”
mode.
ECM Control Settings
Always set both “setpoints” (St 1 and St 2) to the same value since this determines the ultimate
freeze-down temperature which is the same in any mode. Use one of the methods described
above for determining the correct setting for “St 1" then simply set “St 2" to the same value.
After determining the correct value for the “P 2" differential setting (again, use one of the above
methods), you will want to set the value of the second “differential” (P2) to be several degrees
lower than that of the first (P1). By doing so, you will instruct the compressor to start sooner
when the engine is running than it does under normal operation. This allows the system to “top
off” a partially thawed holding plate whenever the engine or generator is started.
The ECM Status Indicator Light
As the Holding Plate temperature rises, the indicator light will begin blinking with single flashes
when the value programmed into the second set of parameters ( a lower “differential” setting) is
reached. At this point the box is “calling for cooling” and the compressor will activate only if the
engine is started. As the plate warms further it eventually reaches the higher values programed
into the first set of parameters. The indicator light then begins blinking in double flashes and the
compressor activates in normal mode.
Box Temperature Monitor
The standard thermostat and ECM controller come with a single temperature probe and provide
a continuous display of the holding plate temperature by which they control the system operation.
Either control may be equipped with the optional box temperature monitor. This option provides
a second temperature probe which monitors the air temperature of the box in addition to the
plate temperature. Digital thermostats and ECM controllers equipped with this option will
continuously display the box temperature. The holding plate temperature can be displayed by
pressing the down “ARROW” key.
Page 46
Re-programming to Factory Default Settings
Occasionally, it becomes desirable to completely reset the controls to their factory defaults and
start your tuning from a “clean slate”. This might be the case if someone unfamiliar with the
correct programming procedure has been changing settings at random. Because of the large
number of settings which could have potentially been changed, it is likely to be easier to re-set
everything to known values and then change only what you need.
Re-programming the controls is a three-step process. The first step is to “clear the settings”, the
second step is to “set the mode” and the third step is to “program in values” to particular
parameters.
1. “Clearing the settings”. This first step is the same for all Glacier Bay thermostats and ECM
controllers. To clear the settings:
● Turn off the power to the control (display goes dark).
● Turn on power to the control while holding down “PRG”.
Your control settings will now be clear. The temperature will be displayed in 0C but the control
will not function properly.
2. “Set the mode”. The procedure for this step is the same for all controls but the numbers are
different. To set the mode:
● With power on to the control (display illuminated), press “PRG” and “SEL”
simultaneously until “0” is displayed (it will start flashing).
● Use the ARROW” keys to scroll to “22“.
● Press “SEL” (The display should now show “C 0”).
● Press “SEL” to show the currently programmed setting.
● Use the “ARROW” keys to alter the parameter setting. (set to “9” for ECM
controllers, set to “1” for all standard refrigerator/freezer thermostats and ARCTIC
AIR thermostats).
● Press “SEL” first, then “PRG” to retain the new setting.
●
● Turn off the power to the control (very important).
Turn the power back on to the control. The “mode” is now correctly set.
3. “Program in the values”. This step consists of programming A) the control setting parameters
and B) the differential and setpoint. Note that these are two separate steps and the differential
and setpoint can be adjusted without any of the other steps.
Standard Thermostat and ECM Thermostat Control Settings
The Glacier Bay digital controls offer many hundreds of programming options, the vast majority
of which have no application in any particular system. Generally, it is only the “setpoint” and
“differential” setting (described in the “Adjusting Setpoint and Differential” section) that the
system operator needs to be familiar with.
To access the control settings, one must first force the control into a “Special Programming
Mode”. To enter this mode and re-program individual parameters:
Page 47
●
●
●
●
●
●
●
Press “PRG” and “SEL” simultaneously until “0" appears (it will start flashing).
Use the “ARROW” keys to scroll to “77".
Press “SEL”. “C 0" will now appear and begin flashing.
Use the “ARROW” keys to scroll to the desired parameter (as identified below).
When the parameter is displayed, press “SEL” to show the currently programmed
setting.
Use the “ARROW” keys to alter the parameter setting.
Press “SEL” first, then “PRG” to retain the new setting.
Most Common Settings:
For standard refrigerator/freezer thermostats or ARCTIC AIR thermostats
● Change “C 18” from “0” to “1” (if you want your control to display the temperature
in 0F rather than 0C.).
● Change “C 13" from “0” to “1” (only if you have the optional box temperature probe
connected).
Use the procedures described in the next section to set the appropriate “setpoint” and
“differential”.
For ECM thermostats
● Change “C 18” from “0” to “1” (if you want your control to display the temperature
in 0F rather than 0C.).
● Change “C 13” from “0” to “1” (only if you have the optional box temperature probe
connected).
● Change “C 33” to “1” (parameter MUST be “1”).
● Change “C 36” to “100” (parameter MUST be “100”).
● Change “C 37” to “-100” (parameter MUST be “-100”).
Use the procedures described in the next section to set the appropriate “setpoint” and
“differential”.
List of all settings: While they may not be required, the following pages offer a description of
the other, less often used, control settings.
Parameter “C 13" - Probe Display (Default = “0” with one Probe, “1” w/optional Box Probe)
For use only when the optional box temperature probe is added, select either “0” to display the
Plate Probe or, “1” to display the box probe. In both cases, pressing the down “ARROW” key
displays the other probe value.
Parameter “P 14" - Calibration Offset (Default =”0.0”)
Introduces an error offset to the temperature probe.
Parameter “C 17" - Probe response time (Default = “5”)
Changes probe response time for noise filtering
Parameter “C 18" - Display Units 0C or 0F (Default = “1”)
Changes units to degrees Centigrade (“0”) or Fahrenheit (“1”). Don’t forget, the “setpoint” and
differential” values must also be programmed appropriately.
Parameter “P 25" - Low Alarm Limit (Default = “-50”)
An audible alarm is sounded if the temperature falls to this limit.
Parameter “P 26" - High Alarm Limit (Default = “90”)
Page 48
An audible alarm sounds if the temperature rises to this limit.
Parameter “P 27"- Alarm Hysteresis (Default = “2”)
Audible alarm hysteresis (differential).
Parameter “P 28" - Alarm Delay (Default = “60 min.”)
Time at the alarm limit before the audible alarm is sounded.
Adjusting “setpoint” and “differential” on the Standard Thermostat and ECM Controller
This section describes how to adjust the setpoint and differential back to factory default settings.
You do not need to do any of the above programming instructions to adjust the setpoint or
differential. The controls delivered to you are set at factory settings (described below) and your
system will operate very well under these settings. For an explanation of how to fine tune the
setpoint and differential, see the following section, “Optimizing Settings for Maximum Efficiency.”
To alter the “setpoint” (ie. The compressor turns OFF at this temperature)
●
Press and hold down the “SEL” Key until “St 1” is displayed - then release the
Key.
●
The number flashing is the current setpoint setting. To change it, use the Arrow
Keys to scroll to the desired number.
●
Press “SEL” then “PRG” to retain the new setting.
●
NOTE For ECM controllers - After entering the “St 1" setpoint parameter and
pressing the “SEL” key, you will be prompted to also enter the “St2" setpoint.
After entering it, simply press the “SEL” Key again then press the “PRG Key to
retain both settings. The setpoint for both “St 1" and “St 2" should always be
entered as the same number.
●
The factory default setting for “St 1" and “St 2" is -16 (-270 C) for the freezer and
+22 (-60C) for the refrigerator. The default is 740 F (230 C) for Arctic Air.
To alter the “differential” setting (ie. The compressor turns ON at the “differential + setpoint”)
●
Press and hold down the “PRG” Key until “P 1" is displayed then release the Key.
●
Press the “SEL” Key to display the current differential setting.
●
Use the ARROW Keys to scroll to the desired number.
●
Press “SEL” then “PRG” to retain the new setting
●
Note For ECM controllers - After entering the new “P 1" differential parameter and
pressing the “SEL” Key, you may use the ARROW Keys to scroll to the “P 2"
parameter. Once “P 2" is displayed, you may enter this parameter by pressing
“SEL”. After both “P 1" and “P 2" have been entered, press “PRG” to retain the
new settings. Remember that the “P 1" setting is active in normal mode and the
“P 2" setting is active in “engine-drive” mode. Therefore, “P 1" will always be a
larger number than “P 2".
●
The factory default setting for “P 1" is +16 (9 for 0C) for the freezer, +8 (4.5 for
0
C) for the refrigerator and +6 (3.3 0C) for Arctic Air. The factory default setting
For “P2" (ECM only) is +12 (6.7 for C0) for the freezer and +4 (2.2 for C0) for the
refrigerator.
Page 49
Control Error Codes
There are five possible error codes which will be displayed to indicate specific FAULT conditions.
They are:
“Er0” - The primary temperature probe (ie. plate probe) has either a “short” or “open” circuit.
Check the wiring. Using an ohmmeter, the resistance on the temperature probe should read 10k
ohms @ 250 C (770 F).
“Er1” - Same as “Er0” except it applies to the secondary temperature probe (ie. box probe) if it is
attached. Otherwise, same as “Er0".
“Er2” - Memory Error. Follow the procedures outlined in “Re-programming to Factory Default
Settings” (Page OM -16 and OM - 17) of the Operation Manual. If this does not resolve the
problem the control must be replaced.
“Er4” - High alarm. Audible alarm sounds. The temperature has exceeded the value set in
parameter “P 26” for a period of time exceeding the value of “P 28”.
“Er5” - Low alarm. Audible alarm sounds. The temperature has fallen below the value set in
parameter “P 25” for a period of time exceeding the value of “P 28”.
Optimizing Settings For Maximum Efficiency
This section will describe two different methods for optimizing the control settings - compressor
run time and charting the cycle . The first method, Compressor Run Time, uses an estimated
compressor run time to determine the correct “setpoint” (ie. turn-off temperature). The
“differential” (turn-on temperature) is then adjusted to turn the freezer on at 100 F (-120 C) and the
refrigerator at 320 F (00 C). This method is fast and fairly accurate so long as the system itself is
operating at maximum efficiency (ie. correct superheat adjustment, correct charge, etc.). The
second method takes more time but is also more accurate. It involves “charting” the temperature
of the plate as it thaws. By analyzing the chart created, a determination can be made for both
the “setpoint” and “differential” settings.
Method #1 - Adjusting the settings based on compressor run time
The basic idea behind this approach is that by knowing how much heat has to be removed (ie.
the number and size of holding plates) and knowing how quickly the compressor removes that
heat (ie. the model of the compressor), we can determine how long the compressor will need to
run to completely freeze down the holding plate(s). After running the compressor the proper
length of time to freeze the plate(s), a note is made of the minimum temperature achieved
(based on the temperature shown on the digital display). This temperature is then programmed
into the control as the “setpoint” (ie. turn-off temperature). The “differential” setting is then
programmed in as the difference between the “setpoint” temperature and +320 F (00 C) for the
refrigerator or +100 F (-120 C) for the freezer).
To adjust the settings based on compressor run time start with warm plates (ie. above 350F /
20C), then:
●
1. Calculate what your compressor run time should be for each box (ie. “zone”) based on
the information below (see “How long should your system run?” below)
●
2. Adjust the “setpoint” on all controls extremely low so that the system will continue to
run and not shut off prematurely.
Page 50
●
3. Use the toggle switches on the control Box to cool only one box at a time.
●
4. Turn the compressor on and watch the temperature displayed on the control. Start “
timing” when the temperature falls to 320F / 00C (for a refrigerator) and/or 100F / -120C (for
a freezer).
5. Continue to run the compressor for the correct period of time for that box (as
determined from the table).
6. After the correct time has elapsed, note the temperature displayed on the control.
This is the new “setpoint” setting (Note: on ECM controls the setting for “normal” mode is
“St 1").
7. After entering the new “setpoint”, determine the correct “differential” setting and enter
it. The correct “differential” setting is the difference between the new “setpoint”
temperature and +320 F (00 C) for the refrigerator or +100 F (-120 C for the freezer).
●
●
●
How Long Should Your System Run?
Your system run time is determined by (a) the hourly BTU capacity of your compressor, (b) the
size and quantity of holding plates and, (c) the type of box (ie. refrigerator or freezer). The
ambient temperature (heat load) is irrelevant as this only changes the “holdover time” (ie. the
time between compressor cycles). Compressor run time is determined individually for each box.
To calculate your run time for a particular box:
1. Add up the total capacity of the holding plate(s) in the box (be sure to differentiate
between refrigerator and freezer capacity).
2. Divide the total plate capacity (from #1 above) by the capacity of your compressor unit
(again - be sure to differentiate between refrigerator and freezer capacity).
3. The resulting number is the total number of hours your compressor will need to run
(for minutes, multiply by 60).
Holding Plate and Compressor Unit Capacities
Holding Plate
Ref.
Frz.
Btu/hr
M1 (11" x 16")*
1381
1030
51
M2 (11" x 20")*
1842
1373
66
M3 (13" x 24")*
2720
2029
93
M4 (15" x 19")*
2354
1755
81
Compressor Unit
Micro HPS
Ref.
3680
Frz.
1245
* Holding plate size includes the expansion valve.
For example:
To determine how long a Micro HPS compressor should run to freeze down two Trimlinetm #3
holding plates in a freezer, add up the total capacity of the holding plates (2029 + 2029 =4058)
and divide the result by the compressor capacity (4058 /1245 = 3.25). Therefore, the correct run
time for a Micro HPS compressor freezing down two Trimlinetm #3 freezer holding plates is 3.25
hours or 3 hours 15 minutes. This example is the longest run time required for the largest single
zone.
Method #2 - Charting The Cycle
For most cruisers the tuning method outlined above will be perfectly adequate. However, for
those technically minded individuals who want to delve more deeply into the principles behind
“precision tuning”, we suggest charting the plate cycle. There is no better way to get a picture of
exactly what is going on with the freeze/thaw cycle then to chart it. The easiest way to
accomplish this is by using a chart recording thermometer. These machines will draw charts
very similar to the ones shown below, allowing you to see exactly the results of your changes. If
Page 51
such a device is not available to you, a diligent individual can get similar results by manually
graphing the temperature displayed on the control every 15 minutes.
The following charts are all taken from a single installed system. They demonstrate the charting
process and show the results of incorrect settings. The temperatures on the chart begin at the
moment the compressor is turned off and cover a complete thaw and re-freeze cycle in 15
minute increments.. Remember, the actual temperatures are not as important as is the shape of
the curve.
Chart # 1 The “Ideal” Chart.
“A”- Compressor OFF - temperature
frozen eutectic solution rises.
of
“B” - Eutectic point reached - thaw
starts.
“C” - Thaw continues - surface
temperature rises.
“D” - Eutectic thawed - temperature
rise rate increases.
“E” - Compressor turns on - plate
surface temperature rapidly drops
(little to no eutectic freezing occurs).
“F” - Compressor continues to run - eutectic solution begins to freeze and the rate of temperature
change slows down.
“G” - Compressor turns off.
“H” - Surface temperature rapidly rises back to the solution eutectic point.
Page 52
The Effect Of Mis-Adjustment
The following charts show what happens when the “setpoint” and/or “differential” are incorrectly
set.
Chart #2
“Setpoint” Too High
This chart is perhaps the most
confusing because the “shape” for the
graph is virtually identical to what you
would expect from a properly adjusted
system. However, the holdover time is
very short because the plate was not
cooled sufficiently to freeze 100% of
the eutectic solution.
Chart #3
“Setpoint” Too Low
Here the low “setpoint” gives the correct
holdover time (compare to Chart #1)
but causes the compressor to run for
much longer than is required to
completely freeze the eutectic solution.
The result is excessive energy
consumption.
Chart #4
“Differential” Too High
In this chart, the compressor has run
the correct period of time (thus
providing maximum holdover) and
completely frozen the eutectic (ie.
“setpoint” is correct). However, the
“differential” is too high and permits the
plate (and box) to warm up too much.
Chart #5“
Differential” Too Low
In this chart the “setpoint” is correct (ie.
the eutectic solution is freezing all the
way). However, the low “differential”
does not permit the solution to thaw
completely before the compressor
comes back on. The result is a short
holdover time.
Page 53
MHPS Superheat
Please view the tube visible from the front of the condensing unit running from the base to the
receiver/suction accumulator/subcooler tank. This is visible just above the left hand rotolock
valve in the picture below. Check to see if frost persists on this tube while the compressor is
running to cool the freezer during the second half of the pulldown cycle. (Brief frosting is O.K.)
Although the expansion valves have been pre-set at the factory, there is a possibility that on
some systems with freezers that the adjustment may not be optimum.
If frost builds up on the tube, you will want to increase superheat by turning the valve stem on the
expansion valve clockwise. If you have two plates in your box, turn each valve clockwise by an
equal amount. Try starting with 1/4 turn.
Use a 4mm or 5/32 in hex wrench to remove the nut and adjust the adjustment nut
Superheat is a measure of how much refrigerant the expansion valve is metering into the plate.
More superheat reduces the amount of refrigerant. Superheat is increased by turning the valve
stem in a clockwise direction.
Page 54
Super Heat adjustment nut
cover
Page 55
APPENDIX 1
TROUBLESHOOTING
There are nine main safety systems in a Glacier Bay Micro Hybrid Plate system that are
designed to protect the equipment and also maximize user safety. Most of these will result in a
system shutdown. An understanding of each system will assist in troubleshooting.
Main circuit breaker
The first of these is the main circuit breaker that is supplied by the installer when the system is
installed. The location may vary but it is often installed in the boat’s main electrical panel. If this
trips, check for loose wires or corrosion at all of the power terminals.
Water pump breaker
Second, there is a 10 amp circuit breaker for the water pump at the base of the condensing
unit, on the right. The white button will pop out if the breaker trips, and must be pushed in to
reset. If the pump breaker has tripped, check the water flow. Check that the sea strainer is clear
and check the pump for proper operation. A tripped water pump breaker will quickly lead to
system shutdown by causing the high pressure cut-out to trip. Also check the wiring for
continuity and potential shorts in the insulation. Check the wire insulation for possible abrasion
or corrosion and for tight connections at the terminal blocks.
Control system breaker
Third, there is there is a 10 amp circuit breaker for the electronic controls and tee control
solenoids at the base of the condensing unit, on the left. If the control breaker has tripped, it will
immediately shut down the whole system. Check the control and solenoid wiring for possible
abrasion or corrosion and for tight connections at the control terminals and at the terminal block
at the condensing unit. Reset by pressing the white button back in after clearing the fault.
High pressure cut-out
Fourth, there is a high pressure cut-out that will shut the system down if pressure rises above
400 psi. The typical symptom for a tripping high pressure cut-out switch is that the system will
run for a minute or two, and then shut off with the digital controls going dark. After a few minutes
the system will start up again as the pressure bleeds off, and the cycle will repeat.
The most common cause of high pressure tripping is inadequate water flow. The first thing to
check for is a clogged water strainer in the through hull or sea chest. Make sure that the pump is
pumping a good supply of water. The water flow should be around 2.2 gallons per minute for
warm water conditions. If the pump is not pumping a significant amount of water, it may need to
be renewed. Otherwise, the seawater condenser may need cleaning.
Another cause of high pressure cut-out tripping could be an over charged system or air in the
system. Over charging can cause high the pressure cut-out to trip, since this can cause liquid
refrigerant to back up in the seawater condenser. Since the system comes pre-charged from the
factory, this would be unlikely to occur unless additional refrigerant were added during a service.
The correct refrigerant charge is 3.5 lbs of R-404a. It is possible to correctly charge a system by
viewing the sight glass instead of weighing the charge. The technique is to add enough
refrigerant so that the plates begin to cool. When they are cold, continue adding until the sight
glass clears. Overcharging is likely if the glass is cleared while the plates are warm.
Page 56
Low pressure cut-out
Fifth, the Low-Pressure (L-P) Cut-Out will shut down the system if the pressure falls below 5
psi. This can happen if refrigerant is lost due to a leak or if the system has run long enough to
pull the plates so cold that the gas pressure falls below the shutdown point. If the system is out
of gas, it won’t cool the plates. If there is still refrigerant in the system, when the pressure rises
above 20 psi, the low pressure cutout will reset and the system can restart.
Temp sensor on motor controller heat sink
Sixth, there is a temp sensor on the motor controller heat sink that will shut the system down if
the temperature rises too high. The most likely cause is poor ventilation of the space where the
condensing unit is installed. Ensure that the temperature of this space remains below 130
degrees F (55 C).
Temp sensor on compressor
Seventh, this sensor will shut the system down if the compressor temperature rises to unsafe
levels.
Locked rotor shutdown software
Eighth, if the compressor is unable to start due to lack of motor rotor sync on startup it will
keep trying several times with a characteristic rising “chirp” sound, before giving up.
Low voltage cutout
Finally, if the house battery voltage drops below a minimum value, the motor controller will
shut the system down. This will save your battery bank from being totally drained. If you
experience repeated failure to start when the controls are calling for cooling, check your house
bank voltage, and for voltage drop on startup, measured at the condensing unit power terminals.
High resistance in the power cable runs can also cause this to occur.
Shorted circuit on compressor
If the compressor attempts to start but shuts off and finally gives up after several attempts,
there could be a short in the compressor wiring. There are three connectors at the top of the
purple compressor. If one of the wires has cut into the insulation of another, the insulation needs
to be repaired.
Swap-Out and RMA approval
If the troubleshooting procedures above do not resolve the issues, then contact your Glacier
Bay, Inc. representative.
The procedure to swap out the condensing unit is to first close off the ball valves at the foot of
the condensing unit to isolate the system. Then close both rotalocks to isolate the condensing
unit. Then desolder the tubes in between and remove the condensing unit. Contact your Glacier
Bay, Inc. representative for more information to receive an RMA (return materials authorization) if
a swap out is necessary .
Page 57
APPENDIX 2
Cold Box Design and Insulation
The box insulation you choose or inherit will affect several aspects of your box performance.
These are the usable volume you will end up with, the heat load and corresponding energy use,
how long you can expect the insulation to perform, and the cost.
It is easy to multiply the surface area of your box interior by the expected heat gain per square
foot, making assumptions regarding the quality of the insulation and the expected temperature
difference, but such an exercise will leave you under predicting real world heat loads by several
times. There are several reasons for this.
For one, it is interesting to note that not all of the heat that has to be removed from the box
comes through the insulation. A significant portion is caused by the oxidation of the food,
otherwise known as spoilage. Therefore, a box full of food will have a higher heat load than an
empty one. The heat load from this source is less at freezer temperatures than at refrigerator
temperatures.
Other factors will include edge effect, which refers to heat that flows around the edges of
insulation panels, and air leakage through loose fitting hatches and drains, the heat added
through the addition of warm food items and the frequency and duration of opening the box.
Movement of Heat
Some discussion of insulation function and the movement of heat is useful to lay a foundation
for evaluating the many choices available.
The function of insulation is to slow down the movement of heat from the outside to the
interior of the box. Heat energy moves by three mechanisms. These are radiation, convection
and conduction.
Radiation is the electromagnetic transfer of heat energy. At refrigerator temperatures it is the
least important source of heat gain, probably less than three percent of the total heat load on the
box.
Convection is heat transfer through the movement of gas molecules. Good convection flow in
a box will result in a more even box temperature.
Conduction is the transfer of heat through the motion of the molecules in a solid. Most of the
heat flow into a box is through a combination of conduction and convection.
The resistance of an insulation material to heat flow is commonly measured in units called R
value. R value is the reciprocal of the K number. K is defined as the number of BTUs which will
move through one one square foot of one inch thick insulation material with one degree F
temperature difference between the two sides. The larger the K number, the higher the thermal
conductivity of the material. The higher the R value, the better insulator it is.
The R value for a given material is not constant, but varies depending on the temperature the
material is tested at. Doubling the thickness of a material doubles the conductive heat resistance
of the material, but does not double the radiant heat resistance. For practical purposes at
refrigeration temperatures, this difference can be ignored and the R values of like thicknesses of
insulation can be added together.
The measurement of R value can be done in several ways. The most appropriate for our
purposes is ASTM 518 standard for “Steady-State Heat Flux Measurements and Thermal
Page 58
Transmission Properties.” This test approximates the conditions seen by boat cold box
insulation. There are other test methods which involve an air gap between the heat source and
the insulation being tested. These methods will usually overstate the R value added by a radiant
barrier if the results are applied to cold box performance. Thus high R value claims for certain
insulation types may not be untrue according to the test procedures followed, but may not give a
correct picture of the performance of the insulation in a boat cold box.
If a radiant barrier is installed so that there is an air gap between the barrier and the heat
source, some thermal benefit can be gained. An example of an effective use would be as a
blanket covering the food in a partially full box. If a radiant barrier, which is usually a shiny, foillike surface, is sandwiched between another solid material, such as fiberglass or plywood, the
heat energy it sees is largely in the form of molecular motion and the heat is rapidly conducted
through the foil.
Insulation Types and Performance
There are some very old boats that have cold boxes built with fiberglass bat insulation, but the
most common type is two part pour-in polyurethane foam. As this foam cures, the cell size
depends on the curing temperature, and is typically not well controlled. This inability to control
the temperature leads to voids that often develop in areas of the pour in foam. It is not unusual
with stock boats to find no insulation at all between the box hull-side liner and the hull, or under
the counter top.
Even if a good thickness of insulation is present, polyurethane foam insulation tends to adsorb
water. Cold boxes that started out with good performance may lose up to two thirds of their
original insulation value if the foam becomes wet from condensation. Other foam types that
share this moisture absorption problem include sheet polyurethane, polyisocyanurate foams, and
molded bead, or expanded polystyrene. Note that this is not just an open or closed cell foam
issue, but depends on the moisture adsorption properties of the resin used to make the foam.
One way to evaluate your existing box insulation for wetness is by drilling a small hole
somewhere at the bottom of the box and checking the insulation space with a cotton swab. If the
swab comes out wet, the original insulation value of your box is compromised. Such a result
would mean that you should consider completely rebuilding your box.
Extruded polystyrene is the best type of foam insulation to use because it doesn’t adsorb
water and will maintain its insulating value indefinitely. Two common brand names are Dow
Square Edge STYROFOAM®, often called blueboard, and Owens Corning FOAMULAR 150®.
Additional information and sources for the Dow product can be found at
http://www.dow.com/styrofoam/index.htm. You can also reach Dow by phone at 1-800 232
2436. Information and sources for the Owens Corning product can be found at
http://www.owenscorning.com/around/insulation/products/foamular.asp
The Owens Corning phone number is 1-800-GET-PINK.
How much insulation do you need? The tradeoffs are between energy consumption, usable
box volume, and cost. For tropical conditions we recommend a minimum of R-20 for a
refrigerator and R-30 for a freezer. Extruded polystyrene has an R value of about 5 per inch.
This would correspond to an insulation thickness of 4 inches of foam in the reefer and 6 inches in
the freezer.
For a 5 cubic foot reefer, the daily heat loads on a 90ºF average day would look something
like this as insulation thickness increases:
Page 59
The same graph for a 5 cubic foot freezer looks like this:
Page 60
A plot of the energy use with increasing insulation thickness curve, would show that the
amount of energy saved as insulation thickness increases also tails off past a certain point.
More insulation is good, but a point of diminishing returns is reached as more insulation is added.
The heat load is not evenly distributed in the box. The temperature differential is greatest at
the bottom of the box and for this reason the bottom generally carries the greatest heat load. It
makes sense to install an extra inch or two of insulation at the bottom of the box, and if
necessary reclaim the extra space by using less at the top.
Notice that a freezer of a given size will have a lot more heat to remove than a refrigerator.
Keep in mind that it also takes relatively more power to remove each BTU of heat at the colder
temperature.
Super Insulation
Many boats simply do not have room to apply the insulation thickness guidelines above and
still have room for a box of the desired volume. So called Super Insulation, or vacuum insulation
panels (VIPs) can provide the answer. There are two basic types of VIP on the market at
present. The first type of panel uses a special one inch thick foam core from Dow Chemical,
called Instill™.
Dow has recently discontinued the manufacture of these foam cores and when the existing
inventory is gone, these panels will no longer be available.
The foam cores for this type of panel are wrapped in a vacuum barrier membrane material.
When the panels are pulled down in a vacuum and sealed, they achieve an insulating value
close to R 30. This product was originally developed for shipping applications and was
reasonable in cost.
On the down side, the vacuum membrane around foam core panels punctures easily. Even if
the membrane can be maintained intact, the internal pressure rises over time. The pressure rise
occurs because of the slow diffusion of air through the membrane and possibly some outgassing
of the foam material comprising the core. The insulation value of these panels goes down to
about R 3 per inch when they are no longer holding a vacuum. They still may be a good option if
only short term performance life is required or provision can be made in the box design to easily
replace the panels. There are some technical options to increase the service life of these panels
such as adding packets of a chemical called a getter when the panel is manufactured. Even so,
there were no manufacturers of this type of panel that offered a performance life warranty.
A second VIP technology is available that uses aerogel as a core material. Aerogel is a
powdery silica based material which has an R value of around 9 per inch at atmospheric
pressure. Glacier Bay, Inc., uses this core material in BARRIER ULTRA-R super insulation
panels. BARRIER ULTRA-R panels have an R value of 50 per inch. They come with a 25 year
performance warranty against loss in R value. This is possible because the aerogel core
chemically adsorbs gas molecules that pass through the vacuum barrier membrane. This getter
activity allows the panel to maintain its high vacuum level and R value over an extended time.
Boxes built with BARRIER ULTRA-R have a total wall thickness of about two and one quarter
inches. Although the initial cost of this material is higher than other insulation options, it is often
chosen for new boat construction and box retrofit projects because usable space can potentially
be doubled or more for a given external volume. When coupled with the long performance life
and superior energy performance, it may offer the most value.
Both types of VIP panels have to be custom built to fit the application. If they were to be
cut or punctured after manufacture, they would lose a high percentage of their performance. Use
of these high tech materials is not an either/or option. VIPs can be used in hatches or high heat
load areas while the rest of the box is constructed of conventional insulation.
Page 61
Box Design Features
One of the most common features to be found in boat cold box design is the box drain.
Drains are usually supplied whether the box was originally equipped with mechanical
refrigeration or whether it was designed as an ice box. They are also one of the more
troublesome features. Often iceboxes are configured so that the drain drains into the bilge. A
stinky bilge is the usual unfortunate result. The drain pipe can also conduct as much as 50
percent of the total daily heat load on the box.
An open drain coupled with leaky hatch seals will cause a continuous air exchange as cold air
sinks through the drain and is replaced by warm outside air. Over time this can introduce a great
deal of additional heat. The drain pipe can be fitted with a stopper or a shut-off valve, which
stops the air loss, but does not fully stop the heat loss by conduction. It can also be a source of
odors inside the box by trapping organic material.
An alternative way to empty the box of water is to bring a plastic tube in from the top of the
box. The tube can be attached to a small electric or manual pump, such as a foot pump, and the
water dumped through the sink through hull.
Hatches
If you are redoing your boxes, you can take a fresh look at hatch locations. For safety
reasons, cold box hatches should have some way of latching, even if they are top opening. This
may be a rules requirement for racers. Side opening hatches may be unusable if, when on the
unfavorable tack, the box contents ends up resting up against the side of the door, ready to fall
out as soon as the door is opened.
It is common advice to avoid side doors and only use top loading hatches. The best approach
is probably to use the type of opening that will provide the most convenient access.
A cubic foot of air at 100ºF contains only about 18 BTUs of heat. Even if all of the cold air in
your box were to spill out when you open a door, it would only take a few seconds of compressor
run time to remove the heat that entered. If you have to remove food and set it on the counter
while you access something at the bottom of a box, it will probably add more heat to the box
when you put it back in than would have been contained in the hot air that could enter through a
side opening door.
It is very important that your hatch gaskets do not leak air, especially with side opening
hatches. Many top hatches are designed with a center hinge in the hatch lid, so that only one
side needs to be opened. These often suffer from a constant leak of air and heat conducted by
the metal hinge. The best thermal solution is to replace this with a one piece design. The next
best thing would be to block the air flow with insulating tape placed between the two sections
under the hinge. You can find more detailed information about Glacier Bay ready made hatch
kits on our web site at www.glacierbay.com.
Condensation issues can arise even with the best materials and construction techniques.
One common complaint is condensation behind a settee cushion adjacent to a cold box. This
happens independently of the quality of the box insulation. The extra insulation provided by the
cushion makes the back side of the cushion colder than the ambient air. If the air temperature
reaches the dew point, condensation will occur. The air cools more with the condensation
process, causing a low pressure area which pulls in more moist air. Remarkable quantities of
water can be generated this way. The solution is to provide ventilation between the cushion and
the cold box wall.
Another condensation trouble spot can be the hatch frames, especially with a side opening
freezer. Two ways to minimize the amount of heat conducted, and thus the chances for
Page 62
condensation or even freezing of the gaskets, are to minimize the mass and maximize the length
of the hatch frame. Commercial boxes often have heating strips in the gaskets or door edges to
eliminate this problem. If a stainless steel liner is used, a thermal break should be designed in,
so the liner material does not continue past the gaskets to the outside of the box.
Page 63