1
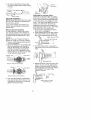
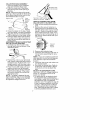
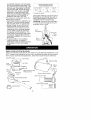
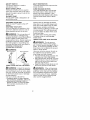
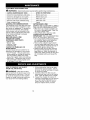
Instruction
Manual
I CRAFTSMAN°I
12 Amp Motor
265 / 346 km/h
ELECTRIC
BLOWER/VACUUM
Model No.
C944.511710
•
Safety
•
•
•
Assembly
Operation
Maintenance
•
Fran£ais
FOR HOUSEHOLD
USE ONLY
C _..._US
WARNING:
Read and follow all Safety Rules and Operating
Instructions
before first use of this product.
For answers to your questions about this product,
call 7am-7pm,
Mon.-Sat.,
or 10am-7pm,
Sun.
1-800-235-5878
Sears Canada,
530086292
3/31/04
(Hours listed are Central Time)
Inc., Toronto,
Ontario
M5B 2B8
Warranty Statement
Safety Rules
2
2
Parts Available
Storage
Assembly
Operation
Maintenance
5
8
10
Troubleshooting
Service & Adjustments
10
Parts Ordering
TWO (2) YEAR WARRANTY
11
11
Table
11
French
FOR CRAFTSMAN
® ELECTRIC
12
Back Cover
POWER BLOWER
For two (2) years from date of purchase, Sears Canada, Inc., will repair or replace
free of charge at Sears' option parts which are defective as a result of materials or
workmanship.
COMMERCIAL OR RENTAL USE:
Warranty is void if the Electric Power Blower is used for Commercial or Rental
purposes.
This warranty does NOT cover:
Expendable parts such as blower tubes which may become broken.
WARRANTY SERVICE IS AVAILABLE BY RETURNING THE ELECTRIC POWER BLOWER TO THE NEAREST SEARS SERVICE CENTRE/DEPARTMENT IN CANADA. THIS
WARRANTY APPLIES ONLY WHILE THIS PRODUCT IS IN USE IN CANADA.
This warranty is in addition to any statutory warranty and does not exclude or limit
legal rights you may have, but shall run concurrently with applicable provincial
legislation. Furthermore, some provinces do NOT allow limitation on how long an
implied warranty will last, so the above limitations may not apply to you.
Sears Canada, Inc,, Toronto, Ontario M5B 2B8
IMPORTANT WARNINGS AND
SAFETY INSTRUCTIONS
AWARNING:
When using electric gardening appliances, basic safety precautions should always be followed to reduce the risk of fire, electric shock, and serious injury. The
warnings and safety instructions in this manual must be followed to reduce the
risk of fire, electric shock, or injury, and to provide reasonable safety and efficiency in using this unit. The operator is responsible for following the warnings and
instructions in this manual and on the unit. Read the entire instruction manual
before assembling and using the unit! Restrict the use of this unit to persons who
read, understand, and follow the warnings and instructions in this manual and on
the unit. Never allow children to use this unit. Close attention is necessary when
used near children.
OPERATOR SAFETY
• Always wear safety glasses or similar
eye protection when operating, servicing, or performing maintenance on
your unit. Wearing eye protection can
help to prevent rocks or debris from
being blown or ricocheting into eyes
and face which can result in blindness
or serious injury.
• Always wear a respirator or facemask
when working with the unit in dusty
environments.
• Dress safely in long pants. Do not
go barefoot or wear short pants or
sandals.
• Do not operate the unit when you are
tired, ill, upset, or if you are under the
influence of alcohol, drugs, or medication.
• Secure
hairsoitisabove
shoulder
and/or extension cord and to reduce
length.
Keep
loose
hair,
loose
clothing, the possibility of the extension cord
fingers,
andallother
parts
ofthebody disconnecting from the unit during
away
fromopenings
andmoving
operation.
• Do not use the unit if the switch does
parts.
Hair,
jewelry,
loose
clothing,
or
clothing
withloosely
hanging
straps, not turn the unit on and off properly.
ties,
tassels,
etc.,
canbecaught
in
Have the unit repaired by your Sears
Service Centre.
moving
parts.
• Keep the extension cord clear of operELECTRICAL
SAFETY
ator and obstacles at all times. Do not
_IkWARNING:
Avoid a dangerous
environment.
To reduce the risk of
electrical shock, do not use in rain, in
damp or wet locations, or around
swimming pools, hot tubs, etc. Do not
expose to snow, rain, or water to avoid
the possibility of electrical shock. Do
not handle extension cord plug or unit
with wet hands.
• Use only a voltage supply as shown
on the nameplate of the unit.
• Avoid dangerous situations. Do not
use in presence of flammable liquids
or gases to avoid creating a fire or explosion and/or causing damage to unit.
• Avoid dangerous environments.
Do
not use in unventilated areas or where
dust or explosive vapors can build up.
• To reduce the risk of electrical shock,
use extension cords specifically
marked as suitable for outdoor appliances. The electrical rating of the
cord must not be less than the rating
of the unit. The cord must be marked
with the suffix '_4V". Make sure your
extension cord is in good condition.
Inspect extension cord before use
and replace if damaged. An undersized extension cord will cause a
drop in line voltage resulting in loss
of power and overheating.
If in
doubt, use the next heavier gauge.
The smaller the gauge number, the
heavier the cord. (NOTE: The correct size to be used depending on
the cord length is shown in this
manual. See SELECT AN EXTENSION
CORD in the ASSEMBLY section).
• Inspect the insulation and connectors
on the unit and extension cord before
each use. If there is any damage, do
not use until damage is repaired by
your Sears Service Centre. Do not pull
or carry by cord; do not use cord as a
handle, close a door on cord, or pull
cord around sharp edges or corners.
Keep cord away from heated surfaces.
Do not unplug by pulling on cord. To
unplug, grasp the plug, not the cord.
• Tie cord to cord retainer and connect
to recessed plug as shown in this
manual to prevent damage to unit
expose cords to heat, oil, water, or
sharp edges.
• Avoid any body contact with any
grounded conductor, such as metal
fences, or pipes, to avoid the possibility of electric shock. Don't handle plug
or unit with wet hands.
• Do not use with damaged cord or
plug. If unit is not working as it
should, has been dropped, damaged, left outdoors, or dropped into
water, return it to your Sears Service
Centre for repair.
• Ground Fault Circuit Interrupter (GFCl)
protection should be provided on the
circuit or outlet to be used for this unit.
Receptacles are available having builtin GFCl protection and may be used
for this measure of safety.
• Keep others including children, animals, bystanders, and helpers a minimum of 30 feet (10 meters) away.
Stop the motor immediately if you are
approached. Do not allow the unit to
be used as a toy.
DOUBLE INSULATION
CONSTRUCTION
This unit is double insulated to help
protect against electric shock. Double
insulation construction consists of two
separate "layers" of electrical insulation instead of grounding.
Tools and appliances built with a
double insulation system are not intended to be grounded. No grounding
means is provided on this unit, nor
should a means of grounding be added to this unit. As a result, the extension cord used with your unit can be
plugged into any standard 120 volt
electrical outlet. Safety precautions
must be observed when operating any
electrical tool. The double insulation
system only provides added protection
against injury resulting from an internal
electrical insulation failure.
,_WARNING:
All electrical repairs
to this unit, including housing, switch,
motor, etc., must be diagnosed and repaired by qualified service personnel.
Replacement parts for a double insu3
lated
appliance
must
beidentical
tothe
parts
theyreplace.
Adouble
insulated
appliance
ismarked
withthewords
"double
insulation"
or"double
insulated".
Thesymbol
[] (square
within
a
square)
mayalsobemarked
onthe
appliance.
Failure
tohave
theunitrepaired
bySears
service
personnel
can
cause
thedouble
insulation
constructiontobecome
ineffective
andresult
in
serious
injury.
UNIT/MAINTENANCE
SAFETY
• Turn off all controls and allow the motor to stop before disconnecting the
unit from the power source.
• Disconnect the unit from the power
source when not in use. Do not leave
the unit when it is plugged into outlet.
• Do not set the unit on any surface except a clean, hard area while the unit
is running. Debris such as gravel,
sand, dust, grass, etc., could be
picked up by the air intake and thrown
out through the discharge opening,
damaging the unit, property, or causing serious injury to bystanders or ope rato r.
• Do not overreach or use from unstable
surfaces such as ladders, trees, steep
slopes, rooftops, etc. Use extra care
when cleaning on stairways. Keep
firm footing and balance at all times.
Keep hands out of tubes.
• Inspect the entire unit before each use
for worn, loose, missing, or damaged
parts. Do not use until the unit is in
proper working order.
• Disconnect unit from power source before servicing, cleaning, performing
maintenance, or storing.
• This unit is double insulated. See the
DOUBLE INSULATION section. Have all
internal service performed by qualified
service repair personnel to avoid
creating a hazard or voiding your warranty.
• Have all maintenance other than the
recommended procedures described
in the instruction manual performed by
your Sears Service Centre.
• Always see your Sears Service
Centre to replace a damaged impeller. Parts that are chipped, cracked,
broken, or damaged in any other
way can fly apart and cause serious
injury. Replace damaged parts before using the unit.
• Never place any object in the air intake opening as this could restrict
proper air flow and cause damage to
the unit.
• Never douse the unit with water or
other liquids or squirt with a water
hose. Clean the unit using a damp
cloth. Wipe off with a clean dry cloth.
See MAINTENANCE.
• Check air intake openings and tubes
frequently, always with the unit
stopped and power source disconnected. Keep vents and tubes free of
debris which can accumulate and restrict proper air flow.
• Do not burn, incinerate, or expose this
unit to extreme heat.
• Store the unit unplugged in a high,
cool, dry, indoor area out of the reach
of children.
• Use only recommended attachments
and replacement parts to avoid creating a hazard and/or voiding warranty.
• Maintain the unit according to recommended procedures.
• Use only for jobs explained in the OPERATION section of this manual.
BLOWER SAFETY
• Use only in daylight or in good artificial
light.
• Inspect the area before using the
unit. Remove all debris and hard objects such as rocks, glass, wire, etc.,
that can ricochet, be thrown, or otherwise cause injury or damage during operation.
• Avoid accidental starting. Be sure the
switch is in the OFF position and keep
your hand and fingers away from the
switch while connecting the unit to the
power source or when carrying a unit
connected to the power source.
• Never run the unit without the proper
equipment attached. When used as a
blower, always install a blower tube.
Use only recommended attachments.
Do not use with any opening blocked,
Keep free of dust, lint, hair and anything that may reduce air flow.
• To avoid spreading fire, do not use
blower near leaf or brush fires, fireplaces, barbecue pits, ashtrays, etc.
• Never place objects inside the blower
tubes; always direct the blowing debris
away from people, animals, glass, and
solid objects such as trees, automobiles, walls, etc. The force of air can
cause rocks, dirt, or sticks to be
thrown or to ricochet which can hurt
people or animals, break glass, or
cause other damage.
• Never use for spreading chemicals,
fertilizers, or any other substances
which may contain toxic materials.
• Avoid
situations
which
could
setthe
VACUUM
SAFETY
collection
bagonfire.Donotvacuum
• Stopthemotor
anddisconnect
the
discarded
matches,
cigars,
cigarettes,
power
source
before
opening
theair
orashfrom
fireplaces,
barbecue
pits,
inlet
doororattempting
toinsert
orremove
thevacuum
tubes.
Themotor
brush
piles,
etc.Toavoid
spreading
fire,donotuseblower
nearleafor
must
bestopped
andtheimpeller
fires,
fireplaces,
barbecue
pits,
blades
nolonger
turning
toavoid
seri- brush
ousinjury
fromtherotating
blades.
ashtrays,
etc.
usethecollection
bagshoul• Hard
objects
canbethrown
through • Always
derstrap
when
vacuuming
toavoid
thecollection
bagorthehousing
and
lossofcontrol.
become
dangerous
missiles
which
airintake
openings,
elbow
tube,
cancause
serious
injury
totheopera- • Check
tororothers.
andvacuum
tubes
frequently,
always
andthepower
• When
using
thevacuum
attachment, withtheunitstopped
disconnected.
Keep
vents
and
theunitisdesigned
topickupdryma- source
tubes
freeofdebris
which
canaccuterial
such
asleaves,
grass,
small
andrestrict
proper
airflow.
Do
twigs,
andbitsofpaper.
Donotvacu- mulate
notusewithanyopening
blocked,
umstones,
gravel,
metal,
broken
Keep
freeofdust,
lint,hairandanyglass,
etc.,toavoid
severe
damage
to
thatmayreduce
airflow.
theimpeller.
Toavoid
thepossibility
of thing
electrical
shock,
donotattempt
tovac- STANDARDS
uumwater
orother
liquids.
Thisproduct
islisted
byUnderwriters
• Never
runtheunitwithout
theproper Laboratories,
Inc.,inaccordance
with
1017.
equipment
attached.
When
used
asa ULStandard
vacuum,
always
install
vacuum
tubes Ifsituations
occur
which
arenotcovered
andcollection
bagassembly.
Make inthismanual,
usecareandgood
judgsurethecollection
bagassembly
is
ment.
Ifyou
need
a
ssistance,
contact
completely
zipped
when
unitisrunning Sears
Service
Centre
orcall
toavoid
flying
debris.
Useonlyrecom- your
1-800-235-5878.
Failure
tofollow
all
mended
attachments.
Safety
Rules
andPrecautions
canresult
inserious
injury.
SAVE THESE INSTRUCTIONS
CARTON CONTENTS
Model C944.511710
• Blower
• Blower Tube
• 2 Vacuum Tubes
• Elbow Tube
• Collection Bag
Examine parts for damage. Do not use
damaged parts.
NOTE: If you need assistance or find
parts missing or damaged, call
1-800-235-5878.
_WARNING"
Stop the unit and
disconnect from the power source before opening the inlet cover or attempting to insert or remove the inlet restrictor,
blower tube, or vacuum tubes. The motor must be stopped and the impeller
blades no longer turning to avoid serious
injury from the rotating blades.
_WARNIN_I:
If received assembled, ensure your unit is properly
assembled and all fasteners are secure.
• A standard screwdriver is required for
assembly.
BLOWER ASSEMBLY
NOTE: Assembly instructions for using
your unit as a vacuum follow this section.
Attaching
the blower tube
If you have already assembled your
unit for use as a vacuum, refer to the
section HOW TO CONVERT UNIT FROM
VACUUM USE TO BLOWER USE.
To attach blower tube:
1. Align the grooves on the blower
tube with the grooves on the blower
outlet.
2. Push the blower tube onto the blower outlet until it snaps into place
(tube is secured by red tube release
button).
3.Toremove
theblower
tube,press
thetuberelease
button
while
pulling
ontube.
(_f,,_Tube
.4
Inlet Cover
Vacuum
,n,et
Release Button
Restrict_r /_ "_J/i
.__)___e
r Tube
VACUUM ASSEMBLY
NOTE: Assembly instructions for using
your unit as a blower are explained in
the previous section.
If you have already assembled your
unit for use as a blower, remove the
blower tube.
Remove the inlet restrictor
An inlet restrictor is used when using
your unit as a blower. This restrictor is
not used during vacuum use and must
be removed during assembly for vacuum use.
NOTE: Be sure to keep the inlet restricter for using your unit as a blower.
1. Ensure unit is stopped and extension
cord is unplugged.
2. Open the inlet cover by inserting the
tip of a screwdriver into the latch
area on the blower unit. Gently tilt
handle of screwdriver toward the
front of the unit to release the latch
while pulling up on the vacuum inlet
cover with your other hand.
Bottom view
of unit
Vacuum
Upper Vacuum Tube
'_
Vacuum Assist Handle
Hoo_
3. Pivot the tube until it is secured to
the blower unit by the red inlet cover
latch.
Latch Area
/
Inlet Cover (closed)
Impeller
Attaching the vacuum tubes
There are 2 vacuum tubes, an upper
tube and a lower tube. The upper tube
has a vacuum assist handle attached
to one end and is cut straight on both
ends. The upper tube attaches to the
blower unit. The lower tube has an
angled end that you point toward the
ground during vacuum use. The lower
tube attaches to the upper tube.
1. Ensure unit is stopped and extension cord is unplugged.
2. While holding inlet cover open, place
the hooks of the vacuum assist handle on the retaining posts of the unit.
Latch Area
/
/
4. Attach the lower vacuum tube to the
upper vacuum tube by aligning the
arrows on the two tubes. Press the
tubes together until the lower tube is
fully seated in the upper tube.
About 3 inches)
_
Upper Tube
Lower Tube
Vacuum Inlet Cover (opened)
3. Turn the inlet restrictor counterclockwise and remove it from the unit. Do
not close the inlet door. You will next
attach the vacuum tubes.
//
Align arrows on upper
and lower tubes
COLLECTION
BAG ASSEMBLY
1. Open the zipper on the collection
bag and insert the elbow tube.
2. Push the small end ofthe elbow
tube through the small opening in
the bag.
NOTE: Make sure edge of the small
opening is flush against the flared area
of the elbow tube and the hole for the
tube release button is on top.
Tube
Elbow Tube
Release
Button
Hole
/
Zipper
Small
Opening
Opening
3. Close the zipper on the bag. Make
sure the zipper is closed completely.
4. Align the grooves on the elbow tube
with the grooves on the blower outlet.
5. Push the elbow tube onto the blower outlet until it snaps into place (elbow tube is secured by red tube release button).
ADJUSTING THE SHOULDER STRAP
ON THE COLLECTION
BAG
1. Carefully loop the shoulder strap
through the buckle as shown in the
illustration below.
Last In_
2. Position the unit on your right-hand
side, blower outlet and bag pointing
toward the rear. Hold the unit in an
upright position with the lower vacuum tube on the ground to support it.
3. Place the shoulder
strap over your
head and onto your left shoulder.
4. Adjust the strap to allow a free flow
of air from the blower. If the collection bag is kinked, the unit will not
operate properly.
NOTE: The strap is designed to position the collection bag on your shoulder
without kinks. The strap is not intended
to support the weight of the unit.
Shoulder strap
on left shoulder
No kinks in
allows free
HOW TO CONVERT UNIT FROM
VACUUM USE TO BLOWER USE
1. Stop unit and unplug the extension
cord.
2. Remove the vacuum tubes by inserting the tip of a screwdriver into
the latch area on the vacuum assist
handle. Gently tilt handle of screwdriver toward the front of the unit to
release the latch while pulling up on
the vacuum assist handle with your
other hand.
Latch Area
J
Assist
Handle
Vacuum
3. Remove the collection bag.
4. Install the inlet restrictor that was removed when assembling for vacuum use.
NOTE: If you are unable to locate the
inlet restrictor, the unit will still operate.
This restrictor improves the blower
function.
5. Close the inlet cover and make sure
it is latched closed.
6. Re-install the blower tube. Refer to
ATTACHING THE BLOWER TUBE for
instructions on how to attach this
item.
SELECT AN EXTENSION
CORD
Use only a 120 A.C. voltage supply as
shown on nameplate of the unit to
power your blower.
° To reduce the risk of electrical shock,
this equipment has a polarized plug
(one blade is wider than the other) and
will require the use of a polarized
extension cord. The appliance plug will
fit into a polarized extension cord only
one way. If the plug does not fit fully
into the extension cord, reverse the
plug. If the plug still does not fit, obtain
a correct polarized extension cord.
Apolarized
extension
cord
willrequire
MINIMUM
WIRE
GAUGE
theuseofapolarized
walloutlet.
This
RECOMMENDATIONS
plugwillfitintothepolarized
walloutlet
25FT. 50FT. 100
FT.
onlyoneway.
Ifplugdoes
notfitfully VOLTS
intothewalloutlet,
reverse
theplug.
If
120
16
16
14
itstilldoes
notfit,contact
aqualified
A.W.G.*
A.W.G.*
A.W.G.*
electrician
toinstall
theproper
wall
outlet.
Donotchange
theequipment
plug,
extension
cordreceptacle,
or
Secure the extension cord to the unit by
extension
cordpluginanyway.
the cord through the cord reTheextension
cordused
toreach
the threading
tainer (see illustration). Insert the cord
power
source
must
be:
receptacle into the recessed plug.
• Specifically
marked
assuitable
forout- CAUTION: Failure to use cord retaindooruse.
Thecordmust
bemarked er could result in damage to the unit,
withthesuffix
'MT-A"
(inCanada
'M,t').
• Heavy
enough
tocarry
fullcurrent extension cord, or both.
fromthepower
source
totheunit.
Otherwise,
lossofpower
andoverheating
canoccur
causing
damage
tounit.Refer
totableforminimum
C°rcdptaclec'f
_
Recessed
wiregauge
recommendations.
The
cordmust
bemarked
withtheproper
wiregauge.
(Appropriate
extension
cords
areavailable.)
Donotusemultiplecords.
• Ingood
condition.
Cord
insulation
must
beintact
withnocracks
or
deterioration.
Plug
connectors
must
be
Retainer-_
undamaged.
DONOT
usemultiple
cords.
*American
Wire
Gauge
KNOW YOUR ELECTRIC BLOWER
READ THIS INSTRUCTION MANUAL AND SAFETY RULES BEFORE OPERATING YOUR
UNIT. Compare the illustrations to your unit to familiarize yourself with the location
of the various controls and adjustments. Save this manual for future reference.
ON/OFF Switch
....
Collection
Co_d
Q /'_--_-
Rear /'"
Handle
_
_
Air Vents
- ,
upper vacuum
Inlet Cover
Retaining Post
Latch
Vacuum Assist Handle
Tube
Tube Release
Button
Blower Tube
/
-'_
IlnletRestrictor
Upper Vacuum
_
Lower Vacuum Tube
/
/
Bag
ON/OFF SWITCH
The ON/OFF SWITCH is used to
activate the motor.
INLET RESTRICTOR
The INLET RESTRICTOR improves
blower function.
INLET COVER LATCH
The INLET COVER LATCH is used to
TUBE RELEASE BUTTON
The TUBE RELEASE BU-i-i-ONsecures
the blower tube or elbow tube to the
open and close the inlet cover and to
secure the upper vacuum tube to the
blower unit.
BLOWER TUBE
The BLOWER TUBE is designed to direct the flow of air.
STOPPING YOUR UNIT
Slide the ON/OFF switch to the OFF
position.
STARTING YOUR UNIT
Your unit has two run positions, LOW
and HIGH. Slide the switch to one of
these positions to turn on the unit.
A(_LWARNING:
Do not use the unit
without the tubes or collection bag
properly attached to avoid flying debris
and/or impeller contact which can
cause serious injury. Always wear eye
protection to prevent rocks or debris
from being blown or ricocheting into
the eyes and face which can result in
blindness or serious injury.
OPERATING
POSITION
,_WARNING:
Eye Protection
Eye Protection
Blower
Vacuum
USING YOUR UNIT AS A BLOWER
'_ WARNING:
Inspect the area before using the unit. Remove all debris
and hard objects such as rocks, glass,
wire, etc., that can ricochet, be thrown,
or otherwise cause injury or damage
during operation.
Use your unit as a blower for:
• Sweeping debris or grass clippings
from driveways, sidewalks, patios, etc.
• Blowing grass clippings, straw, or
leaves into piles, or removing debris
from corners, around joints, or between bricks.
the
blower unit during operation. Also,
pressing the tube release button allows
removal of the blower tube or elbow
tube.
Direct air flow by directing the blower
tube down or to one side. Always work
away from solid objects such as walks,
large stones, vehicles, and fences.
Clean corners by starting in corners and
moving outward. This will help prevent
an accumulation of debris which could
fly into your face.
Be careful when working near plants.
The force of the air could damage
tender plants.
USING YOUR UNIT AS A VACUUM
_WARNING:
Do not vacuum
stones, gravel, metal, broken glass,
etc., to avoid severe damage to the impeller. To avoid the possibility of electrical shock, do not attempt to vacuum
water or other liquids.
Use your unit as a vacuum to pick up
dry material such as leaves, grass,
small twigs, and bits of paper.
• For best results during vacuum use,
operate your unit at high speed.
• Move slowly back and forth over the
material as you vacuum. Avoid forcing the unit into a pile of debris as
this can clog the unit.
• Keep the vacuum tube about an inch
above the ground for best results.
_LWARNING:
If the unit becomes
clogged, stop the unit and unplug the
extension cord. Wait until the impeller
has completely stopped turning, then
remove the vacuum tubes. Carefully
reach into the vacuum opening and
clear out the clogged debris.
CUSTOMER
RESPONSIBILITIES
WARNING:
Disconnect
power
source
before
performing
maintenance.
CARE
& MAINTENANCE
TASK
WHEN TO PERFORM
Check for loose fasteners
Check for damaged
Before each use
and parts
Before each use
or worn parts
Inspect and clean unit and labels
After each use
Remove and empty collection
After each use
bag
Clean collection bag
GENERAL RECOMMENDATIONS
The warranty on this unit does not cover
items that have been subjected to operator abuse or negligence. To receive full
value from the warranty, the operator
must maintain unit as instructed in this
manual. Various adjustments will need
to be made periodically to properly
maintain your unit.
BEFORE
EACH USE
CHECK FOR LOOSE
FASTENERS AND PARTS
• Inlet Cover
• Blower Tube
• Vacuum Tubes
• Collection Bag
CHECK FOR DAMAGED
OR
WORN PARTS
Contact Sears Service Centre for replacement of damaged or worn parts.
• ON/OFF Switch - Ensure switch functions properly by moving the switch to
the OFF position. Make sure motor
stops; then restart motor and continue.
• Inlet Cover - Discontinue use of unit if
inlet cover fails to latch properly or if it
is damaged in any way.
Yearly
AFTER
EACH
HOW TO REMOVE AN OBJECT
FROM THE AIR INTAKE
1. While holding the inlet cover open,
remove the vacuum tubes. The inlet cover must be held open through
all remaining steps.
2. Carefully reach into the vacuum
opening and clear out the air intake
area. Clear all debris from impeller.
3. Inspect the impeller for cracks. If
cracked or damaged, do not use the
unit. Have parts replaced by your
Sears Service Centre. Do not attempt to replace them yourself.
_kWARNING:
Stop the unit and
disconnect from the power source before opening the inlet cover. The motor must be stopped and the impeller
blades no longer turning to avoid serious injury from the rotating blades.
USE
INSPECT AND CLEAN UNIT & LABELS
Stop unit and unplug extension cord.
• After each use, inspect complete unit
for loose or damaged parts. Clean the
unit using a damp cloth.
• Wipe off unit with a clean dry cloth.
CLEAN COLLECTION
BAG
IMPORTANT: THE COLLECTION BAG
MUST BE PROPERLY EMPTIED.
• You must properly empty and maintain
the collection bag to avoid deterioration and obstruction of air flow.
Remove the collection bag from the
unit and empty after each use. Do not
store bag without emptying the bag of
all contents (grass, leaves, etc.).
Wash the bag once a year. Remove
the bag from the blower and turn the
bag inside out. Wash the bag with a
water hose. Allow the bag to hang and
dry completely before you reuse the
bag.
10
USER REPLACEABLE
REPLACEMENT
SERVICE
PARTS
PART
PART NUMBER
Blower Tube
530403765
Elbow Tube
530403769
Upper Vacuum Tube/
Vacuum Assist Handle
530403842
Lower Vacuum
530095589
Tube
Inlet Restrictor
530403791
Collection
530095599
Bag
If your blower is to be stored for a period of time:
_WARNING:
Perform the following steps after each use:
• Stop unit and disconnect from the
power source.
• Allow motor to cool before storing or
transporting.
• Store unit with all guards in place.
Position unit so that any sharp object
cannot accidentally cause injury.
• Store unit unplugged, well out of the
reach of children.
SEASONAL
STORAGE
Prepare unit for storage at the end of
the season or if it will not be used for
30 days or more.
TROUBLESHOOTING
• Stop unit and disconnect from the
power source.
• Clean the entire unit before lengthy
storage.
• Open inlet cover and clean any dirt,
grass, or debris that has collected. Inspect the blower and all tubes. Close
and make sure the cover is latched.
• Clean air vents and air inlet of debris.
• Store your unit and extension cord in a
well ventilated area and covered, if
possible, to prevent dust and dirt accumulation. Do not cover with plastic.
Plastic cannot breathe and may cause
condensation and eventual rust or corrosion.
• Check entire unit for loose screws. Replace any damaged, worn, or broken
parts.
TABLE
WARNING:
Always stop unit and disconnect from the power source before
performing all of the recommended remedies below except remedies that require unit to be operating.
SYMPTOM
Unit fails to
operate.
CAUSE
1. Switch in the OFF position.
2. Extension cord disconnected.
3. Circuit breaker tripped, or
fuse blown.
4. Mechanical failure
Unit
vibrates
abnormally.
1. Mechanical
failure
Impeller will
not turn
freely.
1. Debris in air intake area.
2. Mechanical failure,
REMEDY
1. Slide switch to ON position.
2. Reconnect extension cord.
3. Reset circuit breaker or
fuse.
4. Contact your Sears Service
Centre.
1. Contact your Sears Service
Centre.
1. Clean unit. Remove any
debris.
2. Contact your Sears Service
Centre.
11