1
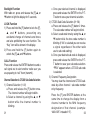
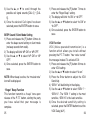
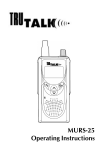
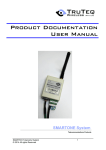
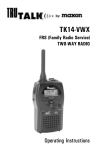
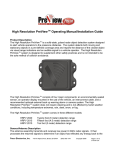
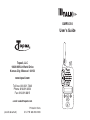
GMRS-310
User’s Guide
Topaz3, LLC
10828 NW Air World Drive
Kansas City, Missouri 64153
www.topaz3.com
Toll-free: 800-821-7848
Phone: 816-891-6320
Fax: 816-891-8815
e-mail: [email protected]
(end of document)
Printed in China
U.S. P/N: 680-090-2034
Table of Contents
1. About Your GMRS-310 Radio
2. RF Exposure
3. FCC Information
4. FCC Licensing Information
5. About Topaz3
6. Package Contents
7. Product Use and Care
8. Belt Clip Attachment
9. Battery Installation
10. Controls and Functions
• GMRS-310 Radio
• LCD Display
11. Basic Operation
• Power On/Off and Volume Adjustment
• P-T-T (Push-to-Talk) Button
• MONITOR / SCAN Function
• Backlight Function
• LOCK Function
• CALL Function
1
• Channel Selection & CTCSS Sub-Code
Selection
• Dual Channel Scan Function
• HI / LOW Transmit Power
• CALL Signal Settings
• BEEP Sound / Silent Mode Setting
• “Roger” Beep Function
• VOX Function
• Optional Ear Bud Speaker Microphone
Use
• Optional Battery Charging
12. Maintenance
13. Troubleshooting
14. Specifications
15. Channel Frequency List
16. CTCSS Sub-Code Frequency List
17. Warranty Service Instructions
18. Warranty
2
1. Introduction
Before using your new GMRS-310 radio,
please read this User’s Guide so that you can
take full advantage of all the features of the
radio.
The GMRS-310 is a lightweight, palm-sized
radio that you can carry almost anywhere;
while hunting, fishing, camping, hiking, at
shopping malls, amusement parks, or sports
events to keep in touch with family and friends.
Using the GMRS-310 does not require a
monthly service fee - the radio can be used
anywhere as
allowed by the FCC.
To insure proper communications with other
radios, they must be on the same channel and
CTCSS (Continuous Tone Controlled Squelch
System) sub-code as your GMRS-310.
The channel is the radio frequency wave your
radio uses to transmit and receive on. The
3
CTCSS sub-code helps reduce unwanted
chatter on the same radio channel, and gives
you more channel choices for increased
privacy.
The GMRS-310 operates on both General
Mobile Radio Service (GMRS) and Family
Radio Service (FRS) channels. Refer to the
Channel Frequency and Sub-Code Lists
(Sections 15 and 16) for channel and CTCSS
sub-code choices.
2. FCC RF Exposure Compliance
The Federal Communications Commission
(FCC), with its action in General Docket 93-62,
November 7, 1997, has adopted a safety
standard for human exposure to Radio
Frequency (RF) electromagnetic energy
emitted by FCC regulated equipment. This
radio subscribes to the same safety standard
for the use of its products. Proper operation of
this radio will result in user exposure far below
4
the Occupational Safety and Health Act
(OSHA) and Federal Communications
Commission limits.
3. FCC Information
The FCC requires that you be advised of
certain requirements involving the use of this
radio. This equipment has been tested and
found to comply with the limits for a Class B
Digital Device, pursuant to Part 15 of the FCC
Rules and Regulations. These rules are
designed to provide reasonable protection
against harmful interference with other
electronic devices in a residential environment.
This equipment uses and can generate radio
frequency (RF) energy. If not used in
accordance with the instructions, it may cause
interference to other radio communications.
However, there is no guarantee that the
interference will not occur in another device’s
reception (which can be determined by turning
the equipment off and on). The user is
5
encouraged to correct the interference by one
or more of the following measures:
• Reorient or relocate the receiving antenna
• Increase the separation between the radio
and other devices
• Consult the manufacturer for technical
assistance
FCC Warning: This equipment generates or
uses radio frequency energy. Changes or
modifications not expressly approved in writing
may cause harmful interference and void the
user’s authority to operate this equipment.
4. FCC Licensing Information
Before using your Maxon GMRS-310, you
must obtain / possess a radio license issued by
the Federal Communications Commission
(FCC). It is illegal to transmit without the
appropriate license.
6
The GMRS-310 operates on General Mobile
Radio Service (GMRS) frequencies, which are
allocated by the FCC for personal uses,
including recreation and travel.
For more information regarding the licensing
application, contact: the FCC’s Consumer
Center at
1-888-CALL-FCC (225-5322).
To obtain a FCC license to operate your
GMRS-310 radio, you must submit FCC Form
605 (main form) plus Form 605 Schedule F
(temporary); also Form 159 Remittance Form
(for payment of fees) directly to the FCC at this
address:
Federal Communications Commission
Wireless Bureau Application
P.O. Box 358130
Pittsburgh, PA 15251-5130
You are required to have in your possession a
current copy of Part 95 of the FCC Rules and
Regulations before operating your radio. It is
your responsibility to insure your radio operates
in accordance with the guidelines established
by the FCC. You should familiarize yourself
with Part 95 of the FCC Rules before operating
your radio.
To obtain current FCC forms and filing
instructions, you can:
• Have the forms mailed to you by calling the
FCC Forms Distribution Center
1-800-418-FORM (3676).
• Have the forms faxed to you by the FCC’s
Fax Information System by calling 1-202-4180177.
7
To obtain current a copies of FCC Rules Part
95, contact:
Superintendent of Documents
Government Printing Office
Washington, DC 20402-9371
or by phone: 1-888-225-5322 (8:00 AM to 4:00
PM EST, Monday thru Friday, excluding
Holidays).
8
Many larger metropolitan areas have U.S.
Government book stores. Check the business
listings of your local telephone directory under
“Government Book Stores” for listings and
locations.
5. About Topaz3
Topaz3 is the exclusive supplier of Maxon,
Legacy and TruTalk brand communication
products.
Our product line ranges from two-way radios
suitable for Business and Industry (B&I)
markets like farm,
Government, law enforcement, utility, etc. to
consumer communications equipment for
recreational and
light-duty business markets.
modules, as well as FRS (Family Radio
Service), GMRS (General Mobile Radio
Service) and MURS
(Multi Use Radio Service) radios, Citizen’s
Band radios and weather monitors.
Available accessory items include a variety of
carrying cases, spare batteries, desktop and
mobile
chargers, ear bud speaker microphones and
more for each radio model.
For additional information on our product line,
visit our website: www.topaz3.com.
Product offerings include a variety of UHF and
VHF handheld and mobile radios, repeaters
and RF link
9
10
6. Package Contents
GMRS-310 Radio
7. Product Use and Care
Ear Bud Speaker
Microphone
Do not expose the radio to long
periods of direct sunlight, nor place
the radio close to heat generating
sources.
Avoid shaking or dropping the radio.
Belt Clip
Hand-Strap
User’s Guide
GMRS-310
User’s Guide
Avoid extreme exposure to water and
cold.
Do not grab or carry the radio by the
antenna - accidental breakage may
occur. Do not hold the antenna when
the radio is in use, as holding the
antenna affects the effective range.
When using rechargeable batteries,
make sure they are fully charged
before using the radio.
11
12
8. Belt Clip Attachment
1) Align the belt clip to the mounting rails on the
back of the radio.
2) Slide the belt clip downward until it locks into
place.
To remove the belt clip - lift the lever at the top
of the clip while pulling the belt clip upward.
9. Battery Installation
NOTE: The GMRS-310 requires 4 AAA batteries
(not included). The radio must be powered OFF
before installing or removing batteries.
NOTE: After removing the belt clip, open the battery
compartment cover using the steps below.
NOTE: The belt clip must be removed to install
batteries into the radio.
1. Push down on the top
center of the battery
compartment cover and
slide away from the 2. Lift the battery compartradio.
ment cover off.
3. Insert 4 AAA batteries.
Match the battery polarity
with the design within the
battery compartment.
13
4. Align the battery compartment cover to the rails on
radio and slide forward
until cover snaps into
place.
14
10. Controls and Functions
GMRS-310 Radio
15
1. Speaker
2. LCD Window
3. ENTER Button: Selects and enters
functions from the menu. When not in the
function menu it is used to send the CALL
signal.
4. 5/b(UP/DOWN) Buttons: Use to select
the function options, scroll through
channels and sub-codes.
5. Microphone
6. FUNCTION Button: Use to select a desired
function menu. Press and hold it to lock the
buttons.
7. P-T-T (Push-To-Talk) Button: Press and
hold to talk on the radio.
8. MONITOR / SCAN Button: Press and hold
to hear other radio traffic. Press and
release to scan channels.
9. Power/Volume Knob: Turns the radio
on/off, and adjusts the radio volume.
10. Antenna
11. External Speaker Microphone / Charger
Jack: Plug ear bud speaker microphone or
optional battery charger into this jack.
16
LCD Display
TX
BUSY
1. CALL: Appears when the radio is sending a
CALL signal to other person.
2. VOX: Appears when the VOX (voice
operated transmission) feature is activated.
3. SCAN: Appears while channel scan is
active.
4. BEEP: Appears when the BEEP function is
on (and silent mode is off).
5. LOCK: Appears when the button lock
function is activated.
6. Battery: Shows your battery life / level.
7. PRIV: Appears when a CTCSS sub-code
(01 ~ 38) is used.
8. Displays the CTCSS sub-code (01 ~ 38) or
the current CTCSS frequency in use.
17
“00” indicates that no CTCSS sub-code is
set.
9. TX: Appears while radio is transmitting a
message (the P-T-T is pressed).
10. BUSY: Appears while monitoring channels
or receiving a message. DO NOT transmit
while this icon is visible.
11. Displays the current channel number (1 ~
22) or the current channel frequency.
11. Basic Operation
Power On/Off and Volume Adjustment
1) Power On
Turn Power/Volume knob clockwise.
2) Power Off
Turn Power/Volume knob counterclockwise, until a click is heard (detent).
3) VOLUME adjustment
Increase volume by turning Power/Volume
knob clockwise. Decrease volume by
turning the Power/Volume knob counterclockwise.
18
P-T-T (Push-To-Talk) Button
1) DO NOT transmit [P-T-T] when receiving a
call or when the “BUSY” icon is seen in the
display.
2) To transmit, push and hold the P-T-T button.
When the “TX” icon appears in the LCD,
begin speaking in a normal tone into the
microphone. Release the P-T-T button once
you have finished your message, and wait
for the other person to respond.
3) Once the person you called has responded,
you can return a response by pressing the
P-T-T button and continue the conversation
by repeating the step above.
MONITOR / SCAN Function
1) MONITOR Function
a. Press and hold the MON (monitor) button
to temporarily remove a CTCSS sub-code
programmed on a channel and to listen to
(monitor) other radio traffic on that
channel. This function is also useful for
adjusting radio volume.
b. If there is no message being received,
19
background noise is heard and the
“BUSY” icon will show in the display.
2) SCAN Function
a. Press and release the MON button to
activate the channel scan function.
b. When scanning, the “SCAN” icon will be
shown in the display and channel
numbers will be scrolling.
c. While in scan, the direction in which the
channels are scanned can be changed.
Press the 5 to scan “up” channel
numbers, or press b to scan “down”
channel numbers.
d. During scan, if a transmission is made
while not receiving a call, you will transmit
on the channel you selected before
entering scan. If a call is received during
scan, you will be able return a message
(transmit) on that same channel. Scan will
resume approximately 5 seconds after
your message has been completed.
e. Press and release the MON button again
to stop channel scan.
20
Backlight Function
With radio on, press and release the [F],5, or
b button to light the display for 5 seconds.
LOCK Function
1) Press and hold the [F] button to lock the [F],
5 , and b buttons, preventing any
accidental change of channels and tones
and also prohibiting the scan function. The
“Key” icon will be shown in the display.
2) Press and hold the [F] button again to
unlock the [F],5, and b buttons.
CALL Function
Press and release the ENTER button to send a
call signal out to alert another radio user you
are preparing to “call” them (transmit).
Channel Selection & CTCSS Sub-Code Selection
1) Channel Selection (1~22)
a. Press and release the [F] button once.
The channel number will begin to blink.
b. Select a channel by using the 5, or b
button while the channel number is
blinking.
21
c. Once your desired channel is displayed,
press and release the ENTER or the P-TT button to save your channel selection.
2) CTCSS Sub-Code Selection (01~38)
a. Press and release the [F] button 2 times.
The sub-code number will begin to blink.
b. Select a sub-code tone by using the 5, or
b button while the tone code number is
blinking.(If ‘00’ is selected you can receive
a signal regardless of the other radio
user’s sub-code setting.)
b. Once your desired sub-code is displayed,
press and release the ENTER or the P-TT button to save your sub-code selection.
“PRIV” appears when a CTCSS sub-code
is selected.
3) Channel Frequency Designation
You may view the channel and CTCSS subcode by either channel / sub-code number
or by frequency.
Press the [F] and ENTER buttons at the
same time to change the display from a
channel number to the MHz frequency
designation of that channel (example:
“462.6125” instead of “3”).
22
To return to the channel number display, press
the [F] and ENTER buttons at the same
time again.
NOTE: When the radio is set to display by
frequency, Channel and CTCSS sub-code
programming will also display by channel
frequency and sub-code frequency as
referenced on the Channel Frequency List and
CTCSS Sub-Code Frequency List.
Dual Channel Scan Function
This function allows you to alternately scan
between two selected channels.
1) Press and release [F] button once and use
5 , or b to select the first of the two
channels.
2) Once the channel has been selected, press
and release the [F] button 2 more times,
(“DCH OFF” will be blinking in the display).
3) Use 5, or b to select the second scan
channel.
4) Press and release the ENTER button to
store the two scan channels, and enter the
23
dual channel scan mode. The radio will
now begin scanning between the two
selected channels.
5) To cancel the dual channel scan function,
press and release the MON button.
HI/LOW Transmit Power
1) Press and release the [F] button 4 times to
enter the HI/LOW power setting.
2) The display will blink either “tPr Hi” (transmit
power high) or “tPr Lo” (transmit power low).
3) Use the 5, or b button to select “tPr Hi” or
“tPr Lo”. Press the ENTER button to save.
Low power is useful for extending the life of
your batteries and should be used at close
distances.
NOTE: Channels 8~14 are permanently set to
“tPr Lo” and cannot be changed due to FCC
regulations.
CALL Signal Settings
1) Press and release the [F] button 5 times to
enter the CALL signal setting.
2) The display will blink “CAL 1”.
24
3) Use the 5 , or b to scroll through the
possible call signal sounds [CAL 0] ~ [CAL
5].
4) Once the desired Call signal has been
selected, press the ENTER button to save.
BEEP Sound / Silent Mode Setting
1) Press and release the [F] button 6 times to
enter the beep sound setting or silent mode
(no beep sounds from radio).
2) The display will blink “bP ON” or “bP OFF”.
3) Use the 5, or b to select “bP ON” or “bP
OFF”.
4) Once selected, press the ENTER button to
save.
NOTE: When beep is active, the “musical note”
icon will be displayed.
“Roger” Beep Function
This function transmits a “beep” tone upon
release of the P-T-T button, alerting the party
you have called that your message is
complete.
25
1) Press and release the [F] button 7 times to
enter the “Roger Beep” setting.
2) The display will blink “rb ON” or “rb OFF”.
3) Use the 5, or b button to select “rb ON” or
“rb OFF”.
4) Once selected, press the ENTER button to
save.
VOX Function
VOX (Voice operated transmission) is a
function which allows you to talk without
pressing the P-T-T button. Your voice “sends”
the message instead. To activate VOX:
1) Press and release the [F] button 8 times to
enter VOX setting.
2) Use the 5, or b button to select “Vo on”.
3) Press the Enter button to adjust the VOX
Sensitivity.
4) “SEN 1” will be blinking in the display.
5) Use the 5, or b button to select “SEN 1” ~
“SEN 10”. The “SEN 1” setting is the most
sensitive, “SEN 10” is the least sensitive.
6) Once the desired sensitivity setting is
selected, press the ENTER button to set the
VOX Delay (dLY).
26
7) “dLY 150” will be blinking in the display. This
is the VOX delay time in which your radio
stays in the transmit mode during VOX
operation. Select between 0.25 seconds
[dLY 025] to 4 seconds [dLY 400]. Once
selected, press the ENTER button to save
your settings.
Optional Ear Bud Speaker Microphone Use
When the optional ear bud speaker
microphone is plugged into the jack at top of
radio, the radio’s internal speaker and
microphone will be disconnected.
Optional Battery Charging
An optional wall-type charger is available for
use with the GMRS-310, sold separately.
When this optional charger is plugged into the
jack at top of radio, rechargeable batteries can
be installed and used in the GMRS-310.
27
12. Maintenance
Your GMRS-310 radio is designed to be
maintenance-free. To keep the radio in good
working condition:
• Clean external surfaces with a clean cloth
dampened in a solution of dishwasher
detergent diluted in water. Apply sparingly to
avoid any moisture leaking into cracks and
crevices. Do not submerge the radio. Dry the
surface thoroughly with a soft, lint-free cloth.
• DO NOT use solvents or spirits for cleaning they may permanently damage the housing.
28
13. Troubleshooting
14. GMRS-310 Radio Specifications
RF Impedance
50 Ohm
Radio does not
power on.
1. Confirm that batteries are installed.
2. Confirm that your batteries are fresh, and not
discharged.
3. Confirm that the battery polarity is correct.
Frequency Range
462.5625 MHz ~
Audio is not
heard over the
speaker.
1. Press monitor and confirm that the speaker sounds.
2. Confirm that the volume has not been turned down.
3. Confirm you are on the same channel and using the
same
Channel Spacing
12.5KHz
Number of Channels
22
Modulation System
FM
Symptom
Solution
Audio is not clear. Sub-code as the person you are calling.
Poor reception.
BEEP sound is
not heard.
1.
2.
3.
4.
Confirm whether batteries are weak.
Change transmit power setting to high (tPr Hi)
Move closer to the person you are speaking.
Move to a higher elevation.
Confirm BEEP sound has been turned on
.
467.7250MHz
(Frequency Modulation)
Maximum RF Output Power
(Conducted High 2W / Low 0.5W)
Operating Temperature -4 F ~ 122 F
“BUSY” icon shows but Confirm that your radio’s sub-code matches the sub-code
NO reception is heard. of the radio you are calling.
Continual
transmission in
VOX.
Confirm that your VOX Sensitivity level (SEN) is not set to
lowest number (SEN 1). This level may be too sensitive
for your voice or environment.
VOX mode does Confirm that your VOX Sensitivity level (SEN) is not set to
not activate.
the highest number (SEN 10). This level may not be
sensitive enough for your voice or environment.
High 0.5W / Low 0.15W
(-20 C ~ 50 C)
Dimensions (H x W x D) 6.375” x 2.125” x 1.3125”
(162mm x 54mm x 33mm)
Weight (with batteries) 4.9 oz. (139g)
Battery Requirements
AAA size, 4 batteries
“Broken”
1. Confirm that the VOX delay time is not set to the lowest
transmissions when
number (dLY 025). A Delay setting of 175 to 225 will
using VOX mode.
generally work well for most users.
29
30
15. Channel Frequency List (MHz)
Channel Frequency
Channel
Frequency
1
462.5625
12
467.6625
1
67.0
14
107.2
27
167.9
2
462.5875
13
467.6875
2
71.9
15
110.9
28
173.8
3
462.6125
14
467.7125
3
74.4
16
114.8
29
179.9
4
462.6375
15
462.5500
4
77.0
17
118.8
30
186.2
5
462.6625
16
462.5750
5
79.7
18
123.0
31
192.8
6
462.6875
17
462.6000
6
82.5
19
127.3
32
203.5
7
462.7125
18
462.6250
7
85.4
20
131.8
33
210.7
8
467.5625
19
462.6500
8
88.5
21
136.5
34
218.1
9
467.5875
20
462.6750
9
91.5
22
141.3
35
225.7
10
467.6125
21
462.7000
10
94.8
23
146.2
36
233.6
11
467.6375
22
462.7250
11
97.4
24
151.4
37
241.8
12
100.0
25
156.7
38
250.3
13
103.5
26
162.2
FRS Channel are 1 ~ 14 above; FRS Channels
8-14 are restricted to 0.5W (500mW).
All other channels are GMRS frequencies and
are 2W (Hi) or 0.5W (Low) operation.
31
16. CTCSS Sub-Code Frequency List (Hz)
Code Frequency Code Frequency Code Frequency
32
17. Warranty Service Instructions
1) Refer to this User’s Guide for proper
operation and adjustments.
2) If the problem cannot be corrected by
reference to this User’s Guide, return the
product with proof of purchase (a sales
receipt) to the place of purchase, or call
Topaz3’s Customer Service Department for
assistance, toll free: 1-800-821-7848, Ext.
499.
For Your Records
Purchased From:
17. Warranty Statement
Topaz3, LLC warrants that each new GMRS310 radio product manufactured or supplied by
it to be free from defects in material and
workmanship under normal use and service for
One (1) year. Any accessory item packaged
with the GMRS-310 radio shall carry a Ninety
(90) Day warranty.
This Warranty is void for sales and deliveries
outside of the U.S.A. or Canada.
To obtain a full written warranty statement,
contact the Topaz3 Customer Service
Department:
1-800-821-7848, Ext. 499.
Purchased From:
Serial Number:
KEEP THIS INFORMATION
IN A SAFE PLACE.
33
34