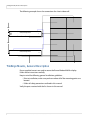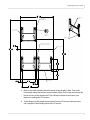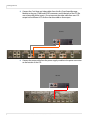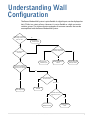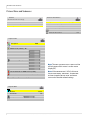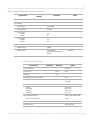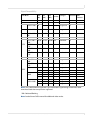
1
Runco WindowWall Installation Guide Copyright © 9 Apr 2010 by Runco All rights reserved. Contents of this publication may not be reproduced in any form without permission of Runco. Part Number 020-1044-00A Trademark Credits Windows™ is a trademark of Microsoft Corp. Big Picture™ is a trademark of Planar TileAlign™ is a trademark of Planar All other names are trademarks or registered trademarks of their respective companies. Disclaimer The information contained in this document is subject to change without notice. Runco makes no warranty of any kind with regard to this material. While every precaution has been taken in the preparation of this manual, the Company shall not be liable for errors or omissions contained herein or for incidental or consequential damages in connection with the furnishing, performance, or use of this material. RoHS Compliance Statement The Runco WindowWalls are fully RoHS compliant. RuncoCare™ - Standard Two Year Limited Warranty Congratulations on your purchase of a Runco® product! With proper installation, setup and care, you should enjoy many years of unparalleled video performance. This RuncoCare Standard Limited Warranty is provided free of charge by Runco International, LLC (“Runco”) with the purchase of a covered Runco product. The following sets forth Runco’s Standard Limited Warranty applicable to all Runco projectors, processors, LCD display and plasma display products, with the exception of the following models: XP-103DHD, SC1, SC1a, CW-95DHD and VW-100HD1. The following terms and conditions of the RuncoCare Standard Limited Warranty represent a contract between us, Runco, and you, the customer, who has purchased a Runco product. This contract applies to purchases of covered Runco products occurring on or after the effective date printed at the bottom of this document. Runco reserves the right to change the terms of this contract, and such changes shall apply to purchases of covered Runco products that occur on or after any future effective date. RuncoCare Standard Features • 2-year protection from defects in material and workmanship • Access to 24x7 phone support • Complimentary 2nd day one-way shipping 1 Runco may update this list of products excluded from this warranty from time to time at Runco’s sole discretion, but updates to the list of covered products will not apply on a retroactive basis. Runco WindowWall Installation Guide iii Warranty Coverage Runco warrants its products to be free from defects in material and workmanship during the warranty period provided below. If, in Runco’s sole determination, a product proves to be defective in material or workmanship during the warranty period, Runco will repair the product, replace the product with a substantially similar new or like new product, or refund a prorata share of the purchase price (calculated based on the remainder of the warranty period and the then-current MSRP1 of a similar product), if repair or replacement of the product is determined by Runco to not be feasible. Runco has sole discretion in determining whether a same or like model is offered, and what constitutes as ‘substantially similar model’. Length of Warranty Runco products are warranted for two (2)-years from the date of shipment from Runco. Lamps are warranted six (6) months from the date of shipment or 1000 hours of use, whichever comes first. All other accessories, which include but are not limited to, cables, remotes, carrying cases, lens cap and other peripherals sold with the Runco product, are warranted for ninety (90) days from the date of the original shipment of the accessory. Eligibility This RuncoCare Standard Limited Warranty is valid only for the first customer who purchases the covered product from an authorized Runco dealer or distributor. This warranty is not transferable. You may be required to provide proof of purchase in order to receive warranty services. RuncoCare Standard Claim Procedure In the event of a product defect, please follow the warranty claim procedure provided below: 1 The customer is required to contact a Runco dealer or Runco Technical Support via email at [email protected] or via phone at (toll free) 800-23-RUNCO (800-237-8626). If the customer is located outside North America, call +3589 4200 554 in Europe for product service. 2 Be prepared to provide the date of purchase, the place of purchase, serial number, product model number, description of the problem and troubleshooting steps already attempted. 3 Runco Technical Support staff will attempt to correct any minor issues that may be causing the problem. If Runco is unable to resolve the problem through troubleshooting, a Return Material Authorization (RMA) number will be issued for the exchange of the defective product if it is determined that the claim was made within the coverage period of the Standard Limited Warranty. 4 If it is determined that the Standard Limited Warranty applies to the claim, the customer will need to return the defective product to the Runco repair depot location specified by the Runco technical support representative. The customer will need to properly package the defective product, consisting of the product only, and not include any accessories (e.g., cables, remotes, carrying cases, lens, lens cap and other peripherals) and return it to the 1 iv MSRP is defined as the most recent product price listed on Runco’s price list. Runco WindowWall Installation Guide Runco repair depot specified by the technical support representative. It is the customer’s responsibility to properly package the hardware, include all appropriate materials, and return it to the location specified by the Runco technical support department. The customer will need to address and resolve any shipping damage claims directly with the shipping company. 5 The customer is responsible for providing a suitable box to ship the defective product to an authorized Runco repair depot. Boxes may be purchased from a Runco technical support representative. 6 The customer is responsible for paying freight charges to ship the defective product to an authorized Runco repair depot. 7 For in-warranty repairs, Runco will pay freight charges to return the repaired/replacement product (which shall not include accessories--e.g., cables, remotes, carrying cases, lens cap and other peripherals sold with the Runco product) to the customer from the Runco repair depot. 8 Once an RMA has been created, the customer may contact [email protected] for follow-up questions or confirmation status of the claim process. Warranty Exclusions This RuncoCare Standard Limited Warranty does not include or is limited by the following: 1 Products not purchased from an authorized Runco dealer 2 Rental costs incurred by the customer in the event of product defect or failure 3 Any product with a defaced, modified, or removed serial number 4 Damage, deterioration, or malfunction resulting from: a Accident, abuse, misuse, neglect, improper ventilation, fire, water, disaster, lightning, or other acts of nature, smoke exposure (cigarette or otherwise), unauthorized product modification (including use of an unauthorized mount), or failure to follow instructions supplied with the product b c d e f Repair or attempted repair by anyone not authorized by Runco Any damage to the product due to shipment Removal or installation of the product Causes external to the product, such as electric power fluctuations or failure Use of supplies or parts (including lamps) that are not purchased from Runco or do not meet Runco’s specifications g Normal wear and tear h Expected lamp degradation and normal decrease in lamp output over a period of time or as the lamp is consumed i Customer caused defects, including but not limited to, scratched/defaced/altered plastics j Failure to follow maintenance procedures as outlined in the product’s user guide where a schedule is specified for regular cleaning of the product Runco WindowWall Installation Guide v k Opening the product and/or tampering with internal circuitry l Products lost, stolen or discarded m Any damage or dissatisfaction associated with latent images, “burn-in,” or any other damage determined by Runco to be the result of customer use patterns n Any other cause, which does not relate to a product defect in material or workmanship 5 Removal, installation, and set-up service charges are excluded from this Standard Limited warranty 6 Black uniformity issues or other LCD issues associated with usage outside the Runco recommended guidelines and specifications for the product 7 Bright or dark sub pixels that are characteristic of LCD technology and considered by Runco to be acceptable and within Runco’s manufacturing specifications. (See Sub Pixel Policy below) 8 Second day shipment delivery time and availability may vary based on origin and destination and Runco is unable to deliver to PO Box and FPO Box addresses Sub Pixel Policy It is not uncommon for one or more sub pixels to become bright or dark during or after the manufacturing process. A bright sub pixel is one that remains in the on position, and a dark sub pixel is one that appears black or off. The sub pixels are usually hard to see and will not detract from the display quality or usability at normal viewing distance. The following are Runco’s criteria for identifying bright or dark sub pixels that would be considered unacceptable: a) the number of bright or dark sub pixels; b) the location of the bright or dark sub pixels; c) the color of the bright sub pixels; and d) the Runco model size. If sub pixels have been identified as unacceptable by Runco the LCD will be deemed faulty and will be replaced if reported within the warranty period. If there are issues with bright or dark sub pixels, gather the information listed above and call or email [email protected]. Other Terms and Conditions 1 Runco will not accept returned Product unless an RMA number has been issued by Runco. 2 If an Advance Exchange return occurs, it is the customer’s responsibility to properly package the defective product and ship it to the address provided by the Runco technical support representative with the RMA number prominently displayed. If the defective product is not properly packaged and is damaged in transit during its return to Runco, you may be invoiced for either the repair costs, if repairable, or the MSRP of a replacement product and shipping costs incurred by Runco. 3 The repaired or replaced product will assume the remainder of your original product’s RuncoCare Service Plan term or 90 days from the date the repaired unit is shipped, whichever is longer. 4 If a replacement product is sent, the customer agrees to retain the replacement for the product you purchased and your defective product becomes the property of Runco. vi Runco WindowWall Installation Guide Extended Service Options Runco offers extended and expanded service plans. For information on additional product protection, please email [email protected] or call (toll free) 800-23-RUNCO (800-2378626). Online Product Registration Please visit http://www.runco.com/support/product-registration/ to register product. Limitation of Implied Warranties RUNCO PROVIDES NO WARRANTIES, EXPRESS OR IMPLIED, EXCEPT THOSE EXPRESSLY PROVIDED HEREIN. RUNCO EXPRESSLY DISCLAIMS ALL OTHER WARRANTIES, INCLUDING THE IMPLIED WARRANTIES OF MERCHANTABILITY AND FITNESS FOR A PARTICULAR PURPOSE. Exclusion of Damages RUNCO’S MAXIMUM AGGREGATE LIABILITY HEREUNDER IS LIMITED TO THE COST OF REPAIR OR REPLACEMENT OF THE PRODUCT. Exclusion of Damages (continued) 1 RUNCO SHALL NOT BE LIABLE FOR DAMAGE TO OTHER PROPERTY CAUSED BY ANY DEFECT IN THE PRODUCT, DAMAGES BASED UPON INCONVENIENCE, LOSS OF USE OF THE PRODUCT, LOSS OF TIME, LOSS OF PROFITS, LOSS OF BUSINESS OPPORTUNITY, LOSS OF GOODWILL, INTERFERENCE WITH BUSINESS RELATIONSHIPS, OR OTHER COMMERCIAL LOSS, EVEN IF THE CUSTOMER HAS BEEN ADVISED OF THE POSSIBILITY OF SUCH DAMAGES. 2 RUNCO SHALL NOT BE LIABLE FOR ANY CONSEQUENTIAL, INCIDENTAL, INDIRECT, SPECIAL, OR PUNITIVE DAMAGES ANY OTHER DAMAGES, WHETHER INCIDENTAL, INDIRECT, CONSEQUENTIAL OR OTHERWISE. 3 SHALL NOT BE LIABLE FOR ANY CLAIM AGAINST THE CUSTOMER BY ANY OTHER PARTY. Effect of Local Law This warranty gives you specific legal rights, and you may have other rights, which vary from locality to locality. Some localities do not allow limitations on implied warranties and/or do not allow the exclusion of incidental or consequential damages, so the above limitations and exclusions may not apply to you. Runco WindowWall Installation Guide vii viii Runco WindowWall Installation Guide Table of Contents Runco WindowWall Installation Guide . . . . . . . . . . . . . . . . . . . . . . . . . . . . . . . . . . . . . . . . . . . . . . . . . . . . . . . . . . . . . i Introduction . . . . . . . . . . . . . . . . . . . . . . . . . . . . . . . . . . . . . . . . . . . . . . . . . . . . . . . . . . . . . . . . . . . . . . . . . . . . . . . . . . . . . . .1 Safety Information . . . . . . . . . . . . . . . . . . . . . . . . . . . . . . . . . . . . . . . . . . . . . . . . . . . . . . . . . . . . . . . . . . . . . . . . . . . . . . .2 Important Safety Instructions . . . . . . . . . . . . . . . . . . . . . . . . . . . . . . . . . . . . . . . . . . . . . . . . . . . . . . . . . . . . . . .2 European Union Disposal Information . . . . . . . . . . . . . . . . . . . . . . . . . . . . . . . . . . . . . . . . . . . . . . . . . . . . . . .4 Recommended Usage . . . . . . . . . . . . . . . . . . . . . . . . . . . . . . . . . . . . . . . . . . . . . . . . . . . . . . . . . . . . . . . . . . . . . . . . . . . .5 Burn-In Versus Temporary Image Retention . . . . . . . . . . . . . . . . . . . . . . . . . . . . . . . . . . . . . . . . . . . . . . . . .5 Normal Use Thermal Guidelines . . . . . . . . . . . . . . . . . . . . . . . . . . . . . . . . . . . . . . . . . . . . . . . . . . . . . . . . . . . . .6 System Architecture . . . . . . . . . . . . . . . . . . . . . . . . . . . . . . . . . . . . . . . . . . . . . . . . . . . . . . . . . . . . . . . . . . . . . . . . . . . . . .7 TileAlign Mounts, General Description . . . . . . . . . . . . . . . . . . . . . . . . . . . . . . . . . . . . . . . . . . . . . . . . . . . . . . . . . . . .8 Runco WindowWall . . . . . . . . . . . . . . . . . . . . . . . . . . . . . . . . . . . . . . . . . . . . . . . . . . . . . . . . . . . . . . . . . . . . . . . . . . . . . . . .9 LCD Tiles . . . . . . . . . . . . . . . . . . . . . . . . . . . . . . . . . . . . . . . . . . . . . . . . . . . . . . . . . . . . . . . . . . . . . . . . . . . . . . . . . . . . . . . . .9 LCD Mounting Structure. . . . . . . . . . . . . . . . . . . . . . . . . . . . . . . . . . . . . . . . . . . . . . . . . . . . . . . . . . . . . . . . . . . . . . . . 10 Off-Board Equipment and Components . . . . . . . . . . . . . . . . . . . . . . . . . . . . . . . . . . . . . . . . . . . . . . . . . . . . . . . . . Quad Input Manager Module . . . . . . . . . . . . . . . . . . . . . . . . . . . . . . . . . . . . . . . . . . . . . . . . . . . . . . . . . . . . . Power Supply Module . . . . . . . . . . . . . . . . . . . . . . . . . . . . . . . . . . . . . . . . . . . . . . . . . . . . . . . . . . . . . . . . . . . . DHD3 Processor . . . . . . . . . . . . . . . . . . . . . . . . . . . . . . . . . . . . . . . . . . . . . . . . . . . . . . . . . . . . . . . . . . . . . . . . . . Equipment Rack (Optional) . . . . . . . . . . . . . . . . . . . . . . . . . . . . . . . . . . . . . . . . . . . . . . . . . . . . . . . . . . . . . . . 11 11 12 12 13 Installing a Runco WindowWall . . . . . . . . . . . . . . . . . . . . . . . . . . . . . . . . . . . . . . . . . . . . . . . . . . . . . . . . . . . . . . . . . . 15 Before You Begin . . . . . . . . . . . . . . . . . . . . . . . . . . . . . . . . . . . . . . . . . . . . . . . . . . . . . . . . . . . . . . . . . . . . . . . . . . . . . . . Tools/Equipment List . . . . . . . . . . . . . . . . . . . . . . . . . . . . . . . . . . . . . . . . . . . . . . . . . . . . . . . . . . . . . . . . . . . . . Other Things You May Need . . . . . . . . . . . . . . . . . . . . . . . . . . . . . . . . . . . . . . . . . . . . . . . . . . . . . . . . . . . . . . Plan Your Installation . . . . . . . . . . . . . . . . . . . . . . . . . . . . . . . . . . . . . . . . . . . . . . . . . . . . . . . . . . . . . . . . . . . . . Prepare Your Installation Location. . . . . . . . . . . . . . . . . . . . . . . . . . . . . . . . . . . . . . . . . . . . . . . . . . . . . . . . . 15 15 15 16 16 Installation Checklist . . . . . . . . . . . . . . . . . . . . . . . . . . . . . . . . . . . . . . . . . . . . . . . . . . . . . . . . . . . . . . . . . . . . . . . . . . . 17 Unpacking and Checking Accessories . . . . . . . . . . . . . . . . . . . . . . . . . . . . . . . . . . . . . . . . . . . . . . . . . . . . . . . . . . . 17 Optional Runco-Supplied Accessories . . . . . . . . . . . . . . . . . . . . . . . . . . . . . . . . . . . . . . . . . . . . . . . . . . . . . 22 Runco WindowWall Installation Guide i Table of Contents Wall Installation . . . . . . . . . . . . . . . . . . . . . . . . . . . . . . . . . . . . . . . . . . . . . . . . . . . . . . . . . . . . . . . . . . . . . . . . . . . . . . . . . .23 Wall Installation Options . . . . . . . . . . . . . . . . . . . . . . . . . . . . . . . . . . . . . . . . . . . . . . . . . . . . . . . . . . . . . . . . . . . . . . . .23 Installing the LCD Mount Structure . . . . . . . . . . . . . . . . . . . . . . . . . . . . . . . . . . . . . . . . . . . . . . . . . . . . . . . . . . . . . .24 Mounting Brackets to a Wall . . . . . . . . . . . . . . . . . . . . . . . . . . . . . . . . . . . . . . . . . . . . . . . . . . . . . . . . . . . . . . . . . . . . .25 Installing Brackets on the First Row of a Fixed Wall. . . . . . . . . . . . . . . . . . . . . . . . . . . . . . . . . . . . . . . . . .26 Installing Brackets on Subsequent Rows. . . . . . . . . . . . . . . . . . . . . . . . . . . . . . . . . . . . . . . . . . . . . . . . . . . .29 Routing Cables. . . . . . . . . . . . . . . . . . . . . . . . . . . . . . . . . . . . . . . . . . . . . . . . . . . . . . . . . . . . . . . . . . . . . . . . . . . . . . . . . .30 Placing Off-Board Module Equipment. . . . . . . . . . . . . . . . . . . . . . . . . . . . . . . . . . . . . . . . . . . . . . . . . . . . . . . . . . . .31 Plugging In Cables to the Off-Board Modules. . . . . . . . . . . . . . . . . . . . . . . . . . . . . . . . . . . . . . . . . . . . . . .31 Installing LCD Tiles . . . . . . . . . . . . . . . . . . . . . . . . . . . . . . . . . . . . . . . . . . . . . . . . . . . . . . . . . . . . . . . . . . . . . . . . . . . . . .33 Installing the First or Bottom Row . . . . . . . . . . . . . . . . . . . . . . . . . . . . . . . . . . . . . . . . . . . . . . . . . . . . . . . . . .33 Installing Second and Subsequent Rows . . . . . . . . . . . . . . . . . . . . . . . . . . . . . . . . . . . . . . . . . . . . . . . . . . .40 Mounting the IR Sensor. . . . . . . . . . . . . . . . . . . . . . . . . . . . . . . . . . . . . . . . . . . . . . . . . . . . . . . . . . . . . . . . . . . .41 Connecting the IR Remote . . . . . . . . . . . . . . . . . . . . . . . . . . . . . . . . . . . . . . . . . . . . . . . . . . . . . . . . . . . . . . . . .41 RS485 Quad Module Connections. . . . . . . . . . . . . . . . . . . . . . . . . . . . . . . . . . . . . . . . . . . . . . . . . . . . . . . . . .41 Checking Your Connections . . . . . . . . . . . . . . . . . . . . . . . . . . . . . . . . . . . . . . . . . . . . . . . . . . . . . . . . . . . . . . . . . . . . .43 System Addresses . . . . . . . . . . . . . . . . . . . . . . . . . . . . . . . . . . . . . . . . . . . . . . . . . . . . . . . . . . . . . . . . . . . . . . . . . . . . . . .44 Setting the Address of Each Quad Input Manager Module . . . . . . . . . . . . . . . . . . . . . . . . . . . . . . . . . .45 Connecting Sources . . . . . . . . . . . . . . . . . . . . . . . . . . . . . . . . . . . . . . . . . . . . . . . . . . . . . . . . . . . . . . . . . . . . . . . . . . . . .46 Loop-Through . . . . . . . . . . . . . . . . . . . . . . . . . . . . . . . . . . . . . . . . . . . . . . . . . . . . . . . . . . . . . . . . . . . . . . . . . . . . . . . . . .47 Configuring a Runco WindowWall . . . . . . . . . . . . . . . . . . . . . . . . . . . . . . . . . . . . . . . . . . . . . . . . . . . . . . . . . . . . . . . .49 Menu Settings . . . . . . . . . . . . . . . . . . . . . . . . . . . . . . . . . . . . . . . . . . . . . . . . . . . . . . . . . . . . . . . . . . . . . . . . . . . . . . . . . .49 Basic Configuration Steps . . . . . . . . . . . . . . . . . . . . . . . . . . . . . . . . . . . . . . . . . . . . . . . . . . . . . . . . . . . . . . . . . . . . . . .49 Master vs. Slave Displays . . . . . . . . . . . . . . . . . . . . . . . . . . . . . . . . . . . . . . . . . . . . . . . . . . . . . . . . . . . . . . . . . . . . . . . .49 Menus and the Remote. . . . . . . . . . . . . . . . . . . . . . . . . . . . . . . . . . . . . . . . . . . . . . . . . . . . . . . . . . . . . . . . . . . . . . . . . .50 Navigational Menus . . . . . . . . . . . . . . . . . . . . . . . . . . . . . . . . . . . . . . . . . . . . . . . . . . . . . . . . . . . . . . . . . . . . . . .52 Global Menus . . . . . . . . . . . . . . . . . . . . . . . . . . . . . . . . . . . . . . . . . . . . . . . . . . . . . . . . . . . . . . . . . . . . . . . . . . . . .52 Status Menus. . . . . . . . . . . . . . . . . . . . . . . . . . . . . . . . . . . . . . . . . . . . . . . . . . . . . . . . . . . . . . . . . . . . . . . . . . . . . .53 Local Menus. . . . . . . . . . . . . . . . . . . . . . . . . . . . . . . . . . . . . . . . . . . . . . . . . . . . . . . . . . . . . . . . . . . . . . . . . . . . . . .54 Display IDs . . . . . . . . . . . . . . . . . . . . . . . . . . . . . . . . . . . . . . . . . . . . . . . . . . . . . . . . . . . . . . . . . . . . . . . . . . . . . . . .55 RS232 Communication . . . . . . . . . . . . . . . . . . . . . . . . . . . . . . . . . . . . . . . . . . . . . . . . . . . . . . . . . . . . . . . . . . . . . . . . . .57 Connecting RS232 Cables. . . . . . . . . . . . . . . . . . . . . . . . . . . . . . . . . . . . . . . . . . . . . . . . . . . . . . . . . . . . . . . . . .58 ii Runco WindowWall Installation Guide Table of Contents Matrix Layout Menu . . . . . . . . . . . . . . . . . . . . . . . . . . . . . . . . . . . . . . . . . . . . . . . . . . . . . . . . . . . . . . . . . . . . . . . . . . . . 59 Adjusting Color Balance . . . . . . . . . . . . . . . . . . . . . . . . . . . . . . . . . . . . . . . . . . . . . . . . . . . . . . . . . . . . . . . . . . . . . . . . Understanding Color Temperature . . . . . . . . . . . . . . . . . . . . . . . . . . . . . . . . . . . . . . . . . . . . . . . . . . . . . . . . Adjusting Color Temperature . . . . . . . . . . . . . . . . . . . . . . . . . . . . . . . . . . . . . . . . . . . . . . . . . . . . . . . . . . . . . Color Balancing Multiple Displays . . . . . . . . . . . . . . . . . . . . . . . . . . . . . . . . . . . . . . . . . . . . . . . . . . . . . . . . . Tips for Color Balancing. . . . . . . . . . . . . . . . . . . . . . . . . . . . . . . . . . . . . . . . . . . . . . . . . . . . . . . . . . . . . . . . . . . 61 61 61 61 64 Advanced Options . . . . . . . . . . . . . . . . . . . . . . . . . . . . . . . . . . . . . . . . . . . . . . . . . . . . . . . . . . . . . . . . . . . . . . . . . . . . . Miscellaneous Options. . . . . . . . . . . . . . . . . . . . . . . . . . . . . . . . . . . . . . . . . . . . . . . . . . . . . . . . . . . . . . . . . . . . Setting the Clock/Scheduling an Event . . . . . . . . . . . . . . . . . . . . . . . . . . . . . . . . . . . . . . . . . . . . . . . . . . . . Setting the Clock . . . . . . . . . . . . . . . . . . . . . . . . . . . . . . . . . . . . . . . . . . . . . . . . . . . . . . . . . . . . . . . . . . . . . . . . . Scheduling an Event . . . . . . . . . . . . . . . . . . . . . . . . . . . . . . . . . . . . . . . . . . . . . . . . . . . . . . . . . . . . . . . . . . . . . . 65 66 67 69 70 Aspect Ratio Settings . . . . . . . . . . . . . . . . . . . . . . . . . . . . . . . . . . . . . . . . . . . . . . . . . . . . . . . . . . . . . . . . . . . . . . . . . . . Scale Mode Settings . . . . . . . . . . . . . . . . . . . . . . . . . . . . . . . . . . . . . . . . . . . . . . . . . . . . . . . . . . . . . . . . . . . . . . Justify Settings . . . . . . . . . . . . . . . . . . . . . . . . . . . . . . . . . . . . . . . . . . . . . . . . . . . . . . . . . . . . . . . . . . . . . . . . . . . Overscan . . . . . . . . . . . . . . . . . . . . . . . . . . . . . . . . . . . . . . . . . . . . . . . . . . . . . . . . . . . . . . . . . . . . . . . . . . . . . . . . . Sharpness . . . . . . . . . . . . . . . . . . . . . . . . . . . . . . . . . . . . . . . . . . . . . . . . . . . . . . . . . . . . . . . . . . . . . . . . . . . . . . . . 73 73 76 76 76 Backlight Control. . . . . . . . . . . . . . . . . . . . . . . . . . . . . . . . . . . . . . . . . . . . . . . . . . . . . . . . . . . . . . . . . . . . . . . . . . . . . . . Auto Backlight On . . . . . . . . . . . . . . . . . . . . . . . . . . . . . . . . . . . . . . . . . . . . . . . . . . . . . . . . . . . . . . . . . . . . . . . . Turn Backlight Off With No Source and DPMS Delay . . . . . . . . . . . . . . . . . . . . . . . . . . . . . . . . . . . . . . . Backlight Intensity . . . . . . . . . . . . . . . . . . . . . . . . . . . . . . . . . . . . . . . . . . . . . . . . . . . . . . . . . . . . . . . . . . . . . . . . 77 77 77 78 Adjusting Position. . . . . . . . . . . . . . . . . . . . . . . . . . . . . . . . . . . . . . . . . . . . . . . . . . . . . . . . . . . . . . . . . . . . . . . . . . . . . . 79 Picture Position. . . . . . . . . . . . . . . . . . . . . . . . . . . . . . . . . . . . . . . . . . . . . . . . . . . . . . . . . . . . . . . . . . . . . . . . . . . 79 Spreading Images Across the Wall . . . . . . . . . . . . . . . . . . . . . . . . . . . . . . . . . . . . . . . . . . . . . . . . . . . . . . . . . . . . . . Using an External Video Processor. . . . . . . . . . . . . . . . . . . . . . . . . . . . . . . . . . . . . . . . . . . . . . . . . . . . . . . . . Using the Quick Configure Feature . . . . . . . . . . . . . . . . . . . . . . . . . . . . . . . . . . . . . . . . . . . . . . . . . . . . . . . . Using the Matrix Layout Menu . . . . . . . . . . . . . . . . . . . . . . . . . . . . . . . . . . . . . . . . . . . . . . . . . . . . . . . . . . . . Using Runco’s Big PictureTM . . . . . . . . . . . . . . . . . . . . . . . . . . . . . . . . . . . . . . . . . . . . . . . . . . . . . . . . . . . . . . . 81 81 81 81 81 Zoom and Viewport . . . . . . . . . . . . . . . . . . . . . . . . . . . . . . . . . . . . . . . . . . . . . . . . . . . . . . . . . . . . . . . . . . . . . . . . . . . . 85 Zoom Menu Entries. . . . . . . . . . . . . . . . . . . . . . . . . . . . . . . . . . . . . . . . . . . . . . . . . . . . . . . . . . . . . . . . . . . . . . . 85 Viewport Adjustment . . . . . . . . . . . . . . . . . . . . . . . . . . . . . . . . . . . . . . . . . . . . . . . . . . . . . . . . . . . . . . . . . . . . . 86 Serial Port Settings and Diagnostics . . . . . . . . . . . . . . . . . . . . . . . . . . . . . . . . . . . . . . . . . . . . . . . . . . . . . . . . . . . . . Serial Port Settings . . . . . . . . . . . . . . . . . . . . . . . . . . . . . . . . . . . . . . . . . . . . . . . . . . . . . . . . . . . . . . . . . . . . . . . Serial Port Status . . . . . . . . . . . . . . . . . . . . . . . . . . . . . . . . . . . . . . . . . . . . . . . . . . . . . . . . . . . . . . . . . . . . . . . . . Controlling With RS232 Commands . . . . . . . . . . . . . . . . . . . . . . . . . . . . . . . . . . . . . . . . . . . . . . . . . . . . . . . 89 89 90 90 Diagnostics . . . . . . . . . . . . . . . . . . . . . . . . . . . . . . . . . . . . . . . . . . . . . . . . . . . . . . . . . . . . . . . . . . . . . . . . . . . . . . . . . . . . 91 Checking Unit Status . . . . . . . . . . . . . . . . . . . . . . . . . . . . . . . . . . . . . . . . . . . . . . . . . . . . . . . . . . . . . . . . . . . . . 91 Checking System Usage . . . . . . . . . . . . . . . . . . . . . . . . . . . . . . . . . . . . . . . . . . . . . . . . . . . . . . . . . . . . . . . . . . 92 Runco WindowWall Installation Guide iii Table of Contents Saving and Recalling Configurations . . . . . . . . . . . . . . . . . . . . . . . . . . . . . . . . . . . . . . . . . . . . . . . . . . . . . . . . . . . . .93 Advantages of Saving Configurations to Memory Slots . . . . . . . . . . . . . . . . . . . . . . . . . . . . . . . . . . . . .93 What the Memories Store. . . . . . . . . . . . . . . . . . . . . . . . . . . . . . . . . . . . . . . . . . . . . . . . . . . . . . . . . . . . . . . . . .93 Global Storage . . . . . . . . . . . . . . . . . . . . . . . . . . . . . . . . . . . . . . . . . . . . . . . . . . . . . . . . . . . . . . . . . . . . . . . . . . . .93 Memory: What Is Saved? And Where? . . . . . . . . . . . . . . . . . . . . . . . . . . . . . . . . . . . . . . . . . . . . . . . . . . . . . .94 Saving Configurations . . . . . . . . . . . . . . . . . . . . . . . . . . . . . . . . . . . . . . . . . . . . . . . . . . . . . . . . . . . . . . . . . . . . .95 Changing the Name of the Memory Slot . . . . . . . . . . . . . . . . . . . . . . . . . . . . . . . . . . . . . . . . . . . . . . . . . . .97 Recalling Stored Configurations. . . . . . . . . . . . . . . . . . . . . . . . . . . . . . . . . . . . . . . . . . . . . . . . . . . . . . . . . . . .98 Deleting a Configuration . . . . . . . . . . . . . . . . . . . . . . . . . . . . . . . . . . . . . . . . . . . . . . . . . . . . . . . . . . . . . . . . . .99 Understanding Wall Configuration . . . . . . . . . . . . . . . . . . . . . . . . . . . . . . . . . . . . . . . . . . . . . . . . . . . . . . . . . . . . . 101 Configuration Scenarios . . . . . . . . . . . . . . . . . . . . . . . . . . . . . . . . . . . . . . . . . . . . . . . . . . . . . . . . . . . . . . . . . . . . . . . Standard Cabling Scenarios. . . . . . . . . . . . . . . . . . . . . . . . . . . . . . . . . . . . . . . . . . . . . . . . . . . . . . . . . . . . . . Standard Cabling With Restrictions on LCD Placement. . . . . . . . . . . . . . . . . . . . . . . . . . . . . . . . . . . . Complex Configurations . . . . . . . . . . . . . . . . . . . . . . . . . . . . . . . . . . . . . . . . . . . . . . . . . . . . . . . . . . . . . . . . . Understanding the Quad Module Route Menu . . . . . . . . . . . . . . . . . . . . . . . . . . . . . . . . . . . . . . . . . . . 102 102 110 115 117 On-Screen Menus . . . . . . . . . . . . . . . . . . . . . . . . . . . . . . . . . . . . . . . . . . . . . . . . . . . . . . . . . . . . . . . . . . . . . . . . . . . . . . . 119 Main Menu and Submenus . . . . . . . . . . . . . . . . . . . . . . . . . . . . . . . . . . . . . . . . . . . . . . . . . . . . . . . . . . . . . . . . . . . . Wall Configuration and Submenus . . . . . . . . . . . . . . . . . . . . . . . . . . . . . . . . . . . . . . . . . . . . . . . . . . . . . . . Wall Configuration and Submenus Continued . . . . . . . . . . . . . . . . . . . . . . . . . . . . . . . . . . . . . . . . . . . . Picture Menu and Submenus . . . . . . . . . . . . . . . . . . . . . . . . . . . . . . . . . . . . . . . . . . . . . . . . . . . . . . . . . . . . Memory Menu and Submenus . . . . . . . . . . . . . . . . . . . . . . . . . . . . . . . . . . . . . . . . . . . . . . . . . . . . . . . . . . . Diagnostics Menu and Submenus. . . . . . . . . . . . . . . . . . . . . . . . . . . . . . . . . . . . . . . . . . . . . . . . . . . . . . . . Diagnostics Menu and Sub Menus (Continued) . . . . . . . . . . . . . . . . . . . . . . . . . . . . . . . . . . . . . . . . . . . Advanced Options and Submenus . . . . . . . . . . . . . . . . . . . . . . . . . . . . . . . . . . . . . . . . . . . . . . . . . . . . . . . Advanced Options and Submenus (Continued). . . . . . . . . . . . . . . . . . . . . . . . . . . . . . . . . . . . . . . . . . . Program Information Menu . . . . . . . . . . . . . . . . . . . . . . . . . . . . . . . . . . . . . . . . . . . . . . . . . . . . . . . . . . . . . . 119 120 121 122 123 124 125 126 127 131 Troubleshooting . . . . . . . . . . . . . . . . . . . . . . . . . . . . . . . . . . . . . . . . . . . . . . . . . . . . . . . . . . . . . . . . . . . . . . . . . . . . . . . . 133 Servicing. . . . . . . . . . . . . . . . . . . . . . . . . . . . . . . . . . . . . . . . . . . . . . . . . . . . . . . . . . . . . . . . . . . . . . . . . . . . . . . . . . . . . . . . 137 Specifications. . . . . . . . . . . . . . . . . . . . . . . . . . . . . . . . . . . . . . . . . . . . . . . . . . . . . . . . . . . . . . . . . . . . . . . . . . . . . . . . . . . 139 Dimensions. . . . . . . . . . . . . . . . . . . . . . . . . . . . . . . . . . . . . . . . . . . . . . . . . . . . . . . . . . . . . . . . . . . . . . . . . . . . . . . . . . . . . 147 LCD Tile Dimensions . . . . . . . . . . . . . . . . . . . . . . . . . . . . . . . . . . . . . . . . . . . . . . . . . . . . . . . . . . . . . . . . . . . . . . . . . . LCD Front View - Landscape . . . . . . . . . . . . . . . . . . . . . . . . . . . . . . . . . . . . . . . . . . . . . . . . . . . . . . . . . . . . . LCD Rear View - Landscape . . . . . . . . . . . . . . . . . . . . . . . . . . . . . . . . . . . . . . . . . . . . . . . . . . . . . . . . . . . . . . LCD Side View - Landscape . . . . . . . . . . . . . . . . . . . . . . . . . . . . . . . . . . . . . . . . . . . . . . . . . . . . . . . . . . . . . . iv Runco WindowWall Installation Guide 147 147 148 149 Table of Contents LCD Front View - Portrait. . . . . . . . . . . . . . . . . . . . . . . . . . . . . . . . . . . . . . . . . . . . . . . . . . . . . . . . . . . . . . . . . 150 LCD Rear View - Portrait. . . . . . . . . . . . . . . . . . . . . . . . . . . . . . . . . . . . . . . . . . . . . . . . . . . . . . . . . . . . . . . . . . 151 LCD Side View - Portrait . . . . . . . . . . . . . . . . . . . . . . . . . . . . . . . . . . . . . . . . . . . . . . . . . . . . . . . . . . . . . . . . . . 152 Power Supply Module Dimensions . . . . . . . . . . . . . . . . . . . . . . . . . . . . . . . . . . . . . . . . . . . . . . . . . . . . . . . . . . . . . 153 Quad Input Manager Module Dimensions . . . . . . . . . . . . . . . . . . . . . . . . . . . . . . . . . . . . . . . . . . . . . . . . . . . . . . 154 Accessories. . . . . . . . . . . . . . . . . . . . . . . . . . . . . . . . . . . . . . . . . . . . . . . . . . . . . . . . . . . . . . . . . . . . . . . . . . . . . . . . . . . . . . 155 Wall Adapter Bracket . . . . . . . . . . . . . . . . . . . . . . . . . . . . . . . . . . . . . . . . . . . . . . . . . . . . . . . . . . . . . . . . . . . . . . . . . . 155 Cosmetic Trim. . . . . . . . . . . . . . . . . . . . . . . . . . . . . . . . . . . . . . . . . . . . . . . . . . . . . . . . . . . . . . . . . . . . . . . . . . . . . . . . . 158 Floor Stand . . . . . . . . . . . . . . . . . . . . . . . . . . . . . . . . . . . . . . . . . . . . . . . . . . . . . . . . . . . . . . . . . . . . . . . . . . . . . . . . . . . 160 Assembling the Column Floor Stand . . . . . . . . . . . . . . . . . . . . . . . . . . . . . . . . . . . . . . . . . . . . . . . . . . . . . . . . . . . 162 Accessing Additional Runco Resources . . . . . . . . . . . . . . . . . . . . . . . . . . . . . . . . . . . . . . . . . . . . . . . . . . . . . . . . . 171 Downloading Additional Documentation and Firmware . . . . . . . . . . . . . . . . . . . . . . . . . . . . . . . . . . . . . . . . 171 Regulatory Information. . . . . . . . . . . . . . . . . . . . . . . . . . . . . . . . . . . . . . . . . . . . . . . . . . . . . . . . . . . . . . . . . . . . . . . . . 173 Runco WindowWall Installation Guide v vi Runco WindowWall Installation Guide Introduction The Runco WindowWall display wall uses cutting edge technology to provide a video wall solution using commercial-grade 46” LCDs in a tiled application. The narrowbezel results in a 7.3mm pixel-to-pixel gap between images on adjacent tiles in a video wall. Each LCD tile is a WXGA format, with a 1366 x 768 resolution. Each LCD tile is 4.14” deep and has an aspect ratio of 1.77 (16:9). It accepts virtually all video formats from 480i to 1080p to UXGA, from a wide range of video sources including composite, component, DVI and HDMI. The TileAlignTM mounting system supports landscape and portrait orientation, freestanding wall deployment and flying wall applications. Because the tiles are selfsupporting, Runco WindowWall can support unlimited stacking height. Caution: This manual is intended for use by qualified service persons and end users with experience installing LCD displays. Runco WindowWall Installation Guide 1 Safety Information Safety Information This display was designed with safety in mind. If you don’t heed the safety warnings and cautions, you could get hurt. The safety warnings are on stickers in various places in and on the display. Important Safety Instructions 2 1 Read these instructions. 2 Keep these instructions. 3 Heed all warnings. 4 Follow all instructions. 5 Do not use any of the Runco WindowWall display wall products near water. 6 Clean the LCD screens with an LCD screen cleaner or LCD wipes. 7 Do not install near any heat sources such as radiators, heat registers, stoves or other apparatus (including amplifiers) that produce heat. 8 Do not defeat the safety purpose of the polarized or grounding type plug. A polarized plug has two blades with one wider than the other. A grounding type plug has two blades and a third grounding prong. The wide blade or the third prong is provided for your safety. When the provided plug does not fit into your outlet, consult an electrician for the replacement of the obsolete outlet. 9 Protect the power cord from being walked on or pinched particularly at plugs, convenience receptacles and the point where they exit from any of the Runco WindowWall display wall products. Runco WindowWall Installation Guide Safety Information 10 Only use the attachments/accessories specified by the manufacturer. 11 Unplug all Runco WindowWall display wall products during lightning storms or when unused for long periods of time. 12 You must follow all National Electrical Code regulations. In addition, be aware of local codes and ordinances when installing your system. 13 Refer all servicing to qualified service personnel. Servicing is required when any of the Runco WindowWall display wall products have been damaged in any way, such as the AC power cord or plug is damaged, liquid has been spilled or objects have fallen into a product, the products have been exposed to rain or moisture, do not operate normally or have been dropped. 14 Keep the packing material in case the equipment should ever need to be shipped. 15 Wall mounts must be secure. The wall must be strong enough to hold all LCD tiles, brackets and cables. The LCD tile weighs about 48lbs (22kg). 16 Slight pressure on the LCD will cause distortion of the image. Heavier pressure will cause permanent damage. Runco WindowWalls should be mounted where viewers cannot touch the screen or insert small objects in the openings that will create hazards by contacting bare conductive parts. Caution: The front polarizer is soft and subject to scratches from sharp objects. 17 The polarizer is a thin sheet of film laminated to the outside layer of glass on the LCD screen. Take care when handling items near the screen. Caution: This product contains a lithium battery. There is a risk of explosion if the battery is replaced by an incorrect type. Dispose of the battery according to the instructions on the next page. WARNING The backlight contains mercury. Lamp(s) inside this product contain mercury. This product may contain other electronic waste that can be hazardous if not disposed of properly. Recycle or dispose in accordance with local, state, or federal Laws. For more information, contact the Electronic Industries Alliance at www.eiae.org. For lamp specific disposal information, check www.lamprecycle.org. Runco WindowWall Installation Guide 3 Safety Information European Union Disposal Information 4 Runco WindowWall Installation Guide Recommended Usage Recommended Usage In order to get the most out of your LCD tiles, use the following recommended guidelines to optimize the display. Burn-In Versus Temporary Image Retention Burn-in causes the screen to retain an image essentially forever, with little or no way to correct the problem. Under normal use, an LCD tile will not experience burn-in, as plasma displays do, nor will it retain images in any way. Normal use of an LCD tile is defined as displaying continuously changing video patterns or images. However, LCD tiles can experience temporary image retention when recommended usage guidelines are not followed. What is Temporary Image Retention? Temporary image retention (TIR) can occur when a static image is displayed continuously for extended periods of time (12 hours or longer). An electrical charge differential may build up between the electrodes of the liquid crystal, which causes a negative-color video image (color-inverted and brightness-inverted version of the previous image) to be retained when a new image is displayed. This behavior is true for any LCD device from any LCD manufacturer. Here are some guidelines to help you avoid TIR: • Use the LCD tile to show a screen saver, moving images or still pictures that change regularly. When using high-contrast images, reposition the images frequently. • Turn off the LCD tile when it is not in use. There are several ways to do this automatically: • To use your source computer’s Power Options Properties, set up your computer to turn off the monitor when not in use. You also need to check the DPMS checkbox and set the DPMS DELAY box in the BACKLIGHT SETTINGS menu. Caution: We suggest turning off the backlight power for four hours per day. Normal use of any LCD device does not cause TIR. Runco WindowWall Installation Guide 5 Recommended Usage Normal Use Thermal Guidelines Normal use of the LCD tile, Quad Input Manager Module and power supply module are defined as operating in the open air to prevent heat buildup, and without direct or indirect heat sources such as lighting fixtures, heating ducts, or direct sunlight that can cause the modules to experience high operating temperatures. For all modules, do not block fans or ventilation openings. At 2000 meters or below, the maximum ambient operating temperature for the LCD tile cannot be above 35º C nor below the minimum ambient operating temperature of 0º C. For the Quad Input Manager Module and power supply module, the maximum ambient operating temperature cannot be above 45º C nor below the minimum ambient operating temperature of 0º C. If one of these conditions exists, it is up to the installer to ensure that module placement is changed, thermal shielding is provided and/or additional ventilation is provided to keep the display within its nominal operating parameters. Cooling Requirements For optimal performance, active cooling by the installer should be planned for when the ambient temperature at the top of the wall is predicted to be above the specified ambient temperature for the tile. Cooling may be done behind the displays and depending on the wall configuration, it may be helpful to place air ducts (AC) at every third display tall. 6 Runco WindowWall Installation Guide System Architecture System Architecture The Runco WindowWall has three main electronic components: the LCD tile, power supply module and the Quad Input Manager Module. The LCD tile has a removable interface board, which connects to the off-board power supply and Quad Input Manager Modules. Using external modules produces less heat and allows for reduced and/or easier service of the LCD tile itself. Removable interface board LCD tile - front view LCD tile - rear view DHD3 Equipment rack (optional) Power supply module Quad Input Manager Module Some basic points to keep in mind: • Each Quad Input Manager Module controls up to four LCDs • Modules are linked together by RS485 cables • The first processor in the A Quad Input Manager Module (A1) is the master processor • The master processor takes in the input from the remote and/or the host RS232 • The DHD3 is an integral part of the configuration and can be attached to a Quad Input Manager Module for Runco’s highest quality video input management, scaling, and processing Runco WindowWall Installation Guide 7 TileAlign Mounts, General Description The following example shows the connections for a basic video wall. A1 A2 A3 A4 B1 B2 B3 B4 RS-232 Dual Link In Digital 1 Digital 2 Digital 3 Loop Out Digital 4 Quad Input Manager Module IR A RS485 Dual Link In Digital 1 Digital 2 Digital 3 Loop Out Digital 4 Quad Input Manager Module B TileAlign Mounts, General Description Runco-supplied mounts are used to secure the Runco WindowWall for display. Follow these instructions carefully. Keep in mind the following general installation guidelines: • Prior to installation, make sure you know where all of the mounting points are located. • Follow all safety precautions outlined in this manual. Verify the parts received with the list shown in this manual. 8 Runco WindowWall Installation Guide Runco WindowWall The Runco WindowWall display wall consists of several different modules. These are described in more detail on the following pages. LCD Tiles The LCD tile is composed of a basic LCD without a cosmetic enclosure but with a mechanical subframe for mounting. The LCD tiles incorporate a simple interface board designed to distribute off-board power, video and control signals to the LCD tile keeping depth, weight, heat and points of potential failure to a minimum. The LCD blade-style module incorporates a bracket that is perfectly paired with the TileAlignTM mount. The LCD tile includes TileAlign adjusters that facilitate precise 6axis alignment ensuring uniform, minimized image-to-image gap. Runco WindowWall Installation Guide 9 LCD Mounting Structure LCD Mounting Structure The TileAlign mounting system simplifies the task of installing and aligning the LCD tiles while allowing for efficient in-wall service. TileAlign is designed to be attached to a wall, used with optional free-standing bases or secured overhead in a flying configuration. When assembled, horizontal and vertical connection brackets ensure that each mount is perfectly spaced from its neighbor in the video wall. The mount system also incorporates a service mode to accommodate front and rear in-wall repair of any LCD tile in the video wall. TileAlign mounts are designed to facilitate the thinnest profile LCD video wall. The combination of the mount plus the Runco WindowWall LCD tiles “blade” design results in video walls that measure a 4.5 inches in depth, screen to wall. 10 Runco WindowWall Installation Guide Off-Board Equipment and Components Off-Board Equipment and Components To reduce heat issues and to make servicing of the video wall easier, the two main Runco WindowWall components are modules that are separate from the LCD tile itself. The Quad Input Manager Modules and power supply modules can be housed in an equipment rack that is typically situated away from the video wall itself. Quad Input Manager Module The Quad Input Manager Module contains four microprocessors, each of which manages the video information flowing to one LCD tile. The Quad Input Manager Module routes up to four digital source inputs to the LCDs. Front View Air intake - keep clear Address selector Rear View Power switch DVI-D digital input or loop in DVI-D digital input Communication/video to LCD DVI-D digital loop out Air exhaust vents keep clear Runco WindowWall Installation Guide Power supply monitor connection 11 Off-Board Equipment and Components Power Supply Module The power supply module provides power for up to four LCDs and one Quad Input Manager Module. Front View Air intakes - keep clear Power supply test switches Rear View AC power switch 115/230 VAC 50/60Hz 20A IEC C20 AC input Air exhaust vents - Quad Input Manager keep clear Module power outlet Interface module power outlets Power supply monitor connection DHD3 Processor The DHD3 is an integral part of the configuration and can be attached to a Quad Input Manager Module for Runco’s highest quality video input management, scaling, and processing. 12 Runco WindowWall Installation Guide Off-Board Equipment and Components Equipment Rack (Optional) Runco’s optional equipment rack easily stores the Quad Input Manager Modules and the power supply modules. The open rear design allows you to route cables from the rear of the modules to the LCDs. Runco WindowWall Installation Guide 13 Off-Board Equipment and Components 14 Runco WindowWall Installation Guide Installing a Runco WindowWall This section explains how to install a Runco WindowWall. We suggest that you read the entire section before you attempt to install the wall. Before You Begin Make sure you have all the items in these lists before you begin unpacking and installing your Runco WindowWall(s). Tools/Equipment List Depending on your installation, you may need one or more of the following items: • • • • • • • • • • • Drill and bits Nut drivers Pencil 3mm hex key M6 (#1/4-20) wrench String/string level Digital/laser level Ladders/lift Back brace Stud finder (if hanging LCD tiles on a wall) Quad Input Manager Module address adjustment tool Other Things You May Need • LCD screen cleaner or LCD wipes - available at most electronics stores • At least two capable people to lift LCD tiles into place Runco WindowWall Installation Guide 15 Before You Begin Plan Your Installation You should have a detailed plan of how the displays are to be configured. The plan should include calculations for the following: • Floor/wall load. Make sure the floor/wall is strong enough to support the weight of the whole Runco WindowWall system. • Each power supply module requires a 20A circuit for 115V operation. • At least 8’’ (203mm) of space above the LCDs so they can be moved up and open for service. The recommended amount of space is 10” (254mm). • Access to both sides of the Quad Input Manager Module and the power supply module. • Cable runs • Ventilation and cooling requirements. Although most of the heating elements are not in the LCD itself, it is still important that you have proper cooling and ventilation for the entire Runco WindowWall and its off-board components. Prepare Your Installation Location You should have prepared the area where you will install the LCD tiles. The mounting structures must be fully designed to accommodate the installation of the LCD tiles. You must also make sure there is enough room for the off-board components and any equipment racks that might house these components. 16 Runco WindowWall Installation Guide Installation Checklist Installation Checklist Use this quick checklist to ensure you have performed the installation steps in the correct order. 1 Unpack and install the LCD mount brackets. 2 Install Quad Input Manager Modules and power supply modules. 3 Run cables between LCD mount and brackets. 4 Install LCD tiles. Unpacking and Checking Accessories The following diagram shows a basic connection of the different cables that connect to the different modules. IR sensor cable Data Cat 6 cable Video Cat 6 cable Quad Input Manager Module A Power supply monitor cable Power cable RS485 cable LCD Wall outlet Power Supply Module AC power cord Power supply monitor cable Quad Input Manager Module B Power cable Power cable Power Supply Module Wall outlet AC power cord Runco WindowWall Installation Guide 17 Unpacking and Checking Accessories The following list are includes items found in your shipment boxes. Per Quad/Power Supply Part Description Quad Input Manager Module Routes up to four digital source images to the LCDs. 1 Power supply module Supplies power for up to four LCDs and one Quad Input Manager Module. 1 Power cable (4ft) Connects the power supply module to the Quad Input Manager Module. 1 RJ45 to RJ45 patch cable (1m) One cable connects the PS MON outlets from one Quad Input Manager Module to another. The other cable connects from one Quad Input Manager Module to another. 2 Picture Note: It is highly recommended that you use the cable label maker to identify each cable before it is installed. 18 Runco WindowWall Installation Guide Unpacking and Checking Accessories Part Description LCD tile 1 or 2 per box depending on your order. LCD mount 1 or 2 per box depending on your order. Runco WindowWall Installation Guide Picture 19 Unpacking and Checking Accessories Part 20 Description Number Vertical bracket Secures the LCD mount. Depends on configuration requirements. Horizontal bracket Secures the LCD mount. Depends on configuration requirements. AC power cable (3m) Depending on your order, cable will be for use in North America or Europe. Gloves Used to handle LCDs. Remote control Used to control your on-screen menus. 1 per power supply module Pair 1 Runco WindowWall Installation Guide Picture Unpacking and Checking Accessories Part Description Number Installation manual Provides detailed setup and configuration information. 1 IR sensor Connects to Quad Input Manager Module A. Mount in a convenient location near your wall. Typically, this might be near the master (A1) display. 1 Cable labels Used to help you identify each cable. 1 dispenser of 150 labels M6 Alignment adjustment tool Used to align modules. 2 Quad Input Manager Module address adjustment tool Used to set addresses of Quad Input Manager Modules. 2 Runco WindowWall Installation Guide Picture 21 Unpacking and Checking Accessories Part Description Number Wall adapter bracket kit Enables wall mounting. Depends on configuration Cosmetic trim Used to finish off display tile edges Depends on configuration Runco DHD3 Provides video processing, scaling and A/D switching. I per configuration HDMI to DVI converter Enables DHD3 to Quad Input Manager Module connection I per configuration Picture Optional Runco-Supplied Accessories Make sure you have the following optional customer-supplied items as needed to complete your installation: • • • • • • • • Curved brackets WallNet Freestanding mount Outer edge/rear cosmetic trim Dual link DVI-D cable DVI-D cables to go from the source to the Quad Input Manager Module RS232 cables to link an external controller to the Quad Input Manager Module Cat 6 -STP video and data cables - Length varies per wall depending on configuration requirements and your sales order. • Power cable (20ft-100ft) - Connects the power supply module to the LCD. Length varies per wall depending on configuration requirements and your sales order. • IR sensor extender cable (3m) - Used to extend from the wall to the Quad Input Manager Module. 22 Runco WindowWall Installation Guide Wall Installation Before you start building your wall, keep the following points in mind: • A structure that is plumb and flat will greatly reduce issues with mounting and alignment of the Runco WindowWall system. • Brackets are to be installed first - do not remove LCDs from their boxes until the entire wall of brackets is installed, level and plumb. • For each row of brackets, build from the center outwards. • After each row of brackets is built, check it for level and plumb. • All brackets in a row should be level with the bracket next to it within ±0.1°. Each bracket should be square with the level surface by ±0.05°. Bracket wall planarity should not exceed ±0.5mm. • For optimal product performance, maintain components within temperature specifications. Occasional temperatures out of specification are acceptable for a short period of time. Wall Installation Options There are three main types of Runco WindowWall installations: • Standard installation - mounted to a wall • Column floor stand - maximum of three high without additional support • 2 x 2 free-standing mount Runco WindowWall Installation Guide 23 Installing the LCD Mount Structure Installing the LCD Mount Structure The TileAlign mounting system is the most important part of the wall installation. The TileAlign mounting system simplifies the task of installing and aligning the LCD tiles while allowing for efficient in-wall service. TileAlign is designed to be attached to a wall, used with optional free-standing bases or secured overhead in a flying configuration. When used in a wall-mount configuration, horizontal and vertical connection brackets ensure that each mount is precisely spaced from its neighbor in the video wall. The mount system also incorporates a service mode to accommodate front and rear in-wall repair of any LCD tile in the video wall with minimal disruption. TileAlign mounts are designed to facilitate the thinnest profile LCD video wall. The combination of the mount plus the Runco WindowWall LCD tiles “blade” design results in video walls that measure a 4.5 inches in depth, screen to wall. 24 Runco WindowWall Installation Guide Mounting Brackets to a Wall Mounting Brackets to a Wall The basic concept of mounting brackets to a wall is to start from the center of the wall and build out the first row. It is recommended that the wall is a flat surface. If the wall is not flat, you will need to insert shims in between the LCD mounts and the wall. Caution: For whatever structure is used to mount the LCD wall, be sure that it is sufficiently engineered to handle the weight of the LCDs. There are three standard brackets that will be used for wall installation. An optional stud adapter bracket can be used if you are not mounting to plywood and want to mount to studs in a wall. LCD mount Horizontal bracket Vertical bracket Wall stud adapter bracket (optional) Runco WindowWall Installation Guide 25 Mounting Brackets to a Wall Installing Brackets on the First Row of a Fixed Wall 26 1 Remove the LCD mounts from the LCD tile boxes. Set aside the boxes with the LCD tiles still in them for later installation. Unpack the horizontal/vertical brackets and hardware from the wall accessory box(es). 2 Use the following drawing to determine the location of the center mount based on the desired LCD location. The LCD mounts are designed to mount with either four M6 or #1/4-20 hardware and a washer. Runco WindowWall Installation Guide Mounting Brackets to a Wall 45.672 1160.06 2X CABLE TIE DOWNS MOUNT HOLES FOR #1/4-20 OR M6X1.0 BOLTS AND WASHERS KICK STAND FOR SERVICE POSITION DETAIL H SCALE 1 : 2 CABLE ROUTE HOLES HORIZONTAL ALIGNMENT BRACKET USE M5X8 BUTTON HEAD SCREWS .015 0.38 DISPLAY OUTLINE 80.775 2051.68 40.395 1026.03 13.386 340.00 3.307 84.00 10.178 258.53 1.914 48.62 19.000 482.60 centering notch .015 0.38 22.843 580.22 3 Mark on the wall vertically where the center of the display will be. Then mark horizontally where the bottom center bracket will be. Use a string to continue the line for the rest of the desired wall. This will help maintain a level row as you progress installing the LCD mounts. 4 To pre-determine the proper mount points for the LCD mount, measure out or use a template. Then loosely attach the LCD mount. Runco WindowWall Installation Guide 27 Mounting Brackets to a Wall 5 Using a level (a digital one is highly recommended), level the bracket as you keep in mind the string at the bottom. 6 Align the v-shaped notch on the LCD mount with the desired center of the LCD (this is done for the first bracket only). 7 Tighten the screws as necessary. Note: Be sure that as you tighten the screws, the wall is flat. If it is not, use shims near the mount points as necessary. 8 Attach horizontal brackets to the LCD mount that will attach to the next LCD mount you want to install. 9 Repeat steps 4-8 for the first row. Be sure to level all brackets with respect to the first mounted bracket. 10 Using a digital level, make sure the first row is level. All brackets in a row should be level with the bracket next to it within ±0.1°. 28 Runco WindowWall Installation Guide Mounting Brackets to a Wall Installing Brackets on Subsequent Rows 1 Using two screws, mount vertical brackets to each LCD mount in the first row. 2 Install all the LCD mounts and attach with the two screws to the vertical brackets. 3 Loosely attach LCD mounts to the wall. 4 Install the horizontal brackets. As you add each new set of brackets, make sure the row continues to be level and plumb. Tighten the screws that attach the LCD mount to the wall. Repeat this process for all of the LCD mounts and horizontal brackets in this row. 5 Using a digital level, make sure the row is level and the columns are plumb. 6 Repeat steps 1-5 for each row that you add. Runco WindowWall Installation Guide 29 Routing Cables Routing Cables Before you install LCD tiles, you need to route cables through the LCD mounts. Notches on the horizontal brackets make routing cables easier. As you configure your wall, it important to think about how it will be set up and where the master (A1) display should be located. This does not need to be the upper left display in an array, but rather should be in a location that will be easily accessible. For example, if you have a 4 x 4 wall and it is easier to see on-screen menus in a lower row, the master (A1) display should be set up there. 1 Route power, data and video cables (see "Unpacking and Checking Accessories" on page 17 for pictures) between the LCD mounts and then through the side hole near the bottom of the LCD mount. Place cables in the LCD mount channel so they are out of the way. Note: It is highly recommended that you use the cable label maker to identify each cable before it is installed. 2 Route power, data and video cables from the brackets to the off-board equipment for the entire wall. For ease in troubleshooting and configuration, we recommend that you cable your wall together in “clusters.” Use one power supply module, one Quad Input Manager Module and (up to) four LCD tiles in each cluster. Pick a rectangle of LCD tiles and connect them all to the same power supply module and the same Quad Input Manager Module. And then use the same power supply module to power that Quad Input Manager Module. Note: For most configurations of the wall, you can choose any arrangement of rectangles. But for configurations that will have multiple sub walls, you will want to plan your configuration before choosing your clusters of LCDs. If you’re not sure how to arrange the clusters, choose a 2 x 2 configuration. See "Understanding Wall Configuration" on page 101 for more information. 30 Runco WindowWall Installation Guide Placing Off-Board Module Equipment 3 If the IR sensor will be mounted near the LCD wall, route the IR sensor cable now. Placing Off-Board Module Equipment Before you install your LCDs, first place your Quad Input Manager Modules and power supply modules where they will be installed. Note: You need a 20A circuit for each power supply module. Plugging In Cables to the Off-Board Modules Once the modules are placed, complete the following steps. 1 For each Quad Input Manager Module, plug the necessary data cables into the gray COMM connector and the video cables into the orange VIDEO connector. 2 For each set of the Quad Input Manager Module and the power supply module, plug one end of a power cable into the 24V connector on the Quad Input Manager Module and the other end into the 24V connector on the power supply module. Do this for each set of Quad Input Manager Modules and power supply modules. 3 For each set of the Quad Input Manager Module and the power supply module, plug one end of the power supply monitor cable into the PS MON connector of the Quad Input Manager Module and the other end into the PS MON connector of power supply module. Runco WindowWall Installation Guide 31 Placing Off-Board Module Equipment 4 For each power supply module, plug one end of the AC power cable into the power supply module and then the other end into the wall outlet. 5 For each power supply module that will plug into an LCD, plug in one end of the longer power cable into one of the 24V connectors on the power supply module. Rear of Quad Input Manager Module Plug one end of the power cable into this connector and other end into the power supply connector. Data Video Rear of power supply module AC power to wall outlet 32 Power to Quad Input Manager Module Power to LCD Runco WindowWall Installation Guide Installing LCD Tiles Installing LCD Tiles The basic concept of installing LCD tiles in the wall is similar to installing brackets. Start from the center of the wall and build out the first row. As you complete each row, ensure the entire row is level. Caution: It is important that you check communication between the LCD tiles as you build each row! This will help minimize changes once your wall is fully installed. Installing the First or Bottom Row As you plug in and install each LCD tile, turn it on to verify it works properly and to ensure that the position sensor is active. See step 10 of this section for more information. Note: Wearing the provided gloves will prevent smudges that would need to be cleaned later. 1 Remove the first LCD from the box that you want to install. 2 Remove the LCD from the bag and then remove the mylar sheet and tape from the LCD tile. 3 Using two people, lift the LCD into place. Each person should put one hand on the handle of the back of the display and one hand on the bottom of the display. Runco WindowWall Installation Guide 33 Installing LCD Tiles Caution: Be careful to limit contact with the thick edge of the bezel on the LCD, as it can be easily damaged. Avoid resting the LCD on the corners, as it can cause damage. If the LCD needs to be rested against a surface, it should be rested face out and resting on the LCD edge that has the thinner bezel (LCD bottom surface). Correct position Incorrect position Never rest the LCD on a corner! 34 Runco WindowWall Installation Guide Installing LCD Tiles 4 Slide the horizontal support bar on the back of the LCD into the notch of the LCD mount. The LCD tile is now in the pre-service mode position. Notch Service mode Pre-service mode Runco WindowWall Installation Guide 35 Installing LCD Tiles 5 Connect the Cat 6 data and video cables from the first Quad Input Manager Module to the gray COMM and VIDEO connectors on the bottom of the LCD. Be sure to keep the cables in pairs; Do not connect the video cable from one LCD output into a different LCD tile than the data cable on that output. LCD Tile 6 Connect the power cable from the power supply module to the power connector on the bottom of the LCD. LCD Tile 36 Runco WindowWall Installation Guide Installing LCD Tiles 7 Make sure the Quad Input Manager Module and the power supply module are turned on. Turn on the LCD tile to make sure the data and video cables are feeding information to the LCD tile. The data information is flowing correctly if you see a green light flashing next to the COM connector. The video information is flowing correctly if you see solid green light next to the VIDEO connector. If you have accidentally reversed these two cables, you will not see green lights at all. 8 Verify that the LCD tile is working by putting up a gray scale test pattern. If you see vertical streaks in the pattern, you will need to change the cable equalization (press MISC once on the remote) until it disappears. For more information about cable equalization, see "Cable Equalization" on page 66. 9 Slide the horizontal support bar on the back of the LCD up over the notch and down into position. Slide over notch and down... ...and into position Note: If the display is not seated properly, make sure the x-axis and z-axis adjusters are seated in the correct positions. 10 Verify that the position sensors are working by displaying the on-screen menus on the LCD. The first LCD on the left in the row should always show the display ID of 1:1. As you build the row out, the left of the two numbers on each LCD should show an incremental number. In the example below, you would expect to see 1 in the far left LCD, 2 in the next one, etc. Each number must also be unique. If you see a duplicate number or no information at all, check your cabling to make sure everything is properly connected and all of your modules are turned on. 1:1 2:1 Runco WindowWall Installation Guide 3:1 37 Installing LCD Tiles 11 For displays in the same row, make sure they are in a straight line using a digital level. Use this level to ensure the displays are plumb (true vertically for both sides and the front) and aligned from display to display. While the displays will be set to a nominal position prior to shipment, you might need to make minor adjustments, which are described in the following steps. 12 Each LCD tile will come from the factory in the nominal position. However, due to installation and manufacture tolerances, adjustments to the module position may be required. 13 Starting with the center display, make sure it is level/parallel with the brackets. If it is not, use the y-axis adjusters to accomplish this. Leave the other adjusters in their nominal positions. Y-axis adjuster 14 For the next display in the row, repeat steps 1-11 and then continue to step 15. 15 When the next display in the row is installed, use the y-axis adjuster to level the display just as you did with the previous one. 16 If the displays are not level with each other, fine-tune the y-axis adjusters of the last installed display until it is level with the rest of the displays in the row. 17 Adjust the z-axis corners of the last installed display until it is flush with the display next to it. 38 Runco WindowWall Installation Guide Installing LCD Tiles Z-axis adjuster 18 Adjust the x-axis of the last installed display so there is a .38mm gap (approximate thickness of a business card) between the displays. 19 If the gap is tapered, you can make slight adjustments to the y-axis to correct it. This could be one or both displays that have the taper. Keep in mind if you adjust too far out of level, it can cause issues with the alignment of subsequent displays. Note: A slight waviness in the gap is typical. Runco WindowWall Installation Guide 39 Installing LCD Tiles Installing Second and Subsequent Rows 1 Starting at the center display of the next row that you want to install, follow steps 1-9 of "Installing the First or Bottom Row" on page 33. Caution: Depending on how the previous row was adjusted, when placing one display on top of another display, be sure to avoid contact between the displays. Damage may occur from the upper displays banging into or resting on the lower displays. 2 Verify that the position sensors are working by displaying the on-screen menus on the LCD. The first LCD on the left in the row should always show the display ID of 1:1. As you build the row out, the left of the two numbers on each LCD should show an incremental number. As you build each column, the right of the two numbers should be an incremental number. In the example below, you would expect to see 1 in the far left LCD, 2 in the next one, etc. Each number must also be unique. If you see a duplicate number or no information at all, check your cabling to make sure everything is properly connected and all of your modules are turned on. Check the number on the left when building a row. Check the number on the right when building a column. 40 1:1 2:1 3:1 1:2 2:2 3:2 1:3 2:3 3:3 3 Make sure the first display in the row is plumb with the display below it using the x-axis adjuster. 4 Using the y-axis adjusters, set the horizontal gap between the displays at .38mm (approximate thickness of a business card). 5 Adjust the z-axis corners of the last installed display until it is flush with the display next to it. Depending on the adjusted corner, this may require that the display be put in service mode. The alignment of the bottom corners might need to be re-adjusted as each new display is installed in the row. 6 Repeat steps 1-5 of this section to install subsequent displays in this row. 7 When you are finished, check the wall one more time to make sure the display IDs are in the correct order. See the example above as a reference. Runco WindowWall Installation Guide Installing LCD Tiles Mounting the IR Sensor Before you mount the IR sensor, keep the following points in mind: • Because most menus will be controlled on the master (A1) display, it is suggested the you mount the IR sensor near this display. • No matter which display a menu is on, you will still need to point the remote towards this one IR sensor that controls the entire wall. Connecting the IR Remote Connect the IR remote to Quad Input Manager Module A. See the diagram in "Unpacking and Checking Accessories" on page 17 for a visual example of this connector location. RS485 Quad Module Connections Use the RS485 cables to connect the RS485 Out of each Quad Input Manager Module to the RS485 In of the next module. The order of the modules does not matter. You do not have to complete the loop - the RS485 In of the first module will remain empty, as will the RS485 out of the last module. Unlike other Runco wall products, these connections must be made, even if you will not be controlling your wall through RS232. Runco WindowWall Installation Guide 41 Installing LCD Tiles 42 Runco WindowWall Installation Guide Checking Your Connections Below is a diagram of a basic configuration. This illustrates which cables are connected where. Use this to make sure you have correctly made all of the basic connections. IR sensor cable Data Cat 6 cable Video Cat 6 cable Quad Input Manager Module A Power supply monitor cable Power cable RS485 cable LCD Wall outlet Power Supply Module AC power cord Power supply monitor cable Quad Input Manager Module B Power cable Power cable Power Supply Module Wall outlet AC power cord Runco WindowWall Installation Guide 43 System Addresses System Addresses Each Quad Input Manager Module contains four microprocessor/scaler engines that each control one LCD. Each microprocessor has an address to which the master uses to communicate with. These are also the addresses that an external host computer will use when controlling the system through RS232. Unlike other Runco wall products, these addresses are determined by the system, not by the installer. Each Quad Input Manager Module has a letter address: A through P. This address is set via the address selector switch on the front of the module. You must set this selector so that each Quad Input Manager Module in your system has a unique address. Each Quad Input Manager Module has four processors, numbered 1 through 4. The address of each processor is the combination of the Quad Input Manager Module letter address and the processor number address. For example, A1, A2, A3, A4, B1, B2, B3, B4, etc. Throughout this manual we will be using these addresses to refer to these processors. Since each processor controls one LCD, we will also be referring to LCDs by this letter/number designation. Keep in mind that if you change where the video and data cables were connected for a particular LCD, its address will change. An LCD’s address is not determined by its position in the array, rather by its Quad Input Manager Module connection. Each Quad Input Manager Module also has four DVI input connections. These four inputs are closely associated with the corresponding LCDs. So in this manual we will also be referring to these connections by letter and number designations, A1, A2, A3, etc. Whether an address refers to an input, a processor, or an LCD will be apparent from the context. Quad Input Manager Module A, and specifically processor A1 has special duties. It is referred to in this manual as the master. The IR remote input, the (optional) host RS232 connection and the (optional) WallNet RS232 connections are all made on processor A. LCD A1 displays most of the menus. 44 Runco WindowWall Installation Guide System Addresses Setting the Address of Each Quad Input Manager Module For each Quad Input Manager Module that is connected to LCDs, you will need to set an address (similar to a unit ID) on the front of the Quad Input Manager Module. Using the Quad Input Manager Module address adjustment tool, manually turn the dial in the middle of the address selector to the letter you want to be identified with the LCDs connected to this Quad Input Manager Module. It is important to note that each module must be unique. So one Quad Input Manager Module needs to be A, the next B, etc. Use a address adjustment tool to turn this dial to the letter you want It is recommended that you set the addresses when the Quad Input Manager Modules are turned on. This make it easier to see LEDs as you switch between addresses. Once you have set the IDs how you want, it is recommended that you power cycle all Quad Input Manager Modules. Runco WindowWall Installation Guide 45 Connecting Sources Connecting Sources Note: If you do not want to connect your sources at this time, you may do Runco WindowWall Layout (see "Matrix Layout Menu" on page 59) and perform color balance before sources are connected. The digital inputs of the Runco WindowWall gives you the flexibility to create a variety of configurations that can be displayed. There are three basic ways that you will most likely use your video wall. • Spread one picture over the entire video wall • Plug in individual inputs into each LCD in the wall • Spread one picture over a section of the wall, or what we’ll call a sub wall, and have individual inputs on the other displays. Each Quad Input Manager Module has four DVI inputs, a Dual Link loop input and a Digital Loop Out. The Runco DHD3 connects as a source to the Quad Input Manager Module. How you connect your sources may depend on what you want to do with the wall. Familiarize yourself with the configuration scenarios ("Understanding Wall Configuration" on page 101) before connecting your sources. If in doubt, connect each source to the Digital In connector that corresponds to the LCD connector where you will want that source to be displayed. If you will use any form of Runco Big Picture, cable the digital loop out and Dual Link In connections as shown in "LoopThrough" on page 47. If you want to connect an analog source to the Runco WindowWall, you will need to use an analog to DVI-D converter or matrix switcher that converts analog signals to DVI. 46 Runco WindowWall Installation Guide Loop-Through Loop-Through All of the “Quick Configure” settings and many other configurations rely on the system being configured for loop through as shown in the diagram below. Connect a DVI-D cable from the Digital Loop Out connector of the first Quad Input Manager Module, to the Dual Link Input connector of the next Quad Input Manager Module. Connect the Digital Loop Out connector of the final Quad Input Manager Module to the Dual Link In connector of the first module, completing the loop. Below is an example of a basic loop through. Runco WindowWall Installation Guide 47 Loop-Through 48 Runco WindowWall Installation Guide Configuring a Runco WindowWall Menu Settings There are four different menu settings that are available when you open the onscreen menus: navigational, global, local and status. These will be described in more detail on the following pages. Basic Configuration Steps Configure your displays when you perform steps in the following order: 1 Runco WindowWall Layout (global) - see "Matrix Layout Menu" on page 59. 2 Color Balance the displays (local) - see "Adjusting Color Balance" on page 61. 3 Configure Wall Settings. See "Understanding Wall Configuration" on page 101 for more information. 4 If you need to adjust the image, see "On-Screen Menus" on page 119 to see different menu options. Master vs. Slave Displays The master display is the LCD where the bulk of the on-screen menu configuration and off-board configurations will be controlled. The master display is the one plugged into the LCD 1 connector of Quad Input Manager Module A, which is identified on screen as A1. All other displays in the array are considered “slave” displays, which will receive many global software and hardware commands from the master (A1). Information specific to individual displays can be controlled on slave displays. Runco WindowWall Installation Guide 49 Menus and the Remote Menus and the Remote All on-screen menus are controlled using a specific remote control created for the Runco WindowWall display wall. This remote allows you to access the four menu types: navigational, global, local and status. These menus are described below. 2 3 1 4 5 6 7 9 8 10 13 11 12 14 15 Note: Keep in mind that you need to point the remote towards where the IR sensor is mounted. Number 50 Definition 1 Turn the display ON/OFF. 2 Move the target left or right. 3 Set the target to all at once. 4 With each press, go to Picture, Input Levels, Aspect Ratio, Picture Position, Zoom Top & Left, Zoom Bottom and Right. 5 Press once for Miscellaneous Options, twice for Backlight Settings, three times for Serial Port Settings. 6 Press once for Recall, twice for Save. 7 Takes you to the next Quick Configure setting (Big Picture, A1, A2, etc.) 8 Press once for the Color Balance menu. Runco WindowWall Installation Guide Menus and the Remote Number Definition 9 With each press, go to Unit Status, Serial Port Status, Setup Summary and Test Patterns. 10 Open the Wall Configuration menu. 11 Bring up the on-screen menus. 12 Return to the previous menu. 13 Press to select a menu option. 14 Move highlight to the top line of the menu. 15 Arrow keys move the highlight around on the menu to select the option you want. Arrows on menu lines lead to other menus. Solid black arrows lead to Navigational menus, hollow blue arrows > lead to Status menus and hollow green arrows lead to Slave menus. ) Runco WindowWall Installation Guide 51 Menus and the Remote Navigational Menus Navigational menus appear only on the master display, which can be identified on screen by A1. These menus simply allow you to get to other menus, and there are no active functions directly available from them. The MAIN MENU and ADVANCED OPTIONS are navigational menus. Ad v an ce d O p ti on s Co l or Ba la nc e S i ze a nd P o s i t i o n M i sc ell an eo u s O pt io n s Ba ck li gh t Se tt i ng s S e r i a l P or t S e t t i n g s S e t Cl oc k / S ch ed u le E v en ts Global Menus Global menus can only be controlled on the master (A1) display. Any changes made to global menus will result in changes to the entire wall. The following menus are globally controlled: • • • • • • • • • • • • 52 Wall Configuration Matrix Layout Quad Module Route Picture Memory Diagnostics Test Patterns Miscellaneous Options Backlight Settings Serial Port Settings Set Clock/Schedule Events Factory Settings Runco WindowWall Installation Guide Menus and the Remote Status Menus Status menus appear on all displays simultaneously and show information specific to each display. Status menus are information only and no settings can be changed. The following menus are status menus: • • • • • • Picture Information Unit Status Serial Port Status Setup Summary Hours Program Information Runco WindowWall Installation Guide 53 Menus and the Remote Local Menus Local menus allow you to make changes to a specific display as needed. This allows you to better fine-tune certain settings, such as scaling or overscan. Local menus can appear on any display, either one at a time or on all at once. You will need to select which display you want to control by using the target control buttons on the remote control. The following menus are locally controlled: • • • • • • • • • • Wall Setup Input Levels Aspect Ratio Color Balance Size & Position Picture Position Zoom Top & Left Zoom Bottom & Right Viewport Top & Left Viewport Bottom & Right This button puts the local menu onto all displays at once. These arrows move the local menu to the next display in the array. Top button When displaying locals menus on all LCD tiles at the same time, notice the highlight bar might be on a different line on each menu. Use the TOP button to simultaneously move the highlight bar to the same place on all menus. 54 Runco WindowWall Installation Guide Menus and the Remote Display IDs LCD displays are identified with a letter and a number, called a display ID. The letter is set on the front panel of the Quad Input Manager Module (see "Setting the Address of Each Quad Input Manager Module" on page 45). The number is chosen by the connector to which the display is connected. If this display will show local menus, the display ID has a green square around it. The master (A1) display has a red square around it. Shows which display a local menu will be on. Shows column of this display in the video wall Example of master display ID when it is the selected display Runco WindowWall Installation Guide Shows row of this display in the video wall 55 Menus and the Remote 56 Runco WindowWall Installation Guide RS232 Communication RS232 Communication RS232 control is not necessary for operation, but is a convenient way to control displays from a computer at a distance. If your installation will not use RS232 control, skip this section. Everything you can do with the remote, you can do with RS232 commands. Plus, you can send inquiries to the displays and find out the current settings and values. RS232 connections are made with cables like Ethernet straight-through cables. This is the common type of LAN connection cable sometimes called a Cat 5 cable. Note: It is important that the RJ-45 cable has “straight through” connections. To see if your cable is correct, hold the two connectors side by side with the ends pointing in the same direction. Look at the sides of the connectors that do not have the locking tab. If the colors of the wires inside the connectors are the same left to right for both connectors, this is the correct cable. If the colors are mirror reflections of each other, it is the wrong type. You need an adapter to go from the computer’s 9-pin serial output connector to an RJ-45 connector. Adapters of this type are readily available at computer and electronic supply stores. The adapter is not pre-wired. You will make three connections inside the adapter, as described below. Wiring the adapter To go from 9-pin D-sub serial connector on the back of the computer to an RJ45 connector, use a standard RJ45-to-9-pin adapter. Wire it internally as shown. The wiring shown for this adapter is correct for straight-through cables. Straight-through cables are wired 1-to-1, 2-to-2, etc. 1 RJ45 9-pin Yellow wire 6 3 Black wire 3 2 Green wire 5 5 5 4 9 Runco WindowWall Installation Guide 3 8 2 7 8 1 6 RJ45 looking into the socket 57 RS232 Communication Connecting RS232 Cables 1 Connect the 9-pin adapter to the serial output connector of the controlling computer. (This computer does not have to be the same one as the computer used as a picture source.) The serial output is sometimes called the Comm Port, and sometimes there is more than one. 2 Connect a cable from the RJ-45 adapter to the In connector of the Quad Input Manager Module A. For more information about configuring RS232 communications, see "Serial Port Settings and Diagnostics" on page 89. RS232 port connection is on the Quad Input Manager Module. Only connect to Quad module A. Otherwise, the connection won’t work. 58 Runco WindowWall Installation Guide Matrix Layout Menu The Runco WindowWall LCDs are equipped with sensors that allow them to know their position in the array. The master (A1) keeps track of this information and displays it in the layout menu. To start the automatic discovery process, go to the MATRIX LAYOUT MENU (MAIN MENU > WALL CONFIGURATION > MATRIX LAYOUT) and select the AUTO option. The discovery process takes about 5-10 seconds for the entire wall. Caution: You must complete this step before performing any other on-screen menu configurations! M a tr ix La yo u t Au t o Quick A1 A2 A3 B1 B2 B3 C1 C2 C3 R es et ** Note: The first time you open this menu, it will be populated from A1 all the way through P4, no matter how many modules you have. Depending on how your wall is set up, one of four scenarios could occur: • Auto Layout Complete - The discovery process completed without errors. • No Auto Layout has been performed. See "Troubleshooting" on page 133. • Error in the Layout - This might appear if an LCD is in service mode. See "Troubleshooting" on page 133. • If your array is larger than nine wide or nine high, you will not be able to see the entire layout on this menu. A message will appear that indicates this. Runco WindowWall Installation Guide 59 Matrix Layout Menu 60 Runco WindowWall Installation Guide Adjusting Color Balance Color Balance is used to select the color temperature of each display, as well as to match the colors of adjacent displays when several displays are arranged in an array. When you see a yellow car move across a video array from one display to another, you want it to have the same color for the whole trip, not change from yellow to tan to orange. Colors vary slightly from one display to the next, because of slight variations in the backlights and displays. This cannot be avoided, but you can compensate for it with color balancing. Understanding Color Temperature Different “pure white” light sources do not always have the same color. For instance, light from an incandescent bulb has more yellow than light from direct sunlight. “Color Temperature” is a way of measuring these color differences. In general, higher color temperature numbers are bluer or “cooler.” You may have a reason for wanting your display to be a specific color temperature. For instance, if you are using the Runco WindowWall in a television studio where you will be videotaping the content, you will want a low color temperature. The Runco WindowWall defaults to the brightest setting possible, which is 100 in the RED, GREEN and BLUE lines under WHITE BALANCE. You may choose a different color temperature by setting it in the COLOR BALANCE menu. Adjusting Color Temperature Select the COLOR TEMPERATURE line in the COLOR BALANCE menu and then select from 3200°K (Warm), 5500°K, 6500ºK, 8500°K (Cool) or NATIVE. If you want the brightest display, select the NATIVE option. Changing the color temperature changes the three WHITE BALANCE values. You can also change the WHITE BALANCE values individually to create a custom color temperature. Once you have changed the values, a new CUSTOM option is available on the COLOR TEMPERATURE line. Color Balancing Multiple Displays Color balancing is subjective. It may seem strange at first, but it gets easier with practice. Fortunately, you don't have to match all the colors; you only have to match whites and grays. It is not necessary to achieve a perfect white or a perfectly colorless gray. It is only necessary that all the displays look alike when they display white and gray. Caution: Never try to match the colors of the displays with the black and white level controls or with the video controls. You will not like the results if you do. Caution: If you are color blind, even a little bit, do not color balance your array. Have someone else color balance the wall. Runco WindowWall Installation Guide 61 Adjusting Color Balance 1 Turn on all the displays in the array and let them warm up for at least five minutes. The backlights must be thoroughly warm before you color balance. 2 Press MISC twice on the remote to open the BACKLIGHT CONTROL menu. Confirm that the BACKLIGHT INTENSITY is greater than 1. Ba ck lig h t C on t r o l A u to B ac kl ig h t on Tu rn B ac kli g ht O f f W h e n No S ou rc e (D PMS ) D P MS D ela y 1 hr B ac kli g ht I n te n sit y 3 10 Open the COLOR BALANCE menu by pressing BALANCE on the remote. Co l or Ba la nc e C o lo r Te m pe rat u re N at iv e Wh it e Te st P at te rn W hi te B al an ce - A ll (C li pb o ar d) R ed 10 0 ( 10 0) Green 10 0 ( 10 0) B lu e 10 0 ( 10 0) R ed 7 ( 7) Green 7 ( 7) B lu e 7 ( 7) Gray Tes t Pa tt er n Gr ay Ba la nc e - Al l B ac kl ig h t Ad ju s tm e nt +0 C o p y t o C li pb o ar d R ec al l F r o m C li pb o ar d R es et t o D ef au l ts Re mo v e Te st P at te rn Note: The color balance menu is a local menu. For more information about navigating local menus, see "Local Menus" on page 54. 4 62 Press the ** button to show the menu on all displays. Runco WindowWall Installation Guide Adjusting Color Balance 5 If the array has never been color balanced, make sure you start with the same color temperature setting on each display. If you are not interested in achieving a specific color temperature, use NATIVE, which is the brightest. If the display has been color balanced before, it will display CUSTOM in the COLOR TEMPERATURE line, because the balance values don’t match any of the pre-set color temperatures. 6 Highlight the WHITE TEST PATTERN line and press ENTER. This will show the white test pattern on all displays. Note: Always use the internal Test Patterns for color balancing, not an external pattern. 7 When all displays are white, find the least bright display in the array. This will be the “baseline” display, and you will not adjust it. All other displays will be adjusted to this baseline display. Why pick the “least bright” display? Why not pick the brightest and adjust to it? When the white value is 100, the display is as bright as it can get. You are adjusting for slight variations in backlight brightness. 8 Choose a display next to the baseline display and adjust its BACKLIGHT ADJUSTMENT to make its overall brightness match the baseline display. (If you can’t bring this setting down to match the baseline, maybe you didn’t choose the darkest display.) 9 Continue with other adjacent displays until the overall backlight brightness matches on all displays. Note: The backlight adjustment does not affect the color of the display. 10 Choose a display next to the baseline display and adjust its white values (red, green and blue) to make its color match the baseline display. Concentrate on the center of the displays, not the adjacent edges. Do not adjust the gray values at this time. 11 Continue with other adjacent displays until all the displays have the same appearance when white. 12 When all displays look the same when displaying the White test pattern, highlight the GRAY TEST PATTERN line and press ENTER. This will show the gray pattern on all displays. 13 Choose any display as the new baseline display. It does not need to be the baseline display you used for white. 14 Adjust the gray values for all the displays until they match the baseline display. Do one display at a time. Again, match the center part of the picture, not the edges. Runco WindowWall Installation Guide 63 Adjusting Color Balance 15 When all displays match in gray, highlight the REMOVE TEST PATTERN line and press ENTER. Press MENU to close all the menus. Tips for Color Balancing • • • • • • 64 COPY TO CLIPBOARD will save all the current settings to a temporary memory. You can then make more adjustments to see if it gets better or worse. RECALL FROM CLIPBOARD will restore these saved settings. The clipboard is only for testing. These values are not saved when AC power is off. Color balance values are saved for all input sources in the same memory location. Stand back from the array and directly in front of it to get an overall view. Small changes are difficult to see at first, particularly with white. When you don’t know which color to change, pick one at random and change it 4 or 5 steps. The result will be either better or worse. If worse, go the other way with that color. If that is also worse, put this color back where you started and do the same with another color. If everything you do makes the match worse, you must be close to the ideal point. Removing red has the same effect on hue as increasing blue and green together. The COLOR BALANCE menu slider bars have colored bulbs at each end to tell you what the effect will be of moving a color toward that end. Changes in the white values affect the gray values but changes in gray values do not affect the white values. Runco WindowWall Installation Guide Advanced Options Advanced Options Advanced options are used mostly for fine tuning and will rarely need to be used. The most commonly used items in the ADVANCED OPTIONS MENU are described in the following sections: • Color Balance: see "Adjusting Color Balance" on page 61 • Backlight Settings: see "Backlight Control" on page 77 • Miscellaneous Options: see "Miscellaneous Options" on page 66 The less commonly used options are covered in the following sections of this manual: • Size and Position: see "Adjusting Position" on page 79 • Serial Port Settings: see "Serial Port Settings and Diagnostics" on page 89 • Set Clock/Schedule Events: see "Setting the Clock/Scheduling an Event" on page 67 Ma in M en u Ad va n ced Opt io n s Wall C on f ig u ratio n Co lo r Ba lan c e P ict u re S iz e an d P os it io n M em o ry M is ce lla n eo u s O p t io n s D ia gn o st ic s Ba ck lig h t S e tt in g s A d van c ed O p t io n s Seri al Port S etti n gs P ro g r a m I n f o r m a t i o n > S e t C l o c k / S c h e d u l e E v e nts Runco WindowWall Installation Guide 65 Advanced Options Miscellaneous Options The MISCELLANEOUS menu contains several unrelated settings. To access the MISCELLANEOUS menu, press MISC once on the remote. Mi sce ll an eo u s C ab l e E qu al iz a ti on M en u Ti m eo u t Ne ver Ti m e Ou t R o tat e Men u N o ne ( E D ID ) P l ug a n d P la y A ll ow F ram e L oc k Cable Equalization This feature adjusts the long line video system to compensate for cable type and length. The default cable equalization is a mid range value that should allow an image to be seen no matter what the cable configuration actually is. The CABLE EQUALIZATION “slave” menu is the first menu to come up when you press the MISC button. Press the ** button to be sure it is on all displays and then use up and down until you get an image on the master. If you can’t see images on the other displays use the target < and > buttons to move the CABLE EQUALIZATION menus to those displays to adjust individually. It may be easier to complete the MATRIX LAYOUT menu on the master before attempting to adjust CABLE EQUALIZATION on the slaves. Mi sce ll an eo u s C ab le E qu al iz a ti on * *** 1 C o py Se tti ng s to Al l Dis p lay s Note: It is possible to have this value so off that no video can be seen. Menu Timeout Determines how long the on-screen menus will be displayed; the range is 0-60 seconds; NEVER TIME OUT means the menus will remain on screen until you choose to turn them off. Rotate Menu Makes the menus readable when the display is arranged in portrait or landscape orientation. ROTATE MENU does not rotate the picture. It only arranges the menus so they read the same way the picture does. To use the display in portrait mode, your source image must be rotated. 66 Runco WindowWall Installation Guide Advanced Options (EDID) Plug and Play Plug and Play allows the source computer’s video card to query the display and send the correct resolution. Most video cards work with Runco displays. For the few that don’t, you may need to turn off Plug and Play and manually specify the video card settings based on the display’s capabilities. Allow Frame Lock Frame lock causes the display to synchronize its vertical refresh timing with that of the incoming source. This prevents frame tearing or frame dropping. To frame lock, the incoming signal must be within the refresh parameters of the display itself, which is from 49 Hz to 62 Hz. Setting the Clock/Scheduling an Event The Runco WindowWall can be easily programmed to schedule specific events, such as turning the unit on or off. 1 To access the SET CLOCK/SCHEDULE EVENTS menu, press MENU on the remote and from the MAIN MENU, select ADVANCED OPTIONS > SET CLOCK/SCHEDULE EVENTS. M ain M en u Wall C on f ig u r at i on P ict u re M em o ry D ia g no st i cs A d va nc ed Op t io n s P ro g r a m I n f o r m a t i o n > Ad v an ce d O pt i on s Co l or Ba la nc e S i z e a nd P o s i t i o n Mi sce ll an eo u s Opt io n s Ba ck lig h t S e tt i ng s Se r i a l P o r t S et t i n g s S e t Cl oc k / S ch ed u le E ve n ts Runco WindowWall Installation Guide 67 Advanced Options Set Cl oc k / Sc hedule Eve n ts Pre ss <ENT ER> to set cl ock and sch edu le e ven ts Curr ent D ate /Tim e: T ue F eb 28 20 07 01 0 7:3 0 Dai ly Tu rn On 02 2 1:3 0 Dai ly Tu rn Off 03 1 2:3 0 Mon day s Re cal l #0 4 04 1 6:0 0 Wednesdays Re cal l #2 3 05 0 2:0 0 Apr 1 2 007 Cl k + 1 Hr 06 0 2:0 0 Oct 28 2 007 Cl k - 1 Hr 1 0:4 0 07 08 09 10 11 12 13 14 15 16 17 18 19 20 68 2 Press ENTER to open the EVENT popup menu. 3 Do one of the following: • To set the clock, see "Setting the Clock" on page 69. • To schedule an event, see "Scheduling an Event" on page 70. Runco WindowWall Installation Guide Advanced Options Setting the Clock Use the following instructions to set the clock. 1 If 0 is not already selected in the Event # line, use the -/+ keys to select it. Ev en t # (0 = s et c lo ck ) 0 F r eq u en c y Ne ve r A ct io n No A ct io n S l o t t o R e c al l D ay o f We ek 1 Tue sd ay Yea r 2 2 007 Month 03 D ate in Mo n t h 05 H ou r 21 Minute 30 Depending on the changes you want to make, update any of the following lines: • Year • Month • Date in Month • Hour • Minute Note: Time is calculated using a 24-hour clock. For example, if the current time is 9:30 p.m., set the Hour line to 21 and the Minute line to 30. 3 When you are finished making the appropriate changes, press ENTER to see the new time at the top of the SET CLOCK / SCHEDULE EVENTS menu. 4 Press MENU to close the menu system. Runco WindowWall Installation Guide 69 Advanced Options Scheduling an Event The most important event that can be “scheduled” for the Runco WindowWall is to turn it on or off. Scheduling an automatic shut off time for the Runco WindowWall helps ensure that Temporary Image Retention does not occur. The following events can be scheduled: • Turn unit off/on • Set the clock ahead/back 1 hour • Recall a memory slot Use the following instructions to schedule an event. 1 Use the -/+ keys to select the “event number” you want to correspond to this event. 2 Use the up/down arrows to select the Frequency line. Use the -/+ keys to scroll through the list until you find the selection you want. The following frequencies can be selected: • One Time (e.g. to set clock ahead one hour in the spring) • Daily (e.g. to turn the unit on/off) • Weekly Eve n t # (0 = s et c lo ck ) 1 F r eq u en c y Da ily A ct io n No A ct io n S l o t t o R e c al l D ay o f We ek 1 We d ne sd ay Yea r 2 007 Month 02 D ate in Mo n t h 28 H ou r 0 Minute 0 Note: If you have set up a one time event, the frequency will show “Never” once the event has occurred. You can schedule the event to occur again by changing the frequency back to “One Time” and then correcting the date and time. 70 Runco WindowWall Installation Guide Advanced Options 3 Use the up/down arrows to select the Action line. Use the -/+ keys to scroll through the list of Action items until you find the one you want. The following actions can be selected: • Turn Unit Off • Turn Unit On • Recall Slot • Set Clock Ahead 1 Hour • Set Clock Back 1 Hour 4 Do one of the following: • If you selected “Recall Slot” in the previous step and want to recall a memory slot other than the one shown, go to 5. • If you did not select “Recall Slot” in the previous step, go to 6. 5 Use the up/down arrows to select the Slot to Recall line. Use the -/+ keys to scroll through the list until you find the selection you want. Ev en t # (0 = s et c lo ck ) F r eq u en c y 3 We ek ly A ct io n R ec al l S lo t S l o t t o R e c al l D ay o f We ek 4 M o n d ay Yea r 20 07 Month 05 D ate in Mo n t h 28 H ou r 12 Minute 30 Note: If you select a memory slot that has not been set up, no action will occur. 6 Depending on the frequency you selected and the change you want to make, update any of the following lines: • Day of Week • Year • Month • Date in Month • Hour • Minute Note: Time is calculated using a 24-hour clock. For example, if you want your unit to turn off at 9:30 p.m., set the Hour line to 21 and the Minute line to 30. Runco WindowWall Installation Guide 71 Advanced Options 72 7 Continue setting up events until you are finished. Changes are automatically saved each time you move from line to line. 8 When you are finished making the appropriate changes, press ENTER to see the new events on the SET CLOCK / SCHEDULE EVENTS menu. 9 Press MENU to close the menu system. Runco WindowWall Installation Guide Aspect Ratio Settings Aspect Ratio Settings The aspect ratio of any picture is its width divided by its height. W/H = Aspect Ratio The native aspect ratio of the Runco WindowWall is 1.77. This is sometimes referred to as 16:9 for 1.77. The native resolution of the Runco WindowWall is 1366 x 768. Many pictures do not have this aspect ratio. Standard television, VGA, SVGA, and XGA signals are 1.33. Movies from DVDs vary depending on the original film format, but are often 1.85. The larger the number, the “wider” the picture seems. When the incoming picture is a different aspect ratio from the screen, the display gives you six choices (see SCALE MODE submenu options) to make it fit. Scale Mode Settings 1 To select the Scale Mode, press PICTURE on the remote three times. As p ect Ra ti o S cal e Mo de J u st if y O v ers ca n S ha rp ne ss 2 16 x 9 Ce n te r 0% 4 With SCALE MODE highlighted, press ENTER. The SCALE MODE submenu displays. F il l S cr e en C ro p L et t er b o x/ P il la r bo x 1 6x 9 4 x3 O n e t o O ne The scale modes are “radio” buttons; you can only choose one at a time. Runco WindowWall Installation Guide 73 Aspect Ratio Settings Note: The display is not capable of compressing the image in one direction while stretching it in the other. For example, if you try to display a UXGA (1600 x 1200) on an Runco WindowWall in a 1 x 2 column arrangement (1366 x 768) at Fill All, the display will letterbox the image and the following note will appear at the bottom of the menu: “Can’t display Change Scale Mode.” You can leave the scale mode at Fill All or change it to Letterbox. You can also select Crop or One to One. Note: The SCALE MODE menu icons change to indicate the effect each mode will have on the picture based on the JUSTIFY and SCALE MODE settings, and the source resolution. Affect on Input Type on 16 x 9 Display Scale Mode Fill Screen 4 x 3 source (e.g. Standard Video or VGA/SVGA/XGA) 16 x 9 source (e.g. 1080i or WXGA computer source) Stretches width of image Displays full image without distortion Fill Screen makes the picture fit top-to-bottom and left-to-right, regardless of how this stretches or compresses the picture. Fill All distorts the picture, when the aspect ratio of the incoming picture is not the same as the display. Crop Crops top and bottom of image; fits width of image without distortion Displays full image without distortion Crop expands non-native aspect ratio pictures until the second edges touch the border and lets the other edges of the picture fall outside the display and get cropped. Letterbox /Pillarbox Fits height of image without distortion; fills width with border Displays full image without distortion Letterbox/Pillarbox expands the picture until the first edges (top-bottom or left-right) touch the border of the display, and then fills in the other sides with a solid color. 74 Runco WindowWall Installation Guide Aspect Ratio Settings Affect on Input Type on 16 x 9 Display Scale Mode 16 x 9 4 x 3 source (e.g. Standard Video or VGA/SVGA/XGA) 16 x 9 source (e.g. 1080i or WXGA computer source) Stretches image to fill width without affecting height Displays full image without distortion (16 x 9) forces the aspect ratio to 16 x 9 (1.77), the standard for many DVD movies. This will distort any picture other than 16 x 9 aspect ratio pictures. 16 x 9 can be used to display anamorphic DVDs on an array. 4x3 Fits height and width of image without distortion; fills width with border Fits height of image, compresses width and fills with border . (4 x 3) forces a 4 x 3 (1.33) aspect ratio, the ratio of standard television. One to One Displays image without distortion at actual size Displays full image without distortion Example above represents a VGA input displayed on one LCD tile Example above is for 1366 x 768 input displayed on one LCD tile One to One maintains the original size and aspect ratio of the picture. This may leave blank areas on all four sides. For instance, a VGA picture (640 x 480) on a 16 x 9 display will occupy only a small area in the center of the screen. The primary use of One to One is to display the image without scaling artifacts. The One to One Scale Mode will produce different cropping results and the image size will be different for each input resolution. Runco WindowWall Installation Guide 75 Aspect Ratio Settings Justify Settings Justify determines how the picture will be placed in a wall of displays. For a single display, Justify determines placement on the screen. For a wall of displays, if the image is not large enough to fill all the displays in the wall, some will be left blank. Top/Left Positions the image starting with the top, leftmost display, then across and down. Center Positions the image starting with the center of the image in the center of the wall spreading out equally to all displays. Bottom/Right Positions the image starting with the bottom, rightmost display, then across and up. Overscan This is used to hide blank areas and stray lines in the edges of an image. The lower the overscan setting, the more of the optical image that is seen. Standard CRT televisions have an overscan of about 5%, which may actually hide content or images that you want to see. Sharpness Sharpness settings determine how crisp the image should be. There are sixteen levels of sharpness, where 0 is the softest and 15 is the sharpest. Seven is the default. 76 Runco WindowWall Installation Guide Backlight Control Backlight Control The backlight is optimized for the LCD operation. For normal operating conditions, the backlight can be adjusted for maximum brightness if desired. If you are operating at higher altitudes up to 2000 meters, it is recommended that you run the backlight at a reduced intensity. Running at maximum intensity at high altitudes can affect the lifetime expectancy. Note: To extend the backlight life, it is recommended that you use the lowest backlight brightness that makes sense for your application. This will reduce power consumption, heat output and the chances of TIR from occurring. (See "Recommended Usage" on page 5) To open the BACKLIGHT CONTROL menu, press twice on the remote. Ba ck lig h t C on t r o l A u to B ac kl ig h t on Tu rn B ac kli g ht O f f W h e n No S ou rc e (D PMS ) D P MS D ela y 1 hr B ac kli g ht I n te n sit y 10 Note: The last two lines will only appear on the master (A1) display. Auto Backlight On If AUTO BACKLIGHT ON is checked, the display turns on the backlights soon after AC power is applied. It won’t wait for a remote control or RS232 command. This is the normal mode for applications where the displays will be on 24 hours a day. This way, no one has to manually turn on the backlights after a power failure. Caution: To prevent temporary image retention (TIR), is recommended that you do not leave the Runco WindowWall on for 24 hours a day. To get the most out of your display, see "Recommended Usage" on page 4. If the displays normally have the backlights off for part of the day or night, do not check this box. Otherwise a power failure at night would turn on the backlights. Turn Backlight Off With No Source and DPMS Delay When checked, TURN BACKLIGHT OFF WITH NO SOURCE (DPMS) causes the backlights to turn off after the source goes absent for the length of time specified in the DPMS DELAY line. If this line is not checked, the backlights remain on indefinitely. To specify an amount of time after which the source is absent that the backlights will shut off, enter that number in the DPMS DELAY line. Runco WindowWall Installation Guide 77 Backlight Control Backlight Intensity The backlight intensity can range from 1-10. Confirm that the BACKLIGHT INTENSITY is greater than 1. If you are operating at higher altitudes up to 2000 meters, it is recommended that you run the backlight at a reduced intensity. 78 Runco WindowWall Installation Guide Adjusting Position Adjusting Position Position moves the picture on the screen but does not move the menus. Picture Position Open the PICTURE POSITION menu (MAIN MENU > ADVANCED OPTIONS > SIZE AND POSITION > PICTURE POSITION). The four arrow keys move the picture on the screen. Pic t ur e P os it io n U s e a rr o w k e y s t o m ov e i m a g e H ori z o nta l P os it io n Vert i cal Po s it io n 1 68 19 The numbers for HORIZONTAL POSITION and VERTICAL POSITION refer to the number of pixels from sync to the first displayed pixel. These numbers get smaller as the picture moves up and to the left. Horizontal Position Shows the number of pixels from the beginning of H sync to the first active pixel. Because there are many black pixels after H sync, this number will not be zero when the picture is at the left border of the screen. Vertical Position Shows the number of lines from V sync to the first active line, so it will not be zero when the picture is at the top of the screen. Note: Adjusting the VERTICAL POSITION too far may cause the image to jump or hop. If the image appears to flicker or hop, readjust the VERTICAL POSITION. Runco WindowWall Installation Guide 79 Adjusting Position 80 Runco WindowWall Installation Guide Spreading Images Across the Wall Spreading Images Across the Wall For the Runco WindowWall, you will need to set up a variety of options that relate to how each display fits into the wall. Whether you use Runco’s Big PictureTM or an external video processor, your goal is to make the picture fit together properly at the edges. Using an External Video Processor The processor divides a single picture into several sections and sends each part on a separate cable. Connect these cables to the proper display. You can still position the picture with the display controls. With most processors, you can position and zoom the picture with the processor controls. Using the Quick Configure Feature The Runco WindowWall contains sensors that easily configure the layout of your wall. Quick Configure sets up the routing (see "Understanding Wall Configuration" on page 101) and the Big Picture Setup (see below) automatically. If you have a more complicated setup and want to manually configure your wall, use the BIG PICTURE SETUP menu. Using the Matrix Layout Menu This feature is described earlier in the manual. For more information, see "Matrix Layout Menu" on page 59. Using Runco’s Big PictureTM To use Runco’s Big PictureTM, you must set the values in the BIG PICTURE SETUP menu for the same wall size on all the LCDs in the wall using the Big Picture feature. B ig P ict u r e S e tu p Wa ll Co n f ig u r at io n Qu ic k C o nf i gu re B ig Pi ct u re Ma tri x P o sit io n Bi g Pi ct ur e A 3 3 x3 1:1 Wal l Wi dt h 3 M a tr ix L ayo u t Wal l Hei g ht 3 Q u ad M od u le A R ou t e Un it Co lu m n 1 E n ab l e H ig h R es ol ut i on a n d Du a l L in k In p u ts Un it Ro w 1 S y nc h r o ni z e H ig h R es ol u ti on s Wal l Mo de B ig P i ct u r e S et u p F ram e Co m p en sa ti on * * ** Runco WindowWall Installation Guide F r am e He ig h t 10 p ix els F ram e Widt h 10 p ix els Co p y S et t in g s t o A ll Di sp la ys 81 Spreading Images Across the Wall Wall Width and Wall Height These show the number of displays wide and high for the picture. This may be different from the physical size of the wall. You could build a 4 x 3 array of displays and use WALL MODE to put a single picture on the four displays in the upper left corner, for instance. Using the QUICK CONFIGURE line on the WALL CONFIGURATION menu will set these automatically. Unit Column and Unit Row These represent the position of the display in this “array.” For example, in the 4 x 3 array of displays shown below, Unit numbering starts at the top left corner of the array. This display would have a Unit Column value of 1 and a Unit Row value of 1. Using the QUICK CONFIGURE line on the WALL CONFIGURATION menu will set these automatically. Unit Row 1 Unit Column 1 Unit Row 1 Unit Column 2 Unit Row 1 Unit Column 3 Unit Row 1 Unit Column 4 Unit Row 2 Unit Column 1 Unit Row 2 Unit Column 2 Unit Row 2 Unit Column 3 Unit Row 2 Unit Column 4 Unit Row 3 Unit Column 1 Unit Row 3 Unit Column 2 Unit Row 3 Unit Column 3 Unit Row 3 Unit Column 4 Unit Row 4 Unit Column 1 Unit Row 4 Unit Column 2 Unit Row 4 Unit Column 3 Unit Row 4 Unit Column 4 Wall Mode When checked, this turns on the Runco’s Big PictureTM feature. When not checked, the display shows the whole picture. Using the QUICK CONFIGURE line on the WALL CONFIGURATION menu will set these automatically. 82 Runco WindowWall Installation Guide Spreading Images Across the Wall Frame Compensation When video displays are used in an array, the intent is to display a large version of an image. However, even the thinnest of mullions break up the image oddly. One way around this is to adjust the image. Imagine looking out a window made up of many panes of glass. The image you see is partially obscured by the frames, but your mind assembles the image and ignores the frames. Runco WindowWall Installation Guide 83 Spreading Images Across the Wall Frame compensation allows you to mimic the mind’s function by “hiding” portions of the picture (as if the mullions were actually hiding the image) and allow the distributed image to appear as one very large image. To ensure images containing diagonal lines remain correctly diagonal, turn on Frame Compensation. Depending on how closely you space the displays, you must determine how much of the picture to “hide” behind the display’s mullions and the space between displays. Frame Height and Frame Width Frame Height can be set to hide pixels at the top and bottom of images. Frame Width can be set to hide pixels to the left and right of images. The Frame Height and Frame Width numbers default to the correct numbers for your display, assuming they are tiled with the frames tightly together. If your installation leaves more space between the frames, you will need to increase these numbers. 84 Runco WindowWall Installation Guide Zoom and Viewport Zoom and Viewport Zoom fits the edges of a large picture - one that covers many displays’ screens - from side to side and top to bottom. To access the Zoom menus, select MAIN MENU > ADVANCED OPTIONS > SIZE AND POSITION. Then select the ZOOM TOP & LEFT menu or the ZOOM BOTTOM & RIGHT menu. You can zoom the sides up to +100 pixels larger in each direction. You can also zoom the sides up to –100 pixels smaller, but only if that side is not the edge of the overall picture. Zoom Menu Entries Image Resolution Shows the resolution of the source picture. This Unit Shows the number of pixels this display is using of all the incoming pixels. Zo o m To p & L eft Zo o m B ot t o m & Ri gh t Ar ro ws move t op an d le ft Ar ro ws move b ott om an d rig ht 0 0 0 0 0 0 Im ag e Re so lu t io n Th is U n it 0 0 1 36 6 x 7 68 68 1 x 3 84 I m ag e Re so lu t io n T h is U n it Runco WindowWall Installation Guide 13 66 x 768 6 81 x 384 85 Zoom and Viewport Viewport Adjustment Use the VIEWPORT menu (MAIN MENU > ADVANCED OPTIONS > SIZE AND POSITION > VIEWPORT WINDOW) to adjust the number of pixels actually used on the display. You can’t increase this number, but you can reduce it. M ai n Men u Ad v an ce d O p ti on s Wal l C o nf i gu ra ti o n C ol or B ala n ce P i c tu r e Si ze a n d Positi on Memory M i sc ell an eo u s O pt i on s Di ag n os ti cs B ack l i gh t S e t ti ng s Ad va n ced Opt io n s Pro g ram I nf o rm at io n S e r i a l P or t S e t t i n g s > S e t Cl oc k / S ch ed u le E v en ts Size & Position Pic t ur e P os it io n Z oo m Wi nd o w To p & L eft Z oo m Wi nd o w B o tt o m & Ri g ht Vie w po r t Wi nd o w To p & L eft Vie w po rt Wi nd o w B o tt o m & Ri g ht Re se t Al l Wi n do w s t o De fa u lt * *** Co p y S et t in g s to A ll D isp l ays Note: The COPY SETTINGS TO ALL DISPLAYS line will only appear if this menu is on the master display (A1). 86 Runco WindowWall Installation Guide Zoom and Viewport View p o r t To p & L eft View p o r t B ot t o m & Ri gh t Ar ro ws mo ve t op an d le ft Ar ro ws move b ott om an d rig ht 0 0 0 0 0 0 0 0 D is pl ay R eso l ut io n 13 66 x 768 D isp l ay Re so lu t io n 13 66 x 768 Vie w p or t 13 66 x 768 Vie w po rt 13 66 x 768 Display Resolution Shows the resolution of the display. This has nothing to do with the resolution of the source picture. Viewport Shows the number of display pixels being used. Runco WindowWall Installation Guide 87 Zoom and Viewport 88 Runco WindowWall Installation Guide Serial Port Settings and Diagnostics Serial Port Settings and Diagnostics If you want to control the displays remotely with RS232 commands from a computer, read this section. For more information, see "RS232 Communication" on page 57. RS232 is also used to upgrade the firmware of the Quad Input Manager Modules. Diagnostic information is available from the UNIT STATUS and HOURS menus. For more information, see "Diagnostics" on page 91. Serial Port Settings To access the SERIAL PORT SETTINGS menu, press MONITOR twice on the remote. S e r i a l P or t S e t t i n g s ASC II R esp o n se Typ e S ym b o li c AS C II R esp o n se Ter m i na to r Bau d R at e CR 19 20 0 ASCII Response Type Determines what type of data will be returned to the computer. For human-readable text in a serial program, choose SYMBOLIC. For computer-read data, use NUMERIC or DATA ONLY. ASCII Response Terminator Will be determined by what your serial program wants to see at the end of every transmission from the display. Baud Rate Must be the same as that used by the controlling computer. The baud rate is not automatically set, as it is with modem communications. It must be manually set here and at the computer to match each other. Note: For firmware upgrades, you don’t need to adjust the baud rate. Runco WindowWall Installation Guide 89 Serial Port Settings and Diagnostics Serial Port Status The SERIAL PORT STATUS menu provides diagnostic information for the serial port. To view RS232 port status, select MAIN MENU > DIAGNOSTICS > SERIAL PORT STATUS. You will see the status of the serial port that has had the most recent activity. To view the status on a different serial port, use the arrow key. Ser ial Port Sta t us R S 23 2 <EN TER > to clea r; +/ - to sele ct d i ffere nt serial p ort Co m m an ds R ec eiv ed 34 Re pl ie s S en t 34 La st P ack et Ty pe O p e r a ti on La st P ack et A d dr ess N ot Ad d res sed By te s Rec ei ve d 92 1 By te s Sen t 77 3 UA RT Fra m ing Errors 4 U A R T O v e r f l o w Er r o r s Gro up A Un it : 1 0 19 200 Ba ud Most Recent . ..115 , 111, 10 8, 117, 1 05 , 111 , 11 0, 63 , 1 3 .s t -- 1? .s t -- 2? .s t -- 3? .l c d .v er ti c a l -r e s ol ut i on? . Controlling With RS232 Commands The RS232 protocol - the “rules” for controlling displays with RS232 commands - are described in a separate document. See "Accessing Additional Runco Resources" on page 171 to see how to get to the web page. Then look for Runco WindowWall and under that the RS232 Guide. 90 Runco WindowWall Installation Guide Diagnostics Diagnostics Most of the submenus available from the DIAGNOSTICS menu are not used on a regular basis. Examples of these menus can be found in "On-Screen Menus" on page 119. To check status information for the system or to see usage information, use the UNIT STATUS and HOURS menus, which are explained in the following sections. Checking Unit Status The UNIT STATUS menu shows information for the LCD, Quad Input Manager Module and the power supply module. This can be a helpful troubleshooting tool if you are having operational issues with one of the system components. Un i t Stat us A 1 MX 46L 01 0- 116 8 LC D Q ua d Mod ul e P o w e r S u p pl y 1 36 6 x 7 68 R ev 02 Tem p er at u r e B ac kli gh t Vo l tag e 25 ° C OK 24 Tem p er at u r e F an F a ile d PS 1 PS 2 PS 3 PS 4 R ed u nd a nt OK OK OK OK OK 31 °C Fan On LCD Indicates the current internal temperature at one point inside the LCD. This is not the highest or the lowest temperature of the LCD, nor an indicator of ambient temperatures. Also shows if the backlight temperature is operating within a normal range. If the voltage is below 22, there is an issue with power to the LCD. This will mostly likely be an issue with cable length or quality of the cable between the power supply module and the LCD tile. Quad Module Indicates the current internal temperature at one point inside the Quad Input Manager Module. This is not the highest or the lowest temperature of the LCD, nor an indicator of ambient temperatures. Also shows whether or not the fan inside in the Quad Input Manager Module is operating. Runco WindowWall Installation Guide 91 Diagnostics Power Supply Indicates if individual power supplies within the power supply module are operating correctly. Note: In order for this menu to show power supply module information correctly, the PS MON cable must be plugged in. If it is not plugged in, you will see the message “PS MON CABLE IS NOT CONNECTED.” Checking System Usage The HOURS menu shows the hours the system and backlights have been in use. It also shows the average LCD usage information. Ho u r s Sy st em Tim e 00 63 6: 45 B ack li gh t Tim e 00 53 2: 00 Ave r ag e Ho u r s Per Da y 0 N um b er o f Da ys > 20 H o ur s 0 Note: The last two lines will only appear on the master (A1) display. System Time Number of hours the system has been plugged in. This number is counted by Quad Input Manager Module A. Backlight Time Number of hours that the LCD has been turned on. This information is stored in the LCD interface board. Average Hours Per Day Shows the average number of hours per day an LCD has been on. Number of Days > 20 Hours Shows the number of days that an LCD display has been on more than 20 hours per day. This feature helps installers keep displays within the normal use thermal guidelines. For more information, see "Normal Use Thermal Guidelines" on page 6. 92 Runco WindowWall Installation Guide Saving and Recalling Configurations Saving and Recalling Configurations Advantages of Saving Configurations to Memory Slots • You can compare multiple settings quickly • You don’t have to repeat settings when comparing entire configurations • You can revert to a known good setting when testing new configurations What the Memories Store The following settings can be stored in a memory slot and recalled when needed: • • • • • • • Selected source Resolution (and much more about the signal) Phase Sharpness Position and size (zoom settings) Everything in the ASPECT RATIO menu Brightness, Contrast, Hue and Saturation for video sources All of this is stored separately for each memory slot. As an example, you could store multiple different wall setups and switch between them quickly. Global Storage The following settings are stored globally; that is, they are stored at the display level and are the same for all memory slots. • Everything in the MISCELLANEOUS menu • All the HOURS settings • All the COLOR BALANCE settings Runco WindowWall Installation Guide 93 Saving and Recalling Configurations Memory: What Is Saved? And Where? In the display, some parameters (values) are associated with the mode. The mode is primarily the horizontal and vertical resolution and the vertical frequency of the incoming source picture. It is more than that, but if you think of it this way, you will be close enough. Some parameters are associated with the input. The parameters specific to mode and input are saved in memory slots. Some parameters are global. They are independent of the mode or input, and are not saved to memory slots, as shown in the table below. Parameter Saved in Slot Global Parameter Saved in Slot ASCII Response Term. x Sharpness x ASCII Response Type x Viewport Window Bottom x Auto Backlight On x Viewport Window Left x Baud Rate x Viewport Window Right x Black Level: R, G & B x Viewport Window Top x Brightness (video) x Wall Height x Wall Mode x Color Balance (all values) x Contrast (video) x Wall Unit Column x Hue x Wall Unit Row x Justify x Wall Width x White Level: R, G & B x Zoom Window Bottom x Zoom Window Left x Menu Timeout Overscan x x Plug and Play (EDID) x Position, Horizontal x Zoom Window Right x Position, Vertical x Zoom Window Top x Saturation x 94 Runco WindowWall Installation Guide Global Saving and Recalling Configurations Saving Configurations 1 Set up the display the way you want it. 2 Press the SAVE button twice. S av e 1 9 17 25 33 2 10 18 26 34 3 11 19 27 35 4 12 20 28 36 5 13 21 29 37 6 14 22 30 38 7 15 23 31 39 8 16 24 32 40 The SAVE grid menu displays. This menu contains 40 numbered memory slots. 3 Using the arrow keys on the remote, navigate to a slot: • An unchecked slot number allows you to save new settings. • A checked slot has settings already saved to it. If you want, you can overwrite what’s already saved. Runco WindowWall Installation Guide 95 Saving and Recalling Configurations 4 Press ENTER. The SAVE SLOT menu displays. Sav e S lo t Nu m b er ( C ur r en t ) 1 S ave N o w ( w il l ov erwr it e o c cu p ied slo t ) N am e D I 1 36 6x 768 S ou rc e Di gi tal C o lo rspa ce RGB R es ol u ti on 1 36 6 x 7 68 Wall 2 x 2 S cal e/ Ju st if y 1: 1 O n e to O n e / C e n te r P os ti o n/ O ve r sc an 168 ,1 9 / 0 % Z o o m UL / L R +0, + 0 Vi ew p or t UL /L R +0 ,+0 / / + 0, + 0 +0, + 0 F r e qu e nc y/ Ph ase 16 02 / 22 .5° S ha rp ne ss N o rm al B la ck L ev el 63 55 57 W h i te L ev el 16 6 17 0 16 9 Note: This menu shows all the settings that will be saved. You can’t change anything but the name in this menu. The appearance of this menu is somewhat different for digital and video sources, reflecting what is saved for them. a If the current settings exactly match what is already in the memory, (CURRENT) will appear in the SLOT NUMBER line. b If the memory already had data, and the only change is to the name, the phrase “will update name of occupied slot” appears in the SAVE NOW line. c If this memory already has something stored in it, the phrase “will overwrite occupied slot” appears in red on the SAVE NOW line. This is the only warning. d If none of these messages appear, this slot is empty. 5 96 Select SAVE NOW and press ENTER. The display instantly stores all the current settings into that memory slot. Runco WindowWall Installation Guide Saving and Recalling Configurations Changing the Name of the Memory Slot The default name is an abbreviation of the source connector, resolution, and if Wall Mode is on, wall settings. In the following example, the name tells you that the source is connected to Digital, which displays 1366 x 768, is part of a 2 x 2 array, and is the display in the upper left corner (column 1, row 1). 1 If you want a more descriptive name, select NAME and press ENTER. A little bar appears beneath the NAME line. Sa ve S lo t Nu m b er 1 S ave N o w N am e D I 1 36 6x 768 2 x2 1:1 S ou rc e Di gi tal C o lo rspa ce RGB R es ol u ti on 1 36 6 x 7 68 Wall 2 x 2 S cal e/ Ju st if y 1: 1 O n e to O ne / Ce n te r P os ti o n/ O ve r sc an 168 ,1 9 / 0 % Z o o m UL / L R +0, + 0 Vi ew p or t UL /L R +0 ,+0 / / + 0, + 0 +0, + 0 F r e qu e nc y/ Ph ase 16 02 / 22 .5° S ha rp ne ss N o rm al B la ck L ev el 63 55 57 W h i te L ev el 16 6 17 0 1 69 a Use the + or - keys to move the yellow selector under the character you want to change. b Use the up/down arrows to change the character. 2 When you are finished, press PREV. 3 Select SAVE NOW and press ENTER. Note: If you use RS232 controls, you can also use commands to send a string name to a memory slot, saving time. Runco WindowWall Installation Guide 97 Saving and Recalling Configurations Recalling Stored Configurations 1 Press SAVE once to open the RECALL grid menu. Re ca ll 1 9 17 25 33 2 10 18 26 34 3 11 19 27 35 4 12 20 28 36 5 13 21 29 37 6 14 22 30 38 7 15 23 31 39 8 16 24 32 40 2 Navigate to the slot you want to recall. When navigating, you can only go to the checked numbers. All the slots with checks have something stored in them. The others are grayed out. 3 Press ENTER to open the RECALL SLOT menu. Re ca ll Slot Number 17 Re ca ll No w Na m e DI 13 66 x7 68 S o u r ce Di gi tal Co l ors pac e RGB Re so lu t io n 1 36 6 x 7 68 Wal l 2 x 2 Sca le /J us ti fy 1: 1 O ne t o O n e / C e n t e r Po st io n /Ov ers ca n 16 8,1 9 / 0 % Z oo m U L / L R +0, + 0 / +0 ,+0 View p o r t U L /L R +0, + 0 / +0 ,+0 F r eq u en cy /P h a se 1 60 2 / 2 2.5 ° S h arp n es s N o rm al Bl ac k L e vel 63 55 57 Wh it e Le ve l 166 17 0 16 9 Note: If this slot number has exactly the same settings that are currently being used, a (CURRENT) message appears on the top line. 98 Runco WindowWall Installation Guide Saving and Recalling Configurations The name of the memory is listed here, as well as all the important parameters (data) stored in that memory slot. 4 If the name is not the one you want, press PREV and choose another memory. 5 In the RECALL SLOT menu, RECALL NOW is selected. Press ENTER to recall the parameters currently displayed in the menu. 6 We suggest that you create a list of memory slots that contains each slot number, name and description. Deleting a Configuration 1 Go to the MEMORY menu (MAIN MENU > MEMORY). Me mory Re ca ll Sav e De le te 2 Select DELETE and press ENTER. This opens the DELETE grid menu with 40 numbered memory slots. De le te 3 1 9 17 25 33 2 10 18 26 34 3 11 19 27 35 4 12 20 28 36 5 13 21 29 37 6 14 22 30 38 7 15 23 31 39 8 16 24 32 40 Navigate with the arrow keys to the slot you want to delete and press ENTER. When navigating, you can only go to the checked numbers. All the slots with checks have something stored in them. The others are grayed out. Runco WindowWall Installation Guide 99 Saving and Recalling Configurations 4 In the DELETE SLOT menu, DELETE NOW is selected. De le te S lo t Nu m b er 17 D el et e No w N am e D I 1 36 6x 768 S ou rc e Di gi tal C o lo rspa ce RGB R es ol u ti on 1 36 6 x 7 68 Wall 2 x 2 S cal e/ Ju st if y P os ti o n/ O ve r sc an 168 ,1 9 / 0 % Z o o m UL / L R +0, + 0 Vi ew p or t UL /L R +0 ,+0 / F r e qu e nc y/ Ph ase / +0, + 0 +0, + 0 1 60 2 / 2 2.5 ° S ha rp ne ss 5 1: 1 O n e to O n e / C e n te r N o rm al B la ck L ev el 63 55 57 W h i te L ev el 16 6 17 0 16 9 Press ENTER. Co n f irm S lo t De le te Ar e y o u Su re? 6 Ye s No Use the left arrow to make the YES red and press ENTER. Co n f irm S lo t De le te Ar e y o u Su re? Ye s No Note: It is not necessary to delete the data in a memory slot before saving new data. Saving will overwrite the stored data. (See "Saving Configurations" on page 95) 100 Runco WindowWall Installation Guide Understanding Wall Configuration The Runco WindowWall system is quite flexible. Its digital inputs can be displayed on the LCD tiles in a variety of ways. However, it is not as flexible as a high cost matrix switcher system. This section contains examples of common scenarios that can be accomplished with the Runco WindowWall system. Do you want to spread one source image across more than one LCD? No See Scenario 1: Individual Inputs Yes Yes How Many LCDs will each Processor Output Drive? 1 Do you have a Video Processor? 3 or 4 2 No See Scenario 5: Two Sub Quad Input Manager Module See Scenario 1: Individual Inputs See Scenario 4: 1 Sub Wall per Quad Input Manager Module Will one source image spread across the whole wall (as opposed to part of the wall)? No How many sub walls will you have at one time? Yes 1 See Scenario 2: Runco Big Picture More than 1 See Scenario 3: One Sub Wall Is more than one sub wall bigger than 4 LCDs? No Yes See Scenario 6: Multiple Sub Walls See Scenario 7: Multiple Large Sub Walls Runco WindowWall Installation Guide 101 Configuration Scenarios Read through the scenarios below and use the flowchart on the previous page to find the ones that apply to your installation. If you fall into more than one scenario, make sure that the cabling of the system is the same for all of your configurations. Configuration of a wall can be broken down into three parts: cabling, source routing and wall configuration. Cabling consists of how the LCD tiles are connected the Quad Input Manager Modules, how the Quad Input Manager Modules Dual Link In and Loop Out connections are made and how the sources are connected to the Digital inputs. Source Routing consists of configuring the internal video switches on each Quad Input Manager Module. These switches control which inputs are displayed on which outputs within the Quad Input Manager Module and are set on the QUAD MODULE ROUTE menu. For most of the scenarios, it is not necessary to know the details of how these switches are set, but for more complex scenarios, it is necessary to understand these switches. For an example of the QUAD MODULE ROUTE menu, see "Wall Configuration and Submenus" on page 120. Wall Configuration consists of setting up the scaling chips in each of the four processors on the Quad Input Manager Module so the correct piece of the image is displayed on each LCD. Because the Runco WindowWall has position sensors, these settings can be done automatically in many of the scenarios. Configuration Scenarios Standard Cabling Scenarios Scenarios 1,2 and 3 all use what we’re calling standard cabling. It does not matter which LCDs are cabled to which Quad Input Manager Module. Scenarios 2 & 3 require standard loop through cabling, as shown on page 104. 102 Runco WindowWall Installation Guide Configuration Scenarios Scenario 1: Individual Inputs A2 A3 B1 B2 B3 C1 C2 C3 A1 Quick C onfigure Big Picture Individual Inputs A Digital 1 Source 1 Digital 2 Source 2 Digital 3 D igital 4 B Digital 2 Digital 3 D igital 4 Source 4 Source 5 Source 6 D igital 1 Digital 2 C Digital 3 D igital 4 Source 8 Loop O ut Source 3 D igital 1 Source 7 Dual Link In Dual Link In Loop O ut D ual Link In Loop Out Source 9 Note: 3 x 3 wall with individual inputs The simplest way to configure a Runco WindowWall system is where each LCD displays the video from one and only one of the inputs. This scenario will be used most often with a video processor such as a Magenta Processor. Cabling To cable a system for individual inputs, you should keep in mind that you will need to be able to tell your video processor which inputs are in which position, so you will probably want to put the displays in some logical order in the Quad Input Manager Modules. If you have unused LCD connectors in your Quad Input Manager Module, do not use those corresponding inputs. The above example shows the cabling for this scenario. There is no need to cable the Loop Out or Dual Link In connectors for this scenario. Source Routing There is a quick configuration for this scenario. In order to route the sources for individual inputs, choose Individual Inputs for the QUICK CONFIGURE BIG PICTURE line in the WALL CONFIGURATION menu. Runco WindowWall Installation Guide 103 Configuration Scenarios Wall Settings Big Picture is not used in this scenario, so WALL MODE should be set to off on the BIG PICTURE SETUP menu for all displays. The Quick Configure setting takes care of this for you. Scenario 2: Runco Big Picture When in Runco Big Picture, one source is spread over the entire wall. In the Runco WindowWall product, any input can easily be used as the source for big picture. A2 A3 B1 B2 B3 C1 C2 C3 A1 Quick Configure Big Picture B3 A Digital 1 Digital 2 Digital 3 Digital 4 Source 1 Source 2 Dual Link In Loop Out Source 3 Dual Link In B Digital 1 Digital 2 Source 4 Source 5 Digital 1 Source 7 Digital 2 Loop Out Digital 3 Digital 4 Source 6 C Digital 3 Digital 4 Source 8 Dual Link In Loop Out Source 9 Note: 3 x 3 wall using Runco Big Picture. Any input can be spread over the whole wall. 104 Runco WindowWall Installation Guide Configuration Scenarios Cabling Because the Runco WindowWall has position sensing, LCDs can be cabled to the Quad Input Manager Modules in any way that is convenient. Keep in mind that most of the configuration menus will appear on the module connected to LCD 1 on the A Quad Input Manager Module so you may want to put that one in a convenient location. The Loop Out connector of each Quad Input Manager Module should be connected to the Dual Link In connector of the next module. The final Loop Out connector should be connected back to the Dual Link In connector of the first module. Note: Cabling video loop connections. Source Routing There is a quick configuration for Runco Big Picture. Choose the input you want to display on the whole wall for the QUICK CONFIGURE BIG PICTURE line in the WALL CONFIGURATION menu. In order for this Quick Configure to work correctly, you must have previously allowed the system to discover its display positions by choosing AUTO in the MATRIX LAYOUT menu. Runco WindowWall Installation Guide 105 Configuration Scenarios Wall Configuration Each display’s wall configuration is set up automatically by the Quick Configure setting. Wall Mode is turned on, the wall width and wall height is set to the width and height of the Runco WindowWall, and each display’s row and column are setting according to its position. Scenario 3: One Sub Wall and Individual Inputs In this scenario, one input is spread over multiple LCDs, while the rest of the LCDs display individual inputs. This scenario may be used in a control room, where each display is monitoring a particular source, and at a command, one input may be magnified for more detailed viewing. The size of the sub wall in this scenario does not matter. The examples show a 2 x 2 sub wall in a 3 x 3 Runco WindowWall, but you could also have a 3 x 5 sub wall in a 6 x 6 wall, or any other configuration. The restriction is that there is only one sub wall in the Runco WindowWall. The other displays are showing individual inputs. Cabling The cabling for this scenario is the same as for the Big Picture Scenario. The Quad Input Manager Modules must be looped together by use of the Dual Link In and Loop Out Connectors (see page 105 for an example). There is no restriction on which displays are connected to which Quad Input Manager Modules but you will want to cable them in an orderly fashion so it is easy for you to associate each input with a particular Quad Input Manager Module. Source Routing There are no quick configure settings for this scenario. You will need to set up the source routing and wall settings for each sub wall configuration and save those settings to a slot. To set up source routing, use the QUAD MODULE ROUTE menu for each Quad Input Manager Module. This menu has two parts, each of which gives a different view of the same settings. If you use one part of the menu, the other will automatically update. The following diagrams use only the lower part of the menu. For simplicity, the rest of the menu is not shown. In the following diagrams, the settings from the QUAD MODULE ROUTE menu are shown on the side of the diagram and these menus will appear on display A1. Wall Settings Once the source is routed, you still need to tell each processor which portion of the source to show. This is done in the BIG PICTURE SETUP menu on each processor. An LCD that is displaying an individual source should have WALL MODE turned off. An LCD that is part of a sub wall should have its height and width parameters set to the sub wall height and width, and its unit row and column parameters set to the row and column within that sub wall. 106 Runco WindowWall Installation Guide Configuration Scenarios In the diagrams that follow, a darkened bar over a settings means that setting is not necessary for this scenario and it doesn’t matter to what it is set. A2 A1 Quad Module Route A Wall Width A3 2 Wall Width 2 Wall Width 2 Switch 1 Loop Wall Height 2 Wall Height 2 Wall Height 2 Switch 2 Loop Unit Row 1 Unit Row 1 Unit Row 1 Unit Column 1 Unit Column 2 Unit Column 1 Switch 3 Switch 4 Digital 3 Loop Internal Loop Digital 1 X External Loop Digital 1 Use Loop X Wall Mode X Wall Mode O Wall Mode External B1 Quad Module Route B Switch 1 Wall Width B3 Wall Width 2 Wall Width 2 Wall Height 2 Wall Height 2 Wall Height 2 Unit Row 2 Unit Row 2 Unit Row 1 1 Unit Column 2 Unit Column 1 Switch 2 Loop Switch 3 Digital 3 Unit Column Switch 4 Digital 4 Internal Loop B2 2 Loop X Wall Mode X Wall Mode O Wall Mode Digital 1 X External Loop Dual Link In Use Loop External C1 Quad Module Route C C2 C3 Wall Width 2 Wall Width 2 Wall Width 2 2 Wall Height 2 Wall Height 2 Switch 1 Digital 1 Wall Height Switch 2 Digital 2 Unit Row 1 Unit Row 1 Unit Row 1 Switch 3 Digital 3 Unit Column 1 Unit Column 1 Unit Column 1 Switch 4 Digital 4 O Wall Mode Internal Loop O Wall Mode O Wall Mode Digital 1 X External Loop Dual Link In Use Loop External Digital 1 Digital 2 Source 1 Source 2 A Digital 3 Digital 4 Source 3 Digital 1 Digital 2 B Digital 3 Digital 4 Source 4 Source 5 Source 6 Digital 1 Source 7 C Digital 2 Digital 3 Digital 4 Source 8 Dual Link In Loop Out Dual Link In Loop Out Dual Link In Loop Out Source 9 Note: 3 x 3 Runco WindowWall with 2 x 2 sub wall, upper left displaying source A1. Runco WindowWall Installation Guide 107 Configuration Scenarios Switch 1 Digital 1 Wall Width 2 Switch 2 Digital 2 Wall Height Switch 3 Digital 3 Unit Row Switch 4 Loop Unit Column Internal Loop Digital 1 O Wall Mode X External Loop Use Loop A2 A1 Quad Module Route A Wall Width 2 2 Wall Height 2 1 Unit Row 1 1 Unit Column 1 A3 Wall Width 2 Wall Height 2 Unit Row 1 Unit Column 1 O Wall Mode O Wall Mode Dual Link In External B1 Quad Module Route B Switch 1 Digital 1 Switch 2 Digital 2 Switch 3 Loop Switch 4 Digital 4 Internal Loop Digital 1 X External Loop Digital 2 Use Loop Wall Width 2 Wall Height 2 Unit Row 1 Unit Column 1 B2 Wall Width 2 Wall Height 2 Unit Row 1 Unit Column 1 B3 Wall Width 2 Wall Height 2 Unit Row 1 Unit Column 2 X Wall Mode X Wall Mode O Wall Mode External C1 Quad Module Route C C2 C3 Switch 1 Digital 1 Wall Width 2 Wall Width 2 Wall Width 2 Switch 2 Loop Wall Height 2 Wall Height 2 Wall Height 2 Switch 3 Loop Unit Row 1 Unit Row 2 Unit Row 2 Switch 4 Digital 4 Unit Column 1 Unit Column 1 Unit Column 2 Digital 1 O Wall Mode Internal Loop X External Loop Dual Link In Use Loop External X Wall Mode A Digital 1 Source 1 Digital 2 Digital 3 Digital 4 Source 2 B Digital 2 Digital 3 Digital 4 Source 4 Source 5 Source 6 Source 7 Digital 2 C Digital 3 Digital 4 Source 8 Dual Link In Loop Out Source 3 Digital 1 Digital 1 X Wall Mode Dual Link In Loop Out Dual Link In Loop Out Source 9 Note: 3 x 3 Runco WindowWall with 2 x 2 sub wall, lower right displaying source B2. 108 Runco WindowWall Installation Guide Configuration Scenarios Quad Module Route A Switch 1 Digital 1 Switch 2 Switch 3 A2 A1 Wall Width 2 Wall Width 2 Digital 2 Wall Height 2 Wall Height 2 Digital 3 Unit Row 1 Unit Row 1 Switch 4 Loop Unit Column 1 Unit Column 1 Internal Loop Digital 1 X External Loop Use Loop O Wall Mode 2 Wall Height 2 Unit Row 1 Unit Column 1 O Wall Mode O Wall Mode Dual Link In External Quad Module Route B Switch 1 A3 Wall Width Loop B1 B2 B3 Wall Width 2 Wall Width 2 Wall Width 2 Switch 2 Loop Wall Height 2 Wall Height 2 Wall Height 2 Switch 3 Digital 3 Unit Row 1 Unit Row 1 Unit Row 1 Switch 4 Digital 4 Unit Column 1 Unit Column 2 Unit Column 1 Internal Loop Digital 1 X External Loop Digital 1 Use Loop X Wall Mode X Wall Mode External Quad Module Route C Switch 1 Loop Switch 2 Loop Switch 3 Digital 3 Switch 4 Digital 4 Internal Loop Digital 1 X External Loop Use Loop O Wall Mode C1 C2 C3 Wall Width 2 Wall Width 2 Wall Width 2 Wall Height 2 Wall Height 2 Wall Height 2 Unit Row 2 Unit Row 2 Unit Row 1 Unit Column 1 Unit Column 2 Unit Column 1 X Wall Mode X Wall Mode O Wall Mode Dual Link In External Dual Link In A Digital 1 Digital 2 Digital 3 Digital 4 Source 1 Source 2 Source 3 B Digital 1 Source 4 Digital 1 Source 7 Digital 2 Digital 3 Digital 4 Source 5 Digital 2 Loop Out Dual Link In Loop Out Source 6 C Digital 3 Digital 4 Source 8 Dual Link In Loop Out Source 9 Note: 3 x 3 Runco WindowWall with 2 x 2 sub wall, lower left displaying source B1. Runco WindowWall Installation Guide 109 Configuration Scenarios Standard Cabling With Restrictions on LCD Placement Scenarios 4, 5 & 6 require a little more planning than the previous scenarios. The LCDs are cabled to specific Quad Input Manager Modules depending on how they will be used in sub walls. A system cabled for one of these scenarios can also use scenarios 1, 2 or 3. Scenario 4: One Sub Wall Per Quad Input Manager Module This scenario uses an external video processor, but saves on the number of outputs required for that processor. Each output of the processor drives four LCDs. The processor outputs can be a higher resolution than the native 1366 x 768 resolution of the tile, thus allowing for better use of the available pixels. Note: 4 x 4 Runco WindowWall with one source per Quad Input Manager Module. 110 Runco WindowWall Installation Guide Configuration Scenarios Cabling Cable the LCDs so each Quad Input Manager Module controls a 2 x 2 square of LCDs. The order within the square does not matter because the position sensors will be used. Cable each output of the video processor to the same numbered input in each Quad Input Manager Module. This could be Digital 1, Digital 2, Digital 3 or Digital 4. It is not necessary to cable the Loop Out connector of the Quad Input Manager Module. Source Routing The QUICK CONFIGURE QUAD setting in the WALL CONFIGURATION menu is used to configure this scenario. If you have cabled the sources to Digital 1, use Quick Configure Quad 1, if you have cabled the sources to Digital 2, use Quick Configure Quad 2 etc. Wall Settings By choosing the Quick Configure, the system will configure each LCD automatically. Because the settings are different for each LCD, the system must send many commands to each LCD. Quick Configure Quad takes a bit longer to respond than other Quick Configure settings. Note that the LCDs connected to each Quad Input Manager Module must be in a rectangle. If they are not, the wall settings will not be set, although the Source Routing will still take place. The rectangle does not have to be 2 x 2. For example, a wall may not have even multiples of four LCDs. Quick Configure Quad will set the wall parameters to the number and size of LCDs on that Quad Input Manager Module, be it 2 x 1, 1 x 2, 1 x 3 etc. The external video processor outputs must be configured accordingly. Runco WindowWall Installation Guide 111 Configuration Scenarios Scenario 5: Two Sub Walls Per Quad Input Manager Module This scenario uses an external video processor, but saves on the number of outputs required for that processor. Each output of the processor drives two LCDs. The processor outputs can be a higher resolution than the native 1366 x 768 resolution of the tile, thus allowing for better use of the available pixels. Note: 4 x 4 Runco WindowWall with two high resolution sources per Quad Input Manager Module. Cabling Cable the LCDs so each pair of LCDs that you will use for a sub wall are adjacent to each other. These can be 1 x 2 or 2 x 1 rectangles; the position sensors will be used to determine how they are arranged. Cable the outputs of the video Digital 1 and Digital 3. The source on Digital 1 will be spread over LCD 1 and LCD 2. The source on Digital 3 will be spread over LCD 3 and LCD 4. It is not necessary to cable the Loop Out connector of the Quad Input Manager Module. 112 Runco WindowWall Installation Guide Configuration Scenarios Source Routing The QUICK CONFIGURE QUAD setting in the WALL CONFIGURATION menu is used to configure this scenario. Use Quick Configure Quad 1 & 3. Wall Settings By choosing the Quick Configure, the system will configure each LCD automatically. Because the settings are different for each display, the system must send many commands to each LCD. Quick Configure Quad takes a bit longer to respond than other Quick Configure settings. Scenario 6: Multiple Sub Walls It is possible to have more than one sub wall at one time on a Runco WindowWall if certain rules are followed: • One sub wall can be any size and use any input. This sub wall will use the External Loop. • All the other sub walls must fit within a single Quad Input Manager Module. This means they will be 2 x 2 or smaller. Quad Module Route A Switch 1 Digital 1 Switch 2 Loop A2 A1 Wall Width B1 B2 2 Wall Width 4 Wall Width 2 Wall Width 2 4 Wall Height 2 Switch 3 Loop Wall Height 2 Wall Height Wall Height 2 Switch 4 Loop Unit Row 1 Unit Row 1 Unit Row 1 Unit Row 1 Digital 1 Unit Column 1 Unit Column 2 Unit Column 2 Unit Column 2 Internal Loop X External Loop Use Loop Dual Link In X Wall Mode O Wall Mode X Wall Mode X Wall Mode External A3 Quad Module Route B Wall Width A4 B3 4 Wall Width 4 Wall Width 2 B3 Wall Width 2 Switch 1 Loop Wall Height 4 Wall Height 4 Wall Height 2 Wall Height 2 Switch 2 Loop Unit Row 2 Unit Row 2 Unit Row 1 Unit Row 2 Switch 3 Loop Unit Column Unit Column 2 Unit Column 2 Unit Column 2 Switch 4 Loop X Internal Loop 1 X Wall Mode X Wall Mode X Wall Mode X Wall Mode Digital 3 External Loop Dual Link In Use Loop Internal C1 Quad Module Route C Switch 1 Loop Switch 2 Loop C2 Wall Width 4 Wall Width 4 Wall Height 4 Wall Height 4 Unit Row 3 Unit Row 3 Unit Column 1 Unit Column 2 X Wall Mode X Wall Mode D1 D2 4 Wall Width 4 Wall Height 4 Wall Height 4 Unit Row 3 Unit Row 3 Unit Column 3 Unit Column 4 Wall Width X Wall Mode X Wall Mode Switch 3 Loop Switch 4 Digital 4 Internal Loop Digital 1 Wall Width 4 Wall Width 2 Wall Width 2 Wall Width 4 Dual Link In Wall Height 4 Wall Height 2 Wall Height 2 Wall Height 4 External Unit Row 4 Unit Row 1 Unit Row 1 Unit Row 4 Unit Column 1 Unit Column 1 Unit Column 1 Unit Column 4 X External Loop Use Loop C3 Quad Module Route D X Wall Mode Switch 1 Loop Switch 2 Loop Switch 3 Digital 3 Switch 4 Loop Internal Loop Digital 1 X External Loop Digital 1 Use Loop C4 External O Wall Mode A Digital 1 Digital 2 Source 1 Source 2 Digital 3 Digital 4 Source 3 Digital 2 Source 4 Source 5 Digital 1 Source 7 Digital 2 Source 8 Digital 3 Digital 4 Source 6 O Wall Mode D4 X Wall Mode Dual Link In Loop Out Source 4 B Digital 1 D3 Dual Link In Loop Out Source 6 Dual Link In C Digital 3 Digital 4 Source 9 Source 9 Loop Out D Digital 1 Digital 2 Digital 3 Digital 4 Source 7 Source 8 Source 8 Source 8 Loop Out Dual Link In Note: 4 x 4 Runco WindowWall with one large and one small sub wall. Runco WindowWall Installation Guide 113 Configuration Scenarios Cabling Cluster the displays into the groups where you want your small sub walls, and cable each sub wall to a single Quad Input Manager Module. Cable the Loop Out of each Quad Input Manager Module to the Dual Link In of the next module and loop the last loop out into the Dual Link In of the first module. Source Routing For the Quad Input Manager Modules that are displaying a small sub wall, set each switch to Loop, Use Internal Loop and set the Internal Loop to the display you want to view on that sub wall. For each display that is part of the large sub wall, set each switch to Loop, and Use External Loop. Set the External Loop of the Quad Input Manager Module that contains the source for the large sub wall to that source. Set the External Loop of all the other Quad Input Manager Modules to Dual Link In. Wall Settings Set the height and width for each display within a sub wall to the height and width of that sub wall and set the unit row and unit column as appropriate. 114 Runco WindowWall Installation Guide Configuration Scenarios Complex Configurations It is possible to design systems that don’t fall into any of the above scenarios, but not all combinations of inputs on sub walls are possible. A system cabled for such a complex configuration may or may not be able to also have some of the simpler configurations. Scenario 7: Multiple Large Sub Walls The previous scenario was restricted such that only one sub wall in a Runco WindowWall could be larger than a single Quad Input Manager Module. If you desire more than one sub wall that is larger than four displays, there are certain restrictions. You must cable the loop connections sequentially among the quad modules that make up each sub wall. Since a sub wall that spans more than one Quad Input Manager Module module uses the external loop, a sub wall is restricted to using inputs from only the first Quad Input Manager Module in the loop through chain. Quad Module Route A A2 A1 B1 B2 Switch 1 Loop Switch 2 Loop Wall Width 2 Wall Width 2 Wall Width 2 Wall Width 2 Switch 3 Loop Wall Height 4 Wall Height 4 Wall Height 4 Wall Height 4 Switch 4 Loop Unit Row 1 Unit Row 1 Unit Row 1 Unit Row 1 Internal Loop Digital 1 Unit Column 1 Unit Column 2 Unit Column 2 Unit Column 2 X External Loop Digital 2 Use Loop X Wall Mode X Wall Mode X Wall Mode X Wall Mode External A3 Quad Module Route B Wall Width A4 2 B3 B3 Wall Width 2 Wall Width 2 Wall Width 2 Switch 1 Loop Wall Height 4 Wall Height 4 Wall Height 4 Wall Height 4 Switch 2 Loop Unit Row 2 Unit Row 2 Unit Row 2 Unit Row 2 Switch 3 Loop Unit Column Unit Column 2 Unit Column 1 Unit Column 2 Switch 4 Loop Internal Loop Digital 3 External Loop Digital 3 Use Loop External X Wall Mode X Wall Mode C1 Quad Module Route C Switch 1 1 Loop X Wall Mode X Wall Mode C2 D1 D2 Wall Width 2 Wall Width 2 Wall Width 2 Wall Width 2 Wall Height 4 Wall Height 4 Wall Height 4 Wall Height 4 Unit Row 3 Unit Row 3 Unit Row 3 Unit Row 3 Unit Column 1 Unit Column 2 Unit Column 1 Unit Column 2 X Wall Mode X Wall Mode X Wall Mode X Wall Mode Switch 2 Loop Switch 3 Loop Switch 4 Loop Internal Loop Digital 1 Wall Width 2 Wall Width 2 Wall Width 2 Wall Width Dual Link In Wall Height 4 Wall Height 4 Wall Height 4 Wall Height 4 External Unit Row 4 Unit Row 4 Unit Row 4 Unit Row 4 Unit Column 1 Unit Column 2 Unit Column 1 Unit Column 2 X External Loop Use Loop C3 Quad Module Route D Switch 1 Loop Switch 2 Loop Switch 3 Loop Switch 4 Loop Internal Loop X External Loop Use Loop Digital 1 C4 X Wall Mode X Wall Mode A Digital 1 Digital 2 Source 1 Source 2 Digital 3 Digital 4 Source 3 Dual Link In External D3 X Wall Mode Dual Link In Loop Out Source 4 B Digital 1 Digital 2 Digital 3 Digital 4 Source 4 Source 5 Digital 1 Digital 2 C Digital 3 Digital 4 Source 7 Source 8 Source 9 Source 6 X Wall Mode D4 2 Dual Link In Loop Out Source 6 Note the cabling difference. A must loop out to C. B must loop out to D Any Source from A can be spread on the left half. Any source from B can be spread on the right half Dual Link In Loop Out Source 9 Digital 1 Digital 2 D Digital 3 Digital 4 Source 7 Source 8 Source 8 Dual Link In Loop Out Source 8 Note: 4 x 4 Runco WindowWall with two 4 x 2 sub walls. One Big Picture is also available, but each sub wall is limited to four sources. Runco WindowWall Installation Guide 115 Configuration Scenarios Quad Module Route A A2 A1 B1 B2 Switch 1 Loop Switch 2 Loop Wall Width 2 Wall Width 2 Wall Width 2 Wall Width 2 4 Switch 3 Loop Wall Height 4 Wall Height 4 Wall Height Wall Height 4 Switch 4 Loop Unit Row 1 Unit Row 1 Unit Row 1 Unit Row 1 Internal Loop Digital 1 Unit Column 1 Unit Column 2 Unit Column 2 Unit Column 2 X External Loop Use Loop Dual Link In X Wall Mode X Wall Mode X Wall Mode X Wall Mode External A3 Quad Module Route B Wall Width A4 2 B3 B3 Wall Width 2 Wall Width 2 Wall Width 2 Switch 1 Loop Wall Height 4 Wall Height 4 Wall Height 4 Wall Height 4 Switch 2 Loop Unit Row 2 Unit Row 2 Unit Row 2 Unit Row 2 Switch 3 Loop Unit Column Unit Column 2 Unit Column 1 Unit Column 2 Switch 4 Loop Internal Loop Digital 3 External Loop Digital 3 Use Loop External Loop Switch 2 Loop X Wall Mode X Wall Mode C1 Quad Module Route C Switch 1 1 X Wall Mode X Wall Mode C2 D1 D2 Wall Width 2 Wall Width 2 Wall Width 2 Wall Width 2 Wall Height 4 Wall Height 4 Wall Height 4 Wall Height 4 Unit Row 3 Unit Row 3 Unit Row 3 Unit Row 3 Unit Column 1 Unit Column 2 Unit Column 1 Unit Column 2 X Wall Mode X Wall Mode X Wall Mode X Wall Mode Switch 3 Loop Switch 4 Loop Internal Loop Digital 1 Wall Width 2 Wall Width 2 Wall Width 2 Wall Width Digital 3 Wall Height 4 Wall Height 4 Wall Height 4 Wall Height 4 External Unit Row 4 Unit Row 4 Unit Row 4 Unit Row 4 Unit Column 1 Unit Column 2 Unit Column 1 Unit Column 2 X External Loop Use Loop C3 Quad Module Route D Switch 1 Loop Switch 2 Loop Switch 3 Loop Switch 4 Loop Internal Loop Digital 1 X External Loop Digital 2 Use Loop External C4 X Wall Mode X Wall Mode A Digital 1 Digital 2 Source 1 Source 2 D3 Digital 3 Digital 4 Source 3 X Wall Mode D4 2 X Wall Mode Dual Link In Loop Out Source 4 Dual Link In B Digital 1 Digital 2 Digital 3 Digital 4 Source 4 Source 5 Digital 1 Digital 2 C Digital 3 Digital 4 Source 7 Source 8 Source 9 Source 6 Loop Out Source 6 Note the cabling difference. A must loop out to C and C back to A. B must loop out to D and D back to B Any Source from A or C can be spread on the left half. Any source from B or Dcan be spread on the right half This configuration cannot be used for one input on the whole wall Dual Link In Loop Out Source 9 Dual Link In Digital 1 Digital 2 D Digital 3 Digital 4 Source 7 Source 8 Source 8 Loop Out Source 8 Note: Runco WindowWall with two 4 x 2 sub walls. One Big Picture is not available, but each sub wall can have eight different sources. Cabling Cluster the displays into the groups where you want your sub walls, and cable each sub wall to Quad Input Manager Module that are sequentially looped together. If you want to be able to also spread an input across the whole wall (Scenario 2), you must complete a single loop. If you want to be able to spread more inputs across the sub wall than will fit on one Quad Input Manager Module, you can split the wall into separate loops. 116 Runco WindowWall Installation Guide Configuration Scenarios Source Routing For each display that is part of a large sub wall, set each switch to Loop, and Use External Loop. Set the External Loop of the Quad Input Manager Module that contains the source for a large sub wall to that source. Set the External Loop of all the other Quad Input Manager Modules to Dual Link In. Note that the source for the sub wall must be in the first Quad Input Manager Module unless you have looped the sub wall back on itself. Wall Settings Set the height and width for each display within a sub wall to the height and width of that sub wall and set the unit row and unit column as appropriate. Understanding the Quad Module Route Menu Each Quad Input Manager Module has five digital video inputs: inputs 1-4 and a Dual Link loop input. Each module has four LCD connections and a Digital Loop out DVI connector. Within each Quad Input Manager Module is a set of electronic switches that allow video to flow from one of the inputs to one of the LCDs and to the Digital Loop Out connector. The example below shows a pictorial representation of these switches. Each circle in the drawing represents one switch. For each switch, you can choose one of the input arrows to flow to the output of that switch which in turn may flow to another switch or to one of the Quad Input Manager Module outputs. Dual Link In External Loop Loop Out Use Loop Internal Loop Switch 1 LCD 1 Digital 1 Switch 2 LCD 2 Digital 2 Switch 3 LCD 3 Digital 3 Switch 4 LCD 4 Digital 4 Note: Representation of the Quad Input Manager Module video switches. Runco WindowWall Installation Guide 117 Configuration Scenarios • An LCD can display its own digital input, its immediate neighbor or the “loop”. • The loop out connector can display any of the five inputs. • The “loop” can be any of the four inputs. It can also be the Dual Link in connector but in that case, the Loop Out connector must also be displaying the Dual Link In input. The QUAD MODULE ROUTE menu allows you to set these switches. There is one QUAD MODULE ROUTE menu for each Quad Input Manager Module in your system. There are two parts to the menu. Each part gives the same information in a different way. The top part of the menu shows you what input (1,2,3,4 or Link In) will be shown on each output (LCD 1, LCD 2, LCD 3, LCD 4 and Loop Out). The bottom part of the menu shows you how each of the seven switches are set. You can change the switches using either part of the menu. The other part will automatically update. It may be frustrating to try to make changes in the switches using the top part of the menu, because not every combination of input to output is allowed. Changing one line on the top may cause changes in other lines. On the other hand, using the bottom part of the menu sets the switches directly so there are no disallowed states. As you set the switches on the bottom part of the menu, the top part of the menu will change to show the effect of your changes. All of the scenarios in this document use only the bottom part of the menu to set up source routing. Q u ad M od u le R ou t e A 1 2 3 4 L in k In L CD 1 L CD 2 L CD 3 L CD 4 L o op O u t Sw i tc h 1 L o op Sw i tc h 2 L o op Sw i tc h 3 L o op Sw i tc h 4 L o op In t er n a l L o o p D ig ita l 3 E x te r n al L oo p D ig ita l 4 U se L oo p In tern a l Note: Quad Module Route A menu. 118 Runco WindowWall Installation Guide On-Screen Menus Main Menu and Submenus Ma in M en u Wal l C o nf i gu ra ti o n Wall C on f ig u r at i on Q ui ck Co n f ig u r e Bi g P ic tu r e P ict u re Big P ic tu r e S e tu p M em o ry M at r i x L a yo u t D ia gn o st i cs Q ua d M o d ul e A Ro u te A d va nc ed Op t io n s > P ro g r a m I n f o r m a t i o n P ic tu re St re tc h /sh ri n k t h e im ag e B ig P ic tu r e A 3 E n ab le Hi g h Re so lu t io n an d D u al L in k In pu ts S yn ch r o n iz e H ig h Re so lu t io n s M em o ry Pi ct u re In fo rm a ti on > R ec al l Pi ct u re Set u p S ave A sp ec t Ra ti o D el et e A d van c ed O p t io n s D iag n o st ic s S er i a l P o r t Sta t u s > > Te st P a tt e rn s S et up Su mm a ry > > U n i t Sta t u s H o ur s C o lo r B al an ce S ize an d Po si t io n M is cel la ne ou s O p t io ns B ac kl i g ht S et t i n g s S er i a l P o r t S e t t i n g s S et C lo ck / Sch e du l e E ven ts P r o g r am I n fo r m at i on Runco International 1195 N W C o mp t o n Dr ive Be ave rt o n, OR 97 00 6- 19 92 , U SA +1. 800 .2 37 .86 26 w w w.ru n co . co m MX4 6 1 366 x 76 8 01 0- 116 8 R ev 02 Co d e G en er at ed D at e: F eb 8 2 01 0 a t 16 :0 9: 07 LC D In t erf a ce: 0 1: Ja n 07 20 10 14 : 17: 3 6 FP G A Ve rsi o n: 11 Runco WindowWall Installation Guide 119 Main Menu and Submenus Wall Configuration and Submenus Wal l C o nf i gu r a ti on Qu ic k Co n fi g ur e B ig P ict u re < s ele ct > B ig P ict u r e S et u p M at r ix L ay ou t Q u ad Mo du l e A R o ut e En a bl e Hi gh R es o lu ti o n an d D ua l Li nk I np u ts S y n ch r o n iz e Hi gh Re so lu t io ns Q ui ck Co n f ig u r e Sp re ad i np ut o ve r en ti r e wa l l A1 A2 A3 A4 C1 C2 C3 C4 Quad 2 Qu ad 3 Quad 4 B1 B2 1 & 3 D Li nk B3 B4 D Li nk Qu ad 1 No BP B ig P i ct u r e S et u p M at r i x P o s i t i o n 3 x3 1: 1 Wall Widt h 3 Wall H ei gh t 3 U n it C ol u mn 1 U n it R ow 1 Wall Mo d e F ra m e C o mp e ns at io n * *** 120 F r a m e H ei gh t 1 0 pi xe ls F r a m e Wi dth 1 0 pi xe ls C o py Se tti ng s to Al l Dis p lay s Runco WindowWall Installation Guide Main Menu and Submenus Wall Configuration and Submenus Continued Wal l C o nf i gu r a ti on Q u i ck Co n f ig u r e Big P ic tu r e < s el ect > B ig P ic tu r e S e tu p M at ri x L ay o ut Q u a d M o d ul e A Ro u te E na b le Hi g h Re so lu t io n an d D u al L in k I n pu ts S yn ch r o n iz e Hi g h Re so lu t io n s Depending on how many Quad Input Manager Modules you have, the number of Quad Module “N” Route lines will be reflected on this menu. For this example, there are three Quad Input Manager Modules. This menu could show all the way from Quad Module A Route through Quad Module P Route. M a t r ix L ayo u t Au t o Q ui c k A1 A2 A3 B1 B2 B3 C1 C2 C3 ** R es et Q u a d M o d ul e R o u te A 1 2 3 4 Li n k I n LC D 1 LC D 2 LC D 3 LC D 4 Lo o p O u t Switch 1 Loop Switch 2 Loop Switch 3 Loop Switch 4 Loop In te r n al L oo p Di g ital 3 E xt er n a l L o o p Di g ital 4 Use L o o p Runco WindowWall Installation Guide I n te rn al 121 Main Menu and Submenus Picture Menu and Submenus Pic tu re In f o rm at io n P ic tu re St re tc h /sh ri n k t h e im ag e Pi ct u re In fo rm a ti on Pi ct u re Set u p A sp ec t Ra ti o > Sy nc Ver t ic al F r eq u en c y (f ra m e l oc ke d) Pro gr es siv e 60 Hz Ho r i z on ta l F r e q ue nc y 50 .0 0k Hz P ix el F r eq u en c y 8 0.1 0M Hz Ho ri z on ta l R es o lu ti o n Vert ic al R eso l ut io n 1 36 6 76 8 In p ut Le ve ls Co lo rs pac e Ce nte r Po in t RGB 255 255 2 55 Bl ack L ev el ( o ff se t ) - Al l Re d 1 28 Green 1 28 Bl ue 1 28 Wh ite L e ve l (g ai n) -A ll 1 32 Re d 1 20 Green 1 54 Bl ue 1 22 S et t o N o mi n al fo r RG B L ev el s ( 0 -2 55 ) Note: If the COLORSPACE is YCbCr, this menu shows BRIGHTNESS, CONTRAST, SATURATION and HUE instead of BLACK LEVEL and WHITE LEVEL and of the their related settings. S et t o N o mi n al fo r Vid eo L ev el s ( 1 6- 23 5) * *** Note: The COPY SETTINGS TO ALL DISPLAYS line will only appear if this menu is on the master display (A1). Co p y Settin g s to A ll Di sp la ys As p ec t Ra ti o S cal e Mo de J u st if y O v ers ca n S ha rp ne ss 122 16 x 9 Ce n te r 0% 4 Runco WindowWall Installation Guide Main Menu and Submenus Memory Menu and Submenus M em o ry R ec al l S ave D el et e R ec al l 1 9 17 25 33 2 10 18 26 34 3 11 19 27 35 4 12 20 28 36 5 13 21 29 37 6 14 22 30 38 7 15 23 31 39 8 16 24 32 40 Sav e D el et e 1 9 17 25 33 1 9 17 25 33 2 10 18 26 34 2 10 18 26 34 3 11 19 27 35 3 11 19 27 35 4 12 20 28 36 4 12 20 28 36 5 13 21 29 37 5 13 21 29 37 6 14 22 30 38 6 14 22 30 38 7 15 23 31 39 7 15 23 31 39 8 16 24 32 40 8 16 24 32 40 Runco WindowWall Installation Guide 123 Main Menu and Submenus Diagnostics Menu and Submenus D ia g no s ti cs U n it Statu s A1 S e r ia l P o r t Sta tu s > > Test Pat t ern s Setup Summary > > Un it Sta t us Ho u r s M X 46 L 0 10 -11 68 L CD Qu ad Mo du le Se rial Port Sta t us R S 48 5 P owe r S u pp ly <EN TE R> to clea r; +/ - to sele ct d i ffer e nt ser i al por t Co m m an ds R ec eiv ed 34 Re pl ie s S en t 34 La st P ack et Ty pe Operation La st P ack et A d dr ess No t A dd re ss ed By te s Re cei ve d 9 21 By te s Sen t 7 73 UA RT Fra m ing Errors A Un it : 1 Te m pe rat u re Ba ckl ig h t Vo ltag e 25 °C OK 24 Te m pe r at u r e Fa n F ail ed PS1 PS2 PS3 PS4 Re du n d an t 31 ° C OK OK OK OK OK 0 19 200 Ba ud Mo st Re ce nt .. .115, 111 , 1 08 , 117 , 10 5, 111, 110, 6 3, 13 . s t- - 1?. st- - 2?. st- - 3?. lcd.ve r tical- r esolu tion ?. Te st P a t te rn s < E NT E R > t o s ele ct , No n e to s h ow p ict u r e 124 Fan On Note: The QUAD MODULE and POWER SUPPLY lines only appear on processor number 1 of each Quad Input Manager Module. 4 UA R T O v e r f l ow Er r o r s Gro up 13 66 x 76 8 R ev 0 2 N o ne Re d R ed S ca le L o go W h i te Green Gr een Sca le Grid B la ck Bl ue B lu e S c ale 4x 4 Co n tr as t Gray Cy an Gr ay Sca le U ni fo rm i ty C u st o m Co lo r Yell ow C o lo rs F o cu s Mage nta C o lo r B ar s Runco WindowWall Installation Guide Main Menu and Submenus Diagnostics Menu and Sub Menus (Continued) D ia g no s ti cs Un it Sta t us > > S e r ia l P o r t Sta tu s Test Pat t ern s Setup Summary > Ho u r s > Setup Summary Cu r r e n t S et u p I n f or ma t i o n Co lo rs pac e RGB Q ua d M o d u le Ro u t e C o de 68 2 Wal l 1:1 3 x 3 Sca le /Ju s ti fy 2 04 8 F il l Scre en /C en t er Po st io n /Ov ers can 10 0,1 00 Zo o m U L/ L R +0, + 0 Vi ew p o r t U L/ L R + 0, + 0 S h arp n es s / 0% / + 0, + 0 / + 0, + 0 4 Bl ack L ev el 10 9 10 9 10 9 Wh it e L e ve l 14 9 14 9 14 9 Ba ck lig h t In t en si ty White Balance Note: The WALL line will only appear on this menu if WALL MODE is checked in the BIG PICTURE SETUP menu. 8 10 0 10 0 10 0 7 7 7 Gray B ala n ce Ba ck lig h t Ad j us tm e nt +0 Ho u r s Sys te m Ti m e 0 06 36 :4 5 Ba ck lig h t Ti me 0 05 32 :0 0 Av era g e H o ur s P er Da y 0 Nu m b er o f D ay s > 2 0 H ou rs 0 Note: The last two lines will only appear on the master (A1) display. Runco WindowWall Installation Guide 125 Main Menu and Submenus Advanced Options and Submenus A d va nc ed Op t io n s Co lo r Ba lan c e Co lo r Ba lan c e C o lo r Te mp e rat u re S iz e an d P o s it io n Na t ive W hi te Te st Pa tt e rn M is ce lla n eo us O p t io n s Wh i te B ala n ce - Al l Ba ckl ig h t S et t in g s S e r i a l P or t S e t t i ng s ( C lip b o ard ) R ed 10 0 ( 10 0) Green 10 0 ( 10 0) B lu e 10 0 ( 10 0) R ed 7 ( 7) Green 7 ( 7) B lu e 7 ( 7) Set Clock / Sc he dul e Eve nts Gr ay Tes t Pat t ern Gra y Ba lan c e - All B ac kli g ht A d ju st m en t +0 C o py t o C lip b o ar d R ec all F r o m C lip b o ar d R es et t o D ef au l ts R em o ve Te st Pa tt e rn Note: See page 128 for all of the submenus. Size & Position P ict u re Po si ti o n Z o o m Win d o w To p & Le ft Z o o m Win d o w Bo t t om & Rig h t Vi ew p o r t Win d ow To p & Le ft Vi ew p o r t Win d ow Bo t t om & R ig h t R es et A ll Win d o w s t o D ef au l t * ** * C o p y S etti n gs to A ll Di sp la ys Note: The COPY SETTINGS TO ALL DISPLAYS line will only appear if this menu is on the master display (A1). 126 Runco WindowWall Installation Guide Main Menu and Submenus Advanced Options and Submenus (Continued) M isc el lan e ou s Serial Port Settings Ca bl e Eq ua li za t io n M en u Tim eo u t AS CII R es po n se Typ e AS CII R es po n se Ter mi n at or Ne ve r Tim e Out Ba ud Ra te Ro tat e Me nu Symbolic CR 1 920 0 No n e (E DI D) P l u g an d P l ay Ba ck lig h t C on t r o l Al lo w F r a me L o ck Note: See page 129 for all of the submenus. A ut o B ac kl ig ht on Tu r n B ac kl i g ht O f f W h en No S ou r c e ( D P M S ) D P MS De la y B ac kli g ht I n te ns ity 1 hr 10 Note: See page 130 for all of the submenus. S e t Cl o ck / S ch ed u le E v en ts Pr ess <EN TER > t o se t c lock an d sc hed ule eve nts Cur ren t Dat e/Ti me: Tue Feb 28 2 007 01 07: 30 Da ily T urn On 02 21: 30 Da ily T urn Of f 03 12: 30 Mo nda ys R eca ll # 04 04 16: 00 Wednesdays R eca ll # 23 05 02: 00 Ap r 1 200 7 C lk +1 Hr 06 02: 00 Oc t 2 8 200 7 C lk -1 Hr 10: 40 07 08 09 10 11 12 13 14 15 16 17 18 19 20 Runco WindowWall Installation Guide 127 Main Menu and Submenus Size & Position Submenus S iz e & Po si ti on Pi ct u re Po sit io n Pic tu re Po s it io n Zo o m Win d o w To p & L eft Zo o m Win d o w B ot t o m & Ri gh t View p o r t Win d o w To p & L eft View p o r t Win d o w B ot t o m & Ri gh t U s e a r ro w k e y s t o m o v e i m a g e H or izo n tal Po sit i on Ve rti ca l P os it io n 168 19 Re se t Al l Wi nd o w s to De fa ul t * * ** Co p y S et t in g s t o A ll Di sp la ys Z o om Top & L e ft Z o om B o t to m & R ig h t Ar r ow s m ov e to p a nd l eft Ar r ow s mo ve bot to m a nd r i ght 0 0 0 0 0 0 0 Im a ge R es ol u ti on 13 66 x 76 8 T h is Un it 6 81 x 38 4 Vie w p or t Top & L e ft Im a ge R es ol ut io n 1 366 x 76 8 T hi s Un it 681 x 38 4 Vie w po rt B o tt o m & R ig ht Ar r ow s m ov e to p a nd l eft Ar r ow s mo ve bot to m a nd r i ght 0 0 0 0 0 0 128 0 0 0 Di sp la y R es o lu ti o n 1 366 x 76 8 D is p lay R es ol ut i on 13 66 x 76 8 View p o r t 1 366 x 76 8 Vi ew p o r t 13 66 x 76 8 Runco WindowWall Installation Guide Main Menu and Submenus Miscellaneous Submenu M isc el lan e ou s Ca bl e Eq ua li za t io n M en u Tim eo u t Ro tat e Me nu (E DI D) P l u g an d P l ay Mi sc el lan e ou s Ne ve r Tim e Out Ca bl e Eq ua li za t io n * *** 1 Co p y Settin g s to A ll Di sp la ys No n e Note: The last line will only appear on the master (A1) display. Al lo w F r a me L o ck Runco WindowWall Installation Guide 129 Main Menu and Submenus Set Clock/Schedule Events Submenu S e t Cl oc k / S ch ed u le E v en ts Pre ss <EN TER> to set cl ock and sc hedu le even ts Curr ent D ate /Ti me: T ue F eb 28 20 07 1 0:4 0 01 0 7:3 0 Dai ly T urn On 02 2 1:3 0 Dai ly T urn Off 03 1 2:3 0 Mon day s R ecal l # 04 04 1 6:0 0 Wednesdays R ecal l # 23 05 0 2:0 0 Apr 1 2 007 C lk + 1 H r 06 0 2:0 0 Oct 28 2 007 C lk - 1 H r 07 08 09 10 11 12 13 14 15 16 17 18 19 20 Ev en t # (0 = s et c lo ck ) F r e qu en c y A ct io n Sl o t to R ec al l D ay o f Week Yea r 130 0 N eve r No A ct io n 1 Tu esd a y 2 00 7 Month 03 D ate in M on t h 05 H ou r 21 Minute 30 Runco WindowWall Installation Guide Main Menu and Submenus Program Information Menu P r o g r am In fo r m a ti on Runco International 119 5 N W C o m pt o n Dr ive Be av ert o n, OR 9 700 6- 19 92 , U S A +1. 80 0.2 37 .86 26 w w w. r un c o . c o m MX4 6 1 366 x 7 68 01 0- 116 8 R ev 02 C od e G en er at ed D at e: F eb 8 2 01 0 a t 16 :0 9: 07 L CD In t erf a ce: 0 1: Ja n 07 20 10 14 : 17: 3 6 FP G A Vers io n: 11 Note: The last line will only appear on processor number 1 of each Quad Input Manager Module. Runco WindowWall Installation Guide 131 Main Menu and Submenus 132 Runco WindowWall Installation Guide Troubleshooting Below is a troubleshooting table of some common issues you might encounter when installing or running your Runco WindowWall display wall. What to look for What you know if you see it What to look for if you don’t see it Solid Green LED next to Video connection on LCD interface board (on the back of the display tile) Video connection is good. Check power connections to display tile and Quad Input Manager Module. Make sure Video and Comm connections are not swapped. Blinking Green LED next to Comm connection on LCD interface board (on the back of the display tile). Comm connection is good. Check power connections to display tile and Quad Input Manager Module. Make sure Video and Comm connections are not swapped. Power LED on front panel of the Quad Module is green. One address LED is lit. Front panel is connected and working properly. Power is good to the Quad Input Manager Module. Check power to Quad Input Manager Module. If you see more than one address LED lit (the ones on the circle) the system is doing an automatic update. Wait up to 20 minutes for it to complete. Do not turn off power during this time. Blinking RS-485 light on all Quad Input Manager Modules except A. RS-485 connections are good. You must have one and only one ‘A’ Quad Module. Green LED in Out Column for the display tile (LCD). Video connection to display tile is good Comm connection to display tile is good ‘A’ Quad Module is powered on and cabled to this one via RS-485 All Quad Input Manager Modules have unique addresses. If the LED is red, there is Comm connection but not video connection. It can take up to a minute for this LED to reflect the state of the system—you may need to wait if you have just turned on or changed connections. Runco WindowWall Installation Guide 133 All LCD backlights turn on with IR remote. IR sensor is connected Quad Input Manager Module A is configured and cabled to the other Quad Input Manager Module (per your configuration). Comm connection to display tiles is good. IR sensor must be plugged in to ‘A’ Quad Input Manager Module. Quad Modules must be cabled together via RS-485 There must be one and only one Quad Input Manager Module ‘A’ If a Quad Input Manager Module has been newly connected, you may have to turn off and then back on to synchronize those displays. If in doubt, A/C power cycle the system after all connections have been made. “Info Pane” appears on all displays when menus are on. (The “info pane” is the gray square which shows the display address, position sensor information and information about the target menu). Video connection is good. Equalization is set within reason. If you see no video it all, the equalization could be bad If some displays do not respond, you may have out of date firmware. All Quad Input Manager Modules must have the same rev level of firmware. UNIT STATUS menu appears on all displays when the MONITOR button is pressed. Properly functioning display wall. If a different menu appears on some displays, you may have mismatched firmware. All Quad Input Manager Modules must have the same rev level of firmware, and that firmware must be “cloned” to all 4 of the processors. UNIT STATUS menu: The display tile (LCD) and its interface board are functioning properly. These three items are reported to the Quad Input Manager Module by the LCD interface board (on the display tile) over the Comm connection. If the voltage is 0 the voltage meter is not functioning on the LCD interface board (some early prototype systems did not have this meter). If the voltage is low, there may be too much drop in your power cables. The Quad Input Manager Module cooling system is operating normally. This portion of the menu only shows up on processor 1 of a Quad Input Manager Module. Check for proper fan function and proper cooling of the rack. Temperature is within reason. Backlight shows OK Voltage is >22 v UNIT STATUS menu: Quad Module Temperature is within reason and Fan is OK. 134 Runco WindowWall Installation Guide UNIT STATUS menu: Power Supplies show OK and power supply fan is OK. The power supply that is being monitored by this Quad Input Manager Module is operating normally. This portion of the menu only shows up on processor 1 of a Quad Input Manager Module. If the message “PS Mon cable is not connected” shows in this menu, there is no power supply monitor cable connected. Connect the RJ45 on the back of the Quad Input Manager Module to that on the power supply module. The Quad Input Manager Module knows which power supply type it has by internal configuration jumpers. If it is reporting failures for supplies that aren’t there, these internal jumpers could be configured wrong. WindowWall Layout | Auto completes correctly. Position Sensors are aligned and working correctly. Look at the Info Pane of each display. It shows you its position as reported by the LCD interface board (on the back of the display tiles). These numbers update about once a second. A display tile (LCD) in service mode will not report the correct position. If a display on the top row shows a row other than 1 or a display on the left side shows a column other than 1, then light energy is causing a false reading. This can happen with some fluorescent lights. Cover the position sensor hole from receiving light Each row should show columns in order from left to right. If the column number starts again at 1, there is a problem either with the receiver of that display or the transmitter of the display next to it. Check for proper alignment of the displays. Similarly each column should show row numbers in order from top to bottom. WindowWall layout shown in menu matches the true physical layout. Comm and Video connections are paired correctly. If the layout shown in the menu looks correct, but the rows or columns are out of order when looking at the position sensor information in the info pane, then the COMM connections to one or more pairs of displays have been crossed. If the layout shown in the menu is different than that shown by looking at the addresses on the info panes, then the VIDEO connections to one or more pairs have been crossed. Runco WindowWall Installation Guide 135 < > buttons on the IR remote move a slave menu sequentially to each display in the display wall. 136 Auto Layout has been performed. If Auto Layout has not been completed or had errors, the menu will appear on each display in address order (A1, A2,A3). If no display is connected for a particular address, the menu will “disappear”. Press the arrow key again to move it to the next one until it comes back. You can see which display is being addressed by watching the info pane on any display. Once auto layout has been done, Quad Modules that are not connected will be ignored, so it will be helpful to attempt auto layout even if the position sensors are not working. Runco WindowWall Installation Guide Servicing When LCD tiles need to be accessed or removed, this can be accomplished without removing other LCDs in the wall. Starting at the top of the wall, LCDs can be pulled up and out to place them in service mode, allowing the LCDs below to be accessed. Within each LCD tile, the simple interface board can be disconnected and replaced using thumbscrews with access from either the front or the back of the wall. LCDs can also be completely removed and replaced very quickly. Because of their streamlined design, they weigh less than typical LCD displays and are more easily handled. Caution: When is service mode, do not unplug the power cable while the LCD is still on. Use the remote control to turn off the LCD and then unplug the power cable. If you unplug the power cable when the LCD is still on, it could damage the LCD. Runco WindowWall Installation Guide 137 LCD tile installed 138 LCD tile between installed and service mode Runco WindowWall Installation Guide LCD tile in service mode Specifications LCD Tile Specifications Specification Dimensions LCD Tile in/lbs mm/kg Width 40.4” 1026mm Height 22.8” 579mm Diagonal overall 46.3” 1176mm Depth 4.14” 105mm Weight 48lbs 22kg Width - Landscape 30.9” 785mm Height - Landscape 20” 508mm Width - Portrait 21.9” 556mm Height - Portrait 20” 508mm Weight 13lbs 6kg Shipping Weight Shipping Dimensions Notes 2 LCDs per box: 142 lbs (64kg) 47” x 18” x 32.5” (1194mm x 457mm x 826mm) LCD Mount Orientation Landscape or portrait Maximum stack height landscape portrait unlimited Rear clearance required none Aspect ratio 16:9 (landscape) 9:16 (portrait) Backlight life 50,000 (half brightness) Runco WindowWall Installation Guide 139 Quad Input Manager Module Specifications Quad Input Manager Module Specification Dimensions in/lbs mm/kg Width 19” 483mm Height 1.7” 43.2mm Depth 18.2” 462mm Weight 12lbs 5.4kg Connector Power In MiniFit RS232 In/Out RJ45 RS485 In/Out RJ45 Video Input DVI-D Dual Link In DVI-D Video Loop Out DVI-D IR 3.5mm PS Mon RJ45 Video Out RJ45 Communication Out RJ45 Notes 24V, 5A Power Supply Module Specifications Specification Dimensions 140 Power Supply Module in/lbs mm/kg Width 19” 483mm Height 3.5” 89mm Depth 18.6 472mm Weight 2 modules 3 modules 4 modules 5 modules 18lbs 21lbs 24lbs 27lbs 8.2kg 9.5kg 11kg 12.2kg Connector Power In C20 AC Inlet Output to Quad Input Manager Module MiniFit Output to LCD tile MiniFit (Qty = 4) Runco WindowWall Installation Guide Notes Power Supply Module Specifications (Continued) Power Supply Module Specification PS Monitor Output Connector Notes RJ45 Input Ratings Input voltage 100-264 VAC Input frequency 47-63 Hz Input current 115 VAC 230 VAC 20A 5A Inrush current 115 VAC 230 VAC 30A 60A Output Ratings Output voltage 24 VDC Output current 13A per LCD tile 5A per Quad Input Manager Module Maximum LCD Optical Specifications Specification Maximum Minimum Screen brightness Typical 500 cd/m Contrast ratio 2500:1 Uniformity 75% 3000:1 Viewing Angle, horizontal & vertical ±178° Color gamut 72% NTSC 100% EBU Color CIE - Native Red (x,y) Green (x,y) Blue (x,y) White (x, y) Color Temperature Presets Native color temperature 0.648, 0.328 0.271, 0.599 0.143, 0.060 0.280, 0.290 3200K, 5500K, 6500K, 8500K 10,000K Number of colors 16.7M Native resolution 1366 x 768 pixels Runco WindowWall Installation Guide 141 Environmental Specifications Specification Maximum Temperature operating, LCD tile Minimum 35° C 95° F 0° C 32° F 20° C +/- 3° C operating, Quad Input Manager Module 45° C 113° F 10° C 50° F 20° C 68° F operating, Power supply module 45° C 113° F 10° C 50° F 20° C 68° F non-operating, LCD tile 50° C 122° F –20° C –4° F 20° C +/- 10° C non-operating, Quad Input Manager Module 85° C 122° F –20° C –4° F non-operating, Power supply module 85° C 122° F –20° C –4° F Altitude (barometric pressure) 2000m Humidity operating, LCD tile 80% R.H. 20% R.H. operating, Quad Input Manager Module 80% R.H. 20% R.H. operating, Power supply module 80% R.H. 20% R.H. 142 Optimal Notes All performance specifications are maintained within this temperature range. Above sea level, or equivalent barometric pressure. De-rate temperature 10° for every 1km above 1000m. Runco WindowWall Installation Guide non-condensing Signal Compatibility Vert. Rate (Hz) Hor. Rate (KHz) Pixel Freq. (MHz) Pixels Scan Type Per Line Digital Frame Lock Input Connector 60 72 VGA 640 x 480 75 85 56 60 SVGA 800 x 72 600 75 85 50 60 60 XGA 1024 x 70 768 75 85 31.469 37.861 37.500 43.269 35.156 37.879 48.077 46.875 53.674 40.600 48.363 47.816 56.476 60.023 68.677 25.175 31.500 31.500 36.000 36.000 40.000 50.000 49.500 56.250 54.570 65.000 63.500 75.000 78.750 94.500 800 830 840 832 1024 1056 1040 1056 1048 1344 1344 1328 1328 1312 1376 Yes No No No No Yes No No No Yes Yes Yes No No No ✓ 848 x 480 852 x 480 1024 x 1024 60 60 60 31.017 33.684 1086 31.726 34.010 1072 32.331 42.677 1320 Progressive Yes Progressive Yes Interlaced Yes ✓ 1152 x 864 75 Progressive No ✓ 1280 x 720 50 60 67.500 0 37.490 44.960 Progressive Yes Progressive Yes ✓ Video Mode VESA VESA 108.00 1600 0 74.250 1650 74.250 1650 Runco WindowWall Installation Guide Progressive Progressive Progressive Progressive Progressive Progressive Progressive Progressive Progressive Progressive Progressive Progressive Progressive Progressive Progressive ✓ ✓ ✓ ✓ ✓ ✓ ✓ ✓ ✓ ✓ ✓ ✓ ✓ ✓ ✓ ✓ ✓ 143 Signal Compatibility Video Mode Vert. Rate (Hz) Hor. Rate (KHz) 60 75 Progressive Yes Progressive No ✓ Progressive No ✓ Progressive Yes ✓ Progressive No ✓ Progressive Yes ✓ Progressive No ✓ Progressive No ✓ Progressive Yes Progressive Yes ✓ 60 60 1400 x 1050 60 1864 Progressive Yes ✓ 1800 Progressive Yes ✓ 1560 Progressive Yes ✓ 2160 Progressive Yes ✓ 2160 Progressive Yes ✓ 2240 Progressive Yes ✓ 1840 Progressive Yes ✓ 66.587 138.50 2080 0 67.521 148.55 2640 0 67.470 148.55 2200 0 Progressive Yes ✓ Progressive Yes ✓ Progressive Yes ✓ 1280 x 960 60 85 60 SXGA 1280 x 1024 75 85 144 Digital Frame Lock Input Connector 1360 x 768 1360 x 768 85 VESA Pixels Scan Type Per Line 47.776 79.500 1664 60.289 102.25 1696 0 68.633 117.50 1712 0 60.000 108.00 1800 0 85.938 148.50 1728 0 63.981 108.00 1688 0 79.976 135.00 1688 0 91.146 157.50 1728 0 47.720 84.750 1776 50.000 80.000 1600 1280 x 768 VESA Pixel Freq. (MHz) 65.317 121.75 0 1400 x 1050 59.94 65.200 122.48 0 1400 x 1050 59.94 64.720 100.97 0 UXGA 1600 x 60 75.000 162.00 1200 0 60 74.537 161.20 0 1680 x 1050 60 65.320 146.31 0 1680 x 1050 60 64.720 119.09 0 1920 x 1080 60 1920 x 1080 50 1920 x 1080 60 Runco WindowWall Installation Guide ✓ ✓ Signal Compatibility Vert. Rate (Hz) Hor. Rate (KHz) 1920 x 1200 50 1920 x 1200 55 1920 x 1200 RB* 60 61.800 158.22 2560 0 66.230 139.87 2112 0 74.020 148.04 2000 0 NTSC (720 x 480) PAL (720 x 576) 480i (720 x 480) 576i (720 x 576) 59.94 15.734 13.500 858 Interlaced Yes 50 15.625 13.500 864 Interlaced Yes 59.94 15.730 13.500 858 Interlaced Yes ✓ 50 Interlaced Yes ✓ 59.94 31.466 27.000 858 Progressive Yes ✓ 50 31.250 27.000 864 Progressive Yes ✓ 50 59.94 24 25 30 24 25 30 37.500 44.964 26.997 28.121 33.749 26.990 28.200 33.750 Progressive Progressive Interlaced Interlaced Interlaced Progressive Progressive Progressive ✓ Video Mode SDTV HDTV 480p (720 x 480) 576p (720 x 576) 720p 1080i 1920 x 1080 Pixel Freq. (MHz) Pixels Scan Type Per Line 15.625 13.500 864 74.250 74.250 74.250 74.250 74.250 74.250 74.250 74.250 1980 1650 2750 2640 2200 2500 2750 2750 Digital Frame Lock Input Connector Progressive Yes ✓ Progressive Yes ✓ Progressive Yes ✓ Yes Yes No Yes Yes No No No ✓ ✓ ✓ ✓ ✓ ✓ ✓ Note: This is the minimum supported signal mode table. Signal timings and formats other than those listed above may also be supported. * RB = Reduced Blanking Note: See the Runco DHD3 manual for additional video modes. Runco WindowWall Installation Guide 145 Input Minimum Sync and Blanking Specifications Parameter Symbol Minimum Horizontal Setting Minimum Vertical Setting Sync pulse width Tsy 2 pixels 2 lines Sync back porch width Tbp 20 pixels 64 (tri-level sync) 3 lines Sync front porch width Tfp 1% of HRes 1 line Note: The following illustration shows the timing characteristics for the Input Sync, Front Porch and Back Porch. 146 Runco WindowWall Installation Guide Dimensions LCD Tile Dimensions Diagrams and CAD drawings of the particular WindowWall configurations are posted at www.runco.com. LCD Front View - Landscape Y-ADJUSTMENT ±3mm 3mm HEX KEY TOP CORNER Z-ADJUSTMENT ±3mm 3mm HEX KEY X-ADJUSTMENT ±3mm 3mm HEX KEY W TOP VIEW 40.380 1025.65 22.829 579.84 46.0 1168 FRONT VIEW BOTTOM CORNER Z-ADJUSTMENT ±3mm 3mm HEX KEY BOTTOM VIEW Runco WindowWall Installation Guide 147 LCD Tile Dimensions LCD Rear View - Landscape HANDLES TILE ALIGN MOUNT EASY AXIS MOUNT INTERFACE INTERFACE INTERFACE MODULE 2X POSITION SENSOR TRANSMITTER POSITION SENSOR RECEIVERS BACK VIEW 148 Runco WindowWall Installation Guide LCD Tile Dimensions LCD Side View - Landscape WITH MOUNT WITHOUT MOUNT SERVICE MODE WALL 8.0 203 MIN [10.0] 254 RECOMMENDED CEILING 12° 4.14 105.0 4.50 114.2 8.24 209.4 SIDE VIEWS Runco WindowWall Installation Guide 149 LCD Tile Dimensions LCD Front View - Portrait Y-ADJUSTMENT ±3mm 3mm HEX KEY X-ADJUSTMENT ±3mm 3mm HEX KEY TOP CORNER Z-ADJUSTMENT ±3mm 3mm HEX KEY TOP VIEW 22.829 579.84 46.0 1168 40.380 1025.65 FRONT VIEW BOTTOM CORNER Z-ADJUSTMENT ±3mm 3mm HEX KEY BOTTOM VIEW 150 Runco WindowWall Installation Guide LCD Tile Dimensions LCD Rear View - Portrait 2X POSITION SENSOR TRANSMITTERS TILE ALIGN MOUNT EASY AXIS MOUNT INTERFACE INTERFACE INTERFACE MODULE POSITION SENSOR RECEIVERS BACK VIEW Runco WindowWall Installation Guide 151 LCD Tile Dimensions LCD Side View - Portrait WITH MOUNT WITHOUT MOUNT PR SERVICE MODE WALL 8.0 203 MIN [10.0] 254 RECOMMENDED CEILING 11° 4.08 103.7 4.50 114.2 SIDE VIEWS 152 Runco WindowWall Installation Guide 9.71 246.7 Power Supply Module Dimensions Power Supply Module Dimensions E R P 19.0 483 3.5 88 2U REMOVABLE RACK MOUNT BRACKETS 13.780 350.00 6X M4X0.8 FOR FEET OR MOUNT BRACKET SCREW PENETRAION 4mm MAX 5.906 150.00 7.480 190.00 14.961 380.00 18.221 462.82 18.6 472 17.4 443 Runco WindowWall Installation Guide 153 Quad Input Manager Module Dimensions Quad Input Manager Module Dimensions R A N 19.0 483 1U 1.7 44 REMOVABLE RACK MOUNT BRACKETS 13.780 350.00 6X M4X0.8 FOR FEET OR MOUNT BRACKET SCREW PENETRATION 4mm MAX 5.906 150.00 7.480 190.00 14.961 380.00 18.173 461.60 17.4 443 154 Runco WindowWall Installation Guide 18.2 464 Accessories The follow sections describe how to install the following accessories: • Wall Adapter Bracket - See "Wall Adapter Bracket" on page 155. • Cosmetic Trim - See "Cosmetic Trim" on page 158. • Floor Stand - See "Floor Stand" on page 160. Wall Adapter Bracket For each LDC module, the stud adapter bracket kit contains the following items: • Two adapter brackets • Four M6 nuts/washers 1 For each LCD tile, mount two adapter brackets to the wall. Runco WindowWall Installation Guide 155 Wall Adapter Bracket 2 156 Install the LCD mount on the adapter brackets. Runco WindowWall Installation Guide Wall Adapter Bracket 3 Install an M6 washer/nut in each mount point of the LCD mount. 4 Repeat steps 1-3 for each LCD tile that you want to mount to a wall. Runco WindowWall Installation Guide 157 Cosmetic Trim Cosmetic Trim For each LDC module, the cosmetic trim kit varies depending on your order: • Left/Right, Top/Bottom Trim • M4 x 10 Phillips flathead black screws 158 1 Using three M4 x 10 flathead screws for each piece of cosmetic trim, install the left and right trim for each outer LCD tile of the video wall. 2 Using five M4 x 10 flathead screws for each piece of cosmetic trim, install the top trim for each LCD tile in the outer top row of the video wall. Runco WindowWall Installation Guide Cosmetic Trim 3 If using a floor stand, remove the two tabs in metal. 4 Using five M4 x 10 flathead screws for each piece of cosmetic trim, install the bottom trim for each LCD tile in the bottom row of the video wall. Runco WindowWall Installation Guide 159 Floor Stand Floor Stand These instructions explain how to assemble the Runco WindowWall column floor stand. Each column floor stand and its related accessories are shipped in one box. Below is a list of all of the parts that you should find in your box. The parts are in two wrapped bundles. Check the contents of the box to make sure you have received all of the parts. Part Cross support (1) Legs (2) Feet (2) Assembly tool (1) Mount adapter brackets (2 pre-assembled with feet) Floor anchor (4) 160 Runco WindowWall Installation Guide Picture Floor Stand Leveling feet (4) 1/4-20 flange button head screws, lock washers and t-nuts (4) m6 hex nuts (6) m6 x 12mm button head screws (2) End caps (4) with push in hardware m6 x 40 screws (4) Washers (8) 4mm ball end hex driver (1) 3/16” Allen key (1) Runco WindowWall Installation Guide 161 Assembling the Column Floor Stand Assembling the Column Floor Stand Use the following instructions to assemble the column floor stand. 1 Slide the cross support onto one foot. 2 The assembly tool is used to properly space pieces. Slide the assembly tool to meet the cross support. The support should slide to where it meets the assembly tool. Cross support assembly tool cutout. End of foot meets flange of assembly tool. 162 Runco WindowWall Installation Guide Assembling the Column Floor Stand 3 Using the ball end driver, tight two anchors on each side of the cross support. Note: This is easier to do with the foot on its side. 4 Remove the assembly tool. 5 Slide the cross support onto the other foot and repeat steps 1-4 for the other foot. Runco WindowWall Installation Guide 163 Assembling the Column Floor Stand 6 Take a leg and remove the adapter bracket to which it is attached. There are ten screws to remove. 7 Slide that same leg onto the cross support. Use the assembly tool to line it up. 8 Tighten down the two anchors with the ball end driver. 9 Tighten eight screws on the side. 10 Repeat steps 6-9 for the other leg. 164 Runco WindowWall Installation Guide Assembling the Column Floor Stand 11 Do one of the following: • If you are going to anchor the column floor stand base to the floor, slide the anchor bracket until the holes line up. • If you are not going to anchor the column floor stand base to the floor, attach the anchor so it is not protruding from the foot. 12 Screw in the leveling feet. Note: The non-anchored position is shown. Runco WindowWall Installation Guide 165 Assembling the Column Floor Stand 13 Tighten the two 1/4 20 cap screws with a 3/16” Allen key. As seen from the side. Note: This picture shows a silver column floor stand. Yours will be black. 14 Install the end caps with the push in hardware. 15 Repeat steps 11-14 in the remaining column floor stand corners. 16 If you need to properly space multiple column mounts horizontally, proceed with steps 17-18. Otherwise, go to step 19. 166 Runco WindowWall Installation Guide Assembling the Column Floor Stand 17 Install four 1/4-20 button head flange screws, t-nuts, and washers on the assembly tool. 18 Slide the assembly tool over the leg and make sure it is all the way against the leg. Tighten the button head flange screws that will attach to the leg. This side attaches to the next column floor stand prior to assembly of the adapter brackets. Runco WindowWall Installation Guide 167 Assembling the Column Floor Stand 19 Attach the adapter bracket to the LCD mount using an M6 x 12 button head screw and nut. 20 Loosely attach the side of the bracket with M6 x 40 screws, washers, lock washers and nuts. 21 Repeat steps 19-20 for the other side. 168 Runco WindowWall Installation Guide Assembling the Column Floor Stand 22 Slide the adapter brackets on top of the column floor stand until the LCD mount is seated on top of the column floor stand. 23 For both brackets, tighten the screws in the front first. Runco WindowWall Installation Guide 169 Assembling the Column Floor Stand 24 For both brackets, tighten all of the other screws on both sides. 170 Runco WindowWall Installation Guide Accessing Additional Runco Resources A wealth of information is available at www.runco.com. Additional resources are on the Partner Portal site. 1 Go to http://partners.runco.com 2 Once you enter your login and password, you can access downloadable utility software, new firmware, user manuals, and service manuals. Downloading Additional Documentation and Firmware Some of the other documents for the Runco WindowWall, which are or will be available from the Runco website, are listed below: Document Name Contents Installation Guide Information for installers and technicians to install and configure displays. RS232 Reference Manual Technical information about the product, such as display mode information and how to use RS232 commands to control displays. Configuration diagrams Shows particular packaged all configurations. CAD drawings Shows particular packaged all configurations. Runco WindowWall Installation Guide 171 Downloading Additional Documentation and Firmware 172 Runco WindowWall Installation Guide Regulatory Information Manufacturer's Name: Manufacturer's Address: Runco 1195 NW Compton Drive Beaverton, OR 97006 Declares that the products Model Numbers:MX46L (Direct-view LCD) Conforms with the provisions of: Council Directive 2004/108/EC on Electromagnetic Compatibility; EN55022:2006 Radiated and Conducted Emissions from IT Equipment EN55024:1998 Immunity of IT Equipment Including: EN61000-4-2 Electrostatic Discharge EN61000-4-3 Radiated Immunity EN61000-4-4 Electrical Fast Transients EN61000-4-5 Line Surge EN61000-4-6 RF Conducted Susceptibility EN61000-4-8 Magnetic Field Immunity EN61000-4-11 Voltage Dips and Interrupts And: EN61000-3-2 EN61000-3-3 Harmonic Current Emissions Voltage fluctuations and Flicker Council Directive 2006/95/EC on Low Voltage Equipment Safety: EN60950:2006 Safety of IT Equipment The Technical Construction File required by this Directive is maintained at the corporate headquarters of Runco, 1195 NW Compton Drive, Beaverton, OR 97006. Note: This equipment has been tested and found to comply with the limits for a Class A digital device, pursuant to part 15 of the FCC Rules. These limits are designed to provide reasonable protection against harmful interference when the equipment is operated in a commercial environment. This equipment generates, uses, and can radiate radio frequency energy and, if not installed and used in accordance with the instruction manual, may cause harmful interference to radio communications. Operation of this equipment in a residential area is likely to cause harmful interference in which case the user will be required to correct the interference at his own expense. Industry Canada (ICES-003): This Class A digital apparatus complies with Canadian ICES-003. Cet appareil numérique de la classe A est conforme à la norme NMB-003 du Canada. Any changes or modifications to the display not expressly approved by Runco could void the user's authority to operate this equipment. Other Certifications: CISPR 22 Runco WindowWall Installation Guide 173 174 Runco WindowWall Installation Guide Index Operation Numbers B 1 to 1/ keep original size, 75 9-pin to RJ45 adapter, 57 backlight auto on, 77 control menu, 62, 77 high temperature warning, 78 hours, 139 intensity, 78 time, 92 turn off with no source, 77 usage hours, 92 warning, 3 barometric pressure, 142 baseline display, 63 basic configuration, 49 connections example, 8 before you begin installing a wall, 15 tools/equipment list, 15 big picture, 81 configuration, 104 setup menu, 81, 120 black level, 61 blanking specifications, 146 brackets adapter, 155 horizontal, 20, 25 installing of subsequent rows, 29 installing on first row, 26 mounting to a wall, 25 vertical, 20, 25 wall stud adapter, 25 brightness screen, 141 where stored, 93 building your wall things to keep in mind, 23 A accessories, 155 accessory box contents, 19 checking, 17 customer-supplied, 22 LCD tile box contents, 19 optional, 22 adapter RJ45 to 9-pin, 57 adapter bracket, 155 for wall studs, 25 address adjustment tool, 21 adjusting color balance, 61 color temperature, 61 adjustment x-axis, 39 y-axis, 38 z-axis, 38 advanced options menu, 119, 126 alignment adjustment tool, 21 allow frame lock, 67 ambient operating temperature, 142 aspect ratio definition of, 73 landscape, 139 menu, 73, 122 portrait, 139 assembling the floor stand, 162 assembly tool for floor stand, 160 auto backlight on, 77 automatic discovery of LCDs, 59 automatic shutoff scheduling, 70 average hours per day, 92 avoiding temporary image retention, 5 Runco WindowWall Installation Guide i Index C cable equalization, 129 cables AC power, 20 connecting, 36 connecting RS232, 58 labels for identifying, 21 power, 18 power supply monitor, 18 routing, 30 certifications, 174 checking unit status, 91 cleaning the LCD screen, 15 clock setting ahead/behind one hour, 71 color balance adjusting, 61 menu, 62, 126 multiple displays, 61 tips, 64 where stored, 93 color gamut LCD tile, 141 color native CIE, 141 color temperature adjusting, 61 understanding, 61 column, 82 base installation, 23 complex configurations scenarios, 115 configuration basic steps, 49 of a video wall, 49 scenarios, 102 individual inputs, 103 multiple large sub walls, 115 multiple sub walls, 113 one sub wall and individual inputs, 106 one sub wall quad module, 110 runco big picture, 104 standard cabling, 102 standard cabling with restrictions, 110 two sub wall per quad module, 112 understanding, 101 conformity information, 173 connecting IR remote, 41 connectors, input, switching, 95 ii contrast where stored, 93 contrast ratio LCD tile, 141 cooling requirements, 16 cosmetic trim, 158 customer-supplied accessories, 22 D delete menu, 123 deleting a memory, 99 DHD processor, 12 diagnostic information, 91 diagnostics menu, 119, 124, 125 dimensions LCD mount, 139 LCD tile, 139, 147 power supply module, 140, 153 Quad Input Manager Module, 140, 154 display IDs, 55 disposal information, 4 drawings LCD tile, 147 power supply module, 153 Quad Input Manager Module, 154 E edid plug and play, 129 equipment list, 15 rack, 7, 13 european union disposal information, 4 external video processor, 81 F fill both ways, 74 fine-tune adjustment, 39, 40 first row installation, 26 floor stand, 160 assembly, 162 assembly tool, 160 cross support, 160 feet, 160 floor anchor, 160 legs, 160 Runco WindowWall Installation Guide Index leveling feet, 161 mount adapter brackets, 160 FPGA version information, 131 frame compensation, 83 height and width, 84 lock, 67, 129 free-standing mount, 23 G global menus, 52 saving, 94 storage, 93 gloves, 20 gray test pattern, 63 H high temperature warning, 78 horizontal bracket, 20, 25 position, 79, 128 hours menu, 92, 125 where stored, 93 hue where stored, 93 humidity, 142 brackets first row, 26 on subsequent rows, 29 checklist, 17 LCD tiles first row, 33 subsequent rows, 40 mount points, 27 mounting brackets to wall, 25 of LCD tiles, 33 of TileAlign mount, 24 of video wall, 15, 23 planning, 16 preparing your location, 16 routing cables, 30 space requirements, 16 introduction, 1 IR remote connecting, 41 IR sensor, 21 mounting, 41 J justify settings, 76 K keep original size, 75 I L image position, 76 individual inputs scenario, 103 input connectors, switching, 95 current ps module, 141 frequency ps module, 141 levels menu, 122 ratings power supply module, 141 voltage ps module, 141 inrush current ps module, 141 installation labels for identifying cables, 21 LCD average usage per day, 92 optical specifications, 141 temperature, 91 wipes, 15 LCD mount, 9, 19, 25 dimensions, 139 identifying center, 28 installing, 24 weight, 139 Runco WindowWall Installation Guide iii Index LCD tile, 7, 9, 19 color CIE, 141 color gamut, 141 contents in box, 19 contrast ratio, 141 dimensions, 139, 147 gloves for handling, 20 installing, 33 installing first row, 33 installing subsequent rows, 40 mounting structure, 10 operating temperature, 142 orientation, 139 screen brightness, 141 service mode, 35, 138 servicing, 137 specifications, 139 uniformity, 141 viewing angle, 141 weight, 3 local menus, 54 loop out connector, 118 M main menu, 119 manufacturer’s address, 173 master display, 49 Matrix layout menu, 59, 120 mechanical specifications, 139, 140 memory deleting one, 99 menu, 119, 123 slots, 96 menu advanced options, 119, 126 aspect ratio, 73 backlight control, 77 big picture setup, 81 color balance, 62 delete (memory), 99 hours, 92 matrix layout, 59 miscellaneous, 66 orientation, 66 picture position, 79 program information, 131 quad module route, 118 iv recall, 98 rotation, 66 save, 95 scale mode, 73 serial port settings, 89 size & position, 86 timeout, 66, 129 unit status, 91 viewport, 86 wall configuration, 120 zoom, 85 menus, 50 global, 52 local, 54 navigational, 52 status, 53 minimum sync specifications, 146 miscellaneous menu, 127, 129 options menu where stored, 93 submenu, 129 mode table, 143 mount brackets to a wall, 25 IR sensor, 41 points on a wall, 27 multiple sub walls scenario, 113 N native color, 141 resolution, 142 navigational menus, 52 normal use thermal guidelines, 6 O off-board equipment, 11 placing, 31 one sub wall and individual inputs, 106 on-screen menus, 50 operating temperature, 142 LCD tile, 142 power supply module, 142 Quad Input Manager Module, 142 operating time of LCD, 92 Runco WindowWall Installation Guide Index optical specifications, 141 option key, 81 optional accessories, 22 equipment rack, 13 orientation of LCD tile, 139 of menus, 66 output ratings ps module, 141 overwriting a memory, 96 Q Quad Input Manager Module, 7, 11, 18 address adjustment tool, 21 digital video inputs, 117 dimensions, 140, 154 operating temperature, 142 placing, 31 RS485 connections, 41 specifications, 140 temperature, 91 weight, 140 quad module route menu, 118, 120 understanding, 117 P parameters saved, 94 phase where stored, 93 picture information menu, 122 menu, 119, 122 position, 79 position menu, 128 placing off-board equipment, 31 planning your installation, 16 plug and play, 129 position, 79 where stored, 93 power cable, 18 power supply module, 7, 12, 18 dimensions, 140, 153 input current, 141 input frequency, 141 input ratings, 141 input voltage, 141 inrush current, 141 operating temperature, 142 operation requirements, 16 output ratings, 141 placing, 31 specifications, 140 weight, 140 power supply monitor cable, 18 preparing your installation location, 16 pressure, barometric, 142 program information menu, 119, 131 R rear clearance requirements, 139 recall, 95 menu, 123 recommended usage, 5 regulatory information, 173 remote control, 20, 50 resolution of LCD tile, 142 RJ45 to 9-pin adapter, 57 rotation menu, 66 routing cables, 30 sources, 102 row, 82 RS232 communication, 57 connecting cables, 58 connector, 140 RS485 connector, 140 Quad Input Manager Module connections, 41 Runco WindowWall, 1 system architecture, 7 S safety information, 2 instructions, 2 saturation where stored, 93 Runco WindowWall Installation Guide v Index save, 95 menu, 123 to slot, 96 saved parameters, 94 saving your work, 95 scale mode settings, 73, 74 scheduling events, 70 screen brightness, 141 serial port diagnostic values, 90 settings, 89, 127 status menu, 124 service mode of LCD tile, 35, 138 servicing LCD tiles, 137 set clock/schedule events menu, 127, 130 setting the clock ahead/behind one hour, 71 setup summary menu, 125 sharpness, 76 where stored, 93 signal compatibility, 143 size and position menu, 126, 128 where stored, 93 slave displays, 49 slot memory, 96 source routing, 102 space requirements for installation, 16 specifications environmental, 142 input minimum sync and blanking, 146 LCD optical, 141 LCD tile, 139 mechanical, 139, 140 power supply module, 140 Quad Input Manager Module, 140 signal compatibility, 143 standard cabling scenarios, 102 cabling with restrictions scenarios, 110, 112, 113 wall installation, 23 status menus, 53 switching input connectors, 95 vi system architecture, 7 time, 92 usage hours per day, 92 number of days over 20 hours, 92 T temperature of LCD, 91 of Quad Input Manager Module, 91 operating, 142 requirements for normal use, 6 warning, 78 temporary image retention avoiding, 5 definition, 5 test pattern gray, 63 menu, 124 white, 63 thermal guidelines, 6 TileAlign, 1, 19 description of mounts, 8 installing the mount, 24 mount, 25 weight, 139 mounting structure, 9, 10 mounts landscape, 26 portrait, 27 tiling the video wall, 81 TIR see temporary image retention tools/equipment list, 15 trim for outside of video wall, 158 troubleshooting, 133 turning the display(s) on/off, 70 U understanding color temperature, 61 quad module route menu, 117 wall configuration, 101 uniformity LCD tile, 141 Runco WindowWall Installation Guide Index unit column and row, 82 status menu, 91, 124 unpacking accessories, 17 usage information, 5 X x-axis adjustment, 39 Y V y-axis adjustment, 38 ventilation requirements, 16 vertical bracket, 20, 25 position, 79, 128 video controls, 61 inputs digital, 117 viewing angle of LCD, 141 viewport, 86 bottom and right menu, 128 top and left menu, 128 Z z-axis adjustment, 38 zoom bottom and right menu, 128 menus, 85 top and left menu, 128 W wall adapter bracket, 155 and aspect ratio where stored, 93 configuration, 101, 102, 119, 120 cosmetic trim, 158 installation, 23 before you build, 23 column base, 23 free-standing mount, 23 options, 23 standard, 23 mode, 82 width and height, 82 weight LCD mount, 139 LCD tile, 3, 139 power supply module, 140 Quad Input Manager Module, 140 white level, 61 white test pattern, 63 WindowWall display wall, 24 LCD tiles, 9 troubleshooting, 133 Runco WindowWall Installation Guide vii viii Runco WindowWall Installation Guide