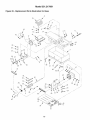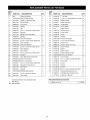
1
Operator's
CRFIF
Manual
/
MFIN°I
1/8tr
Bench Top
JOINTER/PLANER
Model No.
351.21 7881
CAUTION:
Read and follow
all Safety Rules and Operating
Instructions before First Use
of this Product.
Sears, Roebuck and Co., Hoffman
www.sears.com/craftsman
23719.02 Draft (03/20/07)
Estates, IL 60179 U.S.A.
BE PREPARED
Warranty
....................................
SafetyRules...............................
Unpacking..................................
Assembly.................................
Installation
.................................
Operation.................................
Maintenance
..............................
Troubleshooting
.............................
PartsIllustration
andList ...................
Espa_ol.................................
2
2-3
3
3-4
4-6
6-9
9-11
12
14-17
18-31
FOR JOB
•
Wear proper apparel. Do not wear loose clothing,
gloves, neckties, rings, bracelets or other jewelry
which may get caught in moving parts of machine.
•
Wear protective hair covering to contain long hair.
•
Wear safety shoes with non-slip soles.
•
Wear safety glasses complying with United States
ANSI Z87.1. Everyday glasses have only impact
resistant lenses. They are NOT safety glasses.
•
Wear face mask or dust mask if operation is dusty.
•
Be alert and think clearly. Never operate power tools
when tired, intoxicated or when taking medications
that cause drowsiness.
PREPARE
WORK
AREA FOR JOB
•
Keep work area clean. Cluttered work areas invite
accidents.
•
Do not use power tools in dangerous environments.
•
Do not use power tools in damp or wet locations. Do
not expose power tools to rain.
•
Work area should be properly lighted.
•
If this tool is ever used for commercial or rental purposes,
this warranty will apply for only 90 days from the date of
purchase.
Proper electrical receptacle should be available for
tool. Three prong plug should be plugged directly
into properly grounded, three-prong receptacle.
•
This warranty gives you specific legal rights and you may
also have other rights which vary from state to state.
Sears, Roebuck and Co., Hoffman Estates, IL 60179
Extension cords should have a grounding prong and
the three wires of the extension cord should be of
the correct gauge.
•
Keep visitors at a safe distance from work area.
•
Keep children out of workplace. Make workshop childproof. Use padlocks, master switches or remove switch
keys to prevent any unintentional use of power tools.
ONE-YEAR FULL WARRANTY
CRAFTSMAN
PROFESSIONAL
ON
TOOL
If this Craftsman tool fails due to a defect in material or
workmanship within one year from the date of purchase,
call 1-800-4-MY-HOME® TO ARRANGE FOR FREE
REPAIR (or replacement if repair proves impossible).
This warranty does not include expendable parts, such
as lamps, batteries, bits or blades.
TOOL SHOULD
WARNING: For your own safety, read all of the rules
and precautions before operating tool.
BE MAINTAINED
•
Always unplug tool prior to inspection.
•
Consult manual for specific maintaining and adjusting procedures.
•
Keep tool lubricated and clean for safest operation.
•
Remove adjusting tools. Form habit of checking to
see that adjusting tools are removed before switching machine on.
•
Keep all parts in working order. Check to determine
that the guard or other parts will operate properly
and perform their intended function.
Your risk from these exposures vary, depending on how
often you do this type of work. To reduce your exposure
to these chemicals: work in a well ventilated area and
•
Check for damaged parts. Check for alignment of
moving parts, binding, breakage, mounting and any
other condition that may affect a tool's operation.
work with approved safety equipment. Always wear
OSHA/NIOSH approved, properly fitting face mask or
respirator when using such tools.
•
A guard or other part that is damaged should be
properly repaired or replaced. Do not perform
makeshift repairs. (Use parts list provided to order
replacement parts.)
WARNING:
Some dust created by power sanding,
sawing, grinding, drilling and other construction activities contains chemicals known to cause cancer, birth
defects or other reproductive harm.
Some examples of these chemicals are:
•
Lead from lead-based paints.
•
Crystalline silica from bricks and cement and other
masonry products.
•
Arsenic and chromium from chemically-treated lumber.
CAUTION: Always follow proper operating procedures
as defined in this manual even if you are familiar with
use of this or similar tools. Remember that being careless for even a fraction of a second can result in severe
personal injury.
© Sears, Roebuck and Co.
KNOW HOW TO USE TOOL
2
•
Use right tool for job. Do not force tool or attachment
to do a job for which it was not designed.
•
Disconnect tool when changing blades.
•
Avoid accidental start-up. Make sure that the switch
is in the OFF position before plugging in.
•
Do not force tool. It will work most efficiently at the
rate for which it was designed.
•
Keep hands away from moving parts and cutting
surfaces.
•
Never leave tool running unattended. Turn the power
off and do not leave tool until it comes to a complete
stop.
•
Do not overreach. Keep proper footing and balance.
•
Never stand on tool. Serious injury could occur if tool is
tipped or if blade is unintentionally contacted.
•
Know your tool. Learn the tool's operation, application and specific limitations.
•
Use recommended accessories (refer to page 17).
Use of improper accessories may cause risk of
injury to persons.
•
Handle workpiece correctly. Protect hands from possible injury.
Refer to Figures 2, 3, 4 and 24.
•
Turn machine off if it jams. Blade jams when it digs
too deeply into workpiece. (Motor force keeps it
stuck in the work.)
•
Attach fence support to jointer with socket head bolts
and lock washers.
•
Always keep drive, cutterhead and blade guards in
place and in proper operating condition.
•
Insert locking plate assembly into support. Position
plate so that pins are against bottom edge of support.
•
Feed work into blade or cutter against direction of
rotation.
•
Secure plate in position with fence sliding handle and
spacer.
CAUTION: Think safety! Safety is a combination of
operator common sense and alertness at all times
when tool is being used.
Figure 1 - Unpacking
ATTACH SUPPORT
Fence Sliding Handle_
TO JOINTER
_;_
Spacer _"
"_
Fence Support
/
WARNING:
Do not attempt to operate tool until it is
completely assembled according to the instructions.
Refer to Figure 1.
Check for shipping damage. If damage has occurred, a
claim must be filed with carrier. Check for completeness. Immediately report missing parts to dealer.
The jointer/planer is shipped complete in one carton.
Additional parts which need to be fastened to
jointer/planer should be located and accounted for
before assembling.
A Jointer Bed Assembly
B Fence
C Fence Support
D Fence Bracket Assembly
E Locking Plate Assembly
F Fence Sliding Handle with Spacer
G Push Blocks (2)
H Fence Tilting Handle with Spacer
I
Dust Chute
Hardware bag includes:
• 8-1.25 x 20mm Socket Head Bolts (4)
• 8-1.25 x 16mm Socket Head Bolts (2)
• 8mm Lock Washer (6)
• 3, 4, 5 and 6mm HexWrench
• Mounting Bracket (4)
L_ocking Plate
Assembly
Figure 2 - Attach Fence Support
INSTALL
JOINTER
FENCE AND FENCE
BRACKET
TO
•
Attach fence to fence bracket assembly with four
socket head bolts and lock washers.
•
Slide fence and bracket over and onto dovetails of
support and locking plate.
Continue to slide fence forward so that the fence is
•
over the jointer tables. At this position the edge of
the blade guard will rest against the fence, and the
entire width of the cutterhead is covered. Secure
bracket in position with fence sliding handle.
•
Insert fence tilting handle with spacer through right
link and thread into left link.
Fence Tilting
Handle
Fence Bracket
_
_.
ty
•
Place spring inside filter bag arm.
•
Slide arm with spring over dust exhaust port.
•
Place band of the bag over rim of trash can and
secure bag by tightening strap.
To use dust collection set with a trash bag:
• Place spring inside filter bag arm.
Figure 3 - Attach Fence Assembly
•
•
•
Make sure limit plate (Figure 4, page 4) is resting in
slot of block. Position fence against shaft and lock
fence in position with fence tilting handle.
•
Slide arm with spring over dust exhaust port.
•
Assemble bag support. Slide connectors into
channels of support segments.
•
Slide plastic trash bag inside and over bag support.
Let bag overlap 3-4".
•
Place band of the filter bag over and into the
channel of the bag support.
•
Secure in position by tightening strap.
Spring
Place a combination square against face of fence
and table surface. The fence and table must be at
90 ° to each other. If not, loosen tilting handle, loosen
hex nut and turn shaft with a screw driver until fence
is square. Secure in position by tightening hex nut.
_.4__
_.
_
_
i--tlter_ag
_,
Use a bevel gauge or protractor to check 45 ° inward
and outward limit stops. The 45 ° inward stop is the
hex head bolt located beneath the shaft. The 45 °
Dust Exhaust Port
_'_:_'
_..._
f
/ Connector
k -
J
/
Bag
_/Support
/_
/I_ _Strap
outward stop is located at the top of the fence. If
adjustment is needed, loosen hex nut, turn hex head
bolt to proper position and secure in place with hex
nut.
Block
Limit Plate__
Hex Nut
Support
Segments
Baod
Figure 5 - Half Bag Dust Collection Set
Refer to Figure 6-10, pages 4-6.
45 °
The jointer/planer weighs approximately 70 Ibs. when
completely assembled. The jointer/planer must be
installed in a place with ample lighting and correct
power supply. To install jointer/planter:
• Make sure there is plenty of room for moving the
workpiece through the entire cut. There must be
enough room that neither the operators nor the
bystanders will have to stand in line with the wood
while using the tool.
Stop
Figure 4 - Limit Stops
INSTALL
DUST CHUTE
Refer to Figure 25, page 16.
•
Insert pan head screw (Key No. 19) through tabs on
dust chute (Key No. 18). Slide dust chute onto end of
chip exhaust (Key No. 17). Tighten pan head screw.
•
INSTALLING THE HALF BAG DUST
COLLECTION
SET
Jointer/planer can be installed on a workbench using
mounting brackets provided and bolts, lock washers
and hex nuts (not supplied). See Figure 6.
Jointer Base
Refer to Figure 5.
The Craftsman Half Bag Dust Collection Set is
designed to provide dust collection for woodworking
tools with a 21/2"diameter dust exhaust port. The filter
bag attachs to a 30-gallon trash can or a 30-gallon x
1.3 mil plastic trash bag for easy, convenient sawdust
disposal (trash can and plastic trash bag not included).
To use dust collection set with a trash can:
Mounting Bracket
\
Figure 6 - Use Mounting
4
Brackets to Secure Jointer
•
The jointer/planer must be bolted to a firm, level surface.
•
Make sure the jointer/planer does not rock and the
tables are level.
properly installed and grounded in accordance with
all local codes and ordinances. Do not modify plug
provided. If it will not fit in outlet, have proper outlet
installed by a qualified electrician.
•
Inspect tool cords periodically, and if damaged, have
repaired by an authorized service facility.
•
Green (or green and yellow) conductor in cord is the
grounding wire. If repair or replacement of the electric cord or plug is necessary, do not connect the
green (or green and yellow) wire to a live terminal.
•
A 2-prong wall receptacle must be replaced with a
properly grounded 3-prong receptacle installed in
accordance with National Electric Code and local
codes and ordinances.
11 _
I*
19"
Figure 7 - Jointer/Planer
POWER
Foot Print
SOURCE
WARNING:
Do not connect jointer/planer to the power
source until all assembly steps have been completed.
The motor is designed for operation on the voltage and
frequency specified. Normal loads will be handled safely on voltages not more than 10% above or below specified voltage. Running the unit on voltages which are not
within range may cause overheating and motor burnout. Heavy loads require that voltage at motor terminals
be no less than the voltage specified on nameplate.
• Power supply to the motor is controlled by a rocker
switch. Removing the key from rocker switch will lock
the unit and prevent unauthorized use.
GROUNDING
INSTRUCTIONS
WARNING: Any receptacle replacement should be
performed by a qualified electrician.
A temporary 3-prong to 2-prong grounding adapter (see
Figure 9) is available for connecting plugs to a two pole
outlet if it is properly grounded.
Make Sure This
Grounding
Lug _ _ _
Adapter-_._._
3-Pron__
Check with a qualified electrician if you do not
understand grounding instructions or if you are in
doubt as to whether the tool is properly grounded.
•
This tool is equipped with an approved cord rated at
150V and a 3-prong grounding type plug (see Figure
8) for your protection against shock hazards.
•
Figure 9 - 2-Prong Receptacle with Adapter
•
•
•
Properly
•
Figure 8 - 3-Prong
•
__
WARNING:
Do not permit fingers to touch the terminals of plug when installing or removing from outlet.
•
•
Plug must be plugged into matching outlet that is
CORDS
The use of any extension cord will cause some drop
in voltage and loss of power.
Wires of the extension cord must be of sufficient size
to carry the current and maintain adequate voltage.
Use the table to determine the minimum wire size
(A.W.G.) extension cord.
Receptacle
Do not remove or alter grounding prong in any manner.
In the event of a malfunction or breakdown, grounding
provides a path of least resistance for electrical shock.
Many cover plate screws, water pipes and outlet
boxes are not properly grounded. To ensure proper
ground, grounding means must be tested by a qualified electrician.
EXTENSION
Grounding Prong
3-Prong Plug
Do not use a 3-prong to 2-prong grounding adapter
unless permitted by local and national codes and
ordinances. (A 3-prong to 2-prong grounding adapter
is not permitted in Canada.)
Where a 3-prong to 2-prong grounding adapter is
permitted, the rigid green tab or terminal on the side
of the adapter must be securely connected to a
permanent electrical ground such as a properly
grounded water pipe, a properly grounded outlet box
or a properly grounded wire system.
Grounding plug should be plugged directly into a
properly installed and grounded 3-prong groundingtype receptacle, as shown (see Figure 8).
Grounded Outlet
Ground
2-Prong Receptacle
WARNING:
Improper connection of equipment
grounding conductor can result in the risk of electrical
shock. Equipment should be grounded while in use to
protect operator from electrical shock.
•
Is
ToConnected
A Known
•
Use only 3-wire extension cords having 3-prong
grounding type plugs and 3-pole receptacles which
accept the tool plug.
•
If the extension cord is worn, cut or damaged in any
way, replace it immediately.
EXTENSION
CORDLENGTH
WireSize
A.W.G.
Upto 50ft..................................
16
50-100ft...................................
14
NOTE:Usingextension
cordsover100ft.longis not
recommended.
OPERATION
120
Amps .....................................
Hertz .....................................
Phase ..................................
Cutterhead RPM .........................
ELECTRICAL
WARNING:
12
60
Single
10,000
WARNING:
For your own safety, read all of the
instructions and safety precautions before operating
tool.
CONNECTIONS
Make sure unit is turned off and discon-
nected from power source before inspecting any wiring.
The motor is assembled with an approved three conductor cord to be used on 120 volts as indicated. The
power supply to the motor is controlled by a double
pole locking rocker switch.
• Remove the key to prevent unauthorized use.
The power lines are inserted directly onto the switch.
The green ground line must remain securely fastened
to the frame to properly protect against electrical shock.
Refer to Figures 10-20, pages 7-9.
•
Know general power tool safety. Make sure all precautions are understood (see pages 2, 3 and 6).
•
Whenever adjusting or replacing any parts on
jointer/planer, turn switch off and remove plug from
power source.
•
Make sure all guards are properly attached and
securely fastened.
•
Make sure all moving parts are free from interference.
•
Always wear eye protection or face shield.
•
Make sure blades are aligned and properly attached
to cutterhead.
•
Do not plug in jointer/planer unless switch is in OFF
position. After turning switch on, allow jointer/planer
to come to full speed before operating.
•
Keep hands clear of all moving parts.
•
Do not force cut. Slowing or stalling will overheat
motor.
•
Use quality lumber. Blades last longer and cuts are
smoother with good quality wood.
•
Do not perform jointing/planing operations on material shorter than 8W', narrower than 3/4",or less than
1/4"thick
•
Never make jointing cut deeper than 1/8".
•
Always keep cutterhead and blade guards in proper
working condition.
•
Maintain the proper relationships of infeed and outfeed table surfaces and cutterhead blade path.
Do not back the work toward the infeed table.
DESCRIPTION
Craftsman 61/8
'' jointer/planer is used to surface the
faces and edges of boards, produce a flat surface on
warped boards and shape bevels, chamfers and tapers.
The jointer/planer features cast iron infeed and outfeed
tables, cast iron body with smooth work surfaces and
lead screws for precise table height adjustment.
Balanced guide fence tilts 45 ° (inward) and 45 ° (outward). Built-in blower for chip removal. Tool comes with
locking rocker switch with removable key and push
blocks. Jointer/planer easily handles rough-cut lumber,
planes hard and soft woods up to 61/8
'' wide using a two
blade cutterhead, and takes cuts up to 1/8".
SPECIFICATIONS
Table size ............................
285/8x 61/4"
Fence size ...........................
22%x 33/4"
Blade width ...............................
Maximum cut ...........................
Cuts Per Minute .........................
Overall Size .......................
Dust collection port ..................
Weight ..................................
Motor ...............................
RULES
Jointing is a surfacing operation in which a small
amount of wood is removed from the edges and faces
of boards to get smooth, straight and even surfaces
such that the two edges that run across the planing
blocks would fit together perfectly, forming a seamless
joint.
Planing refers to the sizing of lumber to a desired thickness while creating a level surface parallel to the opposite size of the board. Depth of cut is the term used to
indicate how deep the blades will cut into the workpiece.
WARNING:
Operation of any power tool can result in
foreign objects being thrown into eyes which can result
in severe eye damage. Always wear safety goggles
complying with United States ANSI Z87.1 (shown on
package) before commencing power tool operation.
MOTOR
The 120 Volt AC universal motor has the following
specifications:
Voltage ...................................
SAFETY
•
61/J'
•
Support the workpiece adequately at all times during
operation; maintain control of the workpiece.
•
Use hold-down/push blocks for jointing material narrower than 3" or planing material thinner than 3".
•
Take precautions against kickback. Do not permit anyone to stand or cross in line of cutterhead's rotation.
Kickback or thrown debris will travel in this direction.
1/8"Deep
20,000
285/8x 18 x 12"
2V2" Diameter
70 Ibs
12A, 120V
6
•
Turn switch off and disconnect power whenever
jointer/planer is not in use.
•
Replace or sharpen blades as they become damaged
or dull.
•
Do not attempt to perform an abnormal or little used
operation without study and the use of adequate holddown/push blocks, jigs, fixtures, stops and the like.
•
Keep jointer/planer maintained. Follow maintenance
instructions (see pages 10-11).
POSITIONING
The fence can be adjusted to cut any angle from 0o-45 °
inward and outward. The fence can be tilted inward up
to 45 ° (toward the cutterhead) to maintain greater stability of a narrow workpiece or up to 45 ° outward (away
from cutterhead) for larger angle cutting operations.
To adjust tilting angle:
•
Loosen fence tilting handle.
•
The fence tilting handle is spring loaded. To continue
turning the handle, gently pull the handle away from
the fence and return it to the original position.
•
Release the handle and continue loosening.
•
Manually tilt fence inward/outward to the desired
angle. Use a bevel scale or protractor to measure tilt
angle.
DEPTH OF CUT
Refer to Figure 10.
The depth of cut is adjusted by the relative positioning
of the infeed table with respect to the cutterhead. Infeed
table can be raised or lowered using the handwheel.
Turning the handwheel counterclockwise will lower the
infeed table causing more wood to be removed from
workpiece. Turning the handwheel clockwise will raise
the infeed table causing less wood to be removed from
workpiece.
Do not make jointing or planing cuts deeper than 1/8".
Infeed Table
Depth of Cut
Hand Knob
Figure 10 - Depth of Cut
CHECK
DEPTH
OF CUT
Refer to Figure 11.
• Place a straight edge on the outfeed table extending
over the infeed table.
•
Measure from the surface of the infeed table to the bottom of the straight edge. This will be the depth of cut.
NOTE: This jointer/planer will make a maximum 1/8"
deep cut. To reduce the danger of kickback and possible injury, we recommend taking cuts of 1/16"or less.
CAUTION:
Make sure the switch is in the OFF position and the cord is unplugged from power source
before performing this check.
Outfeed
T
Figure 11 - Check Depth of Cut
FENCE
NOTE: The fence has positive stops at 0 ° (90 ° from
table), 45 ° inward and 45 ° outward.
• Tighten fence tilting handle.
•
To continue tightening, gently pull the handle away
from fence and return the handle to the original position.
•
Release the handle and continue tightening.
•
Make sure the fence is tight and secure.
The fence can be positioned so that any desired width
of the blade is exposed.
To adjust fence position:
•
Loosen fence sliding handle.
•
Slide fence forward to the desired position.
•
Tighten fence sliding handle.
•
Make sure fence is tight and secure.
CAUTION: Do not remove blade guard. Make sure
that the cutterhead is covered all the time.
CAUTION: Do not slide fence away from the jointer
body. All sides of the cutterhead must be covered all the
time.
BLADE
GUARD
The blade guard provides protection over the cutterhead. It must always be in place and function properly.
Check the guard to make sure it functions properly. To
check:
•
f Cut _/8"
Pass a 1/4"thick piece of wood over the cutterhead
between the guard and the fence. The guard will
spread and leave way for the wood piece to pass.
The guard must return to the original position automatically when the wood piece is removed.
xeth
•
Open the blade guard all the way until it stops, and
release it several times. It should always return to its
original position by spring action.
CAUTION: If the blade guard fails to operate properly,
the spring must be replaced or adjusted.
_.)
•
To replace spring, contact your nearest Sears store
or service center.
•
To adjust or to assemble spring see "Adjusting Blade
Guard", page 10.
ADJUSTING
BLADE
HEIGHT
Rotate the cutterhead by hand. The blades should
just touch the straightedge. If a blade is too low or
too high at either end, adjust blade height using the
jack screws.
Refer to Figures 12-14.
CAUTION:
Make sure the switch is in the OFF position and cord is unplugged before proceeding with
checking blades.
AVOID DAMAGE
The blades have been adjusted at the factory to assure
proper operation and should require no adjustment.
However, shipping and handling may have caused misalignment. For accurate cutting, the blades must be as
high as the outfeed table when positioned at the highest point. To check blade height:
•
Jointer/planer is a precision woodworking machine and
should only be used on quality lumber. Using bad lumber could result in a poor quality cut on subsequent
pieces.
For proper operation, it is preferable to use the jointer
with a dust collecting system (see Using a Vacuum
Hose, page 9) attached to the exhaust port in the rear
of the jointer. Attaching a dust collecting system is
especially required when taking deeper cuts to prevent
clogging of wood chips.
• Do not use dirty boards. Dirt and stones are abrasive
and will wear blade.
Block the blade guard from closing using a scrap
piece of wood about 61/4"long between the fence
and blade guard.
Blade Clam
Clamp
•
Remove nails and staples. Jointer should only cut wood.
•
Avoid knots. Heavy cross-grain makes knots hard
and they can come loose and jam the jointer.
•
Assess value of badly warped boards. Operator can be
tempted to use too deep of cut to square boards quickly. Use several passes to maintain a level surface.
ON-OFF
Figure 12 - Block Blade Guard
•
Turn the cutterhead so that one of the blades is at
the highest position.
Place a straightedge
blade.
SWITCH
Refer to Figure 15.
The operating positions of the On-Off switch are located
on the front of your jointer/planer.
• Push the switch up to turn jointer/planer on and push
down to turn the unit off.
CAUTION: The cutterhead blades are extremely
sharp. Do not let your fingers contact the cutting edge
at any time.
•
TO BLADES
•
over the outfeed table and the
The switch has a removable key that allows the unit
to be locked in the OFF position.
To activate locking mechanism:
• Push the switch to OFF position.
I
•
Steel Straight Edge I
Pull switch key.
To deactivate locking mechanism:
•
_Ou_tfeed_
Table
O
WARNING:
Be sure the switch is in OFF position and
the cord is unplugged from the power source before
removing switch key.
infeed
_
Insert and press switch key in the slot on switch.
Table
Figure 13 - Checking Outfeed Table Alignment
The straight edge must touch evenly on the outfeed
table at both ends of the blade.
Switch Key
Switch_k
Blade Clamp
Cutterhead
Blade Lock
Screw
Figure 15 - On-Off Switch
Jack Screw
Blade
Figure 14 - Cutterhead
Assembly
8
FEEDING WORKPIECE
USING
Refer to Figures 16-18.
Feed rate refers to rate at which wood is passed over
blades. An even feed will produce a uniform service. To
feed workpiece:
• Hold the board firmly down on both tables and
against the fence.
Refer to Figure 19.
• Always use hold-down/push-blocks when jointing
wood that is narrower than 3", planing wood thinner
than 3".
•
Keep fingers close together.
•
Feed the board at a continuous even rate of speed.
Any hesitation or stopping could cause a "step" to be
cut on the edge of the board.
HOLD DOWN/PUSH
BLOCKS
Figure 19 - Feeding with Push Blocks
•
Grasp the hold-down/push-blocks
•
Position the push-blocks flat on top of workpiece and
push the workpiece down against the table.
Use a hand-over-hand motion to maintain control
over the workpiece at all times.
•
•
Figure 16 - Feeding Workpiece
•
As the trailing hand passes over the cutterhead,
remove the leading hand.
•
Continue feeding while placing the leading hand
behind the trailing hand until the entire length of the
board is cut.
When planing workpiece between '/2- 3/4"and narrower than the push-blocks, tilt the push-blocks so
that it clears the cutterhead guard while feeding.
BEVELING
AND CHAMFERING
Refer to Figure 20.
• The fence on the jointer/planer is adjustable from
45 ° inward to 45 ° outward. Adjust the fence to the
desired angle and tighten fence tilting handle
•
•
Beveling refers to cutting the entire edge of a board
at an angle. Beveling may require several passes
due to the depth of cut needed.
Chamfering refers to removing only the corner of the
edge of a board. Normally a chamfer is made on one
pass; so a 1/16
Hdepth of cut is made.
Figure 17 - Guiding Workpiece
Bevel Edge
•
Feed with the grain whenever possible.
•
If the nature of the workpiece is such that it must be
fed against the grain, take very light cuts and feed
slowly.
•
When using long workpieces, to avoid injury from slips
or kickbacks and to exert even pressure on the cutterhead, use extra supports (see Recommended
Accessories, page 17) at both infeed and outfeed ends.
With the Grain
Against the Grain
Figure 18 - Direction of Feed
Chamfer Ed_g_e_
Figure 20 - Beveling and Chamfering
WARNING: Turn the switch to OFF position and
unplug jointer/planer from power source before proceeding to do maintenance work.
CHECKING
Rotation
Rotation
firmly.
FOR WORN
BLADES
Condition of blades will affect precision of cut. If blade
wear is not observed when checking the blade height,
the quality of cut will indicate the blade condition. Dull
blades will tear rather than sever wood fiber. A raised
grain will occur when dull blades pound on wood where
there is difference in density. A raised ridge will be produced where the blades have been nicked.
SHARPENING
BLADES
Refer to Figure 21.
The blades can be honed individually by whetting them
with a fine sharpening stone. Make sure oilstone is flat
and is not worn. To sharpen blades:
• Partially cover the stone with paper to protect the
table top.
• Position infeed table so stone will contact blade
•
•
•
Place blade clamp against the replacement blade
and replace in cutterhead.
•
Secure blade and blade clamp using four blade lock
screws. Do not tighten blade lock screws.
NOTE: Check blade height at both ends of blade (see
Adjusting Blade Height, page 7).
• Tighten blade lock screws.
along its beveled surface.
Stroke the stone across blade from one side to other
while stone is also moved slightly in the direction of
feed.
Make sure to do the same number of strokes on
each place.
•
Recheck blade adjustment and make sure blade is
still level with outfeed table.
•
Repeat the procedure to replace the other blade.
•
Remove the scrap wood and release blade guard.
•
Make sure all the blade lock screws are tight and snug.
ADJUSTING
BLADE
GUARD
Refer to Figure 25, page 16.
CAUTION:
Do not lubricate the pivot point of the blade
guard. Oil and lubricating products may contain chemicals that can damage and/or destroy blade guard or
other plastic parts.
If the blades are nicked they must be replaced or
reground. They can be reground several times until they
become 13/161'
wide.
NOTE: Many shops do not have capabilities to resurface blades. Yellow pages should list "Sharpening
Services" or "Tool Grinding."
The blade guard needs adjustment or spring replacement if it does not cover the cutterhead when released.
To adjust or replace spring:
• Lay the jointer/planer on the side so that the switch
is facing upward.
Figure 21 - Sharpening
Blades
Never install unbalanced blades or reground blades
less than '3/16"wide.
REPLACING
•
Remove four screws and bottom cover (Key Nos. 37
and 54).
•
Loosen and remove screw, washer and spring (Key
Nos. 13, 12 and 11 ) under the base that secures the
blade guard.
•
Slide out blade guard.
•
If the spring is out of tension, it must be replaced.
Remove screw (Key No. 8) that retains spring.
Contact your nearest Sears store or service center
for replacement.
•
Replace new spring so that the short arm of the
spring is held by screw (Key No. 8).
•
Position blade guard so that the long arm of the
spring is against the wall of the blade guard.
•
Secure blade guard using spring, washer and pan
head screw.
•
Replace bottom cover. Secure with screws.
•
Make sure blade guard functions appropriately.
BLADES
Refer to Figure 22.
•
Unplug the jointer/planer from power source and turn
the switch to OFF position.
•
Block the blade guard from closing down.
•
Loosen and remove four blade lock screws securing
blade and blade clamp.
Blade Clam
REPLACING
Refer to Figures 23 and 25.
• Turn the switch to OFF position and unplug the tool
from power source.
Clamp
Figure 22 - Block Blade Guard
•
Lift blade and blade clamp from cutterhead
•
Clean any sawdust and resin buildup from cutterhead and blade clamp.
DRIVE BELT
10
•
Lay the jointer/planer on the side so that the switch
is facing upward.
•
Remove four screws and bottom cover (Key Nos. 37
and 54).
•
Remove two screws and access cover (Key Nos. 37
and 38).
•
Remove fan belt (Key. No. 31) from cutterhead pulley
by turning belt and maintaining pressure.
•
GENERAL
Remove four bolts (Key No. 24) that retain motor
mounting plate (Key No. 49).
Rem'_e
Jointer/planer will operate best if it is kept in good operating condition. Keep unit adjusted as described in
"Operation."
• Do not allow gum and pitch to accumulate on the
tables, fence, blades and blade guard.
• Apply a thin coat of paste type wax to the tables and
the fence so that the wood slides easily while feeding.
""
•
Figure 23 - Replacing Timing Belt
•
Remove drive belt (Key No. 53).
•
Replace with new drive belt. Make sure belt seats
fully in grooves of both pulleys and install motor
plate to base with the four bolts. Do not completely
tighten bolts.
•
Push motor assembly towards the right to apply tension to the drive belt. Tighten bolts securely.
•
Replace fan belt onto cutterhead pulley, making sure
belt seats properly in grooves of both pulleys.
•
Replace access cover using two screws
•
Replace bottom cover using four screws.
REPLACING
MAINTENANCE
Keep blades sharp (see Sharpening Blades, page
9). Sometimes replacing blades is less expensive
than resurfacing them. Keeping a spare set of blades
on hand is recommended. Blades should always be
sharpened or replaced in sets of two.
LUBRICATION
WARNING:
Make sure the switch is in the OFF position and the tool is disconnected from the power
source.
WARNING:
Do not at any time let brake fluids, gasoline, penetrating oils, etc. come in contact with plastic
parts. They contain chemicals that can damage and/or
destroy plastics.
FAN BELT
• Turn the switch to OFF position and unplug the tool
from power source.
on the side so that the switch
•
Motor and cutterhead bearings are sealed and need
no lubrication.
•
Fence, fence bracket and elevation screws should
be cleaned of debris and greased as needed.
•
Lay the jointer/planer
is facing upward.
•
Remove four screws and bottom cover (Key Nos. 37
and 54).
•
Remove two screws and access cover (Key Nos. 37
and 38).
• Apply a paste wax to surfaces to keep them slick
and prevent corrosion.
•
Loosen chip exhaust housing (Key No. 21) by
removing two socket head bolts (Key No. 24).
BRUSH
•
Remove old fan belt and place new belt over fan
pulley.
MACHINED
•
Surface of tables and fence must be kept smooth and
clean for easy work feed.
INSPECTION
AND REPLACEMENT
WARNING: Turn jointer off and disconnect from power
source. Brush life depends on amount of load on motor.
Regularly inspect brushes after 100 hours of use.
Brushes are located on either side of motor.
• Attach chip exhaust housing to base with the two
belts.
•
SURFACES
Refer to Figure 25, page 16.
Pull belt over cutterhead pulley making sure the belt
seats in grooves of both pulleys.
•
Loosen brush cap (Key No. 44) and remove brush (Key
No. 45) from motor.
•
Replace brushes if springs are worn.
•
Replace brushes if carbon is worn to 3/8"length or
less.
NOTE: Replace brushes in sets only.
• Replace brushes and tighten brush cap.
11
SYMPTOM
POSSIBLE
Motor does not start
1. Defective switch
2. Defective motor
CORRECTIVE
CAUSE(S)
ACTION
1. Have switch replaced
2. Have motor replaced/repaired
NOTE: 1 and 2 must be done by a qualified
service technician; Consult Sears service.
3. Correct low line voltage condition
3. Low line voltage
Motor stalls (resulting in blown 1. Circuit overloaded
fuses or tripped circuit
breakers)
2. Low line voltage
3. Motor overloaded
4. Incorrect fuses on circuit breakers
5. Short circuit in motor; loose
connections or worn insulation
on lead wires
6. Clogged wood chips
1. Reduce circuit load
(turn off other appliances)
2. Correct low line voltage conditions
3. Reduce load on motor
4. Have correct fuses or circuit breakers
installed
5. Inspect terminals in motor for damaged
insulation and shorted wires and have
them replaced
6. Take shallow depth of cut and attach a
shop-vac to exhaust port. Inspect chip
blower assembly and fan belt
Motor starts slowly or fails to
come to full speed
1. Defective motor windings
2. Clogged wood chips
1. Have motor replaced/repaired.
2. Take shallow depth of cut and attach a
shop-vac to exhaust port. Inspect chip
blower assembly and fan belt
Motor running too hot
1. Motor overloaded
2. Restricted air circulation due to
dust accumulation
1. Reduce load on motor
2. Clean dust and restore normal air circulation
Frequent opening of fuses or
circuit breakers
1. Motor overloaded
2. Fuses or circuit breakers do not
have sufficient capacity
3. Circuit overloaded
1. Reduce load on motor
2. Have correct fuses or circuit breakers
installed
3. Reduce circuit load
(turn off other appliances)
Snipe
(gouging at end of boards)
1. Dull blades
1. Replace or sharpen blades.
See "Sharpening Blades," page 10
2. Support long boards.
See "Recommended Accessories," page 17
3. See "Feeding Workpiece," page 8
2. Inadequate support of long boards
3. Uneven feed
Uneven depth of cut
1. Blade height not uniform
2. Fence not perpendicular
jointer bed
3. Feeding wood too fast
45 ° cuts inaccurate
to
1. Fence stops not adjusted properly
2. Fence bottom not even with
outfeed table due to wood chips
under fence
1. Adjust blade height.
See "Adjusting Blade Height," page 7
2. See "Install Fence and Fence Bracket to
Jointer" page 3
3. Feed wood slower
1. Adjust fence stops.
See "Install Fence and Fence Bracket to
Jointer.", page 3
2. Clean wood chips from underside of fence
Fuzzy grain
Planing wood with high moisture
Remove high moisture content from wood by
drying
Torn grain
1. Too heavy a cut
2. Blades cutting against grain
3. Dull blades
1. Reduce depth of cut
2. Feed work along grain
3. Replace or sharpen blades
12
NOTES
13
Model 351.217881
Figure 24 - Replacement
Parts Illustration
for Fence and Infeed Table
19
5
6
12
15
14
7
22
37
48
27
./
39
40
44
J
46
14
KEY
NO.
KEY
PART NO.
DESCRIPTION
QTY.
NO.
PART NO.
DESCRIPTION
QTY.
1
23710.00
Fence
1
25
18424.00
Table Pin
4
2
STD840508
5-0.8mm Hex Nut*
2
26
18425.00
Frame Pin
4
3
STD840610
6-1.0mm Hex Nut*
4
27
18426.00
Fence Support
1
4
18954.00
5-0.8 x 25mm Hex Head Bolt
2
28
18427.00
Pin
2
5
18410.00
Handle
1
29
18428.00
6
18454.00
Spacer
2
3O
STD840812
Locking Plate
8-1.25mm Hex Nut*
1
1
7
18411.00
Fence Plate
1
31
00979.00
8-1.25 x 35mm Hex Head Bolt
1
8
STD852008
8mm Lock Washer*
6
32
18965.00
Table Frame
1
9
01822.00
8-1.25 x 20mm Socket Head Bolt
4
33
09845.00
3CMI-6 E-ring
4
10
18412.00
Plate Shaft
1
34
09721.00
6-1.0 x 30mm Set Screw
1
11
18413.00
05224.00
6-1.0 x 35mm Set Screw
1
18414.00
1
2
35
12
Right Link
10mm Push Nut
36
18430.00
Support Plate
1
13
00179.00
6-1.0 x 20mm Socket Head Bolt
4
37
STD852005
5mm Lock Washer*
2
14
STD852006
6mm Lock Washer*
8
38
03855.00
5-1.0 x 10mm Socket Head Bolt
2
15
18415.00
Bracket Shaft
1
39
18431.00
Knob
1
16
18416.00
Left Link
1
4O
18432.00
Elevation Screw
1
17
18417.00
Fence Bracket
1
41
STD851005
5mm Fiat Washer*
1
18
06101.00
6-1.0 x 50mm Socket Head Bolt
1
42
01640.00
6-1.0 x 16mm Set Screw
4
19
18418.00
Limit Plate
1
43
STD851006
6mm Flat Washer*
4
20
18419.00
Shaft
1
44
01784.00
5-0.8 x 10mm Pan Head Screw
1
21
18420.00
Block
1
45
18955.00
6-1.0 x 30mm Socket Head Bolt
4
22
18421.00
Handle
1
46
9-23000
23
18422.00
Infeed Table
1
47
09721.00
Push Block (set of 2)
6-1.0 x 30mm Set Screw
1
1
24
18423.00
Bracket
4
48
STD870816
8-1.25 x 16mm Socket Head Boll
2
*
A
Standard hardware item available locally
Not Shown
15
Model 351.217881
Figure 25 - Replacement
Parts Illustration
for Base
18
19\
17
14._
/
13
55, 56
48
45
'3
16
50
KEY
NO.
PART NO.
DESCRIPTION
QTY.
KEY
NO.
PART NO.
DESCRIPTION
Fan Belt
QTY.
1
N/A
Base with labels
1
31
18444.00
2
STD315215
6201ZZ Ball Bearing
2
32
18455.00
V4-20x 5/8"Socket Head Pan Screw
8
3
00519.00
1
33
18456.00
Blade Clamp
2
4
08077.00
3AM1-12 Retaining Ring
Strain Relief
1
34
9-22994
Blade (set of 2)
1
5
00090.00
Line Cord
1
35
18458.00
Cutterhead
1
6
18440.00
1
36
23713.00
7
18441.00
Spring
Pin
1
37
N/A
Drive Pulley
Table Frame
1
1
8
01903.00
4-0.7 x 10ram Pan Head Screw
9
38
18461.00
Access Cover
1
9
18958.00
1
39
18459.00
Jack Screw
4
lO
23712.00
Bumper
Blade Guard with label
1
40
18443.00
Shaft
1
11
18964.00
12
STD851005
Spring
5mm Flat Washer*
13
03855.00
5-0.8 x 10mm Socket Head Bolt
14
18959.00
15
STD81005
Chip Collector
5mm Flat Washer*
16
01784.00
5-0.8 x 10mm Pan Head Screw
17
18960.00
18
18962.00
19
20
1
1
41
16080.00
Switch
1
2
42
STD51004
4mm Flat Washer*
6
13
43
05156.00
4mm Serrated Washer
2
1
43
02861.00
Brush Cap
2
3
44
02862.00
Carbon Brush (set of 2)
1
3
45
02863.00
Brush Holder
2
Chip Exhaust
Dust Chute
1
47
18433.00
Motor
1
1
48
23714.00
Motor Pulley
1
01874.00
6-1.0 x 20ram Pan Head Screw
1
49
18436.00
18449.00
Impeller
1
50
STD852005
Motor Mounting Plate
5mm Lock Washer*
1
4
21
18448.00
Chip Blower Mounting Plate
1
51
02621.00
Cord Clamp
1
22
STD851006
6mm Flat Washer*
9
52
01760.00
6-1.0 x 16ram Socket Head Bolt
1
23
STD852006
6mm Lock Washer*
6
53
18438.00
Drive Belt
1
24
01505.00
6-1.0 x 12ram Socket Head Bolt
5
54
23715.00
Cover
1
25
18462.00
55
23717.00
Foot A
2
26
18447.00
Thread Forming Screw
Fan Shaft
6
1
56
23718.00
Foot B
2
27
18446.00
Spacer
1
57
STD870512
5-0.8 x 12mm Socket Head Bolt*
1
28
STD315505
6000ZZ Ball Bearing*
2
58
23744.00
Mounting Bracket (set of 4)
4
29
01043.00
6-1.0 x 10mm Set Screw
5
A
18625.01
Half Bag Dust Collection Set
1
1
A
23719.02
Operator's Manual
1
3o
18445.00
Fan Pulley
*
Standard hardware item available locally
A
Not Shown
N/A Not Available
Recommended
A
17
Accessories
Blade (set of 2)
I
9-22994
CEPILLO MECANICO/
CEPILLADORA DE BANCO
de 6118"
El riesgo debido a la exposici6n
una mascara para la cara o respirador
dos, aprobados por OSHNNIOSH.
PRECAUClON:
Siempre
EL
•
Ingles ........................................
OPERADOR
14-17
18
Reglas de Seguridad
18-19
...........................
....................................
•
19-20
Instalacion ....................................
20-22
Operaci6n ....................................
22-25
Mantenimiento
25-27
................................
de Problemas .........................
DEBE
Use ropa apropiada.
Use una cubierta
cabello
•
de seguridad
Use una mascara
sial
•
su reemplazo si no se puede reparar la unidad). Esta garanfia no
incluye partes fungibles, tales como lamparas, baterias, barrenas
o cuchillas.
Este alerta y piense claramente. Nunca opere herramientas
mecanicas cuando este cansado, intoxicado o bajo la influencia
Parte del polvo producido
mecanicas
en ambientes
mecanicas
en lugares
malformaciones
AIgunos
ejemplos
congenitas
•
Plomo
•
Silice cristalino proveniente
ial de mamposteffa.
•
Arsenico
da.
proveniente
y cromo
de pinturas
proveniente
Mantenga
de extensi6n
a los visitantes
para tres puntas puesto a
deben tener una punta de conexi6n
del cord6n
de extensi6n
a una distancia
prudente
DEBE
y remueva las Ilaves del arrancador
uso involuntario de las herramientas
deben ser
del Area
DAR
Desenchufe
•
Consulte
•
y otro mater-
MANTENIMIENTO
siempre
el manual
la herramienta
antes de inspeccionarla.
para informarse
sobre los procedimientos
y ajuste especfficos.
Mantenga la herramienta
lubricada y limpia de modo que
funcione de la manera mas segura.
Retire las herramientas
de ajuste. Desarrolle
verificar que hayan sido retiradas
antes de encender la maquina.
trata-
18
para impedir
mecanicas.
HERRAMIENTA
de mantenimiento
qufmicamente
adecuadamente.
Mantenga a los niffos fuera del lugar de trabajo. Haga que
su taller sea a prueba de niffos. Use candados, interruptores
•
•
de madera
Los cordones
A LA
son:
cemento
debe estar iluminada
a la liuvia.
Debe haber disponible una toma de corriente adecuada para
la herramienta.
El enchufe de tres puntas debe enchufarse
SE
con base de plomo.
de ladrillos,
mecanicas
•
maestros
cualquier
por el lijado
qufmicas
las herramientas
El Area de trabajo
de trabajo.
u otros daffos reproductivos.
de estas sustancias
No exponga
peligrosos.
hOmedos o
•
•
mecanico, serrado, esmerilado, taladrado y otras tareas de construcci6n contiene sustancias quimicas que pueden ocasionar
cancer,
DE TRABAJO
A REALIZAR
No use herramientas
Por su propia seguridad, lea todas las normas
antes de manejar la herramienta.
ADVERTENCIA:
EL AREA
LA TAREA
somnolencia.
No use herramientas
•
ADVERTENCIA:
y precauciones
que produzca
a tierra y los tres alambres
del calibre correcto.
IL 60179
contra el polvo,
mucho polvo.
•
Esta garantfa le otorga derechos legales especfficos y tambien
puede usted tener otros derechos que vaffen de estado a estado.
Estates,
NO son anteojos
•
•
and Co., Hoffman
se produce
directamente
a un receptaculo
tierra correctamente.
tit de la fecha de compra.
al impacto.
Mantenga el Area de trabajo limpia. Las Areas de trabajo
desordenadas
atraen accidentes.
Siesta herramienta se usa alguna vez para fines comerciales
o
de alquiler, esta garanfia es valida flnicamente por 90 dfas a par-
Roebuck
con suelas antideslizantes.
para la cara o una mascara
utilizar la herramienta
mojados.
(o
para sujetar el
•
CRAFTSMAN
Siesta herramienta Craftsman fallara por causa de defectos en el
material o en la mano de obra en un lapso de un aho a partir de
en las
para el cabello,
lentes que s61o son resistentes
de seguridad.
AI_IO PARA
corbatas,
atascarse
Use gafas de seguridad que cumplan con la norma ANSI
Z87.1 de los Estados Unidos. Los anteojos comunes tienen
28
la fecha de compra, LLAME al 1-800-4-MY-HOME®
PARA
SOLICITAR LA REPARACION
GRATUITA DEL PRODUCTO
protectora
guantes,
Use zapatos
PARA
UN
No use ropa holgada,
•
PREPARE
DE
PREPARADO
largo.
de medicaci6n
COMPLETA
ESTAR
•
19
Montaje ......................................
Sears,
de operaci6n
EL TRABAJO
anillos, pulseras ni otras joyas que puedan
piezas m6viles de la maquina.
2-17
Ilustraci6n y Lista de Partes ......................
Garantfa ........................................
HERRAMIENTA
siga los procedimientos
ajusta-
lares. Recuerde que descuidarse
aunque s61o sea por una fracci6n de segundo puede ocasionarle
graves lesiones.
PARA
GARANTIA
adecuadamente
correctos, tal como se definen en este manual, aun cuando este
familiarizado
con el uso de esta o de otras herramientas
simi-
PRECAUCION:
Lea y siga todas las Reglas
de Seguridad y las Instrucciones de Operaci6n
antes de usar este producto por primera vez.
Identificacion
qufmicas
en un Area bien ventilada y utilice equipo de seguridad aprobado.
Cuando trabaje con este tipo de herramientas,
utilice siempre
Modelo No.
351.217881
Desempaque
de estas sustancias
depende de la frecuencia con la cual realice este tipo de trabajo.
Para reducir la exposici6n a estas sustancias quimicas: trabaje
el habito de
las herramientas
de ajuste
•
Mantenga
todas las partes
listas para funcionar.
Revise el
protector u otras piezas para determinar
si funcionan
tamente y hacen el trabajo que deben hacer.
•
Revise que no haya partes daffadas.
Verifique
Si hay una protecci6n o cualquier
deber&n repararse correctamente
A
B
el alineamiento
de las partes m6viles, si hay atascamiento,
roturas y montaje
cualquier otra condici6n que pudiera afectar el funcionamiento
de la herramienta.
•
adicionales que deben asegurarse
antes de armar:
correc-
o
LA
•
DEBE
otra parte daffada, estas
o ser reemplazadas.
No
SABER
COMO
correcta
para cada trabajo.
herramienta o el accesorio
que no fueron disehados.
•
Cuando
•
Evite que la herramienta
cambie
las cuchillas,
desconecte
se encienda
No fuerce la herramienta.
a la velocidad
para la
mecanico
de la gufa
E
F
Conjunto
Manivela
de la placa de sujeci6n
de desplazamiento
de la guia con anillo separador
G
H
Bloques de empuje (2)
Manivela de inclinaci6n de la gufa con anillo separador
I
Canal para polvo
La bolsa de arficulos
de ferreteffa
•
•
Pernos de cabeza
Pernos de cabeza
hueca, 8-1.25 x 20 mm (4)
hueca, 8-1.25 x 16 mm (2)
•
•
Arandela de seguridad de 8 mm (6)
Llave hexagonal de 3, 4, 5 y 6 mm
•
Soporte
de montaje
incluye:
(4)
la herramienta.
_/A
por accidente.
est& en la posici6n
Funcionara
del cepillo
mecanico/cepilladora
a
OFF
en la forma mas eficiente
para la cu_.l se diseff6.
•
Mantenga las manos alejadas
superficies cortadoras.
•
Nunca deje desatendida
No trate de alcanzar
de las partes movibles
una herramienta
Desconectela
y no abandone
detenido por completo.
•
No fuerce la
ni los use para una tarea
AsegL_rese de que el interruptor
(apagado) antes de enchufar.
•
USAR
HERRAMIENTA
Use la herramienta
de la bancada
C Soporte de la gufa
D Conjunto de la pieza de montaje
haga reparaciones
provisionales
(valgase de la lista de
piezas incluida para solicitar piezas de reemplazo).
EL OPERADOR
Conjunto
Gufa
al cepillo
y de las
I
_C
en funcionamiento.
el lugar hasta que se haya
demasiado
lejos. Mantengase
firme y
equilibrado.
•
Nunca se pare sobre la herramienta.
Se pueden producir
lesiones graves si la herramienta
se vuelca o hace contacto
con la cuchilla sin intenci6n.
•
Conozca su herramienta. Aprenda a manejar
su aplicaci6n y limitaciones especfficas.
•
Use los accesorios
recomendados
Si se usan accesorios
lesionar a alguien.
•
Maneje
la pieza de trabajo
manos de posibles
•
•
la pb.gina 17).
puede sufrir lesiones
en forma correcta.
Protejase
o
Consulte
trabada
•
•
2, 3, 4 y 24.
•
en
de la gufa al cepillo
hueca y arandelas
iPiense
en ia seguridad!
La seguridad
combinaci6n
del sentido comQn del operador
alerta permanente
al usar la herramienta.
ADVERTENCIA:
armada
pernos
desplazamiento
_Anillo _1_
"
de desplaza-
Soporte de la gufa
,j
es una
y un estado
No trate de operar la herramienta
haya sido completamente
mediante
del soporte.
Fije la placa en su lugar mediante la manivela
miento de la gufa y el anillo separador.
Manivela de
de la gufa
PRECAUClON:
mec_.nico
de seguridad.
Inserte el conjunto de la placa de sujeci6n en el soporte.
Coloque la placa de modo que los pasadores queden contra
el horde inferior
Siempre mantenga los protectores de la transmisi6n,
el portacuchilla y la cuchilla en su lugar yen adecuadas condiclones de funcionamiento.
o cortadora
Fije el soporte
de cabeza
en la pieza de trabajo).
Introduzca la pieza de trabajo en la cuchilla
sentido contrario al de rotaci6n.
las Figuras
FIJE EL SOPORTE AL CEPILLO MECANICO
las
lesiones.
Apague la maquina si se atasca. La hoja se atasca si se introduce muy profundamente
en la pieza de trabajo (la fuerza del
motor la mantiene
•
(consulte
incorrectos,
Figura 1 - Desempaque
la herramienta,
separado_
de
hasta que
segt_n las instrucciones.
C_onjunto de
Consulte
la Figura
la placa de
sujeci6n
1.
Verifique que no hayan ocurrido daffos durante el envfo. Si hay
dahos, se deberb, presentar un reclamo a la compafffa de transporte. Verifique que este completa.
tribuidor si faltan partes.
El cepillo
mecanico/cepilladora
una caja. Es necesario
Avise inmediatamente
de banco se envfa completo
Iocalizar y tomar
Figura 2 - Fije el Soporte
al disen
en cuenta las piezas
19
de la Guia
INSTALE LA GUlAY LA PIEZA DE MONTAJE
DE LA GUlA EN EL CEPILLO MECANICO
INSTALE EL CANAL PARA POLVO
•
Fije la gufa al conjunto de pieza de montaje de la gufa mediante cuatro pernos de cabeza hueca y arandelas de seguridad.
•
•
Deslice
la guia y la pieza de montaje
Consulte
sobre las colas de
milano del soporte y la placa de sujeci6n.
•
•
la Figura
2,5 en la p,_gina 16.
Inserte el tornillo de cabeza de placa (Clave No. 19) por las
pestahas del canal para polvo (Clave No. 18). Deslice el canal
para polvo hasta el extremo del aspirador de astillas (Clave
No. 17). Apriete el tornillo de cabeza de placa.
Siga deslizando
la gufa hacia delante de modo que quede
sobre las planchas del cepillo mecanico. En esta posici6n, el
COMO INSTALAR EL EQUIPO RECOLECTOR
DE POLVO DE MEDIA BOLSA
borde del protector de las cuchillas descansa sobre la gufa y
el portacuchilla
queda cubierto a todo Io ancho. Fije la pieza
Consulte
de montaje en su lugar mediante
miento de la gufa.
la manivela
Inserte
de la gufa con el anillo
la manivela
de inciinaci6n
separador por el esiab6n
izquierdo.
Manivela
derecho
de inclinaci6n _
de la gufa
Gufa
y enrosque
__
la Figura
de desplaza-
en el eslab6n
galones o una bolsa plastica para basura de 30 galones x 1.3
milipulgadas
para permitir el desecho sencillo y practico de
aserrin (no se incluye el cubo de basura ni la bolsa pl_.stica
para basura).
Conjunto de
la pieza de
montaje de
la gufa
Para usar el equipo
i
Cerci6rese
de la Guia
de que la placa limitadora
(vease la Figura
4)
descanse en la ranura del bloque. Coloque la guia contra
el vdtstago y fijela en su lugar mediante la manivela de
inclinaci6n.
Coloque una escuadra de combinaci6n
contra la cara de
la gufa y la superficie de la plancha. La guia y la plancha
el resorte
Coloque
Deslice
polvo.
para verificar
dentro del brazo de la bolsa de filtrar.
•
Ponga la banda de la bolsa sobre el reborde
basura y ajuste la bolsa apretando la cinta.
el brazo con el resorte
recolector
el resorte
sobre el orificio de escape
los
del cubo de
•
Coloque
•
Deslice
polvo.
dentro del brazo de la bolsa de filtrar.
•
Arme el soporte de la bolsa. Deslice los conectores
ranuras de los segmentos
del soporte.
•
Deslice la bolsa plastica
la bolsa entre 3 y 4".
•
Ponga la banda de la bolsa de filtrar sobre el soporte
bolsa y dentro de la ranura.
•
Fije en su lugar apretando
el brazo con el resorte
sobre el orificio de escape
por dentro del soporte.
de
por las
Deje solapar
de la
la cinta.
Orificio de escape
'__
Bolsa
para filtrar
"_
de
de polvo con una bolsa para
Resorte
el vdtstago con un destornillador
hasta que la gufa quede
perpendicular.
Fije en su lugar apretando la tuerca hexagonal.
o transportador
de polvo con un cube de basura:
•
deben quedar perpendiculares
entre sf. Si no es asf, afloje
la manivela de inclinaci6n, afioje la tuerca hexagonal y gire
Use una falsa escuadra
recolector
•
Para usar el equipo
basura:
Figura 3 - Instale el Conjunto
5.
El Equipo Recolector de Polvo de Media Bolsa Craftsman estb.
dise_ado para recolectar el polvo residual de herramientas de
carpinterfa que tengan un orificio de escape de polvo de 272" de
di_.metro. La bolsa de filtrar se une a un cubo de basura de 30
de polvo
Segmentos
del soporte
Conector
topes limitadores de 45 ° hacia adentro y hacia fuera. El tope
de 45 ° hacia adentro es el perno de cabeza hexagonal situado debajo del vastago. El tope de 45 ° hacia fuera est,_ situado
en la parte superior de la gufa. Si es necesario un ajuste,
_'_)
afioje la tuerca hexagonal, gire el perno de cabeza hexagonal
a la posici6n adecuada y fije en su lugar mediante la tuerca
Banda j1_
Soporte
_bolsa
,_de
_
la
hexagonal.
Soporte
Placa limitadora --
Tuerca hexagonal
Cubo de
basura
_,,
para la
basura
o,sa
Figura 5 - Equipo
Recolector de Polvo de Media Bolsa
Vastag
Consulte
Tope de 45 ° hacia adentro
Figura 4 -Topes
las Figuras 6-10 en las paginas
21 y 22.
El cepillo mecanico/cepilladora
de banco pesa aproximadamente
70 lb. una vez que est,_ armado. El cepillo mec_.nico/cepilladora
Limitadores
debe instalarse
20
en un lugar que cuente con suficiente
iluminaci6n
y una fuente
de alimentaci6n
mecanico/cepilladora
•
adecuada.
Para instalar
•
el cepillo
de banco:
AsegLirese que haya suficiente espacio para mover la pieza
de trabajo a traves de todo el corte. Deberb. haber suficiente
hexagonales
a tierra deberb, conectarse
directa-
Tomacorriente puesto a
adecuadamente
Punta de conexidn
a tierra
Enchufe de 3
El cepillo mec_tnico/cepilladora
se puede instalar en un banco
de trabajo mediante los soportes de montaje suministrados,
y
pernos, arandelas de seguirdad y tuercas
incluyen). Consulte la Figura 6.
de conexi6n
mente a un z6calo para 3 clavijas instalado y conectado
debidamente
a tierra, tal como se muestra (vease la Figura 8).
espacio de manera que ni los operadores ni demurs personas
tengan que pararse en Ifnea con la madera mientras se este
usando la herramienta.
•
El enchufe
puntastierra
_J
(no se
Figura 8 - Recept_culo
para 3 Puntas
Base del
•
_
cepillo mecgtnico
No retire ni modifique en forrna alguna la punta de conexi6n a
tierra. En caso de un mal funcionamiento
o una descompostura, la conexi6n a tierra proporciona una ruta de menor
resistencia para la descarga electrica.
ADVERTENClA:
Soporte de montaje
tomacorriente,
el enchufe.
•
El cepillo
mecanico/cepilladora
superficie
firme y nivelada.
se debe empemar
Cerci6rese de que no se meza el cepillo
y que esten niveladas las planchas.
19"
del
los terminales
Revise peri6dicamente
los cordones de la herramienta
y si
estan daSados, Ilevelos a un centro de servicio autorizado
para que los reparen.
•
El conductor verde (o verde y amarillo) del cord6n es el cable
de conexi6n a tierra. Si es necesario reparar o reemplazar el
cord6n electrico o el enchufe, no conecte el cable verde (o
verde y amarillo) a un terminal cargado.
•
Un z6calo para dos clavijas debera ser reemplazado con un
z6calo para tres clavijas debidamente conectado a tierra e instalado de acuerdo con las Normas para Instalaciones Electricas
(National Electric Code) y los c6digos y regulaciones locales.
ADVERTENClA:
S61o un electricista
calificado
debe cambiar
Figura 7 - Area que Ocupa el Cepillo Mecbnico/Cepilladora
los receptb.culos.
FUENTE DE ALIMENTACION
Se puede usar temporalmente
un adaptador de 3 puntas a 2
puntas con conexi6n a tierra (vease la Figura 9) para conectar
ADVERTENCIA:
No conecte
la fuente de alimentaci6n
del ensamblaje.
el cepillo mecanico/cepilladora
hasta haber cumplido
a
los enchufes a un tomacorriente
puesto a tierra.
todos los pasos
bipolar que este correctamente
Tal6n de tierra
El motor ha sido disefiado
para funcionar
especificados.
Las cargas normales
gos dentro de un intervalo de110%
Aseg_rese
al voltaje y frecuencia
se pueden manejar sin riesrespecto al voltaje especifica-
Adaptador_,,_]Enchufe de 3 puntas
conectado
qua _ste
una tierra
conocida
_
do. Si se hace funcionar la unidad a un voltaje fuera de este
intervalo, se puede recalentar y quemar el motor. Las cargas
pesadas exigen que el voltaje en los terminales
inferior al especificado.
•
La fuente de alimentaci6n
del motor no sea
del motor se controla
mediante
Receptaculo
2 puntas
un
Figura 9 - Recept_culo
interruptor basculante. Si se extrae la Ilave del interruptor basculante, se bloquea la unidad e impide el uso no autorizado.
INSTRUCCIONES
PARA
ADVERTENCIA:
LA CONEXION
Si no se conecta
•
A TIERRA
correctamente
•
las instrucciones
que la herramienta
tierra, consulte
•
Esta herramienta
de conexi6n
haya quedado
un electricista
a tierra
efectivamente
No utilice este tipo de adaptadores a menos que este permitido por los c6digos y regulaciones
nacionales y locales. (En
de conexi6n
a tierra
de tierra permanente,
por ejemplo, una tuberfa de agua puesta a tierra, una caja de tomacorriente
puesta a tierra oun sistema de cables puesto a tierra.
o duda
puesta a
calificado.
viene equipada
para
Si se permite el uso de un adaptador de 3 a 2 puntas con
conexi6n a tierra, se debe conectar firmemente la lengOeta
verde o terminal rfgido en un lado del adaptador a una toma
de un electrochoque.
Si no entiende
a
para 2 Puntas con Adaptador
Canada no se permite usar adaptadores
de 3 puntas a 2 puntas.)
el conductor
a tierra del equipo, se corre el riesgo de un electrochoque.
El
equipo debe estar conectado a tierra mientras se usa para proteger al operador
o
•
1 1_
k
el enchufe
El enchufe debe conectarse en el tomacorriente
correspondiente que haya sido instalado y conectado a tierra debidamente, de acuerdo con todos los c6digos y regulaciones
locales. No modifique el enchufe que se incluye. Si no cabe
en el tomacorriente,
solicite a un electricista calificado que
instale un tomacorriente
adecuado.
a una
mecanico/cepilladora
o desconectar
que los dedos toquen
•
Figura 6 - Utilice Soportes de Montaje para Asegurar el
Cepillo Mecbnico
•
AI conectar
no permita
•
con un cable especificado
para 150 V y un enchufe de 3 puntas para conexi6n a tierra
(vease la Figura 8) que Io protegen a usted de un electrochoque.
Muchos de los tornillos de la plancha
de agua y las cajas de tomacorriente
de cubierta, las tuberias
no est,_n debidamente
conectados a tierra. Para garantizar que la conexi6n a tierra
sea efectiva, un electricista calificado debe verificar los
medics de conexi6n a tierra.
21
CORDONES
DE
SPECIFICACIONES
EXTENSION
•
El uso de cualquier tipo de cord6n de extensi6n ocasionara
una cafda en el voltaje y una perdida de potencia.
•
Los cables del cord6n
de extensi6n
suficiente para conducir
voltaje correcto.
•
•
•
la corriente
Utilice la tabla para determinar
de extensi6n (AWG).
deben tener
adecuada
el tamaffo
el tamaffo
y mantener
mfnimo
el
Tamaffo
CORDON
DE
Cortes
Orificio
No se recomienda
utilizar cordones
CONEXIONES
(rpm) ....................
70 Ibs
DE OPERACION
El funcionamiento
de todas las herramientas
120
12
gafas de seguridad que cumplan con los requisitos de la norma
estadounidense
ANSI Z87.1 (se indica en el paquete) antes de
comenzar a usar la herramienta mecanica.
60
ADVERTENOIA:
Para su propia seguridad, lea todas las
instrucciones
y las precauciones
de seguridad antes de operar la
herramienta.
10,000
ELECTRICAS
ADVERTENCIA:
Cerci6rese de que la unidad este apagada y
desconectada
de la fuente de alimentaci6n
antes de inspeccionar
el cableado.
•
Aprenda las reglas de seguridad generales para el uso de
herramientas
mecanicas. Asegt_rese de comprender
todas
las precauciones
(veanse las paginas 18, 19 y 22).
La unidad esta conectada
do (vea la Figura 10).
•
Cuando ajuste o reemplace cualquier parte del cepillo
mecanico/cepilladora,
abra el interruptor y retire el enchufe
de la fuente de alimentaci6n.
•
AsegLirese que todos los protectores
acoplados y firmemente sujetos.
como Io ilustra el diagrama
de cablea-
El motor se ensambla con un cable de tres conductores,
aprobado para usarse con 120 voltios como se indica. La fuente de alimentaci6n del motor estA controlada por un interruptor basculante enclavador bipolar.
•
AsegLirese
•
Siempre
Las Ifneas de energia electrica se insertan directamente
en el
interruptor. La Ifnea de conexi6n a tierra verde debe permanecer
firmemente sujeta al bastidor para ofrecer la adecuada protec-
•
AsegLirese que las cuchillas
acopladas al portacuchilla.
•
No enchufe el cepillo mecanico/cepilladora
a menos que el
interruptor este en la posici6n OFF (apagado). Despues de
Extraiga
ci6n contra un electrochoque.
que nada obstaculice
esten correctamente
la Ilave para evitar el uso no autorizado.
•
de
mecanicas puede hacer que sean lanzados a los ojos cuerpos
extraffos, Io cual puede lesionarlos gravemente. Siempre use
MonofAsico
del portacuchilla
2W' Diametro
12A, 120V
DE SEGURIDAD
ADVERTENCIA:
(Hz) .....................................
Velocidad
...................
Profundidad del corte es el termino empleado para indicar la profundidad con que las cuchillas penetran en la pieza de trabajo.
de CA de 120 voltios tiene las siguientes
Fase .......................................
de polvo
285/8x 18 x 12"
Cepillar con cepilladora
se refiere a reducir el tamaffo del
madero al espesor deseado al mismo tiempo que se crea una
superficie nivelada, paralela al lado opuesto de la tabla.
de mAs
..........................................
Frecuencia
recolector
20,000
.....................
ladas de modo que los dos bordes que pasan por los bloques
cepillado encajen perfectamente
en una uni6n sin costura.
14
...........................................
Amperaje
generales
Cepillar con cepillo mec_inico es una operaci6n de nivelado en
la que se elimina una pequeha cantidad de madera de los bordes
y caras de una tabla para obtener superficies lisas, rectas y nive-
MOTOR
Voltaje
por minuto ................................
REGLAS
de 100 pies de largo.
El motor universal
especificaciones:
W'
en
16
de extensi6n
6W'
maxima ...........................
Motor .......................................
Norma AWG
pies ........................................
de corte
................................
Peso ...........................................
EXTENSION
del alambre
AVlSO:
225/8x 33/4"
de la gufa .........................
Dimensiones
Hasta 50 pies .......................................
50-100
Dimensiones
Profunidad
del cord6n
Si el cord6n de extensi6n estA desgastado,
roto o daffado
cualquier forma, reemplAcelo inmediatamente.
DEL
28% x 6W'
Ancho de la cuchilla
Utilice t_nicamente cordones de extensi6n trifilares que tengan
enchufes tipo conexi6n a tierra de tres puntas y receptAculos
tripolares que acepten el enchufe de la herramienta.
LONGITUD
Tamaho de la mesa ............................
use protecci6n
ninguna
parte movible.
para los ojos o para la cara.
esten alineadas
y correctamente
cerrar el interruptor, permita que el cepillo mecanico/cepilladora alcance toda la velocidad antes de usar.
•
Mantenga
•
No fuerce el corte. Si disminuye
cado, se recalienta el motor.
DESCRIPCION
•
El cepillo mecanico/cepilladora
de banco de 6%" se usa para
alisar las caras y bordes de una tabla, aplanar la superficie de
maderas combadas y hacer biseles, chafianes y conos. El cepillo
Use madera de calidad. Las cuchillas duran mas y los cortes
resultan mas uniformes si la madera es de buena calidad.
•
No cepille materiales que tengan
3/4" de ancho 0 W' de espesor.
menos de 8V8" de Iongitud,
•
Nunca haga un corte de juntura
mayor de Vs" de profundidad.
•
Mantenga siempre el portacuchilla
y los protectores
cuchillas en buenas condiciones
de funcionamiento.
•
Mantenga la proporci6n adecuada entre las superficies
de
las planchas de alimentaci6n
y salida y la trayectoria de las
cuchillas del portacuchilla.
Consulte
las Figuras
10-20 en las pAginas 23-25.
mecanico/cepilladora
cuenta con planchas de alimentaci6n
y salida de hierro fundido, cuerpo de hierro fundido con superficies
lisas de trabajo y tornillos de avance para un ajuste preciso de la
altura de las planchas. Una gufa de direccionamiento
equilibrada
se inclina 45 ° (hacia adentro) y 45 ° (hacia fuera). Un soplador
incorporado
para la eliminaci6n de astillas. La herramienta viene
con un interruptor basculante de enclavamiento
con Ilave removible y bloques de empuje. El cepillo mecAnico/cepilladora
facilmente maneja maderos toscos, cepilla maderas duras y suaves
de hasta 6%" de espesor mediante un portacuchillas
de dos
hojas y hace cortes de hasta %'.
22
las manos alejadas
de las partes movibles.
la velocidad
la pieza hacia la plancha
o se queda atas-
de las
•
No haga retroceder
•
Apoye la pieza de trabajo adecuadamente
durante toda la
operaci6n; mantenga el dominio sobre la pieza de trabajo.
de alimentaci6n.
•
Use bloques de sujeci6n/empuje
para nivelar la uni6n de
materiales de menos de 3" de ancho o desbastar materiales
COMO
Tome las precauciones
No permita
de rotaci6n
arrojados
•
m_.s de 45 ° hacia adentro (hacia el portacuchilla)
mayor estabilidad a una pieza de trabajo angosta
(en sentido
irfin en esta direcci6n.
Reemplace
•
No intente
la alimentaci6n
si no se esta
mecb.nico/cepilladora.
o afile las cuchillas
realizar
opuesto
si se dahan o desafilan.
una operaci6n
extraha
•
Afloje
•
La manivela de inclinaci6n de la guia esta accionada por
resorte. Para seguir girando la manivela, tire suavemente
para
o poco comQn
la manivela
separarla
de inclinaci6n
de la gufa.
de la gu/a y devuelvala
a su posicidn
original.
•
Suelte la manivela
Dele mantenimiento
•
Incline manualmente
la guia hacia adentro/afuera
hasta Iograr
el 6.ngulo deseado. Use un saltarregla o un transportador
para
al cepillo
mecfinico/cepilladora.
de mantenimiento
(vease las pfiginas
Siga las
26-27).
medir el fingulo
PROFUNDIDAD
Consulte
DEL
la Figura
CORTE
alimentaci6n
10.
se puede subir o bajar mediante
Girar el volante
de alimentaci6n
madera
relativa de la
La plancha de
en sentido horario hace que
para eliminar menor cantidad
Perilla reguladora
de la profundidad
corte
Cerci6rese
Mida desde la superficie
de la plancha
la parte inferior del escantill6n.
profundidad del corte.
la manivela
de alimentaci6n
obtenida
de los cortes efectuados
Afloje
Deslice
la gufa hacia delante
•
Apriete
la manivela
•
Cerci6rese
de desplazamiento
de desplazamiento
de que la guia este apretada
No extraiga
DE
LAS
la Profundidad
la guia en sentido
opuesto
al
CUCHILLAS
de las cuchillas
protege
Haga avanzar
un pedazo
zo de madera, el protector
su posici6n inicial.
Abra completamente
se detenga
su posici6n
PRECAUCION:
Profundidad
-rte
" mdtx" dede*/8''
del Corte
el
mec_tnico. En todo momento el portacuchilla
cubierto por todos sus lados.
con este cepillo
--...
11 - Verifique
de las cuchillas.
este cubierto
No desplace
del portacuchilla.
Siempre
correctamente.
de que funciona
de madera
correcta-
de W' de espesor
_)
23
debe regresar
sobre
el protector
automfiticamente
de las cuchillas
y sueltelo varias veces. Siempre
original por acci6n del resorte.
Si el protector
sera necesario
de las cuchillas
reemplazar
no funciona
•
Para ajustar o armar el resorte,
consulte
26.
a
o ajustar el resorte.
Para reemplazar el resorte, p6ngase en contacto
da o centro de servicio Sears mas cercano.
pfigina
a
hasta que
debe regresar
•
tector de las cuchillas",
Figura
y segura.
el portacuchilla
entre el protector y la guia. El protector debe
separarse y dar paso al pedazo de madera. AI retirar el peda-
P
c_
el protector
todo momento
deseada.
de la guia.
cuerpo del cepillo
debe permanecer
•
_
de la guia.
hasta la posici6n
PRECAUCION:
correctamente,
de salida_
en
de la gufa:
•
•
PRECAUCION:
Cerci6rese de que el interruptor este en la
posici6n OFF (apagado) y que el cord6n este desenchufado
de
la alimentaci6n
electrica antes de efectuar esta verificaci6n.
.
la cuchilla
hasta
serb. la
de %_".
Plancha
para
original.
y segura.
a fin de exporter
Verifique el protector para cerciorarse
mente. Para verificar:
La medida
de la manivela
a su posicidn
y continQe apretando.
debe estar en su lugar y funcionar
de salida que sobrepase
de la gufa.
tire suavemente
•
mecfinico/cepilladora
no sobrepasa %'. Para disminuir el riesgo
de contragolpes
y lesiones, recomendamos
hacer cortes no
mayores
de inclinaci6n
de que la gufa este apretada
PROTECTOR
11.
La profundidad
Suelte la manivela
•
El protector
Coloque un escantill6n en la plancha
la plancha de alimentaci6n.
AVlSO:
•
Cerci6rese de queen
portacuchilla.
DEL CORTE
a 0° (90 ° de la plancha),
de la gu/a y devuelvala
PRECAUCION:
del Corte
VERIFIQUE LA PROFUNDIDAD
la Figura
la manivela
Para ajustar la posici6n
Plancha de alimentaci6n
Consulte
Para seguir apretando,
La guia se puede posicionar
cualquier medida.
de
no rebaje mdts de W'.
Figura 10 - Profundidad
Apriete
•
separarla
de la pieza de trabajo.
AI cepillar,
de inclinaci6n.
•
el volante.
en sentido antihorario hace que baje la plancha
para eliminar mayor cantidad de madera de la
pieza de trabajo. Girar el volante
suba la plancha de alimentaci6n
y continQe aflojando.
AVlSO: La gufa tiene topes absolutos
46 ° hacia adentro y 45 ° hacia fuera.
La profundidad del corte se ajusta por la posici6n
plancha de alimentaci6n
respecto al portacuchilla.
•
para cortes de mayor angulo.
sin estudiarla o sin usar bloques de sujeci6n/empuje,
posicionadores, portapiezas,
topes y accesorios
similares.
instrucciones
•
al portacuchilla)
para darle
o hacia fuera
Para ajustar el dtngulo de inclinaci6n:
y desconecte
el cepillo
•
•
en caso de contragolpes.
que nadie cruce ni este de pie en la trayectoria
del portacuchilla.
Los contragolpes
o los residuos
Abra el interruptor
usando
necesarias
LA GUIA
La guia se puede ajustar para cortar a cualquier ,_ngulo entre 0 ° y
45 ° hacia adentro y hacia afuera. La gufa se puede inclinar no
de menos de 3" de espesor.
•
POSICIONAR
con su tien-
"Cdmo ajusta el pro-
COMO
AJUSTAR
Consulte
las Figuras
PRECAUCION:
LA ALTURA
DE LAS
EVITE
CUCHILLAS
12-14.
El cepillo
Cerci6rese
de que el interruptor
han sido ajustadas
mecanico/cepilladora
polvo es particularmente
necesario cuando se hacen cortes mas
profundos, para evitar que se atasquen las astillas.
•
Iongitud
No use tablas sucias.
•
Extraiga los clavos y las grapas.
cortar s61o madera.
•
Evite los nudos. La madera
que desgastan
aproximadamente.
de
Bloque de madera
•
Tornillo de la abrazadera
EvalOe las tablas
Protector de
la cuchilla
Ponga un escantill6n
sobre la plancha
Escantill6n
quede
est,_n sumaque sus dedos
la Figura
•
Gire manualmente
de la cuchilla,
del interruptor
en la parte frontal del cepillo
•
Empuje el interruptor
mecanico/cepilladora
•
El interruptor
de encendido/
mecb.nico/
hacia arriba para encender del cepillo
y hacia abajo para apagarla.
tiene una Ilave removible
bloquear
de bloqueo:
Lleve el interruptor
•
Tire de la Ilave del interruptor.
a la posici6n
el mecanismo
Inserte y empuje
rruptor.
que permite
OFF (apagado).
•
ADVERTENCIA:
OFF (apagado).
de bloqueo:
la Ilave del interruptor
Aseg@ese
en la ranura del inte-
que el interruptor
la posici6n OFF (apagado) y que el cord6n
antes de extraer la Ilave del interruptor.
Plancha de
alimentaci6n
con la plancha
la superficie.
de funcionamiento
se ubican
Para desactivar
_ORTACUCHILLA
uniforme
puede
DE ON/OFF (ENCENDIDO/APAGADO)
•
contacto
nivelada
Para activar el mecanismo
acero
Figura 13 - C6mo Verificar la Alineaci6n
de Salida
El operador
un corte demasiado profundo para
la tabla. Pase la maquina varias veces
la unidad en la posici6n
de salida y la cuchilla.
Plancha
de salida
y atascar
cepilladora.
de modo que una de las cuchillas
PRECAUClON:
Las cuchillas del portacuchilla
mente afiladas. No permita en ningLin momento
entren en contacto con el filo cortante.
tupida
desprender
combadas.
debe
18.
mas elevada.
A ambos extremos
El cepillo mecb.nico
Consulte
apagado
Figura 12 - Bloquee el Protector de la Cuchilla
son abrasivos
INTERRUPTOR
Las posiciones
•
y las piedras
con veta atravesada
demasiado
verse tentado a aplicar
escuadrar rapidamente
para mantener
en la posici6n
La suciedad
la cuchilla.
endurece los nudos y estos se pueden
el cepillo mecanico.
Gire el portacuchilla
para
usar una manguera de succi6n, pagina 25) conectado al orificio
de escape en su parte posterior. Instalar un sistema recolector de
Impida que se cierre el protector de las cuchillas interponiendo entre el y la gufa un trozo de madera residual de 6W' de
Abrazadera
la
•
es una mb.quina de precisi6n
Para un funcionamiento
correcto es preferible usar el cepillo
mecanico con un sistema recolector de polvo (consulte C6mo
su
cortar de forma precisa, las cuchillas deben estar tan altas como
la plancha de salida en su punto mas elevado. Para verificar la
altura de las cuchillas:
•
CUCHILLAS
de mala calidad en las piezas subsiguientes.
en fdtbrica para garantizar
correcto funcionamiento
y no debe ser necesario ajustarlas. No
obstante, el envfo y manejo puede haberlas desalineado. Para
•
LAS
trabajar en madera y s61o se debe usar en madera de buena calldad. El uso de madera de mala calidad podria ocasionar cortes
este en la
posici6n OFF (apagado) y que el cord6n este desenchufado
antes de empezar a verificar las cuchillas.
Las cuchillas
DAI_IAR
se encuentre
en
este desconectado
de la Plancha
el escantill6n
Llave del interruptor
Interruptor
debe hacer
de salida.
el portacuchilla.
Las cuchillas
deben ape-
nas rozar el escantill6n. Si una cuchilla esta demasiado baja o
alta por cualquier extremo, ajuste su altura mediante los
tornillos niveladores.
_
Abrazadera
de la cuchilla
Figura 15 - Interruptor
Portacuchilla
de On-Off (Encendido/Apagado)
COMO HACER AVANZAR LA PIEZA DE TRABAJO
Tornillo de
Consulte
seguridad
de la cuchilla
las Figuras
16-18 en la p,_gina 25.
La velocidad de alimentaci6n
se refiere a aquella con la que se
hace avanzar la madera sobre las cuchillas. Una alimentaci6n
Tomillo nivelador
uniforme
da un resultado
uniforme.
Para hacer avanzar
la pieza
de trabajo:
Cuchilla
•
Sujete firmemente
la tabla sobre ambas planchas
gufa.
Figura 14 - Conjunto
•
del Portacuchilla
24
Mantenga
unidos
los dedos.
y contra
la
•
Haga avanzar
la tabla a una velocidad
vacila o para, puede
borde de la tabla.
uniforme
y continua.
hacer que se corte un "escal6n"
Si
en el
Figura 19 - C6mo Alimentar con Bloques de Empuje
•
Agarre
•
Ponga los bloques
firmemente
los bloques
de empuje
de trabajo y presi6nela
Figura 16 - C6mo Hacer Avanzar la Pieza de Trabajo
•
A medida que la mano trasera
retire la mano delantera.
•
ContinUe alimentando
sobre la pieza
contra la plancha.
•
Mueva con una mano sobre la otra para mantener
la pieza de trabajo en todo momento.
•
Si desbasta
pasa sobre el portacuchilla,
mientras coloca la mano delantera
de sujeci6n/empuje.
horizontalmente
detr_.s
piezas de trabajo
controlada
entre _/2y 3/4" y m_.s angostas
que los bloques de empuje, inclfnelos para evadir el protector
del portacuchillas
mientras hace avanzar la pieza.
de la trasera hasta cortar la tabla en toda su Iongitud.
COMO BISELAR Y ACHAFLANAR
Consulte
•
la Figura
20.
La gufa del cepillo
mec_.nico/cepilladora
se puede ajustar
entre 45 ° hacia adentro y 45 ° hacia fuera. Ajuste la guia al
6.ngulo deseado y apriete la manivela de inclinaci6n de la
guia.
•
Biselar es cortar oblicuamente
Biselar una pieza puede
debido a la profundidad
•
Figura 17 - C6mo Dirigir la Pieza de Trabajo
toda la arista de una tabla.
requerir hacer avanzar
varias veces
de corte necesaria.
Achaflanar
es eliminar s61o una esquina de la arista de la
tabla. Normalmente,
un chaflan se hace en un solo pase con
un corte de %e" de profundidad.
Alimente
en la direcci6n
Si la naturaleza
de la veta, si es posible.
de la pieza de trabajo
zar en sentido opuesto
alimente lentamente.
Si la pieza de trabajo
obliga a hacerla
Arista biselada
avan-
a la veta, haga cortes muy ligeros y
es larga, use apoyos
adicionales
(con-
Arista
suite Accesorios
recomendados,
p6.gina 17) tanto en el
extremo de alimentaci6n
como en el de salida para evitar
heridas
presi6n
por deslizamiento
o contragolpe
uniforme sobre el )ortacuchilla.
y para ejercer
_
achaflanada
una
Figura 20 - C6mo Biselar y Achaflanar
ADVERTENCIA:
y desconecte
alimentaci6n
Rotaci6n
COMO
DE
LAS
Lleve el interruptor
a la posici6n
OFF (apagado)
del cepillo mecb.nico/cepilladora
de la fuente de
antes de realizar labores de mantenimiento.
VERIFICAR
EL
DESGASTE
CUCHILLAS
El estado de las cuchillas
afecta la precisi6n
del corte. Si no se
examin6 el desgaste de las cuchillas cuando se verificaba su
altura, la calidad del corte indicara su estado. Si las cuchillas
En contra de la veta
estan romas, desgarran la fibra de la madera en vez de cortarla.
La veta se eleva si las cuchillas desafiladas
golpean la madera
Rotaci6n
Figura 18 - Sentido de la Alimentaci6n
en puntos de densidad diferente.
cuchillas estan picadas.
COMO
COMO
AFILAR
LAS
Consulte
la Figura
21 en la p6.gina 26.
Consulte
•
USAR
la Figura
BLOQUES
DE
SUJECION/EMPUJE
19.
Las cuchillas
Use siempre bloques de sujeci6n/empuje
cuando nivele o
ranure tablas de menos de 3" de ancho o cuando desbaste
se pueden
Las aristas se elevan si las
CUCHILLAS
esmerilar
individualmente
con una piedra de afilar fina. Cerci6rese
aceite sea plana y no est@ desgastada.
tablas de menos de 3" de espesor.
•
Cubra parcialmente
superficie
25
superior
amol_.ndolas
de que la piedra de
Para afilar las cuchillas:
la piedra con papel para proteger
de la plancha.
la
•
Ponga la plancha
contacto
•
de alimentaci6n
con la cuchilla
de modo que la piedra haga
a Io largo de su superficie
•
biselada.
•
Pase la piedra de un lado a otro de la cuchilla mientras,
ademas, mueve la piedra ligeramente en el sentido de
alimentaci6n.
Extraiga los residuos
cuchillas.
Cerci6rese
cuchilla
COMO
•
Cerci6rese
lugar.
de pasarla
Si las cuchillas
pueden
el mismo nOmero de veces por cada
estb.n picadas,
se deben reemplazar
amolar varias veces hasta que su espesor
o amolar.
DE
de apretar
AJUSTAR
y suelte el protector
todos los tornillos
y de que queden
LAS
EL
de seguridad
quimicos
cuchillas
Sial
PROTECTOR
la Figura
25 en la p,_gina 16.
que pueden dafiar o destruir
y otras piezas de pl6.stico.
soltar el protector
el protector
de las cuchillas
de las
no queda cubierto
tacuchilla, es necesario ajustar el protector o reemplazar
resorte. Para ajustar o reemplazar el resorte:
Figura 21 - C6mo Afilar las Cuchillas
COMO
REEMPLAZAR
Consulte
•
LAS
o amoladas
cuyo
•
Ponga el cepillo mecdtnico/cepilladora
el interruptor quede hacia arriba.
•
Extraiga los cuatro tornillos
37 y 54).
•
Afloje y extraiga el tornillo, la arandela y el resorte (Claves
No. 13, 12 y 11) debajo de la base que sujetan al protector
la cuchilla.
•
Deslice
•
Si el resorte
mecanico/cepilladora
el@ctrica y Ileve el interruptor
el protector
a la posici6n
de las cuchillas
y saque el protector
a un lado de modo que
y la cubierta
inferior
(Claves
No.
de
de la cuchilla.
no esta tenso, se debe reemplazar.
Extraiga
el
y solicite un reemplazo.
CUCHILLAS
•
el cepillo
el porel
tornillo (Clave No. 8) que sujeta al resorte. P6ngase en contacto con la tienda o el centro de servicio Sears mas cercano
la Figura 22.
Desenchufe
de la
ajustados.
PRECAUClON:
No lubrique el punto de giro del protector de
las cuchillas. El aceite y los lubricantes podrian contener agentes
sea de W_6".
AVlSO: Muchas tiendas no prestan el servicio de rehacer la
superficie de las cuchillas. En las paginas amarillas debe aparecer "Servicios de esmerilado" o "Amolado de herramientas".
No instale nunca cuchillas desequilibradas
ancho sea inferior a _3/_e".
de las
CUCHILLAS
Consulte
Se
de madera
OFF (apagado).
BIoquee
•
Afloje y extraiga los quatros tornillos de seguridad
la cuchilla y la abrazadera de la cuchilla.
nuevo de modo que su brazo corto quede
que sujetan
Ponga el protector de la cuchilla de modo que el brazo largo
del resorte quede contra la cara del protector de la cuchilla.
•
Sujete el protector
dela y el tornillo
Tornillo de
la
la cubierta
Vuelva a instalar
Cerci6rese de que el protector
debidamente.
COMO
REEMPLAZAR
Consulte
las Figuras 23 y 25.
mediante
el resorte,
la aran-
de placa.
•
inferior. Asegure
con tornillos.
de la cuchilla funcione
LA CORREATRANSMISORA
•
Lleve el interruptor a la posici6n OFF (apagado)
la herramienta
de la fuente de alimentaci6n.
•
Ponga el cepillo mecanico/cepilladora
el interruptor quede hacia arriba.
•
Extraiga
de
la cuchilla
de la cuchilla
de cabeza
•
Abrazadera
de la cuchilla
Bloque de madera
(Clave No. 8).
•
para que no se abra.
Portacuchilla
el resorte
sujeto por el tornillo
de la alimentaci6n
•
Coloque
los cuatro tornillos
y desconecte
a un lado de modo que
y la cubierta
inferior
(Claves
No.
37 y 54).
Figura 22 - Bloquee el Protector de la Cuchilla
•
Levante la cuchilla y la abrazadera
rarlas del portacuchillas.
de la cuchilla
para sepa-
Elimine cualquier acumulaci6n
de aserrin y resina del portacuchilla y la abrazadera de la cuchilla.
•
Ponga la abrazadera de la cuchilla contra la cuchilla
repuesto y vuelva a instalar en el portacuchilla.
•
Sujete la cuchilla y la abrazadera de la cuchilla mediante los
quatros tornillos de seguridad de la cuchilla. No apriete los
tornillos de seguridad de la cuchilla.
Verifique
la altura a ambos extremos
suite C6mo ajustar la altura de las cuchillas,
•
Apriete
•
Vuelva a verificar
los tornillos
de seguridad
el ajuste
•
Repita el procedimiento
•
Separe
la correa
•
y la cubierta
del ventilador
girando
de acceso
(Claves
presionada
la correa.
Extraiga los cuatro pernos (Clave No. 24) que sujetan
de montaje del motor (Clave No. 49).
la placa
de
de la cuchilla
(conExtral
pagina 23).
y cerci6rese
de que
Figura 23 - Reemplazo
de salida.
para reemplazar
•
la otra cuchilla.
26
Extraiga
la correa
"
de la Correa
del ventilador
No.
(Clave No. 31) de la polea del
y manteniendo
de la cuchilla.
de la cuchilla
est@ nivelada con la plancha
Extraiga los dos tornillos
37 y 38).
portacuchilla
•
AVlSO:
•
Reguladora
(Clave
de Tiempo
No. 53).
•
•
•
Instale
la correa
nueva. Cerci6rese
de que la correa
encaje
Mantenga
Vuelva a instalar
la correa
del ventilador
de acceso
usando
•
Instale
inferior
COMO
de nuevo la cubierta
REEMPLAZAR
LA
usando
LUBRICAClON
en las
ADVERTENClA:
Cerci6rese de que el interruptor est@ en la
posici6n OFF (apagado) y que la herramienta est@ desconectada
de la alimentaci6n
el@ctrica.
dos tornillos.
cuatro tornillos.
ADVERTENClA:
frenos, la gasolina,
CORREA
•
Lleve el interruptor a la posici6n OFF (apagado)
la herramienta
de la fuente de alimentaci6n.
•
Ponga el cepillo mecanico/cepilladora
el interruptor quede hacia arriba.
•
Extraiga
a un lado de modo que
inferior (Claves
No.
37 y 54).
Afloje la cubierta
y la cubierta
de acceso (Claves
del aspirador
de astillas
de ventilador
(Clave No. 21)
la nueva en la
Una la cubierta
correas.
•
Tire de la correa por encima del portacuchilla
asegurandose
de que encaje en las hendiduras de ambas poleas.
del aspirador
de astillas
a la base con las dos
La superficie de las planchas y la guia se deben conservar
lisas y limpias para facilitar el paso de la pieza de trabajo.
•
Aplique
funcionarb,
superficies
para mantenerlas
que se acumulen
guia, cuchillas
goma ni grumo
y protector
Y REEMPLAZO
DE
LAS
ESCOBILLAS
ADVERTENClA:
Apague el cepillo mecanico y descon@ctelo
de la fuente de alimentaci6n.
La vida Otil de las escobillas
depende de la carga a que se someta el motor. Inspeccione
las
escobillas regularmente
cada 100 horas de uso. Las escobillas
estb.n situadas a cada lado del motor.
mejor si se mantiene
en buenas condiciones
de funcionamiento.
Mantenga
tal como se describe en la secci6n "Operaci6n".
•
una cera en pasta alas
INSPECCION
GENERAL
mecanico/cepilladora
planchas,
MAQUINADAS
•
polea del ventilador.
No permita
y grasa.
pulidas y evitar que se oxiden.
•
MANTENIMIENTO
sellados
No.
hueca (Clave No. 24).
usada e instale
y el motor vienen
quimicos
Se debe limpiar la guia, la pieza de montaje de la guia y los
tornillos de elevaci6n seg0n sea necesario para eliminar los
SUPERFICIES
los dos pernos de cabeza
Retire la correa
El cepillo
del portacuchilla
agentes
lubricaci6n.
restos de material
Extraiga los dos tornillos
37 y 38).
extrayendo
Los rodamientos
y no necesitan
•
y la cubierta
En ningL_n momento permita que el liquido de
los aceites penetrantes,
etc. entren en con-
tacto con las superficies de plastico. Contienen
que pueden dahar y/o destruir el plastico.
y desconecte
•
los cuatro tornillos
en
pares.
en la polea del por-
Instale de nuevo la cubierta
•
C6mo afilar las
cie. Se recomienda tener a mano un juego de cuchillas de
repuesto. Siempre se debe afilar o reemplazar las cuchillas
los pernos.
Presione el conjunto del motor hacia la derecha para tensar la
correa de transmisi6n. Apriete firmemente los pernos.
•
•
(consulte
apriete totalmente
correctamente
•
las cuchillas
cuchillas, pagina 26). En algunos casos, resulta mas
econ6mico reemplazar las cuchillas que rehacerles la superfi-
tacuchilla asegurandose
de que encaje
hendiduras de ambas poleas.
•
afiladas
completamente
en las hendiduras de ambas poleas e instale
la placa del motor en la base mediante los cuatro pernos. No
Consulte
la unidad
Aplique una capa delgada de cera en pasta alas planchas y
la guia para facilitar el desplazamiento
de la madera durante
la alimentaci6n.
•
Reemplace
las escobillas
si estan desgastados
•
Reemplace
las escobillas
siesta
Iongitudes
de %" o menos.
AVlSO:
•
27
25 en la p6.gina 16.
Afloje el tapaescobilla
(Clave No. 44) y separe la escobilla
(Clave No. 45) del motor.
de resina en las
de las cuchillas.
la Figura
•
Reemplace
Reemplace
las escobillas
las escobillas
desgastado
los resortes.
el carb6n y su
s61o en pares.
y apriete el tapaescobilla.
SINTOMA
CAUSAS(S)
El motor no arranca
MEDIDA
POSIBLE(S)
1. Interruptor defectuoso
2. Motor defectuoso
CORRECTIVA
1. Solicite
el reemplazo
2.
el reemplazo/reparaci6n
Solicite
del interruptor
del motor
AVlSO: 1 y 2 deben ser efectuados por un tecnico de
mantenimiento
profesional; consulte al centro de
servicio Sears
3. Voltaje
de Ifnea bajo
El motor se para (haciendo que
los fusibles se quemen o los
1. Sobrecarga
cortacircuitos
2. Voltaje
se abran)
3.
del circuito
Corrija la condici6n
de bajo voltaje
1. Reduzca la carga del circuito (apague
artefactos electricos)
de Ifnea bajo
2.
Corrija las condiciones
Motor sobrecargado
Fusibles o cortacircuitos
incorrectos
3.
Reduzca
4.
Haga instalar fusibles
5.
Cortocircuito
del motor; conexiones
sueltas o aislamiento de los
5. Verifique que los terminales del motor no tengan
el aislamiento da_ado ni los conductores
6. Astillas
principales
cortocircuitados
atascadas
6,
de bajo voltaje de Ifnea
la carga del motor
o cortacircuitos
lentamente
toda
1. Devanados
2. Astillas
del motor defectuosos
atascadas
Haga cortes de poca profundidad e instale un
producto Shop-Vac en el orificio de escape.
1. Motor sobrecargado
muy caliente
2.
Circulaci6n
Los fusibles o cortacircuitos
se abren con frecuencia
Solicite
Haga cortes de poca profundidad
3.
Redondeo (depresiones en
los extremos de la tabla)
e instale un
Soporte
del corte
en 45 ° inexactos
la carga del motor
2.
no tienen
2.
Elimine el polvo y restablezca
normal del aire
Haga instalar fusibles
3.
Reduzca la carga del circuito (apague
artefactos electricos)
1. Reduzca
del circuito
desafiladas
inadecuado
3. Alimentaci6n
la circulaci6n
la carga del motor
o cortacircuitos
adecuados
otros
1. Reemplace o afile las cuchillas. Consulte
afilar las cuchillas" en la pagina 26
para tablas largas
no uniforme
2.
Soporte las tablas largas. Consulte
recomendados"
en la pb.gina 17
3.
Consulte "C6mo hacer avanzar
jo" en la pb.gina 24
"C6mo
"Accesorios
la pieza de traba-
1. Altura de las cuchillas
no uniforme
1. Ajuste la altura de las cuchillas. Consulte "C6mo
ajustar la altura de las cuchillas" en la pagina 23
2.
a la
Gufa no perpendicular
2.
Consulte
bancada del cepillo mecanico
3. Alimentaci6n
demasiado acelerada
3.
la gufa en el cepillo mecanico" en la pb.gina 19
Pase la madera mas lentamente
1. Topes de la guia no ajustados
correctamente
1. Ajuste los topes de la gufa. Consulte "lnstale
la gufa y la pieza de montaje de la guia en el
2.
2.
Parte inferior de la gufa desnivelada
respecto a la plancha de salida por
astillas debajo de la gufa
Veta desgarrada
del motor
suficiente
Sobrecarga
1. Cuchillas
2.
Veta fibrosa
el reemplazo/reparaci6n
de astillas y
por
de polvo
1. Motor sobrecargado
2. Fusibles o cortacircuitos
capacidad
Cortes
1,
2.
1. Reduzca
de aire restringida
acumulaci6n
irregular
del soplador
producto Shop-Vac en el orificio de escape.
Inspeccione
el conjunto del soplador de astillas y
la correa del ventilador
El motor estb. funcionando
Profundidad
adecuados
y h_.galos reemplazar
Inspeccione
el conjunto
la correa del ventilador
o no Iogra desarrollar
su velocidad
otros
3.
4.
conductores
desgastado
El motor arranca
de Ifnea
Cepillado
contenido
de madera con alto
de humedad
Las cuchillas
de la veta
3.
Cuchillas
desafiladas
28
en contra
de
de la
gufa
1. Reduzca
estb.n cortando
la gufa y la pieza de montaje
cepillo mecanico" en la pagina 19
Elimine las astillas en los lados inferiores
Sequela madera
humedad
1. Corte muy pesado
2.
"lnstale
para eliminar
la profundidad
2.
Pase la pieza de trabajo
3.
Reemplace
su alto contenido
de
del corte
en el sentido
o afile las cuchillas
de la veta
NOTAS
29
NOTAS
30
NOTAS
31
Your Home
For repair _ in your home _ of all major brand appliances,
lawn and garden equipment, or heating and cooling systems,
no matter who made it, no matter who sold it!
For the replacement parts, accessories and
owner's manuals that you need to do-it-yours_f.
For Sears professional installation of home appliances
and items like garage door openers and water heaters.
1-800-4-MY-HOME
Call anytime,
®
day or night (U.S.A. and Canada)
www.sears.com
For expert
home
(1-800-469-4663)
solutions
www.sears.ca
advice:
www.managemyhome.com
Our Home
For repair of carry-h items like vacuums, lawn equipment,
and electronics, call or go on-linefor the location of your nearest
Sears Parts & Repair Service
1-800-488-1222
(U.S.A.)
1-800-533-6937
Call anytime,
1-800-827-6655
Para pedir servicio
a domicilio,
www.sears.ca
agreement
on a product serviced by Sears:
(U.S.A.)
1-800-361-6665
de reparaci6n
y para ordenar
(Canada)
day or night
www.sears.com
To purchase a protection
Center
Au Canada
(Canada)
pour service en fran£;ais:
1-800-LE-FOYER Mc
(1-800-533-6937)
piezas:
1-888-SU-H OGAR ®
(1-888-784-6427)
www.sears.ca
S lrs
® Registered
Trademark
/
TM
Trademark
/
SM
Service
Mark of Sears
® Marca Registrada / TM Marca de Fabrica / SM Mama de Servicio
MC Marque de commerce / MD Marque depos6e de Sears Brands,
Brands,
de Sears
LLC
LLC
Brands,
LLC
® Sears
Brands,
LLC