1
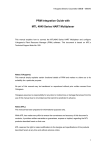
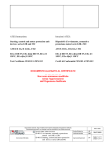
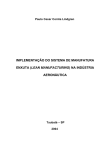
MTL4840 HART maintenance system Instruction Manual INM4840 Contents CONTENTS Page PAGE 1. INTRODUCTION . . . . . . . . . . . . . . . . . . . . . . . . . . . . . . . . . . . . . . . . . . . . . . . . . . . . . . . . . . . . . . 1 2 DESCRIPTION . . . . . . . . . . . . . . . . . . . . . . . . . . . . . . . . . . . . . . . . . . . . . . . . . . . . . . . . . . . . . . . . 1 3 2.1 General purpose or IS? . . . . . . . . . . . . . . . . . . . . . . . . . . . . . . . . . . . . . . . . . . . . . . . . . . . . . . . . . . . . . . . . . . . . . . . . 1 2.2 Generic or custom? . . . . . . . . . . . . . . . . . . . . . . . . . . . . . . . . . . . . . . . . . . . . . . . . . . . . . . . . . . . . . . . . . . . . . . . . . . 1 2.3 Large or small scale application? . . . . . . . . . . . . . . . . . . . . . . . . . . . . . . . . . . . . . . . . . . . . . . . . . . . . . . . . . . . . . . . . . 3 2.4 Connection methods . . . . . . . . . . . . . . . . . . . . . . . . . . . . . . . . . . . . . . . . . . . . . . . . . . . . . . . . . . . . . . . . . . . . . . . . . . 3 SAFETY INFORMATION . . . . . . . . . . . . . . . . . . . . . . . . . . . . . . . . . . . . . . . . . . . . . . . . . . . . . . . . 3 3.1 Precautions - General . . . . . . . . . . . . . . . . . . . . . . . . . . . . . . . . . . . . . . . . . . . . . . . . . . . . . . . . . . . . . . . . . . . . . . . . . 3 3.2 Precautions - BPHM64 . . . . . . . . . . . . . . . . . . . . . . . . . . . . . . . . . . . . . . . . . . . . . . . . . . . . . . . . . . . . . . . . . . . . . . . . . 3 4 INSTALLATION . . . . . . . . . . . . . . . . . . . . . . . . . . . . . . . . . . . . . . . . . . . . . . . . . . . . . . . . . . . . . . . 5 4.1 System overview . . . . . . . . . . . . . . . . . . . . . . . . . . . . . . . . . . . . . . . . . . . . . . . . . . . . . . . . . . . . . . . . . . . . . . . . . . . . 5 4.2 BPHM64 HART backplane . . . . . . . . . . . . . . . . . . . . . . . . . . . . . . . . . . . . . . . . . . . . . . . . . . . . . . . . . . . . . . . . . . . . . 5 4.3 HCU16 HART connection unit . . . . . . . . . . . . . . . . . . . . . . . . . . . . . . . . . . . . . . . . . . . . . . . . . . . . . . . . . . . . . . . . . . . 5 4.4 HCU16AO HART connection unit. . . . . . . . . . . . . . . . . . . . . . . . . . . . . . . . . . . . . . . . . . . . . . . . . . . . . . . . . . . . . . . . . 8 4.5 MTL customised backplanes . . . . . . . . . . . . . . . . . . . . . . . . . . . . . . . . . . . . . . . . . . . . . . . . . . . . . . . . . . . . . . . . . . . . . 8 4.6 HMU HART Backplanes . . . . . . . . . . . . . . . . . . . . . . . . . . . . . . . . . . . . . . . . . . . . . . . . . . . . . . . . . . . . . . . . . . . . . . . 8 4.7 BPMH and BPSH Backplanes . . . . . . . . . . . . . . . . . . . . . . . . . . . . . . . . . . . . . . . . . . . . . . . . . . . . . . . . . . . . . . . . . . . 10 4.8 Backplane mounting . . . . . . . . . . . . . . . . . . . . . . . . . . . . . . . . . . . . . . . . . . . . . . . . . . . . . . . . . . . . . . . . . . . . . . . . 10 4.9 Backplanes – identification and tagging . . . . . . . . . . . . . . . . . . . . . . . . . . . . . . . . . . . . . . . . . . . . . . . . . . . . . . . . . . . 12 4.10 Backplane earth rails . . . . . . . . . . . . . . . . . . . . . . . . . . . . . . . . . . . . . . . . . . . . . . . . . . . . . . . . . . . . . . . . . . . . . . . . 12 4.11 Backplanes – connections . . . . . . . . . . . . . . . . . . . . . . . . . . . . . . . . . . . . . . . . . . . . . . . . . . . . . . . . . . . . . . . . . . . . . 13 4.12 Cabling recommendations . . . . . . . . . . . . . . . . . . . . . . . . . . . . . . . . . . . . . . . . . . . . . . . . . . . . . . . . . . . . . . . . . . . . . 15 5 6 7 MODULES. . . . . . . . . . . . . . . . . . . . . . . . . . . . . . . . . . . . . . . . . . . . . . . . . . . . . . . . . . . . . . . . . . 16 5.1 MTL4841 and 4842 – installation . . . . . . . . . . . . . . . . . . . . . . . . . . . . . . . . . . . . . . . . . . . . . . . . . . . . . . . . . . . . . . . 16 5.2 Isolator modules (if used) . . . . . . . . . . . . . . . . . . . . . . . . . . . . . . . . . . . . . . . . . . . . . . . . . . . . . . . . . . . . . . . . . . . . . . 16 5.3 Modules – setting and configuration . . . . . . . . . . . . . . . . . . . . . . . . . . . . . . . . . . . . . . . . . . . . . . . . . . . . . . . . . . . . . . 16 FAULT FINDING AND ROUTINE MAINTENANCE . . . . . . . . . . . . . . . . . . . . . . . . . . . . . . . . . . . . . . 17 6.1 Maintenance precautions . . . . . . . . . . . . . . . . . . . . . . . . . . . . . . . . . . . . . . . . . . . . . . . . . . . . . . . . . . . . . . . . . . . . . 17 6.2 Fault finding . . . . . . . . . . . . . . . . . . . . . . . . . . . . . . . . . . . . . . . . . . . . . . . . . . . . . . . . . . . . . . . . . . . . . . . . . . . . . . 17 6.3 Routine maintenance. . . . . . . . . . . . . . . . . . . . . . . . . . . . . . . . . . . . . . . . . . . . . . . . . . . . . . . . . . . . . . . . . . . . . . . . . 18 SOFTWARE CONNECTIVITY . . . . . . . . . . . . . . . . . . . . . . . . . . . . . . . . . . . . . . . . . . . . . . . . . . . . . 18 7.1 Introduction . . . . . . . . . . . . . . . . . . . . . . . . . . . . . . . . . . . . . . . . . . . . . . . . . . . . . . . . . . . . . . . . . . . . . . . . . . . . . . . 18 7.2 Communication modes . . . . . . . . . . . . . . . . . . . . . . . . . . . . . . . . . . . . . . . . . . . . . . . . . . . . . . . . . . . . . . . . . . . . . . . 18 7.3 Software setup . . . . . . . . . . . . . . . . . . . . . . . . . . . . . . . . . . . . . . . . . . . . . . . . . . . . . . . . . . . . . . . . . . . . . . . . . . . . . 18 APPENDIX A . . . . . . . . . . . . . . . . . . . . . . . . . . . . . . . . . . . . . . . . . . . . . . . . . . . . . . . . . . . . . . . . . . . . 19 MTL4000 Series, HART enabled backplanes . . . . . . . . . . . . . . . . . . . . . . . . . . . . . . . . . . . . . . . . . . . . . . . . . . . . . . . . . . . . 19 HART connection and maintenance units . . . . . . . . . . . . . . . . . . . . . . . . . . . . . . . . . . . . . . . . . . . . . . . . . . . . . . . . . . . . . . . 20 Symbols This publication includes Warnings, Cautions and Information issues where appropriate to point out safety-related or other important information. The corresponding symbols should be interpreted as follows: WARNING: these indicate where there is a danger of personal injury or death. CAUTION: these indicate the presence of a hazard which could result in equipment or property damage. INFORMATION (NOTE): these alert the reader to pertinent facts and conditions. Although Caution hazards are associated with equipment or property damage, it should be understood that use of damaged equipment could, under certain operational conditions, result in degraded process performance and even personal injury or death. The user is urged therefore, to comply fully with all Caution notices. © 2007 MTL Instruments Group plc. All rights reserved. INM4840-5 Nov 2007 ii MTL4840 HART maintenance system INM4840-5 Nov 2007 Figure 1.1 - BPHM64 HART backplane 1. manage up to sixteen of the MTL4842 modules, making a possible total of 256 HART devices per MTL4841 module. INTRODUCTION This instruction manual describes the procedures for installing, connecting, checking and maintaining the MTL4840 HART® maintenance system, which is a simple interface between smart devices in the field and HART instrument management software running on a PC. The MTL4841 modules are then connected via an RS485/RS232 converter to the host PC. Depending upon the management software running on the PC, up to 31 of the MTL4841 modules could be connected to it, making a potential device count of 7,936! See Figure 2.1 for a diagram of this structure. The following sections are outlined here. In addition to this standard configuration, the MTL4840 system will support the multi-drop connection of HART devices. With up to fifteen HART devices on a single loop, it is possible to expand the capacity of each backplane (and consequently the system). Section 2 describes the system and the solutions available Section 3 covers some safety aspects. Section 4 deals with installing the backplanes For intrinsically safe applications, consideration must be given to the safety parameters for each loop. For further information, please refer to MTL or your local representative. Section 5 describes installing and configuring the modules Section 6 provides information on fault finding, and maintenance Section 7 introduces software for the MTL4840 System. 2.1 See the MTL web site (www.mtl-inst.com) for the full specifications of the MTL4840 system components and accessories, and of the MTL4000 Series isolators. 2 The MTL HART Management System can be used to control and maintain field devices that are located in a safe area or a hazardous areas. DESCRIPTION For safe areas, HART Connection Units (HCUs - and their related HMUs - see Section 2.3.1) provide the necessary terminals to connect up to 16 field devices, with organised links to the MTL4842 interface module. The MTL4840 HART Maintenance System enables a user to calibrate, configure and maintain an entire network of 'smart' field devices from a single workstation. Hazardous-area field devices can be handled through backplane-mounted, IS isolating interfaces (BPxH). Having the isolators mounted on a backplane dramatically reduces the amount of hand wiring required and therefore reduces the number of potential wiring errors. The hazardous-area wiring terminates on the isolating modules, not the backplane, consequently the backplanes do not need IS certification. The key elements that make this possible are the MTL4841 communications module and the MTL4842 HART interface module. These two modules provide the multiplexing for the individual field devices, making each one addressable and identifiable. The other important element is the terminal circuit board that simplifies the interconnection of all these devices to the MTL484x modules. A range of terminal boards and backplanes has been designed to suit the more standard applications but custom versions can also be designed to suit individual OEMs and their applications. 2.2 Generic or custom? A range of generic connection units is available for both input and output field-device wiring. These are not designed for any particular DCS type and may be used universally. The MTL4841and MTL4842 use the compact plug-in style of the MTL4000 Series of intrinsically safe isolating interface units. This provides a quick and easy installation method onto the backplanes. The alternative is to choose a connection unit or backplane that integrates with the type of DCS being used on the plant. The key advantage of this method is the use of a DCS’s specific connector type, which simplifies the wiring of the connection units into the system. The system is organised in multiples of 16 (sixteen). The MTL4842 HART interface module can handle up to sixteen field devices. The MTL4841 communications module is the next "layer", which can INM4840-5 Nov 2007 General purpose or IS? 1 Hazardous area Safe area Workstation PC running instrument management software Up to 7936 * HART® devices RS232 Process control system eg DCS, PLC RS232/485 convertor RS485 To up to 31 MTL4841 communications modules 1 2 3 31 MTL4841 communications modules 1–16 1–16 P MTL4046P 1–16 16 HART 3 HART HART 2 HART 1 MTL4842 HART interface modules I 1–16 Each MTL4841 handles up to 16 MTL4842 HART interface modules* 4/20mA + HART signals MTL4041 B 1–16 1–16 Each MTL4842 handles up to 16 HART transmitters or valve positioners HART signals 1 HART signals 2 HART signals I5 HART signals 16 HART transmitters and valve I P Terminal Terminal Notes: The diagram shows a mix of IS and general purpose applications (Refer to your local code of practice for rules governing the segregation of IS and non-IS loops) * The number of HART devices that can be supported may be dependent on the instrument management software selected. HART® is a registered trademark of the HART Communication Foundation Figure 2.1 - System Overview ( typical installation) INM4840-5 Nov 2007 2 Various solutions are available to suit individual DCS types and a listing of the currently available connection units and backplanes is given in Appendix A. The HART signals, for routing to the maintenance system, are derived from those passing through the connection unit. The connection unit method is used for field devices in non-hazardous areas. 2.3 The second method of getting the HART signals for the maintenance system is to pick them off the backplane (Figure 2.3) used to accommodate intrinsic safety isolators, e.g. MTL4000 Series units. Large or small scale application? The MTL HART maintenance solution is capable of addressing several thousand field devices, but most real world applications are significantly smaller than this. MTL has also devised a simple, integrated solution (HMUxx) that is proving popular for smaller installations of up to 32 devices. Field connections The type of HART signal defines the type of HMU that will be used: HMU16 Provides connections for up to 16 AI signals HMU32 Provides connections for up to 32 AI signals HMU16AO Provides connections for up to 16 AO signals HMU32AO Provides connections for up to 32 AO signals HART signals + 4/20mA signals Host/system connector Up to 32 field loops The HMU range of connection units (see Section 4.6) is designed for applications where a smaller footprint is required and there is only a small number of HART signals to be connected. MTL4000 Isolators 2.3.1 HART maintenance connections Each HMU accommodates one MTL4841 communications module and one, or two - as appropriate, MTL4842 multiplexer modules, each of which can handle 16 signals. This method can be expanded to accommodate more signals but, depending on the amount of expansion required, it would probably be better to use the method described next for more than 32 loops. 2.3.2 Figure 2.3 - Generic backplane connection unit More than 32 field loops The backplane can be customised to provide a host/system connector that best suits the user’s choice of DCS or PLC. For larger installations, the system should probably be based on the BPHM64 HART interface - see Section 4.2. This unit will accommodate one MTL4841 communications module and up to four MTL4842 multiplexer modules to accommodate a total of 64 signals. However, the MTL4841 can manage a total of 16 MTL4842 modules, i.e. 256 signals, so three more BPHM64 carriers can be linked to the first, each fitted with four MTL4842 modules. In these two cases the derived HART signals are then multiplexed together for transmission to the maintenance system - see Section 5 for configuration information. Finally, backplanes are available that not only have the I/O modules, similar to the one above, but can also accommodate the required MTL4842 and MTL4841 modules (for up to 32 channels) and provide RS485 ports to link to the management system. See Section 4.7 for further details. Further expansion is possible by repeating this structure up to 30 times. The overall method is illustrated in Figure 2.1. See Section 5.3.1 for configuration details. 2.4 3 Connection methods There are three basic methods of interfacing to the HART signals: Before beginning the installation of any of this equipment it is IMPORTANT that the information in this section is read and understood. a) via a connection unit b) via an I/O module backplane c) via a HART + I/O module backplane 3.1 A connection unit - see Figure 2.2 - has one set of screw terminals for the field devices and another set of screw terminals for connection to the main system. 4/20mA input (or 4/20mA output) signals Host/system connections Field connections + Precautions - General Units MUST NOT be installed in a hazardous area unless certified and marked for this purpose or unless protected by a locally accepted explosion-proof technique. HART maintenance connections HART signals SAFETY INFORMATION • Make sure all installation work is carried out in accordance with local standards, codes of practice, and site regulations. • Check that the hazardous-area equipment complies with the descriptive system document. • If in doubt, refer to the certificate/catalogue for clarification of any aspects of intrinsic safety or contact MTL, or your local representative, for assistance. • Check that the interface unit(s) functions(s) are correct for the application. 3.2 Precautions - BPHM64 The BPHM64 is FM-Approved as non-incendive for use in Class I, Division 2, Groups A,B,C and D hazardous locations. WARNING - EXPLOSION HAZARD. DO NOT REMOVE OR REPLACE FUSES UNLESS POWER HAS BEEN DISCONNECTED OR THE AREA IS KNOW TO BE NON-HAZARDOUS. Figure 2.2 - Generic HCU connection unit INM4840-5 Nov 2007 3 BPHM64 PWR HART Tx2+ Ch2+ Ch2- Tx1+ Tx1+ Ch1+ Ch1- FIELD 2 Ch1+ BPHM64 SYSTEM Ch1HART INTERFACE Ch2+ Ch2MTL4842 2 4 4 MTL4842 MTL4842 MTL4842 3 3 6 6 5 5 8 8 7 7 HCU16 10 10 9 9 DCS terminals To additional 30 (max.) MTL4841 comms. modules 12 12 11 11 14 14 13 13 16 16 15 15 RS485 Comms BPHM64 HCU16 FIELD PWR SYSTEM TB1 TB5 1 1 2 2 3 3 4 4 5 5 6 6 7 7 8 8 TB6 1 16ch HART outputs (filtered) MTL4841 + 16ch 1 1 16ch HART inputs or outputs +24V Tx2+ TB2 2 1 3 2 4 3 5 4 6 5 7 6 8 + 64ch MTL4842 MTL4842 MTL4842 MTL4842 DCS terminals 7 8 HART TB3 1 2 3 4 TB7 5 1 6 2 7 3 8 4 BPHM64 5 6 PWR 7 8 TB4 1 2 TB8 3 1 4 2 5 3 6 4 7 5 8 6 DCS terminals + 64ch 7 8 MTL4842 MTL4842 MTL4842 MTL4842 HCU16AO BPHM64 16ch I.S. 4-20 mA analogue + HART signals PWR HART + 64ch DCS MTL4842 16 ch to DCS analogue input/output Figure 4.1 - System diagram showing key components INM4840-5 Nov 2007 4 MTL4842 MTL4842 MTL4842 links between backplanes 4 INSTALLATION 4.1 4.2.3 System overview See Figures 2.1 and 4.1. 4.2 BPHM64 HART backplane For medium to large scale installations, the BPHM64 HART backplane is the method of choice to handle the HART maintenance signals passing to and from the field devices. Connect the ribbon cables to the appropriate connector for the corresponding MTL4842 module. 4.2.4 DC supply in P1 0V PWR2 P2 P3 PWR 1 2 HART signal connections 206 mm P5 MTL4842 MTL4842 See Section 4.12 for cabling recommendations and limits. MTL can provide 10-way cables in a range of different lengths on request. P4 FS1 MTL4842 MTL4842 Link to other BPHM64 backplanes Up to four boards may be linked together to provide a total of sixteen MTL4842 modules under one MTL4841 communications module (see Figure 4.1). 10-way connectors P5 and P6 (Figure 4.2) are used to link the additional BPHM64 backplanes together. BPHM64 PWR1 HART signal connections Each of the four MTL4842 modules has a DIN41651 20-way ribbon cable connector (P1–P4) beside it. Each one provides 16 signal connections and 4 ground returns to the module. These connectors receive the HART signals coming from either connection units or backplanes equipped with similar DIN41651 connectors. See Section 4.12 for cabling recommendations and limits. MTL can provide 20-way cables in a range of different lengths on request. 4.2.5 MTL4842s MTL4841 4.2.6 RS485 communication connections Two RS485 ports are provided on the board - see Figure 4.2. These are used to connect the BPHM64 backplane to the PC running the maintenance software and to onward link to MTL4841 communications modules on other backplanes. MTL4841 Links to additional BPHM64 backplanes P6 MTL48xx modules fitting and configuration MTL4842 modules may be fitted in any position that corresponds with a HART signal cable. See Section 5 for details. Full details of this communications link are provided in Sections 4.12.3 and 4.12.4. RS485 ports to management system PORT1 4.3 The HCU16 HART connection unit - see Figures 4.4 & 4.5 - provides a connection interface between the field wiring and the onward link to the host/system control for non-hazardous areas. It also provides a take-off point for the HART signals to the maintenance system. PORT2 125 mm Connections to the field signals and the system are via screw-clamp terminals and the link to the BPHM64 is via a 20-way ribbon cable. Figure 4.2 - BPHM64 - backplane Each channel has three terminals: +ve, -ve and a transmitter supply terminal (Tx +) – see Figure 4.5. The HART signal has to be terminated with an impedance of approximately 240Ω. Positions are provided on the circuit board to fit parallel resistors (normally 250Ω), or an appropriate series resistor to raise the impedance if it is < 240Ω. This unit can be used with analogue outputs if the system's current signal is compatible with HART communications. The backplane accommodates 1 x MTL4841 and up to 4 x MTL4842 modules. However, an MTL4841 can support up to 16 x MTL4842 modules and so the system has been designed to expand easily by interconnecting an additional three BPHM64 backplanes. Note that the other BPHM64 backplanes only require MTL4842 modules, not MTL4841 modules (see Figure 4.1). 4.2.1 Mounting The HCU16 is supplied fitted in a carrier for DIN rail mounting. The footprint of the carrier is 150 x 125mm and the height from the top face of T-section DIN rail is approximately 55mm. The BPHM64 is designed for mounting in a control room equipment cabinet and is supplied fitted on a carrier suitable for T or G section DIN-rail mounting in any orientation. Weight (excluding modules): 296g Weight (per module) 100g approx. Footprint dimensions: See Figure 4.2 Height (modules fitted): 116mm from top of DIN rail 4.2.2 HCU16 HART connection unit Tx2+ Ch2+ Ch22 FIELD Ch1+ BPHM64 HART INTERFACE SYSTEM Ch1- 2 4 3 6 5 72mA @ 24V dc 8 8 7 7 HCU16 10 10 9 9 12 12 11 11 PWR 1 14 14 PWR 2 13 13 16 16 15 15 125 mm Figure 4.4 - HCU16 connection unit Figure 4.3 - DC power connections INM4840-5 Nov 2007 Ch2- 6 Connect the dc power to the board as shown in Figure 4.3. 0V Ch2+ 1 5 21–35V dc 0V Tx2+ 4 150 mm Current: Ch1- 3 The BPHM64 has a removable, 4-way, screw-clamp terminal connector that provides redundant 24V dc supply connections. Voltage: Tx1+ Ch1+ 1 DC power connections Power requirements: P1 Tx1+ 5 +24 or Tx+ from DCS 2 wire transmitter input Tx1 + Ch1 + Ch1 Tx Tx1 + Ch1 + Ch1 DCS input + DCS input +24 or Tx+ from DCS 3/4 wire transmitter input Tx1 + Ch1 + Ch1 Tx Tx1 + Ch1 + Ch1 DCS input + DCS input Field terminals BPHM64 HART INTERFACE System terminals Tx1 + Ch1 + Ch1 Tx1 + Ch1 + Ch1 Tx2 + Ch2 + Ch2 Tx2 + Ch2 + Ch2 Tx3 + Ch3 + Ch3 Tx3 + Ch3 + Ch3 Tx4 + Ch4 + Ch4 Tx4 + Ch4 + Ch4 Tx5 + Ch5 + Ch5 Tx5 + Ch5 + Ch5 Tx6 + Ch6 + Ch6 Tx6 + Ch6 + Ch6 Tx7 + Ch7 + Ch7 Tx7 + Ch7 + Ch7 Tx8 + Ch8 + Ch8 Tx8 + Ch8 + Ch8 Optional 250W P1 1mF x 16 Tx9 + Ch9 + Ch9 Tx9 + Ch9 + Ch9 Tx10 + Ch10 + Ch10 Tx10 + Ch10 + Ch10 Tx11 + Ch11 + Ch11 Tx11 + Ch11 + Ch11 Tx12 + Ch12 + Ch12 Tx12 + Ch12 + Ch12 Tx13 + Ch13 + Ch13 Tx13 + Ch13 + Ch13 Tx14 + Ch14 + Ch14 Tx14 + Ch14 + Ch14 Tx15 + Ch15 + Ch15 Tx15 + Ch15 + Ch15 Tx16 + Ch16 + Ch16 Tx16 + Ch16 + Ch16 Figure 4.5 - Schematic of HCU16 connection unit INM4840-5 Nov 2007 Link or resistor 6 Field terminals BPHM64 HART INTERFACE System terminals P1 Smart positioner Smart positioner + 1 2 Filter 1 + 3 4 Filter 2 1 + 2 3 + 4 TB1 Smart positioner Smart positioner 5 6 Filter 3 7 8 Filter 4 1 + Filter 5 2 5 + 6 Filter 6 4 + 8 1 3 4 TB2 TB6 5 Filter 7 6 5 6 7 Filter 8 8 7 8 1 Filter 9 1 2 2 3 Filter 3 10 4 4 TB7 TB3 5 Filter 5 11 6 6 7 Filter 7 12 8 8 1 Filter 1 13 2 2 3 Filter 14 4 3 4 TB4 TB8 5 Filter 15 6 5 6 7 Filter 16 8 7 8 17 18 19 20 Figure 4.6 - Schematic of HCU16AO connection unit 7 4/20mA output 7 2 3 INM4840-5 Nov 2007 4/20mA output TB5 + + Sm1 4/20mA output 4/20mA output 4.6 FIELD The HMU range of connection units is designed for applications where a smaller footprint is required or where only a small number of HART signals need to be connected. They are based on a HART control board combined with one or two of the HCU16 or HCU16AO boards. Consult Figures 4.5 and 4.6 for field and system connections to these backplanes. SYSTEM TB1 TB5 1 1 2 2 3 3 4 4 5 5 6 6 7 7 8 8 An HMU backplane uses one MTL4841 module and one or two MTL4842 modules to suit the number of signal channels supported. The type and number of HART signals handled depends on the HMU model chosen, as shown below. TB6 1 TB2 2 1 3 2 4 3 5 4 6 5 7 6 8 7 8 275 mm HMU HART Backplanes HMU16 provides connection for up to 16 AI signals HMU32 provides connection for up to 32 AI signals HMU16AO provides connection for up to 16 AO signals HMU32AO provides connection for up to 32 AOsignals TB3 1 2 HMUs are supplied on a DIN-rail mounting carrier - see Figure 4.8 - and may be mounted anywhere in the cabinet in any orientation. 3 4 TB7 5 1 6 2 7 3 8 4 4.6.1 5 7 8 TB4 1 2 TB8 3 1 4 2 5 3 6 4 7 5 8 6 DC power connections Each HMU backplane has DC POWER terminals for the connection of a (nominal) 24V dc supply. 6 Power requirements: Voltage: 21–35V dc Current: 72mA @ 24V dc Connect the dc power to the board as shown in Figure 4.8. Observe polarity. 7 8 4.6.2 HCU16AO HMU backplanes may be linked together to provide a total of sixteen MTL4842 modules under one MTL4841 communications module. (Consequently, other HMUs do not need an MTL4841 module to be fitted.) 10-way connectors P1 and P2 - see Figure 4.8 - are used to link the additional HMU backplanes together. 125 mm Figure 4.7 - HCU16AO connection unit 4.4 See Section 4.12 for cabling recommendations and limits. MTL can provide 10-way cables in a range of different lengths on request. HCU16AO HART connection unit Many systems have 4-20mA analogue outputs that are not compatible with HART data because their impedance is normally too low for the HART to operate correctly. In addition, the noise generated by the analogue output can sometimes interfere with the HART data, or sometimes the HART signal can even affect the stability of the current signal. Up to 16 may be connected in this way but the sum of all the interconnecting cable lengths between the first and last unit must not exceed four (4) metres. 4.6.3 The HCU16AO HART connection unit - see Figure 4.6 & 4.7 - enables HART signals to be used in current output loops, in non-hazardous areas. It has 16 isolated channels, each with a low-pass filter in series with the current signal from the system. This has virtually no effect on the 4-20mA signals but presents a suitable high impedance (> 240Ω) to the HART signals for their detection and measurement. IMPORTANT Please note the position used for the MTL4842 module for the HMU16 and the HMU16AO in Figure 4.8. 4.6.4 Field and system connections are made via pluggable 8-way, screwclamp terminals, in 4 groups of 4 channels. RS485 communication connections Two RS485 ports are provided on the board - see Figure 4.8. These are used to connect the HMU backplane to the PC running the maintenance software and, possibly, to onward link to MTL4841 communications modules on other backplanes. The HCU16AO is supplied in a carrier for DIN rail mounting. Overall footprint of carrier: 275 x 125mm. Height from top of DIN rail to top of screw connectors: 58mm Full details of this communications link are provided in Section 4.8.x. MTL customised backplanes MTL has a range of customised backplanes that accept MTL4000 Series isolators. These have been produced for various types of DCS and PLC equipment and have system connectors that suit the equipment type. Many are fitted with a DIN41651 20-way ribbon cable connector to enable the backplane to be connected to a HART maintenance system. See Appendix A or check with MTL for availability. Other types of backplane are available that have provision for the inclusion of an MTL4841 and one or two MTL4842 modules on the backplane itself. These are dealt with in Section 4.7. INM4840-5 Nov 2007 MTL48xx modules fitting and configuration See section 5.1 for details. As with the HCU16, the HART data is transferred to the BPHM64 HART multiplexer interface via a 20-way ribbon cable. 4.5 Links to other HMU backplanes 8 1 3 5 7 P2 Tx2+ Ch2+ Ch2- FIELD 125 mm Tx1+ Ch1+ BPHM64 SYSTEM Ch1HART INTERFACE Tx2+ Ch2+ Ch2- 1 3 5 7 2 4 6 8 10 9 12 11 14 13 16 15 2 4 6 8 1 3 5 7 9 10 11 12 13 14 P1 15 16 1 3 5 7 Tx2+ Ch2+ Ch2- P2 Tx2+ Ch2+ Ch2- Tx1+ Ch1+ Ch1- Tx1+ Ch1+ Ch1- FIELD FIELD Tx1+ Ch1+ BPHM64 SYSTEM Ch1HART INTERFACE HCU16 Tx1+ Ch1+ BPHM64 SYSTEM Ch1HART INTERFACE Tx2+ Ch2+ Ch2- Tx2+ Ch2+ Ch2- 1 3 5 7 2 4 6 8 10 9 12 11 14 13 16 15 1 3 5 7 2 4 6 8 P1 P2 FIELD 1 TB1 2 3 4 5 6 7 8 TB2 1 2 3 4 5 6 7 8 1 TB3 2 3 4 5 6 7 8 TB4 1 2 3 4 5 6 7 8 HCU16AO C B A C B MTL4842 8 7 6 5 4 3 2 1 TB8 8 7 6 5 4 3 2 1 TB7 8 7 6 5 4 3 2 1 TB6 8 7 6 5 4 3 2 1 TB5 SYSTEM A RS485 RS485 125 mm HCU16 10 9 12 11 MTL4841 MTL4842 MTL4841 No module MTL4842 HMU16AO RS485 RS485 C B A C B A POWER + Tx2+ 2 4 6 8 9 10 11 12 14 13 16 15 P2 HCU16AO FIELD TB1 1 2 3 4 5 6 7 8 TB2 1 1 TB4 2 3 4 5 6 7 8 P1 FIELD TB1 1 2 3 4 5 6 7 8 TB2 1 TB4 1 2 3 4 5 6 SYSTEM 2 1 TB5 3 4 5 6 7 8 2 1 TB6 4 5 6 7 8 2 1 TB8 3 4 5 6 7 8 SYSTEM 3 2 1 TB5 4 5 6 7 8 2 1 TB6 4 5 6 7 8 3 2 1 TB8 4 5 6 7 8 All dimensions in mm Figure 4.8 - HMU HART backplanes C B A C B A RS485 RS485 POWER + C B A C B A RS485 RS485 POWER + BPHM64 HART INTERFACE C B A C B A RS485 RS485 POWER + P2 Tx1+ Ch1+ Ch1- CONN2 HCU16 MTL4842 POWER + P1 P1 2 4 6 8 9 10 11 12 13 14 15 16 13 14 15 16 7 8 HCU16AO 9 INM4840-5 Nov 2007 MTL4841 MTL4842 MTL4842 MTL4841 MTL4842 MTL4842 MTL4841 MTL4842 MTL4841 No module MTL4842 HMU16 240 mm HMU32 388 mm CONN2 125 mm 365 mm HMU32AO 125 mm 640 mm 4.7 BPMH and BPSH Backplanes 4.8 Backplane mounting 4.7.1 BPMH16 and BPSH16 backplanes 4.8.1 Using mounting plate VMPH16 • 16 x MTL4041A/B/P isolators, 16 x MTL4046/C/P isolators, or a mixture of these isolators Attach the backplane to the VMPH16 mounting plate using the screws provided. Use mounting centres ‘D’ - shown in figure 4.11 - to attach plate to required surface or structure. • 1 x MTL4841 communications module 4.8.2. • 1 x MTL4842 HART interface module. The BPMH16 and BPSH16 backplanes are designed to carry: Surface mounting The hazardous area connections from the field devices go directly to the isolator modules. The safe area connections to the control system are as follows: • BPMH16 - Elco 8016 38-pin male connector • BPSH16 - screw-clamp connectors (2 per module). 4.7.2 VMPH16 mounting plate To meet EMC requirements, the above backplanes must be mounted on a VMPH16 mounting plate or on the metal surface of a cabinet or panel. See Figure 4.11 for mechanical details. Figure 4.9 - SMS01 mounting kit components The VMPH16 has threaded inserts (marked 'A' in Figure 4.11) and is supplied with six mounting screws to enable the backplane to be mounted onto it. Surface mounting kit (type SMS01) is available for this purpose. SMS01 contains 40 sets of the components shown in Figure 4.9. 4.7.3 Prepare panel BPSH16-32 backplane Refer to Figure 4.11. The BPSH16-32, MTL4000 Series HART backplane is designed primarily for use with 16 (sixteen) of the MTL4044 dual-channel analogue input modules. This backplane can also be used with the MTL single channel isolators but not all 32 HART monitoring channels can be used in this configuration. a) Prepare holes in the mounting surface at the centres shown. Thread these (M4) if retaining nuts will not be used. A BPSH16-32R version is also available, fitted with 250 ohms input resistors connected across the safe area control system connections. M4 x 20mm screw (A) The hazardous area connections from the field devices go directly to the isolator modules. Backplane Plain washer (C) Screw terminals are provided for the safe area interface to the control system. 4.7.3 M4 x 10mm spacer(D) DC power connections The BPxH16 backplanes have redundant power supply connections and each supply input connector has dual pins for daisychaining the supply. See Section 4.xx for connection details. Power Voltage: 21–35V dc Current: 1.35A ( 1.55A for BPSH16-32) 4.7.4 HART signal connections Retaining Washer (E) Figure 4.10 - Surface mounting details Fit backplane Refer to figures 4.9 and 4.10. The HART signals are routed to the MTL4842 module(s) by the backplane and require no further connections. 4.2.5 a) Select an M4 x 20mm screw (A). b) Place a locking washer (B) and a plain washer (C) over it. Links between backplanes c) Additional boards may be linked together to provide a total of sixteen MTL4842 modules under one MTL4841 communications module. Two 10-way connectors are provided (next to the MTL4841 module) to link backplanes together, in the same way as shown in Figure 4.2. e) Repeat steps a) to d) for the other five (5) mounting holes. f) MTL48xx modules fitting and configuration See section 5 for details. 4.7.7 RS485 communication connections Two RS485 ports are provided on each board. These are used to connect the BPHM64 backplane to the PC running the maintenance software and to onward link to MTL4841 communications modules on other backplanes. Full details of this communications link are provided in Section 4.8.x. INM4840-5 Nov 2007 Insert the screw through a fixing hole on the baseplate. d) Fit a 10mm spacer (D) and retain it with washer (E). See Section 4.8 for cabling recommendations and limits. MTL can provide 10-way cables in a range of different lengths on request. 4.7.6 Locking washer (B) 10 Attach the baseplate using the prepared panel holes. Retain the screws with a suitable nut if the holes are not tapped. BPSH16 B BPMH16 B C C 15 A 12 112 13 13 9 314 10 10 11 11 12 112 314 9 A 8 8 A 6 5 A 3 3 112 5 A 19 B 4 28.5 28.5 BPSH16 BPMH16 C 19 B 132 A 1 2 A 1 2 4 112 6 7 A 7 A A 14 14 15 16 A 16 A C 132 170 170 25 BPSH16-32 122 VMPH16 A A A A 14 12 11 13 MTL4044 MTL4044 MTL4044 9 331 347 10 MTL4044 MTL4044 8 MTL4044 7 MTL4044 6 5 MTL4044 4 MTL4044 3 MTL4044 2 MTL4044 1 MTL4044 28.5 A A C BPSH16-32 19 A A MTL4044 14 4 A A 15 MTL4044 MTL4044 116 335 A D 16 MTL4044 4842 MTL4842 A B 5 MTL4842 B D 4842 MTL4841 4841 8 C D D 13.5 13.5 132 170 A = Backplane mounting holes B = Tagging strip (TSK18) mounting areas C = Earth rail (ERK18) mounting areas D = Mounting plate fixing holes 170 A holes are fitted with threaded inserts to accept the mounting screws supplied. Figure 4.11 - BPxx backplanes and VMPH16 mounting plate INM4840-5 Nov 2007 All dimensions in mm 11 4.9 4.8.3 DIN-rail mounting – with DIN-rail mounting kit DMK01 & mounting plate VMPH16 DIN-rail mounting kits (type DMK01 or DMK04) are available for this purpose. DMK01 contains 40 sets of the components shown in Figure 4.12, while DMK04 contains 4 sets of these components. Backplanes – identification and tagging A rectangular area for identification is provided on each backplane see Figure 4.11. In addition, tagging strips are available (TSK18) for mounting over the backplane safe-area connections. Two areas - marked ‘B’ in Figure 4.11 - are provided with threaded inserts for attaching the tagging strip mounting posts. 4 4 1 1 2 3 6 9 8 5 B 7 4 Figure 4.12 - DMK0x mounting kit components Figure 4.14 - Tagging strip (TSK18) Fit backplane Mount the tagging strip to the backplanes as follows:- Refer to figures 4.12 and 4.13. a) Select a mounting screw (A). Attach each tagging strip mounting post (1) with two M3 x 12 mounting screws (2) and washers (3). b) Place a locking washer (B) and a plain washer (C) over it. Attach colour coding labels (6) onto tag label (5). c) Mark tag label (5) with tag references. Insert the screw through a fixing hole on the baseplate. d) Fit a spacer (D) and retain it with washer (E). e) Repeat steps a) to e) for the other five (5) mounting holes. Slide tag label (5) into tag strip holder (4) and retain with plastic retaining rivet (7). f) Attach plastic retaining tie (8) with two plastic rivets (7). Fit the mounting feet (F) onto the DIN-rail in roughly the correct positions. Clip tag strip holder (4) onto mounting posts (1) by pushing downwards. g) Offer up the baseplate to the mounting feet on the DIN rail, locate the screws into the middle holes in the feet and secure each in turn. Return to tighten each screw before finishing. 4.10 Optional earth rail kits are available (ERK18) - see Figure 4.15. Cable screens from hazardous-area circuits or spare pairs from a multicore cable can be connected to the terminals on the earth rails. These are mounted on the backplane at the same height as the tops of the module, close to the hazardous-area connectors. Earth rails are attached using the following procedure:- 6 x 1/2 inch screw (A) Backplane Backplane earth rails Locking washer (B) Plain washer (C) 1 M4 spacer (D) Retaining Washer (E) 5 DIN-rail mounting foot (F) 4 2 T-section rail 3 1 c G-section rail Figure 4.15 - Earth rail kit (ERK18) Figure 4.13 - T- or G-section DIN-rail mounting Locate the earth rail mounting positions - marked ‘C’ in Figure 4.11 - at each end of the backplane . Attach each mounting post (1) with two M3 x 12 mounting screws and washers (2). Fit the earth terminals (3) onto the rail (4). Insert the ends of the earth rail into the slots at the tops of the mounting posts. Finally, insert the plastic retaining rivets (5) into each end of the rail. INM4840-5 Nov 2007 12 4.11 Backplanes – connections 4/20mA MTL4041B/ MTL4041P Power supply and data connections are also made to the backplanes. See section 4.5.3 for power connections and 4.5.4 for data connections. 4.11.1 Hazardous area MTL4041A only Safe-area circuit connections are made to the backplane in one of two ways – either by multiway connectors (BPMH16) or by screw clamp terminals (BPSH16 & BPSH16-32). The following sections explain the methods for connecting these two types. BPMH16 – multiway connector 4/20mA The BPMH16 backplane is provided with a 38-way Elco male connector for the 16 safe-area circuits. The mating female connector can be obtained as an accessory (MTL part number ELC38). HHC* 2 1 3 5 4 6 MTL4041A MTL4041B MTL4041P The ELC38 consists of the following Elco parts: Connector part no.: 58-8016-038-000-059 Crimps (39 pieces) part no.: 60-8017-0513-00-339 I The connection procedure is:- I Check pin assignment for the MTL4041A/B/P as per figure 4.17. Check pin assignments for the MTL4046/C/P as per figure 4.18. Using the crimps provided, make the appropriate connections to the mating half of the multiway Elco connector according to the pin assignments detailed in Table 4.1 and Figure 4.16. Figure 4.17 Plug multiway connector onto the backplane and secure with its locking screw. Terminal 2 3 4 5 6 7 8 9 11 13 14 Please note: Module pins 9 and 12 are linked on the backplane. Table 4.1 - Multiway connections for MTL4041A/B/P and MTL4046/C/P BPMH16 module and pin ident. Elco pin ident. BPMH16 module pin configuration A B Module 1 9 & 12 11 U V Module 9 9 & 12 11 C D Module 2 9 & 12 11 W X Module 10 9 & 12 11 E F Module 3 9 & 12 11 Y Z Module 11 9 & 12 11 H J Module 4 9 & 12 11 AA BB Module 12 9 & 12 11 K L Module 5 9 & 12 11 CC DD Module 13 9 & 12 11 M N Module 6 9 & 12 11 EE FF Module 14 9 & 12 11 P R Module 7 9 & 12 11 HH JJ Module 15 9 & 12 11 S T Module 8 9 & 12 11 KK LL Module 16 MM 9 & 12 11 Power sense PWR 1 power status NN 0V PP PWR 2 power status RR 0V SS Module power status TT 0V 10 11 12 13 14 9 + 4/20 mA HHC* Complete connector tag label and attach to the backplane (optional). Elco pin ident. 8 7 Vs + 2035V dc Vs Safe area Load Function Tx supply +ve Optional HHC connection Optional HHC connection Current input -ve Common Optional HHC connection Optional HHC connection Output +ve Output -ve Supply -ve Supply +ve +ve -ve +ve -ve Hazardous area P I 4/20mA + 1 HHC* 2 3 4 5 6 MTL4046/C/P I I 7 8 9 10 11 12 13 14 + Vs + 2035V dc HHC* * Hand held communicator Safe area Figure 4.18 D CCDB C B BA D K A J AH F E P N M L U T S R W V Y X CC BB AA Z HH FF EE DD NN MM LL KK JJ TT SS RR PP Terminal 2 3 4 5 7 8 11 12 13 14 Figure 4.16 - Multiway connector (ELC38) INM4840-5 Nov 2007 13 Function Optional HHC Output +ve Output -ve Optional HHC Optional HHC Optional HHC Input -ve Input +ve Supply -ve Supply +ve connection +ve connection -ve connection -ve connection +ve 4.11.2 BPSH16 & BPSH16-32 - screw-clamp terminals In the case of the screw-clamp terminal backplanes, each module position is provided with a 2-way split-level terminal block for safe area signals. Primary power supply + + _ _ Secondary power supply The connection procedure is:Check pin assignments for the MTL4041B/P as per Figure 4.17. 1 2 PWR 0 V PWR 0 V Check pin assignments for the MTL4046P as Figure 4.18 Make the appropriate connections to the safe-area terminals in accordance with Table 4.2 and Figure 4.19. Maximum wire gauge is 2.5mm2 (12 AWG) and wire entry for each terminal is from side of block. Figure 4.20 - Pin assignments - safe area power supply Notes 1. To pass HART data, input terminal 11 or 12 must be referenced to the backplane power supply. Connect each of the two power supply connectors to the independent supply sources according to the terminal assignments shown in Figure 4.20. 2. Module pins 9 and 12 are linked on the backplane. The maximum wire size is 2.5mm2 (12AWG). Table 4.2 - Screw terminal connections for MTL4041B/P and MTL4046P Safe area terminal BPMH16 module and pin ident. Safe area terminal BPMH16 module and pin ident. 1+ Module 1 9 & 12 11 9+ Module 9 9 & 12 11 9 & 12 11 10+ Module 10 9 & 12 11 9 & 12 11 11+ Module 11 9 & 12 11 9 & 12 11 12+ 9 & 12 11 13+ 9 & 12 11 14+ 9 & 12 11 15+ 9 & 12 11 16+ 2+ Module 2 2– 3+ Module 3 3– 4+ Module 4 4– 5+ Module 5 5– 6+ Module 6 6– 7+ Module 7 7– 8+ Module 8 8– 10– 11– Module 12 9 & 12 11 Module 13 9 & 12 11 Module 14 9 & 12 11 Module 15 9 & 12 11 Module 16 9 & 12 11 12– 13– 14– 15– 16– FS1: 2A (MTL fuse kit FUS16) FS2: 250mA (MTL fuse kit FUS02) 4.11.4. Safe area – ring-mained power supplies A “ring main” system can be used to distribute power to the backplanes. This permits individual backplanes to be taken out of service without affecting supplies to other backplanes. Two or more backplanes can be removed, provided they are neighbours, without disrupting the supply to other backplanes. Make the connections as shown in Figure 4.21. Note: Backplanes can be ring-mained providing the maximum circuit current does not exceed 12A. Wire sizes up to 2.5mm2 (12AWG) can be used and should be chosen according to load and voltage drop. 0V PWR1 1 2 3 4 5 6 7 8 9 10 11 12 13 14 15 16 + 8 9 10 + 11 12 13 14 + 9– The backplane has two fuses: FS1 protects the isolators and FS2 protects the MTL4841 and MTL4842 modules. Ratings for these fuses are: 15 16 1– Plug the connectors into the sockets on the backplanes. 1 2 3 4 5 6 7 8 9 10 11 12 13 14 15 16 PSU Power supply connections 8 4.11.3 + 9 Figure 4.19 - Screw-clamp terminal pin assignments 10 11 12 13 14 15 16 A secondary supply can be connected in the same configuration to PWR2 connector 11 12 13 14 15 16 All of the BPxH backplanes have provision for dual, redundant 24V dc power supplies. The supplies have individual, screw-terminal, plug-in connectors and two LEDs are provided on the backplane to indicate which supplies are operational. A series diode in each supply input means that the higher of the two voltage supplies is used and there is an automatic switch-over of supplies if one fails. 8 9 10 The BPMH16 backplane has three monitor points that sense the two individual power supply voltages and also the final output voltage after the series diodes. These are provided on the Elco multipin connector (see Table 4.1) via 10kΩ series protective resistors to provide the process system with status indications. Figure 4.21 - Supply circuitry for interconnecting backplanes INM4840-5 Nov 2007 14 4.12 Cabling recommendations 4.12.1 HART signals cable Biasing When no communication is taking place, the bus is in an undefined, floating state and, consequently, noise on the bus may be decoded as real characters. Well-written software should discard most of these characters, but the system may be further protected by biasing the bus to a known state and thereby preventing the reception of ‘false’ characters. HART signal cables are used to connect the BPHM64 backplane with a HART connection unit or an IS backplane. This connection is made with a 20-way ribbon cable. 20-way HART ribbon cables Connector type 20-way DIN41651 bump polarised Cable 0.05 inch pitch standard ribbon MTL4841 communication modules from MTL have no built-in facility for terminating or biasing the network; as this is often provided by the RS232/RS485 converter. Maximum length 15m/50ft 4.12.4 RS485 2-wire interconnection The MTL4840 system uses a 2-wire connection as shown below: Standard lengths of this 20-way cable are available from MTL using the part number HM64RIB20-x.x, where the x.x denotes lengths between 0.5 and 6.0 metres. 4.12.2 Master Backplane interface bus The interface bus provides a connection between a single MTL4841 communications module and up to 16 MTL4842 HART interface modules/backplanes. This connection is made via a ten-way ribbon cable. Connector type 10-way DIN41651 bump polarised Cable 0.05 inch pitch standard ribbon Maximum length 4m/13ft (between modules 1 and 16) T T Command from Master Response from Slave Figure 4.22 - 2-wire bus This 2-wire bus uses the same pair of wires to transmit queries from the master and responses from the slave. 10-way HART ribbon cables The MTL4841 communications module connects to the maintenance workstation via a 2-wire link, accessible from the RS485 Port connections on the backplane. Up to 31 MTL4841 modules (slaves) can be connected to a single Master maintenance workstation, as shown in Figure 4.22. Standard lengths of this 10-way cable are available from MTL using the part number HM64RIB10-x.x, where the x.x denotes lengths between 0.5 and 4.0 metres. Note: The ribbon cables connecting the HCUs or MTL4000 backplanes to the BPHM64 and interface Bus cables are not suitable for running outside of the cabinet or under control room floors. Generally this will not be necessary, as to maintain integrity, each group of cabinets would interface their HART signals via independent MTL4841 communication modules. Each MTL4841 module is linked by standard communications cables suitable for RS485 data at 9.6, 19.2 or 38.4 kbaud. 4.12.3 Slave 31 Slave 1 RS485 PORT 1 A B C RS485 connection RS485 PORT 2 A B C Figure 4.23 - RS485 port connectors The RS485 physical layer Most PCs running instrument maintainance software masters use RS232C for serial communication; however, this interface type does not allow the communications network to extend beyond 10 to 20 metres in length. Connect the bus to the backplane as follows using a screened cable, for example Belden 8132 or 9841. MTL have chosen to use an RS485 serial interface, which includes tri-state operation, and allows network lengths of up to 1000 metres and operates with data rates between 1200 baud and 39.4 kbaud when used with the MTL4841. RS485 also allows the simple parallel connection of a number of units. Note: When an RS232 master is used, a data converter must be inserted. Connect the two cores of the RS485 cable to screw terminals A & B of Port 1 on the backplane - see Figure 4.23. • Connect the cable screen to terminal C. • If multiple backplanes are to be connected, use Port 2 to loop to Port 1 of the next backplane. To avoid spending time in troubleshooting, it is suggested that the same colour convention is used for all connections to backplane terminals A and B, e.g. red to A, black to B. Note: No damage will occur if the signalling lines are connected with the wrong polarity. The system will not operate in this case but all that has to be done is to reverse the two connections to make it operate correctly. The RS485 serial interface standard For the purposes of this document RS485 can be regarded as a 2wire, half-duplex, differential, multi-drop (32 nodes), communications standard. The RS485 standard defines the characteristics of the drivers and receivers that can be connected to the bus. It does not define the cabling or connectors used, nor does it specify a particular data rate or signal format. 4.12.5 Data converters Many RS232/485 data converters are available but the one that has received the most extensive testing and which is recommended for use with the MTL4841 is the Westermo MA45 RS232/485. Terminations Follow the manufacturers instructions for setting up the RS232 connection to the controlling PC. The RS485 connection should be configured to suit the MTL4841 settings, which are discussed in Section 5 of this manual. RS485 interfaces should ideally be provided with a ‘matched’ termination to prevent reflections and ringing of the signal on the bus cabling. The termination is usually a simple resistive terminator, with an impedance that matches the characteristic of the cable - this will normally be in the range of 100 - 200Ω. INM4840-5 Nov 2007 • 15 Table 5.1 - MTL4841 address switch setting options 5 MODULES 5.1 MTL4841 and 4842 – installation Switch Number 1 ON OFF ON OFF ON OFF ON OFF ON OFF ON OFF ON OFF ON OFF ON OFF ON OFF ON OFF ON OFF ON OFF ON OFF ON OFF ON Place the MTL4841 over its connector, in the position marked on the backplane. Ensure that the module is not tilted, which could damage the connector pins, then press it carefully to the backplane. All safe-area circuit and power connections are made through this connector. Tighten the two (captive) mounting screws. Repeat this procedure for the MTL4842 module(s) but please note: When fitting the MTL4842 module on the HMU16 and HMU16AO backplanes, DO NOT place the MTL4842 beside the MTL4841 - see Figure 4.8 5.2 Isolator modules (if used) If the backplane accommodates isolators, refer to instruction manual INM4000 for information on wiring hazardous-area connectors for MTL4000 Series isolators. Position each isolator module in its appropriate location on the backplane as shown in Figure 5.1. Ensure that the module is not tilted, which could damage the connector pins, then press it carefully to the backplane. All safe-area circuit and power connections are made through this connector. Tighten the two (captive) mounting screws (A) to hold the isolator in postion. Insert the hazardous area connector into the top of the module as shown. 2 OFF ON ON OFF OFF ON ON OFF OFF ON ON OFF OFF ON ON OFF OFF ON ON OFF OFF ON ON OFF OFF ON ON OFF OFF ON ON 3 OFF OFF OFF ON ON ON ON OFF OFF OFF OFF ON ON ON ON OFF OFF OFF OFF ON ON ON ON OFF OFF OFF OFF ON ON ON ON 4 OFF OFF OFF OFF OFF OFF OFF ON ON ON ON ON ON ON ON OFF OFF OFF OFF OFF OFF OFF OFF ON ON ON ON ON ON ON ON 5 OFF OFF OFF OFF OFF OFF OFF OFF OFF OFF OFF OFF OFF OFF OFF ON ON ON ON ON ON ON ON ON ON ON ON ON ON ON ON Address 1 2 3 4 5 6 7 8 9 10 11 12 13 14 15 16 17 18 19 20 12 22 23 24 25 26 27 28 29 30 31 MTL4841 address switch Up to 31 MTL4841 communications modules can be connected to a single maintenance workstation. Each MTL4841 must be configured with a unique address by using the five switches located on the top of the module. See Table 5.1 for settings. A A Table 5.2 - MTL4842 address switch setting options Switch Number 1 ON OFF ON OFF ON OFF ON OFF ON OFF ON OFF ON OFF ON OFF Figure 5.1 - Mounting an isolator module on the backplane 5.3 Modules – setting and configuration 5.3.1 MTL4841 – setting and configuration The baud rate for the RS485 interface is selected using switches A & B top of the MTL4841 communications module. Set the switches to one of the options given here. Switches A ON OFF ON OFF INM4840-5 Nov 2007 B OFF ON ON OFF Baud rate 1200 9600 19200 38400 16 2 OFF ON ON OFF OFF ON ON OFF OFF ON ON OFF OFF ON ON OFF 3 OFF OFF OFF ON ON ON ON OFF OFF OFF OFF ON ON ON ON OFF 4 OFF OFF OFF OFF OFF OFF OFF ON ON ON ON ON ON ON ON OFF Address 1 2 3 4 5 6 7 8 9 10 11 12 13 14 15 16 5.3.2 MTL4842 – setting and configuration Up to 16 MTL4842 HART interface modules can be connected to a single MTL4841 communications module. Each MTL4842 must be configured with a unique address by using the four switches located on the top of the module. Table 5.2 shows the switch settings for the individual addresses. 5.3.3 The MTL4840 system is controlled by a host computer running instrument management software. Although the software is needed to operate the system, some checks can be made on the correct functioning of the hardware in isolation. These checks are made by observing the operation of the LEDs on top of the MTL4841 and MTL4842. Self-test checks When power is applied to the MTL4841 and MTL4842, the following events should happen: • The green PWR LED on these modules will light. The red ACTIVE LED on the MTL4842 will light to show that it is being addressed by the MTL4841. • LEDs A to D light in sequence as shown in table 5.3, as the MTL4842 scans once around all the loop addresses 1 to 16. The sequence is repeated with each MTL4842. Loop address 1 ❍ ● ● ● 2 ● ❍ ● ● 3 ❍ ❍ ● ● 4 ● ● ❍ ● 5 ❍ ● ❍ ● 6 ● ❍ ❍ ● 7 ❍ ❍ ❍ ● 8 ● ● ● ❍ 9 ❍ ● ● ❍ 6.1 Maintenance precautions b) By providing some method of securing the connector temporarily so that it cannot touch the backplane or the safe-area circuits. Table 5.3 LED A B C D FAULT FINDING AND ROUTINE MAINTENANCE Most codes of practice permit live maintenance on intrinsically safe devices and systems, provided that precautions are taken to preserve the integrity of the device or system. During live maintenance of MTL4000 modules, the hazardous-area connectors that plug into the tops of the modules are likely to be removed, so the cables that connect into the hazardous-area connectors must be reasonably flexible in order to allow connectors to be inserted and removed easily from the module tops. When a hazardous area connector is unplugged, care must be taken to ensure that it is not laid in a position where it could come into contact with the backplane or backplane components. The backplane is connected to safe-area circuits and is therefore not intrinsically safe. An unprotected connector could by-pass the essential segregation between the safe-area and hazardous-area circuits. This can be avoided in one of the following ways: a) By plugging the connector into an MTL4099 dummy isolator or other uninstalled MTL4000 module directly upon removal (but NOT into any other module mounted on the backplane). Operation at power-up • 6 6.2 10 11 12 13 14 15 16 ● ❍ ● ❍ ● ❍ ● ❍ ❍ ● ● ❍ ❍ ● ● ● ❍ ❍ ❍ ❍ ● ❍ ❍ ❍ ❍ ❍ ❍ ● Fault finding When fault finding, carry out the following steps as far as is necessary: 1) Check the condition of the installation to make sure that no damage or deterioration has occurred. ● = off ❍ = on Note: Address 16 is shown by all four LEDs being extinguished. 2) Check that one, or more, of the backplane power LEDs is ON. If not, check the power supply fuse and, if necessary, change it. The rating is: BPMH16/BPSH16 : 2A (Fuse kit FUS16). Following this, the MTL4841 enters either the scanning mode or the scanning disabled mode. 3) Check that the power LEDs on the MTL4841/4842 modules are ON. If not, check power supply fuse FUS2. Its rating is 250mA. The 'standard' MTL4841 module is delivered in MTL/Cornerstone mode and has a default setting of “scanning enabled”. The MTL4841-AMS is delivered preconfigured to AMS mode and in this mode the default is “scanning disabled”. In either case the instrument maintenance software can be used to change the MTL4841’s scanning mode. 4) Exchange potentially faulty isolator modules as follows. a) Unplug the hazardous-area connector. b) Unscrew and remove the module from the backplane. c) Plug-in and secure the replacement unit on the backplane. d) Replace the hazardous-area connector. Scan list Each loop connected to an MTL4842 is added to the scan list if a HART device is detected on power up or if the instrument maintenance software resets the MTL4841. Loops can be added individually or removed from the scan list using the “loop rebuild“ facility in the instrument maintenance software. Potentially faulty modules should be tested in workshop conditions, using the following procedure: a) Connect a power supply to a spare BPS backplane (refer to section 4.11.3) b) Plug the suspect module into any position on the backplane. Scanning enabled The MTL4841 scans continuously round all loops on the scan list indicated by the MTL4842 LED sequence. c) Scanning disabled One MTL4842 indicates the last loop addressed by the MTL4841. Carry out the test procedure described in the appropriate section for the particular module in instruction manual INM4000. 5) If an MTL4841 is changed, the Cornerstone software does not recognise a replacement device until either: a) the node name (stored within the new MTL4841) is made the same as that of the removed device, using the software. b) the network is restarted; when the software will adopt automatically the node name of the replacement device. INM4840-5 Nov 2007 17 6.3 Routine maintenance It is advisable to check the general condition of the installation occasionally to make sure that no damage or deterioration has occurred. The following should be checked at least once every two years (more frequently for particularly harsh environments): 7 SOFTWARE CONNECTIVITY 7.1 Introduction The MTL HART system provides access from a PC to the HART field devices for configuration, diagnostics and the monitoring of device performance. HART devices may be selected for regular status monitoring, and an alert issued if the status changes. 1. Modules are of the types specified in the relevant documentation and are mounted in the correct positions on the associated backplanes. In addition, MTL’s HART connection system supports dedicated software packages for valve positioners to optimise valve maintenance schedules. 2. Modules and hazardous area connectors are correctly and legibly tagged; that the connectors are plugged into the matching modules and that the tag details given comply with the relevant documentation. 7.2 3. Modules and hazardous area connectors are securely plugged into their matching sockets. Communication modes The MTL4841 supports two communication modes: 4. All connections to the backplane, and to the hazardous area connectors, are properly made. 5. Connecting cables to backplanes and to the hazardous area connectors are of the specified type and rating. They should be correctly routed and segregated and not frayed or otherwise damaged. • MTL mode and • Arcom mode to suit the various types of Instrument Management Software package available. MTL mode is used by Applied System Technologies Cornerstone software and several valve manufacturers diagnostic software. 6. Cable screens are properly earthed Arcom mode is used by Emerson AMS software and also several valve manufacturers diagnostic software. Caution: It is strongly recommended that users only undertake the tests and routine maintenance described in sections 6.2 and 6.3. If a module is faulty, repairs or modifications MUST NOT be made as these may affect the intrinsic safety of the module. For repair or replacement, any faulty units or backplanes should be returned to the MTL Group company or the representative from which they were purchased. MTL4841s are therefore available in the following formats. Part Number MTL4841 Configuration mode MTL mode Software package Cornerstone Valvelink (stand alone) HART OPC server Fieldcare FDM MTL4841-AMS Arcom mode AMS suite Ver1.4 - 6.2 Fieldcare (with DTM*) Pactware (with DTM*) FDM (with DTM*) MTL4841-AMSv7 Arcom PLUS mode AMS suite Ver 7 or later MTL4841-PRM Arcom mode PRM Standard MTL4841’s are shipped pre-configured to MTL mode. Units ordered as MTL4841-AMS are pre-configured to Arcom mode and have AMS written on the batch code label for identification. * Some software packages based on the FDT Specification will require the MTL4840 communications DTM. This can be downloaded free of charge from the MTL website at: www.mtl-inst.com/products/soft-tools/soft_tools.htm 7.3 Software setup Having connected the MTL4841/MTL4842 system, as described in this manual, set up the software as described in the software user’s manual. Acknowedgements: Cornerstone is a trademark of Applied System Technologies Inc. Windows is a trademark of Microsoft Corporation HART is a registered trademark of HART Communication Foundation INM4840-5 Nov 2007 18 APPENDIX A In addition to a comprehensive range of generic MTL4000 Series backplanes, MTL has also developed a very wide range of custom backplanes to meet the requirements of its customers. The following listing is provided to illustrate the breadth of generic and custom types created to meet the needs for individual system manufacturers and their DCS models. The listing also includes a range of HART connection boards, explained earlier, to suit both general and custom requirements. Many applications can benefit from simplified wiring and connection techniques, so we recommend that you contact your local MTL representative who will be able to explain how we can find a solution for your particular requirement. The listing was complete at the time of publication but further models may have been added since then. BPM8-FBM201/4/37 Foxboro FBM201HCU Foxboro FBM204HCU Foxboro BPHIMA-16AI HIMA BPHIMA-16AI-R HIMA BPHIMA-16AIO HIMA BPHIMA-16-2AI HIMA BP-GHAI-3700 Honeywell BP-GHAI01 Honeywell BP-GHAI05 Honeywell BP-GHAI16 Honeywell BP-GHAO21 Honeywell BPHM64-A Honeywell BPHM64-ACC Honeywell MTL4000 Series, HART enabled backplanes BPM08-FMAI Honeywell Plantscape BPM08-2AI Generic BPM08-FMAICC Honeywell Plantscape BPM08-2AV Generic BPM08-FMAIO Honeywell Plantscape BPM16-2AI Generic BPM16-FMAI Honeywell Plantscape BPM16-2AV Generic BPM16-FMAICC Honeywell Plantscape Generic BPM16-FMAO Honeywell Plantscape BPM16-AV Generic BPM16-FMAOCC Honeywell Plantscape BPM08-SC2AI Generic BPM16-FMAIF Honeywell Plantscape BPM08-SC2AI(I) Generic BV-GHAI01 Honeywell PMIO Generic BV-GHAI05 Honeywell PMIO Honeywell PMIO BPM16-AIO BPM16-2AV Generic BC-GHAI11 BPM16-2AV Generic BC-GHAO11 Honeywell PMIO BPM32-SCAIO Generic BC-THAI11 Honeywell PMIO BPM32-SCAIR Generic BC-THAO11 Honeywell PMIO BPHM64 Generic BP-THOX12 Honeywell PMIO BPHM64-CC Generic BU-GHAI11 Honeywell PMIO BPMH16-M Generic BU-GHAI11-HON Honeywell PMIO Generic BU-GHAI11CC Honeywell PMIO Generic BU-GHAO11 Honeywell PMIO BPSH16-32 Generic BU-GHAO11CC Honeywell PMIO BPSH16-32R Generic BU-THAI11 Honeywell PMIO BAC-ABBAIO-L ABB BU-THAI11CC Honeywell PMIO BAC-ABBAIO-R ABB BU-THAO11 Honeywell PMIO BAC-INFI90AIH ABB BU-THAO11CC Honeywell PMIO BAC-INFI90AOH ABB BAC-16HDAI Honeywell SMS BAC-ISTA002 ABB FC-GIMTLAI-1620m Honeywell SMS BPM32-ABAI Allen Bradley FC-GIMTLAO-420M Honeywell SMS BP-FBM201 Foxboro FC-GIMTLRT-1620M Honeywell SMS BP-FBM201/4/37 Foxboro FS-GIMTLAI-1620M Honeywell SMS BP-FBM204 Foxboro FS-GIMTLAO-420M Honeywell SMS BP-FBM204-S Foxboro FS-GIMTLRT-1620M Honeywell SMS BP-FBM205 Foxboro BACH-16HDAI Honeywell SMS BP-FBM211 Foxboro BPICS-AI ICS BP-FBM214 Foxboro BPICS-AI-CC ICS BPCAB-FBM214/215 Foxboro BPICS-16AI ICS BPM04-FBM201 Foxboro BPICS-16AI-CC ICS BPM04-FBM214 Foxboro BPICS-2AI ICS BPM08-FBM211 Foxboro BPICS-2AI-CC ICS BPM16-FBM211 Foxboro ICSFTA-8AI ICS BPM16-FBM214/215 Foxboro ICSFTA-8AI-CC ICS BPM32A-FBM201/4 Foxboro ICSFTA-AI250 ICS BPM32A-FBM211 Foxboro ICSFTA-AI250-CC ICS BPM32B-FBM201/4 Foxboro BPM32-MPCAI Siemens Moore Foxboro BPM32-MPHFM Siemens Moore BPM16-2AI BPMH16U BPSH16 BPM32B-FBM211 INM4840-5 Nov 2007 19 BPM32-MPSAM Siemens Moore BPSN-08-AI Simrad Norge BPSN-16-AIH Simrad Norge BPM16-2AI3700 Triconex BPM16-AI3700-L Triconex BPM16-AI3700-R Triconex BPM32-AIH3700 Triconex BPM32-AIH3704E Triconex HCU3700/ISOREP Triconex BPYOK-AI Yokogawa Centum CS BPYOK-AI(16) Yokogawa Centum CS BPYOK-AIO Yokogawa Centum CS BPYOK-MA Yokogawa Centum CS BPYOK-MA(16) Yokogawa Centum CS BPY-MA Yokogawa Centum CS AMC80HCU Yokogawa Centum CS AMM11HCU Yokogawa Centum CS BPYR3-AAI135/835 Yokogawa Centum R3 BPYR3-AAI141 Yokogawa Centum R3 BPYR3-AAI841 Yokogawa Centum R3 BPYR3-AI Yokogawa Centum R3 BPYR3-AIO Yokogawa Centum R3 BPYR3-AV Yokogawa Centum R3 BPYR3-AVO141 Yokogawa Centum R3 BPYR3-AVO841 Yokogawa Centum R3 BPYR3-MA Yokogawa Centum R3 BPYR3-MA(V) Yokogawa Centum R3 BPYR3-MA841 Yokogawa Centum R3 AAB841HCU Yokogawa Centum R3 AAV141HCU Yokogawa Centum R3 BPY-RS-AI16-KS Yokogawa Prosafe BPY-RS-SAI16-KS Yokogawa Prosafe BPY-RS-AI16V-KS Yokogawa Prosafe BPY-RS-AO8-KS Yokogawa Prosafe BPY-RS-SAI16V-KS Yokogawa Prosafe INM4840-5 Nov 2007 HART connection and maintenance units HCU08 20 Generic HCU08RF Generic HCU16 Generic HCU16AI Generic HCU16AIO Generic HCU16AO Generic HMU16 Generic HMU16-P250 Generic HMU16-S200 Generic HMU16-S240 Generic HMU16AO Generic HMU32 Generic HCU-FBM211 Foxboro HCU1492AI Honeywell Plantscape HCU1492AI-CC Honeywell Plantscape HCU1492AIR Honeywell Plantscape HCU1492AIR-CC Honeywell Plantscape HCU1492AO Honeywell Plantscape HCU1492AO-CC Honeywell Plantscape HCU16HDAI Honeywell SMS HCU16-P250 Honeywell SMS HCU16-S150 Honeywell SMS HCU16-S200 Honeywell SMS HCU16-S240 Honeywell SMS HCU-MPCAM Siemens Moore HCU-MPCAI Siemens Moore HCU-MPSAM Siemens Moore HCU-SM331RAI Siemens S7 HCU-SM332RAO Siemens S8 HCU3700/3703E Triconex HCU3700/3703EB Triconex HCU3700/ISOREP Triconex HCU3704E Triconex HCU3805E Triconex HCU-FTA3700 Triconex INM4840-5 Nov 2007 21 MTL Instruments Pty Limited 1/30 Canvale Road Canning Vale Perth, WA 6155 Australia Tel: +61 (0)8 9455 2994 Fax: +61 (0)8 9455 2805 E-mail: [email protected] MTL Canada Safety Instrumentation #102, 4249 97 Street Edmonton, Alberta Canada T6E 5Y7 Tel: +1 780 485 3132 Fax: +1 780 485 3122 E-mail: [email protected] MTL Instruments China Co. Ltd. Room 1002A, The Gateway No 10 Yabao Road, Chaoyang District Beijing 100020 China Tel: +86 010 8562 5718/5720/5721 Fax: +86 010 8562 5725 E-mail: [email protected] MTL Instruments sarl Les Carrés du Parc 10 rue des Rosiéristes 69410 Champagne au Mont d’Or France Tel: +33 (0)4 78 64 98 32 Fax: +33 (0)4 78 35 79 41 E-mail: [email protected] MTL Instruments GmbH An der Gümpgesbrücke 17 D-41564 Kaarst Germany Tel: +49 (0)2131 718930 Fax: +49 (0)2131 7189333 E-mail: [email protected] MTL India No. 36, Nehru Street Off Old Mahabalipuram Road Sholinganallur Chennai - 600 119 India Tel: + 91 (0)44 24501660/24501857 Fax: + 91 (0)44 24501463 E-mail: [email protected] Group Internet home page http://www.mtl-inst.com/ Members of The MTL Instruments Group MTL Italia srl Via Cantù 11 I - 20092 Cinisello Balsamo MI Italy Tel: +39 (0)2 61802011 Fax: +39 (0)2 61294560 E-mail: [email protected] MTL Instruments KK 3rd Floor, Gotanda Masujima Building 1-8-13 Higashi-Gotanda, Shinagawa-Ku Tokyo 141-0022 Japan Tel: +81 (0)3 5420 1281 Fax: +81 (0)3 5420 2405 E-mail: [email protected] MTL Instruments BV PO Box 55, 6680 AB Bemmel de Houtakker 36, 6681 CW Bemmel The Netherlands Tel: +31 (0)481 450250 Fax: +31 (0)481 450260 E-mail: [email protected] MTL Instruments Pte Limited 31 Ubi Road 1 #04-01 Aztech Building Singapore 408694 Tel: +65 6 487 7887 Fax: +65 6 487 7997 E-mail: [email protected] MTL Instruments Villa No. 4, Sector 2-17, Street 6 PO Box 53234, Abu Dhabi, UAE Tel: +971 2 446 6840 Fax: +971 2 446 6841 E-mail: [email protected] Measurement Technology Limited Power Court, Luton, Bedfordshire England LU1 3JJ Tel: +44 (0)1582 723633 Fax: +44 (0)1582 422283 E-mail: [email protected] MTL Incorporated 4001 W. Sam Houston Parkway N., Suite 150 Houston TX 77043 USA Tel: +1 281 571 8065 Fax: +1 281 571 8069 E-mail: [email protected]