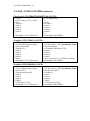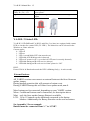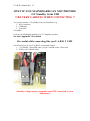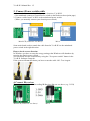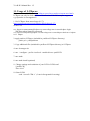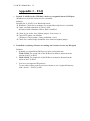
1
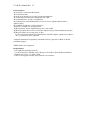
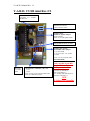
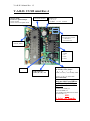
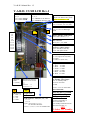
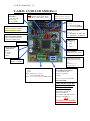
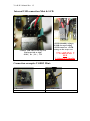
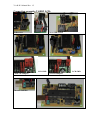
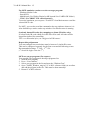
Y.A.R.D.2 Manual Rev. 1.5 Y.A.R.D. 2 µ / Mini / LCD www.yard2usb.de Y: Yet A: Another R: Remote D: Device 2: 2nd Version Disclaimer: Y.A.R.D. is available as an assembly set and not as a final product. By using Y.A.R.D.2 USB you are accepting to use this device on YOUR OWN RISK ! I’m not responsible for any damage of your hardware / software. Y.A.R.D.2 Manual Rev. 1.5 Y.A.R.D.Yet Another Remote Device 2 It is available with 3 different versions: Micro, Mini and LCD Y.A.R.D.2 USB USB connection IR Receiver IR Wakeup IR Sender RTC wakeup Rotary encoder Buttons i²c Header LCD & Light sensor Windows Software Linux Software Micro Mini LCD X X X X X X X X X X X X X X 7 1 127 X X X X X X X X X The device has following features (Micro / Mini / LCD): - IR receiver for supported protocols (RC5, RC6, NEC, Samsung, Denon) - IR wakeup support Additional for Micro: - Up to 7 push buttons Additional for Mini and LCD: - IR Sender (for some protocols) - RTC (Real time clock) for programmable wakeup with GoldCap buffer for min 3 days in case of an power failure. - i²c Header for extensions (FAN Controller) (Mini from Rev04) Additional for LCD Version: - Up to 15 push buttons (up to 127 if you do not need the Rotary encoder) - Rotary encoder with separate push Button - LCD for character and graphic LCD with controllers: HD44780, KS0108, T6369C - Automatic back light adjustment via Photo resistor if LED back light is used. Windows Software IR events via WinLirc protocol (WinLirc not required) MCE Emulation (e,g. Windows 7/8 Media center, PowerDVD) JSON (for Kodi / XBMC), no plugin required Keyboard emulation General sending of Keys to the foreground Window Every program with Winlirc interface can be used Media Portal can be controlled with my own Winlirc Plugin. PVR monitoring for automatic wakeup DVBViewer WMC Vista / WMC 7 (Beta) Media Portal (only if mySQL5 is used for MediaPortal - Beta). Starting applications via IR Power on Reset handling FritzBox Call monitor Y.A.R.D.2 Manual Rev. 1.5 Linux Software yard2srvd is a background Daemon lirc daemon patch Work as an input device event[x] (keyboard emulation) yard2wakeup for automatic wakeup time for VDR yard2config for Y.A.R.D.2 configuration yard2record to create IRMap table for own lirc server implementation and for /input/event[x] yard2flash to update Y.A.R.D.2 firmware lirctest is a simple lirc test application [Beta] own lirc server implementation. lirc is not needed [Beta] An input device can be created dev/input/event[x], which simulates keystrokes [Beta] LCDproc driver (only char. LCDs) LCD is only supported on Linux distributions with full compiler support for LCDproc ! e.g. Openelec is NOT supported A manual installation on OpenElec (x86/RasPi/Cubex) is possible, without LCD and yard2flash support. XBMCbuntu is also supported. Requirements: - Free USB port (internal preferred) - Y.A.R.D.2 needs 5V StandBy from USB port in S5 mode (Check mainboard manual) - Windows XP, Vista, 7, 8 32Bit / 64Bit - Linux (LCD support currently only textmode via LCDProc) Y.A.R.D.2 Manual Rev. 1.5 Y.A.R.D. 2 USB mini Rev.2/3 1 2 3 4 1/2=Data 3=+ 4=GND IR Receiver Mainboard connector Chassis Power switch Jumper JFW: Firmware update Jumper Open: normal Close: Force FW update mode Status LED for direct 5V LED Jumper J5V (green): 5V Standby selcet jumper 1 5V from USB 2 out 5V to PIC / ext. 5VSB 3 GND Close 1-2: use 5V from USB (Recommended) IR Sender + (Anode) GND USB connector: GND | D+ | D- | +5V 1357 2468 Open: use top row for internal USB cable Close: use USB-B connector Only use this if you MB has no 5V standby on USB port option !! Connect 5V Standby to Pin 2 and GND to 3 (5V standby and GND must be from the same PSU !!) SEE 2. Select +5V Standby Y.A.R.D.2 Manual Rev. 1.5 Y.A.R.D. 2 USB mini Rev.4 Jumper JFW: Firmware update Jumper Open: normal Close: Force FW update mode Not used currently IR Receiver 1|2|3|4 1/2=Data 3=+5V 4=GND Mainboard connector Chassis Power switch 1 2 : Mainboard 3 4 : PowerSwitch IR Sender + Anode | GND I2C connector 1 : GND 2 : 5V 3 : SCL 4 : SDA LED USB connector: GND | D+ | D- | +5V Jumper J5V (green): 5V Standby selcet jumper 3 | 2 | 1 GND | 5V OUT | +5V Standby USB Close 1-2: use +5V from USB (Recommended) Only use this if you MB has no 5V standby on USB port option !! Connect 5V Standby to Pin 2 and GND to 3 (5V standby and GND must be from the same PSU !!) SEE 2. Select +5V Standby Y.A.R.D.2 Manual Rev. 1.5 Y.A.R.D. 2 USB µ Micro Rev.1 / Rev.2 Button: 1: Btn1 + 2: Bnt2 + 3: GND Mainboard connector Chassis Power switch 1: PowerSwitch 2: PowerSwitch 3: Mainboard 4: Mainboard Mainboard: + - IR Receiver 1: GND 2: +5V 3: Data 4: Data PowerSwitch: + LED 1: +5V 2: GND Jumper J5V (green): 5V Standby selcet jumper 3: GND 2: out +5V 1: +5V Standby (USB) Close 1-2: use +5V from USB (Recommended) Only use this if you MB has no 5V standby on USB port option !! Connect 5V Standby to Pin 2 and GND to 3 (5V standby and GND must be from the same PSU !!) SEE 2. Select +5V Standby + + USB connector: GND | D+ | D- | +5V Jumper JFW: Firmware update Jumper Open: normal Close: Force FW update mode Y.A.R.D.2 Manual Rev. 1.5 Y.A.R.D. 2 USB LCD Rev.1 CLCD/GLED JCG 1|2|3 1-2: Contrast GLCD 2-3: Contarst CLCD LCD Contrast JLC 1|2|3 1-2: GLCD use 10k Resistor 2-3: CLCD No Resistor =0 LCD BL Resistor JLR(2pin) Open: Use Resistor R3 (56)! Close: No Resistor = 0 LCD Power Jumper JLP (3pin) +5V | LCD-out | ext +5V (J5E) ** LCD 12 34 56 78 9 10 11 12 13 14 15 16 17 18 19 20 * External +5V Power J5E +5V ext. for LCD Backlight GND Rotary Encoder / Spin button TOP: GND | Button | 1 | 2 I2C connector SDA | SCL | 5V | GND Jumper JFW: Firmware update Jumper Open: default (normal use) Close: FW update mode GLCD Select Jumper JSJ: 1: +5V; high (Font 6x8, RST) 2: Output 3: GND; low (Font 8x8) Jumper JSW: 1: Btn1 2: GND 3: Btn2 4: GND 5: GND 6: GND 7: GND 8: GND 9: Btn3 10: GND 11: Btn4 12: GND IR Sender GND + (Anode) Mainboard connector Chassis Power switch 13 24 Mainboard : 1-2 PowerSwitch: 3-4 * ** IR Receiver 1: Data = 2: 2: Data 3: +5V 4: GND Light sensor USB connector: GND | D+ | D- | +5V 1357 2468 Open: use top row (1-3-5-7) for internal USB cable Close: 1-2, 3-4, 5-6, 7-8 to use USB-B cable Jumper J5V (green): 5V Standby selcet jumper 1 in: 5V Standby USB 2 out 5V out to PIC 3 GND Close 1-2: use 5V from USB (Recommended) Only use this if you MB has no 5V standby on USB port option !! Connect 5V Standby to Pin 2 and GND to 3 (5V standby and GND must be from the same PSU !!) SEE 2. Select +5V Standby Y.A.R.D.2 Manual Rev. 1.5 Y.A.R.D. 2 USB LCD SMD Rev.1 LCD Power Jumper JLP (3pin) 1 ext +5V (J5E) 2 LCD-out 3 +5V (USB) Jumper JSW: GND | GND | GND | GND | GND GND | Btn1 | Btn2 | Btn3 | Btn4 LCD 19 17 15 13 11 9 7 5 3 1 20 18 16 14 12 10 8 6 4 2 CLCD/GLED JCG 1|2|3 1-2: Contrast GLCD 2-3: Contarst CharLCD LCD BL Resistor JLR(2pin) Open: Use Resistor (56) !! Close: No Resistor = 0 !! LCD Contrast JLC 1|2|3 1-2: CLCD No Resistor =0 2-3: GLCD use 10k Resistor Jumper JFW: Firmware update Jumper Open: default (normal use) Close: FW update mode IR Receiver 1: Data = 2: 2: Data 3: + 4: GND Light sensor Rotary Encoder / Spin button Button 1 - Right 2 - Left GND I2C connector SDA | SCL | 5V | GND Mainboard connector Chassis Power switch IR Sender GND | + (Anode) 12 34 Mainboard : 1-2 PowerSwitch: 3-4 USB connector: GND | D+ | D- | +5V 1357 2468 Open: use top row (1-3-5-7) for internal USB cable Close: 1-2, 3-4, 5-6, 7-8 to use USB-B cable Jumper J5V (red): 5V Standby selcet jumper 1 +5V Standby USB 2 out 5V out to PIC 3 GND Close 1-2: use 5V from USB (Recommended) Only use this if you MB has no 5V standby on USB port option !! Connect 5V Standby to Pin 2 and GND to 3 (5V standby and GND must be from the same PSU !!) SEE 2. Select +5V Standby Y.A.R.D.2 Manual Rev. 1.5 Y.A.R.D. 2 USB LCD SMD Rev.2 LCD SMD Rev. 2 has the same layout as Rev.1 except Jumper JSW ! There is a +5V output instead of GND ! Jumper JSW: +5V | GND | GND | GND | GND GND | Btn1 | Btn2 | Btn3 | Btn4 Y.A.R.D.2 Manual Rev. 1.5 Internal USB connection Mini & LCD Connect USB cable to the top row Pin layout left to right GND | D+ | D- | +5V +5VSB (Standby voltage) If USB is not providing +5VSB connect a +5VSB voltage to the Jumper J5V !! WARNING !! SEE 2. Select +5V Standby Connection examples YARD2 Mini: IR Receiver Power-MB Switch Y.A.R.D.2 Manual Rev. 1.5 Connection examples YARD2 LCD: IR Receiver LCD SMD Power-MB Switch LCD SMD LCD SMD CharLCD Jumpers External Switches GraLCD Jumpers Y.A.R.D.2 Manual Rev. 1.5 Y.A.R.D. 2 USB micro mini & LCD – Supported IR protocols: Receive: Send: RC5, RC6(A), NEC, Samsung, Sony, Denon RC5, RC6(A), NEC, Samsung Y.A.R.D. 2 USB LCD - Supported LCDs: Character LCD: HD44780, KS0073, KS0066 Graphic LCD: T6963c (max 240x128), KS0108 (only 128x64) CLCD is recommended, because of lower µC load! Y.A.R.D. 2 USB LCD connector: Character LCD (HD44780/KS0073/66) (CLCD) 1: GND 3: LCD Contrast +5V (via Poti) 5: Backlight +5V (via Resistor?) 7: Data 0 9: Data 2 11: Backlight GND (PWM) 13: Read / Write 15: Enable2 17: Data 4 19: Data 6 2: +5V Main Power 4: 6: 8: Data 1 10: Data 3 12: RS 14: Enable 1 16: 18: Data 5 20: Data 7 Graphic LCD (T6963c) (GLCD) 1: GND (Logic) 3: LCD Contrast Adjust (input) 5: Backlight +5V (via Resistor?) 7: Data 0 9: Data 2 11: Backlight GND 13: Data Read (RD) 15: Command /Data input (C/D) 17: Data 4 19: Data 6 2: +5V Main Power (Logic) 4: Font Select (FS) (+5V/GND via Jumper) 6: LCD Contrast “–Vee” provided by LCD! 8: Data 1 10: Data 3 12: Data Write (WR) 14: Enable (CE) 16: Reset 18: Data 5 20: Data 7 Graphic LCD (KS0108) (GLCD) 1: GND (Logic) 3: LCD Contrast Adjust (input) 5: Backlight +5V (via Resistor?) 7: Data 0 9: Data 2 11: Backlight GND 13: Chip Select 2 (CS2) 15: Data/Instruction (RS) 17: Data 4 19: Data 6 2: +5V Main Power (Logic) 4: Reset (RST) (+5V via Jumper !) 6: LCD Contrast “–Vee” provided by LCD! 8: Data 1 10: Data 3 12: Chip Select 1 (CS1) 14: Read/Write (RW) 16: Enable (E) 18: Data 5 20: Data 7 Y.A.R.D.2 Manual Rev. 1.5 Y.A.R.D. 2 USB LCD SMD connector: Character LCD (HD44780/KS0073/66) (CLCD) 1: GND 3: LCD Contrast +5V (via Poti) 5: RS 7: Enable 1 9: Data 0 11: Data 2 13: Data 4 15: Data 6 17: 19: Backlight +5V (via Resistor?) 2: +5V Main Power 4: 6: R/W 8: Enable 2 10: Data 1 12: Data 3 14: Data 5 16: Data 7 18: 20: Backlight GND (PWM) Graphic LCD (T6963c) (GLCD) 1: GND (Logic) 3: LCD Contrast Adjust (input) 5: Data Write (WR) 7: Enable (CE) 9: Data 0 11: Data 2 13: Data 4 15: Data 6 17: Reset 19: Backlight +5V (via Resistor?) 2: +5V Main Power (Logic) 4: LCD Contrast “–Vee” provided by LCD! 6: Data Read (RD) 8: Command /Data input (C/D) 10: Data 1 12: Data 3 14: Data 5 16: Data 7 18: Font Select (FS) (+5V/GND via Jumper) 20: Backlight GND (PWM) Graphic LCD (KS0108) (GLCD) 1: GND (Logic) 3: LCD Contrast Adjust (input) 5: Reset (RST) 7: Data/Instruction (RS) 9: Data 0 11: Data 2 13: Data 4 15: Data 6 17: Chip Select 1 (CS1) 19: Backlight +5V (via Resistor?) 2: +5V Main Power (Logic) 4: LCD Contrast “–Vee” provided by LCD! 6: Read/Write (RW) 8: Enable (E) 10: Data 1 12: Data 3 14: Data 5 16: Data 7 18: Chip Select 2 (CS2) 20: Backlight GND (PWM) Y.A.R.D.2 Manual Rev. 1.5 Jumper Options (positions see explanation above): CLCD/GLCD JCG LCD Contrast JLC: LCD BL Resistor JLR LCD Power Jumper JLP (3pin) External +5V Power J5E GLCD Select Jumper JSJ Only non SMD LCD-Version Jumper JFW: I²C connector Rotary Encoder / Spin button Jumper JSW Jumper J5V (green) IR Receiver Select your used LCD GLCD or CLCD Select if your LCD needs a additional contrast resistor. GLCD or CLCD Select if your LCD needs a Backlight resistor or not. (Default 56Ω) LED Backlight normally needs a resistor if not included on LCD. Be sure you use the correct resistor for your LCD !! Otherwise you can damage your LCD !!! If you use a normal LCD with LED backlight you can use the USB as PSU for the backlight. Close: +5V | LCD-out If you use a LCD with a high current (>250mA) backlight you can select the external PSU for the backlight. Close LCD-out | ext +5V (J5E) Connect external PSU for LCD Backlight Power JLP T6369c: Select your Font you want to use with your GLCD Font 6x8: Close 1-2 (+5V) Font 8x8: Close 2-3 (GND - default) KS0108: +5V: Close 1-2 See 3. Firmware update. I²C connector for additional addons. (FAN-controller) GND: Connect to GND Button: Button of the Rotary Encoder (if available) Left pin of the Rotary Encoder Right pin of the Rotary Encoder Connect your buttons/switches to this Jumperblock You can connect 4 buttons directly (1-2), or 15 with a diode matrix (Appendix1) See chapter 2. “Select +5V Standby” Connector for IR-Receiver TSOP31238 1: GND 2: 5V (VCC) 3: Data (out) TSOP 32238 1: Data (out) 2: 5V (VCC) 3: GND Y.A.R.D.2 Manual Rev. 1.5 USB connector: GND | D+ | D- | +5V Light sensor IR Sender / StatusLED See chapter 1. “Connect Y.A.R.D.2 USB LCD / Mini to your system” Connecter for light sensor for automatic backlight adjust Connecter the IR send diode Y.A.R.D. 2 Status LED: Y.A.R.D.2 LCD SMD and Y.A.R.D.2 mini Rev.2 (or later) are equipped with a status LED or a header for a status LED (5V LED !). The behaviour can be selected in the Windows or Linux software. Current modes: 0. LED off 1. LED on 2. LED 1 second blink (RTC time must be set) 3. LED blink if IR Wakeup code is detected 4. LED on if system is off (e.g. to check if OFF state is correctly detected) 5. LED blink during an IR-code receive (always) 6. LED blink during an IR-code receive when system in “ON” HINT: From 05/2014: In Bootloader mode the LED is blinking fastly (~ 4 each second) External buttons All YARD2 versions can connect an external button at the force firmware update jumper. During normal operation this will generate a button event. During YARD2 Bootup this will enter force update mode, see 4. More buttons can be connected, depending on your YARD2 version: Micro: 3 additional buttons can be connected, see description above Mini: only the force update Jumper Button is available LCD: Up to 15 buttons can be additional connected to the button headers. Additionally the Rotary Encoder can be used as buttons. See Appendix 1 for an example. Buttons must be connected from “+” to “GND”. Y.A.R.D.2 Manual Rev. 1.5 1. Connect Y.A.R.D.2 to your system A: USB-B / USB-B mini connector (if available) Close all 4 jumper (1-2, 3-4, 5-6, 7-8) of USB connector and attach a normal USB-B / mini to USB-A cable. Connect to a free USB Port of your system. B: Internal USB header Open all jumper, use a internal 4pin cable (upper row of YARD) to connect to a USB header on your Main board. (1=GND | 3=D+ | 5=D- | 7=+5V) Be careful when you connect the USB cable! Do not mix up the direction! For internal connection you need an internal USB cable. This is not part of the Y.A.R.D.2 package. You can get such a cable easily e.g. via eBay. Internal USB cable (4Pin 4Pin or 5Pin 4Pin) 2. Select +5V Standby – WARNING read carefully Y.A.R.D. 2 USB needs +5V standby power to work while the system is in S5 mode (Shutdown / OFF). It is recommended to use +5V standby power from USB port. See also Appendix 2 for details Look at you mainboard manual for this feature. It is possible that you need to enable this feature by Bios setting or mainboard jumper. If you mainboard provides +5V standby from USB close jumper J5V at 1-2. Mini R1-3/ LCD Mini R4 LCD SMD Micro R1 Y.A.R.D.2 Manual Rev. 1.5 ONLY IF YOU MAINBOARD CAN NOT PROVIDE +5V Standby from USB !! BE VERY CAREFUL WHEN CONNECTING !! You can use another +5V standby from your Mainboard e.g. 1. WOL connector 2. CIR header 3. From PSU if available. Look at your Mainboard manual for a +5V Standby provider! See also Appendix 2 for details Be careful while connecting this you Y.A.R.D. 2 USB! Check Pin layout of your Y.A.R.D.2 version and connect 1. +5V Standby (here RED cable ) to pin 2 (middle of the 3 Pins) and 2. GND to pin 3 (Black cable). Standby voltage must be from the same PSU connected to your Mainboard. Y.A.R.D.2 Manual Rev. 1.5 3. Connect Power switch cable 1. Connect the Power switch cable from your chassis to Y.A.R.D.2 (See mainboard connector Chassis Power switch on the Hardware description page) 2. Connect a cable from Y.A.R.D. to the main board power switch (Where you normally connect your chassis power switch) Mini/LCD (connector see above) Micro Some main board needs to attach the cable from the Y.A.R.D.2 to the mainboard power switch in the right direction. How to check correct direction: In Windows you have to setup the energy settings, that Windows will shutdown by pressing the chassis power switch. You can check now the connection by using the “Test power switch” button in the Y.A.R.D. Software Setup tab. If the system will not shut down you have to turn the cable 180°. Test it again. 4. Connect IR receiver IR receiver must be installed according IR-Receiver Pin out, see above (e.g. 31238) Mini/LCD (connector see above) Micro Y.A.R.D.2 Manual Rev. 1.5 5. Firmware update (force Firmware update mode) Normally Firmware update is done completely by software. See section “Windows or Linux” software for details. In case that anything went wrong during Firmware update process or FW update procedure changes, you can force to enter “Firmware update mode” by closing jumper JFW. Force Firmware update process: 1. Disconnect Y.A.R.D.2 USB from USB (& Power) completely 2. Close jumper JFW 3. Connect Y.A.R.D.2 to USB (& Power) 4. Wait 10 seconds and remove JFW jumper 5. Start Y.A.R.D.2 software and start Firmware update 6. After update is completed, close Y.A.R.D.2 Software and restart it. Y.A.R.D.2 should work now normally. 6. Remote control & Logitech Harmony You can use any multi remote control as long as you select a model with a supported protocol. For a Logitach Harmony you can use e.g. following profiles: - Asrock 330HT Select: "Media Center PC" -> ASRock -> ION 330HT - Origen AE TechnologyS16V Select: "Media Center PC" -> Origen -> TechnologyS16V Y.A.R.D. 2 is only a IR receiver. You have to learn and configure each remote control button in the software!! LCD related section: 7. LCD contrast adjust: Adjust the LCD contrast with the 10k Poti to your specific LCD. Without this your LCD might show nothing or is black 8. Negative voltage for LCD contrast: Y.A.R.D. 2 does not provide negative voltage for contrast adjusts! If you need negative voltage and it is not provided directly from the LCD, you can use a external –12V DC/DC converter (+5V -> -12V) and connect the –12V negative voltage output to Pin 6 of LCD connector (cable) or Pin 2 of Jumper “CLCD/GLED JCG” Y.A.R.D.2 Manual Rev. 1.5 Y.A.R.D. 2 USB Windows Software description 1. Driver installation for normal / update mode A: Windows XP 32/64bit After connecting Y.A.R.D.2 USB to the system a dialog is shown to select driver. Select “YARD2” directory and install driver B: Windows Vista / Windows 7 32/64bit After connecting Y.A.R.D.2 USB to the system will not find any known driver for this device. Open “Device Manager” search for Y.A.R.D. 2 and update driver manually: Right click update driver. Select “YARD2” directory and install driver C: Windows 8 32/64Bit See additional document “Windows8_Installation.pdf” or visit www.yard2usb.de and select Videos For the Firmware update another driver is necesarry. At the first time you update the Firmware following A or B. In device manager it is shown as “sprut device” or “Custom USB Devices”or “YARD2_BOOTLOADER”(depends how old your YARD is ) Select “Bootloader” directory and install driver. 2. Y.A.R.D. 2 Software (Windows) Every option in the software with a “Y:” in front, is a Y.A.R.D.2 USB option and needs to be saved by pressing “Save YARD settings”. Almost all settings / buttons in the software have hints with a further description. All settings are stored in the Registry: “HKEY_CURRENT_USER\Software\YARD2”. Configuration: 2.0 Menu YARD2 Test Power switch To test the correct connection of the mainboard power switch: If you press the button the system will probably shutdown. If the system does not shutdown: 1. Check Windows default behaviour when the Power button is pressed 2. Turn the cable from the Y.A.R.D. to the mainboard YARD2 Dump / Erase EEPROM DATA If something does not work you can erase the EEPROM and start again. For debug you can save the EEPROM to a file YARD2 Expert Settings Here you can change or enable some not common settings. YARD2 Export Settings Export all Windows settings from the registry to a file. Y.A.R.D.2 Manual Rev. 1.5 2.1 Setup tab If you want to start this application during Windows start. Check this box. Select COM port and press “Open Com port” If you selected the right one, you see the current status in the Y.A.R.D.2 field Options: TCP port for Winlirc: Change only if you use another port. Default: 8765 Test Winlirc Y.A.R.D. 2 sends dummy data to all connected WinLirc devices. Y: Status LED: Set mode Status LED. LED modes see above. Y: Y: Use WakeUP IR Button also as shutdown command: If enabled the power switch button will be triggerned even if system in ON. Depending on your system power button setup this will shutdown your system. FritzBox Call Monitor If you use a Fritz!Box and it is configured to send the incoming calls via TCP, you can show a the information which number is calling to your number. Reset Y.A.R.D. 2 Reset / reboot the device. Firmware update See 2.2 2.2 Firmware Update Dialog Dialog to update the Y.A.R.D. FW. “Select FW” and press “Upload new FW”. Check “Reset EEPROM DATA” to reset the configuration to default. Use this only if you have problems during Y.A.R.D.2 startup. After the new FW is flashed press “Close FW update” Hint: At first update you have to install the Y.A.R.D.2 Bootloader driver. See: Driver installation at next page how to install driver. Do not exit the update dialog! After driver is installed, press “Upload Firmware” again. In Firmware update mode, no COM-port is available. It is done via a custom USB interface. Y.A.R.D.2 Manual Rev. 1.5 2.3 RTC / POR tab Setup time and wake up time Y: Start system after power loss: If a power loss is detected you can decide to start the system or not. Configure POR (Power on Reset = Power loss) handling. Reboot / Shutdown -> Restart Stability Test (Use this only for Debug !!) You can test Y.A.R.D.2 and you system for wakeup and system start. 2.4 VDR / Recording tab Y.A.R.D. SW tries to get the next programmed recording and set the wake up time automatically. Currently supported: - DVBViewer / DVBViewer Recording Service - Windows Media Center Vista - Windows Media Center Windows 7 - Windows Media Center Windows 8 - Media Portal (if mySQL database is used) “Set new wake up time immediately” programmes the wake up time on every recording change. Otherwise time will be set only during shutdown. For some Media application you have to setup some individual parameters DVBViewer and DVBViewer Recording Service XBMC IP address if default IP / port is not used 2.5 IR Key map tab Y.A.R.D. is only a IR Receiver. Every button on your remote control must be learned and configured !! Please note that the controlling with IR commands is handled in 4 steps: 1: Mouse and Start application 2: XBMC via TCP if option is checked 3: MCE Emulation of the selected application 4: OnTop Window If an IR event is working with e.g. 2: XBMC then 3 and 4 will be skipped! Y.A.R.D.2 Manual Rev. 1.5 Every code needs unique specific keyname. An automatic prefix can be used. For the common IR buttons / events you can use the IR Setup wizard. Additional buttons can be added afterwards. To change the settings double-click or press “Edit / Setup IR Code”. Setup Wizard: 1. 2. 3. 4. Press “Wizard” Press the button on your remote for the shown event e.g. “UP” Press Skip if you do not want to use this Event. Wizard close automatically after all buttons configured. Y.A.R.D.2 Manual Rev. 1.5 Manual button learning: 1. Press “Learn new IR code” to enable learing mode 2. Press a button on your remote control you want to use and enter a keyname or select one from the pre-defined list. Set MCE, XBMC action and program assigment from dropdown menu. 3. Press “Learn new IR code” again to disable learning mode 4. You can edit or delete IR Code afterwards if necessary Mouse & MCE emulation & XBMC Setup Select IR code in upper list and select the emulated key in dropdown field or via context menu. Mouse: Configure IR code exclusively to work as a mouse replacement OnTop: Configure keystroke for OnTop window MCE: Configure which IR code is used for MCE emulation. XBMC: Configure XBMC action of selected IR code for JSON TCP. Note: If you use MCE emulation with Windows Vista or higher, the user context (e.g. Administrator privileges) of the YARD Software and the target application must be the same! Attach IR code to applications and send scripts Edit the IR code by DoubleClick or use “Edit / Setup IR Code” Select application (see Apps Tab) or Sendscript and press OK. IR Wake up/ Start up Button Learn a specific IR code to power on you system press 1. “Y: Learn Start IR command”. Press the button on your remote device. 2. Press and hold the button you want to use for 1 second 3. Press “Save YARD settings” to save this code to YARD2 EEPROM. To Reset Wake Up code, double click to the code below the button. Learn system Force Power off IR button Learn a specific IR code to force power off you system press 1. “Y: Learn Force off IR button”. Press the button on your remote device. 2. Press and hold the button you want to use for 1 second 3. Press “Save Y: YARD settings” to save this code to YARD2 EEPROM. To Reset Wake Up code, double click to the code below the button. !Warning – The system will be power off immediately! Y.A.R.D.2 Manual Rev. 1.5 For MCE emulation you have to select a target program: - Windows Media Center - PowerDVD - MediaPortal (Use Winlirc Plugin for MP instead! See YARD2 SW folder!) - XBMC (Use XBMC TCP control instead!) To test the emulation you can press “Test MCE” from Main menu to send the selected MCE code. For MCE, you can also send the command to the top windows whatever it is. Also defined keys can be send to top window if no Media center is running Send only known IR codes (key mapping) to clients (WinLirc only): If selected only IR code which are in the list will be send. All other will be logged but ignored for controlling. This is recommended after you configured all IR buttons! Repeat delay adjustment You can configure how much time must be between 2 similar IR events. This can be configured seperatly for the first event and all following events. Recommended settings: 1st: 200 – 2nd: 150 (1st should be higher than the 2nd ) MCE new target programs (For experts) You can add a new program to the target programs list: 1. Start the new program 2. Press “List windows” 3. Select your program in the list and note the “WindowClass” 4. Open “YARD_Window_map.ini” (Y.A.R.D. software folder) in an editor and add the program to the file. This must be done manually! 5. Restart Y.A.R.D. software Y.A.R.D.2 Manual Rev. 1.5 2.6 Apps tab Configure application that can be used with YARD SW. Select program and “Toggle” option: ’X’: Usage disabled at the moment ‘I’: Can be used to start with IR-command ‘A’: Start application with Y.A.R.D.2, start delay 1 second for each SW Send IR Script: Here you can configure the IR codes which will be sending when you attach a IR Code to a send script. It can contain 1..10 IR codes. IR Send is still experimental and in work and does not work sometimes. 2.7 LCD (Only available in LCD Version) 2.7.1 LCD setup Configure your LCD display. Currently supproted displays CLCD: HD44780, KS0066/73, GLCD: T6963c, KS0108 (only 128x64). Recommended are CLCD, because of the lower data rate Y: Display Time and WakeUp while system is off (Req. USB standby power) Self explaing Y: Show own welcome message during start You can enter your own welcome message during start up Show own shutdown message Last message before system shutdown. Y: LCD Testmode (Time, IR, USB Status) This is useful for debuging – currently only 4x16 / 4x20 displays are supported If you enable, you can not write on the LCD yourself!! If system is shutdown, the backlight is disabled. You can see the text on the LCD if you look carefully on the LCD. The text may be very dark. Clear LCD after YARD software start Clears the LCD direcly after the Y.A.R.D. is succesfully opened by the software. LCDHype Textmode only (KS0108 Controller) This option activate only the Textmode with the KS0108 Controller when used with LCDhype Y: Rotary Encoder If you use a rotary encoder, you can configue your used type. Some encoders send more than one impulse per turn. Look at the datasheet of you encoder how many impuls/turn is send. (1..4) Switch direction left <-> right if necesarry Y.A.R.D.2 Manual Rev. 1.5 2.7.2 LCD Test On this page you can test your LCD – self explaing Be sure Testmode is disabled!! You can also see the text ans graphics that external programs, like LCDhype is sending to Y.A.R.D.2 SW 2.7.3 Lightsensor Setup max and min value for automatic backlight adjustment with light Sensor Get current value and press “Minimum” or “Maximum” to setup the values. LCD Backlight Setup max and min value for automatic backlight adjustment with light Sensor Press “Save YARD settings” after configuration 2.8 Log tab Configure the Log option. If everything works well disable all. “Log all events / messages / IR”: Log every message created by YARD2 SW “Log all Remote keys”: Log only the IR commands “Log all LCD output”: Log all LCD controls received from external LCD program, e.g. LCDHype Hint: Disable log if you do not need it! Y.A.R.D.2 Manual Rev. 1.5 3 Application specific settings 3.1 MCE application e.g. Windows Media Center (Vista / Win7) Configure MCE emulation and select e.g “Windows Media Center” as target. Thats all 3.2 XBMC / Kodi XBMC / Kodi can be easily controlled via JSON TCP interface. With this interface you can use almost any remote control feature of XBMC. Activate JSON TCP in XBMC: Settings Services Remote control “Allow programs on this system to control XBMC” On some system you have also to check: “Allow programs on other systems to control XBMC” This depends on your network configuration Restart XBMC. Check also Firewall settings for YARD2 software and XBMC / Kodi ! Y.A.R.D.2 Manual Rev. 1.5 3.3 DVBViewer For DVBViewer use the WinLirc Plugin provided with DVBViewer 1. Enable Plugin: Settings Input Input Plugins Winlirc 2. Set “Repeat delay” and “Tastenverz.” to 100 since this is already done in YARD2 Software (or lower if you setup less than 100 in YARD software) 3. Configure events in Settings Input Learn mode Y.A.R.D.2 Manual Rev. 1.5 3.4 MediaPortal You can control MediaPortal in 2 ways: 1. You can use the WinLirc Plugin in this folder and put it into [MP]\plugins\process Configure it with MediaPortal Configuration Tool Plugins Recommended! 2. You can use IR Server Suite: http://forum.team-mediaportal.com/threads/ir-server-suite-aka-irss-releases.75092/ Be sure that Y.A.R.D. SW is started before ISS ! Do not use to start "Winlirc.exe" or "YARD.exe" " For automatic wakeup time programming use mySQL. If you have login problems from YARD2 Software, add a new user in MySQL and setup it in VDR tab in YARD2 Software. MySQL commands (MySQL server command line client): CREATE USER 'yard'@'%' IDENTIFIED BY 'yard'; GRANT ALL ON *.* TO 'yard'@'%'; 3.5 Eventghost Use the WinLirc interface of Evenghost for cummunication. 3.6 LCDHype Install LCDhype (076) and copy folder “Controller” which contains the driver “YARDhype” from the software package folder “LCDhype” to the installation folder of LCDhype. Optional: For a faster startup of LCDhype, remove all other controller driver from “Controller” except “YARDhype” and “Preview”. Also copy the “Plugins” folder to the installation folder of LCDhype . You find information and some examples how to use the plugins inside the plugin folder. If you use a KS0108 LCD update the LCDhpye.exe with the “lcdhype_0761_install_0760_before.zip”. Y.A.R.D.2 Manual Rev. 1.5 4 Communications with Y.A.R.D.2 Software 4.1 External command line Wake up “SetWakeup.exe” SetWakeup.exe is made for external scheduler. It has the same parameters as CmosTimer (Common RTC wake up program). You can rename this program if needed. (e.g. for PVRScheduler) Usage: Setwakeup /offonly (Disable Timer) Setwakeup /wakeup=Long date time format e.g. 31.12.2005 10:45:30 Setwakeup /wakeuponly=Long date time format e.g. 31.12.2005 10:45:30 Setwakeup yyyy mm dd hh mm - e.g. 2010 10 20 22 50 Examples: Setwakeup /wakeup=31.12.2005 10:45:30 Setwakeup /wakeuponly=31.12.2005 10:45:30 Setwakeup 2010 10 20 22 50 4.2 External Wake up YARDdll.dll You can use YARDdll.dll to set wakeup time with your program. Exported function: YARD_SET_TIME(NewWU: TSystemTime) 4.3 External LCD program for Y.A.R.D.2 LCD At the moment only LCDhype fully supports Y.A.R.D.2 to show your info on LCD. Use LCDhype driver (YARDhype) included in Y.A.R.D.2 software package and copy it to “[LCDhype]\controller” folder. An LCDSmartie driver is available, but only for character LCDs. If you want to develope a driver for a LCD program, please contact me. 4.4 WinLirc IR-Events: Y.A.R.D.2 uses WinLirc protocol for distributing IR-Events. If you want to use the IR-Events, create a socket and connect to the configured IP (e.g. localhost) & Port (8765) WinLirc format (each frame ends with Hex10 (0x10, $10)): [16Byte IR Code][blank][Repeat 00.FF][blank][Name][blank][YARD2USB] [HEX10] 0011223344556677 00 IR_Button1 YARD2USB[HEX10] If [Name] is not defined the 16Byte IR Code is repeated 0011223344556677 00 0011223344556677 YARD2USB[HEX10] Y.A.R.D.2 Manual Rev. 1.5 Y.A.R.D. 2 USB Linux Software description Linux Software is open source and under GPL licence! Source: https://www.assembla.com/code/yard2srvd/git/nodes Package: https://launchpad.net/~yard2team/+archive/stable Y.A.R.D.2 software structure: The Y.A.R.D.2 daemon yard2srvd is used to communicate with other application and Y.A.R.D.2 hardware. The default daemon mode via yard2tools.cfg is Input mode, which simulate a keyboard. With this virtaul keyboard normally all application can operate if they accept keyboard commands. For IR lirc applications a lircd daemon patch available or an integrated lirc compatible server implementation inside the yard2srvd daemon can be used. Y.A.R.D.2 itself has no LCD program implemented. You need an external program like LCDproc which send the data via yard2srvd to the connected LCD. Important: An udev rule is provided to start the daemon automatially: /usr/bin/yard2srvd -d -c /etc/yard2/yard2tools.cfg If you do not use udev for startup the yard2srvd, the startup script depends on your Linux distribution, you have to modiy your init script to start yard2srvd. For testing you can start yard2srvd with with detailed log: sudo ./yard2srvd –l 5 sudo is necessary for the first time to create a lircd compatible socket in /var/run/lirc/lircd and the input event if you use the integrated lirc server or input events. Y.A.R.D.2 Manual Rev. 1.5 Installation of yard2tools (2 possible ways): 1. PPA – package (Recommended for normal user): Installation from launchpad as debian package: ---------------------------------------------1. Add Y.A.R.D.2 ppa to your system ppa sudo add-apt-repository ppa:yard2team/stable 2. Update database: sudo apt-get update 3. Install yard2tools sudo apt-get install yard2tools 4. Reboot If you can not add repository, you can download the yard2tools package manually: https://launchpad.net/~yard2team/ 2. Source from git: ---------------------------------------------1. get Y.A.R.D 2 linux software from git clone git://git.assembla.com/yard2srvd.git yard2 2. See also README for installation You need libusb-dev nad libbsd-dev to compile yard2. If not installed sudo apt-get install libusb-dev sudo apt-get install libbsd-dev 3. 4. 5. 6. Run ./configure Run make Run make install if you want to copy the files to /usr/local/.. Add your user to group "dialout" (needed to open the serial port without sudo) usermod -a -G dialout username 7. Use -daemon as argument to run as real daemon (Startup, done by udev rule) After installation use yard2record to create IR code event mapping! See also 4. yard2record Y.A.R.D.2 Manual Rev. 1.5 1. yard2srvd Y.A.R.D 2 Linux daemon yard2srvd is the main daemon which communicates with the Y.A.R.D.2 hardware. All communication will be done via this daemon. Therefore other programs can send commands via Unix socktes to the daemon. Available I/O sockets: - /tmp/configserver: Used only for yard2config program!!!! - /tmp/lcdserver: Used to communicate with LCD programs like lcdproc - /tmp/yardsrv_sock: Used for the lircd communication - /var/run/lirc/lircd: Used for integrated lirc server; using the same socket name as lirc. External programs can connect to this socket to get IR events (same as lirc). Commandline options: -d, --daemon: Start in daemon mode. -c <file> : Config file normally “/etc/yard2/yardtools.cfg” -D <device>, --device=<device>: The tty device for yard2. Default: /dev/ttyYARD2 or /dev/ttyACM0, checked in this order. -I, --input: Use the Linux input system to deliver the key codes. -i <file>, --irmap=<file>: The IR map filename (with path). -L, --lirc: Use lircd server with yard2 patch. -O, --ownlirc: Use own lirc implementation. -1, --rdelay1: Set repeat delay 1 in ms. Default 250, accepted values 50..1000 -2, --rdelay2: Set repeat delay 2 in ms. Default 100, accepted values 50..1000 -l <val>, --loglevel=<val>: Loglevel: 1:error, 2:warning, 3:info, 4:verbose, 5:debug -s, --syslog: Use syslog for logging. -h, --help: Help text. Info: Options -I, -L and -O are mutual exclusive. The default udev rule use these parameters: Yard2srvd -d -c /etc/yard2/yard2tools.cfg Change it if you want to change the udev rule, it is is located in: /lib/udev/rules.d/60-usb-yard2.rules Normally change the option in the config file: /etc/yard2/yard2tools.cfg Hint: To see the output of yard2srvd if you use –s option use “sudo tail -f /var/log/syslog“ Y.A.R.D.2 Manual Rev. 1.5 2. yard2config: This is the main configuration program for the Y.A.R.D.2 hardware. yard2srvd must be started before. You can configure the main settings of the Y.A.R.D.2 hardware. The setting description can be found at the Windows description. LCD can be configured, but currently only a beta of LCDproc implementation for character LCDs is available. 3. yard2wakeup: yard2wakeup: [-C | -I | -S] [2] [3] Commandline options: -C: Read current wake up from Y.A.R.D.2 -I: New wake up time in time_t -S: New wake up time as string (dd.mm.yyyy MM:HH) [2]: reduction time in minutes [3]: -Poff: Shutdown system (need sudo) Example: yard2wakeup -S “20.12.2012 20:10” 10 = program 20.12.2012 20:00 yard2wakeup -I 1046958562 It can also called directly with VDR –s option. Y.A.R.D will be programmed with the new time (or wakeup disabled) In this case the system will be shutdown if the time is in the future. For VDR an automatic wakeup script is available. This will program the next wakeup time automatically if you shutdown the system via VDR. Wakeup script is located in: /share/vdr/shutdown-hooks/S90.yard2-wakeup VDR/yaVDR: Disable other shutdown scripts in WEB front end by setting to "None" easyVDR: Disable all other wakeup methodes in “Settings” Important: Enable Y.A.R.D.2 wake up by setting YARD2_ENABLED="yes" in the file /etc/vdr/vdr-addon-yard2wakeup.conf Y.A.R.D.2 Manual Rev. 1.5 4. yard2record: yard2record: [-i] -i <file>: Optional: the IR map filename (with path). If not specified (recommended) default filename is used If you use a different filename, change it also in /etc/yard2/yard2tools.cfg You have to create an IR map file with “Input mode” or “Own lirc Server” mode! With this program you can create a remote control mapping config for the lirc server implementation and Input(x) in yard2srvd. After changing the key-ID map, you have to reboot to activate the changes! The default configuration file path is: home/[user]/yardirmap.txt" yard2tools.cfg use this file from path: /etc/yard2 Copy the file to this location “sudo cp /home/[user]/yardirmap.txt /etc/yard2/” or use “sudo yard2record -i /etc/yard2/yardirmap.txt” File Format: ACSII [IR CODE 16char]@[BUTTON NAME]@[Event ID]@ Example: 0701020304000000@KEY_LEFT@106@ Diffrent modes for yard2record are available (easiest way is 1: Enter Button Name and Event ID on your own 2: Enter Button Name Event ID will be selected automatically 3: Enter Event ID Button name will be selected automatically 3): For yaVDR, easyVDR and XBMC a Key table is shown for an easier handling. Look at the keyboard / IR maping in yaVDR and easyVDR: See also Appendix 4 for all available Linux KEY-IDS yaVDR: http://www.yavdr.org/documentation/0.5/de/ch02s03.html easyVDR: http://wiki.easy-vdr.de/index.php?title=Bedienung Y.A.R.D.2 Manual Rev. 1.5 Common VDR / XBMC KEY-IDs KEY_UP: 103 KEY_DOWN: 108 KEY_LEFT: 105 KEY_RIGHT: 106 KEY_OK: 352 KEY_ENTER: 28 KEY_MENU: 139 KEY_ESC: 1 KEY_SPACE: 57 KEY_BACKSPACE: 14 KEY_FASTFORWARD: 208 KEY_REWIND: 168 KEY_PREVIOUS: 412 KEY_NEXT: 407 KEY_BACK: 158 KEY_POWER: 116 KEY_EPG: 365 KEY_FN: 464 KEY_TEXT: 388 KEY_RED: KEY_GREEN: KEY_YELLOW: KEY_BLUE: KEY_PLAY: KEY_PAUSE: KEY_STOP: KEY_RECORD: KEY_SETUP: KEY_TIME: KEY_MODE: KEY_SCREEN: KEY_PROG1: KEY_PROG2: KEY_PROG3: KEY_PROG4: KEY_PVR: KEY_AUDIO: KEY_VIDEO: 398 399 400 401 207 119 128 167 141 359 373 375 148 149 202 203 366 392 393 KEY_IMAGES: 442 KEY_CHANNELUP: 402 KEY_CHANNELDOWN: 403 KEY_CHANNEL: 336 KEY_VOLUMEUP: 115 KEY_VOLUMEDOWN: 114 KEY_MUTE: 113 KEY_FAVORITES: 365 KEY_SUBTITLE: 370 KEY_1: 2 KEY_2: 3 KEY_3: 4 KEY_4: 5 KEY_5: 6 KEY_6: 7 KEY_7: 8 KEY_8: 9 KEY_9: 10 KEY_0: 11 Hint: Some distributions use KEY_OK instead of KEY_ENTER. Try both if “Enter” is not working 5. yard2flash: With this program you can update the Y.A.R.D.2 Firmware. 1. Start yard2config and select “U” to enter update mode Note: yard2config will close itself after this command!! 2. Run: sudo yard2flash --program [filename] 3. Programming takes some time …. 4. Reset is done automatically (in case of a problem run: sudo yard2flash --reset) 5. Wait about 20 seconds for reassigning USB device 6. If you use udev rule, yard2srvd will be shutdown and restart automatically. Otherwise yard2srvd daemon waits 5 minutes after entering Update mode and tries to reconnect. If you need longer than 5 minutes you have restart yard2srvd. 6. lirctest: To test the lirc IR events you can use lirctest. This will connect to the lirc socket and print out the lirc string if remote control button is pressed. You can use this with lircd and the yard2srvd integrated lirc server implementation. Y.A.R.D.2 Manual Rev. 1.5 7. yard2lcdtest: For Y.A.R.D.2 LCD version a small LCD test utility is provided. Start yard2lcdtest and enter commands: C: Clear LCD G[line]: Goto line x start with 0 (G0 = set cursor to line 0) W[Text]:Write text to LCD (e.g. WHalloWorld) Only supports are Linux distributions with full compiler support, e.g. Openelec is not supported ! 8. Event/Input server (default for udev & yard2tools.cfg): yard2srvd can simualte an keyboard event through the Linux event handler. This is the default mode in yard2tools.cfg. To activate it, use “-I” commandline option Hint: The remote control config file is not compatible with the lirc.conf file. To create a new one use”yard2record” (see above) The keyboard ID of the events can be found in the _input_h_KeybIDs.txt. 9. Integrated lirc server implementation: yard2srvd has a basic lirc compatible server (beta) implemented (without IRSEND!). To activate it, use “-O” commandline option Important: Do not start original lircd! It is not necessary if you are using the integrated lirc server in yard2srvd. Hint: The remote control config file is not compatible with the lirc.conf file. To create a new one use”yard2record” (see above) Y.A.R.D.2 Manual Rev. 1.5 10. Use original lircd Y.A.R.D.2 is now official part of lircd distribution. Just select yard2 for installation. See lircd documentation for installation. Old version 0.9.1b: 1. Get lirc 0.9.1b from sourceforge: git clone -b release_0.9.1b --single-branch git://git.code.sf.net/p/lirc/git lirc_091b 2. Change to folder lirc_091b and apply patch to Lirc 0.9.1b (included in yard2srvd directory yard2_lircd_091b_patch.txt) patch –p1 < yard2_lircd_091b_patch.txt 3. lirc need some additional tools to compile. If not installed sudo apt-get install - libtool-1.3.3 - automake-1.4 - autoconf-2.13 (min. Version) - man2html 4. Copy additional files (included in yard2srvd directory): copy \daemons and \remotes to lirc root directory "[lirc]\" 5. run lirc autogen ./autogen.sh 6. run lirc configure ./configure --with-driver=yard2 7. run make 8. run make install 9. Start LIRC sudo daemons/lircd -n -H yard2 Y.A.R.D.2 Manual Rev. 1.5 11. Usage of LCDproc: Documentation of LCDproc http://lcdproc.sourceforge.net/docs/current-user.html) LCDporc can only be used with Linux distributions with full compiler support, e.g. Openelec is not supported ! 1. Get LCDproc from sourceforge (0.5.7): http://sourceforge.net/projects/lcdproc/files/lcdproc/0.5.7/ or use CVS cvs -d:pserver:[email protected]:/cvsroot/lcdproc login [Hit Enter when promt for password] cvs -d:pserver:[email protected]:/cvsroot/lcdproc checkout -r lcdproc0-5-7 lcdproc 2. apply patch to LCDproc (included in yard2srvd LCDproc directory) patch -p0 < yard2patch.txt 3. Copy additional files (included in yard2srvd/LCDproc dirctory) to LCDproc 4. run: sh autogen.sh 6. run: ./configure --prefix=/usr/local --enable-drivers=yard2LCD 7. run: make 8. run: make install (optional) 9. Change settings and resolution of your LCD in LCDd.conf: [yard2LCD] Size=16x2 10. Start LCDd sudo ./server/LCDd –f (-f run in foreground for testing) Y.A.R.D.2 Manual Rev. 1.5 12. Openelec installation (i386 32/64Bit / ARM6 32Bit) - SSH login required. 1. Get Openelec binaries from the YARD2 Software package 2. Copy OE binaries (x86/ARM6) to e,g, \\openelec\downloads\yard2 3. Connect to OE with a SSH client (e.g. putty) (Enable SSH if disabled) 4. Create an folder /storage/yard2 mkdir /storage/yard2 5. Copy all files to this folder and make them executable (chmod +x *) cd /storage/downloads/yard2 cp * /storage/yard2 cd /storage/yard2 chmod +x * 6. Copy autorun.sh to “/storage/.config” cp autorun.sh /storage/.config 7. All configuration files must be in “/storage/yard2” Change you settings in /storage/yard2/yard2tools.cfg if necessary 8. Restart system and run yard2record –i /storage/yard2/yardirmap.txt See installation instruction above for yard2record and other programs. 9. Restart system after yard2record to activate changes Note: - yard2flash (Firmware update) is not supported on Openelec! - LCD is not supported Y.A.R.D.2 Manual Rev. 1.5 Appendix 1 1. Example for a diode matrix for JSW to provide up to 15 switches. Y.A.R.D.2 Manual Rev. 1.5 Appendix 2 – +5VSB (Standby) Y.A.R.D.2 needs +5VSB (5V Stand by) voltage from the system. This is provieded normally from the USB port. On some mainbaords you have to enable this via mainboard Jumper or Bios settings. Please look into your mainboard / system manual if 5VSB is not provided via USB or how to enable it. Known mainbord settings: Asus P8Q77 P8H77 H97M-E Enable in Bios: “legacy USB” and Wakeup via Keyboard Enable in Bios: “legacy USB” and Wakeup via Keyboard Enable in Bios: “Charging USB devices in Power State S5” Warning: This will not power the YARD2 after a power loss! Enable also “Restore Power loss” “Power on” Currently only a very few MB was not able to provide 5VSB from USB. Normally this is working with newer mainboards without problems. Y.A.R.D.2 Manual Rev. 1.5 Appendix 3 – FAQ 1. I attach Y.A.R.D.2 to the USB bus, a device is recognized but no COM port (Windows) or ttyACM (Linux) device is installed. Solution: Probably the Y.A.R.D.2 is in Bootloader mode. Windows: Check device manager if a custom Microchip device is installed Linux: run lsusb and check if a device with idVendor=04d8, idProduct=ff0b or f544 is installed Check if you set the force Update jumper, if set remove it Cancel FW update via Software (Windows: Cancel update; Linux yard2flash --reset) Check for a solder bridge around the force firmware update jumper 2. I installed everything, Software is running, but I cannot receive any IR signal Solution: 1. Probably you installed the IR Receiver in the wrong direction TSOP 31238: The round side of the IR Receiver must be directed on the outside of the Y.A.R.D.2 2. TSOP 32238: The round side of the IR Receiver must be directed on the inside of the Y.A.R.D.2 3. You use a not supported IR protocol Try any other remote control you have at home or use a Logitech Harmony with “Asrock – 330HT” profile Y.A.R.D.2 Manual Rev. 1.5 Appendix 4 – Linux input.h KEY-Ids KEY_RESERVED KEY_ESC KEY_1 KEY_2 KEY_3 KEY_4 KEY_5 KEY_6 KEY_7 KEY_8 KEY_9 KEY_0 KEY_MINUS KEY_EQUAL KEY_BACKSPACE KEY_TAB KEY_Q KEY_W KEY_E KEY_R KEY_T KEY_Y KEY_U KEY_I KEY_O KEY_P KEY_LEFTBRACE KEY_RIGHTBRACE KEY_ENTER KEY_LEFTCTRL KEY_A KEY_S KEY_D KEY_F KEY_G KEY_H KEY_J KEY_K KEY_L KEY_SEMICOLON KEY_APOSTROPHE KEY_GRAVE KEY_LEFTSHIFT KEY_BACKSLASH KEY_Z KEY_X KEY_C KEY_V KEY_B KEY_N KEY_M KEY_COMMA KEY_DOT KEY_SLASH KEY_RIGHTSHIFT KEY_KPASTERISK KEY_LEFTALT KEY_SPACE KEY_CAPSLOCK KEY_F1 KEY_F2 KEY_F3 KEY_F4 KEY_F5 KEY_F6 KEY_F7 KEY_F8 KEY_F9 KEY_F10 KEY_NUMLOCK KEY_SCROLLLOCK KEY_KP7 KEY_KP8 0 1 2 3 4 5 6 7 8 9 10 11 12 13 14 15 16 17 18 19 20 21 22 23 24 25 26 27 28 29 30 31 32 33 34 35 36 37 38 39 40 41 42 43 44 45 46 47 48 49 50 51 52 53 54 55 56 57 58 59 60 61 62 63 64 65 66 67 68 69 70 71 72 KEY_KP9 73 KEY_KPMINUS 74 KEY_KP4 75 KEY_KP5 76 KEY_KP6 77 KEY_KPPLUS 78 KEY_KP1 79 KEY_KP2 80 KEY_KP3 81 KEY_KP0 82 KEY_KPDOT 83 KEY_ZENKAKUHANKAKU 85 KEY_102ND 86 KEY_F11 87 KEY_F12 88 KEY_RO 89 KEY_KATAKANA 90 KEY_HIRAGANA 91 KEY_HENKAN 92 KEY_KATAKANAHIRAGANA 93 KEY_MUHENKAN 94 KEY_KPJPCOMMA 95 KEY_KPENTER 96 KEY_RIGHTCTRL 97 KEY_KPSLASH 98 KEY_SYSRQ 99 KEY_RIGHTALT 100 KEY_LINEFEED 101 KEY_HOME 102 KEY_UP 103 KEY_PAGEUP 104 KEY_LEFT 105 KEY_RIGHT 106 KEY_END 107 KEY_DOWN 108 KEY_PAGEDOWN 109 KEY_INSERT 110 KEY_DELETE 111 KEY_MACRO 112 KEY_MUTE 113 KEY_VOLUMEDOWN 114 KEY_VOLUMEUP 115 KEY_POWER 116 KEY_KPEQUAL 117 KEY_KPPLUSMINUS 118 KEY_PAUSE 119 KEY_SCALE 120 KEY_KPCOMMA 121 KEY_HANGEUL 122 KEY_HANGUEL 122 KEY_HANJA 123 KEY_YEN 124 KEY_LEFTMETA 125 KEY_RIGHTMETA 126 KEY_COMPOSE 127 KEY_STOP 128 KEY_AGAIN 129 KEY_PROPS 130 KEY_UNDO 131 KEY_FRONT 132 KEY_COPY 133 KEY_OPEN 134 KEY_PASTE 135 KEY_FIND 136 KEY_CUT 137 KEY_HELP 138 KEY_MENU 139 KEY_CALC 140 KEY_SETUP 141 KEY_SLEEP 142 KEY_WAKEUP 143 KEY_FILE 144 KEY_SENDFILE 145 KEY_DELETEFILE KEY_XFER KEY_PROG1 KEY_PROG2 KEY_WWW KEY_MSDOS KEY_COFFEE KEY_SCREENLOCK KEY_DIRECTION KEY_CYCLEWINDOWS KEY_MAIL KEY_BOOKMARKS KEY_COMPUTER KEY_BACK KEY_FORWARD KEY_CLOSECD KEY_EJECTCD KEY_EJECTCLOSECD KEY_NEXTSONG KEY_PLAYPAUSE KEY_PREVIOUSSONG KEY_STOPCD KEY_RECORD KEY_REWIND KEY_PHONE KEY_ISO KEY_CONFIG KEY_HOMEPAGE KEY_REFRESH KEY_EXIT KEY_MOVE KEY_EDIT KEY_SCROLLUP KEY_SCROLLDOWN KEY_KPLEFTPAREN KEY_KPRIGHTPAREN KEY_NEW KEY_REDO KEY_F13 KEY_F14 KEY_F15 KEY_F16 KEY_F17 KEY_F18 KEY_F19 KEY_F20 KEY_F21 KEY_F22 KEY_F23 KEY_F24 KEY_PLAYCD KEY_PAUSECD KEY_PROG3 KEY_PROG4 KEY_DASHBOARD KEY_SUSPEND KEY_CLOSE KEY_PLAY KEY_FASTFORWARD KEY_BASSBOOST KEY_PRINT KEY_HP KEY_CAMERA KEY_SOUND KEY_QUESTION KEY_EMAIL KEY_CHAT KEY_SEARCH KEY_CONNECT KEY_FINANCE KEY_SPORT KEY_SHOP KEY_ALTERASE 146 147 148 149 150 151 152 152 153 154 155 156 157 158 159 160 161 162 163 164 165 166 167 168 169 170 171 172 173 174 175 176 177 178 179 180 181 182 183 184 185 186 187 188 189 190 191 192 193 194 200 201 202 203 204 205 206 207 208 209 210 211 212 213 214 215 216 217 218 219 220 221 222 Y.A.R.D.2 Manual Rev. 1.5 KEY_CANCEL 223 KEY_BRIGHTNESSDOWN 224 KEY_BRIGHTNESSUP 225 KEY_MEDIA 226 KEY_SWITCHVIDEOMODE 227 KEY_KBDILLUMTOGGLE 228 KEY_KBDILLUMDOWN 229 KEY_KBDILLUMUP 230 KEY_SEND 231 KEY_REPLY 232 KEY_FORWARDMAIL 233 KEY_SAVE 234 KEY_DOCUMENTS 235 KEY_BATTERY 236 KEY_BLUETOOTH 237 KEY_WLAN 238 KEY_UWB 239 KEY_UNKNOWN 240 KEY_VIDEO_NEXT 241 KEY_VIDEO_PREV 242 KEY_BRIGHTNESS_CYCLE 243 KEY_BRIGHTNESS_ZERO 244 KEY_DISPLAY_OFF 245 KEY_WIMAX 246 KEY_RFKILL 247 KEY_MICMUTE 248 KEY_OK 352 KEY_SELECT 353 KEY_GOTO 354 KEY_CLEAR 355 KEY_POWER2 356 KEY_OPTION 357 KEY_INFO 358 KEY_TIME 359 KEY_VENDOR 360 KEY_ARCHIVE 361 KEY_PROGRAM 362 KEY_CHANNEL 363 KEY_FAVORITES 364 KEY_EPG 365 KEY_PVR 366 KEY_MHP 367 KEY_LANGUAGE 368 KEY_TITLE 369 KEY_SUBTITLE 370 KEY_ANGLE 371 KEY_ZOOM 372 KEY_MODE 373 KEY_KEYBOARD 374 KEY_SCREEN 375 KEY_PC 376 KEY_TV 377 KEY_TV2 378 KEY_VCR 379 KEY_VCR2 380 KEY_SAT 381 KEY_SAT2 382 KEY_CD 383 KEY_TAPE 384 KEY_RADIO KEY_TUNER KEY_PLAYER KEY_TEXT KEY_DVD KEY_AUX KEY_MP3 KEY_AUDIO KEY_VIDEO KEY_DIRECTORY KEY_LIST KEY_MEMO KEY_CALENDAR KEY_RED KEY_GREEN KEY_YELLOW KEY_BLUE KEY_CHANNELUP KEY_CHANNELDOWN KEY_FIRST KEY_LAST KEY_AB KEY_NEXT KEY_RESTART KEY_SLOW KEY_SHUFFLE KEY_BREAK KEY_PREVIOUS KEY_DIGITS KEY_TEEN KEY_TWEN KEY_VIDEOPHONE KEY_GAMES KEY_ZOOMIN KEY_ZOOMOUT KEY_ZOOMRESET KEY_WORDPROCESSOR KEY_EDITOR KEY_SPREADSHEET KEY_GRAPHICSEDITOR KEY_PRESENTATION KEY_DATABASE KEY_NEWS KEY_VOICEMAIL KEY_ADDRESSBOOK KEY_MESSENGER KEY_DISPLAYTOGGLE KEY_SPELLCHECK KEY_LOGOFF KEY_DOLLAR KEY_EURO KEY_FRAMEBACK KEY_FRAMEFORWARD KEY_CONTEXT_MENU KEY_MEDIA_REPEAT KEY_10CHANNELSUP KEY_10CHANNELSDOWN KEY_IMAGES KEY_DEL_EOL 385 386 387 388 389 390 391 392 393 394 395 396 397 398 399 400 401 402 403 404 405 406 407 408 409 410 411 412 413 414 415 416 417 418 419 420 421 422 423 424 425 426 427 428 429 430 431 432 433 434 435 436 437 438 439 440 441 442 448 KEY_DEL_EOS 449 KEY_INS_LINE 450 KEY_DEL_LINE 451 KEY_FN 464 KEY_FN_ESC 465 KEY_FN_F1 466 KEY_FN_F2 467 KEY_FN_F3 468 KEY_FN_F4 469 KEY_FN_F5 470 KEY_FN_F6 471 KEY_FN_F7 472 KEY_FN_F8 473 KEY_FN_F9 474 KEY_FN_F10 475 KEY_FN_F11 476 KEY_FN_F12 477 KEY_FN_1 478 KEY_FN_2 479 KEY_FN_D 480 KEY_FN_E 481 KEY_FN_F 482 KEY_FN_S 483 KEY_FN_B 484 KEY_BRL_DOT1 497 KEY_BRL_DOT2 498 KEY_BRL_DOT3 499 KEY_BRL_DOT4 500 KEY_BRL_DOT5 501 KEY_BRL_DOT6 502 KEY_BRL_DOT7 503 KEY_BRL_DOT8 504 KEY_BRL_DOT9 505 KEY_BRL_DOT10 506 KEY_NUMERIC_0 512 KEY_NUMERIC_1 513 KEY_NUMERIC_2 514 KEY_NUMERIC_3 515 KEY_NUMERIC_4 516 KEY_NUMERIC_5 517 KEY_NUMERIC_6 518 KEY_NUMERIC_7 519 KEY_NUMERIC_8 520 KEY_NUMERIC_9 521 KEY_NUMERIC_STAR 522 KEY_NUMERIC_POUND 523 KEY_CAMERA_FOCUS 528 KEY_WPS_BUTTON 529 KEY_TOUCHPAD_TOGGLE 530 KEY_TOUCHPAD_ON 531 KEY_TOUCHPAD_OFF 532 KEY_CAMERA_ZOOMIN 533 KEY_CAMERA_ZOOMOUT 534 KEY_CAMERA_UP 535 KEY_CAMERA_DOWN 536 KEY_CAMERA_LEFT 537 KEY_CAMERA_RIGHT 538