1
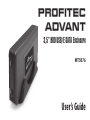
PROFITEC
ADVANT
3,5” HDD USB/E-SATA Enclosure
MT5076
User’s Guide
EN Contents
Package contents .......................................................................2
Features..........................................................................................2
Specification.................................................................................2
Compatibility ...............................................................................3
Disk Installation...........................................................................3
Hardware connection ...............................................................4
Drivers Installation .....................................................................5
Unplugging the hardware ......................................................6
Hard disk Partitioning ...............................................................8
Package contents
■
■
■
■
■
■
■
■
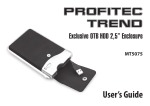
3.5” External Enclosure
USB 2.0 Cable
e-SATA cable
AC/DC 12V/5V power adapter
Power cord
Enclosure stand
CD Driver
User Manual
Note: 1 pc per each
2
Features
■ Supports 3.5” HDD with all standard sizes
■ Data transfer rate: Up to 480Mbps/3Gbps
Note: (12Mbps on USB 1.1 operation system)
■ No need for extra driver (Except on Windows 98)
■ Hot-swappable(Plug & Play)
Specification:
■
■
■
■
■
■
■
Interface: USB 2.0/e-SATA
HDD Supported: SATA
LED indicators: Power, HDD, USB, FAN
Material: Al&Mg Alloy+ABS
Weight: 200 g (case only)
Dimension: 195mm*113mm*31.5mm
Power: input: 100-240V, 50-60 Hz,
output: 12V/ 5V, 2A
■ Working Environments:
Working Temperature: 5°C - 50°C
Storage Temperature: -40°C - 70°C
Working Humidity: 5-90%
Remark: Specifications are subject to change
without prior notice.
Compatibility
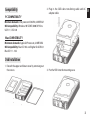
2. Plug in the SATA data transferring cable and AC
adapter cable
PC COMPATIBILITY
Minimum demands: Intel processor 350 MHz, 64 MB RAM
OS Compatibility: Windows 98 SE/ME/2000/XP/Vista
USB 1.1 / USB 2.0
Mac COMPATIBILITY
Minimum demands: Apple G3 Processor, 64 MB RAM
OS Compatibility: Mac OS 10.2 and higher for USB 2.0
Mac OS 9.1 - 10.2
Disk Installation
1. Detach the upper and lower cover by removing out
the screws.
3. Put the HDD into the mounting cave.
3
EN
EN
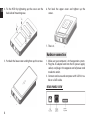
4. Fix the HDD by tightening up the screws on the
backside of mounting cave.
6. Put back the upper cover and tighten up the
screws.
7. That is it.
Hardware connection
5. Put back the lower cover and tighten up the screws.
1. Make sure your computer is in the operation system.
2. Plug the AC adapter cord into the DC power supply
socket, and plug in the opposite end of power cord
to electric outlet.
3. Connect enclosure and computer with USB 2.0 cable or e-SATA cable.
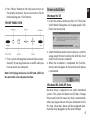
REAR PANEL VIEW
4
4. Press “Power” button on the front panel to turn on
the external enclosure. You can also turn on fan for
better cooling (press “Fan” button).
FRONT PANEL VIEW
5. Then, system will recognize external enclosure automatically. If you plug enclosure via eSATA cable you
have to restart your computer.
Note: Don’t plug enclosure via USB and eSATA at
the same time. Use only one interface.
Drivers installation
Windows 98/ SE
1. Insert the external enclosure driver CD. The Install
shield Wizard dialog box will be pop-upped. Click
[Next] icon to continue.
2. Select the default option icon to continue , until the
setup wizard finished installing the USB disk, then
click [Finish] to restart computer.
3. When the installation is completed, the [Safe Remove] icon will appear on the taskbar when device
is connected.
Windows ME, 2000,XP, Vista
No extra driver is required to run under mentioned
systems. The system will detect an USB Mass Storage
Device and install the necessary drivers automatically
when you plug enclosure into your computer for the
first time. Since then, device will be recognized automatically when plugged in to the same USB port.
5
EN
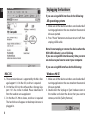
Unplugging the hardware
EN
If you are using eSATA interface do the following:
All operating systems
1. Make sure all the relative windows are closed and all
running applications that are stored on the external
drive are quitted.
2. Press “Power” button on enclosure to turn it off, then
unplug eSATA cable.
Note: Do not unplug or remove the device when the
HDD LED indicator is on or blinking.
If you are using eSATA interface every time you turn
on enclosure you have to restart your computer.
If you are using USB interface do the following:
MAC OS
A. This external enclosure is supported by the Mass Storage Support 1.3.5 in Mac OS, no driver is required.
B. On the Mac OS 8.6, the software Mass Storage Support 1.3.5 has to be installed. Please download it
from the website: www.apple.com
C. On the Mac OS 9.0 or above, no driver is required.
The hard drive will appear on desktop whenever is
plugged in.
6
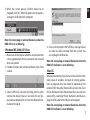
Windows 98 SE
1. Make sure all the relative windows are closed and all
running applications that are stored on the external
drive are quitted.
2. Double click the Unplug or Eject hardware icon in
the taskbar and select the device that you want to
remove, and click [Safety Remove]
3. When the system pop-up [Confirm device to be
stopped], click [OK]. When the green icon disappears,
unplug the USB cable from computer.
EN
Note: Do not unplug or remove the device when the
HDD LED is on or blinking.
Windows ME, 2000, XP, Vista
1. Make sure all the relative windows are closed and all
running applications that are stored on the external
drive are quitted.
2. Double click the [safe remove hardware] icon in the
taskbar.
3. Select [USB Disk] and click the [Stop] icon to safely
remove the device.(You can also click first on [Display device components] to show the detailed information of the disk).
4. Once system prompts the “USB Mass Storage Device
can now be safely removed from the system” you
can unplug the USB device.
Note: Do not unplug or remove the device when the
HDD LED indicator is on or blinking.
Mac OS
When disconnecting the external enclosure from computer, close all windows and quit all running applications or programs that are stored or operated on the
external HDD. Drag the [External Drive] icon into [Trash
Bin] to dismount it from the desktop, then you can turn
power off by switching “Power” button on and then unplug the USB cable form USB port of computer.
Note: Do not unplug or remove the device when the
HDD LED indicator is on or blinking.
7
EN Hard disk partitioning
Windows 2000/2003/XP
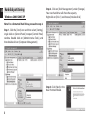
Step 2. Click on [Disk Management] under [Storage].
Your new hard drive will show the capacity.
Right click on [Disk 1] and choose [Initialize Disk]
Note: For a formatted Hard Drive, proceed to step 2.
Step 1. Click the [Start] icon and then select [Setting],
single click on [Control Panel] to open [Control Panel]
window. Double click on [Administrative Tools], and
then double click on [Computer Management].
Step 3. Click [Next] in the
New Partition Wizard.
8
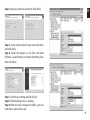
Step 4. Input your partition space then click [Next]
EN
Step 5. Assign a drive letter for your new Hard drive,
and click [Next].
Step 6. Select the options as you like, and select
[Perform a quick format] to shorten formatting time,
then click [Next].
Step 7. Confirm your setting and click [Finish]
Step 8. The formatting status is showing.
Step 9. When the status change to Healthy, your new
hard drive is about to be used.
9
EN
Step10. Go to My Computer, you will find the new
device in the window.
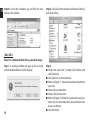
Step 2. Click [Go] on the desk bar and choose [Utilities],
click [Disk Utility].
Mac OS X
Note: For a formatted Hard drive, proceed to step 2.
Step 1. A warning window will pop up for new and
unformatted hard drive. Click [Initialize].
10
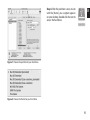
Step 3.
■ Choose the new drive (1) under [Disk Utilities] and
click [Partition].
■ Click [Options] to choose format.
■ Refer to [Figure 1]. Choose the number of partitions
you want.
■ Name the new hard drive
■ Choose the [Format] icon
■ Refer to [Figure 2]. Define file system and size of partition. You can make more than one partition or else
leave it as default
■ Click [Partition]
Step 4. After the partition is over, an icon
with the [Name] you assigned appears
on your desktop. Double click the icon to
access the hard drive.
EN
Figure 1: Choose the partition for your hard drive.
Figure 2: Choose the format for your hard drive.
11
EN
Note: This HDD enclosure is manufactured according to newest technology and specification.
Media-Tech is not responsible for lost data and damaging hard disk.
For more information, drivers, instruction manuals, please visit our website: www.media-tech.eu
Manufacturer is restricting right to modernize and making changes of this device.
In accordance with continuous development of hardware and software some functions
demonstrated on pictures might be presented differently in the future.
12