1
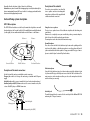
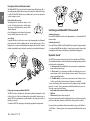
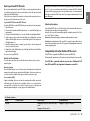
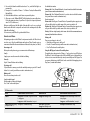
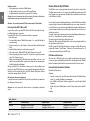
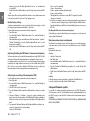
Main features........................................................................................................................................................................................................14
Technical specifications of Midland BTX1 FM.........................................................................................................................................................14
Charging batteries.................................................................................................................................................................................................14
Unit and fixing system description........................................................................................................................................................................15
Switching your Midland BTX1 FM on and off.........................................................................................................................................................16
Operative ‘mode’...................................................................................................................................................................................................16
How to pair two BTX1 FM units.............................................................................................................................................................................17
Compatibility with other Midland BT line unit......................................................................................................................................................17
Talk 2 All - Pairing to a different brand Intercom...................................................................................................................................................18
Pairing the BTX1 FM to Bluetooth devices.............................................................................................................................................................18
Pairing to a GPS Navigator....................................................................................................................................................................................18
How to listen to the “FM Radio”.............................................................................................................................................................................20
Disable/Enable the “FM Radio”.............................................................................................................................................................................. 20
How to use the wired audio input.........................................................................................................................................................................21
Using a PMR446 transceiver with cable connection..............................................................................................................................................21
Setup and special configurations..........................................................................................................................................................................21
Setup and firmware update..................................................................................................................................................................................22
Warranty...............................................................................................................................................................................................................23
European CE Notice Certification and Safety Approval Information.......................................................................................................................23
Midland BTX1 FM - 13
UK
Index
MIDLAND BTX1 FM
UK
Basic Intercom System
BTX1 FM is an intercom communication system solution for motor cyclists. The design is very slim and aerodynamic, all the main functions are easy to operate thanks to the big
three buttons placed on the front of the unit.
BTX1 FM is fixed on the helmet using the adhesive plate or the screw mounting clamp. Thanks to the audio kit with ultra slim speakers you can enjoy high quality stereo music
while riding.
Main features
››
››
››
››
››
››
››
Intercom driver - passanger (10mt).
FM Radio Stereo with RDS
Connect your phone to receive and place phone call and listen to stereo music
Connect your GPS for voice street indication
Connection for PMR466 radio with internal or external Bluetooth
AUX wired connection for MP3 player and PMR446 radio
Setup and Firmware update via USB connection to a PC
Midland BTX1 FM is available in two versions:
›› Single BTX1 FM Intercom kit with one unit only
›› Twin BTX1 FM Intercom kit with with two units
Depending on the model purchased, the package contains the following
parts:
BTX1 FM single
›› 1 BTX1 FM communication unit
›› 1 audio kit with two stereo speakers, microphone with boom and wired microphone
›› 1 plate with bi-adhesive strip to fix the unit onto the helmet
›› 1 clamp to fix the unit onto the helmet
›› 1 miniUSB wall-mounting power supply
BTX1 FM Twin
›› 2 BTX1 FM communication units
›› 2 audio kits with two stereo speakers, microphone with boom and wired microphone
›› 2 plates with bi-adhesive strip to fix the unit onto the helmet
›› 2 clamps to fix the unit onto the helmet
›› 1 miniUSB wall-mounting power supply with double plug
The units included in the TWIN kit are already paired and can therefore be immediately used in Intercom mode.
14 - Midland BTX1 FM
Technical specifications of Midland BTX1 FM
General:
›› Bluetooth ver. 3.0 stereo (Headset/Handsfree/A2DP protocol)
›› AGC system automatically controls the volume in relation to background noise
›› Voice (VOX) or manual communications activation
›› Manual controls to enable: telephone, intercom and wire connection
›› Fully waterproof
›› Lithium battery with 12 hours talk time
›› Recharge time: app. 6 hours
Bluetooth connections:
With identical device for Driver to Passanger intercom
Bluetooth devices:
›› Mobile phone with MP3 player Stereo (A2DP protocol), GPS (Garmin Zumo and
TomTom Rider 1 and 2)
›› PMR446 transceivers (with built-in or external Bluetooth connection) for
group bike-to-bike communications
Wire connections:
›› For stereo audio input like iPod/MP3 player (with optional cable)
›› For PMR446 transceivers (with optional cable)
Attention: Midland BTX1 FM is designed to withstand rain and water. However, if it
is raining, always verify that the rubber caps protecting the sockets are fully fitted.
Charging batteries
Attention: Make sure that the unit is fully charged before use. Allow at least 8 hours
for a full charge before using the unit for the first time.
Charge the unit by inserting the wall-charger into the charging socket (lift the
rubber cover to insert the plug).
The red LED on the unit will start flashing when charging begins.
Allow the headset to charge until the unit stops flashing or the blue LED turns on.
When the charge is complete (the red LED is not flashing), release the headset
from the charger.
Unit and fixing system description
Description of the audio kit
The audio system includes two ultra-flat
stereo speakers and two interchangeable
microphones, which are both supplied with
a bracket and wired connection.
UK
Normally, after the first time, it takes 6 hours for a full charge.
Attention: every time the mini USB recharging plug is inserted (or detached), the
device is automatically turned off. To use it while it is in charge, you should turn the
device on with the plug already inserted.
BTX1 FM description
The BTX1 FM has five buttons on the front; the main three big button are multi
functions buttons: the Forward (on the left), the middle button and the Backward
(on the right), the two small rounded buttons are the Volume + and Volume -.
Volume +
Volume -
Fixing the stereo speakers
The two stereo speakers have a Velcro/adhesive strip that aids their fixing into
your helmet.
Beware not to completely cover your ear with the speakers, you must always be
able to listen to the traffic sound and your indicators.
The microphone can be fixed onto the helmet in two ways:
Boom Microphone
Place the section with the Velcro/adhesive strip between the padding and the
rigid cover of the helmet, so that the microphone is correctly positioned in front of
your mouth and that the white symbol is facing your mouth. This type of microphone is suited for Open Faced and Flip Front helmets.
Forward button
Middle button
Backward button
Description of the wired connections
On the bottom of the unit you can find three wired connection:
Charger jack: enables to recharge the unit using a standard miniUSB power
supply
Audio kit jack: enable to connect an audio kit (stereo headset and microphone)
Auxiliary audio jack (AUX) 2.5mm: can be used to connect an audio source, like
a stereo iPod/MP3 player or PMR446 transceiver
Wired microphone
Using the Velcro/adhesive strip, place the microphone inside the helmet in front
of your mouth. This type of microphone is more suited for Full Faced helmets. The
mini connector on the microphone allows you choose the microphone that best
suits the helmet you are using.
Audio kit jack
The audio kit must then be connected to the central jack of the Midland BTX1 FM
unit using the “L” shaped connector.
Charger jack
Audio kit jack
Auxiliary audio jack (AUX)
Midland BTX1 FM - 15
UK
Description of the installation brackets
The Midland BTX1 FM can be fixed onto the helmet in two different ways: By either using the plate with bi-adhesive strip, or the clamp. These methods allow you
to safely “fix” the BTX1 FM unit onto your helmet and to remove it at any time in
order to recharge or store it.
Plate with bi-adhesive strip
The fixing plate has a bi-adhesive strip on one of
its sides. To fix the plate in place, clean the application area on the helmet surface, remove the biadhesive film and
place the fixing plate on the helmet by keeping it
contact with the surface for a few seconds.
Screw Clamp
Using the Allen Key, loosen the two screws on the clamp and place the Backward
plate between the helmet padding and the external rigid protection. Then,
tighten the two screws in order to firmly fix the clamp in place. Inside the clamp is
included a small plastic spacer that can be removed to give a tighter fit if required.
Switching your Midland BTX1 FM on and off
Switching the unit on:
Press and hold “Middle” button down for approximately 3 seconds until the BLUE
indicator lights.
Switching the unit off:
Press and hold both “Middle” and “Backward” buttons together for approximately
3 seconds until the RED indicator flashes 3 times, thus lessening the chances that
you might turn off the unit accidentally (especially whilst wearing gloves).
Operative “mode”
Fitting and removing your Midland BTX1 FM
The BTX1 FM can be easily fitted onto the helmet by sliding it downwards so that
it fits into the slot of the selected fixing device (plate with bi-adhesive strip or
clamp). BTX1 FM is maintained in position thanks to the fixing clip located on
the upper section (A).
To detach the BTX1 FM, simply press the fixing clip and push the unit upwards.
16 - Midland BTX1 FM
The BTX1 FM can operate in three main “mode”: Intercom, Phone and FM Radio.
The 3 multi function buttons can have different functionality depending on which
mode the unit is at that moment.
›› In “Intercom mode” the middle buttons let you manage the communications
between driver and passanger
›› In “Phone mode” you can manage your Bluetooth cellular phone to place/
answer a phone call or to listen to the music (in stereo mode). Please use your
phone responsibly and safely.
›› In “FM Radio mode” you can listen to your favourite radio station in stereo,
seek for a specific radio station and save it (6 memory are available).
You can switch (toggle) from one mode to the other simply pressing the Middle
button for 3 seconds. A voice announcement will tell in which mode you are on.
The toggle sequence is the following:
›› Intercom mode (if another unit has been paired)
›› FM Radio
›› Phone mode (if a phone has been paired)
Every time you turn on the unit, the default mode is Intercom (if it was previously
paired to another unit), otherwise it will be Phone (If was paired to a phone).
If you need to know in which mode the unit currently is, just press the “Volume +
“ and “Volume –“ button together. A voice announcement will tell you the current
mode.
The two units supplied in the same BTX1 FM box, are already paired and ready to
use, which mean you don’t need to perform this procedure. The unit are already
paired using the Middle button.
If the devices are not part of the same kit, or the units has been purchased separately, you need to first pair it in order to use it.
To pair the BTX1 FM to another BTX1 FM unit
To pair the BTX1 FM to another BTX1 FM unit, you must first enter the setup mode:
1. Turn off the unit
2. Press and hold down the middle button about 7 sec., until the Red light is on
permanently.
3. Now press the Middle button for 3 seconds. The Blue and Red light will flash.
4. Do the same procedure on the other unit, When successfully paired, each unit
will have the Blue light on for one second and than go back to the setup mode
(Red light always on).
5. Now the pairing procedure is complete, you just need to exit the setup mode
before you can use the units:
6. Double click on the Middle button, the Red light will turn off and the Blue
light will start flashing.
You can use now your BTX1 FM.
How to use the Intercom
To use the intercom feature, be sure the both units are turned on and correctly
paired together.
If needed, you can disable the VOX feature simply by pressing the Backward button for 7 sec. A voice announcement will advise you when the VOX is disabled.
To turn the VOX on again, just press the same button and a voice announcement
will advise you that the VOX is now active. This setting is remembered also if you
turn off the unit.
Adjusting the volume
Your Midland BTX1 FM uses AGC technology, which automatically adjusts the
listening volume in relation to background noises.
However, it is also possible to manually adjust the volume by means of the “Volume +” and “Volume -“buttons.
Attention: volume can be adjust only when an audio connection is active.
Attention: the volume buttons (Vol + and Vol -) cannot be used to adjust the volume of the wired audio source. The AGC system with automatically increase the
volume on higher speed.
Compatibility with other Midland BT line units
The BTX1 FM is compatible with BT Next Conference and BTX2 FM.
When paired the max distance of the intercom is defined from the lower possible.
The BTX1 FM is compatible with the previous line of Midland BT (BT
Next, BTX2 and BTX1) only if updated to firmware version 2014.
Manual activation
Press the Middle button on one of the two units. Communication is enabled and
remains active until you press again the middle button. The intercom need some
second to activate, you will hear a beep tone when the intercom is open.
Voice activation (VOX)
Simply start talking, after some seconds the communication will be opened and
will remain active for the time you are talking. If there is no conversation the
intercom will be closed after 40 seconds. If needed you can close the intercom
manually without waiting 40 seconds (just press the middle button).
A- Manual activation
Mode
Intercom
Forward button
Middle button
Short press: Open/Close intercom to paired
raider
Long press: Change mode
Backward button
Long press: Toggle on/off wired
Midland BTX1 FM - 17
UK
How to pair two BTX1 FM units
UK
Talk 2 All - Pairing to a different brand intercom
Thanks to the “Talk2 All - Universal Intercom” feature it is now possible to pair your
BTX1 FM to a different brand intercom available on the market.
1. On the BTX1 FM enter the setup mode: (With the unit OFF press and hold down
the Middle button about 7 sec., until the Red light is on permanently.
2. Press the “Forward” button for 3 seconds, the Red and Blu LED light will flash.
3. On the other intercom (not Midland brand) follow the procedure to pair to a
phone.
›› Phone (A2DP Stereo)
›› GPS (A2DP Stereo)
›› Dongle A2DP Stereo
›› Phone (HFP Mono)
›› GPS mono
›› PMR446 Transceiver
Background feature
Talk2All - Universal Intercom
not Midland brand device
When successfully paired (no red/blue flashing light).
To open the intercom communication on the BTX1 FM press forward button.
On the other intercom just press the phone redial button.
Maybe it will be necessary to press the dial button two times, depending on the model
of the not Midland intercom.
Attention: when using this configuration, the other intercom (not Midland brand) will
not be able to be paired to a phone.
Pairing the BT Next Conference to Bluetooth devices
The BT Next C. Conference unit can be paired to other Bluetooth devices, like
Phone, GPS Navigator or PMR446 Radio with built-in or external Bluetooth (dongle).
The pairing procedure must be done using the “Volume +” or the “Volume
-“ buttons.
›› Pairing to the “Volume +” button: for Phone with music A2DP stereo, GPS Navigator with A2DP audio or external mono/Stereo A2DP dongle.
›› All devices paired to “Volume +” button has higher priority and will interrupt
all the other communication (like Intercom, FM Radio and Music).
›› Pairing to the “Volume -” button: for a second phone with mono audio (Hands
Free Protocol) for GPS navigators/ Radar detector and other devices which
mono audio.
18 - Midland BTX1 FM
It is possible to keep always in background the audio connection of the device paired on Vol- button. In this way the Intercom communication will not be interrupted, for example, by the GPS’s street indication or the G8BT radio communication.
To activate the “Background” feature just press long the “Vol-” button, the voice
“Background ON” will tell you that now is active.
To deactivate the “Background” feature just press again long the “Vol-” button,
the voice “Background disable” will tell you that now is not active anymore.
By default the “Background” feature is off.
Attention: this feature is used only for G8BT two way radio or GPS devices
paired on “Vol-”. This feature must be off if you have a phone paired on “vol-”
button.
Attention: A2DP audio source are supported only on Vol+. The second phone paired
on Vol- can support only mono audio (HFP).
When a device is paired to the “Vol +” or “Vol –“ buttons the “Phone” mode is
activated.
Pairing with one or two phone
The cellular phone can be paired to the “Vol +” (if the support for stereo A2DP is
requested) or to the “Vol –“.
When a phone is paired to the “Vol +” or “Vol-“ the “Phone” mode is activated.
An incoming call has always the higher priority, that means all other communications will be closed (Intercom, FM Radio, Music).
If another incoming call will arrive on the second phone, alert sound will notify it.
How to pair the BT Next Conference to a Phone
To pair the BT Next C. to a Phone, you must first enter the setup mode:
1. Turn off the unit
How to use a Phone
After pairing your phone to the BT Next C. unit you must switch to the “Phone” mode
in order to use it. Press the middle button until you hear “Phone” from the voice announcement. Now all the three main buttons are dedicated to the phone (see Table B)
Answering a call
When you hear the phone ring, you can answer in two different ways:
To redial the last number:
Phone on Vol+: Press“Forward”button for 3 seconds in order to redial the last number
(you will hear one audio confirmation tone).
Phone on Vol-: Press“Backward”button for 3 seconds in order to redial the last number (you will hear one audio confirmation tone).
To make a voice call:
Phone on Vol+: Briefly press“Forward”button. If your mobile phone supports voice
calls, you will be asked to speak the name of the contact you wish to call.
Phone on Vol-: Briefly press“Backward”button. If your mobile phone supports voice
calls, you will be asked to speak the name of the contact you wish to call.
Priority: Calls have a high priority, which means that all other communications are
temporarily disabled when a call arrives.
Ending a call
There are several ways to end a call:
›› Wait for the called person to end the call.
›› Press the “Forward” button (you will hear an audio confirmation tone).
›› Press “End” button on the mobile phone.
Using the MP3 player feature of the mobile phone
The mobile phone, when paired on “Volume +” can be used as stereo MP3 players.
The BT Next C. device fully supports the A2DP and AVRCP protocols that enable you
to listen to stereo music and remotely control your mobile phone’s MP3 player. You
can even use the buttons on the BT Next C. unit to control the following play options:
Play, Pause, Forward and Backward.
Vocally:
Simply say one word to answer the call and start talking.
Manually:
Tap the “Forward” button and start talking.
Rejecting a call
If you don’t wish to answer, you can let the mobile phone ring or press the “Forward”
button for 3 seconds (you will hear one audio confirmation tone).
Making a call
There are several ways to make a call.
From the mobile keypad:
Dial the number on the mobile keypad:
Press “Send” on the mobile phone.
\ Forward
Play/Pausa
Backward B-Phone mode
Mode
Phone
Phone (when music is plaing
and paired on “Vol +”)
Forward button (Phone on Vol+)
Short press: Voice dial /accept or close if it
is in progress
Long press: redial last number/ or reject
Short press: Forward the song
Middle button
Long press: Change mode
Short press: Play/pause
Long press: Change mode
Backward button (Phone on Vol-)
Short press: Voice dial /accept or close if it
is in progress
Long press: redial last number/ or reject
Short press: Backward the song
Midland BTX1 FM - 19
UK
2. Press and hold down the middle button about 7 sec., until the Red light is on
permanently.
3. Now press for 3 seconds the “Volume +” or “Volume -” button, the Blue and Red
light will flash.
4. Enable the Bluetooth device search feature on your mobile phone
5. After some seconds, “Midland BT NEXT” will be displayed on your mobile phone.
Follow the pairing procedure of your Phone. If a pin code is requested you must
enter “0000” (four time zero).
When successfully paired, the Blue light of the unit will be on for one second and
than the unit will exit the setup mode and switch to the working mode (the Blue
light will start flashing).
You can use now your BT Next C. together with the Phone.
UK
Available controls:
›› To play/pause music: click on the “Middle” button.
›› To skip forward to the next song: press the “Forward” button.
›› To skip backwards to the previous song: press the “Rear” button..
Priority: the music listening mode has the lowest priority. Therefore, it will always be
disabled when another type of communication is enabled.
Attention: It is possible to control A2DP Stereo music only in “Phone Mode”
How to pair the BTX1 FM to a GPS
In general is possible to pair the BTX1 FM to all the GPS for motorbike that support Bluetooth headset connection.
To pair the BTX1 FM to a GPS, you must first enter the setup mode:
1. Turn off the unit
2. Press and hold down the “Middle” button about 7 sec., until the Red light is
on permanently.
3. Now press firmly (3 sec) the “Volume +” button, the Blue and Red light will
flash.
4. Enable the Bluetooth device search feature on your GPS
5. After some seconds, “Midland BTX1 FM” will be displayed on your GPS.
6. Follow the pairing procedure of your GPS. If a pin code is requested you must
enter “0000” (four times zero).
7. When successfully paired, the Blue light of the unit will be on for one second
and then the unit will exit the setup mode and switch to the working mode
(the Blue light will start flashing).
When you pair the GPS to the Volume + button, you loose the possibility to pair
the phone to the BTX1 FM unit. You can overcome this limit by pairing the phone
directly to the GPS and then the GPS to the BTX1 FM unit. All the phone features
are therefore managed by the GPS itself.
GPS navigator always in background
To keep the intercom open while the GPS give the street indication you must have
the “background” feature active.
Attention: we can’t garantee this features because is depending on third part
device.
How to listen to the FM Radio
The FM Radio receiver is integrated inside the unit. You just need to switch to the
“FM Radio” mode in order to use it. Long press the middle button until you hear “FM
radio” from the voice announcement. Now all the three main button are dedicated
to the FM Radio (See Table).
Press short the Forward or the Backward button to seek the FM Radio station. When
you press long the Forward or the Backward button, you can scan up or down the 6
recorded stations. A voice announcement will tell you the number of which memory
you are entering. A double beep tone will be played when the last or the first recorded station is reached.
To save the station you are listening, press the Forward and Backward buttons together for 3 sec. You will hear a beep tone for confirmation.
The station is saved over the last recorded station used.
Thanks to the RDS system, the FM Radio will choose the strongest signal available for
the radio station you like to listen.
The RDS system is OFF by default, if needed you can toggle on/off the RDS pressing
together the “Volume +” and “Volume –“ buttons for 3 sec when the radio is on. A
voice announcement will tell you the RDS status.
FM Radio with intercom
When you are in “FM Radio” mode is not possible to manually open the intercom,
you can only open it using VOX feature (just talk) to the unit paired on the “Middle”
button. To manually activate the intercom you must switch to “Intercom” mode.
How to Disable/Enable the FM Radio
By default the FM radio is on.
Disabling:
›› Enter the “Setup” mode: turn off the unit and hold down the “Middle” button
about 7 sec., until the Red light is on permanently.
›› Press “Middle” and “Volume+” buttons together for 3 seconds. The blue LED will
flash twice.
›› Double click on the “Middle” button to exit the “Setup” mode and use the BTX1
FM.
Enabling:
Radio FM mode
Mode
FM Radio
20 - Midland BTX1 FM
Forward button
Short press: seek station up
Long press: Scan recorded
Middle button
Short press: On/off
Long press: Change mode
Backward button
Short press: seek station down
Long press: Scan recorded
How to pair PMR446 transceiver with integrated Bluetooth
If your PMR446 trasceiver has an integrated Bluetooth (like the G8BT), you must pair
the trasceiver using the “Volume +“ button:
›› Turn off the unit
›› Press and hold down the “Middle” button about 7 sec., until the Red light is on
permanently.
›› Now press firmly (3 sec) the “Volume +” button, the Blue and Red light will flash.
›› Follow now the pairing procedure explained on the manual of the transceiver
itself
Attention: If you are pairing to a G8BT transceiver, just when the BTX1 FM finish the
pairing (only the Blu LED is flashing) you must follow this procedure to activate the
Bluetooth connection:
›› Shortly press to the “forward” button in “Phone” mode, a purple light will confirm the audio connection ON. Now it’s ready to transmitt and receive trough
the BTX1 FM
›› Follow the same procedure every time you need to reconnect the G8BT to the
BTX1 FM (no need to make the pairing procedure again)
Attention: the PMR446 audio connection can be set on “Stand by” pushing the
“forward” button on the BTX1 FM in “Phone” Mode
Attention: the connection with the Bluetooth radio (G8E-BT) can be set in “Stand
by” mode simply by pushing the “forward” button on the BTX1 FM in “Phone” Mode.
How to use the wired audio input
Your Midland BTX1 FM is also supplied with a wired audio input (AUX), that can
be used to connect an audio source, like an iPod (or any other MP3 Player) or a
PMR446 transceiver for group communication or for a coverage increase.
Listening to music
To listen to music from the wired input, connect the audio source using the optional AUX cable.
The volume buttons (Vol + and Vol -) cannot be used to adjust the volume of the
wired audio source. The AGC system with automatically increase the volume on
higher speed.
Attention: never set the volume of the MP3 Player to the maximum possible. Normally the best level is about the 70% of the maximum.
Hint: We recommend that you perform a few tests adjusting the volume of your
iPod/MP3 player so at the normal speed the Headset volume is suited to your
needs. The AGC system will automatically increase the volume on higher speed.
Make a note to remember this setting for future trips.
Enabling/disabling the wired input
If needed the wired input can be enabled or disabled:
Enabling/Disabling: Make a Long press on the “Backward” button (you will hear
one audio beep tone for enabling confirmation and two audio beep tone for disabling).
Using a PMR446 transceiver with the cable connection
In order to connect the transceiver to your Midland BTX1 FM, you need to purchase the specific 2.5mm plug AUX cable, sold separately.
ome manufacturers radios use a different pin configuration, so we recommend
that you ask your dealer as to which cable is best suited to your needs.
The cable connected to the transceiver normally has also a PTT button that can
be placed on the handlebar of your bike or held in your hand (If you are the passanger rider).
To communicate via the attached radio, press the PTT button to speak and release
it to listen. It is not possible to talk and listen simultaneously.
Adjust the volume of the transceiver to your needs, remembering that the volume
adjustment is controlled by the automatic AGC system and that it will therefore
be automatically increased in relation to background noise.
If you wish to use a PMR446 transceiver for group communications and simultaneously maintain the Intercom feature enabled between two or more BTX1 FM
devices, you must remember that every time you talk to communicate with the
PMR 446 transceiver (pressing the PTT button), you will also activate the intercom
of the BTX1 FM to the unit connected to the “Middle” button (thanks to the VOX
feature).
To avoid the Intercom activation when you speak on the PMR446, you can decide
to pair the BTX1 FM unit on the “Backward” or “Forward” (where the VOX is not
active) or if you still want to use the “Middle” button, you must disable the VOX
feature, as explained in the previous section.
Attention! If you disable the VOX feature, you will only be able to answer incoming
phone calls by pressing the “Forward” button.
Setup and special configurations
Resetting all paired devices
Sometimes you may find it necessary to delete all the pairing references stored in
the BTX1 FM unit (reset operation).
To perform this operation you must first enter the setup mode:
›› Turn off the unit
›› Press and hold down the “Middle” button about 7 sec., until the Red light is
on permanently.
›› Than simultaneously press and hold down the “Volume +” and “Volume –“
Midland BTX1 FM - 21
UK
›› Follow the same procedure up described; now the blue LED will flash once.
›› To exit the “Setup” mode, double click the “Middle” button.
UK
buttons for 3 seconds. The Blue Light will be lit on for 1 sec and than back
to steady RED.
›› Double click on the “Middle” button to exit the “Setup” mode and use the BTX1
FM.
This procedure deletes all the paired Bluetooth devices stored in the memory and
it is therefore possible to start a new “clean” pairing session.
Back to factory setting
Sometimes you may find it necessary to go back to the factory setting, to reset all
the changes/setup already made and have a “clean” unit.
To perform this operation you must first enter the setup mode:
›› Turn off the unit
›› Press and hold down the “Middle” button about 7 sec., until the Red light is
on permanently.
›› Than simultaneously press and hold down all the three buttons “Forward”“Middle”-“Backward” for 3 seconds. The Blue Light will be lit on for 1 sec and
than back to steady RED.
›› Double click on the “Middle” button to exit the “Setup” mode and use the BTX1
FM.
Adjusting/ Disabling the VOX feature (Intercom and telephone)
The Intercom feature can be enabled both manually and vocally (VOX). The VOX
activation is influenced by the background noise and therefore by the speed.
For optimum results, it is possible to choose one of the following four microphone
sensitivity levels: high, medium, low and very low. The default setting of BTX1
FM is “low”. It is also possible to disable the VOX feature in order to activate the
Intercom and phone call answering features in manual mode only.
Adjusting the sensitivity of the microphone (VOX)
To perform this operation you must first enter the setup mode:
1. Turn off the unit
2. Press and hold down the “Middle” button about 7 sec., until the Red light is
on permanently.
3. Your BTX1 FM is now in “Set up mode”.
4. Press the “Backward” button until the red light indicator changes to a steady
blue.
5. Now, press “Volume +” or “Volume -“ to increase or reduce sensitivity. Every
time you press the Volume buttons the RED light will flash for confirmation.
When you reach the end of the upper and lower limit, the RED light will not
flash.
6. Press again the “Backward” button; the Blue light will flash several times, in
order to let you know the selected sensitivity:
One flash = VOX disabled
22 - Midland BTX1 FM
Twice = very low sensitivity
3 times= low sensitivity
4 times= medium sensitivity (default setting)
5 times = high sensitivity
The light indicator is now back to steady RED (“Set up mode”) and the
changes are confirmed
7. If needed, you can adjust again the sensitivity repeating the steps from point
1, otherwise exit the Setting mode by double clicking the “Middle” button.
Once the red light turns off, the blue led starts blinking. Now you can use your
BTX1 FM.
Disabling the VOX feature (Intercom and telephone)
Follow all the procedure described in the previous steps and choose the option of
only one flash (VOX disabled).
Wired connection always in background
This feature let you keep the wired connection always on, even when the phone
or the intercom is open. This feature can be useful when you connect a PMR446
transceiver.
By default this option is on.
Disabling:
›› Enter the “Setup” mode:
›› Turn off the unit
›› Press and hold down the “Middle” button about 7 sec., until the Red light is
on permanently.
›› Press the “Forward” and “Middle” button together for 3 seconds. The blue LED
will flash twice.
›› Double click on the “Middle” button to exit the “Setup” mode and use the BTX1
FM.
Enabling:
Follow the same procedure up described; now the blue LED will flash once.
To exit the “Setup” mode, double click the “Middle” button.
Setup and Firmware update
It is possible to configure and update the firmware of your BTX1 FM using the
USB connection to your PC. On the Midland web site www.midlandradio.eu in
the BTX1 FM page you can find the PC software and the new firmware updates
if available.
ATTENTION DO NOT CONNNECT THE UNIT TO THE PC BEFORE you DOWNLOAD AND
INSTALL THE SOFTWARE
FCC Compliance Information
The use of the device will impair your ability to hear other sounds and others
around you.
Listening to music or speaking on a telephone may prevent you from hearing
others around you and distract you from riding safely. The use of such device
while riding may endanger you and others, and its use, in some areas, could not
be allowed.
Using this device at a high volume may result in permanent hearing loss.
If you experience ringing in your ear or any other hearing related pain, reduce the
volume or discontinue using this device. With continued use at high volume, your
ears may become accustomed to the sound level, which may result in permanent
damage to your hearing.
Please use this device at a safe volume level.
This device complies with Part 15 of the FCC Rules. Operation is subject to the
following two conditions: (1) this device may not cause harmful interference, and
(2) this device must accept any interference received, including interference that
may cause undesired operation.
You are cautioned that changes or modifications not expressly approved by the
part responsible for compliance could void the user’s authority to operate the
equipment.
“This device complies with Industry Canada licence-exempt RSS standard(s).
Operation is subject to the following two conditions: (1) this device may not cause
interference, and (2) this device must accept any interference, including interference that may cause undesired operation of the device.”
“This equipment complies with Industry Canada radiation exposure limits set
forth for an uncontrolled environment. “
NOTE: This equipment has been tested and found to comply with the limits for
a Class B digital device, pursuant to part 15 of the FCC Rules. These limits are
designed to provide reasonable protection against harmful interference in a
residential installation. This equipment generates, uses and can radiate radio
frequency energy and, if not installed and used in accordance with the instructions, may cause harmful interference to radio communications. However, there
is no guarantee that interference will not occur in a particular installation. If
this equipment does cause harmful interference to radio or television reception,
which can be determined by turning the equipment off and on, the user is encouraged to try to correct the interference by one or more of the following measures:
›› Reorient or relocate the receiving antenna.
›› Increase the separation between the equipment and receiver.
›› Connect the equipment into an outlet on a circuit different from that
›› to which the receiver is connected.
›› Consult the dealer or an experienced radio/TV technician for help.
Warranty
The warranty lasts 24 months for the main device and 6 months for the accessories (batteries, chargers, antennas, headsets).
For further information about the warranty, please visit www.midlandradio.eu
<http://www.midlandradio.eu>
European CE Notice Certification and Safety Approval Information
This product is CE marked according to the RTTE Directive (99/5/EC) and is free
use in all the EU countries.
Users are not permitted to make any changes or modifications to the device.
Modifications which are not expressly approved by the producer invalidate the
warranty card.
For further information, please go to our website: www.cte.it
Warning: Direct plug-in ac/dc power supply must be used for disconnecting the transceiver from the mains; the desktop charger must be positioned close to the unit and easily
accessible
Midland BTX1 FM - 23
UK
Use at your own risk
UK
24 - Midland BTX1 FM
EC Certificate of Conformity
(to EC Directive 99/5 -2004/108- 2006/95/EC)
• INFORMAZIONE AGLI UTENTI
Ai sensi dell’art. 13 del decreto legislativo 25 luglio 2005, n.151 “Attuazione delle Direttive
2002/95/CE, 2002/96/CE e 2003/108/CE, relative alla riduzione dell’uso di sostanze
pericolose nelle apparecchiature elettriche ed elettroniche, nonché allo smaltimento dei
rifiuti”.
• Il simbolo del cassonetto barrato riportato sulle apparecchiature indica che il prodotto alla
fine della propria vita utile deve essere raccolto separatamente dagli altri rifiuti. L’utente
dovrà, pertanto, conferire l’apparecchiatura giunta a fine vita agli idonei centri di raccolta
differenziata dei rifiuti elettronici ed elettrotecnici, oppure riconsegnarla al rivenditore al
momento dell’acquisto di una nuova apparecchiatura di tipo equivalente, in ragione di
uno a uno. L’adeguata raccolta differenziata per l’avvio successivo dell’apparecchiatura
dismessa al riciclaggio, al trattamento e allo smaltimento ambientalmente compatibile
contribuisce ad evitare possibili effetti negativi sull’ambiente e sulla salute e favorisce
il riciclo dei materiali di cui è composta l’apparecchiatura. Lo smaltimento abusivo del
prodotto da parte dell’utente comporta l’applicazione delle sanzioni amministrative di cui
al dlgs. n.22/1997 (articolo 50 e seguenti del dlgs. n.22/1997).
• Alle Artikel, die auf der Verpackung oder der Gebrauchanweisung dieses Symbol
tragen, dürfen nicht in den normalen Mülltonnen entsorgt werden, sondern müssen
an gesonderten Sammelstellen abgegeben werden. Dort werden die Materialien
entsprechend ihrer Eigenschaften getrennt und, um einen Beitrag zum Umweltschutz zu
liefern, wiederverwertet.
• All articles displaying this symbol on the body, packaging or instruction manual of same,
must not be thrown away into normal disposal bins but brought to specialised waste
disposal centres. Here, the various materials will be divided by characteristics and recycles,
thus making an important contribution to environmental protection.
• Tous les articles présentant ce symbole sur le corps, l'emballage ou le manuel d'utilisation
de celui-ci ne doivent pas être jetés dans des poubelles normales mais être amenés
dans des centres de traitement spécialisés. Là, les différents matériaux seront séparés
par caractéristiques et recyclés, permettant ainsi de contribuer à la protection de
l'environnement.
DECLARATION OF CONFORMITY N° 2013121201
C.T.E. International S.r.l.
VIA SEVARDI 7 – ZONA INDUSTRIALE MANCASALE – 42124 REGGIO EMILIA
Manufacturer:
Address:
Products Name:
• Todos los artículos que exhiban este símbolo en el cuerpo del producto, en el embalaje
o en el manual de instrucciones del mismo, no deben ser desechados junto a los
residuos urbanos normales sino que deben ser depositados en los centros de recogida
especializados. En estos centros, los materiales se dividirán en base a sus características
y serán reciclados, para así poder contribuir de manera importante a la protección y
conservación del medio ambiente.
• Όλα τα προϊόντα στα οποία εμφανίζεται το ακόλουθο σύμβολο στο σώμα, τη συσκευασία
ή το εγχειρίδιο χρήσης τους, δεν πρέπει να εναποθέτονται στους κοινούς κάδους
απορριμάτων αλλά να προσκομίζονται στα ειδικά κέντρα αποκομιδής. Εκεί, τα διάφορα
υλικά θα πρέπει να διαχωρίζονται ανάλογα με τα χαρακτηριστικά και τα ανακυκλούμενα
υκλικά, συμμετέχοντας έτσι ουσιαστικά στην προστασία του περιβάλλοντος.
Product Type:
Brand :
DO:
7.1.4.4
Rev:
5
Authorised on: 02/02/2010
By :
S. Peterlini
Signature
BTX1 FM
BLUETOOTH HEADSET INTERCOM
MIDLAND
The product described above is in conformity with the following Specifications based on sample testing:
Item of
99/05/CE
3.1a
Standard
EN 60065 :2002
+A1+A11
+ A2+A12
Title
Audio, video and similar electronic apparatus - Safety requirements
Generic standard to demonstrate the compliance of low power electronic
and electrical apparatus with the basic restrictions related to human
exposure to electromagnetic fields (10 MHz - 300 GHz) - General public
Edition
or date of
issue
2011
3.1a
EN 50371
3.1b
EN 301 489-1
Electromagnetic compatibility and Radio spectrum Matters (ERM);
ElectroMagnetic Compatibility (EMC) standard for radio equipment and
services; Part 1: Common technical requirements
V1.9.2
3.1b
EN 301 489-17
Electromagnetic compatibility and Radio spectrum Matters (ERM);
ElectroMagnetic Compatibility (EMC) standard for radio equipment; Part
17: Specific conditions for Broadband Data Transmission Systems
V2.2.1
Electromagnetic compatibility and Radio spectrum Matters (ERM);
Wideband transmission systems; Data transmission equipment operating
in the 2,4 GHz ISM band and using wide band modulation techniques;
Harmonized EN covering the essential requirements of article 3.2 of the
R&TTE Directive
V1.8.1
3.2
EN 300 328
Supplementary information to the conformity assessment result on which the declaration is based:
Conformity assessment procedures are referred to art. 10(4) linked with Annex III of Directive 1999/5/ec.
The test sample fullfils the requirements specified above, on the basis of test result and their evaluation.
The product herewith complies with the essential requirements of EC Directive 99/05/EC, 2004/108/EC and
following implements and modifications, 2006/95/EC and following implements and modifications, 93/97/EC.
Reference to any marking or other indication (e.g. on the product) is exhibited in attachment to this
declaration.
Reggio Emilia, 12/12/2013
CTE International srl
Assurance Quality Responsible
Giovanni Bo
This document is owned by Cte International srl. It is forbiddeen to reproduce or diffuse it without the authorisation of the Quality
Assurance Manager of CTE International srl.
2002
Vertrieb durch:
ALAN ELECTRONICS GmbH
Daimlerstraße 1K - D-63303 Dreieich Deutschland
www.alan-electronics.de
Vor Benutzung Bedienungsanleitung beachten. Bei Verwendung von Batterien beachten Sie
bitte die Umweltbestimmungen. Batterien niemals ins offene Feuer werfen, und nur in dafür
vorgesehene Sammelbehälter entsorgen.
Prodotto o importato da:
CTE INTERNATIONAL s.r.l.
Via. R.Sevardi 7- 42124 Reggio Emilia Italia
www.cte.it - www.midlandradio.eu
Prima dell’uso leggere attentamente le istruzioni. Se il prodotto contiene batterie: non gettare
nel fuoco, non disperdere nell’ambiente dopo l’uso, usare gli appositi contenitori per la raccolta.
Produced or imported by:
CTE INTERNATIONAL s.r.l.
Via. R.Sevardi 7 42124 Mancasale Reggio Emilia Italy
BTX1 FM
BASIC INTERCOM SYSTEM
Importado por:
ALAN COMMUNICATIONS, SA
C/Cobalt, 48 - 08940 Cornellà de Llobregat Barcelona España
Tel: +34 902 384878 Fax: +34 933 779155
www.midland.es
Lea atentamente las instrucciones antes de usar el equipo. si el producto contiene pilas
o baterías no las tire al fuego ni las disperse en el ambiente después de su uso, utilice los
contenedores apropiados para su reciclaje.
M A N UA L E D ’ U S O
INSTRUCTION GUIDE
WW W.MIDLA N DR A DIO.E U
|
®