1
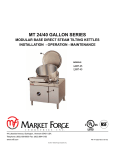
FT-20CE
ELECTRIC FLOOR MODEL TILTING KETTLES
INSTALLATION - OPERATION - MAINTENANCE
44 Lakeside Avenue, Burlington, Vermont 05401 USA
Telephone: (802) 658-6600 Fax: (802) 864-0183
www.mfii.com
PN 14-0352 Rev A (9/14)
© 2014 - Market Forge Industries Inc.
Your Service Agency’s Address:
Model
Serial number
Oven installed by
Installation checked by
TABLE OF CONTENTS
IMPORTANT
WARNING: Improper installation, adjustment, alternation,
service or maintenance can
cause property damage, injury or death. Read the installation, operation and maintenance instructions thoroughly
before installing or servicing
this equipment.
FOR YOUR SAFETY
Do not store or use gasoline or
other flammable vapors or liquids in the vicinity of this or any
other appliance.
The information contained in this
manual is important for the proper installation, use, and maintenance of this oven. Adherence
to these procedures and instructions will result in satisfactory
baking results and long, trouble free service. Please read
this manual carefully and retain
it for future reference.
ERRORS: Descriptive, typographic or pictorial errors are
subject to correction. Specifications are subject to change
without notice.
INSTALLATION
Introduction.. . . . . . . . . . . . . . . . . . . . . . . . . . . . . . . . . . . . . . . . . . . . . . . . . . . . . . . . . . . . . . 2
Service Connections. . . . . . . . . . . . . . . . . . . . . . . . . . . . . . . . . . . . . . . . . . . . . . . . . . . . . . 3
Installation Instructions. . . . . . . . . . . . . . . . . . . . . . . . . . . . . . . . . . . . . . . . . . . . . . . . . . . . 4
OPERATION
Operating Instructions. . . . . . . . . . . . . . . . . . . . . . . . . . . . . . . . . . . . . . . . . . . . . . . . . . . . . 5
MAINTENANCE
Cleaning. . . . . . . . . . . . . . . . . . . . . . . . . . . . . . . . . . . . . . . . . . . . . . . . . . . . . . . . . . . . . . . . . 6
Introduction
DESCRIPTION
3. Thermostat control closes to energize contactor coils.
Model FT-20CE (20 gallon capacity) is an electrically
powered, self-contained, tilting kettle. The appliance has
a jacket of double-wall construction forming a sealed reservoir around the lower two-thirds of the kettle. The reservoir is charged with distilled water. Kettles are equipped
with a “clean lock” to hold kettle in cooking position or 105
degrees for ease of cleaning, removable electric heating
element and controls, and a low water cutoff device for
protection of the heating elements.
4. Power is supplied to the elements through closed
power contactors.
5. As the temperature of water rises in the kettle reservoir, increase in steam pressure is indicated on the
pressure gauge.
6. When the temperature of steam in the reservoir
reaches the setting shown on the temperature control dial, the temperature control opens to shut off the
heating elements. The temperature control will cycle
On/Off as required to maintain set temperature.
BASIC FUNCTIONING
Self-contained kettles operate by generating steam in the
kettle reservoir. The sequence of operation is as follows:
1. Operator turns the power switch to the ON position
and sets the temperature control dial at the desired
setting from 1 to 10 (90 degrees Fahrenheit to 285
degrees Fahrenheit, 32 degrees Celsius to 140 degrees Celsius, jacket temperature).
2. Control circuit is normally completed to the temperature control if the following conditions exist:
a. Water level in the kettle reservoir is adequate to
prevent circuit interruption by the low water cutoff device. An activated cut-off is indicated by the
amber low water light.
b. Kettle is in vertical position with circuit completed
through the tilt interlock switch.
INSTALLATION
2
Service Connections
ELECTRICAL CHARACTERISTICS
MODEL
pH
FT-20CE
208V
230V
240V
380V
415V
480V
kW
Amp
kW
Amp
kW
Amp
kW
Amp
kW
Amp
kW
Amp
1
12
33.4
12
30.1
12
28.9
12
18.3
12
16.7
12
14.5
3
12
57.6
12
52.2
12
50.0
-
-
-
-
-
-
SERVICE CONNECTIONS
EC
Electrical Connection - to be as specified on data plate.
ELECTRICAL CONNECTION EC
RELIEF VALVE
DIMENSIONS ARE IN INCHES [MM]
4 [102]
FLANGED FOOT DETAIL
12.5
[318]
24
[610]
4 EQUALLY SPACED
Ø7/16 [11] HOLES ON
3 [76] B.C.
ELECTRICAL CONNECTION EC
30.75 [781]
21 [533]
18
[457]
30.25
[768]
43.5
[1105]
20.25
[514]
7 [178]
4.25 [108]
25 [635]
Figure 1
3
INSTALLATION
Installation Instructions
1. Select a location to provide drainage directly below
the pour path of the kettle. Position appliance to allow sufficient rear clearance from wall to tilt freely and
completely without obstruction.
2. Mark hole locations through flanged adjustable feet.
Remove kettle.
3. On hole locations marked, drill holes and insert expansion shields to accommodate 5/16” size lag bolts.
4. Reposition kettle. Level kettle by making necessary
adjustments on flanged feet.
5. Bolt down kettle and seal with Silastic or other equivalent sealing compound. Sealant must be applied
not only to bolt heads but also around flanges making
contact with floor surface to fulfill NSF International
requirements. Wipe off excess sealant immediately.
6. A control box with power supply equivalent to electrical rating of kettle should be located conveniently
nearby.
7. A waterproof electrical connection from power supply
to rear of control housing must be provided.
8. Ground kettle to terminal provided inside control
housing.
9. Turn power ON and check for proper operation.
INSTALLATION
4
Operating Instructions
TILTING INSTRUCTIONS
1. Ensure that the external electrical service to kettle is
on.
Your kettle has a standard “Clean Lock” feature and may
not be tilted without disengaging the tilt knob located on
the console at the top right. This feature locks the kettle
in the upright position and also allows the operator to lock
the kettle at 105 degrees for ease of cleaning. To tilt the
kettle the full distance, the tilt lock knob must be disengaged from the cleaning position by pulling out the tilt lock
knob and tilting the kettle forward the full distance. Follow
these steps to tilt kettle:
2. Check pressure gauge for correct cold kettle reading.
Reading should be in the green vacuum zone (25 - 30
In. Hg or 84 - 100 kPa of vacuum). If reading is not
low enough, follow VENTING INSTRUCTIONS prior
to using kettle.
3. Place power switch in ON position.
4. Preheat kettle by placing thermostat knob at ‘10’.
Wait until TEMPERATURE light goes off.
1. Pull out the tilt knob at top right located on console.
2. Using kettle tilt handle pull kettle forward to desired
angle of pour or until kettle locks at 105 degrees. The
tilt knob can be released after the kettle has been
tilted approximately 10°.
NOTE: Preheating should not be used when cooking
milk and egg food products which adhere to
hot cooking surfaces. These foods should be
placed into a cold kettle.
5. Add food to be cooked into kettle.
3. Kettle will lock in position at 105 degrees and may be
tilted further by pulling the tilt lock knob a second time
allowing the kettle to tilt the full distance.
6. Place thermostat knob at required temperature setting from 1 to 10 coinciding with a temperature range
indicated by the table on the next page.
4. To return the kettle to the upright position, pull out the
tilt lock knob and tilt the kettle upward until it locks in
the upright position. The kettle should not move in
either direction once in the upright position.
Approximate cooking temperatures with water at various thermostat settings are as follows:
THERMOSTAT
SETTING
APPROXIMATE (JACKET)
TEMPERATURE
°F
°C
1
140°
60°
2
155°
68°
3
172°
78°
4
187°
86°
5
205°
96°
6
223°
106°
7
240°
116°
8
255°
124°
9
271°
133°
10
285°
140°
7. When cooking is finished, set thermostat knob and
power switch to OFF position.
8. Pour finished product from kettle using tilt handle. Be
careful to avoid splashing.
9. Add water to kettle for cleaning purposes.
10. Wash kettle thoroughly. See CLEANING INSTRUCTIONS.
5
OPERATION
Cleaning
clear water. Dry the surface completely and allow
one hour before using the appliance to cook.
WARNING
Disconnect the power supply to the appliance
before cleaning or servicing.
Following daily and period maintenance procedures will
prolong the life for your equipment. Climatic conditions salt air - may require more thorough and frequent cleaning
or the life of the equipment could be adversely affected.
WARNING
Never spray water into electric controls or
components!
STAINLESS STEEL
To remove normal dirt, grease or product residue from
stainless steel, use ordinary soap and water (with or without detergent) applied with a sponge or cloth. Dry thoroughly with a clean cloth. Never use vinegar or any other
corrosive cleaner.
CAUTION
The equipment and its parts are hot. Use care
when operating, cleaning and servicing.
CAUTION
To remove grease and food splatters or condensed vapours that have baked on the equipment, apply cleanser
to a damp cloth or sponge and rub cleanser on the metal
in the direction of the polishing lines. Rubbing cleanser
as gently as possible in the direction of the polished lines
will not mar the finish of the stainless steel. NEVER RUB
WITH A CIRCULAR MOTION.
Do not use cleaning agents that are corrosive.
Your kettle should be cleaned immediately after each
use or when cooking a different product. Before cleaning,
check that the kettle has cooled enough to touch it.
1. Rinse the inside of the kettle thoroughly and drain to
remove any food particles.
Soil and burn deposits which do not respond to the above
procedure can usually be removed by rubbing the surface
with SCOTCH-BRITE™ scouring pads or STAINLESS
scouring pads. DO NOT USE ORDINARY STEEL WOOL
as any particles left on the surface will rust and further
spoil the appearance of the finish. NEVER USE A WIRE
BRUSH, STEEL SCOURING PADS (EXCEPT STAINLESS), SCRAPER, FILE OR OTHER STEEL TOOLS.
Surfaces which are marred collect dirt more rapidly and
become more difficult to clean. Marring also increases
the possibility of corrosive attack. Refinishing may then
be required.
2. Using a nylon brush, clean the kettle with a mild detergent and water. Never use steel wool or scouring
powder as it will scratch stainless steel. Plain steel
wool can leave small pieces of steel which can rust.
3. Rinse the inside of the kettle thoroughly with clean
water. Tilt the kettle to allow the detergent and water
solution to drain.
4. Wipe the exterior of the kettle with a clean, damp
cloth.
WHAT TO DO IF SURFACE RUST APPEARS
TO REMOVE HEAT TINT
Metal utensils should never be used as they will scratch
the surface of the equipment and rust may begin to form.
To remove surface accumulation of rust from the inadvertent use of such utensils, the following procedure may be
used.
Darkened areas sometimes appear on stainless steel surfaces where the area has been subjected to excessive
heat. These darkened areas are caused by thickening
of the protective surface of the stainless steel and is not
harmful. Heat tint can normally be removed by the foregoing, but tint which does not respond to this procedure calls
for a vigorous scouring in the direction of the polish lines
using SCOTCH-BRITE™ scouring pads or a STAINLESS
scouring pad in combination with a powdered cleanser.
Heat tint action may be lessened by not applying or by
reducing heat to equipment during slack periods.
CAUTION
Improper use of this procedure may damage
your appliance!
1. Use undiluted white vinegar with a non-abrasive
scouring pad (plastic) or cloth on the affected area to
remove the rust stain. The appliance should not be
heated and remain at room temperature during the
entire cleaning process.
All food contact surfaces must be thoroughly drained and
flushed prior to cooking in the kettle.
CONTROL PANEL
2. If the stain resists removal, additional exposure time
with vinegar may be required, to a maximum of one
hour.
The textured control panel should be cleaned with warm
water and mild soap. Never use an abrasive cloth or steel
wool. Never use cleaning solvents with a hydrocarbon
base.
3. Thoroughly wash all of the vinegar away with fresh
MAINTENANCE
6