1
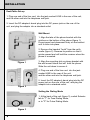
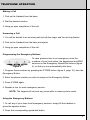
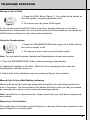
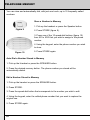
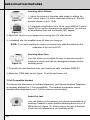
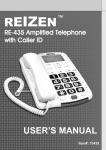
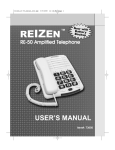
REIZEN
™
RE-4
40 Amplified Telephone
USER’S MANUAL
Item#: 73040
INTRODUCING RE-40 AMPLIFIED TELEPHONE
• Large, lighted keypad makes it easy for those with low vision
• Powerful adjustable amplifier allows incoming volume up to 40 db
• Super Bright LED Ringer Light allows you to see your phone is
ringing
• Amplified Super Loud Ringer with adjustable volume up to 95 db
• 2-way speakerphone
• 10 one-touch memory buttons for speed-dialing
• Adjustable outgoing voice amplification lets you adjust the volume of
your voice up to 15 db so callers can hear you better
• Adjustable Tone Control allows you to adjust the tone of incoming
sound to enhance clarity and to help you distinguish between similar
sounding words
• Missed Call / Extension In-Use / Voice Mail Waiting indicators
• Redial / Pause / Flash buttons
• 3 programmable emergency buttons for police, fire & EMS
• Handset is compatible with hearing aids with T-Coil
• 3.5 mm audio jack for a headset, neckloop or other assistive-listening
device
• On-hold music
• Desk or wall-mounted
• Ideal for home or office use
2
TABLE OF CONTENTS
Contents Check List....................................................................................................... 4
Telephone Features....................................................................................................... 5
Installation
Desk/Table Installation................................................................................................... 6
Wall Mount Installation................................................................................................... 6
Setting the Dialing Mode................................................................................................6
Operation
TELEPHONE OPERATION
Making a Call.................................................................................................... 7
Answering a Call............................................................................................... 7
Programming the Emergency Buttons.............................................................. 7
Using the Emergency Buttons...........................................................................7
Redial/Pause..................................................................................................... 8
Flash................................................................................................................. 8
Hold................................................................................................................... 9
Using the Speakerphone...................................................................................9
Missed Call & Voice Mail Waiting Indicators..................................................... 9
Extension in Use Indicator............................................................................... 9
TELEPHONE MEMORY
Store a Number in Memory..............................................................................10
Auto Dial a Number Stored in Memory............................................................10
Edit a Number Stored in Memory.................................................................... 10
Delete a Number Stored in Memory................................................................ 11
AMPLIFICATION FEATURES
Ringer Control..................................................................................................11
Ringer Tone Control.........................................................................................11
Outgoing Voice Volume....................................................................................11
Incoming Voice Volume....................................................................................11
Incoming Tone Control.....................................................................................12
T-Coil................................................................................................................12
Audio Out.........................................................................................................12
Additional Information
Warranty........................................................................................................................13
Specifications................................................................................................................14
Important Information....................................................................................................15
3
CONTENTS CHECK LIST
Parts Check List:
1. Base Unit
2. Handset
3. Handset Coil Cord
4. Telephone Line Cord
Handset
5. AC Power Adaptor
6. Wall Mounting Bracket
7. User’s Manual
Base Unit
Telephone Line Cord
Handset Coil Cord
User’s Manual
Wall Mounting Bracket
4
AC Power Adaptor
FEATURES
HANDSET
Compatible with
hearing aids with
T-Coil
MEMORY BUTTONS
10 one-touch memory
buttons for speeddialing
OUTGOING VOLUME CONTROL
adjusts the volume of your voice up to
15 db so callers can hear you better
3.5MM AUDIO JACK
for a headset, neckloop or
other assistive-listening device
RINGER SWITCH
Amplified super loud
ringer with adjustable
volume up to 95db
RINGER TONE
SWITCH
Lo-Hi Selectable
Tone Control
EMERGENCY BUTTONS
3 programmable Emergency
buttons for Police, Fire & EMS
MEMORY
STORE BUTTON
SUPER BRIGHT LED
RINGER LIGHT
allows you to see
when your phone is
ringing
REDIAL/PAUSE
BUTTON
FLASH BUTTON
INDICATORS for:
- Missed Calls
- Extension in Use
- Voice Mail Waiting
ADJUSTABLE TONE
CONTROL
allows you to adjust the tone
of incoming sound to
enhance its clarity.
Also helps you to distinguish
between similar-sounding
words
HOLD BUTTON
2-WAY SPEAKER
PHONE BUTTON
AMPLIFIER
SWITCH
On/Off switch for
amplifier
KEYPAD
Large lighted keypad
buttons, makes it easy for
those with low vision
INCOMING VOLUME
CONTROL
Powerful adjustable
amplifier allows
incoming volume up to
40 db
5
INSTALLATION
Desk/Table Set-up
1. Plug one end of the line cord into the jack marked LINE in the rear of the unit,
and the other end into the telephone wall jack.
2. Insert the DC adaptor's barrel plug into the DC power jack on the rear of the
unit, and plug the adaptor into a standard outlet.
Wall Mount
1. Align the tabs of the phone bracket with the
notches on the bottom of the phone (figure 1).
Press inward and downward firmly on the bracket
until it clicks into place.
2. Remove the handset "tooth" from the unit's
cradle (figure 2). Reverse its position so that it
points upward and will hold the receiver when the
phone is mounted.
Figure 1
3. Align the mounting slot on phone bracket with
the wall mount fixture that will hold the phone.
Slide the unit down to secure it.
4. Plug one end of the line cord into the jack
marked LINE in the rear of the unit,
and the other end into the telephone wall jack.
Figure 2
5. Insert the DC adaptor's barrel plug into the DC
power jack on the rear of the unit, and plug the
adaptor into a standard outlet.
Setting the Dialing Mode
1. At the back of the unit (figure 3), switch Selector
tab to "T" for Tone Dialing Mode,
or to "P" for Pulse Dialing Mode.
Figure 3
6
TELEPHONE OPERATION
Making a Call
1. Pick up the Handset from the base.
2. Dial the desired number.
3. Hang up upon completion of the call.
Answering a Call
1. You will be alerted to an incoming call by both the ringer and the red ring flasher.
2. Pick up the Handset from the base and speak.
3. Hang up upon completion of the call.
Programming the Emergency Buttons
Figure 4
To save precious time in an emergency, store the
numbers of your local police, fire department and EMS
services on the Emergency Speed-Dial buttons (figure
4), so that you can automatically dial them.
1. Program these numbers by pressing the STORE button (figure 9, page 10), then the
Emergency Button.
2. Enter the phone number you wish to assign to the Emergency Button.
3. Press STORE again.
4. Repeat in turn for each emergency service.
NOTE: The keypad will not emit any tones while in memory store mode.
Using the Emergency Buttons
1. To call any of your three local emergency services, simply lift the handset or
press the speaker button.
2. Press the corresponding speed-dial button.
7
TELEPHONE OPERATION
Redial/Pause Button (figure 5)
1. To redial the last number you dialed, simply pick up the
Handset or press the Speaker button.
Figure 5
2. Press the R/P button (figure 5). Your telephone will
automatically redial the last number you dialed.
3. To insert a pause between numbers during the memory storage procedure, press the
R/P button.
Flash Button
The FLASH Button (figure 6) enables you to access such special
services available from your local phone company as:
Figure 6
• Call waiting
• 3-Way Calling
Call Waiting:
1. While talking, you will hear the Call-Waiting signal as a series of beep tones.
2. Press the FLASH button to switch calls and put the current one on hold.
3. To switch back to the original call, press FLASH again.
3-Way Calling:
1. To set up a 3-way phone conversation, dial the number of your first party.
2. Press FLASH.
3. Dial the number of your second party.
4. Press FLASH again.
5. To terminate your 3-way call, simply hang up.
8
TELEPHONE OPERATION
Placing a Call on Hold
1. Press the HOLD Button (figure 7). Your caller will be placed on
hold with gentle, computer-generated music.
Figure 7
2. To resume your call, press HOLD again.
3. You can also use the HOLD function to switch to another extension on the same
telephone line. Simply place the unit on hold, pick up the other telephone, and press the
HOLD button to release the call to the second extension.
Using the Speakerphone
1. Press the SPEAKERPHONE button (figure 8) to either dial out
for a call or answer a call.
Figure 8
2. To hang up in either case, press the button again.
Note: You can switch between Handset and Speakerphone during conversation:
1. Press the SPEAKERPHONE button, while conversing using Handset.
2. Replace the Handset on the base. While the unit is operating in this mode, the
Speakerphone indicator comes on.
3. Switch back to the Handset at any time simply by lifting it from the base.
Missed Calls & Voice-Mail Waiting Indicators
Missed calls as well as voice-mail waiting are indicated by the red flasher panel at the
front of the phone. The left one-third of the flasher will blink to alert you that you missed
an incoming call or that you have voice-mail messages waiting.
Note: Voice-Mail is an optional service. Please check with your local phone company for
more details.
Extension-in-Use Indicator
The middle third of the flasher panel will light up to alert you that another extension of the
same telephone line is being used.
9
TELEPHONE MEMORY
You can store and automatically dial, with just one touch, up to 10 frequently called
numbers.
Store a Number in Memory
1. Pick up the handset or press the Speaker button.
Figure 9
2. Press STORE (figure 9).
3. Press one of the 10 speed-dial buttons (figure 10)
from M1 to M10 that you wish to assign to the phone
number.
4. Using the keypad, enter the phone number you wish
to store.
Figure 10
5. Press STORE again.
Auto Dial a Number Stored in Memory
1. Pick up the Handset or press the SPEAKER button.
2. Press the desired memory button. The phone number you stored will be
automatically dialed.
Edit a Number Stored in Memory
1. Pick up the handset or press the SPEAKER button.
2. Press STORE.
3. Press the speed-dial button that corresponds to the number you wish to edit.
4. Using the keypad, enter the edited phone number that you want to replace the
original one.
5. Press STORE again.
10
TELEPHONE MEMORY/AMPLIFICATION FEATURES
Delete a Number Stored in Memory
1. Press STORE.
2. Press the memory button that corresponds to the number you wish to delete.
3. Press star (*) on the keypad.
4. Press the STORE button and tone will sound indicating that the number has been
deleted.
Super-Loud Ringer Volume Control
1. Make sure you hear your phone ringing by adjusting its
Super-Loud ringer volume. Do this by moving the RINGER
VOLUME switch (figure 11), located on the right side of the
unit.
Figure 11
2. Turn from LO or HI for desired volume up to 95 db. Turn to
OFF to shut off ringer.
Ringer Tone Control
Figure 12
1. You may require a higher or lower ring pitch in order to hear
incoming calls better. Adjust the pitch to suit your needs by
using RINGER TONE switch (figure 12) at the right side of the
unit.
Outgoing Voice Volume
1. Use the OUTGOING VOLUME CONTROL switch (figure 13),
located on the right side of the unit, to adjust the volume to suit
your listener.
Figure 13
2. You can amplify your voice volume up to 15 db so your
callers can hear you better.
11
AMPLIFICATION FEATURES
Incoming Voice Volume
Figure 14
Figure 15
1. Adjust the volume of incoming calls simply by sliding the
VOL control (figure 14) at the lower right of the unit. This will
provide volume of up to 18 db.
2. For greater amplification up to 40 db, press AMPLIFY button
(figure 15) to turn the incoming voice amplifier on. You will see
an amplification icon and the Amplify LED appear.
3. Adjust the volume in your earpiece by moving the VOL slide control.
4. In standard use, the amplifier turns off when you hang up.
NOTE: If you want amplifier to remain on continuously, slide the switch on the
underside of the unit to AUTO.
Incoming Voice Tone
Figure 16
Your unit allows you to adjust the tone of incoming sound to
enhance its clarity and help you distinguish between similarsounding words.
1. To identify the tone that best suits your hearing on calls, first press AMPLIFY.
2. Adjust the TONE slide control (figure 16) at the unit’s lower left.
T-Coil Compatible Handset
To eliminate the dissonance of ordinary telephones, your Reizen Amplified Telephone
is expressly designed for T-Coil compatibility. The handset incorporates special
elements that complement your T-Coil for maximum sound clarity.
Audio-Out Jack
Figure 17
12
Your unit allows you to transport your phone conversation to a
neckloop, headset or other assistive-listening device via a 3.5
MM audio jack (figure 17). Simply plug in the jack at the back
of unit and use telephone as you normally would.
WARRANTY
What Your Coverage Includes
• Reizen, Inc. Products are warranted from date of purchase against defects in
materials for a period of one (1) year.
• If a product fails to function properly, return it prepaid and properly packaged to
Reizen, Inc. If the manufacturer determines that a defect of material or in
workmanship exists, the customer's sole remedy will be repair or replacement of the
product at no charge.
• Replacement will be made with a new or re-manufactured product component.
• If the product is no longer available, replacement may be made with a similar product
of equal or greater value.
• All parts including repaired and replaced parts are covered only for the original
warranty period.
• The original purchaser of the product must provide proof of purchase to receive the
warranty service.
• Reizen, Inc. dealers or retail stores who sell Reizen products do not have the right to
alter, modify or in any way change the terms and conditions of this warranty.
What Your Coverage Does Not Include
Your Warranty does not cover normal wear of parts or damage resulting from any of
the following:
• Negligent use or misuse or the product;
• Use on improper voltage or current;
• Any use contrary to the operating instructions;
• Abuse including tampering, damage in transit or unauthorized repair or alterations;
• Acts of God such as fire, flood, hurricanes and/or tornados.
This warranty gives you specific legal rights that vary from country to country,
state to state, province to province, or jurisdiction to jurisdiction.
13
SPECIFICATIONS
REIZEN RE-40 Amplified Telephone
Specifications
FCC Registration #
US: MTCTE00BSPHONE
Ringer Equivalence
1.0 B
Phone Specifications
- 10 one-touch buttons for speed-dialing
- 3 emergency buttons
- Adjustable incoming volume up to 20dB
- Speakerphone
- Tone and volume control
- Super bright ring flasher
- Handset compatible with hearing aid T-coil
- On-hold music, Redial/Pause, flash buttons
- Tone selector for adjusting sound clarity and
distinguishing between similar-sounding words
- Desk or wall mounting
Maximum Gain
15dB (for both High Frequency and Wide Band)
Tone Control Range
200 Hz ~ 4 kHz
Size
26.0 x 7.2 x 31.0 cm.
10.2” x 2.8” x 12.2”
Weight
1.25 kg.
2.75 lbs.
Power requirements
Input: 120V AC, 60 Hz, 12 W
Output: 12V DC, 500 mA
14
IMPORTANT INFORMATION
THE FCC WANTS YOU TO KNOW …
In the unlikely event that your Reizen RE-40 Amplified Telephone causes problems on
the phone line, the phone company can temporarily discontinue your service. If this
happens, the phone company attempts to notify you in advance. If advance notice is
not practical, the phone company notifies you as soon as possible and advises you of
your right to complaint with the FCC.
Also the phone company can make changes to its lines, equipment, operation or
procedures that could affect the operation of this telephone. The telephone company
notifies you of these changes in advance, so you can take the necessary steps to
prevent interruption of your telephone service.
15
REIZEN
™
REIZEN Inc., P.O.Box 3312, Farmingdale, NY 11735
www.ReizenUSA.com
Reizen is a Registered Trademark of Reizen, Inc.
Copyright © 2004 Reizen, Inc. All Rights Reserved.