1
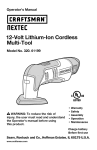
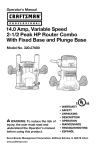
Operator's
Manual
ICRAFTSMA
I
4.0 Amp RECIPROCATING
SAW
Model No. 320.17291
[_
CLIS_TED
US
* WARRANTY
* SAFETY
* DESCRIPTION
* ASSEMBLY
_IL WARNING:
To reduce the risk of
injury, the user must read and
understand the Operator's Manual
before using this product.
Sears Brands Management
IL 60179 U.S.A.
www.craftsman.com
* OPERATION
o MAINTENANCE
o TROUBLESHOOTING
. ESPANOL
Corporation Hoffman Estates,
i_
=[e_[_e_'_
Warranty
Page 2
Safety Symbols
Page 3-4
General Safety Instructions
Page 5-8
Description
Page 9-10
Assembly
Page 10
Operation
Page 10-15
Maintenance
Page 16-17
Troubleshooting
Page 18
Exploded
Page 19-20
View and Parts List
Sears Repair Parts Phone Number
The purpose
of safety symbols
_,
_,
WARNING:
Be sure to read and understand
SAFTY ALERT SYMBOL:
A_, DANGER:
FOR ONE YEAR from the date of purchase, this product is warranted
against any defects in material or workmanship. With proof of purchase,
defective product will be replaced free of charge.
visit the
avoided,
all safety instructions
Indicates
Indicates
DANGER,
with other symbols
in this
an imminently
will result in death or serious
CAUTION:
avoided,
Indicates
an imminently
may result in death or serious
WARNING,
OR CAUTION.
or pictographs
hazardous
situation,
which,
if not
situation,
which,
if not
injury.
WARNING:
Indicates a potentially hazardous
avoided, could result in death or serious injury.
_,
This warranty does not cover the blade, which is an expendable part
that can wear out from normal use within the warranty period.
hazardous
situation,
which,
if not
injury.
Damage Prevention and Information Messages
This warranty is void if this product is ever used while providing
commercial services or if rented to another person.
These inform the user of import information and/or instructions that could lead to
equipment or other property damage if they are not followed. Each message is
preceded by the word "NOTE," as in the example below:
This warranty gives you specific legal rights, and you may also have
other rights which vary from state to state.
Corporation,
dangers.
SYMBOL SIGNAL MEANING
ONE YEAR LIMITED WARRANTY
Sears Brands Management
to possible
manual, including all safety alert symbols such as "DANGER,"
"WARNING,"
and "CAUTION"
before using this reciprocating
saw. Failure to follow all
instructions
listed in this manual may result in electric shock, fire and/or serious
personal injury.
Back Cover
For warranty coverage details to obtain free replacement,
web site: www.craftsman.com
your attention
The safety symbols and the explanations
with them deserve your careful
attention and understanding.
The symbol warnings do not, by themselves,
eliminate any danger. The instructions and warning they give are no substitutes
for proper accident prevention measures.
May be used in conjunction
CRAFTSMAN
is to attract
NOTE: Equipment and/or property damage may result if these instructions are
not followed.
Hoffman Estates, IL 60179
INTRODUCTION
SAVE THESE
_1, WARNING:
To ensure safety and reliability,
at a Sears Parts & Repair Service Center.
INSTRUCTIONS!
READ ALL INSTRUCTIONSZ
This reciprocating
enjoyable. Safety,
making
it easy to maintain and operate.
,_
WARNING:
Some dust created by using power tools contains chemicals
known to the state of California to cause cancer and birth defects or other
reproductive
17291
recommend a Wide Vision Safety Mask for use over
eyeglasses or standard safety glasses with side shields.
Always use eye protection which is marked to comply with
ANSI Z87.1
harm.
Manual_Revised_10
0719
Page 2
be performed
WARNING:
The operation of any power tools can result in
foreign objects being thrown into your eyes, which can result
in severe eye damage. Before beginning power tool
operation, always wear safety goggles or safety glasses with
side shield and a full face shield when needed. We
saw has many features for making its use more pleasant and
performance, and dependability
have been given top priority
in the design of this product,
all repairs should
17291
Manual_Revised_10
0719
Page 3
SAVE THESE INSTRUCTIONS
Some of these following symbols may be used on this tool. Please study them
and learn their meaning. Proper interpretation
of these symbols will allow you
to operate the tool better and more safely.
SYMBOL
NAME
Volts
Voltage
A
Amperes
Current
Hz
Hertz
Frequency
W
Watt
Power
rain
Minutes
A_, WARNING:
the warnings
injury.
DESIGNATION/EXPLANATION
V
GENERAL POWER TOOL SAFETY WARNINGS
Read all safety warnings
and instructions
and instructions.
may result in electric
Failure to follow
shock, fire and/or serious
Save all warnings and instructions for future reference.
(cycles
The term "power tool" in the warnings refers to your mains-operated
power tool or battery-operated
(cordless) power tool.
per second)
(corded)
WORK AREA SAFETY
Time
Keep work area clean and well lit. Cluttered
Alternating
---==
no
]
Direct
Current
Current
Type or a characteristic
No Load Speed
Class
.../rain
Rotational
II Construction
Per Minute
Wet Conditions
Read The Operator's
Manual
Eye Protection
Safety
_lb
No Hands
No Hands
No Hands
No Hands
Alert
Symbol
Symbol
Symbol
Symbol
Hot Surface
17291ManuaLRevised_lO
0719
speed,
Double-insulated
locations.
Do not expose
Do not operate power tools in explosive atmospheres, such as in the
presence of flammable liquids, gases or dust. Power tools create sparks
which may ignite the dust or fumes.
of current
at no load
Keep children and bystanders away while operating a power tool.
Distractions can cause you to lose control.
construction
Revolutions,
strokes, surface
orbits, etc., per minute
Alert
or dark areas invite accidents.
Type of current
speed,
ELECTRICAL SAFETY
Power tool plugs must match the outlet. Never modify the plug in any
way. Do not use any adapter plugs with earthed (grounded) power tools.
Unmodified plugs and matching outlets will reduce risk of electric shock
to rain or use in damp
Avoid body contact with earthed or grounded surfaces such as pipes,
radiators, ranges and refrigerators. There is an increased risk of electric
shock if your body is earthed or grounded.
read and understand
operator's
manual
To reduce the risk of injury, user must
before using this product.
glasses with side shields and a full face
Always wear safety goggles or safety
shield when operating this product.
Precautions
that involve
Do not expose power tools to rain or wet conditions.
power tool will increase the risk of electric shock.
Water entering
a
your safety,
Do not abuse the cord. Never use the cord for carrying, pulling or
unplugging the power tool. Keep cord away from heat, oil, sharp edges
or moving parts. Damaged or entangled cords increase the risk of electric
shock.
blade
in serious
Failure will
to result
keep your
hands personal
away frominjury.
the
Failure will
to result
keep your
hands personal
away frominjury.
the
blade
in serious
blade
in serious
Failure will
to result
keep your
hands personal
away frominjury.
the
•
When operating a power tool outdoors, use an extension cord suitable
for outdoor use. Use of a cord suitable for outdoor use reduces the risk of
electric shock.
•
If operating a power tool in a damp location is unavoidable, use a
residual current device (RCD) protected supply. Use of an RCD reduces
the risk of electric shock.
•
NOTE: The term "residual current device (RCD)" maybe replaced by the
term "ground fault circuit interrupter (GFCI)" or "earth leakage circuit breaker
(ELCB)".
blade
in serious
Failure will
to result
keep your
hands personal
away frominjury.
the
To reduce
avoid
contact
the with
risk of
anyinjury
hot surface.
or damage,
Page 4
17291
ManuaLRevised_lO
0719
Page 5
PERSONAL SAFETY
power tool operation. If damaged, have the power tool repaired before
use. Many accidents are caused by poorly maintained power tools.
Stay alert, watch what you are doing and use common sense when
operating a power tool. Do not use the tool while tired or under the
influence of drugs, alcohol, or medication. A moment of inattention while
operating power tools may result in serious personal injury.
Keep cutting tools sharp and clean. Properly maintained cutting tools with
sharp cutting edges are less likely to bind and are easier to control.
Use the power tool, accessories, tool bits, etc., in accordance with
these instructions, taking into account the working conditions and the
work to be performed. Use of the power tool for operations different from
those intended could result in a hazardous situation.
Use personal protective equipment. Always wear eye protection.
Protective equipment such as dust mask, non-skid safety shoes, hard hat,
or hearing protection used for appropriate conditions will reduce personal
injuries.
Prevent unintentional starting. Ensure that the switch is in the OFF
position before connecting to a power source and/or battery, picking up
or carrying the tool. Carrying power tools with your finger on the switch or
energizing power tools that have the switch on invites accidents.
Remove any adjusting key or wrench before turning the power tool on.
A wrench or a key left attached to a rotating part of the power tool may result
in personal injury.
Do not overreach. Keep proper footing and balance at all times.
enables better control of the power tool in unexpected situations.
This
Dress properly. Do not wear loose clothing or jewelry. Keep your hair,
clothing and gloves away from moving parts. Loose clothes, jewelry or
long hair can be caught in moving parts.
WARNING:
always
injury.
tools, basic safety precautions
to reduce the risk of fire, electric
should
shock, and personal
A
WARNING: The operation of any tool can result in foreign objects being
propelled into your eyes, resulting in severe eye damage. When operating
power tool, always wear safety goggles or safety glasses with side shields and
a full face shield when needed.
A_, WARNING:
If any parts are missing, do not operate the tool until the
missing parts have been replaced. Doing so could result in serious personal
injury.
SERVICE SAFETY
•
If devices are provided for the connection of dust extraction and
collection facilities, ensure that these are connected and properly used.
Use of these devices can reduce dust-related hazards.
Have your power tool
identical replacement
tool is maintained.
serviced by a qualified repair person using only
parts. This will ensure that the safety of the power
Do not force the power tool. Use the correct power tool for your
application. The correct power tool will do the job better and more safely at
the rate for which it was designed.
If any part of this reciprocating
saw is missing or should break, bend, or
fail in any way; or should any electrical component fail to perform properly:
shut off the power switch and remove the saw plug from the power source
and have the missing, damaged, or failed parts replaced before resuming
operation.
Do not use the power tool if the switch does not turn it on and off. Any
power tool that cannot be controlled with the switch is dangerous and must
be repaired.
Tool service must be performed only at a Sears Parts & Repair Service
Center. Service or maintenance performed by unqualified personnel could
result in a risk of injury.
POWER TOOL USE AND CARE
Use only identical
replacement parts when servicing
instructions in the maintenance section of this manual.
Disconnect the plug from the power source and/or the battery from the
power tool before making any adjustments, changing accessories, or
storing power tools. Such preventive safety measures reduce the risk of
starting the power tool accidentally.
Store idle power tools out of the reach of children and do not allow
persons unfamiliar with the power tool or these instructions to operate
the power tool. Power tools are dangerous in the hands of untrained users.
parts or failure to follow
electric shock or injury.
Manual_Revised_lO
0719
Page 6
maintenance
instructions
a tool. Follow the
Use of unauthorized
may create a risk of
SPECIFIC SAFETY RULES FOR RECIPROCATING SAW
Hold power tool by the insulated gripping surfaces when performing
an operation where the cutting accessory may contact hidden wiring
or its own cord. Cutting accessory contacting with a "live" wire may make
exposed metal parts of the power tool "live" and give the operator an electric
shock.
Maintain power tools. Check for misalignment or binding of moving
parts, breakage of parts and any other condition that may affect the
17291
When using power
be followed
17291
Manual_Revised_lO
0719
Page 7
Use clamps or another practical way secure and support the work piece
to a stable platform. Holding the work by hand or against your body leaves
it unstable and may lead to loss of control.
Always remove the plug from the electrical supply before changing the
saw blade and/or adjusting the saw base.
The saw blade must be secured
securely locked before use.
KNOW YOUR RECIPROCATING SAW (Fig. 1)
Fig. 1
in the blade clamp. Check that it is
Tool-less
External
Accessible
Brushes
Blade
Clamp
Live Tool
Indicator
Make certain all adjusting screws and the blade clamp are tight before
making a cut. Loose adjusting screws and holders can cause the tool or
blade to slip and loss of control may result.
Check that the switch is "OFF"
starting could cause injury.
before
plugging the tool
in. Accidental
Secure material before cutting. Never hold it in your hand or across legs.
Small or thin material my flex or vibrate with the blade, causing loss of
control.
Never touch the saw blade after immediate
prolonged use.
Shoe Assembly
LED Work Light
Trigger Switch
PRODUCT
SPECIFICATIONS
use. It may be hot after
Always wear safety goggles or eye protection when using this tool. Use
a dust mask or respirator or connect the tool with an external dust vacuum if
the cutting generates a great amount of dust.
Motor
120V ~ 60 Hz,4A
Keep hand away from cutting area. Do not reach under the material
being cut. The proximity of the blade to your hand is hidden from your sight.
No load Speed
0-3500
Blade stroke
1/2 in.
Do not use dull or damaged saw blades and accessories.
Weight
4 Ibs. (1.8kg)
_i,
WARNING:
The safe use of this product
Strokes/Min
requires an understanding
of the
information on the tool and in this operator's manual, as well as knowledge of
the project you are attempting. Before use of this product, familiarize yourself
with all operating features and safety rules.
BARREL-STYLE GRIP
The barrel-style
EXTERNAL
grip is designed
ACCESSIBLE
External accessible
brushes
for one-handed
use.
BRUSHES
extend the life of the saw.
LED WORKLIGHT
The saw has a built-in LED worklight that illuminates
depressed. This feature is convenient when working
additional light is needed.
17291
Manual_Revised_lO
0719
Page 8
17291
Manual_Revised_lO
0719
when the trigger switch is
in close or tight areas where
Page 9
TOOL-LESS
BLADE CLAMP
Your saw has a blade clamp design that does not require the use of a blade
wrench when installing or removing the blade.
VARIABLE
SPEED TRIGGER
A_, WARNING: Do not allow familiarity with this product to make you careless.
Remember that a careless fraction of a second is sufficient to inflict serious
SWITCH
injury.
The variable speed switch delivers higher speed with increased trigger switch
pressure and lower speed with decreased trigger switch pressure.
LIVE TOOL INDICATOR
LED shines green when the tool is plugged
into a power source.
_, WARNING: Always wear safety goggles or safety glasses with side shields
when operating power tools. Failure to do so could result in objects being
thrown into your eyes resulting in possible serious injury.
_,
WARNING:
by Craftsman
recommended
_i,
WARNING:
lie]
_I
[e]__
If any parts are broken or missing, do not attempt
to plug in the
power cord or operate the reciprocating
saw until the broken or missing
are replaced. Failure to do so could result in possible serious injury.
parts
Do not use any attachments
or accessories
for this product. The use of attachments
can result in serious personal injury.
not recommended
or accessories
APPLICATIONS
You may use this product
for the purposes
listed below:
•
Cutting all types of wood products
board, and hard wood).
accessories not recommended
for use with this saw. Any such alteration or
modification
is misuse and could result in a hazardous condition leading to
possible serious injury.
•
Cutting
•
Cutting drywall.
UNPACKING
•
Cutting metals such as sheet steel, pipe, steel rods, aluminum,
copper.
_i,
WARNING:
This product
Do not attempt
has been shipped
to modify this reciprocating
completely
Carefully remove the tool and any accessories
all items listed in the packing list are included.
•
Inspect the tool carefully
during shipping.
•
If any parts are damaged or missing,
the back page of operator's manual.
PACKING
from the box. Make sure that
to make sure no breakage
Do not discard the packing material
satisfactorily operated the tool.
saw or create
paneling,
composition
and plastic.
brass, and
until you have carefully
BLADES
occurred
inspected
please refer to the numbers
saw, 1pc wood cutting
Note: A wood cutting blade is attached in shipment; other blades, such as metal
cutting blade and plastic cutting blades are available separately.
SELECTING
or damage
and
listed on
LIST
1pc 4A Reciprocating
Masonite
(lumber, plywood,
assembled.
•
•
not
blade, soft bag, operator's
manual
Selecting the correct type of blade is important in order to obtain the best
performance from the saw. Select the blade based on the application and on
the material you wish to cut. Selecting the right blade will give you a smoother,
faster cut and prolong the life of the blade.
Blades with fewer teeth, e.g.,10 teeth per inch (TPI) are typically used for
cutting wood; blades with more teeth are better for cutting metal or plastic.
recommend
14 TPI for plastics and soft metals and 18 TPI for hard metals.
_lk WARNING:
This saw should
We
not be used for pruning or with a pruning
blade. Failure to heed this warning could cause loss of control and can result in
possible serious injury.
17291
Manual_Revised_10
0719
Page 10
17291
Manual_Revised_10
0719
Page 11
INSTALLING/REMOVING
LED WORKLIGHT (Fig. 4)
BLADE (Fig. 2)
1.
Unplug the saw.
Fig. 2
2.
Rotate the blade clamp
counterclockwise
and hold
Blade clamp
Blade
to open.
3.
Your reciprocating
saw has
a built-in LED worklight to
illuminate the cutting area.
To activate the LED worklight,
plug in your reciprocating
saw
and depress the trigger switch.
Insert saw blade until it is
fully seated.
The LED worklight will turn
off when the trigger switch is
released.
Note: Blade can be installed
with teeth facing up or down.
4.
Release the blade clamp to secure the blade.
5.
To remove the blade, rotate the blade clamp counterclockwise
the blade.
and remove
1.
WARNING:
Cutting into
Fig. 5
2. Clearly mark the line of cut.
3.
Make sure that the saw
blade is clear of any foreign
material and that the power
cord and extension cord are
VARIABLE SPEED (Fig. 3)
_i,
Secure the workpiece to a
work bench or table with a
vise or with clamps.
Fig. 3
To turn the saw off, release the
trigger switch.
The variable speed trigger
switch delivers higher speed
with increased trigger pressure
and lower speed with decreased
trigger pressure.
LED Worklight
OPERATING THE SAW
(Fig. 5 & Fig. 6)
TURNING THE SAW ON/OFF (Fig. 3)
To turn the saw on, depress the
trigger switch.
Fig. 4
out of the blade path.
4.
|
J
Trigger switch
electrical wiring in walls can
cause the metal surface of the
saw to become electrically live. Do not touch metal parts when cutting into a
wall; grasp only the insulated gripping surfaces provided on the tool. Make sure
hidden electrical wiring, water pipes, and mechanical hazards are not in the
blade path when cutting into a wall.
Hold the saw firmly in front
and away from you.
Note: The barrel-style grip of
this saw is designed for onehanded use only. Keep your
other hand away from the saw
and the cutting area of the
workpiece.
Fig. 6
5. Depress the trigger switch to
start the cutting action.
6.
Set the shoe assembly
against the workpiece.
7.
Move the blade into the
workpiece.
Note: Do not force. Use only
enough pressure to keep the
saw cutting. Let the blade and
saw do the work. Press the base against the workpiece
17291
Manual_Revised_10
0719
Page 12
17291
Manual_Revised_10
0719
throughout
the cut.
Page 13
PLUNGE
_,
CUTTING
WARNING:
plunge cutting.
_,
METAL CUTTING (Fig. 8)
WOOD OR WALL BOARD (Fig. 7)
Blades longer than 6 in. can whip and should not be used for
Failure to heed this warning can result in serious
WARNING:
Cutting into electrical
personal
injury.
wiring can cause the blade, the blade
clamp, and the saw bar assembly to become electrically live. Do not touch metal
parts when cutting into a wall; grasp only the insulated surfaces on the tool.
Make sure hidden electrical wiring, water pipes, and mechanical hazards are not
in the blade path when cutting into a wall.
You may cut metals, such as
sheet steel, pipe, steel rods,
aluminum, brass, and copper,
with this saw.
Observe the following tips when
metal cutting:
•
Be careful not to twist or
bend the saw blade.
1.
Secure the workpiece
2.
Mark the line of cut clearly.
Do not force the tool; use a
slow speed setting.
3.
Make sure the saw blade is clear of any foreign material and that the power
cord and extension cord are out of the blade path.
Use cutting oil when cutting
soft metals and steel.
4.
Hold the saw firmly in front
of and away from you.
Cutting oil also keeps the blade cool, increases cutting
blade life.
5.
Choose a convenient
starting point inside the
cutting area and place the
tip of the blade over that
point, but not touching the
workpiece.
6.
7.
to a work bench or table with a vise or with clamps.
A
AI_ WARNING:
fumes.
since normal sparking
of motor could ignite
Clamp the workpiece firmly and cut close to the clamping point to eliminate
any workpiece vibration. When cutting conduit pipe or angle iron, clamp the
workpiece in a vise if possible and cut close to the vise. To cut thin sheet
material, "sandwich" the material between two sheets of plywood and clamp
the layers to eliminate vibration and material tearing.
Rest the front edge of the
shoe assembly on the
workpiece and hold it firmly
in position as you begin the
cut
Always
keep firm pressure on the shoe assembly
against the workpiece.
With the saw blade above
the workpiece and the front edge of the shoe resting on the workpiece,
the trigger switch and allow the saw blade to reach full cutting speed.
A_, WARNING:
Make sure the blade does not touch the workpiece
motor reaches full speed. Failure to heed this warning
control of the saw and result in serious injury.
8.
Pivot the saw blade downward
workpiece.
9.
Allow the saw to penetrate
Manual_Revised_lO
0719
press
until the
can cause you to lose
until the tip of the blade starts cutting the
the workpiece.
10. Tilt the saw until the blade is perpendicular
17291
Never use gasoline,
action, and prolongs
to the workpiece.
Page 14
17291
Manual_Revised_lO
0719
Page 15
_,
A_, WARNING:
by a qualified
To ensure safety and reliability,
service technician
A_, WARNING:
reciprocating
cleaning.
all repairs should
LUBRICATION
be performed
at a Sears Service Center.
All of the bearings in this product are lubricated with a sufficient amount of
high grade lubricant for the life of the unit under normal operating conditions.
Therefore, no further lubrication is required.
For your safety, always turn off the switch and unplug the
saw from the power source before performing
any maintenance
or
Periodic maintenance of your reciprocating
saw allows for long life and troublefree operation. The saw can generate considerable quantities of cutting residue.
A cleaning
and maintenance
schedule
As a common-sense
and preventive
recommended
steps:
•
Inspect the blade; check
should
be maintained.
maintenance
practice,
it for wear or damage.
Use a soft clean and damp cloth to wipe the tool housing. A mild detergent
can be used, but use nothing like alcohol, gasoline or other cleaning agents.
Never use caustic agents to clean plastic parts.
A_, WARNING:
Always wear safety goggles
during power tool operations
wear a dust mask.
,_, WARNING:
blade to cool before removing
or safety glasses with side shields
or when blowing dust. If operation
When changing
a blade immediately
it to avoid possible
The reciprocating
saw is
equipped with externally
accessible brushes.
BRUSH
\
is dusty, also
after operation,
1.
Unplug the saw.
2.
Remove brush caps
(2) using a flat blade
screwdriver.
3.
BRUSH
Remove brush assemblies
(2).
4.
CAP
ASSEMBLY
BRUSH
CAP
Check for wear. Replace
both brush assemblies when
BRUSH
ASSEMBLY
either has less than 1/4 in.
length of carbon brush remaining.
Note: Do not replace one side without
replacing
the other.
5.
Reassemble using new brush assemblies. Make sure curvature of brush
matches curvature of motor and that brush moves freely in brush tube.
6.
Replace caps.
7.
Tighten all brush caps securely.
Do not over-tighten.
allow the
burning.
_h, WARNING:
Keep the air vents unclogged
_,
Avoid using solvents when cleaning
WARNING:
BRUSH REPLACEMENT (Fig. 9)
To replace:
follow these
Keep the ventilation slots of the motor clean to prevent overheating of the
motor. Electric tools are subject to accelerated wear and possible premature
failure when they are used to work on fiberglass, wallboard, spackling
compounds
or plaster. The chips and grindings from these materials
are highly abrasive to electrical tool parts, such as bearings, brushes,
commutators,
etc. Consequently,
it is not recommended
that this tool be
used for extended work on any fiberglass material, wallboard, spackling
compound,
or plaster. During any use on these materials, it is extremely
important that the tool is cleaned frequently by blowing with an air jet.
•
WARNING: Water must never come into the tool.
and clean at all times.
plastic parts. Most plastics
are susceptible to damage from various types of commercial solvents and may
be damaged by their use. Use clean cloths to remove dirt, dust, oil, grease, etc.
A_, WARNING:
Do not at any time let brake fluid, gasoline,
products, penetrating
can damage, weaken
injury.
17291
Manual_Revised_lO
0719
petroleum-based
oils, etc. to come in contact with plastic parts. Chemicals
or destroy plastic which may result in serious personal
Page 16
17291
Manual_Revised_lO
0719
Page 17
4.0 A RECIPROCATING
PROBLEM
CAUSE
SOLUTION
Motor overheating
Be sure cooling vents
are free from dust and
Clean and clear vents.
Do not cover vents with
obstacles,
hand during operation.
17291
Manual_Revised_lO
0719
Page 18
SAW MODEL
NUMBER
The Model Number will be found on the Nameplate.
Number when ordering parts for this tool.
17291
Manual_Revised_lO
0719
320.17291
Always mention
the Model
Page 19
4.0 A RECIPROCATING
SAW MODEL
NUMBER
The Model Number will be found on the Nameplate.
Number when ordering parts for this tool.
320.17291
Always mention
the Model
27
5700003000
Ball Bearing
1
28
3421035000
Gear Case Cover
1
29
4870458000
Trigger Switch
1
30
4930423000
Terminal
1
31
3125578000
Guide Bush
1
32
4930074000
Socket
1
1
2740287000
Stator
1
2
2822974000
Motor Assy
1
3
5690231000
O Ring
1
33
5610024000
Tapping
4
2822975000
Pinion Assy
1
34
3120234000
Cord Anchorage
1
35
4930004000
Connecter
1
Screw
2
5
2822973000
Gear Assy
1
6
5690016000
O Ring
1
36
4540017000
Power Supply
7
5700022000
Needle Bearing
1
37
3125413000
Transparent
8
3550214000
Crank Roller
1
38
4890695000
PCB Assembly
1
9
3421052000
Drive Bracket
1
39
3125600000
Brush Cover
2
10
3704639000
Clip
1
40
4960283000
Carbon
2
11
3421162000
Clamp Collar
1
41
2800182000
Brush Holder Assy
2
12
3551410000
Bush
1
42
3321027000
Left Housing
1
13
3660424000
Torsion
1
43
3125510000
Transparent
14
3125030000
Sleeve
1
44
5610103000
Tapping
15
5660032000
Circlips
1
45
5620041000
Screw
3
16
3551448000
Plunger
1
46
5650007000
Spring Washer
3
17
5670268000
Detent
1
47
3125412000
Decorate
Cover
1
18
5670270000
Located
1
48
5620449000
Hexagon
Socket
19
5670292000
Pin
1
49
3650113000
Pivot Shoe
1
20
5650364000
Washer
1
50
3810008000
Jigsaw
Blade
1
21
5690206000
Rubber
1
51
3321028000
Right Housing
1
22
5700193000
Oil Impreging
2
52
2822966000
Internal
1
23
5620399000
Hexagon
2
53
4930008000
Sleeve
2
24
3421034000
Gear Case
1
54
3121045000
Cord Guard
1
25
3704850000
Felt Ring
1
55
3550165000
Parallel Pin
1
26
3125556000
Dust Cover
1
56
3125625000
Rubber
2
17291
ManuaLRevised_10
0719
Spring
For Shaft
Pin
Pin
Ring
Bearing
Socket
Screw
Page 20
17291
ManuaLRevised_10
0719
Indicator
Cap
1
Brush
Cap
1
Screw
Wire Assy
Pole
1
13
Set Screw
2
Page 21
[_:e) i =
57
4810002000
Power Cord & Plug
1
58
4930064000
Shark Teeth Terminal
2
59
4860005000
Inner Wire
2
60
4930061000
Shark Teeth Terminal
2
61
4930038000
Receptacle
1
17291
Manual_Revised_lO
0719
Page 22
17291
Manual_Revised_lO
0719
Page 23
Your Home
For troubleshooting, product manuals and expert advice:
managemylife
www.managemylife.com
For repair - in your home - of all major brand appliances,
lawn and garden equipment, or heating and cooling systems,
no matter who made it, no matter who sold it!
For the replacement parts, accessories and
owner's manuals that you need to do-it-yourself.
For Sears professional installation of home appliances
and items like garage door openers and water heaters.
1-800-4-MY-HOME
®
Call anytirne, day or night
(1-800-469-4663)
www.sears.com
(U.S.A. and Canada)
www.sears.ca
Our Home
For repair of carry-in items like vacuums, lawn equipment,
and electronics, call anytime for the location of the nearest
Sears Parts & Repair Service Center
1-800-488-1222 (U.S.A.)
www
1-800-469-4663 (Canada)
.sears .com
www .sears
.ca
To purchase a protection agreement on a product serviced by Sears:
1-800-827-6655 (U.S.A.)
Para pedir serviciode reparacidn
a domicilio,y para ordenar piezas:
1-888-SU-HOGAR®
1-800-361-6665 (Canada)
Au Canada pour service en frangais:
1-800-LE-FOYERMc
(1-800-533-6937)
(1-888-784-6427)
www.sears.corn
® Registered
® Marca
Mc Marque
Trademark
Registrada
/
/
T_
4 Trademark
www.sears.ca
Se lrs
of KCD IP, LLC in the
United States,
_ Marca de F_brica
de KCD IP, LLC en Estados
de commerce
/ MDMarque d_pos_e de Sears Brands, LLC
Unidos,
or Sears Brands,
o Sears
Brands,
LLC in other countries
LLC in otros
pa[ses