1
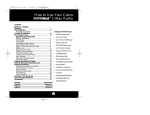
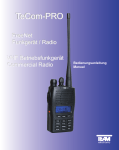
PMR250-UK.qx
6/17/99 2:55 PM
Page 1
How to Use Your Cobra
MicroTalk 2-Way Radio
Contents
Section A - English:
Features.....................................................................................1
The PMR Story........................................................................A1
Included Accessories
Controls & Indicators ..........................................................A2
Our Thanks to You ................................................................A3
Operating your MicroTalk
Battery Installation............................................................2
LCD Display ..........................................................................4
Turning On............................................................................5
Auto Battery Power Saver...............................................5
Select Main Channel (1-8)...............................................6
Select CTCSS Subchannel (00-38)................................6
Battery Low ..........................................................................9
Calling Another Party .......................................................10
Talking To Another Party .................................................12
Talk Confirmation Tone....................................................14
Listening For Another Party ...........................................14
Auto Squelch.......................................................................15
Maximum Range Extender.............................................15
MicroTalk Range................................................................16
Making Life Easier And Safer ..........................................17
External Microphone/Speaker Jack ............................19
Advanced Features ..............................................................20
Ringer.....................................................................................22
Tone Settings.......................................................................24
Lock Function......................................................................26
Caring for Your MicroTalk ................................................27
MicroTalk Specifications ..................................................28
Accessories ..............................................................................30
Features of This Product
• UHF FM Frequencies
• No Air-time Fees
• Up to 3 km (2-mile) Range
• 8 Main Channels
• 38 CTCSS Subchannels
• LCD Function Display
• Talk Confirmation Tone
• Call/Ring Button
• Recharging Pads
• Retractable Antenna
• Auto Battery Saver Circuity
• Auto Squelch
• Lock Key
• Ring Notification
• Wrist Strap/Belt Clip
Deutsch..........................................................Abschnitt B
Español..............................................................Sección C
Français..............................................................Section D
Italiano..............................................................Sezione E
1
PMR250-UK.qx
6/17/99 2:55 PM
Page 2
Operation
Operation
Install Batteries
Battery
Installation
1
Note
Batteries not included with
MicroTalk 2-way radio.
Clear antenna.
Note
Always use high-quality
alkaline or NiMH batteries.
Incorrect positioning can
damage both the batteries
and the unit.
Only the Cobra NiMH
battery pack (part no.
PMR-BP) can be recharged
via the Desktop Charger
(part no. PMR-CH).
3
A.
B.
2
2
Pull lock tab down
and lift door up
(towards you) to
remove battery
cover.
4
See Accessories on page 30.
Charge ports for recharging
NiMH (Nickel Metal
Hydride) battery pack are
located on back of unit.
Insert four “AAA”
batteries. Position
batteries according
to polarity markings.
Note
When batteries are low or
need charging the
BATT LOW indicator will
blink. Replace alkaline
batteries or recharge NiMH
battery pack.
Remove belt clip by (A.) pulling tab out and
(B.) sliding belt clip up and off unit.
3
PMR250-UK.qx
6/17/99 2:55 PM
Page 4
Operation
Operation
LCD Display
LCD Display
Turning
On Your
MicroTalk
Turning On Your MicroTalk
Rotate ON - OFF Volume Control
clockwise.
An audible “tone” will indicate that the unit is on.
The LCD will go through a 3-second self-test and
then go to operational mode.
Note
Whenever the unit is on you
can receive communications.
Operational Mode
Auto Battery Power Saver
Auto Battery
Power Saver
Your MicroTalk has a unique circuit designed to
extend battery life. If there are no transmissions
within 10 seconds, the unit will automatically
switch to battery save mode.
Note
The Auto Battery Save
Circuit does not affect the
unit’s ability to receive
incoming transmissions.
The
4
icon will flash.
5
PMR250-UK.qx
6/17/99 2:55 PM
Page 6
Operation
Operation
Select Main Channel (1-8)
Select Main
Channel
1
Note
Rotate ON - OFF Volume Control
clockwise.
An audible “tone” will indicate that the unit is
on.The LCD will go through a 3-second selftest and then go to operational mode.
Units must be on same
channel and subchannels
to communicate.
Select CTCSS Subchannel (00-38) continued Select CTCSS
Subchannel
1 Rotate ON - OFF Volume Control
clockwise.
An audible “tone” will indicate that the unit is on.
The LCD will go through a 3-second self-test and
then go to operational mode.
Note
If you push and hold the
button,the LCD display will
cycle through the different
functions.
Note
Push and hold the
buttons for fast channel
advance.
Note
2
Select channel by pushing and releasing either
button.
2
Select main channel by pushing and releasing
either
button.
3
Push and release
button. Small numbers
flash next to channel display on LCD.
To return to operational
mode and not save your
last setting push and
release button.
Select CTCSS Subchannel (00-38)
Select CTCSS
Subchannel
The CTCSS (Continuous Tone Controlled Squelch
System) is a great convenience when you are in an area
with many radios.It acts like a gate to transmissions
from other radios.Once your radio is set to a CTCSS
code,you will only hear transmissions from other radios
on the same channel and the same CTCSS code.
continued
6
7
PMR250-UK.qx
6/17/99 2:55 PM
Page 8
Operation
Operation
Select CTCSS
Subchannel
Select CTCSS Subchannel (00-38) continued
Battery Low
Battery Low
Note
Note
4
Push and hold the
buttons for fast channel
advance.
Select subcode number by pushing and releasing
either
button.
When battery capacity is at
the 1/4 level it is recommended that you replace
alkaline batteries or
recharge your NiMH (Nickel
Metal Hydride) battery pack.
When the unit is in normal use the
icon may
begin flashing. This is a warning to you that your
batteries are getting low.
Only the Cobra NiMH
battery pack (part no.
PMR-BP) pack can be
recharged via the
Desktop Charger (part
no. PMR-CH).
Replace alkaline batteries as soon as possible
and/or recharge NiMH battery pack.
Note
5
8
NiMH rechargeable battery
Pack (item no. PMR-BP) and
2 port desktop charger
(item no. PMR-CH) are not
included with this unit.
See Accessories section on
page 30.
When desired code is displayed push and
release button. If key stroke tone is on,
an audible tone will confirm your selection.
9
PMR250-UK.qx
6/17/99 2:55 PM
Page 10
Operation
Calling
Another
Party
Operation
Calling Another Party
To alert another party that you wish to
communicate:
Note
3
1
Turn on your MicroTalk 2-way radio.
An audible “tone” will indicate that the unit is
on. The LCD will go through a 3-second selftest and then to operational mode.
2
10
Select desired channel by pushing and
releasing either
button.
Both the calling and receiving units must be on same
channel and subchannel for
the call function to work.
Note
Your incoming “Call”audio
ringing level is dependent on
your unit’s volume setting.
4
Push and release
button. The indicator
icon will flash and the icon will remain on
for 3 seconds. The unit you are calling will emit
a 2 second ring tone.
5
Wait for the party’s response or proceed to
“Talking To Another Party” section on next
page.
Place antenna in full
upright position.
11
PMR250-UK.qx
6/17/99 2:55 PM
Page 12
Operation
Talking to
Another
Party
Operation
Talking To Another Party
To send your outgoing message:
3
Push and hold
4
The
Note
While PTT button is
depressed you cannot
receive incoming calls.
button.
Note
Both units must be on same
channel to communicate.
1
Turn on your MicroTalk 2-way radio.
An audible “tone” will indicate that the unit is
on.The LCD will go through a 3-second selftest and then go to operational mode.
2
Place antenna in full
upright position.
5
12
icon will appear.
Hold mic about
5 cm from mouth.
Speak in
a normal voice.
6
Release button
and listen for
response.
Note
When you release the
PTT button,the person you
are talking to will hear a
tone indicating that it’s OK
to talk. See Talk
Confirmation Tone section
on page 14.
13
PMR250-UK.qx
6/17/99 2:55 PM
Page 14
Operation
Talk
Confirmation
Tone
Operation
Auto Squelch
Talk Confirmation Tone
Your listener will hear an
audible tone when you
release the PTT button.
Your MicroTalk is equipped with Auto Squelch,
which automatically shuts off weak transmissions
and unwanted noise due to ter rain conditions or
if you have reached your range limit.
This alerts the other party
that you have finished talking
and it’s OK for them to begin
talking.
Maximum Range Extender
Auto squelch can be temporarily removed
to allow all signals to enter by pressing the
button (Maximum Range Extender).
Auto Squelch
Maximum
Range
Extender
Listening For Another Party
Listening For
Another Party
When you have finished talking:
Listening
mode.
Note
While PTT button is
depressed you cannot receive
incoming communications.
Note
To learn more about the
range of your MicroTalk,
see MicroTalk Range
Section on page 16.
1
Push and hold the
button for 1 second to
allow all signals to enter.
Range is dependent on
battery condition and
the features of the terrain.
Release button to receive incoming
transmissions.
Your MicroTalk is always in listening mode when
the PTT button is not pressed and you are not in
function mode. See Advanced Features section
on page 20.
1
14
15
PMR250-UK.qx
6/17/99 2:55 PM
Page 16
MicroTalk Range
MicroTalk
Range
Making Life Easier and Safer
MicroTalk Range
Your MicroTalk Radio has a range of up to 3 km
(2miles). This effective range may be shortened
under some conditions.
MicroTalk
2-Way Radio
Can Make
Life Easier
and Safer
MicroTalk 2-Way Radio Can Make Life
Easier and Safer
As you become familiar with your MicroTalk
Radio you will find many of your own uses for
the unit.
Some suggestions include:
1. Under flat, open
conditions you will
experience the
MicroTalk’s maximum range.
2. Range can be
reduced by buildings
and foliage in the
path of the signal.
3. Range will be
further reduced by
dense foliage and
hilly terrain.
To achieve maximum
range the auto squelch
can be overridden.
Refer to Maximum
Range Extender section
on page 15.
16
1. Talking with fellow
hikers.
2. Keeping track of
your family and
friends in a
shopping centre.
continued
17
PMR250-UK.qx
6/17/99 2:55 PM
Page 18
Making Life Easier and Safer
MicroTalk
2-Way Radio
Can Make
Life Easier
and Safer
MicroTalk 2-Way Radio Can Make Life
Easier and Safer continued
External Microphone/Speaker Jack
External Microphone/Speaker Jack
External
Microphone/
Speaker Jack
Your MicroTalk 2-Way Radio can be fitted with
an external microphone/speaker (not included),
freeing your hands for other tasks.
To attach the external microphone/speaker:
Note
Note
In some countries it may
be illegal to use a hand
held radio whilst driving a
motor vehicle.
3. Communicating
between different
floors of a building.
4. Talking to a
neighbour or a
friend.
5. Checking on
travelling companions in another car.
6. Agreeing on a
meeting spot after
an event.
18
External microphone/
speaker (item #FA-SM) is
not included with this unit.
See Accessories section on
page 30 for available units.
1
Open Mic/Spkr tab on top of unit.
2
Insert plug into the Mic/Spkr jacks.
19
PMR250-UK.qx
6/17/99 2:55 PM
Page 20
Advanced Features
Advanced
Features
Note
When using or programming
functions,pushing and
releasing the
button or
the
button will save all
entered information.
Advanced Features
Advanced Features
Your MicroTalk has many advanced features
not found on other 2-way radios.
These include:
• Ring Notification Modes
• Tone Indicator Settings
• Key Stroke Tone
• Talk Confirmation Tone
• Lock Key
Note
To exit out of function mode
and return to operational
mode without saving entered
information simply press the
button.
Note
If you push and hold the
button,the MicroTalk
will cycle through the different functions.
If after 10 seconds no selection is made, the unit will
return to operational mode.
20
21
PMR250-UK.qx
6/17/99 2:55 PM
Page 22
Advanced Features
Ringer Modes
Advanced Features
Ringer Modes
Your MicroTalk will signal you that there is an
incoming transmission with a ring tone. To set
Ringer:
Ringer Test
To test the ringer mode:
Note
1
Rotate ON - OFF Volume Control
clockwise.
An audible “tone”will indicate the unit is on
and then the LCD will go through a 3 second
self-test and then go to operational mode.
2
Push and hold
3
Quickly push and release
ring for 5 seconds.
Unit must be in operational
mode to test ring.
22
button.
button. Unit will
23
PMR250-UK.qx
6/17/99 2:55 PM
Page 24
Advanced Features
Tone
Settings
Note
The Key Stroke Tone and
Talk Confirmation Tone can
be temporarily turned on or
off at any time while in
operational mode.
Tone Setting
The Key Stroke Tone and Talk Confirmation Tone
can be temporarily turned on or off during the
operation of your MicroTalk 2-Way Radio.
Advanced Features
Talk Confirmation Tone Indicator
To temporarily eliminate the Talk Confirmation Tone:
Key Stroke Tone Indicator
You will hear an audible tone when any button is
pushed (except PTT button). To turn the audible
tone on or off:
Note
1
Push and release
button until
icon flashes.
For more information see
Talk Confirmation Tone
section on page 14.
Note
1
Push and hold
button until
icon
disappears from the LCD display.
2
Push and release either
button until
icon appears in the LCD display.
To restore the Talk
Confirmation Tone repeat
steps 1- 3 as shown to
the left.
Note
When you push and hold
the PTT button,the unit
exits out to operational
mode.
2
24
To return to the audible mode, push and hold
button until
icon appears in the LCD
display.
3
Push and hold
disappear.
button.
icon will
If after 10 seconds no selection is made, the unit will
return to operational mode.
25
PMR250-UK.qx
6/17/99 2:55 PM
Page 26
Advanced Features
Caring for Your MicroTalk Radio
Lock Function
Caring for Your MicroTalk Radio
The purpose of the LOCK function is to lock most
buttons to avoid accidental operation.
The MicroTalk 2-Way Radio will give you years
of service if cared for properly.
To engage the LOCK function:
Here are some suggestions:
Lock Function
Note
Call button, Range Extender
button and PTT button
do not lock and are fully
operational while the unit
is locked.
1
The unit cannot lock while
in function mode.
2
26
Push and release
button.
Most buttons are locked.
To “unlock” push and release
Buttons are “unlocked” and
Caring
for Your
MicroTalk
Radio
icon flashes.
1. Handle unit
gently.
2. Keep away
from dust.
3. Never place the
unit in water or in
a damp place.
4. Avoid exposure
to extreme
temperatures.
button again.
icon disappears.
27
PMR250-UK.qx
6/17/99 2:55 PM
Page 28
MicroTalk Specifications
MicroTalk Specifications
C.TRANSMITTER
I.GENERAL SPECIFICATIONS
A.FREQUENCY
PMR
Channel
1
2
3
4
5
6
7
8
Channel
Frequency
In MHz
446.00625
446.01875
446.03125
446.04375
446.05625
446.06875
446.08125
446.09375
1. EFFECTIVE RADIATED POWER
UNIT
mW
500
2. CARRIER FREQ.STABILIT Y
Hz
500
3. MODULATION LIMITING
kHz
2.5
4. CARRIER ATTACK TIME
ms
80
5. AUDIO FREQUENCY RESPONSE
@ 300 HZ
@ 3000 HZ
dB
dB
-6
-6
6. AUDIO DISTORTION
%
3
7. HUM and NOISE
dB
45
8. TRANSIENT FREQ.BEHAVIOR
a) TX ON
b) TX OFF
ms
ms
30
5
B. RECEIVER
UNIT
1. SENSITIVITY
FOR 12 DB SINAD
FOR CALL SIG.DETECTION
28
µV
µV
0.25
0.2
2. MAX. AUDIO OUTPUT @10% THD
mW
100
3. MAX.S/N RATIO @ 1mV RF INPUT
dB
45
4. SQUELCH
a) SENS.
b) ATTACK TIME
c) CLOSING TIME
µV
ms
ms
0.2
120
200
5. AUDIO FREQUENCY RESP.
@ 300 HZ
@ 3000 HZ
dB
dB
-6
-6
6. SIGNAL DISPLACEMENT BW
+/-kHz 5
7. ADJACENT CH.REJECTION
dB
55
8. INTERMODULATION REJECTION
dB
55
9. SPURIOUS RESPONSE REJECTION
dB
65
D. POWER SUPPLY
1. BATTERY LIFE (1:1:18 RATIO)
2. BATTERY
HR
24
V
4.8 - 6.0
The use of this 2-way radioproduct
involves the public airways and its use may
be subject to local laws, regulations, and
ordinances. Before using the product you
should check to see that the contemplated
use does not violate any local law, regulation or ordinance that may be applicable.
29
PMR250-UK.qx
6/17/99 2:55 PM
Page 30
Accessories
Notes
(1) NiMH Rechargeable
Battery Pack
High performance Nickel
Metal Hydride battery pack for
multiple recharging
PMR-BP
2 Port Desktop Charger
Charges your MicroTalk Radio
and (1) NiCad battery pack
PMR-CH
Carrying Case
Durable case perfectly fits your
MicroTalk radio
PMR-CCB
Ear Bud Mic with PTT
Integrated speaker/mic adapter
that fits in your ear. Includes
shirt clip.
PMR-EBM
Lapel Microphone
Remote microphone/speaker
connection.
PMR-SM
Replacement Belt Clip
PMR-BC
You Can Find These High-Quality Accessories
At Your Local Cobra Dealer.
Vox Mic
VOX (Voice Operated
Transmitter) adapter allows
you hands-free operation.
PMR-VOX
30
31
PMR250-UK.qx
6/17/99 2:56 PM
Page 32
Private Mobile Radio
2-Way Radio
Cobra MicroTalk PMR 250
Betriebsfunkgerät für
Gegensprechbetrieb
Radio móvil privada
bidireccional
Cobra MicroTalk
PMR 250
© 1999 Cobra Electronics Corporation
6500 West Cortland Street
Chicago, Illinois 60707
Appareil de
radiocommunications
à usage privé
www.cobraelec.com
Ricetrasmettitore
portatile per
uso privato
“Ingenious Products for Easier Communication.”
PMR250-UK.qx
6/17/99 2:56 PM
Page 34
The Private Mobile Radio Story
The Private Mobile Radio Story
Ever wish you could talk to someone who wasn’t
within earshot? Like contacting ski partners back
at the lodge? Or letting a friend know how to find
you in a busy shopping centre? Cobra’s MicroTalk
radios are a great way for friends or family to
increase their fun - and safety - by staying in touch
while on the go and they are perfect for business
use as well, such as office to warehouse communications.
1
2
The ERC (European Radiocommunications
Committee) has created 8 channels, called Private
Mobile Radio (PMR). These channels are in the
UHF (Ultra High Frequency) band which means
great penetration through buildings, thick forests,
hills, and other dense structures. They are also FM
(Frequency Modulation) signals which means
crystal-clear reception even in crowded noisy
environments.
Included with your MicroTalk
1. Removable Belt Clip
2. Wrist Strap
A1
PMR250-UK.qx
6/17/99 2:56 PM
Page 35
Controls and Indicators
Controls and Indicators
1. Retractable Antenna
2
2. Belt Clip
1
3. On/Off Volume Control
3
1
4. Microphone Jack
4
5
5. Speaker Jack
6. Battery Charge Pads
7. Lock Button
8. LCD Display
9. Enter Button
10. Function Button
11. Call Button
12. Channel Select Buttons
7
9
13. Microphone
10
11
14. Maximum Range
Extender Button
14
8
15
12
13
15. PTT (Push To Talk ) Key
16. Battery Chamber
16
6
Thank you for purchasing the Cobra PMR 250
2-way Radio. Properly used, this Cobra product
will give you many years of reliable service.
A2
Cobra on the World Wide Web:
Frequently Asked Questions
(FAQ) can be found on-line at:
www.cobraelec.com
A3