1
Dust Collector
330002
WARNING
Read the SAFETY section and Complete
the ASSEMBLY procedures before operating the Shopsmith Dust Collector.
Ta ble of Contents
Parts List ...................................................... 2
Introduction/Safety .................................... 4
General Information ................................... 7
Assembly ..................................................... 8
Maintenance and Troubleshooting ........ 10
Dust Collector
330002
Parts List
Ref.
No.
1
—
2
3
4
—
5
6
7
—
8
9
10
11
12
—
13
14
15
16
17
18
19
19A
19B
19C
20
21
22
23
24
25
—
25A
25B
26
27
28
Part
No.
514808
514809
514856
514966
514855
515595
515689
515561
515534
515596
515549
515562
515533
515112
120392
515287
†
120392
513627
120388
515535
515248
515690
515563
515586
514881
515550
515137
514832
514817
515562
51476702
521769
521761
521762
515555
515553
515219
Item
Description
Qty.
Filter Hood ...............................................
Retaining Strap Asmy. (Incl. 2-4) ........
Strap, Metal .............................................
Rack ..........................................................
Clamp .......................................................
Main Housing Asmy. (Incl. 5-29) .........
Main Housing w/Warning Label ..........
Self tapping Screw ................................
Support Bracket .....................................
Motor & Blower Asmy. (Incl. 8-20) .....
Inlet Seal ..................................................
Self-Taping Screw, ¼-20x3/4” .............
Fan Housing ............................................
Hex Head Cap Screw, ¼-20x1” ............
Flat Washer, 3/8” ....................................
Fan Assembly (incl.11, 13-14) ..............
Fan
Flat Washer .............................................
Hex Head Cap Screws, 3/8-6x1” ..........
Flat Washer .............................................
Motor Housing ........................................
Key, Square, 3/16” ..................................
Motor w/plug ..........................................
Connector ...............................................
Strain Relief .............................................
Screw .......................................................
Motor Seal ...............................................
Self-tapping Screw ................................
Self-Tapping Screw, #10-16x1/2” ........
Cover Plate ..............................................
Self-Tapping Screw ...............................
3-way Inlet ...............................................
Handle Package (Incl. 25A-25B) ...........
Handle .......................................................
Screw .......................................................
Self-Tapping Screw ...............................
Cable Clip .................................................
Bag Clip ....................................................
Manufacturer:
Part Number:
Description:
Page 2
1
1
1
1
1
1
1
4
1
1
1
6
1
1
4
1
1
4
4
1
1
1
1
1
2
1
2
4
1
4
1
1
1
2
6
1
3
Ref.
No.
29
30
31
32
33
—
34
34A
35
36
36A
36B
37
38
39
40
41
42
43
44
45
46
47
48
—
49
—
50
51
52
53
54
55
Part
No.
518393
300006
514831
120380
514896
522388
†
515107
515547
515552
522323
515555
515546
515554
515664
51481208
515138
120214
102634
514807
514806
514755
51478902
514805
514890
514825
514929
514824
514928
514826
514828
300004
300007
Item
Description
Qty.
Retaining Strap Assembly ................... 1
Bag, Package of 6 ................................... 1
Hex Head Cap Screw, ¼-20x1-3/8” ...... 4
Spring Lock Washer, ¼” ...................... 4
Rear Handle ............................................. 1
Switch Service Pack (incl. 34-34A) ..... 1
Switch ....................................................... 1
Switch Key ............................................... 1
Leg Cap, Right ........................................ 1
Wiring Harness ....................................... 1
Wire Cover .............................................. 1
Self-Tapping Screw ............................... 1
Right Leg .................................................. 1
Leg Cap, Left .......................................... 1
Left Leg .................................................... 1
Snap-In Plug ............................................ 8
Truss Head Screw ................................ 14
Lock Washer .......................................... 14
Nut, 5/16”-20 ........................................... 14
Wheel Retainer ....................................... 2
Wheel ........................................................ 2
Wheel Shaft ............................................. 1
Base Pan .................................................. 1
Caster ....................................................... 2
Attachment Kit (Incl. 49-56) .................. 1
Extension Wand ...................................... 2
Inlet Pug Assembly (Incl. 50-51) ......... 2
Inlet Plug .................................................. 2
Cap ............................................................ 2
Floor Pickup ............................................ 1
Elbow Brush ............................................ 1
Hose .......................................................... 2
Reducer
(Optional - Only needed when used with MKV 500)
56
514829
57
515670
58
515126
59
513897
†Not available as
Utility Pickup ...........................................
Power Cord .............................................
Star Washer ............................................
Hex nut, #10-32 ........................................
a service part.
Shopsmith, Inc.
6530 Poe Avenue
Dayton, Ohio 45414
937/898-6070
937/890-5197 Fax
330002
Shopsmith Air FIltration System DC3300
1
1
2
2
330002
Dust Collector
Figure 1
Page 3
Dust Collector
Introduction/Safety
Dust Free Woodworking
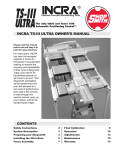
The Shopsmith Air Filtration System provides
an efficient and effective means to collect
wood shavings and dust from the workshop.
Unlike conventional shop vacuums, the Dust
Collector is designed to collect and filter the
large volume of dust and shavings produced
with modem woodworking equipment. When
used in conjunction with efficient dust collection chutes and attachments, the Dust Collector will help you approach “dustfree” woodworking.
Airflow is the Key
The “heart” of the Shopsmith Dust Collector
is a large industrial blower which moves large
volumes of air. The dust and shavings pass
through the blower, are slowed down, and
then settle in the disposable bag. The air is
then returned to the room after passing
through a large, permanent filter capable of
filtering even the smallest wood dust particles.
As you put your hand over the end of the hose
you will not feel the high vacuum, or sealed
suction, of a home or shop vacuum. A home
vacuum cleaner needs this sealed suction to
move air through small openings. A shop
vacuum also requires a high sealed suction
when used for water pick-up. The large airflow of the Shopsmith Dust Collector can be
“observed” by placing a few fingers into the
end of the hose. The airflow of the Shopsmith
Dust Collector is much higher than any home
or shop vacuum.
Safety First
The Shopsmith Dust Collector has many builtin safety features. But, the effectiveness of
these features depends on you. Throughout
Page 4
330002
this manual, we list WARNINGS, CAUTIONS,
and NOTES. We advise that when you come
to one of these listings, please read and understand it fully. Their meanings are:
WARNING
A WARNING is given when failure to follow the
directions could result in injury, loss of limb, or
life.
CAUTION
A CAUTION is given when failure to follow
the directions could result in temporary or
permanent damage to the equipment.
NOTE
A NOTE is used to highlight an important
procedure, practice or condition.
WARNING
General Safety Rules for
Power Tools
• Read and understand the Owners Manual.
• Ground all tools (unless double insulated).
• Wear proper eye and ear protection. Also,
wear a dust mask.
• Do not use power tools in damp, wet or explosive atmospheres.
• Keep work areas well lit, clean, and free from
clutter.
• Repair or replace damaged parts before further use. If a strange noise or vibration develops, turn off and unplug the machine. Correct
the problem.
• Do not overreach. Keep proper footing and
balance at all times.
330002
Dust Collector
• Do not leave the tool running unattended. Turn
power off. Don’t leave tool until it comes to a
complete stop.
• Avoid unintentional starting. Make sure the
switch is in the “off” position before plugging in
or unplugging the tool.
Safety Rules for the
Shopsmith Dust Collector
• Read and understand the Owners Manual. Learn
the Dust Collector’s applications and limitations as well as the specific potential hazards
peculiar to it.
• Ground the Dust Collector. The collector comes
equipped with an approved 3-conductor cord
and a 3-prong grounding type plug to fit the
proper grounding type receptacle, the green
conductor in the cord is the grounding wire.
Never connect the green wire to a live terminal.
• Avoid dangerous environments. Electric shock
could occur if the Dust Collector is used on wet
surfaces. Do not expose it to rain, snow or wet
floors. Store it indoors.
• Do not operate the Dust Collector without the
3-way inlet or the 4' inlet and elbow securely
mounted in place. The airflow can pull body
parts into the intake opening and into contact
with the fan.
• Do not pick up water or wet materials with the
Dust Collector.
• Position the hose(s) out of the way so you won’t
trip over them. . Do not pick up hot or burning
materials such as cigarettes and ashes. They
could ignite a fire in the bag. These materials
should be properly disposed of in a fireproof
container.
• Do not attach the Dust Collector or hoses to a
tool used for metal grinding or sharpening.
Sparks generated during grinding could ignite
dust and shavings inside the bag. They may
also damage the hose and the fittings.
• Do not reach across a power tool to turn off the
Dust Collector. Turn off the power tool and then
go around to the Dust Collector and turn it off.
• Do not force the Dust Collector to do a job for
which it was not designed.
• Check damaged parts. A damaged part should
be properly repaired or replaced before further
use. If a strange noise or vibration develops,
immediately turn off the power, unplug the Dust
Collector and correct the problem.
• Avoid unintentional starting. Make sure the
switch is in the “Off” position before plugging in
or unplugging the Dust Collector.
• Turn off and unplug the Collector before changing bags, and performing maintenance and service.
• Do not stand or lean on the Dust Collector. You
could fall onto the Collector or it could tip over
injuring you and/or damaging the Collector.
• Maintain the Dust Collector. Keep the Dust
Collector maintained according to the Owners
Manual.
• Use only recommended Shopsmith parts and
accessories on your Dust Collector. NEVER
use non-Shopsmith replacement parts or accessories. They are not designed like Shopsmith
parts. Using non Shopsmith parts may cause a
hazardous condition and will void your warranty.
• Do not leave the Dust Collector running unattended.
• Do not drag the cord across sharp tools or
edges which could damage the cord. Do not try
to move or unplug the Dust Collector by pulling
on the cord.
Page 5
Dust Collector
Sawdust and Shavings
Sawdust and shavings can be fire hazards and breathing dust can be a health hazard for some people. Dust
may cause physical discomfort, especially if you have
emphysema, asthma, or an allergic reaction. The dust
from some woods can create a toxic reaction.
Attach the Dust Collector to the dust chutes on your
power tools. This will help collect most of the sawdust
and shavings while you’re working and prevent them
from entering the air in the room.
330002
handle the amperage of the circuit.
Grounding - The circuit you use should be properly
grounded to protect you from electrical shock.
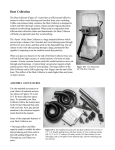
• The plug on the Shopsmith Dust Collector has three
prongs, as shown in Figure 1. The receptacle should
have three corresponding holes.
Cover of Grounded
Outelet Box
Electrical Requirements
Grounding Blade
This powerful Dust Collector draws a substantial amount
of starting current. Therefore, it should not be run on the
same circuit as the Shopsmith Mark V. You could overload the circuit.
Before starting the Dust Collector, attach hose(s) and set
up as intended for use. If the unit does not come up to
speed within five seconds, turn off the switch. Place an
inlet plug assembly in one of the openings in the 3-way
inlet and try starting the unit again. After the unit is
running, you can remove the inlet plug.
If the Dust Collector still fails to come up to speed
immediately, more than likely your shop wiring is too far
from your electrical entrance box or if you’re using an
extension cord, the wire gauge is too small.
Circuit - Before you plug in your Dust Collector, check the
output and the amperage of the circuit you’ll be using.
The output of the circuit must meet or exceed the electrical
requirements of the Dust Collector power plant. The
amperage must be rated high enough to handle the load
(in amps) of that motor, plus any other tools or appliances you may have plugged into the same circuit and
running at the same time.
• The Shopsmith Dust Collector 115-volt motor is rated
at 1/2 hp and draws 8.0 amps. This motor runs on
ordinary U.S. house current - 115 volts, 60 cycles (hz).
The circuit you use should be rated for at least 15 amps.
• If you have fuses, we recommend you install “slow-
Figure 1
• Do not modify the plug. If it will not fit the outlet, have
the proper outlet installed.
• If you have a two-hole receptacle, use a temporary
adapter to plug in the Dust Collector. (See Figure 2.) The
grounding lug or wire on the adapter MUST be connected to a permanent ground such as a grounded
outlet box. The temporary adapter should be used only
until a properly grounded outlet can be installed.
(Adapters are not allowed in Canada.)
• If you are unsure as to whether your outlet box is
grounded ask a licensed electrician.
Figure 2
Extension Cords - If you use an extension cord to plug in
your Dust Collector, be sure it’s a three-conductor cord
with a grounding plug and receptacle.
• The wire gauge must be thick enough to prevent loss
of power and overheating - the longer the cord, the
thicker the wire should be. Use only 12 gauge, 3-wire
cord or heavier.
blow” fuses. Fusetron T-15 is recommended. When
you first turn on the machine, for a brief instant the
motor pulls 5-6 times its usual amperage to get up to
running speed.
• Before using an extension cord, inspect it for loose
• If you need to run a new circuit to operate the Dust
• Don’t let the connection between the power cord and
Collector, be sure that the wire you use is rated to
Page 6
wires or damaged insulation. Replace damaged cords
immediately, and only replace with Shopsmith approved parts.
an extension cord lie on a damp or wet surface.
330002
Dust Collector
General Information
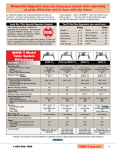
Terms to Know
The main parts of the Dust Collector are:
Dust Collector Attachment Kit:
1.
10. Two Hoses - Connect to the 3-way inlet.
11. Two Inlet Plug Assemblies - Placed in
the 3-way inlet port(s) that are not in use.
12. Two Extension Wands
13. Floor Pickup
14. Elbow Brush
15. Reducer - Allows you to connect the Shopsmith
2.
3.
4.
5.
6.
7.
8.
9.
Bag - A heavy duty, disposable, 30-gallon, 4 mil., clear plastic bag.
3-Way Inlet - Allows the hookup of one
2-1/2" diameter hose, or you can use two
or three hoses simultaneously.
Filter Hood - Filters dust particles out of
the air and returns dustfree air to the
room. An adjustable retaining strap secures it to the main housing.
Rear Handle - Easily accessible for movement of the unit.
Power Switch - A rocker type on/off
switch with an internal dust seal for extra
safety.
Main Housing Assembly - Contains the
motor and blower assembly.
Bag Clips - Three clips hold the bag
while the retaining strap is being attached.
Retaining Strap - Secures the bag to the
main housing.
Base Pan - Supports the unit. Two front
casters and two rear wheels are attached
for easy mobility.
Mark V Model 500 (sold separately).
16. Utility Pickup
Specifications
The Dust Collector’s specifications will give
you an idea of its capabilities.
Bag: _________ 30 gallon capacity
Motor: _______ 1/2 hp industrial-duty capacitor start.
Power Cord: __ 12' long
Airflow: ______ 330 cfm
Dimensions: __ 21" wide x 26" long x 48" high
Weight: ______ approximately 64 pounds
Figure 3
Page 7
Dust Collector
Assembly
330002
(42) and nuts (43), starting at the top hole.
Hand tighten all three nuts.
Assemble the Dust Collector according to the
following procedures. The numbers in parentheses are reference numbers listed in the
Parts List.
Tools Required:
Medium and large Phillips screwdrivers
Large bladed slot screwdriver
Rubber mallet (or block of wood)
Adjustable wrench, or 7/16" and 1/2"
wrenches
! 1/2" socket, ratchet wrench and short extension
! Pliers
!
!
!
!
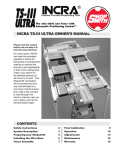
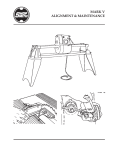
Install the Legs
1. Lay the main housing (5) on its side. Make
sure it’s on top of cardboard to prevent
scratching. Point the smaller diameter end
with three clips toward you and the 3-way
inlet towards the left. Place a block of
wood or a book under the housing so it
doesn’t roll. (See Figure 4).
Figure 4: Lay the Main Housing on its side.
2. Locate the three holes on the top of the
housing. Position the left leg (39) over the
three holes, making sure the narrower side
of the leg faces the front toward the 3-way
inlet. (See Figure 5). Attach the left leg to
the housing with screws (41), lock washers
Page 8
Figure 5: Support the left leg as you attach it to the Main
Housing. The narrower side faces toward the front (3hose inlet) side.
3. Turn the housing over on the opposite
side, then attach the right leg (37) to the
housing in the same manner described
above. When you have completed installing both legs, the circled “r” registration
mark after the word “Shopsmith” on the
legs should be near the larger diameter
end (top) of the main housing. Also, the
narrower side of both legs should be on
the same side of the housing as the 3-way
inlet.
Install the Base Pan
4. With the main housing and assembled
legs still on its side, position the base pan
(47) between the legs, so that the straight,
open side faces toward the front (the side
with the 3-way inlet). (See Figure 6).
330002
Dust Collector
Attach the Rear Handle
11. Attach the handle (33) to the back of the
legs, using cap screws (31) with lock washers (32) under the cap screw heads.
Tighten the Rear Handle
Screws
Figure 6: With the housing on its side, position the base
pan so the straight side faces towards the front.
12. Using a 7/16" wrench, tighten the
capscrews (31) which hold the handle (33).
5. Attach the legs to the base pan (47) with
four screws (41), lock washers (42) and
nuts (43). Hand tighten all eight fasteners.
Install Snap-in Plugs and Left
Leg Cap
Install the Rear Wheels
6. With the Dust Collector still on its side,
install the rear wheels, by inserting a retainer (44) into a 5/8. socket (or closed-end
wrench). Then with a rubber mallet, tap
the socket containing the retainer onto one
end of the wheel shaft (46).
7. Slip a wheel (45) onto the wheel shaft with
the three spoke side facing the retainer.
Place a suitable block under the base pan
or lift it by hand. Insert the shaft through
the base pan’s wheel ‘.haft holes.
8. Put the other wheel on the wheel shaft
with the three spoke side facing out. Install the other retainer cap and tap it securely against the wheel shaft end with a
mallet.
9. Set the unit upright.
Tighten the Leg Screws
10. Using a 1/2" socket and. ratchet wrench to
hold the nuts (43), tighten the leg screws
(41) securely with a large Phillips screwdriver.
13. Insert the snap-in plugs (40) into the four
round holes in the side of each leg. Insert
the left leg cap (38) into the top of the left
leg.
Install Filter Hood
14. Slip the bent tab of the metal retaining
strap (2) through the loop of the rack (3),
making sure that the writing on the rack is
on the outside (see Figure 7).
Figure 7: Assemble the hood retaining strap, rack and
clamp, and feed through the hem in the filter hood.
15. With the bent tab of the strap on the inside
of the rack; feed the pointed end of the
strap through the hem of the filter hood (1)
until the pointed end comes out through
the other slot in the hem.
16. Put the pointed end of the strap through
the loop in the clamp nut (4) (see Figure 7)
so there is at least 1/2" of the strap to bend.
Page 9
Dust Collector
330002
17. Use suitable pliers to bend a tab over the
clamp nut (4) toward the housing. Crimp
both the tabs flat in order to hold the rack
(3) and clamp to the strap. (See Figure 7.)
18. Install the filter hood (1) over the main
housing (5) so that the hemmed bottom of
the filter hood (containing the metal strap
you just installed) fits between the two
rolled ribs of the housing. Turn the filter
hood so the strap clamp is centered at the
back of the housing and the filter hood’s
stripes are aligned with the legs’ stripes.
19. Tighten the retaining strap assembly securely with a large blade flathead screwdriver.
Note
Be sure you tighten the strap between the
two ribs on the main housing. If the strap is
tightened over a rib, the filter hood will
loosen and blow off the Dust Collector.
Install Bag
20. To install the bag, open the bag (30) and
position it under the main housing (5).
Starting from the front, push the bag under
the front clip (28) and take up the slack in
the bag as you push the edge of the bag
under each clip on both sides. The bag’s
excess should be neatly folded at the back
of the housing.
21. Install the plastic retaining strap assembly
(29), but do not firmly clamp it yet.
22. Check around the circumference of the
housing lip, and adjust the bag as needed
to get a good fit. Remember to gather the
excess to the back of the housing and fold
it as flat as you can. When all is snug,
engage the clamp on the plastic retaining
strap.
Page 10
Hook Up the Dust Collector
23. Plug the male socket trailing from the
back of the housing into the female socket
located on the leg. You will hear a “click”
when they are properly seated.
24. Place the Dust Collector behind power
equipment. Connect however many hoses
you are going to be using to the 3-way
inlet (25) and to the dust chute{s) on power
equipment.
25. For each inlet you are not currently using,
push an inlet plug (50) with a cap (51) into
the open inlet.
26. Plug the Dust Collector into a wall socket.
Refer to the section, “Electrical Requirements.”
Using the Dust Collector
What NOT to Pick Up
The Dust Collector will help you keep a virtually dust-free workshop. You’ll breathe less
dust, have a cleaner and safer shop, and eliminate the tracking of dust and shavings to other
areas.
When the Dust Collector is attached to woodworking equipment by the hoses, there is no
occasion for large scraps to be sucked into the
blower. However, when sweeping the floor
and cleaning up, pick up large wood scraps
before you use the dust collector.
Just remember that all materials “picked up”
pass through the fan and fan housing. While
the fan will not be damaged by small scraps
which you may occasionally pick up, it is not
advisable to make a practice of picking up
larger scraps. They will be drawn into the fan
and be struck at high velocity by the fan
blades and flung against the fan housing with
330002
a loud noise. In some instances, large scraps
could even become jammed in the fan.
Hoses
The hoses attach to stationary or handheld
power woodworking equipment with 2-1/4"
dust chute outlets. A reducer allows you to
connect to equipment with 1-1/4" chutes such
as the Shopsmith Mark V Model 500 (having
a serial number 222396 or lower). Three 2-1/
2" diameter hoses can be connected to the 3way inlet and used simultaneously. The large
airflow and filter capacity make it suitable for
other dust producing activities such as drywall sanding. Through use, you’ll discover
more.
Filter the Air - You can use the Dust Collector
to filter dust from the air in your workshop by
removing the hoses and any inlet plugs.
Optional 4 “ Inlet - With this inlet you can
connect the Dust Collector to power tools
equipped with 4. dust chutes and hoses.
Permanent Piping System using the 4. Inlet For some workshops it may be more convenient to have a permanent system rather than
move the Dust Collector to various locations
throughout the shop. But long lengths of flexible hose are not the solution. They will greatly
reduce the airflow and should not be used for
permanent systems. However, Schedule 10
PVC pipe and various fittings offer less resistance to airflow than flexible hose and are
recommended for permanent piping systems.
The instructions that come with the optional
4. inlet explain how to construct a permanent
system.
Dust Collector
WARNING
Turn off and unplug the Dust Collector before
you start a maintenance or troubleshooting procedure.
Cleaning the Filter Hood
During operation, dust will build up on the
inside surface of the filter hood. Every time
the bag is changed, tap the top and sides of the
filter hood to dislodge the dust buildup. If
you’re generating a lot of fine dust, tap off the
dust buildup more often
If you desire, you can wash the filter hood
when it becomes soiled and/or clogged. Before washing, dislodge the dust buildup and
remove the retaining strap. Then hand or
machine wash the hood in cold water using a
mild detergent. Line dry or tumble dry on no
heat. When hood is dry, reinstall the retaining
strap assembly.
Cleaning the Exterior
As needed, clean the outside of the Dust
Collector with a sponge or cloth slightly dampened with a soap and water solution. Wipe or
air dry all parts thoroughly.
WARNING
Do not allow water to enter the switch area or to
drip through the filter hood
Caring for Your Dust
Collector
Your Dust Collector is designed to deliver
years of reliable service with a minimum of
maintenance.
Page 11
MKV TABLE SYSTEM RETRO KIT - 500 TO 510
555135
Troubleshooting Guide
Dust Collector problems usually have simple solutions. Under normal use, you should rarely
have to service your Dust Collector. Most problems can be corrected by maintenance or a
change of work habits.
Maintenance and Troubleshooting
Problem
Probable Cause
Unit will not start.
Solution
Plug loose in outlet.
Check plug and outlet.
Defective switch.
Replace switch.
Defective motor.
Replace motor.
Tripped circuit breaker or blown Reset circuit breaker or replace
fuse.
fuse.
Long extension cord, insufficient Refer to “Electrical Requirewiring or on same circuit as ments” in the Safety section.
Shopsmith Mark V or other machinery.
Motor stops and starts er- Electrical short in cord.
ratically
Electrical short in switch.
Replace switch.
Check plug and outlet.
Plug loose in outlet.
Dust blowing out around fil- Loose retaining strap.
ter hood or bag
Tighten retaining strap.
Dislodge dust buildup.
Filter hood clogged.
Loss of airflow
Replace power cord.
Plugged hoses, extension wands or Unplug affected part(s).
attachments.
Filter hood or collection bag Strap is tightened on top of rib on For filter hood, tighten strap between ribs.
blows off main housing when main housing.
Dust Collector is turned on.
For collection bag, tighten strap
on flat area between rib & main
housing.
NOTE
If you have any questions about your Shopsmith
MARK V Lift Assist, please call our Customer
Service Department TOLL-FREE at 1-800-7627555,
send
us
an
e-mail
at
[email protected], visit our webside
at www.shopsmith.com, or write to us at:
Shopsmith, Inc., Attn: Customer Service Technical Dept., 6530 Poe Avenue, Dayton, Ohio
45414.
When you contact us, please tell us your Customer
Number and Date Code of your equipment. (Your customer number appears on the invoice and mailing labels
of the literature we send to you. The date code is located
on the serial label sticker on your machine). To keep them
handy, please write in the alloted spaces below.
Customer No.
Date Code:
845240
Rev A
03/05
©2005 Shopsmith, Inc.
6530 Poe Avenue
Dayton, Ohio 45414
All Rights Reserved
Printed In U.S.A.