1
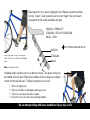
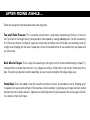
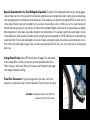
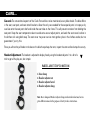
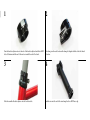
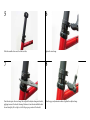
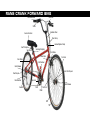
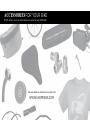
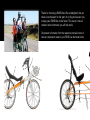
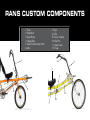
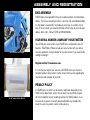
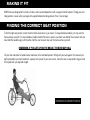
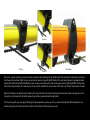
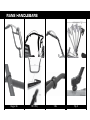
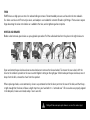
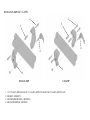
OWNERS MANUAL for Crank Forward & Recumbent Bikes
YOUR RESPONSIBILITIES
A lot of these items are common sense, and it may seem silly to include them in this booklet. In spite of this, when accidents occur, usually one or
more of these items were ignored. A little review of the basics can’t hurt.
You must have the skill to operate the bicycle safely before riding in traffic. Every bike has different handling characteristics. Take the time to learn
the behavior of your bike. If you are riding a tandem or short-wheelbase bike, remember there is wheel- overlap which means that your front wheel
can strike your foot if you turn sharply. Practice in unobstructed open areas before riding on public roads.
Always wear a bike helmet and use a rear-view mirror.
Check the operation of brakes and steering before each ride, along with tire pressures. Make sure all the clamps on the handlebar and risers are
snug. Inspect tires for cuts, bulges or excessive wear.
Maintain your bike. Don’t unnecessarily expose it to the elements. Watch for corrosion. Promptly touch up any areas of paint damage.
Do not overload the bicycle. RANS bikes are designed for loads up to 250 or 275 Ibs. (Check our web site for weight limit specific to model.) Cargo may affect the handling of your bike. Be especially careful of any cargo or apparel that could interfere with the braking or steering mechanisms
or contact the wheels of the bike when in motion.
Aftermarket items such as fairings, tailboxes, body socks, pedals incorporating clip-in devices, assisted drive systems, and other items not specifically engineered for your bike may adversely affect handling and safety, and are the sole responsibility of the rider as to their suitability for use on
a RANS bike.
Ride under control. This goes double for tandems. Avoid excessive speed going down hills. Ride slowly on damp surfaces. Remember, you will
need extra stopping distance when wheel rims and tires are wet. Be aware of drain grates, gravel or sand, uneven pavement, wet leaves and
debris. If your bike suddenly begins to handle differently, stop immediately and inspect for problems.
Be sure your reflectors are correctly installed and not damaged or missing. Do not allow your reflectors to be obscured by gear or cargo. Keep
your reflectors clean. Reflectors are not sufficient for night visibility. Use powered front and rear lighting for maximum safety.
CRANK FORWARD BICYCLES
GENERAL
PROFESSIONAL ASSEMBLY OF YOUR RANS BIKE IS REQUIRED BEFORE RIDING!
Check security of the wheels, handlebars, brake levers, shifters, grips, and
seat prior to riding. Adjustment of the gearing and brakes may be required.
Seek the help of your dealer, local bike shop, or qualified bike mechanic
for best results.
Check tire pressure and inflate as required. Pressure limits are printed on
the sidewalls of the tires. Always ride on tires inflated within the range of
the recommended values.
Rider weight limit is specified on your bike, this decal is usually on the seat tube. Use of the bike with loads greater than
specified voids the warranty. Ramping and jumping the bike also voids the warranty.
FITTING THE BIKE TO THE RIDER
Three main adjustments come into play in order to fine tune the bike to a specific rider. The one size fits all design is
accomplished by the laid back angle of the seat tube. As the seat raises or lowers the distance to the handlebar and
pedals change. Most riders will fit with simple adjusting of seat height and tilt. Handlebar height, or rotation adjustments
can be made to suit individual taste and some may require a deeper bar for greater reach back. Other bar choices are
available, consult our web site at www.ransbikes.com for detailed information on handlebar options.
Begin by setting the seat with the front tilted down slightly. This adjustment is
made using the QR on the underside of the seat. Step over the bike, hold the bars
and check for proper leg extension. Proper seat height occurs when the leg is
straight when the heel of your foot (with the intended riding shoes) is on the pedal.
Place the toe on the pedal and there should be slight bend at the knee.
Seat tilt will affect seat height. The more nose down tilt rotates the body slightly
down and forward requiring a slight raise to seat height. Less tilt raises and
pushes back the body; meaning seat height may need to be reduced.
These settings are not critical, riding a bit and experimenting with tilt and
height is recommended. The increase in comfort will be noticed once you have
achieved the right setting. Note: seat tilt is usually at the right angle when it feels
like you are almost sliding out of the seat. A foot on the pedal will secure you
in the seat. This effect will be a little less on the Cruz and Fusion due the more
laid back seat angle. Too little tilt may result in the front edge of the seat applying
pressure against the thighs and chafing, and less circulation can result. Tilt the
seat until no pressure is felt.
We also provided numbers etched on the seat post that correspond with
your pant inseam. This usually places the seat very close to the correct
height. Use this gauge as a starting point ride to fine tune. Also knowing
your “seat setting number” allows you to check for slippage and if
removing the seat, restore it to your setting. The inseam scale will vary depending on size. Refer to the diagram for adjustment in scale readings.
Adjusting seat tilt is as easy as flipping the
Quick Release to position and lock.
Use the “inseam” scale to position seat at
correct height. Your pant inseam corresponds
to this number etched on seat post.
Adjusting seat tilt is as easy as flipping the Quick Release to position and lock.
Use the “inseam” scale to position seat at correct height. Your pant inseam
corresponds to this number etched on seat post.
SEQUOIA - SUBTRACT 3”
STANDARD - SET ON YOUR INSEAM
SMALL - ADD 2”
SEQUOIA
Adjust seat height so leg is straight when
heel of the foot is on crank at most extended
point.
Note, be sure hips are level.
HOW TO READ INSEAM GAUGE
STANDARD
SMALL
3”
2”
Handlebar height should be set to just above the knees. This general setting can
be modified after test rides. Rotating the handlebar will also change wrist and palm
comfort and the feel and reach. The best bar position occurs when:
1.
2.
3.
4.
Elbows are slightly bent.
Wrist are not held at an odd angle producing pressure.
The bars are just above the knees or higher.
Check the security of clamps after adjusting handlebar.
Do not attempt riding with loose handlebars! Injury may result.
AFTER RIDING AWHILE...
Some fine-tuning tips to enhance performance and enjoyment…
Too much Palm Pressure: This is caused by several factors, rough roads, overreaching to the bars, or bars too
low. To correct for the rough road, try taking bumps at lower speeds or wearing padded gloves. Correct overreaching
first. Check seat location, too high will cause you to lean down to the bars more. As the bars are raised they come aft
a slight amount helping with the reach. Deeper bars or bars that extend further aft are available from your dealer and
our online store.
Back Muscle Fatigue: This is a sign of overreaching or pulling too much on the bars (before being in shape). Try
rotating the bars to locate them more aft, or try a deeper set of bars. A little more tilt will shorten the distance to the
bars. If everything is adjusted correctly keep riding. As your muscles strengthen the fatigue will go away.
Numb Seat: Time in the saddle is what will cause the circulation to restrict, and numbness to set in. Standing up on
the pedals for a few seconds will help. If this becomes a chronic problem, try putting a layer of open cell foam stuffed
between the stock cushion and seat. Adjustment of seat height and tilt may be required. You can buy open cell foam
for cushions at most craft stores.
Stand Up Riding: The Fusion and Cruz are not intended for riding while standing on the pedals. Coasting yes. but
since the bars will be too close to your knees when off the saddle, this will conflict with pedaling. The Dynamik, Zenetik,
and Alterra’s however can be ridden while off the seat. Some may require handlebar adjustment or changing the bar,
depending on your build. While stand pedaling is possible on these two bikes, it is still different from a standard D/F
and will require some adapting. Learning to ride this way is a great asset on the more aggressive trails, where the
Dynamik and Alterra seems to be eager to go.
The CF-1 & CF-2 Seat: The CF-1 and CF-2 seats are wonderful for comfort, and have the added advantage of
springboard affect, especially when more to the front of the seat. This is a great idea if the road is extra bumpy, just
slide an inch or two forward and you will notice the shock absorbing nature.
Handling Characteristics: Long wheelbase has advantages on loose surfaces- it is easy to maintain control. You
will find it easy to maintain control on loose sand and other surfaces not so ideal for skinny high-pressure tires. You
will also find going a little slower on such roads is a good idea, especially if you are riding skinny high pressure tires.
The fatter tires will be at home on such roads, and it opens up a great experience to be able to cruise the back-roads
on a bike that is comfortable.
The laid back seat angle places less weight on the front wheel, there can be some tendency for front wheel sliding when
tight cornering too fast on a loose surface. Shifting body weight and controlling speed will enhance your ability to corner.
Again tire size, tread type, and pressure will affect this greatly. Otherwise the bikes handle very naturally, there is no
learning curve, simply get on and ride (provided you are currently able to ride a bike!) However learning and understanding the
special nature of this design will enhance your utilization and enjoyment. The more you ride the more you will enjoy.
Special Consideration for Trail Riding the Dynamik: The lighter front loading will come into play during aggressive trail rides, but with a little practice it will become second nature to compensate, and in some cases an advantage,
such as popping the front wheel over small obstacles. Crank clearance can be less than typical MTB’s so watch out for
crank strikes! Bunny hops are no problem once you learn to push down a bit, or stiffen your arms, since the nose of
the bike will pop up easily. As you ride you will notice the same body English works here as on typical bikes, but slightly
different portions. It only takes a few rides though to start nailing the trail. You will get used the low seat height, the few
inches difference really feels big! The bike seems to hug the ground compared to a MTB. Definitely nice when ducking
under tree limbs! The low top tube height is nice also; it helps avoid painful groin jams when an errant dismount occurs.
Plus the low top tube height is great when you have encountered a hill that wins, you can simply stay on the bike and
walk it up.
Using Shock Forks: Most MTB shock forks will adapt. The rake needs
to be at least 38mm. Stroke can be your personal preference but 56 to
76mm is plenty. Much over 76mm will, however start lifting the head angle
and change the bikes handling.
Front Tire Clearance: If trying out larger tires than spec, foot to tire
clearance may become close or contact possible. Check this prior to riding.
Caution: Changing tire sizes can affect toe
clearance with the front wheel.
CARE...
General: The conventional aspects of the Crank Forward line can be maintained, as any bike should. The bike differs
in the seat, seat post, and seat attach brackets. About the only care needed for these special parts is to spray a dry
wax lube onto the seat post shaft and inside the seat tube on the frame. This will prevent corrosion from binding the
seat post. Keep the seat components clean to avoid extra wear at adjust points, and wash the seat cover/cushion in
the kitchen sink using dish soap. The seat cover may even survive most gentle cycles in the clothes washer, but no
guarantees if you try this.
Since you will tend to pull harder on the bars on this bike than perhaps the norm, inspect the stem and bar clamps for security.
Headset Adjustment: The headset is adjusted to be play free by using the headset adjustor. It is a bit of a
trick to get all the play out, but simple:
PARTS LAYOUT TOP TO BOTTOM
1. Riser clamp
2. Headset adjuster nut
3. Headset adjuster barrel
4. Headset adjuster clamp
Note: Riser clamp and Headset adjuster clamp are identical in function, but are
given different names for the purpose of clarity in these instructions.
1
2
Turn the headset adjuster nut onto the end of the headset adjuster barrel that is NOT
slotted. Continue until the end of the nut is even with the end of the barrel.
Slide clamp over threaded section with clamp slot aligned with the slot in the threaded section.
3
4
Slide the assembled headset adjuster onto the fork steer tube.
Push the riser into the end of the riser clamp that does NOT have a lip.
5
6
Slide the assembled riser onto the fork steer tube.
Tighten the riser clamp.
7
8
Turn the nut up into the riser clamp. This will push the adjuster clamp into headset,
applying tension to the headset bearings. Continue to turn the nut until the headset
has no lateral play. Not so tight as to effect the proper operation of the headset.
When the proper adjustment is achieved, tighten the adjuster clamp.
RANS CRANK FORWARD BIKE
Hand Brake Lever
Handlebar
Shifter
Handlebar Riser
Seat and Cushion
Riser Clamp
Headset Adjuster Clamp
Seat Tilt Adjust
Seat Post
Seat Height Adjuster
Front Brake
Cable Stops
Rear Brake
Front Hub
Front Derailluer
Quick Release
Front Fork Dropout
Rear Dropout
Rear Derailluer
Cassette
Sprocket
Crank
Quick Release
Front Fork
Pedal
Rim
Tire
ACCESSORIES FOR YOUR BIKE
RANS offers a variety of custom made accessories for your RANS bike.
For more details on our line of accessories visit:
WWW.SHOPRANS.COM
RECUMBENT BICYCLES
Thanks for choosing a RANS bike. We are delighted, that you
share our enthusiasm for the sport of cycling and we want you
to enjoy your RANS bike to the fullest. This owner’s manual
contains some information you will find useful.
Component information from the respective manufacturers of
various components used on your RANS can be found online.
2
1
4
11
3
3
5
12
9
6
6
3
RANS CUSTOM COMPONENTS
1. Riser
2. Seat Mesh
3. Sprint Brace
4. Hoagie Seat
5. Seat Cushion/Cover (Std.)
6. Idler
7. Flip-It
8. T-Bar
9. Oval or V-Clamp
10. Seat Pan
11. Cable Cover
12. Frame
1
8
7
1
5
6
9
10
12
12
9
10
ASSEMBLY AND REGISTRATION
BIKE ASSEMBLY
RANS Dealers have agreed that they will assemble and test each bike before
delivery. If you have received your bike in a less than fully assembled condition,
it is the dealer’s responsibility to provide any necessary re-assembly instructions. If for any reason you are uncomfortable with the setup of your bike upon
delivery, don’t ride it. Contact RANS at (785) 625-6346.
YOUR SERIAL NUMBER & WARRANTY REGISTRATION
Serial Number Rear Dropout
You will find your serial number of your RANS bike is embossed in one of 3
locations. (See Photos.) Please include your serial number with your online
warranty registration. Ask your dealer for the serial number if you have trouble
reading or locating it.
Register online @ www.rans.com.
It is vital that you register your warranty with RANS so that you may be informed of product safety actions or other issues that may arise regarding the
maintenance and operation of your bike.
PRIVACY POLICY
Serial Number Bottom Bracket
It is RANS policy to restrict use of warranty registration data solely to the
RANS service department, unless the bike owner has specifically requested to be included to receive marketing materials for RANS products. In no
instance will any owner or warranty data be offered to any outside entity,
except in event of a product recall or safety advisory.
MAKING IT FIT
RANS bikes are designed to fit all sizes of riders, and to accommodate them with a range of comfort options. Finding your best
riding position is easier when you begin with a good fundamental riding posture. Hereʼ’s how to begin:
FINDING THE CORRECT SEAT POSITION
To find the right seat position, mount the bike. Hold a brake lever as you mount. On long-wheelbase models, just step over the
frame and seat yourself. On short-wheelbase models (and the Screamer captainʼ’s position), take hold of the seat back with one
hand, hold the handlebar grip with the other, fold the riser forward, step over the frame and seat yourself.
REMEMBER: IF YOU LET UP ON THE BRAKE, THE BIKE MAY ROLL
Lift your foot and rotate the pedal counter-clockwise to the extended position. Sitting with your back against the seat and your
leg fully extended, your heel should rest squarely on the pedal. If your knee is bent, move the seat as required to bring your heel
to the pedal with your leg held straight.
PROPER SEAT ADJUSTMENT POSITION
Position 1
V-Clamp
Position 2
Oval Clamp
The oval or v-clamp seat clamp system will release enough to slide with deployment of the QR handle. For seat back tilt adjustments, pull the pins
from the sprint brace tubes. When the seat is positioned as desired, clamp with the QR handle. If the sprint brace tube pins have been removed,
replace them before mounting the bike. Both oval and v-clamps can be adjusted for more clamping pressure by tightening the QR. The top adjustment of the clamp should be set to allow the seat to slip over the shoulder bolts but not move side to side. Use (2) 6mm allan wrenches to adjust.
Now, with the brakes still applied and sitting back in the seat, place the ball of your foot on the pedal, extend your leg fully and apply pressure. In
this position, which represents the bottom power of your stroke, your knee should be slightly bent.
At first you may prefer your seat upright. After gaining riding experience, you may want to try a more reclined position. Minor adjustments are
made by pulling the pins from the sprint brace tubes and tilting the seat to the position you want.
ADJUSTING YOUR RISER
There are different designs of handlebars and risers used on RANS bikes.
RANS long-wheelbase bikes usually feature the T-bar riser. Height and bar position are adjustable throughout a three-inch range
at both ends of the riser. Using a hex wrench, loosen the clamps, adjust and retighten. You should be able to sit back comfortably in the seat, resting hands on the handlebar grips with elbows gently bent. The handlebar should be roughly chest high. The
handlebar should not crowd your face, chest or knees. Check www.rans.com for more on custom sized bars and risers.
RANS short-wheelbase bikes and tandems feature the Flip-It riser. The Flip-It folds forward, away from the seat, letting you
mount the bike easily. There should be sufficient tension on the quick-release to keep the riser firmly in place when you pull it
back to the riding position. Use care not to excessively leverage the quick-release as this can over-tighten the Flip-It mechanism
and deform the clamping mechanism or fork steer tube. Flip-Its without the quick-releases need only occasional adjustment of
tension. Use a hex wrench to adjust until it moves smoothly with some friction. For bar and riser combinations see www.shoprans.com.
The Flip-It folds forward, away from the seat, a self locking bolt at the base of the riser adjusts tension, controlling the riser’s
freedom of movement. Sufficient tension should be applied to keep the Flip-It play free, with some light friction.
The travel of the Flip-It is limited by a set screw at its base. Adjust this screw with a hex wrench to adjust the lay of the handlebar
when pulled fully into your chest. With either riser, the handlebar should not crowd your face, chest, or knees.
WARNING! THE 3-INCH RULE:
WHEN CLAMPING HANDLEBARS TOGETHER, BE SURE THREE INCHES OF
THE THINNER BAR REMAIN INSIDE THE LARGER TUBE.
RANS HANDLEBARS
Chopper Bar
HR 3-Way
T-Bar
Flip-It
WARNING! CONTROL OF THE BRAKE WILL BE COMPROMISED IF THE HANDLEBAR IS POSITIONED FORWARD OF THE FORK’S CENTER OF PIVOT.
RIDING YOUR RANS BIKE
If you’re unaccustomed to recumbent riding, it may take some practice to control the bike with confidence. Practice on a smooth
surface with plenty of room, free of traffic and obstacles. An empty parking lot is ideal. Itʼs important to become acquainted with
your bike before mixing with traffic.
Apply a brake when mounting. If a brake is not applied when mounting, the bike may roll.
Lean back in the seat. Relax your back, shoulders, neck and arms. Turn the handlebar left and right. Lean on one foot, then the
other to acquaint yourself with the weight and balance.
Check your gear settings. Begin on a level surface in a low gear.
Now sit back and relax. Focus your attention well ahead. This helps avoid over controlling and wobbling. Try gentle turns in both
directions. Acquaint yourself with the brakes by applying them gently. Try U-turns in both directions. Try circles.
If you’re riding a short-wheelbase model, beware of striking your heels on the front wheel during sharp turns. This happens because the bottom bracket is located close to the front wheel. Learn to point your toes forward a bit when turning a tight corner.
As your balance improves, you will not need to correct your steering as much and “heel-strike” will happen much less often.
Shift and acquaint yourself with the bikeʼ’s gearing. Anticipate the need to shift down, as when approaching traffic lights, so
youʼ’ll be in a low gear when starting again.
Look around and enjoy the view! You can see in all directions without neck strain. Practice looking in the rear-view mirror and
over your shoulders. Watch out for the natural tendency to steer the bike into the traffic lane when you check traffic behind you.
Anytime youʼ’re in traffic on any kind of bike, ride as if youʼ’re invisible. Do not assume other vehicle operators see you.
After a half hour or so, you should be confident in your balance and control. Remember, riding a RANS bike is a natural position,
so relax.
CARING FOR YOUR RANS BIKE
FRAME
The RANS bike frame requires little to maintain. Keep it clean and dry. Dirt, dust and grit can be removed safely by spraying
with common furniture polish and wiping with a clean cloth. Although not required, automotive wax may be applied to finished
surfaces. Avoid high pressure spray. Trapped water can promote corrosion and damage moving parts.
DRIVE TRAIN
To extend the life and efficiency of your drive train, use a degreaser to remove grit from the chain, chain rings, derailleurs and
brake pivots; lubricate to reduce friction and corrosion. Your RANS dealer offers cleaning products and lubricants appropriate
for your locale.
SEATS
RANS recumbent seats are state-of-the-art, built for comfort, performance and durability. Light, isolated soiling can be removed
with a damp cloth. For a more thorough cleaning of the seat bottom or mesh, remove and hand or machine-wash with a mild detergent. Air dry. To remove mud or other heavy soiling from the seat back, remove the seat from the frame, wash with soap and
water, rinse and air-dry. Seat bottom and back fabrics are designed to easily be replaced, and replacement fabrics are available
through your dealer or you can order online at www.shoprans.com.
TIRES
RANS bikes use high-pressure tires for reduced rolling resistance. Recommended pressures are found on the tire sidewalls.
Our bikes use tubes with Presta-style valves, and adapters are included for common Shrader-style fittings. Presta valves require
finger-loosening the valve stem before air is added to the tube, and re-tightening when complete.
WHEELS AND BRAKES
Before wheel removal, open brakes as per applicable procedure: Pull the cable lead tube from the yoke on the right brake arm.
1
2
3
4
5
6
Open and rotate the quick-release lever counter-clockwise to remove the forward wheel. To remove the rear wheel, shift the
chain to the smallest sprocket on the rear cassette (highest setting on the right gear shifter) and open the quick-release; once it
drops from the fork, remove the chain from the sprocket.
When replacing wheels, we recommend q.r. levers are positioned so that the lever points to the rear of the bike, and that the q,r.
is tight enough that the lever will leave a slight imprint on your hand after it is “cammed over”. Be sure axles are properly aligned
in the dropouts, brakes are closed, and q.r. levers are shut.
Riding with loose or open quick releases can result in serious injury!
OVAL & V-CLAMP SEAT CLAMPS
2
2
3
3
4
4
1
OVAL CLAMP
1
V-CLAMP
1. 1 1/2” V-CLAMP - (BPST0269-L/R) OR 2” V-CLAMP - (BPST0270-L/R) OR OVAL V-CLAMP - (BPST0312-L/R)
2. 8MM BOLT - (BPHW0072)
3. 8MM THREADED BUSHING - (BPHW0074)
4. 6MM X 60MM SKEWER - (BSST0006)
7. Damage during shipping.
8. Dated bill of sale required.
BIKES Limited Parts Warranty
RANS Bicycles Inc. guarantees all parts on all models of RANS Bikes for a period of 90 days from the
date of purchase by the original owner, subject to the same conditions of the limited frame warranty above.
RANS will repair or replace at our sole option. Labor and shipping charges are not covered by these warranties.
Bikes Warranty Registration Form
6. Damage resulting from the installation of aftermarket items, including fairings, racks, kickstand or any other fixture to the bike not specifiacally sold by or authorized by RANS as acceptable for use with the specific model and model year of bike.
(Your Name)________________________________________
(Age)________________
(Address)_________________________________(City) __________________
(St/Prov)_____________ (Post Code)________(Your Email)_______________
5. Damage resulting from rust or corrosion.
(Purchased From)_____________________________________________________________________
4. Normal wear and tear.
(Model)_________________________________(Date Purchased)____________________________
3. Flaws in the surface, aesthetics, or appearance of the bike, including though not limited to decals,
anodized, plated, painted or powdercoated finishes; brazed-on parts; cable-stops, pump pegs, ect.
You may also Register on-line at:
WWW.RANS.COM
2. Damage due to improper assembly or repair.
(Serial # On the crank tube 2-letters and 8 numbers) ____________________________________________
1. Damage resulting from neglected, modified, overloaded (over 275 lbs. rider & cargo) improperly adjusted or poorly maintained bikes, or bikes used in competition or commercially, or damage resulting in mistreatment or accidents.
(Comments)______________________________________________________
RANS Bicycles, Inc. guarantees its bike frames against breakage for the lifetime of the original owner,
subject to these conditions:
....................................Cut along lines and send to RANS...............................................................
BIKES Limited Frame Warranty
PLACE
STAMP
HERE
THANKS!
Ride safe and please contact us to let us know how the bike is
working for you, any comments, ideas, or otherwise that you
would like to share. Thanks for purchasing a RANS and I hope
you will have many years of great cycling!
Randy Schlitter,
RANS DESIGNS, INC.
4600 Highway 183 Alternate
Hays, KS 67601
President RANS Bikes Inc.
RIDING - RULES OF THE ROAD
1. Watch for car doors opening and for cars pulling into traffic. Ride defensively. Always be prepared to stop quickly if necessary. Be extremely careful
at intersections.
2. Advise motorists of your intent by giving the proper hand signals at least 100 feet before turning or stopping and also while waiting to turn. If traffic is
heavy, walk your bicycle with pedestrian traffic. Look both ways before crossing streets.
3. Replace damaged reflectors and straighten or tighten any that are bent or loose. Reflectors are no substitute for lights. Always equip your bicycle with
all state required lights, bicycle flags, reflective tape, and reflectors to make the bicycle and you more visible.
4. Ride slowly on damp surfaces as the tires will slide more easily. Apply the brakes sooner than normal as a greater stopping distance is required, especially if the wheel rims on caliper brake equipped models are wet. Lightly apply the rear brake to control your speed on downhill areas. Only apply the
front brake gradually. Be carefully on loose gravel and loose soil. Apply the brakes gradually to maintain control.
5. Vision is very limited at dusk, so be very careful to avoid possible hazards.
6. Don’t not let a coat or other clothing hang down and cover the rear reflector. Use extra caution in wet weather. Wear light-colored or reflective clothing,
such as a reflective vest and reflective bands for your arms and legs. Use reflective tape on your helmet.
7. Always be courteous to pedestrians. Give pedestrians the right of way. Do not park your bike where it may be in someone’s way, ride while carrying
items, or with anything attached to your bike that might hinder your vision or control.
8. Ride on the correct side of the road. Ride with the traffic, not against. Ride in single file. Ride close to the curb, but far enough away so your pedal
does not strike the curb.
9. Watch for the “other guy”, the car, or the bicycle in front of you, and be prepared to take defensive action. Do not follow a car or another bicycle too
closely. Especially beware of traffic approaching from behind; you may need to swerve to avoid hitting something.
10. Always keep both hands on the handlebar for better control of the bike. Keep your eyes on the road and the traffic around you. Be prepared to make
an emergency stop to prevent an accident.
4600 Highway 183 Alt. Hays, KS 67601 P. (785) 625-6346 F. (785) 625-2795
WWW.RANS.COM