1
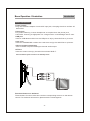
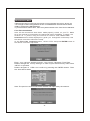
DPT-770
DIGITAL PHOTO FRAME User Manual content
Important Safety Instructions ................................................................. 1
Panel Illustration ....................................................................................... 3
Base Operation Illustration
Basic Introduction ..........................................................................................4
Basic play ..................................................................................................... 5
Photo Frame setup................................................................................. 7
TV Installation Menu.............................................................................. 8
DVB Setting Menu ........................................................................ 9
Remote Function......................................................................................
12
Important Safety Instructions
Introduction
1) Read these instructions.
2) Keep these instructions.
3) Heed all warnings.
4) Follow all instructions.
5) Do not use this apparatus near water.
6) Clean only with dry cloth.
7) Do not block any ventilation openings, install in accordance with the instructions.
8) Do not install near any heat sources such as radiations, heat registers, stoves, or other
apparatus (including amplifiers) that produce heat.
9) Do not defeat the safety purpose of the polarized plug. If the provided plug does not fit
into your outlet, consult an electrician for replacement of the obsolete outlet.
10) Protected the power cord from being walked on or pinched particularly at plugs,
convenience receptacles, and the point where they exit from the apparatus.
11) Only use attachments/accessories specified by the manufacturer.
12) Unplug this apparatus during lighting storms or when unused for long periods of time.
13) Refer all servicing to qualified service personnel. Servicing is required when the
apparatus has been damaged in any way, such as power-supply cord or plug is damaged,
liquid has been spilled or objects have fallen into the apparatus, the apparatus has been
exposed to rain or moisture, does not operate normally, or has been dropped.
14) Mains plug is used as the disconnect device, the disconnect device shall remain
readily operable.
15) The ventilation should not be impeded by covering the ventilation openings with items,
such as newspapers, table-cloth, curtains, etc.
16) No naked flame sources, such as lighted candles, should be placed on the apparatus.
17) Attention should be drawn to the environmental aspects of battery disposal.
18) The use of apparatus in moderate climate.
19)Portable Cart Warning
A product and cart combination should be moved with care. Quick stop,
excessive force, and uneven surface may cause the product and cart
combination to overturn.
WARNING: To reduce the risk of fire or electric shock, do not expose this apparatus to rain
or moisture.
WARNING: The batteries shall not be exposed to excessive heat such as sunshine, fire or
the like.
The symbol indicates that dangerous voltages constituting a risk of electric shock
are present within this unit.
The symbol indicates that there are important operating and maintenance
instructions in the literature accompanying this unit.
-1-
Caution
1. The apparatus shall not be exposed to dripping or Splashing and
that no objects filled with liquids, such as Vases, shall be placed
the apparatus.
2. The mains plug is used as the disconnect device, the disconnect
device shall remain readily operable.
3. To be completely disconnect the power input, the mains plug of
apparatus shall be disconnected from the mains.
4. The mains plug of apparatus should not be obstructed or should
be easily accessed during intended use.
5. Battery shall not be exposed to excessive heat such as sunshine,
fire or the like.
-2-
Introduction
Panel Illustration
Manufacturer of this unit follows a principle of constant improvement and is not held
responsible for any changes that are made to the unit nor accepts any liabilities for these
changes. Thanks for your choice of our products.
2
3
18
4
6
1
7
5
AV OUT
RF
PHONE
OFF
FUNCTION
UP
DOWN
LEFT
RIGHT
PLAY/PAUSE
STOP
CARD(SD/MMC/MS)
USB
ON
DC IN 12V
8 9
10 11 12 13 14
15
16
17
1.TFT Display
2.AV OUT Jack
3.PHONE Jack
4.Remote Sensor
5.Bracket
6.POWER Button
7.DC 12V Input Jack
8.FUNCTION Button
9.UP Button
10.DOWN Button
11.LEFT Button
12.RIGHT Button
13.PLAY/PAUSE Button
14.STOP Button
15.CARD IN Slot
16.USB IN Port
17.SPEAKER
18. 75ohm Antenna Input
-3-
Base Operation Illustration
Introduction
Basic Introduction
Power supply
Plug one end of the adaptor into the DC input jack, then plug the other end into AC
wall outlet.
Phone jack
For private listening .insert a headphone or earphone into the phone jack.
CAUTION: Listening at high power for a long moment could damage users ears.
USB port
Insert a USB data traveller into the USB port to enjoy the audio files or pictures.
Card slot
Insert an SD/MMC/MS card into the card slot to enjoy the audio files or pictures.
AV out jack and connecting
Jack for CVBS output and left/right channel audio output.
RF Port
Insert an antenna to enjoy the television show of DVB-T.
Connect AV out jack to a TV set as below picture.
YELLOW
VIDEO
R
RED
L
WHITE
Function Buttons on the Panel
These buttons function is the same as the corresponding buttons on the remote
control.For the detail information, please see the following texts.
-4-
Introduction
Base Operation Illustration
BASIC PLAY
Power on the unit then enter the main menu. The screen shows nine functions, eg:
Photo, Music, Photo +Music,Movie, Setup, Calendar, Clock, Alarm, Auto-Power.
Insert a USB data traveller or SD/MMC/MS card first, Press NAVIGATION
(UP/DOWN/LEFT/RIGHT) BUTTON to select one of the following function.
Photo
Press NAVIGATION buttons to select photo option, then press ENTER to confirm
the selection. After the player read it for several seconds, it begins to browse the
picture automatically one by one . When photo in auto play off mode, it enters
Thumbnail mode directly. During picture playing, press STOP button, thumbnail
mode menu appears on the screen .The bottom screen shows the information:
Resolution, created date, rotate, and slide show.
Rotate: Highlight the rotate option and press ENTER to confirm, then enter the
rotate mode, there are three options appear in the bottom of the screen including
Rotate it, Reset and return. Use NAVIGATION buttons to select picture you desired
to rotate, then press ENTER to rotate it. Select reset to restore the picture. Select
return to back the thumbnail mode.
Side show: Select slide show option to slide the picture one by one.
Press NAVIGATION LEFT and NAVIGATION RIGHT buttons to rotate the picture
Clockwise and Anticlockwise respectively.
Press NAVIGATION DOWN button to flip the picture vertically.
Press NAVIGATION UP button to flip the picture horizontally.
Music
Press NAVIGATION keys to select music icon in main menu, then press ENTER to
confirm. System will enter the default media (USB or card) choosen in setup, after
read out of data in media, it will show files in media.If auto play selected in setup
menu, system will play the first music file automatically, otherwise, you can select
any files you want to play.
During playback, all remote keys for audio are available. Press FUNCTION can back
to main menu.
Movie
Press NAVIGATION buttons to select movie option, then press ENTER To confirm.
After the player read it for several seconds, it begins to play movie automatically.
Press FUNCTION button to return the root menu during movie playback, press
PLAY/PAUSE to resume playback. This unit supports MPEG4 format.
Photo+music
Press this button in main menu to enter photo+ music mode, in this mode to view
picture and listen to music in same time.
-5-
Base Operation Illustration
Introduction
Calendar
Use NAVIGATION keys to select Calendar icon and press ENTER to enter Calendar
menu
1.Display: select this item to display a calendar
2.Set Date: select this item to change date information with yyyy-mm-dd format
3.Exit: select this item to return to main menu
Clock
Use NAVIGATION keys to select Clock icon and press ENTER to enter Clock Setting
menu
1. Display: choose CLOCK to display a clock on screen only or choose CLOCK &
CALENDER to display a calendar with clock on screen
2. Set Time: select this item to change time information with hh:mm:ss format
3. Exit: select this item to return to main menu
ALARM
Use NAVIGATION keys to select Alarm icon and press ENTER to enter Alarm Setting
menu
1. Enable: choose On to enable a timer alarm choose Off to disable timer alarm
2. Set Time: set time with hh:mm format for a timer alarm
3. Exit: select this item to return to main menu
Note 1: when an alarm is triggered, please press STOP key to disable current alarm.
If you use other keys to stop the alarm, it will be triggered again every 9 mins.
Note 2: If you set ENABLE item as On, it will be triggered every day on the same time.
Auto Power
Use NAVIGATION keys to select Auto-Power icon and press ENTER to enter AutoPower On/Off setting menu
1. Power On Enable: choose On/Off option to enable/disable timer power on
2. Power Off Enable: choose On/Off option to enable/disable timer power off
3. Set Time: select this item to change time information for auto power on/off
4. Exit: select this item to return to main menu
Note: timer power on/off means when system time reachs the time user set, and timer
power on/off is enabled, system will automatically power on/off if system is in power
off/on state.
STB
Use Navigation keys to select STB icon and press Enter to enter STB setting menu.
1.Press setup to select System setting menu.
2.Select DVB setting menu.
-6-
Base Operation Illustration
Introduction
Photo Frame setup
Select setup option to display setup menu. Use NAVIGATION keys to select the desired
item. Then press UP/DOWN/LEFT/RIGHT button, the sub-options for each item will
appear on the right side of the screen.
1.Photo setting
Interval time
To browse picture at interval time. There are several options for you to set as follows:
5sec./10sec./15sec./30./1min./3min.
Transition effect
To select one of the effects when changing from one picture to another: No effect/Cover
up/ Cover down/ Cover left /Cover right/Uncover up/Uncover down/Uncover left/Uncover
right/Wipe up/Wipe down/Wipe left/Wipe right/Push up/Push down/Push left/Push
right/blind Vertical/blind horizontal/ color Ration Ver/color Ration Hor/random.
Show Type:
Set how the photos should be prompted.
Fit screen: Will display the photos original format
Full screen: Will display the photos full screen and cut off the top and bottom sections.
Browse
to select thumbnail and file manager mode.
2. Auto play
The options of auto play include photo, music and movie.
3. Custom setup
Logo Type: It is used to select the Default and Favorite.
Media: Set priority for default media source.
4. Exit
Press ENTER to exit the setup menu.
-7-
TV Installation Menu
Please press the TV button on the remote control to appear the menu, where you
can change to DVB. Navigate with the UP or DOWN button the DVB and activate
DVB by pressing the ENTER button.
If you use DVB-T the first time, than the system entered to the First Time Installation.
First Time Installation
After all the connections have been made properly, switch on your TV. Make
sure the receiver is connected to the mains and press <POWER> to switch the
receiver on. If you are using the receiver for the first time, a First Time
Installation menu will be displayed to guide you through the initial setup. Use
the remote controller to finish the setup.
At the First time installation menu, select <YES> and press ENTER button on
the remote controller to proceed.
Enter your regional settings, include your Country, Language, Time Zone.
Please change the country settings in order to your active country. Then select
<NEXT> to proceed.
Please navigate to <YES> and confirm by pressing the ENTER button. Than
the Auto search starts.
Note: The previous channel list will be deleted and replaced by the new one.
-8-
DVB Setting menu
You can set DVB menu by Pressing setup
User can edit the program name in TV Program menu of DVB
Move
Move will allow you move the position of the channels in the list.
Note: This option will not appears in this list when SETUP->Installation->LCN
is set to ON.
Delete
Delete will delete the program permanently from database. User must res can
to recover it.
Setting Country and Language
User can select preferred country and language at Setup - Installation
page.
How to receive the programs?
Scan the possible frequency and bandwidth to receive the programs.
There are start Auto Scan or Manual Scan.
Auto Scan
Auto Scan will erase the database first, and scans default frequency and
bandwidth by Country Setting.
(1) Press <Enter> button to confirm clear action and start Auto Scan.
It costs time to do Auto Scan, user can press <Enter> button to exit at anytime.
Later if you want to scan again, you can follow above Quick
Installation procedure.
Manual Scan
Manual Scan adds the scanning results into database, it doesn't erase the
database. But the User has to know the Frequency and Bandwidth for
scanning. If the user scans the same Frequency and Bandwidth more than
once, the previous programs will be overwritten.
Auto Time Zone/ Time Zone
Allow you to enable or disable Auto Time Zone update. If you know the GMT
(Greenwich Mean Time) time zone offset of your location, set the Auto Time
Zone to OFF and select an appropriate Time Zone, otherwise set it to OFF
and let the system update the time zone offset automatically according to the
broadcast stream.
Note: Some Countries are covered with more than one Time Zone.
-9-
Channel Lock
Lock the channel which has been set to lock status when turning on the Channel
Lock.
Change Password
To change the PIN code, select this option, press <Left/Right> button to trigger
changing password and <0~9> buttons to enter old password, new password and
confirm new password. If succeed, the PIN Code Changed message will be
displayed, otherwise the PIN Code Error message will be displayed.
Favorites
User can quickly channel up/down the favorite programs by favorite filter. There are 8
groups of favorite for user setting: News, Sport, Movie, Music, Shopping, Travel, Boy
and Girl. Press <1~8> button to set or clear the favorite group when Favorites option
selected.
Lock
You will be asked password before watching a locked program when SETUP ->
Password ->Channel Lock is turned on.
Press <OK> button to set or clear lock status when Lock option selected.
Note: This option will not appears in this list when you enter this list without input
the correct password while the password asked.
Volume
Press <Vol-/Vol+> button to adjust the volume.
Press <Mute> button to mute.
If adjust the volume while mute, mute will be canceled.
Program List
Press <OK> button to display Program List with No., name and lock/scramble/skip
status.
Press <Up/Down/Left/Right> to switch the program.
Press <OK/Exit> to return normal play mode.
Pause
Pause video and audio. But it will be canceled by any input.
Favorites
User can switch the favorite programs in the same favorite group. About favorites
setting.
Press <UP/DOWN> button to switch the same favorite program in normal play mode.
Teletext
Display teletext on screen, the style of teletext may be different by content provider.
Press <Text> button to display the teletext setting page.
Press <Up/Down> button to select the teletext language if the program has teletext.
Press <OK/Exit> button to exit the teletext setting page.
Press <0~9/Up/Down/Left/Right> button to change teletext page if teletext exists.
-10-
Subtitle
Display the subtitle on screen, the style of subtitle may be different by content
provider.
Press <Subtitle> button to display subtitle setting page.
Press <Up/Down> button to select subtitle language, if the program has subtitle.
Press <OK/Exit> button to exit subtitle setting page.
Teletext Subtitle
Display subtitle by teletext, the style of the teletext subtitle may be different by
content provider.
Press <Text/Subtitle> button to display teletext or subtitle setting page.
Press <Left/Right> button to select TTX Subtitle.
Press <Up/Down> button to select teletext subtitle language.
Press <OK/Exit> button to exit the setting page.
No Signal
STB can't get signal, for example, cable is disconnected.
No Service
Program doesn't have any content to play.
Service Scrambled
Program is scrambled for payment, you need contact with the content provider to
know how to descramble it.
Antenna Overload
The power of antenna is overload.
HDTV Not Support
If the program content is HDTV format, this STB doesn't support it.
Channel Locked
Program is locked by setting lock and turning on channel lock in password setting .
User must input correct password to watch program.
-11-
Remote Function
STANDBY
Introduction
SPEAKER TFT on/off
DISPLAY
1
1
18
MENU
2
2
19
SUBTITLE
3
3
20
17
18
19
20
4
21
AUDIO
5
22
REPEAT
6
23
AUDIO
21
REPEAT
ZOOM
10+
22
SETUP
PLAY/PAUSE
4
5
6
MUTE
24
25
26
7
ENTER
FUNCTION
VOL-
VOL+
8
REV
PREV
NEXT
USB
CARD
TEXT
TV
9
CLOCK CALENDAR
31
32
10
11
12
13
14
33
34
15
16
29
30
EPG
FAVORITE
9
26
10
27
REV
28
FWDD
3. 0-10+ keys
These keys are used to input the time,
as well as media file numbers.When a
numeric item is displayed on the screen,
press the 0-10+ keys to select the
desired entry and press ENTER to
confirm.
4. ZOOM
During PICTURE playback, press
ZOOM to magnify the image as
follows:
200%
25%
29
13
TV
14
TEXT
31
15
Blue
32
FAVORITE
16
Yellow
33
Red
34
Green
30
EPG
5. STOP
Press STOP button to stop during playback.
Press PLAY/PAUSE to resume playback.
2. SPEAKER
During playback ,Press the speaker to
close the speaker or phones output.
150%
CARD
12
17
1. TFT on/off
Press TFT on/off Key to turn on
backlight of TFT-LCD
Press it again to turn off backlight of
TFT-LCD.
25
8
11
27
28
24
7
STOP
23
6.PLAY/PAUSE
Press PLAY/PAUSE button to pause during
playback, press this button again will
resume playback.
7.MUTE
Press the MUTE button, the audio output
of the main unit will be shut off; pressing
this button again or VOL+ / VOL- button
will resume the audio output.
8.Vol+ & VolPress volume+button to increase the
volume, and press volume, and press
volume- button to reduce the volume.
9.NEXT
Press this button during play to skip a
file or picture ahead.
50%
100%
-12-
Remote Function
Introduction
10.PREV: Press this button during play
to skip a file or picture back forward.
NAVIGATION button, the sub-options
for each item will appear on the right
side of the screen.
11. CARD: Play photos in card directly,
also change priority of media type
selection.
24. NAVIGATION(UP/DOWN/LEFT/
RIGHT)
Press NAVIGATION buttons to select
the desired items or rotate the picture
during picture playback.
12. USB: Play photos in USB directly,
also change priority of media type
selection.
25. ENTER :Press this button to confirm
selection.
13.TV: P ress TV to switch between
television and radio mode.
26. FUNCTION: Push the FUNCTION
button once, the main menu show in the
display screen.
14.TEXT: T his displays teletext
information.
27. REV: Press this button during
normal playback of video of audio files,
the playback speed will cycle with each
press as:2X,4X,8X,16X,32X,Normal
press PLAY to resume normal
playback.
15.BLUE
16.YELLOW:
Press YELLOW key to show nine small
pictures in TV mode or other model.
Note: this is the digest function.
28. Forward: Press this button during
normal playback of video of audio files,
the playback speed will cycle with each
press as: 2X, 4X, 8X, 16X, 32X, Normal
press PLAY to resume normal
playback.
17.STANDBY:Press this button to
switch the power between normal work
mode and standby mode.
18.DISPLAY: During playback, press
DISPLAY to display the file and time in
formation.
29. CLOCK
Click to show big clock directly.
19.MENU: Press MENU button during
playback to return the main menu.
30. CALENDAR
Click to show calendar directly.
20.SUBTITLE: Press SUBTITLE
repeatedly to select subtitle languages
or control subtitle on/off .
Note: this function is media specific.
31. EPG
Press the <EPG> button to display the
electronic program guide again press
<RIGHT> button to display more detail.
21. AUDIO: Press this button to display
the Audio channel. In the Audio
channel options, you can press the
NAVIGATION ARROWS to choose the
RR, LR, LL mode.
32.FAVORITE: Press this button to turn
on the favorite Channel Groups.
33. RED
22.REPEAT: Press REPEAT to select
repeat single, Repeat all and repeat off.
23. SETUP: Select setup option to
display setup menu. NAVIGATION keys
to select the desired item. Then press
-13-
34. Green
All rights reserved
Copyright Denver Electronics
www.denver-electronics.com
Note on environmental protection:
After the implementation of the European Directive
2002/96/EU in the national legal system, the following applies:
Electrical and electronic devices may not be disposed of with
domestic waste. Consumers are obliged by law to return electrical
and electronic devices at the end of their service lives to the public
collecting points set up for this purpose or point of sale. Details to
this are defined by the national law of
the respective country. This symbol on the product, the instruction
manual or the package indicates that a product is subject to these
regulations. By recycling, reusing the materials or other forms of utilizing old
devices, you are making an important contribution to protecting our
environment.