1
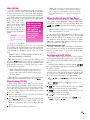
Note: The thermocouple must protrude into the firing
chamber the correct distance: 1” for ¼”wide
thermocouples, 1 2" - 5 8" for 1/8” wide thermocouples.
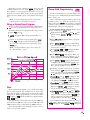
The cone bent too far: Use a
negative Cone Offset for a cooler
firing, such as -10 (°F).
Note: Do not be overly concerned with achieving an exact 6
o’clock bend. The difference between a 3 o’clock and a 6 o’clock bend is only a few
degrees.
When Cone Temperature
Is Off More Than 20°F/11°C
The maximum amount that Cone Offset can change the
temperature is 20°F/11°C. When the temperature is off
more than that amount, correct with Thermocouple Offset.
FAN
Control the Optional AOP Receptacle in Cone-Fire
The AOP (auxiliary output) is a special-order kiln switch
box receptacle. The Sentry controls the power to the AOP
receptacle. The AOP is usually used to power a kiln vent. In
the Fan option, select when an AOP-powered kiln vent will
turn on during Cone-Fire.
Before the Fan option will appear on the Options list, (1)
you must enter a Cone-Fire program in active memory and
(2) you must select
in the AOP1 or AOP2 option.
(See page 22 for instructions on selecting
.)
From
appears.
, press
repeatedly until
Press
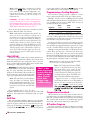
. Use the and keys to select one of these settings:
I
The vent is on during Pre-Heat, the
cone firing, and Slow Cooling. It turns off
at 212°F/100°C.
I
The vent is on during Pre-Heat and
the cone firing. Then it shuts off. (It is off
during Slow Cooling.)
I
The vent is off all the time.
After selecting one of the above, press
. Press
to return to
.
In ceramics, Cone Offset (see page 20) adjusts only one
range of pyrometric cones without affecting the other
cones. Thermocouple Offset, on the other hand, affects all
cones and all Ramp-Hold firings equally. For example, a 5°
hotter setting in Thermocouple Offset fires everything 5°
hotter.
Note: If you find that all your cones are consistently
under- or over-firing, adjust Thermocouple Offset. If
you need to adjust only a particular cone, use Cone
Offset.
Calibrating Thermocouple Offset
With a Digital Pyrometer
You can calibrate Thermocouple Offset using a calibrated digital pyrometer. One way to calibrate your pyrometer is to take it to a heat treater or other location that has a
calibrated controller you can trust. Take a reading from a
furnace with your pyrometer. Either zero it out to match
the calibrated controller on the furnace, or write down the
temperature difference between your pyrometer and the
reliable source. Store your pyrometer. Use it only for calibrating controllers. Thus, it remains a reliable calibration
standard.
Note: The temperature at which you calibrated your
digital pyrometer should be the same temperature you use to check the controller’s temCone Offset afperature readout. Example: If you took a
reading from a reliable source at 2000°F, you
fects a range of
should check the controller reading at
cones in
around 2000°F.
Cone-Fire mode.
Thermocouple
Offset affects all
firings in both
modes.
Note: If the temperature is above 1650°F / 900°C and
the kiln is struggling to reach temperature, the vent fan
will automatically turn off.
General Options
General options are available on all Sentry controllers.
TCOS / Thermocouple Offset
Thermocouple Offset for Ceramic Firings
Calibrate the Thermocouple(s)
The thermocouple is the rod protruding into the firing
chamber. It measures temperature. Thermocouples can
“drift” as they age, causing a shift in temperature readings.
Thermocouple Offset calibrates the controller to compensate for drift.
Mount the thermocouple of the calibrated
pyrometer in the firing chamber near the Sentry’s thermocouple. With the Sentry on Hold,
compare readings between the Sentry and the
calibrated pyrometer. Adjust Thermocouple
Offset to compensate for any temperature
difference between them.
Note: You can also return your controller to the factory to have it calibrated on certified test equipment.
Setting Thermocouple Offset
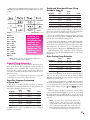
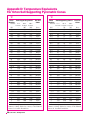
You can enter a temperature change up to 45°F/25°C
higher or lower than the zero factory setting.
From
Press
appear.
, press
appears.
.
repeatedly until
, or a Thermocouple Offset, will
Using the and keys, enter the new offset. (See
chart on next page.) Press
.
will appear. To return to
, press
.
21