1
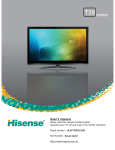
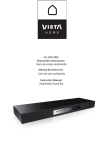
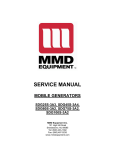
MONDO Wi-Fi Manual.qxd
10/12/07
12:01
Page 1
English
W I - F I
I N T E R N E T
INTERNET
RADIO
Français
Deutsch
Italiano
Norway
R A D I O
ADAPTOR
Operating Guide
mode d’emploi
Bedienungsanleitung
Mode d emploi
Bruksanvisning
w w w . r e v o . c o . u k
MONDO Wi-Fi Manual.qxd
10/12/07
12:01
Page 2
English
Contents
Welcome to Mondo Wi-Fi
3
Setting Mondo’s Clock
8
Benefits of Internet Radio
3
Setting An Alarm
8
Mondo Wi-Fi Overview
3
Configure Menu
9
Warranty
3
Network Configuration
9
Warranty Registration
3
Version + Firmware Updates
9
Before Getting Started
3
Languages
9
Wi-Fi Internet Requirements
3
Factory Reset
9
Connecting Mondo
3
Register
9
Controls and Connections
4
Clock
9
Remote Control
4
Sleep Mode
9
Powering Mondo
4
Backlight
9
Reciva Radio Portal
4
Wi-Fi Strength
Connecting To Your Network
5
Media Player Operation
10
Choosing a Station
6
Windows + Apple Mac Set-Up
10
Station Updates
6
Accessing Shared Music
10
On-Demand Broadcasts
7
General Media Player Operation
10
General Operation
7
Windows PC UPnP Set-Up
11
Resetting Mondo
7
Troubleshooting
12
Alarm + Clock Functions
8
Spare and Accessories
12
9
Preface
Copyright and
Acknowledgements
Copyright © 2007 Revo Technologies Ltd.
All rights reserved.
Revo Technologies Ltd
The Inox Building
Caldwellside
Lanark
Scotland
United Kingdom
ML11 7SR
Tel. 01555 66 61 61
Int. Tel. +44 1555 66 61 61
Fax. 01555 66 33 44
Int. Fax. +44 1555 66 33 44
Email. [email protected]
Website: www.revo.co.uk
The information in this guide is believed to
be correct at the time of publication.
However, our policy is one of continuous
development and so the information is
subject to change without notice.
Revo, Mondo and M-Port are trademarks or
registered trademarks of Revo Technologies
Limited.
iPod® is a registered trademark of Apple
Computer, Inc.
2
Safety Warnings
Do not operate this radio near water.
Avoid small objects and liquids from getting
into this product.
Do not remove screws or casing parts.
Use only the power supply unit supplied.
EEC: This product has been designed and
type-tested to comply with EU requirements
and carries a CE mark.
Technical Support
Should you encounter any difficulties with
the operation of your Revo Mondo Wi-Fi, or
should you suspect that it may be faulty in
some way, please call our technical support
department on the number below:
01555 66 61 61
Alternatively, email [email protected] or
visit the troubleshooting section of our
website at: www.revo.co.uk/support
MONDO Wi-Fi Manual.qxd
10/12/07
12:01
Page 3
English
Welcome to Mondo Wi-Fi
Thank you for buying our Mondo Wi-Fi internet radio, we feel sure that it will
provide you with years of enjoyment and reliable service.
This guide has been designed to quickly get you up-and-running and listening
to internet radio, offer guidance on the more complex features of this
product and provide information on safety, warranty and registration.
Benefits of Internet Radio
Access to 7,000+ internet radio stations
Search by genre or country
Access ‘Listen Again’ services
Station list updates automatically
No subscription charges
Mondo Wi-Fi Overview
The Mondo Wi-Fi Internet Radio Adaptor is
capable of accessing thousands of internet
radio stations from all over the world, giving
the user an unprecedented choice of radio
content.
Mondo Wi-Fi connects to any sound system
that has RCA inputs, be it a hi-fi system or
boombox type product. It then links to any
broadband Wi-Fi connection to stream both
live and “Listen Again" internet radio
broadcasts.
Mondo has the added benefit of providing
full electronic alarm clock functionality.
Warranty
Revo Technologies Ltd warrants to the
purchaser that this product will be free
from parts and manufacturing defects in
the course of normal use for a period of
one year from the date of purchase.
This warranty does not apply in cases of
accidental damage, where the case has
been removed, wear and tear, negligence,
modification or inappropriate use.
Should you encounter problems with this
product, please contact your supplier or
alternatively see page 2 of this guide for
technical support contact details.
Warranty Registration
It is a warranty condition that you register
your purchase by either completing the
warranty card enclosed with your radio or
alternatively registering online at
www.revo.co.uk/register
Before Getting Started
Wi-Fi Internet Requirements
In order to use your Mondo Wi-Fi internet
radio adaptor you will require a wireless
(Wi-Fi) broadband Internet connection.
If your wireless network is configured to use
Wired Equivalent Privacy (WEP) or Wi-Fi
Protected Access (WPA) data encryption,
you need to know the WEP or WPA code
(Web Key) in order allow Mondo Wi-Fi to
Connecting Mondo
Mondo can be connected to any audio
system that has stereo RCA connectors.
communicate with the network.
Mondo Wi-Fi should be able to operate
anywhere within 35 metres of the wireless
base station – depending on the operating
environment and the specification of your
wireless base station.
Please ensure that your wireless network is
powered-up and connected to your
broadband Internet connection.
Using the connection leads supplied, simply
connect to the corresponding red and black
RCA connectors on Mondo’s rear panel.
3
MONDO Wi-Fi Manual.qxd
10/12/07
12:01
Page 4
English
Controls and Connectors
back
1.
2.
4.
A
1.
3.
A
2.
3.
5.
select
1.
2.
3.
4.
5.
Power
Back
Scroll Left
Scroll Right
Select
1.
2.
3.
4.
Wi-Fi Antenna
Stereo RCA Line-Out
DC Power Socket
Headphone Socket
4.
Remote Control
12.
11.
1.
2.
3.
4.
10.
9.
8.
7.
5.
6.
1. Scroll Left
2. Select
3. Reply
4. Back
5. Presets
6. Media Player
7. Browse
8. Volume Down
9. Scroll Right
10. Volume Up
11. Alarm 0n/Off
12. Standby
Media Player
Stop
Play / Pause
Skip Back
Skip Forward
Powering Mondo Wi-Fi
Your Mondo Wi-Fi internet radio adaptor can be powered from the mains using the power
adaptor supplied.
To power from the mains, insert the power adaptor plug into the DC power socket on the
rear of Mondo Wi-Fi. Pressing the
button will switch Mondo Wi-Fi on.
Only use the power adaptor supplied. Replacements can be purchased from our website
www.revo.co.uk, or alternatively call us on 01555 66 61 61.
Reciva Radio Portal
The station list used by Mondo Wi-Fi’ is
compiled and managed by Reciva Limited,
they also provide the internet radio
technology used in Mondo Wi-Fi.
4
Mondo Wi-Fi users are able to access
additional internet radio services by visiting
the Reciva Radio Portal at - www.reciva.com
and registering their radio.
MONDO Wi-Fi Manual.qxd
10/12/07
12:01
Page 5
English
Connecting To Your Network
Press the ON/OFF button to power-up
Mondo Wi-Fi. Mondo’s LCD screen will
display a welcome message.
Rev
o Pic
ondo
Wi-Fi
Revo
Mo
I
n
t
er
n
e
t
a
d
i
o
Wi-Fi
R
e
v
o
P
i
c
oR
W
i
F
i
Internet Radio
After a few seconds this message will
change to ‘Initialising Network’
Initialising
ReI
vn
oi
P
i
c
o
W
N
e
t
w
r
k
t
i
a
l
i
s
ii
ngFi
InteN
r
n
e
t
e
t
w
orR
kadio
You will then be given the option to scan
for available networks. Press the SELECT
Welcome to DAB
button to action this request.
•••••
NOTE: If you make a mistake at any point,
press BACK to return to previous screen.
Revo Uno
If Mondo can’t find a wirelessDigital
network it Radio
will display the following message.
Setting clock...
If this happens please check that your
wireless router is switched on, refer to
the manufacturer if problem persists.
12:03:26
12-08-2006
If Mondo does find your wireless network,
Scanning..
.
it will display the network name,
for
example:
•••••
10
In some cases Mondo Wi-Fi1Xtra
may find
txthe
t u<
s.
>..on 0203
more than one network. Use
buttons to see the names of each one –
Station
not
when the
and press the SELECT button
name of your own network available
is displayed.
If your network is not configured to
request a password (WEP/WPA), Mondo
will connect to the network and display:
If a WEP/WPA key (password) is
required, Mondo will display the following:
After a few seconds, Mondo will ask you
to input the WEP/WPA code and will
display the password entry screen:
Use the < > buttons to cycle back and
forward through the alpha-numeric
character list. Press the SELECT button
to select a character.
Please note, WEP/WPA pass codes are
case-sensitive.
If you make a mistake while entering your
password, press the BACK button to
delete a character.
After selecting the final character of your
password, scroll to the word ‘END’ and
press the SELECT button to enter your
code. Mondo Wi-Fi should now
successfully connect to your network.
Mondo Wi-Fi will automatically remember
the WEP/WPA code for your network,
and other networks you have used
previously. You will not need to re-enter
these codes in the future.
Connecting to
N
e
t
w
o
r
k
I
n
i
t
i
a
l
i
s
in
g
C
o
n
n
c
t
i
n
g
t
o
Network
Revo Pico Wi-Fi
< Scan for
Internet Radio
n
e
n
n
et
cw
to
ir
nk
g to>
< Co
S
c
a
n
f
o
r
N
et
tw
wo
or
rk
k
n
e
>
N
oit
Wia
rl
ei
ls
ei
sn
sg
In
Ne
t
w
o
r
k
s
F
o
u
n
N
en
tr
wf
oo
rr
kss d
oc
W
i
e
l
e
< NS
a
Netn
we
ot
rw
ko
srk
Foun>
d
My Home Network
Re
ci
ong
Wit
-o
Fi
Cv
oo
nnP
ei
ct
M
y
H
o
m
e
N
e
t
w
o
r
k
I
n
t
e
r
n
e
t
a
d
i
o
N
o
W
i
r
e
e
s
s
N
e
t
w
ol
rR
k
R
e
v
o
P
i
c
W
i
F
i
Revo Pico Wi-Fi
Nn
ete
wr
on
re
kt
sR
Fa
od
ui
no
d
I
In
Nt
ee
tr
wn
oe
rt
kR
Oa
kdio
< In
Si
ct
ai
nal
fi
os
ring
t
w
o
rk
O
MyNe
Hn
oe
mt
ew
Nr
ek
tk
work
o
N
e
t
w
o
r
k
Ini
t
i
a
l
i
s
ing>
Initialising
Network
N
ei
tr
wk
ol
rn
ko
W
e
e
s
s
EN
no
te
r
W
E
P
kt
eyset...
C
l
o
c
Connecting to
N
e
t
wr
ok
rs
kPF
Oo
ku
N
e
t
w
o
Ente
r
W
E
k
en
yd
N
e
t
w
o
r
k
Conn cting to
Connecting to
Nm
etwN
ork
My Ho
twork
Nee
twoe
rk
<ENS
Dc
<a
>n f
0or
1234>
<
Entn
ee
rtw
WEr
P key>
<ENS
Dc
<a
>n o
0ok
1234>
<
f
r
< Scan for
k
Nen
te
wt
ow
ro
kr
Ok >
n
e
t
w
o
r
k
No Wireless >
<N
Ee
Nt
Dw
<o
>rks
0F
1o
2u
3n
4d
>
N
o
W
ire
le
s
s
<
E
N
D
<
>
0
1
2
3
4
>
re
<N
EN
No
Dw
<W
>i
0le
1s
2s
3n
4d
>
e
t
o
rks
F
o
u
MN
ye
Hw
oo
mr
ek
NP
eF
to
wu
on
rd
k
E
nt
t
e
r
Ws
E
k
e
y
Ry
ei
vH
oo
Pe
ia
cN
oe
Ww
io
-r
Fk
i
M
U
s
n
gm
s
v
et
d
k
e
y
M
y
H
o
mn
e
N
e
t
wd
o
r
k
I
n
t
e
r
et
R
a
i
o
<
E
N
D
<
>
0
1
2
3
4
>
Using saved key
Network Ok
<END<> 0 1234>
Nn
ett
woa
rkis
O
k
I
i
ng
Nei
twi
orl
k O
k
6
Nes
ta
wv
or
UsMusic
ing
ek
d key
Now
tuning..
.y
Ente
r WEP ke
<END<> 0 1234>
Cn
ot
ne
nr
ecW
tE
iP
ngke
ty
o
E
Enter WEP key
Network
87.50MHz
99.50MHz
<END<> 0 1234>
UsiS
nc
gan
saf
vo
er
d key
<
<END<> 0 1234>
<e
Ev
No
Dn
<e
>t
0rk
1i
23F
4>
>
R
P
iw
co
o
W
i
Internet Radio
<EN
No
D<W
>ire
0le
1s
2s
34>
t
w
o
rks F
ou
nd
<N
Ee
Nn
D
<
>
>
i
t
ial0
is1
i2
n3
g4
<EI
ND
<
>
0
1
2
3
4>
Nm
ee
twN
oe
rk
My Ho
twork
Using saved key
Us
eg
d ko
ey
Ci
on
ng
nes
ca
tv
in
Us
i
n
g
s
a
v
ed t
key
Nw
eo
tr
wk
orO
kk
Net
Revo Pico Wi-Fi
<Int
Se
cr
an
net
foR
radio
n
e
t
w
o
r
k
Enter WEP key>
Initialising
No N
W
ei
tr
we
ol
re
kss
Networks Found
<END<> 0 1234>
CoH
no
nm
ee
ctN
ie
ng
My
twt
oo
rk
Network
<EN
NS
Dc
<a
>n
0or
1k
234>
<
e
t
w
orf
k
O
network
>
No Wireless
UN
se
it
nw
go
sk
as
vP
eF
do
kn
ed
y
E
n
t
e
rr
W
E
ku
e
y
My Home Network
<END<>
0 1234>
Network Ok
<END<>
0 1234>
Enter WEP key
Using saved key
5
MONDO Wi-Fi Manual.qxd
10/12/07
12:01
Page 6
English
Choosing a Station
When Mondo Wi-Fi has connected to your
wireless network, you are now ready to
select a station.
Welcome to DAB
••••
•
Please
Note: You can move back to the
previous screen at any time by pressing
the BACK button.
R
evo U
no has three main menu
Mondo
Wi-Fi
Digheadings
ital RStations,
adio
Configure and Media
Player.To select a radio station, use the
Sett<
in>gbuttons
clockuntil
...the word STATIONS
Welcome
to DAB
button.
appears, then press the SELECT
•••••
12:now
03:2
6 the option of selecting
Clo
You
have
a ck not set...
1station
2-08-2
6
location
(country) or by genre.
by00
Use the < > buttons to pick yourRevo
searchUno
Scanmethod,
ning..then
. press
10 SELECT.Digital Radio
•••••
Choosing location will give you an
tting clock...
list of countriesSe
broadcasting
1Xtralphabetical
a
<
>
buttons
to
internet
radio.
Use
the
txt us...on 0203
scroll through the country list. Press
to select your desired location.
12:03:26
StatSELECT
ion not
12-08-2006
avaiFor
labexample:
le
Scanning...
•••••
10
You will then be given the choice of listing
6 Music
1Xtra
all station types in this country, or listing
Nt
owus
t.
u.
n.
io
nn
g.
.
.
tx
0
2
03
them by genre eg. Pop, Dance... etc.
Station not
available
Use the < > keys and press SELECT to
make your selection, Mondo Wi-Fi will now
download the station list for your choice.
You can now scroll through the station list
and make your selection by pressing the
SELECT button.
Choosing Genre will give you an
alphabetical list of station types. Use the
< > keys to view these.
Press the SELECT button to choose your
desired genre.
You will now be given the choice of viewing
all stations in this genre, or further
sorting them by location (country)
Now select your chosen station from the
alphabetical list.
Station Updates
Occasionally, Mondo Wi-Fi will tell you that it
is receiving an updated station list. It does
this automatically and periodically, ensuring
that Mondo Wi-Fi always has the latest
station directory on-board.
6
<Stations
>
<Stations
>
<Stations
>
<Location
6537 Stations
<Stations
>
<Location
>
<Stations
>
<Location
<Genre
>
6537
Station
s
<Stations
>
<Stations
6537 Stations>
<Stations
>FM
87.50MOR
Hz
<Location
>
<Genre
<Location
<Albania
<Stations
<Genre
6537 Stations>
<Stations
>
<Location
6537
Station
16
Statio
ns s>
<Stations
>
<Location
6537
Station
s
<Location
>
6537 Stations>
<Stations
>
<Genre
<Albania
6537
Station
s>FM
<
[All
9
9.50Station]
M
Hz
<Genre
<Albania
>
<Location
>
6537
Station
s
16
Statio
ns
323
Stations
<Location
<Genre
6537
CloStation
ckns
not s
s>
et...
16
Statio
<Genre
6537
Station
s
<Location
6537 Stations>
<Genre
>
<
[All
Station]
>
6537
Station
s
<Albania
>
<Location
<
Dance
6537
Stations>
<
[All
Station]
>
323
Stations
<Albania
16
Statio
ns s>
<Genre
>
6537
Station
323
Stations
323
Stations
<Genre
<Albania
>
16
Statio
ns
<Albania
6537 Stations>
<Genre
>
6537
Station
s
16
Statio
ns
<Albania
>
<
Dance
[All
Station]
16
Statio
Loading
3ns
23 s>
6537
Station
<Genre
>
<
Dance
>
16
Statio
ns
[All
Station]
323
Stations
Stations
<Albania
6537
Stations>
<
Station]
323
Stations
<Albania
>
<[All
[All
Station]
OR ns
16
Statio
<Albania
>
323
Stations
<
[All
Station]
16
Statio
Loading
3ns
23
323
Stations
<
Dance
>
Loading
23
<Cool
FM3ns
>
16
Statio
323
Stations
<Albania
<
Dance
>
Stations
323
Stations
<
[All
Station]
>
96
kbps
WMA
Stations
<
Dance
>
16
Statio
ns
[All
Station]
323
Stations
<
Dance
>
323
Stations
<[All
Station]>
>
323
Stations
<
Dance
Loading
323
Stations
<Cool
FM323
>
323
Stations
<
[All
Station]
>
323
Stations
Loading
3MA
23
<Cool
FMW
>
<
Genre
>
Stations
96
kbps
<
Dance
>
323
Stations
Loading
3MA
23
<
Dance
>
Stations
96
kbps
W
Loading
3
23
6537
Stat
ions
323
Stations
<
Dance
>
Stations
Loading
323
323
Stations
Stations
<Cool
FM
>
323
Stations
Genre
<
Dance
>
Stations
<Cool
FMW
>
96
kbps
<
Genre
>
Loading
3MA
23
6
Music
6537
Stat
ions
323
Stations
<
Dance
>
Loading
3MA
23
<Cool
FM
96
kbps
<Cool
FMW
>
6537
Stat
ions
Stations
Loading
3
23
Now
tuning..
.
323
Stations
Stations
96
kbps
MA
<Cool
FMW
>
96
kbps
W
Stations
Loading
3MA
23
<
Genre
>
96
kbps
W
MA
<
Dance
>
<
Genre
>
<Cool
FM ions >
Stations
6537
Stat
<
Dance
<Cool
FM
[All
Station]
323
Stations
<
Genre
6537
Stat
ions >
96
kbps
MA
<Cool
FMW
<
Genre
>
323
Stations
96
kbps
W
MA
323
Stations
6537
Stat
ions >
<
Genre
96
kbps
6537
Stat
ions
<Cool
FMWMA
>
6537
Stations >
< Dance
96
kbps
WMA
[All
Station]
<
Genre
>
<
Dance
>
323
Stations
Loading
323
<
Genre
>
[All
Station]
323
Stations
<
Dance
6537
Stations >
<
Genre
>
323
Stations
<
Dance
Stations
6537
Stations >
323
Stations
323
Stations
<
Dance
6537
Stations >
<
Genre
>
323 Stations
<
[All
Station]
>
Loading
3ions
23
323
Stations
6537
Stat
Loading
3
23
<Cool
FM>
<
Dance
>
[All
Station]>
323
Stations
Stations
<
Dance
<
[All
Station]
>
96
kbps
WMA
323
Stations
Stations
Dance
>
<
[All
Station]
323
Stations
323
Stations
<
[All
Station]>
>
323
Stations
<
Dance
Loading
323
<Cool
FM>
323
Stations
<Cool
FM>
Loading
3MA
23
323
Stations
Stations
96
kbps
W
<
[All
Station]
>
Station
Update
Loading
3
23
<
[All
Station]
>
Stations
96
kbps
W
Loading
3MA
23
323
Stations
<
[All
Station]
>
from
Reciva
Stations
323
Stations
Loading
3
23
Stations
<Cool
FM>
323
Stations
<
[All
Station]
>
Stations
Station
<Cool
FM>
96
kbps
W
MA
Loading
3Update
23
323
Stations
Station
Update
Loading
3
23
<Cool
FM>
from
Reciva
96
kbps
W
<Cool
FM>
Stations
Loading
3MA
23
from
Reciva
Stations
96
kbps
W
MA
<Cool
FM>
96
kbps
W
Stations
Loading
3MA
23
96
kbps
W
MA
Station
<Cool
FM>Update
Stations
Station
Update
<Cool
FM>
from
Reciva
96
kbps
WUpdate
MA
<Cool
FM>
Station
from
Reciva
96
kbps
WUpdate
MA
Station
96
kbps
WUpdate
MA
from
Reciva
Station
<Cool
FM>
from
Reciva
96 from
kbps Reciva
WMA
Station Update
Station Update
from Reciva
Station
Update
from Reciva
from Reciva
Station
Update
from Reciva
94.50MHz
Preset 1
BBC 7
87.50MHz
????????
99.50MHz
MONDO Wi-Fi Manual.qxd
10/12/07
12:01
Page 7
English
On-Demand Broadcasts
Some radio stations provide a number of
additional ways to listen to content; for
example being able to listen to radio
shows that have already been broadcast,
know as On-Demand or ‘Listen-Again’.
To choose between a ‘Live’ broadcast or
an On-Demand one, simply use the < >
buttons to select your option and press
SELECT to choose.
<
<
<
Live (Real
Live
(Real >
Audio)
Audio)
Live
(Real >
<
<
Audio)
On Demand
On Demand
<
On Demand
OR
<
<
If you select On-Demand, you will be
presented with a list of shows that are
available to ‘Listen Again’.
Use the < > buttons until your choice is
displayed on the LCD, then press the
SELECT button to confirm.
Some stations may allow you to fastforward through an On-Demand
broadcast. Do so by pressing BROWSE
on the remote control and using the < >
buttons to forward and rewind through
the broadcast. Press SELECT to play
from your selected point.
Chart
Live (Show
Real
Chart
Show
Audio)
< Chart Show
Start
e
<
On Tim
Dem
and
Start
Tim
<00:03:
03e
<00:03:
03
Start Time
<00:03:03
< Chart Show
Start Time
<00:03:03
>
>
>
>
>
>
>
>
>
>
>
>
>
>
General Operation
Changing Volume
To change Mondo Wi-Fi’s volume, press the
VOLUME UP and DOWN buttons on
Mondo’s remote control, the volume level
will be displayed on Mondo’s LCD screen.
Mondo Wi-Fi will remember its previous
volume level after shutdown and power-up.
Internet Radio Presets
Mondo Wi-Fi can store five presets on its
remote control. To store the current
station, press and hold one of the preset
keys for a period of two seconds. To select
a stored station, simply press the
corresponding preset key.
Returning To Main Menu
You may return to Mondo’s top-line main
menu at anytime by pressing the BACK
button and working back through previous
menus.
LCD Backlight
Under standard factory settings, Mondo will
dim its LCD backlight after approximately
30 seconds. Pressing any button on Mondo
or the remote control will temporarily return
the LCD brightness to full. To change these
factory settings see the ‘Backlight’
instructions on page 9 .
Requesting a Station
If you want to listen to a radio station that
is not listed in Mondo’s station list, you can
visit the Reciva website at
http://www.reciva.com/ and make a
request to add the station to the list.
Resetting Mondo Wi-Fi
In the unlikely even that Mondo Wi-Fi should
‘crash’, ‘freeze’ or stop responding to key
presses, it is possible to perform a reset
and bring it ‘back to life’.
factory reset will completely reset Mondo’s
memory, clearing all WEP/WPA codes and
user settings. This will effectively return
Mondo to its default factory settings.
A ‘Factory Reset’ can be activated from
Mondo’s ‘Configure’ menu. Performing a
7
MONDO Wi-Fi Manual.qxd
10/12/07
12:01
Page 8
English
Alarm + Clock Functions
Setting Mondo’s Clock
Turn Mondo Wi-Fi on and from the
Configure menu locate the Clock option.
Press SELECT and Mondo will give you
two options; ‘Set Clock’ or ‘Set Alarm’.
Choose ‘Set Clock’ and press SELECT,
now use the < > keys to change the hour,
then press SELECT to set. Mondo Wi-Fi
will now ask you to set the minutes in the
same way, press SELECT to set the time.
Setting An Alarm
<Set clock
Set minutes
<08:05
>
>
Press the
button to switch on your
radio, then press the
button on the
Mondo Wi-Fi remote control. Use the < >
keys to change the hour, then press
SELECT to set. Mondo Wi-Fi will now ask
you to set the minutes in the same way,
press SELECT to set the alarm time.
<Set alarm
>
<Alarm1
>
Set alarm
<On
>
08:00
<Set time
>
Set minutes
<08:05
>
Buzzer
<Set mode
>
Once
Set days
>
08:05:10
10-10-2007
BBC Radio 1
calls cost max
Snooze 10 mins
<
10
>
Press the
button to put Mondo into
standby mode. Mondo will now display the
current time on the top row of its display,
with the alarm time shown in brackets on
the second line of the display.
Sleep time
<
15 mins
>
Mondo Wi-Fi wake you up to an audible
tone, to stop the alarm simly press any
button on Mondo or its remote control.
When the alarm has been deactivated,
Mondo will switch to the radio station that
was playing before Mondo went into
standby mode.
8
¯
¯
Clock
Clock
˘
˘
¯
¯
Clock
Clock
˘
˘
Clock ˘
¯ Set
Clock
Set
Clock
08:10
08:10
Set Clock
Set
Clock
Set
A
larm
08:10
Set
Alarm
08:10
0
0:00
00:
00
Set
Clock
Se08:10
t Alarm
l
AS
le
at
r0
mA
Sa
er
tm
:
0
Ala0
r0
m:
S0
et:
0
:1
0
0
0
7:
0
0
7
:
1
0
Set Alarm
Ala
r
m
S
et:
0
0
:0
0
Ala
r
m
S
et:
22:35
0
7
:1
0
22:35
07:10 )
(07:10
(07:10
)
Alarm Set
:
22:35
0
7
:
1
0
22:35
(07:10 )
(07:10 )
22:35
(07:10 )
MONDO Wi-Fi Manual.qxd
10/12/07
12:01
Page 9
English
Configure Menu
Network Configuration
Enables you to scan again for connection to
another wireless network, or to manually
configure the network parameters. You can
also choose to enable the ‘Low Signal
Warning’ prompt when your wireless
network signal is low.
Version
This will display such information as your
device s serial number and
hardware/software version numbers.
This information may be requested when
dealing with technical support issues.
Update Firmware
Use this to check whether there are any
firmware updates available for your Mondo
Wi-Fi radio adaptor. Mondo will check, and
prompt you if there is. You can then make
the decision whether to start a firmware
download or not. A firmware update can
take several minutes, do not switch Mondo
Wi-Fi off until this procedure has been
completed. Doing so my cause permanent
damage.
Language
This allows you to change Mondo’s display
language. Languages supported include
English, French, German, Italian,
Norwegian, Danish, Dutch, Portuguese,
Spanish, Swedish and Finnish.
menu. It is also possible to access the
alarm clock features of Mondo Wi-Fi
through this menu, as an alternative to
using the remote control.
Sleep Mode
Select Sleep Mode from the congigure
menua to programme Mondo to turn itself
off after a pre-defined period of time. Sleep
Mode operates in 15 minute incraments,
from 15 minutes to 90 minutes. Simply use
the < > keys to define the sleep period and
press SELECT. Mondo Wi-Fi will now
automatically put itself into standby mode
after the time has elapsed.
Backlight
It is possible to change the brightness of
Mondo Wi-Fi’s LCD screen via the Configure
menu. There are three brightness settings
as follows:
Normal: This setting defines Mondo’s
normal LCD brightness level. Use the < >
keys to select the required brightness level
and press SELECT to set.
Auto-Bright: When switched on, pressing
any button on Mondo or its remote control
will activate ‘Auto-Bright’ mode for a period
of 30 seconds. The actual brightness level
for ‘Auto-Bright’ is defined by this setting.
See page 7 for details.
Standby: This sets the LCD brighness level
for when Mondo Wi-Fi is in ‘Standby’ mode.
Use the < > keys to select the required
brightness level and press SELECT to set.
Register
Wi-Fi Strength
This will display a key code that can be used
to register your radio on the Reciva
customer portal: http://www.reciva.com/
This will display the strength of your Wi-Fi
signal and will range between 0 % - 100 %.
The further Mondo Wi-Fi is away from your
Wi-Fi base-station, the weaker the signal
strength will be.
Factory Reset
Clock
Set Mondo Wi-Fi’s on-board clock via this
9
MONDO Wi-Fi Manual.qxd
10/12/07
12:01
Page 10
English
Media Player Operation
Mondo Wi-Fi’s media player functionality
allows you to play audio files (AAC, AIFF, AU,
MP3, RM, WAV and WMA) and playlists
(M3U) stored on a networked PC or Apple
Mac. The media player functions have been
tested and certified to operate with
Windows 2000, Windows XP, Windows
Vista and Mac OSX 10.2 or a later version.
Windows PC Set-Up
Ensure that your PC is available on the
network, then using Windows Explorer,
locate the folder where your audio files are
stored...then
Right click on the folder.
Select ‘Properties’
Click on ‘Sharing’
Select “Share this folder on the network’
and ‘Allow network users to change my
files’. Please note, do not try to make your
‘My Documents’ or any of its sub-folders
(e.g. ‘My Music’) shareable.
Apple Mac Set-Up
Setup Windows File Sharing on the MAC:
From the ‘Dock’, click ‘System Preferences’.
From the ‘System Preferences’ window
(under the ‘Internet & Network’ section)
click ‘Sharing’.
From the ‘Sharing’ window, do the following:
Under the ‘Services’ section, enable
‘Personal File Sharing’ and ‘Windows
Sharing’. Also, click ‘Start’ for each of these
services.
Under the ‘Firewall’ section, keep firewall off.
Under the ‘Internet’ section, keep ‘Internet
Sharing’ off.
Setup an Account:
From the ‘System Preferences’ window,
under the ‘System’ section, click ‘Accounts’.
Select an account and remember its ‘Short
Name’ and password. This information will
be used by Mondo Wi-Fi when connecting to
your Mac.
Directory Setup:
From the ‘Dock’, click ‘Finder’. From the
‘Finder’ window, click ‘Applications >
Utilities’. Holding Ctrl click on ‘Directory
Access’ then select ‘Get Info’ and ensure
that read / write enabled. Next double click
on ‘Directory Access’ and enable the
following:
✓
✓
10
AppleTalk
SLP
✓
✓
LDAPv3
SMB/CIFS
You should now be able to access the audio
files on your Mac by selecting ‘Media Player
> Windows Shares’ on Mondo Wi-Fi, then
selecting your Mac from the list of devices.
On selecting your Mac, if no shared folders
are found, press the SELECT button and
select user - at this point you can enter in
the ‘Short Name’ and password for your
Mac account.
Accessing ‘Shared’ Music
When Mondo has connected to your
wireless network, press the BACK button
until ‘Stations’ is displayed. Use the < >
keys to find the ‘Media Player’ menu onscreen, then press the SELECT button.
Using the < > keys, find and select
“Windows Shares’, then ‘Scan for PCs’.
Mondo will now display ‘Finding PCs’. When
the scan is complete, use the < > keys to
find your PC and select, Mondo will now
search for shared folders. Using the < >
keys to highlight the correct folder and
press SELECT.
Mondo will display ‘File Scan...’ as it scans
through all the files on your Mac or PC.
PLEASE NOTE If you have a large number
of files, this operation could take several
minutes.
When Mondo has finished scanning, it will
display ‘By Album’. You can now browse
through the scanned media files, which will
be organised ‘By Album’, ‘By Artist’, and
‘Playlist’ - if available.
IMPORTANT The first time Mondo Wi-Fi
completes a file scan, a file called
“reciva_media_cache” is written to the folder
where the audio files are stored. This will
speed-up subsequent file scans.
Listening To A Single Track
Scroll until ‘By Artist’ is on-screen then
press SELECT. Now use the < > keys to
scroll until your artist choice is displayed,
then press SELECT. Now scroll until your
desired album is displayed, and select it.
The prompt ‘Add To Queue’ will appear at
this point. Scroll until your chosen track
name is on-screen and press SELECT. Your
choice will now start to play.
Listening To A Complete Album
Using the < > keys, locate and select
‘By Artist’, then select your choice of artist.
Now use the < > keys to scroll until your
album choice is displayed, then press
SELECT. The prompt ‘Add To Queue’ will
appear at this point, press SELECT and
your chosen album will start to play.
Queuing Tracks For Playback
Also, for the ‘SMB/CIFS’ item, click
‘Configure’ and select an appropriate
workgroup.
Highlight your chosen track then press
SELECT. ‘Track Added To Queue’ will now
be displayed.
Copy and paste the audio files to
‘Documents’ in the ‘Finder’ window. Ensure
that your Mac is successfully connected to
the wireless network. Note, you may need
to wait for few minutes for the changes to
take effect.
Queuing Albums For Playback
Highlight your chosen album then press
SELECT. Scroll to ’Add To Queue’ then
SELECT. ‘Tracks Added To Queue’ will now
be displayed.
MONDO Wi-Fi Manual.qxd
10/12/07
12:01
Page 11
English
Controlling Playback
Use the STOP
button on Mondo’s
remote control to stop playback.
button to start
Use the PLAY/PAUSE
a track, pause a track, or restart a paused
track.
to
Use SKIP TO PREVIOUS TRACK
start playback of the previous track in the
queue.
to
Use the SKIP TO NEXT TRACK
start playback of the next track in the
queue.
Browsing A Queue
Press the BROWSE button - the currently
playing track name will be displayed. Use
the < > keys to see the tracks that are
queued for playback. To jump ahead and
play a track from the queue, use the < >
keys and SELECT.
Removing Tracks From A Queue
Press the BROWSE button - the currently
playing track name will be displayed.
Use the < > keys to scroll to the track
that you would like to remove from the
queue. Press and hold the STOP key for 2
seconds. Mondo will display ‘Delete Track?’.
Use the < > keys to to highlight either
‘Yes’ or ‘No’. Press SELECT to make your
selection. ‘Removed From Queue’ will be
displayed if you decided to delete a track.
To clear the entire contents of a queue,
select ‘Clear Queue’ from the the main
Media Player menu.
Playing Tracks Randomly
Select and add the individual tracks to the
queue as described previously.
Return to the main top-line Media Player
menu and select ‘Playback Mode’.
Use the < > keys to display ‘Shuffle’, then
select SELECT.
Confirm that ‘Shuffle’ mode should be
enabled, by selecting YES or NO.
Repeating Tracks In A Queue
Select the individual tracks as previously
described.
Return to the main top-line Media Player
menu and select ‘Playback Mode’.
Scroll to display ‘Repeat’, then press
SELECT button.
Confirm that ‘Repeat’ mode should be
enabled, by selecting YES or NO.
Windows PC UPnP Set-Up
If your PC is running Microsoft Windows XP
or Vista, then you can use Window Media
Player 11 (WMP 11) to act as your UPnP
(Universal Plug and Play) media server 1.0.
WMP 11 can be downloaded from
Microsoft’s website and installed by following
the instructions detailed in its installation
wizard.
Once installed, Windows Media Player 11
will create a library from all the media files
available to it on your PC. To add new media
files to the library, select ‘File > Add to
Library… > Advanced Options’, click ‘Add’
and choose the files you wish to add and
click ‘OK’.
You will now need to connect Mondo Wi-Fi
to Windows Media Player 11 and configure
it to allow the radio to access your media
library. In order to this, you will need to do
the following:
Keep pressing BACK to get to Mondo’s
top-line menu and then scroll to ‘Media
Player’ and press SELECT.
Now use the < > keys to scroll to ‘UPNP
Servers’ and press SELECT. Mondo will
scan for all available UPnP servers. Note, it
may take a few seconds for Mondo to
complete its scan and before the scan has
been completed. Mondo will display
‘[Empty]’. Mondo will continue to display
‘[Empty]’ if no UPnP servers are found.
If “No PC Found” is displayed on Mondo’s
display, click the library tab in Windows
Media Player and select media sharing, now
select share my media and then click ‘OK’.
At this point you can scan for UPnP
servers on Mondo Wi-Fi again, Mondo will
now be listed as a unknown device in the
media sharing window click the ‘Allow’
button and then click ‘OK’. Mondo Wi-Fi
should now be accessing your Windows
Media Player Library.
PLEASE NOTE that only WMA files in
Windows Media Player are accessible using
UPnP.
Playing Music Using UPnP
When the UPnP server is configured to
share media files with Mondo Wi-Fi, you can
begin playing music as follows:
Press the BACK button until ‘Stations’ is
displayed, then scroll to ‘Media Player’
option, now press the SELECT button.
Use the < > keys to highlight ‘UPNP
Servers’ and press SELECT. Mondo will
scan for all available UPnP servers. Please
note, it may take a few seconds for Mondo
to complete its scan. Before the scan has
been completed, Mondo will display ‘[Empty]’
and continue to do so if no UPnP servers
can be found.
After a successful scan, select your UPnP
server using the < > keys (if there is more
than one UPnP server), and then pressing
the SELECT button.
Mondo will now list the media categories
available from the UPnP server, e.g. ‘Music’,
‘Playlists’ etc. Use the < > keys to choose
which category you wish to browse, then
press SELECT. Use the < > keys to
highlight a sub category and press SELECT.
Scroll to highlight the media files that you
wish to play, then press SELECT. Mondo
will display ‘[Add to Queue]’, press SELECT
again and Mondo will add the tracks to its
queue and begin playing them automatically.
added to the radio’s queue.
11
MONDO Wi-Fi Manual.qxd
10/12/07
12:01
Page 12
English
Browsing A Queue
Press the BROWSE button - the currently
playing track name will be displayed. Use
the < > keys to scroll through the tracks
that are queued for playback. If you want to
jump to a particular place in the queue,
press the SELECT button when the
required track is displayed. It is important to
note here that media files scanned from the
radio’s ‘Windows Shares’ function can also
be added to the radio’s queue.
Full instructions on queue management,
controlling music playback etc. under UPnP
can be found on page 11.
Troubleshooting
If you are experiencing any problems with
your Mondo Wi-Fi internet radio adaptor,
please read the following ‘troubleshooting’
guide. Alternatively can can visit the HELP
section of the Reciva website
(www.reciva.com) the support section of the
Revo website (www.revo.co.uk) or call our
technical support staff on 01555 66 61 61.
If you have trouble connecting Mondo Wi-Fi
to your wireless network, these steps may
help to resolve the problem:
1. Confirm that a Wi-Fi connected PC can
access the Internet (i.e. can browse the
web) using the same network.
5. If you have an encrypted network, check
that you have entered the correct key or
pass phrase into the radio. Remember that
text-format keys are case sensitive. If, when
attempting to connect to an encrypted
network, your radio displays: ‘Wireless
error’ followed by a 5-digit number, then
please ensure that you enter the correct
pass phrase for the network. If the problem
persists, then you may need to consult your
network configuration.
If Mondo Wi-Fi can connect to the network
successfully, but is unable to play particular
stations, it may be due to one of the
following causes:
2. Check that a DHCP server is available, or
that you have configured a static IP address
on the radio. You can configure a static IP
address on the radio using the menu item
‘Configure -> Network Config -> Edit Config’,
and then select ‘No’ for ‘Auto (DHCP)’.
1. The station is not broadcasting at this
time of the day (remember it may be
located in a different time zone).
3. Check that your network’s firewall is not
blocking any outgoing ports. As a
minimum, Mondo Wi-Fi needs access to
UDP and TCP ports 80, 554, 1755, 5000
and 7070.
3. The station is not broadcasting anymore.
4. Check your access point does not
restrict connections to particular MAC
addresses. You can view the radio’s MAC
address using the menu item ‘Configure ->
Network Config -> View Config -> MAC
address’.
2. The station has reached the maximum
allowed number of simultaneous listeners.
4. The link on the radio is out of date.
5. The Internet connection between the
server (often located in a different country)
and you is slow. Try using a PC to play back
the stream via the broadcaster’s web site.
If you can play back the station with a PC,
but not via Mondo Wi-Fi - use the form at
http://www.reciva.com/ to notify Reciva of
the problem - they can change the station
data that is used by the radio.
Accessories and Spares
The following optional accessories and spare parts are available for Mondo.
Please contact your local retailer or alternatively call us on 01555 666 161.
Accessories and spare parts can also be purchased online at www.revo.co.uk
Remote Control:
Replacement Mondo remote control.
Mains Power Supply Unit:
Replacement power supply for Mondo.
Stereo RCA Leads:
Replacement leads to connect Mondo to a hi-fi system or similar.
12
MONDO Wi-Fi Manual.qxd
10/12/07
12:01
Page 13
English
Safety Information
CAUTION:
TO REDUCE THE RISK OF ELECTRIC SHOCK:
DO NOT REMOVE SCREWS, COVERS OR THE CABINENT.
NO USER SERVICING PARTS INSIDE.
REFER SERVICING TO QUALIFIED SERVICE PERSONNEL.
The lightning flash with
arrowhead symbol within an
equilateral triangle is intended
to alert the user to the
presence of uninsulated
"dangerous voltage" within the
product's enclosure that may
be of sufficient magnitude to
constitute a risk of electric
shock to persons.
The exclamation point within an
equilateral triangle is intended
to alert the user to the
presence of important
operating and maintenance
(servicing) instructions in the
literature accompanying the
appliance.
WARNING: TO REDUCE THE RISK OF FIRE
OR ELECTRIC SHOCK, DO NOT EXPOSE
THIS APPLIANCE TO RAIN OR MOISTURE.
IMPORTANT SAFETY INSTRUCTIONS
To reduce the risk of electrical shock, fire,
etc:
1. Read these instructions.
prong. The wide blade or the third prong
are provided for your safety. If the
provided plug does not fit into your outlet,
consult an electrician for replacement of
the obsolete outlet.
10. Protect the power cord from being
walked on or pinched particularly at
plugs, convenience receptacles, and the
point where they exit from the apparatus.
If the power cord is damaged, it must be
repaired by a qualified repairer.
11. Only use attachments/accessories
specified by the manufacturer.
12. Use only with the cart, stand, tripod,
bracket or table specified by the
manufacturer, or sold with the apparatus.
When a cart is used, use caution when
moving the cart/apparatus combination
to avoid injury from tip-over.
PORTABLE CART WARNING
13. Unplug this apparatus during lightning
storms or when unused for long periods
of time.
14. Refer all servicing to qualified service
personnel. Servicing is required when the
apparatus has been damaged in any way,
such as power-supply cord or plug is
damaged, liquid has been spilled or
objects have fallen into the apparatus, the
apparatus has been exposed to rain or
moisture, does not operate normally, or
has been dropped.
2. Keep these Instructions.
3. Heed all Warnings.
4. Follow all instructions.
5. Do not use this apparatus near water.
6. Clean only with dry cloth. For stubborn
stains, use a soft cloth dampened with a
weak solution of mild detergent and
water. Dry the apparatus immediately
afterwards with a clean cloth. Do not use
abrasive clothes, thinners, alcohol, or
other chemical solvents, because they
may damage the finish or remove the
panel lettering.
7.
8.
Do not block any ventilation openings. The
ventilation shall not be impeded by
covering the ventilation openings with
items, such as newspapers, table clothes,
curtains, etc.
Do not install near any heat source such
as radiators, heat registers, stoves, or
other apparatus (including amplifiers) that
produce heat.
9. Do not defeat the safety purpose of the
polarized or grounding - type plug. A
polarized plug has two blades with one
wider than the other. A grounding type
plug has two blades and a third grounding
15. The apparatus shall not be exposed to
dripping or splashing and no objects filled
with liquids, such as vases, shall be
placed on the apparatus.
16. The mains plug or an appliance coupler is
used as the disconnect device, the
disconnect device shall remain readily
operable.
17. Please read Rating Labels at the bottom
of the Sender and Receiver for power
input and other safety information.
FCC
This device complies with Part 15 of the FCC
Rules Operation that is subject to following
two conditions:
(1)
This device may not cause harmful
interference and,
(2)
This device must accept any
interference received, including
interference that may cause undesired
operation.
WARNING: Changes or modifications to this
unit not expressly approved by the party
responsible for compliance could void the
user authority to operate the equipment.
13
MONDO Wi-Fi Manual.qxd
Revo Technologies Ltd
10/12/07
The Inox Building
12:02
Caldwellside
Telephone Support
Online Support
Page 64
Lanark
Scotland
United Kingdom
01555 666 161
www.revo.co.uk/support
[email protected]
ML11 7SR