1
SEARS
!
OWNER'S
MANUAL
Model No.
565. 66480
®
Caution:
Read these instructions
MICROWAVE
carefully before use.
If you follow the
instructions,
your
microwave
oven will
•
Safety
•
Installation
•
Operation
•
Cooking
•
Care and Service
provide you with many
years of good service.
Precaucion:
Lea atentamente
estas
instrucciones antes de la
utilizacion.
OVEN
Instructions
(English
(English
(English
& Spanish)
& Spanish)
& Spanish)
Guide
SAVE THESE INSTRUCTIONS
GUARDE ESTAS INSTRUCCIONES
Sears,
Roebuck and Co., Hoffman
Estates,
IL. 60179,
U.S.A.
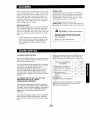
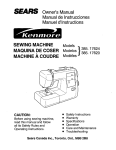
Thank you for purchasing
this Kenmore
Microwave
Oven !
To make a request for service, information
or replacement of parts, Sears will require the complete
Model number and Serial number of your oven. The Model number is found on the label on the inner left side
of the control panel. Note that you must open the door to see the Model number. The Serial number is found
on the label on the back of oven.
Copy your Model and Serial numbers
here.
Model No.
Serial No.
Date of Purchase
•
The oven
must
be level.
•
• The turntable and turntable roller rest must be
in the oven during cooking.
Do not cook bacon directly on the turntable.
Excessive local heating of the turntable may
cause it to break.
Do not
heat
baby
bottles
or baby
food
•
Place the cookware gently on the turntable and
handle it carefully to avoid possible breakage.
microwave
and could
•
Incorrect
turntable
Do not heat narrow-necked
syrup bottles.
containers,
•
Use only the specified
Automatic Popcorn.
Do not attempt
oven.
in your
use of browning dish may cause the
to break. See page 8.
bag size when using
The oven has several built-in safety switches
ensure that the power remains off when the
door is open. Do not tamper with these
switches.
•
to
Do not operate the microwave oven empty.
Operating the oven with no food or food that is
extremely low in moisture can cause fire,
charring or sparking.
PRECAUTIONS
oven. Uneven
cause physical
to deep-fry
heating
injury.
in the
may occur
such as
microwave
Do not do home canning in this microwave
oven as it is impossible to be sure all contents
of the jar have reached boilingtemperature.
Do not use this microwave
oven for
commercial
purposes.
This microwave
made for household
use only.
TO AVOID POSSIBLE
oven
EXPOSURE
TO EXCESSIVE MICROWAVE ENERGY
(a)
(b)
(c)
(d)
Do not attempt to operate this oven with the door open since open-door operation
in harmful exposure to microwave energy. It is important not to defeat or tamper
safety interlocks.
Do not place any object between the oven front face and the door or allow soil or
residue to accumulate on sealing surfaces.
Do not operate the oven if it is damaged. It is particularly important that the oven
closes properly and that there is no damage to the:
(1) DOOR (bent)
(2) HINGES AND LATCHES (broken or loosened)
(3) DOOR SEALS AND SEALING SURFACES
The oven should not be adjusted or repaired by anyone except properly qualified
personnel.
can result
with the
cleaner
door
service
is
When using electrical appliances, basic safety precautions
should be followed, including the following:
WARNING
-
To reduce the risk of burns, electric
to persons or exposure
1. Read all instructions
2,
before using the appliance.
Read and follow the specific "PRECAUTIONS
TO AVOID POSSIBLE EXPOSURE TO
EXCESSIVE MICROWAVE ENERGY" on the
previous page.
to excessive
....
;
Do not overcook
foods. Carefully
attend the
appliance
if paper, plastic, or other combustible
materials
are placed inside the oven to facilitate
cooking.
b,
Some products such as whole eggs and sealed
containers -- for example water with oil or fat
and closed glass jars-- may explode and
therefore should not be heated in this oven.
7,
Use this appliance only for its intended use as
described in the manual. Do not use corrosive
chemicals or vapors in this appliance.
This type of oven is specifically designed to
heat, cook or dry food. It is not designed for
industrial or laboratory use.
8,
As with any appliance, close supervision
necessary when used by children.
9,
Do not
operate
this
Do not use the cavity for storage
purposes.
Do not store combustible
items such as bread,
cookies,
paper products,
etc. inside the oven. If
line,
the oven
oven
is
if it has a damaged
properly
or if it
10. This appliance
qualified
nearest
should
be serviced
only by
service technicians.
Contact the
authorized
service facility
for
examination,
lightning
strikes the power
turn on by itself.
energy:
cord or plug, if it is not working
has been damaged
or dropped.
Keep in mind the following rules at all times:
a.
microwave
6,
3. As with most cooking appliances, close
supervision is necessary to reduce the risk of a
fire in the oven cavity.
If a fire should start:
• Keep the oven door closed
• Turn the oven off, and
• Disconnect the power cord or shut off power at
the fuse or circuit breaker panel.
shock, fire, injury
repair
or adjustment.
11. Do not cover
or block
12. Do not store
or use this
any vents
appliance
on the oven.
outdoors.
may
c. Do not use wire twist-ties in the oven. Be sure
to inspect purchased items for wire twist-ties
and remove before placing them in the oven.
4. This oven must be grounded. Connect only to
properly grounded outlet. See "GROUNDING
INSTRUCTIONS" on page 2.
13. Do not use this oven near water, near a kitchen
sink, in a wet basement or near a swimming
pool, and the like.
14. Do not immerse
cord
or plug
in water.
15. Keep cord
from
heated
surfaces.
away
16. Do not let cord hang over edge of table or
counter.
5. Install or locate this oven only in accordance
with the provided installation instructions.
17. When cleaning surfaces of door and oven that
comes together on closing the door, use only
mild, nonabrasive soaps or detergents applied
with a sponge or soft cloth.
(See "Cleaning" instructions on page 29.)
SAVE THESE INSTRUCTIONS
_k
DANGER
Consult a qualified electrician if the grounding
instructions are not completely understood as to
whether the appliance is properly grounded.
- Electric Shock Hazard
Do not disassemble this appliance. Touching
some of the internal components, even if the
appliance is unplugged, can result in electric
shock that can cause serious personal injury
or death.
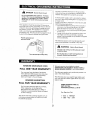
This appliance
electrical
short
must be grounded.
circuit,
grounding
If there
reduces
A short power supply
cord is provided
to reduce
the risk of becoming
entangled
in or tripping
over
a longer
cord.
Longer cord sets or extension
cords may be used
with following
precautions:
• The marked
electrical
rating of the cord set or
extension
cord should
be equal to or higher
than the electrical
rating of the appliance.
• The extension
cord must be a grounding
type
3-wire cord.
is an
the risk
of electric
shock by providing
an escape wire for
the electric
current.
This appliance
is equipped
with a cord that has a grounding
wire with a
grounding
plug. The plug must be plugged
into an
outlet that is properly
installed
and grounded.
Properly
grounded
polarized
outlet
•
and
Longer cord should
be arranged
so that it will
not drape over the countertop
or tabletop
where it can be pulled on by children
or tripped
over accidentally.
The electrical
power
must not be pinched
_
cord must
or crushed
WARNING
- Electric
be kept dry and
in any way.
Shock Hazard
Improper
use of the grounding
in electric shock.
Three-pronged
KENMORE
(grounding)
MICROWAVE
Do not plug into an outlet until appliance
properly installed and grounded.
plug
OVEN
is
Warranty
service is available
by simply
CONTACTING
THE NEAREST
SEARS STORE or
SEARS SERVICE CENTER in the United States.
FULL ONE YEAR WARRANTY
This Warranty applies only while this product is in
use in the United States.
For one year from the date of purchase,
if this Kenmore Microwave Oven fails due
to a defect in material or workmanship,
Sears will repair it, free of charge.
KENMORE
plug can result
MAGNETRON
FULL FIVE YEAR WARRANTY
The Warranty
give
you specific
legal
you may also
state to state.
have
other
which
rights
rights,
SEARS, ROEBUCK AND CO.,
DEPT. 817 WA,
HOFFMAN ESTATES, IL. 60179
For five years from the date of purchase,
if the magnetron in this Kenmore
Microwave Oven fails due to a defect in
material or workmanship,
Sears will repair
it, free of charge.
For Service
Call:
1 - 800 - 4 - REPAIR
1 - 800 - 473 - 7247
The above warranty coverage applies only to
microwave ovens which are used for private
household purposes.
2
and
vary from
!!i!ir i)i
i) iiiililYiYFi!!i
i iiiisiiF!)J)Jiiiii!!ir))iiiiiiii
ii
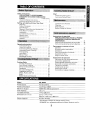
Safety Instructions
Chart
PRECAUTIONS TO AVOID POSSIBLE
Quick-On Cooking Chart .................
26
EXPOSURE TO EXCESSIVE MICROWAVE
Automatic Defrost Chart .................
27
ENERGY ......................
inside cover
Important Safety Instructions
............
!
:::::::::::::::::::::::::::::::::::::::::::::::::::::::
::: :::: ::: ::::::::::::b_:EEEH_EIE_i_HH!Ni!_H?_!_JlIJJE2J_I_IJIEJJlE??_E?!!!!Ii
?IilE}ilEEE_ETIINiii !_NHH_H?Ei£
Electrical Grounding Instructions
.........
2
Setting up & Getting to Know Your Oven
Questions
and Answers
.................
28
Warranty
.............................
2
Cleaning
..............................
29
Table of Contents .......................
3
Sears Service ..........................
29
Specifications ..........................
3
Before Calling for Service ................
30
Names of Oven Parts and Accessories .....
4
Auto Return Turntable ...................
5
Installation
............................
5
Control Panel and Features ...............
6
Setting Clock ..........................
7
Instrucciones de seguridad
Child Lock-Out .........................
7
PRECAUCIONES PARA EVITAR LA POSIBLE
Utensils ..............................
8
ESPOSICION A EXCESIVA ENERGIA DE
::_i_i_:_#_::_::qiiiiiiiiiiiii_:iiiii_i_i::i_:_f_::i_!ii!:=:_==:=i_!i!_==_:_=:_:_===_=_i=_i=_==_H_iiiiii_ii_:i:_:_iii_iHi
_iii_i;ii_!i
i! iii!!iii!iiiiiiiii)iiiiiiiiiiiiiiiiiiil;iiiiiii!i
ili!!i i
MICROONDAS .........................
31
ii[iii ii
iiiiiiiiiL; ]iii!iiiiiiiiiiiii!!!!!iiiii!iiiiii! iiiiiiiiiiiiiiii
Operating Instructions
Automatic Popcorn .....................
Quick-On Cooking ......................
Automatic Defrost by Weight .............
Automatic Senosr Cooking ...............
Time Cooking ..........................
Hold Warm ............................
Minute Timer ..........................
Multistage Cooking .....................
Cooking Guide
Cooking Techniques ....................
Auto Sensor Cooking ....................
Sensor Cooking Recipes .................
Appetizers
............................
Soup and Sandwiches ...................
Vegetables and Rice ....................
Meats, Poultry and Fish .................
Eggs ..................................
Baked Goods and Desserts ...............
Instrucciones
Instrucciones
9
9
10
11
t2
13
13
13
14
15
17
19
20
21
22
24
25
Instrucciones
de operacion
Palomitas de maiz automaticamente
.......
Cocinando rapidamente .................
Descongelado automatico por peso .......
Cocinado con sensor automatico ..........
-Iqempo de cocinado .....................
Conservando el calor ....................
Alarma por minuto ......................
Cocinando en etapas multiples ...........
37
37
38
39
40
41
41
41
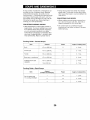
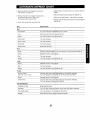
Power Source
AC 120 V, 60 Hz
Power Consumption
13.2 Amps,
Maximum
1000W (IEC-705 test procedure)
1.6 cu. ft.
Dimensions
Weight
(w x h x d)
(Approx.)
1480W
14-3/16'' (360 ram)
23-7/16'' x 14" x 17-5/8"
(595 mm x 357 mm x 448 mm)
45.2 Ibs. (20.0 kg)
Specifications
subject to change without notice.
KENMORE is a registered trademark of Sears, Roebuck and Co..
3
32
33
33
34
34
35
36
36
565. 66480
Oven Capacity
Turntable Diameter
importantes de seguridad ....
de toma de tierra electrica ....
Para preparar y conocer su horno
Garantia ..............................
Bandeja rotativa automatica ..............
Instalacion .............................
Panel de controles y funciones ............
Ajustando el reloj .......................
Seguro contra ni6os ....................
Model
Output
i iiiii iii iii!iiiiiiiii
iiiiiiii}iiiiiiiiiiiiiiiiiiiiiiiiii;:
i ii!i!iiiiiiiiH!iii
iiiii;iiiiiiiiiii!!
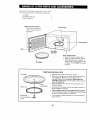
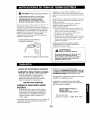
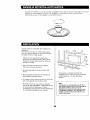
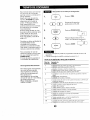
Remove the oven and all materials
from the carton.
Your oven comes with the following
Turntable
Turntable roller rest
Owner's Manual
Safety
Shuts
interlock
off oven
door is opened
operation.
accessories:
1
1
1
system
power
Interior light
if
during
--..-..._._
Control panel
Door
--
Turntable
roller
rest
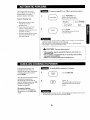
Door release button
• Press the button to open door.
• When you open the door during
cooking process, the cooking
stops but the program will not be
canceled. Touch START to resume
cooking.
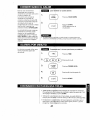
Turntable
TURNTABLE
Turntable
Roller rest
Receptacle
at cavity bottom----_
center
Hub
(underside)
INSTALLATION
1. Place the roller rest on the cavity bottom.
2. Place the turntable on top of the roller rest as shown
in the diagram. Make sure the turntable hub is
securely locked in the receptacle. Never place the
turntable upside down. The turntable rotation should
never be restricted,
Both turntable and roller rest must always be used
during cooking.
All food and containers of food are always placed on
this turntable for cooking.
This turntable returns to its original starting position
when cooking is finished. The light and fan will remain
on but microwave power is turned off.
This turntable rotates clockwise or counterclockwise;
this is normal.
4
When a cook cycle is completed, the turntable will continue to turn until it reaches the same position
as it was at the start. If however, you open the door it will stop immediately even if it has not reached
the original position.
..-,
•
. .
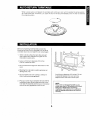
Remove all packing material and accessories.
Examine the oven for any damage such as dents
or broken door. Do not install if oven is damaged.
1. Select a level surface that provides enough
open space (see illustration at right) for the
inlet and/or outlet vents.
•
Leave a minimum
clearance
(7.5 cm) above the oven.
•
Do not remove the legs from the bottom
oven.
of the
•
Blocking the inlet and/or outlet openings
damage the oven.
can
•
Do not install oven over a range, cooktop or
other heat-producing
appliance.
2.
of 3 inches
OPEN
A minimum clearance of 3 inches (7.5 cm)
is required between the oven and any
adjacent wall. One side must be open.
Plug your oven into a standard 120-volt / 60-Hz
household outlet. Be sure the electrical circuit
is at least 15 amperes and that your microwave
oven is the only appliance on the circuit.
NOTE:
This unit is not designed for 50 Hz or any
circuit other than a 120-volt/60-Hz
AC circuit.
This oven is designed for countertop
installation
only. Insertion into a cabinet or
wall will damage the product and void the
wa rra nty.
5
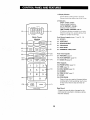
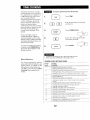
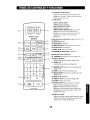
(1) Display
Counts
Shows
Window
down cooking
time in seconds,
clock time when oven is not in use.
(2) Indicators
STEP1/STEP2/STEP3
:
Cooking stage indicators
AUTO/DEFROST/PAUSE
:
Cooking mode indicators
TIME/POWER/SERVING/LB/oz
:
A flashing indicator prompts you to enter
desired cooking time, power setting, food
weight or number of servings.
f
STEP
(2)
(1)
[ -I .. cl o ozi
Quick
Touch
Auto Sensor keypads (page 11 and 15 - 18)
SENSOR
(3)
(4) VEGETABLE
,(4)
(3)--
POTATO
(5) SENSOR REHEAT
--(5)
(6) STEW/SOUP
(7)
(6)_
PIZZA SLICE
--(8)
(8) DONENESS
-(10)
--(11)
Auto menu keypads
<HIGH/LOW>
(7)
(9)_
AUTO---_OPCORNIDEFROST
(12)---(13)
QUICK
I
ON
(9)
y
POPCORN (page 9)
(10) AUTO DEFROST (page 10)
:: T1-PovvER
I .o,oX---(14)
(11) QUICK ON (page 9)
Other keypads
(12) POWER LEVEL (page 12)
2
(13) TIME (page 12)
(16)-
4
5
6
7
8
9-
w
--(15)
(14) HOLD WARM (page 13)
(15) NUMBER
(16) TIME OF DAY (page 7)
(17) START
(18) STOP/CLEAR
-TIME
OF
DAY
i"
I START
18) --
--(17)
DOOR
Clears all previous setting if pressed before
cooking starts. During cooking: touch once
to stop oven; twice to stop and clear all
entries.
Beep Sound
RELEASE
A beep tone sounds when a keypad on the
control panel is touched to indicate a setting
has been entered.
6
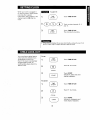
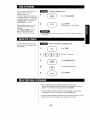
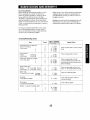
When your oven is plugged
in
for the first time or when power
resumes
after a power
interruption,
the numbers
in the
display
reset to 0:00. Set the
clock.
To set 3:15 :
1,
OF DAY
Touch TIME OF DAY.
Touch
num0er
keypads
3,1
and 5.
=
OF
DAY __
TIME
•
Your oven has a safety feature
which prevents children from
accidentally turning it on.
Even if the oven is accidentally
programmed
to cook, no
cooking takes place when this
feature is set.
Touch TIME OF DAY.
The clock starts counting.
If the clock (or display) shows any abnormality,
unplug
the AC outlet. Plug it in again and then reset the clock.
the oven from
To set :
1.
OF DAY
Touch TIME OF DAY.
Touch 9 four times.
=
4 times
=
_
START
Touch START.
Indicator L lights and clock
display reappears.
To cancel :
1.
OF
DAY
TIME
Touch TIME OF DAY.
Touch
7 four times.
=
4 times
Touch START.
Indicator L disappears and
clock display reappears.
,
7
IkVff,_)
II;I ;t f.,NI_ k'Lell[o,)'_,l
k_ILI
l_'t=1ii_i l_V_l[_=(eWFAvj _ [okvj =1_
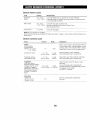
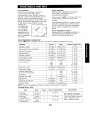
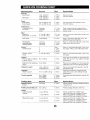
Utensils
Use
Remarks
Small smooth
pieces can be used to cover thin parts of meat or
poultry to prevent overcooking.
Arcing can occur if foil is too close
to oven walls. The foil should be at least 1 inch (2.5 cm) away from
oven walls.
Aluminum
foil
Shielding
Browning
dish
Searing
meats
Follow manufacturer's
instructions,
The bottom of browning
dish
must be at least 3/16 inch (5 mm) above the turntable.
Incorrect
usage may cause the turntable
..!
Reheating
short-term
Glass
Warming
Always remove lid. Use only to heat food until
glass jars are not heat resistant and may break.
Glassware
Cooking
Heat-resistant
oven glassware only. Make sure there
trim. Do not use cracked or chipped dishes.
Oven cooking
bags
Cooking
Follow
Paper plates
and cups
Short-term
warming
and cookinq
Use for short-term
cooking/warming
unattended
while cooking.
Paper towels
Reheating
short-term
Use to cover food for reheating
and absorbing
supervision
for a short-term
cooking only.
jars
Parchment
and
cooking
to break.
Dinnerware
Microwave-safe
only. Follow manufacturer's
use cracked or chipped dishes.
manufacturer's
Make slits to allow
paper
and
cooking
Reheating
short-term
and
cooking
just warm.
Do not close
with
metal
spattering
only.
or a wrap
Do
not
leave
fat.
tie.
oven
Use with
for steaming.
Microwave-safe
only. Follow
the manufacturer's
instructions.
Should be labeled
"Microwave
Safe." Some plastic containers
soften asthe food inside gets hot.
Microwave-safe
only. Use to cover food during cooking
moisture.
Do not allow plastic wrap to touch food.
Thermometers
Cooking
Microwave-safe
Wax paper
Cooking
Use as a cover to prevent
wrap
Most
is no metallic
Cooking
Plastic
Do not
steam to escape.
Use as a cover to prevent
Cookinq
Plastic
instructions.
instructions.
only
(meat
to retain
and candy thermometers).
spattering
and to retain
moisture.
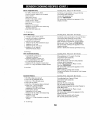
ikvJrz_
i =1;1f_'1
L _]i lie]l-'] =lW,_\vLe]
i m]=1=]II#l ikVA
I [_];{e_VlVl-'\vJ
=l[e_vJ=1_
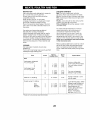
Remarks
Utensils
Aluminum
Food carton
Aluminum
tray may cause arcing. Transfer the food
microwave-safe
dish before cooking.
tray
with
metal
Metal
or metal-trimmed
Meta
twist
handle
May cause arcinq. Transfer
utensils
Metal shields the food
cause arcing.
ties
foam
microwave
energy.
dish,
Metal trim may
They may cause arcing and could cause a fire in the oven.
May cause a fire in the oven.
Paper bags
Plastic
food into microwave-safe
from
into a
Plastic foam may melt or contaminate
exposed to high temperature.
cups
Wood will dry out when used in the microwave
or crack.
Wood
UTENSIL TEST:
the liquid
inside when
oven and may split
Fil a microwave-safe container with 1 cup of cold water (250 mL) and place it in the oven
along with the utensil in question. Cook on HI power for I minute. Carefully feel the utensil.
If the empty utensil is warm, it should not be used for microwave cooking. Do not exceed
1 minute testing time. This test cannot be used for plastic containers.
_,
CAUTION
- Personal Injury Hazard
"13ghtly-closed utensils could explode.
Closed containers are opened and plastic pouches pierced before cooking.
8
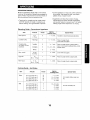
To pop one bag of 3.5-oz (100-g) microwave
This feature lets you pop a
3.5-oz (100-g) or 3.0-oz (85-g)
prepackaged microwave
popcorn quickly and easily.
.
POPCORN_
Popcorn Popping Tips:
Touch POPCORN once.
Display shows bag size.
Select bag size as follows.
L
•
Microwave popcorn bag
should be at room
temperature.
• Place only one bag in the
oven at a time. Follow
package instructions. Do not
increase quantity.
• Popcorn popping devices are
not recommended
for use
with this feature.
popcorn:
Bag Size
Touch POPCORN
3.5 oz (100 g)
3.0 oz (85 g)
once
twice
.
START
•
•
•
_
The
shows the time
Touchdisplay
START.
counting down.
If popcorn
bag size is not 3.5 oz (100 g) or 3.0 oz (85 g}, do not use this
feature. Follow instructions
on the package.
Do not leave the oven unattended
while the corn is being popped.
Rememberto
supervise
children closely.
_
CAUTION
- Personal Injury Hazard
* After popping, open bag carefully. Popcorn and steam are
extremely hot.
* Do not reheat unpopped kernels or reuse bag. Overcooking
can result in an oven fire.
* Never use a brown paper bag for popping corn.
A time-saving feature, this
simplified control lets you
quickly set and start microwave
cooking without the need to
touch START.
You can choose from ten preset
cooking time selections
(30 seconds to 9 minutes) to
cook at highest power level (HI).
Quick-On cooking chart is
located on page 26.
30 seconds Cooking
To set Quick-On cooking for
30 seconds, touch QUICK ON
and 0.
To set Quick-On
1.
_
QUICKoN_
2.
•
cooking for 2 minutes:
Touch QUICK ON.
Touch
2.
The oven begins cooking and
display shows time counting
down.
You may open the door to stop cooking
To start again, close the door and touch
9
before the selected
START.
time
is over.
The Auto Defrost by Weight
feature allows precise, even
defrosting of frozen foods -automatically.
Just touch the AUTO DEFROST
key, then enter the frozen food's
weight using the number keys
(weight up to 5.9 Ibs.). The menu
selects 1 Ib if a weight is not
entered.
To defrost 1,2 Ib of chicken pieces:
,
"_
Touch AUTO DEFROST.
EFROSTJ
I _IC"
I
I-
LB1
Enter the weight by touching
1
and then 2.
oEF,o_T
( I'L,=,
Pause
This feature has a built-in pause
mechanism to allow for
checking, turning, separating or
rearranging the food. When the
PAUSE indicator flashes in the
display (and the beep tone
sounds 5 times), open the door
and rearrange the food. If you
do not open the door at the
pause, the oven automatically
starts the second defrost period.
Auto Defrosting
on page 27.
DAUTO
Touch START.
Indicator STEP1 lights and the
total defrost time appears in the
display.
,
After the first stage of cooking,
5 times. The indicator changes
the PAUSE indicator flashes for
and separate, rearrange or turn
the beep tone sounds
from STEP1 to STEP 2 and
5 seconds. Open the door
food over.
chart is located
o
START
defrosting.
Touch
START to resume
_
For manual
defrosting
using
Time Cooking,
see page 12.
•
Defrosting Tips:
•
Check the food during
defrosting.
•
•
To enter a weight of less than 1 Ib, always press 0 first. For example, to
enter 0.2 Ib, press O and then 2.
Only one digit can be entered after a decimal point. If in doubt, convert
to the lower number.
Remove frozen food from its
original paper or plastic wrap.
When it is difficult to remove
the wrap, defrost the food in
the wrap until the Pause.
At the pause, remove the
wrap.
Conversion
Place foods in a flat
microwave-safe
baking dish
or roasting rack to catch
drippings.
Food should still be
somewhat icy in the center
when removed from the oven.
The Auto Defrost menu
includes standing time.
Food can be defrosted
styrofoam package.
in a
10
Chart
Ounces
Tenths of a Pound
1-2
0.1
3-4
0.2
5
0.3
6-7
0.4
8
0.5
9 -10
0.6
11 -12
0.7
13
0.8
14- 15
0.9
Automatic Sensor cooking/
reheating allows direct access
operation for a variety of foods.
Five cooking courses are
provided.
At the beginning of a cooking
period, the sensor measures the
steam generated from the food
in the oven to determine the
correct cooking time and power
level.
See pages
information
and sample
15-
To reheat 1 serving of frozen foods:
Touch SENSOR REHEAT twice.
=
SENSOR
REH EAT )
ll J_l--I
C
Touch DONENESS HIGH/LOW
keypad once or twice to adjust,
if desired.
,
ONENESS_
IGH/LOWJ
18 for more
on Sensor
recipes.
display.
.... in the
Course number appears
Touch once for longer cooking
time. Indicator H appears.
Cooking
Touch twice for shorter cooking
time. Indicator L appears.
The oven automatically
sets to
medium
doneness
if no selection
is made.
....
:
-
!
Cooking "lips:
• Cover food with plastic wrap,
wax paper or well-fit
casserole lid. Loose-fitting
covers may cause the oven to
miscalculate cooking time.
(Never use tightly sealed
plastic containers.)
Touch START.
While the display shows the
selected Course number and/or
doneness, the oven sensor
measures the amount of steam in
the oven to determine the
cooking time.
After sensor measures steam,
cooking time appears in the
display window. Beep tone
sounds for 1 second and starts
the time count down.
=
_
START
Small quantities
of foods (less
than 4 oz or 115 g) should not
be cooked using Auto Sensor.
Cook using -Iqme cooking.
•
The room temperature
be below 95°F (35°C).
should
Keep the inside of oven, the
turntable and the outside of
cooking containers dry.
Wipe off all spillovers.
Excessive humidity in the
oven may result in an
incorrect cooking time.
Do not open the oven door
while the display still shows
the selected course number at
the beginning of cooking.
During this period, the oven
sensor measures the amount
of steam in the oven to
determine the cooking time,
which appears in the display
when the process has
completed.
AUTO
SENSOR
Cookin,q
courses
Food Category
Touch keypad
Course No.
once
H1
SENSOR REHEAT, Frozen foods
(to defrost/reheat
frozen foods)
twice
H2
POTATO
once
A1
STEW/SOUP
once
A2
VEGETABLE
once
A3
PIZZA SLICE
once
A4
SENSOR REHEAT, Refrigerated
(to reheat non-frozen foods)
foods
DONENESS
HIGH/LOW
keypad:
Proper food doneness varies with each individual. After a few Auto
Sensor Cooking trials, you will learn which setting produces the best
results for you.
If an error message (El or E2) flashes:
• If the door is opened before time countdown appears in the display,
E1 will flash. Press STOP/CLEAR
twice and restart using Time Cooking.
(Partially-cooked
foods are no longer suitable for Auto Sensor Cooking.)
• E2 will flash if the oven has not been plugged into a power supply for
more than five minutes when you start a sensor cooking. Press
STOP/CLEAR
twice and wait for 5 minutes to restart from step 1.
11
This basic microwave cooking
method allows you to cook food
for a desired time. In addition to
the 141(maximum) power level,
you can select different
microwave power from 9 levels,
1 (10% of HI power level) to 9
(90% of HI power level) for the
foods that require slower
cooking. The oven also provides
power level 0 (no power) so that
the clock can be utilized as a
minute timer. See page 13 for
details.
To cook at power level 8 for 40 seconds:
Touch TIME.
o
Enter 40 seconds by touching
and then 0.
2.
POWER
Touch
POWER
LEVEL.
LEVEL
[
'ILl
III
POWER
(_
Touch
8 to select
The display
shows
power
8.
level 8.
STEPI
To check the power level during
cooking,
touch POWER LEVEL.
The power level appears
in the
display
window.
( )
Touch
START.
I
START
,
•
•
Manual
sty,,
_
Foods with high moisture
content should be cooked on
maximum power, as this is the
fastest cooking method and best
maintains the natural flavor and
texture of the foods.
4
'-'!
_o,,,E.
Cooking time can be set up to 99 minutes 99 seconds.
When you cook on HI power, skip steps 3 and 4.
Defrosting
POWER LEVEL SETTING GUIDE
For
manual
defrosting
(without
using Auto Defrost features),
use
power
level 3. To speed
up the
defrosting
of dense foods over
1 Ib (450 g), you may start on Hlfor
2 minutes,
then reduce to the
level 3.
Power
Level
Cooking
Examples
1
• Softening cream cheese and butter•
• Keeping casseroles and main dishes warm
2
• Softening chocolate and clarifying butter.
• Heating breads, rolls, pancakes, tacos, tortillas and French toast•
• Taking the chill out of fruit. Heating small amounts of food.
3
• Completing the cooking cycle of casseroles,
• Manual defrosting.
• Thawing meat, poultry and seafood.
4
• Cooking tess tender cuts of meat in liquid or slow-cooking
dishes.
• Completing the cooking cycle of less tender roasts.
5
• Cooking
• Cooking
• Cooking
stews and soups after bringing to a boil.
custards and pasta.
rump roast, ham, vea! and lamb.
6
• Cooking
scrambled
7
* Cooking
cheese
8
• Reheating
9
• Cooking onions, celery and green peppers quickly.
• Reheating rice and pasta.
HI
• Cooking poultry, vegetables and most casseroles.
• Preheating a browning dish. Boiling water.
12
stews
and sauces.
eggs. Baking cakes.
dishes.
precooked
or prepared food quickly. Cooking fish.
"his is an appropriate feature to
:eep food warm such as
:asserole, stew, etc.
4old Warm keeps food warm for
i programmed
100 minutes after
i cooking program is completed
)r until the door is opened or
;TOP/CLEAR is pressed.
To keep a casserole warm:
1
WARM
Touch HOLD WARM.
START
Touch START.
HOLD appears in the display.
.
-he Hold Warm
Jsed with
feature
the Time
)rogram.
-ouch HOLD
Cooking
WARM
epeat
Time
;hown
on the
can be
Cooking
previous
and then
steps
page.
•
Do not defrost
may occur.
Zou can use the timer function
)f your oven for purposes other
han cooking.
food
and then
use the Hold Warm
feature,
as spoilage
To set 3 minutes for a telephone call:
1.
TIME
Touch TIME.
Touch
3 , 0 and
Touch
POWER
O.
LEVEL.
LEVEL
4.
@
Touch 0 (power
level 0).
Touch START.
You can program up to 3 stages of cooking in sequence.
To program 2-stage or 3-stage cooking, repeat the Time Cooking
steps 1 to 4 on the previous page and touch START.
Using the Minute Timer feature for the first stage, you can delay
cooking start time by up to 99 minutes and 99 seconds.
Using the Auto Defrost by Weight feature for the first stage, you can
defrost first and can program up to 3 stages of cooking.
13
Microwave
Arranging:
Advantages of microwave cooking are speed
and efficiency. For warming, heating, and
defrosting, nothing compares. There are a few
tips that will make microwaving
easier and
more enjoyable.
clams
burst.
as potatoes,
roasts
vegetables,
so they
Shielding:
To prevent
overcooking,
bony areas can be protected
with
of aluminum
foil.
and
Standing
Time:
Foods
after removal
from
necessary
to allow
do not
continue
thin or
small strips
cooking
the oven. Standing
foods to complete
even
time is
cooking.
Defrosting
The microwave's
ability to defrost is one of its
most appreciated features. Many of the same
principles and techniques that apply to
microwave cooking also apply to microwave
defrosting.
Shape and Size
Small pieces cook faster than large ones. For
even cooking, it is important to have all the
pieces the same size. Evenly shaped pieces,
round or doughnut shaped, microwave best.
When cooking items of varying thickness,
arrange the thick portion near the outer edge
of the dish.
Converting Recipes
Microwave recipes will likely call for less liquid
and cooking time.
Moisture,
Sugar and Fat
Food high in moisture,
sugar or fat cook faster
than foods that are low in these substances.
of liquid to moist foods.
of water slows cooking.
and whole
Reheating:
Place food that is denser/larger/
thicker to the outer edge and the
smaller/thinner
or more porous food to the
center.
carrots,
absorb microwave
energy
less quickly
than porous foods such as ground
beef or
mashed
potatoes.
Therefore,
denser foods take
longer to cook.
Add a minimum
excess amount
pattern,
Covering:
Covering
speeds heating
and
prevents
spattering.
Stirring:To
help food cook more quickly and
evenly.
Turning
Over: To help larger foods such as
roasts or whole chickens
cook more evenly.
Quantity
The more food being cooked, the longer you
will have to cook it. As a general rule, when
doubling a recipe, increase the cooking time
by about 50 percent. When cutting a recipe in
half, reduce the time by about 40 percent.
such
Techniques
foods in a circular
when possible.
Piercing:
Pierce the membrane
of foods such
as eggs, oysters, snails, sausages,
livers,
Microwave Cooking Principles
Because microwave cooking requires only
one-quarter to one-third the time of
conventional cooking, the same cooking
principles become even more important.
Density
Dense foods,
Cooking
Arrange
Microwave
Thermometers
For best results, a microwave-safe
thermometer
can be carefully
and properly
inserted
into the food. The guide to internal
temperatures
gives suggested
thermometer
readings
for meat and poultry.
Keep in mind
that standing
time is essential
for most food to
An
Starting Temperature
Frozen or refrigerated foods take longer to
microwave than food at room temperature.
reach
Delicate Ingredients
Some foods require special attention when
cooked in the microwave oven. Delicate foods
"such as eggs, cheese, mayonnaise, etc. cook
so quickly, they should be watched carefully.
its proper
serving
temperature.
Guide to Internal Temperatures
130°F (54%).
140°F (60%).
150°1:(66%).
155°1:(68%).
160°F (71%).
165°1:(74%).
170°F (77%).
14
Rare beef
Medium beef
Vegetables, hot drinks,
soups, casseroles
Veal
Fish steaks and fillets
Well done lamb, pork
Poultry parts, whole fish,
Well done beef
H 1: Refrigerated
foods
(press SENSOR REHEAT keypad once)
H2: Frozen foods
(press SENSOR REHEAT keypad twice)
REHEAT
SENSOR
Refrigerated"
Use to reheat
room
Frozen
cooked
or refrigerated
food
at
temperature:
foods:
Use to defrost
precooked
and heat
frozen
food:
For best reheating results :
• Auto Sensor Reheat is best used for 1 - 2 servings.
• Always cover foods loosely but completely with wax paper,
plastic wrap or casserole lid.
(Do not use any snap closing lids.)
• Do not use Auto Sensor Reheat for less than 4 oz (115 g) or
more than 20 oz (560 g) of food. Use Time cooking.
• Very dense foods, such as refrigerated or frozen lasagna
should be allowed to stand covered after reheating.
• Do not use SENSOR REHEAT keypads to heat uncooked food.
All foods must be precooked and can be at room, refrigerated
or frozen temperature.
• The following types of foods are not recommended:
Boil-in-the-bag entrees or vegetables, raw or uncooked food,
frozen cheesecake, dried foods, bread or pastry, beverages.
AI: Potato
POTATO
Suitable for all types of fresh
whole, quartered
or sliced
potatoes: white baking
potatoes, sweet potatoes or red
boiling potatoes.
(6 oz- 3 Ibs or 170 g - 1.4 kg)
(STEW/S
OUP_
Suitable to cook one-container
dishes such as full bodied meat,
vegetable
and liquid
combinations.
For best results:
• When cooking quartered or sliced potatoes, use LOW
doneness setting.
• Allow 5 - 10 minutes standing time.
• The best container for quartered or sliced potatoes is a 1/2to
11/2quart (1/2to 11/2litre) microwave-safe
casserole.
• Turn over after cooking time appears in the display window.
A2: Stew/Soup
For best results:
• Stir foods once after cooking time appears in the display
window.
Press START after closing the door.
• A standing time is automatically
included at the end of
cooking time.
CAUTION:
Do not use this feature to reheat canned or precooked
soups.
A3: Vegetable
_k VEGETABLE_
Suitable
for a wide
variety
fresh or frozen vegetables
vegetable
combinations.
(4oz-21bsor115g-900g)
of
and
For best results:
• The best container for cooking vegetables is a 1/2to 2 quart
(1/2to 2 litre) microwave-safe
casserole.
• Stir after cooking time appears in the display window.
• When cooking frozen vegetables, use LOW doneness setting.
A4: Pizza slice
For best results:
• Pizza should not be frozen.
• When reheating whole pizza, use HIGH doneness setting.
• Reh.eating pizza slice is best used for 2 - 4 slices.
PIZZA SLICE
Suitable
for room
refrigeration
over pizza.
or
temperature
left
CAUTION: Be careful when eating pizza cooked in the microwave.
The pizza surface and sauce can be very hot.
15
SENSOR REHEAT GUIDE
Food
Amount
Special
Casserole
4 oz - 20 oz
Cover with plastic wrap or casserole
Entree
(115 g - 560 g)
Unstirrable foods (ex. lasagna)
3 - 5 minutes after reheating.
Plate of food
4 oz - 20 oz
(115 g - 560 g)
Cover with wax paper or plastic wrap.
Arrange less dense foods in center of plate. Cover.
Allow to stand covered.
Fried chicken
2 - 4 pieces
Cover with wax paper.
NOTE:
Notes
lid. Stir after reheating.
should be allowed to stand covered
for
Do not reheat in foil containers.
When reheating
power level 3.
delicate sauces/dips
that contain sour cream,
or eggs, or cream cheese, reheat manually
using
SENSOR COOKING GUIDE
Food
Amount
Potato
White potatoes
Sweet potatoes
Whole: 6 - 8 oz each.
(170 - 230 g)
quartered
or sliced:
Red potato, boiling
New potatoes,small
Vegetables
Artichokes, Beans,
Broccoli, Brussels sprouts,
Cabbage, Carrots, Corn,
Cauliflower, Eggplant,
Mushrooms, Onion, Okra,
Pea, Spinach, Squash,
Zucchini, or mixture of
these.
Water
Preparation
1 -6
none
1/2 - 1 Ib
(225 g - 450 g)
1/4cup
(50 mL)
Peel and quarter or slice. Add water.
Cover with plastic wrap or casserole lid.
1/2 - 1 Ib
(225 g - 450 g)
1/4cup
(50 mL)
Wash and!or peel. Pierce with fork. Add water.
Cover with plastic wrap or casserole lid.
Wash. Prepare and cut into slices or cube.
Add water.
4 oz - 2 Ibs
(115 g -900
g)
1 - 4 tbs.
15 - 60 mL)
Pizza Slice
! slice: 3 oz
(12 inch,l/8 cut or
16 inch,lA2 cut)
Wash, scrub and pierce several places with fork.
Place on paper towel. Arrange potatoes in circle
avoiding center of the turntable. When cooking a
potato, place it away from the turntable center.
Cover with plastic wrap or casserole lid.
Stir large quantities of vegetables after cooking
time appears in the display.
Let stand 3 - 5 minutes.
Place on a paper plate or paper towel.
No cover.
2-6
16
POTATO
RECIPE
Twice-Baked
4
baking
Potatoes
potatoes
Cookin 9 Time : About
(6 oz - 170 g each)
1/2 cup (125 mL) butter or margarine
1/2 cup (125 mL) dairy sour cream
1/2 teaspoon (2 mL) salt
Dash pepper
Paprika
4 servings
VEGETABLE
Asparagus
with
RECIPE
Mustard
1 Ib (450 g) asparagus,
into pieces
1/4 cup (50 mL) water
Sauce
cleaned
Cookin 9 Time : About 7 - 11 minutes
and cut
Combine asparagus and water in 11/2quart
(11/2 litre) microwave-safe
casserole.
Cover with casserole lid. Place in oven.
Cook on VEGETABLE.
Stir once after cooking time appears in the
display window. Drain. Set aside.
Combine remaining ingredients in small bowl.
Pour over asparagus and toss lightly to coat
asparagus.
Cook on HI, 1 to 11/2minutes or until heated
through.
1/3cup (75 mL) mayonnaise
1 tablespoon
(15 mL), minced fresh parsley
1 teaspoon
(5 mL) prepared dijon-style
mustard
1/2teaspoon
(2 mL) onion
White pepper to taste
salt
6 servings
STEW/SOUP
Hearty
RECIPES
Beef Vegetable
Stew
Cookincj Time : About 70 - 80 minutes
21/4 cups (510 mL) water
2 beef bouillon cubes
1
3
2
3/4
1/2
1
1/2
1/4
1/4
1
15 - 20 minutes
Pierce potatoes with a fork several times.
Place in oven end-to-end in a ring on a paper
towel, spacing about 1 inch (2.5 cm) apart.
Cook on POTATO.
Remove from oven. Let stand several minutes.
When potatoes can be handled, remove
1/4inch (0.6 cm) horizontal slice from top of
each potato. Carefully scoop out pulp, keeping
skins intact. Blend butter, sour cream, salt, and
pepper into potato pulp.
Beat vigorously until smooth. Spoon pulp
mixture into potato shells, or pipe in with
pastry bag and star tip.
Place filled shells in a ring along edge of
microwave-safe
plate.
Cook on HI, 2 to 4 minutes.
Sprinkle with paprika.
Place all ingredients in 3 quart
(3 litre) microwave-safe
casserole, and stir.
Cover with casserole lid.
Cook on STEW/SOUP.
Stir once after cooking time appears in the
display window.
Ib (450 g) round steak,
cut into 1/2 inch (1.25 cm) cubes
tablespoons
(45 mL) cornstarch
large potatoes, peeled and cubed
cup (175 mL) thinly sliced carrots
cup (125 mL) thinly sliced celery
medium onion, diced
teaspoon
(2 mL) salt
teaspoon
(1 mL) freshly ground pepper
teaspoon
(1 mL) thyme
bay leaf, crushed
4 - 6 servings
17
Bacon
Veqetable
Cooking Time : About 75 - 85 minutes
Soup
7 oz (200 g) slices bacon, diced
1 medium tomato, peeled and chopped
1 carrot, sliced
1
1
1
1
2
Combine all ingredients in 3 quart (3 litre)
m icrowave-safe casserole.
Cover with Casserole lid.
Cook on STEW/SOUP.
Stir once after cooking time appears in the
display window.
stalk celery, sliced
medium
red potato, cubed
small zucchini, sliced
medium onion, ,.'hopped
bay leaves
1 teaspoon
(5 mL) basil
1 teaspoon
(5 mL)Italian
herb seasoning,
season as desired
3 cups (690 mL) beef broth
4 - 6 servings
Onion-Beef
Cooking Time : About 60 - 70 minutes
Soup
3 medium
onions, thinly sliced
1/4 cup (50 mL) butter or margarine
4 cups (920 mL) beef broth
1/4 cup (50 mL) white wine
1 teaspoon
(5 mL) Worcestershire
1 teaspoon
(5 mL) salt
1 teaspoon
(5 mL) soy sauce
1/2 teaspoon
(2 mL) paprika
Grated Parmesan cheese
Combine onions and butter in 3 quart (3 litre)
microwave-safe
casserole. Cover with
casserole lid. Cook on HI, 4 to 6 minutes.
Add remaining ingredients, except cheese.
Blend well. Cover. Cook on STEW/SOUP.
Stir once after cooking time appears in the
display window.
Serve in bowls with cheese sprinkled on top.
sauce
6 servings
Ham
and Potato
Scallop
Cooking Time : About 25 - 30 minutes
1 cup (250 mL) white sauce,
seasoned as desired
Place potatoes in 11/2quart (11/2litre)
microwave-safe
casserole.
Add ham and onion.
Pour white sauce over ham and potatoes
mixture, stir to combine.
Cover with casserole lid. Place in oven.
Cook on STEW/SOUP.
Stir once after cooking time appears in the
display window.
After cooking, sprinkle with cheese.
Cover and let stand 10 minutes or until cheese
is melted.
3 medium
potatoes, peeled and
thinly sliced (about 1 Ib - 450 g)
5 oz (140 g) diced cooked ham
1 teaspoon
(5 mL) instant minced onion
1/4 cup (1 oz - 30 g) shredded cheddar cheese
4 servings
Casserole
Italiano
Cooking Time : About 35 - 45 minutes
I/2 Ib (225 g) lean ground beef
3/4 cup (175 mL) spaghetti sauce
1/2 can (4 oz -115 g) tomato sauce
3/4 cup (175 mL) water
Crumble beef into 2 quart (2 litre)
microwave-safe
casserole.
Place in oven.
Cook on HI, 3 to 4 minutes.
Stir to break up beef. Drain.
Add remaining ingredients except cheese to
beef. Blend well.
Cover with casserole lid. Place in oven.
Cook on STEW/SOUP.
Stir once after cooking time appears in the
display window.
After cooking, sprinkle with cheese.
Stir and let stand before serving.
l/2 can (8 oz - 230 g) green beans, drained
3 cups (4 oz- 115 g) uncooked
medium-width
egg noodles
1 tablespoon
(15 mL) onion flakes
1 clove garlic, minced
1 tablespoon
(15 mL) sugar
1 teaspoon
(5 mL)Italian
herb seasoning
1/4 teaspoon
(1 mL) salt
pepper to taste
1 cup (4 oz- 115 g) shredded
cheese
mozzarella
- 8 servings
18
CONVERTING
RECIPES
Mosthotappetizers
adaptwelltomicrowave
cooking,
theexception
beingthosewrapped
in
pastry.Pastryrequires
thehotenvironment
of
theconventional
ovento become
crisp.
• Coverappetizers
or dipsonlywhencalledfor
bya recipe.
Usecasserole
lids,waxpaper,
plasticwrap,or papertowel.
• Appetizers
anddipsthatcontaincheese,
mayonnaise
andotherdelicate
ingredients
areusuallyheatedonpowerlevel1.Ahigher
settingmightcauseseparation
ordrying.
• Toppings
forcanapes
canbemadeahead
andthenplacedonbreadorcrackers
just
beforeheating.
Thisguarantees
crispness.
Reheating Guide - Convenience Appetizers
Special
Notes
Amount
Meat spread
4 oz
(115 g)
8
1 - 11/2 min.
4 servings
7
1/2- 11/2 min.
1 wedge
8
1/2-1 min.
4 wedges
8
11/2 - 21/2 min.
Whole
8
2 -4 rain.
1/2cup
(t25 mL)
1
2 -3 min.
Cover with wax paper.
12
170 g)
7
1 - 2 min.
Place on paper towel or paper plate.
4-6
(6 oz- 170 g)
5
1 - 2 min.
Place on paper towel or paper plate.
Cocktail
franks
Cooked pizza,
10 inches, cut into
8 portions
Dips, cream
Egg rolls
(6 ozMini Tacos
Power
Approx.
Cooking Time
Item
Transfer
to small microwave-safe
bowl.
Place on paper towel.
Cover with wax paper.
Place on paper towel or paper plate or
leave in uncovered cardboard box, points
toward center.
Cooking Guide - Hot Drinks
Item
Water
Amount
6 oz (170 mL) cup, 1
6 oz (170 mL) cup, 2
8 oz (230 mL) cup, 1
8 oz (230 mL) cup, 2
Milk
6 oz (170 mL) cup, 1
6 oz (170 mL) cup, 2
8 oz (230 mL) cup, 1
8 oz (230 mL) cup, 2
Power
Approx.
Cooking Time
HI
HI
1 - 11/2 min.
11/2 - 21/2 min.
HI
HI
11/2 - 21/2 min.
3 - 4 min.
7
7
11/2
-
2 - 3 min.
4 - 5 min.
19
For instant coffee, soup, tea,
etc.
21/2 min.
3 - 4 min.
7
7
Special Notes
For hot chocolate,
etc.
A large variety of sandwich combinations
can
be made in your microwave oven. Because
sandwiches heat quickly, be careful not to
overcook them -- the bread can become tough
and chewy. Heat breads until warm, not hot,
and cheese until it just begins to melt. Let the
following tips guide you when adapting or
creatin 9 your own sandwiches.
CONVERTING SANDWICH
• Thinly
sliced
often
meat
CONVERTING SOUP RECIPES
• When cooking canned soups, remove from
can. Use microwave-safe
dish. Add milk or
water as directed on can. Cover dish.
RECIPES
• Stir cream-style soup halfway through
cooking time. Let stand, covered, 3 minutes
before serving.
• Heat sandwiches on white paper towels or
paper plates. To prevent splattering, as well
as to absorb steam and prevent sogginess,
you can wrap each sandwich in a paper
towel. Remove wrapping immediately
after
warming. It takes less than 1 minute to heat
most sandwiches. Heat on power level 8.
Cooking Guide -Canned
sliced meat heats better than thickly
meat. The slower-cooking
thick slices
cause the bread to overcook before the
is hot.
Soups
Item
Amount
Power
Broth
101/4 oz (290 mL)
8
4 - 6 min.
Cream-style
101/4 oz (290 mL)
8
5 - 7 min.
Tomato
103/4 oz (300 mL)
8
5 - 7 min.
Bean, pea, or mushroom
103/4 oz (300 mL)
7
6 - 8 min.
Undiluted
vegetable
103/4 oz (300 mL)
8
2 - 4 min.
19 oz (540 mL)
8
5 - 7 min.
chunk-style
Approx.
Cooking Time
Cooking Guide - Quick Soups
A mou nt
Item
(number
Cup of Instant soup
11/4 oz (35 g) envelope
Power
of envelopes)
Approx.
Cooking
1
HI
1 - 2 min.
2
HI
2 - 3 min.
4
HI
4 - 5 min.
2O
Time
Frozen Vegetables
Remove frozen vegetables from package
(10 oz/280 g) and place them in a
microWave-safe casserole.
Fresh Vegetables
Spread out cut vegetables in a shallow
microwave-safe
dish. Add 'water as
recommended
in chart. Add salt to water or
salt after cooking. Whole vegetables such as
potatoes, squash or eggplant should be
pierced and arranged in a circular pattern with
heavier ends pointing towards the outer edge
of dish. Cook covered. Halfway through
cooking, stir,
rearrange and/or
turn vegetables
over. Let stand,
covered. Whole
vegetables should
stand 10 minutes
and cut vegetables
5 minutes.
Cook covered on HI6H 3 - 5 minutes. Stir once
during cooking. Let stand covered a few
minutes.
Add 2 tablespoons (30 mL) of water to frozen
artichokes, brussels sprouts, okra and peas
and 1/2cup (125 mL) water plus 1 tablespoon
(15 mL) butter or margarine to frozen lima
beans:.
Frozen Vegetables in a Pouch
Remove pouch from package, and place on a
microwave-safe
plate. Pierce one hole in
pouch. Follow package directions.
Fresh Vegetables Cooking Chart
Cook on HIGH
power.
(All weights in the chart are the purchase weights before peeling and trimming.)
Vegetable
Asparagus,
spears
Beans, green
or wax, cut in pieces
Broccoli,
cut in pieces
Brussels
sprouts
Cabbage,
Carrots,
shredded
sliced or diced
Cauliflower,
chopped
Corn, on the cob
Amount
Water
1 Ib (450 g)
2 tbsp (30 mL)
3 - 4 min,
1 Ib (450 g)
1/4cup (50 mL)
4 - 6 min,
1 Ib (450 g)
1/4cup (50 mL)
4 - 6 min.
10 oz (280 g)
1/4cup (50 mL)
3 - 5 min.
1 Ib (450 g)
1/4cup (50 mL)
5 - 6 rain.
1 Ib (450 g)
2 tbsp (30 mL)
5-7
1 medium
1/4 cup (50 mL)
3 - 5 min.
1 ear
2 ears
4 ears
no ne
no ne
none
Approx.
Cooking
min.
2 - 5 min.
5 - 8 min.
10 - 13 min.
Mushrooms,
sliced
1/2Ib (230 g)
2 tbsp (30 mL)
2 - 4 min.
Peas, green,
shelled
1 Ib (450 g)
1/4 cup (50 mL)
5 - 7 min.
Potatoes, white, baking,
6 - 8 oz (170 - 230 g) each.
Pierce skin.
1
2
4
no ne
no ne
no Re
Potatoes,
3
1/4cup (50 mL)
7 - 9 min.
1 Ib (450 g)
no Re
4 - 6 min.
11/2 Ib (680 g)
no ne
7 - 9 min.
1 Ib (450 g)
1/4 cup (50 mL)
red, boiling
Spinach,
leaf
Squash,
pierce with fork
Zucchini,
sliced
NOTE: Your
oven is equipped
with
Sensor
Cooking
for fresh and frozen
Time
31/2 - 6 min.
6 - 8 min.
8-11 min.
5-7
min.
vegetables.
Cooking Guide - Rice
Water
Power
Long grain,
1 cup (250 mL)
13/4 cups
(425 mL)
3
20 - 25 min.
Short grain,
1 cup (250 mL)
12/3 cu ps
(400 mL)
3
22 - 27 min.
7 min. to boil. Add rice, salt and
butter or margarine. Cover
Wild rice, brown rice,
t cup (250 mL)
2 cups
(500 mL)
3
40 - 50 min.
tightly.
Item
Approx.
21
Cooking
SpecialNotes
Time
Use 3-quart (3 L) microwavesafe casserole. Heat water 5 to
Let stand 5 minutes.
CHECKING DONENESS
Beef: The color inside meat indicates
doneness. Rare roast should be red inside.
Medium is pink and gray indicates well done.
Pork: Cooked pork meat should be gray with
clear juice.
Poultry: Juices should be clear yellow when
cooked. Legs should move freely.
Fish and Seafood: Should be opaque in color
and flake easily.
PREPARATION
Use a microwave-safe
baking dish, casserole,
etc. to cook meat, poultry and fish.
Frozen meat, poultry and fish should be
completely thawed.
Wash poultry and fish in cool water.
Arrange small items in a single layer in dish
and avoid overlapping edges of food.
Place thick sections toward edge of the dish.
Use a rack in the dish to elevate meat out of
the juices.
To check internal
temperature
of various
meats and poultry,
use a microwave
or
conventional
meat thermometer
after
Use spices and seasonings as desired.
Add salt after cooking if necessary.
Kitchen bouquet with butter may be used to
obtain "cooked" color of meats and poultry.
Aluminum
foils can be used to cover thin parts
of meat or poultry wings and legs to prevent
overcooking.
Foils should be applied toward
the end of cooking time. Place meat fat side
down.
removing
in the microwave
Return
period
level.
Cover
time.
COOKING
Use wax paper or plastic wrap to stop
splattering.
Turn over or rearrange
meat, poultry
and fish
halfway
through
cooking
meat
from
the oven.
Insert
the
thermometer
avoiding
bone or fat. Lower
temperatures
are found in the center of the
roast or in the muscle close to a large bone.
Never use a conventional
meat thermometer
oven.
undercooked food to oven for a short
of time at the recommended
power
Let stand as recommended
in chart.
roasts and whole poultry during stand
time.
Food
Power
Approx.
Cooking Time
Stand
Time
Special
Notes
Beef
Hamburgers,
refrigerated
4 oz (115 g) each
1
2
4
HI
HI
HI
1 - 2 min.
2 - 4 min.
4 - 6 min.
2 min.
2 min.
2 min.
Cover loosely with wax paper.
Turn over halfway through
cooking.
H ambu rge rs, frozen
4 oz (115 g) each
1
2
4
HI
HI
HI
2 - 3 rain.
4 - 6 rain,
7 - 9 min.
2 rain.
3 min.
3 min.
Turn over and separate
halfway through cooking.
15 - 20 rain.
5 rain.
8 - 11 rain.
10 - 13 min.
12 - 15 min.
10 - 15 min.
10 - 15 min.
10 - 15 rain.
Cook in a shallow dish.
Meat loaf 11/2 Ib (680 g)
Roasts,
tender
5
5
5
in loaf dish.
Cover
with wax paper.
1 Ib (450 g)
Rare
Medium
Well done
Arrange
Cover with wax paper. Shield
halfway through cooking and
turn roast over if necessary.
Stand tented with foil.
*Approx. temp. after stand
Rare 130 F (540C)
Medium 140°F (60°C)
Well done 170°F (77°C)
*Check with conventional
meat th, _rmometer.
22
L
Food
Power
Pork
Chops, loin 1/2inch (1 cm)
thick, 7 oz (200 g) each
1
2
4
HI
HI
Ht
Approx.
Cooking Time
3-5 min.
6 - 8 min.
9-11 min.
12 - 15 min.
Pork roast, 1 Ib (450 g)
i
i
i
!
i
Ham, slice 1 inch (2.5 cm)
thick, 1 Ib (450 g)
HI
2 rain.
3 min.
3 rain.
10 min.
7 - 9 min.
Special
Notes
Place in a shallow dish. Cover
10 - 15 min.
11 - 14 rain.
Ham, precooked
canned 3 Ib (1.4 kg)
Stand
Time
5 rain.
loosely with wax paper. Turn
over halfway through cooking.
Cover with wax paper. Shield
halfway through cooking and
turn roast over if necessary.
*Approx. temp. after stand
170°F to 175°F (77°C to 79°C )
Shield edge of ham with strip
of foil. Place on roasting rack.
Cover with wax paper. Turn
over halfway through cooking.
*Approx. temp. after stand
120°F to 130°F (50°C to 55°C )
Cover with wax paper. Turn
over halfway through cooking.
i
Sausage links,
fresh 1 - 2 oz (30 - 55 g) each
2
4
HI
HI
1/2- 2 min.
1 - 3 min.
1 min.
1 min.
Sausage links, frozen,
precooked brown and serve
3/4oz (20 g) each
2
4
HI
HI
I/2 - 1 min.
1 -2 min.
1 min.
1 min.
HI
HI
HI
1 min.
1 - 2 min.
11/2 - 3 min.
1 min.
1 rain.
1 min.
HI
HI
HI
3/4 - 11/2 min.
11/2 - 2 rain.
21/2 - 4 min.
Wieners,
2 oz (55 g) each
1
2
4
1/2
-
:
Bacon, slices
1
2
4
Lamb
Chops, shoulder
1/2inch (1 cm) thick
1
2
*Check
with
conventional
1 min.
1 min.
1 min.
Pierce before cooking.
Cover with wax paper.
Turn over once.
Score before cooking.
Cook on bacon rack or line
bottom of dish. Place bacon
on paper towel. Cover loosely
with another paper towel. Do
not turn over bacon.
Cover loosely with wax paper.
HI
HI
2 - 4 min.
4 - 6 rain.
meat thermometer.
23
2 min.
5 min.
Food
Apl_rox.
Power
Cookiqg
Pou Itry
Chickens, whole,
up to 4 Ib (1.8 kg)
1 Ib (450 g)
Cornish hens
1 Ib (450 g)
Stand
Time
Special
Notes
Time
Place breast-side
i
HI
6 - 9i min.
10 min.
HI
5 - 8 imin.
10 min.
down on a
roasting rack in a dish. Cover
with plastic wrap or wax
paper. Turn over halfway
through cooking. Stand tented
with foil. When cooked, "
internal temperature should
be 180°F (82°C) and juices
should run clear.
Chicken pieces,
up to 2 Ib (900 g)
1 Ib (450 g)
HI
5 - 8 min.
5 min.
Arrange skin-side up in a
baking dish halfway through
cooking, meatier portions
toward edge of dish. Cover
with plastic wrap or lid.
HI
4 - 6 min.
5
7
7
6 - 9 min.
4 - 7 min.
3 min.
5 rain.
3 min.
Arrange
dish.
4 - 7 min.
3 min.
HI
7- 10 min.
5 min.
Fish and Seafood
Fish fillets, 3/4 Ib (340 g)
Fish steaks 2, 6 oz (170 g) each
Scallops 1 Ib (450 g)
Shrimp, medium size, shelled
and cleaned, 1 Ib (450 g)
Whole fish, stuffed or unstuffed
in a single layer in
Cover with wax paper.
Rearrange or stir shrimp or
scallops halfway through
cooking.
11/2 to 13/4 Ib (680 - 800 g)
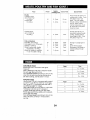
SCRAMBLED EGGS
Break eggs into a microwave-safe
glass
measure.
Add 1 tablespoon milk and 1 teaspoon butter
for each egg. Beat with a fork.
Cook at Power Level 6 according to time in the
chart. Stir at least once during cooking time.
Stir after cooking, and let stand 1 minute.
Eggs
POACHED EGGS
Use 6-ounce (170 mL) microwave-safe
custard
cup with 1/4cup (50 mL) water for 1 to 3 eggs.
Use 1-quart (1 L) microwave-safe
dish with 1
cup (250 mL) water for 4 eggs.
Heat at HI POWER to bring water to a boil with
1/8 teaspoon
salt and up to 1/4teaspoon
vinegar. Break egg carefully into hot water.
Pierce egg several times lightly with toothpick.
Cover with wax paper.
Cook at Power Level 5 according to time in the
chart. Let stand, covered, 1 minute before
serving.
1
3/4 - 11/2 min.
2
11/2 - 21/2 min.
3
21/4 - 4 min.
4
31/4 - 5 min.
Eggs
Time
1
3/4 - 11/2 min.
2
11/2 - 3 min.
3
2
4
24
Time
-
31/2 rain.
3 - 5 min.
Converting Recipes
When adapting quick bread recipes, you will
find it necessary to reduce the amount of
leavening (baking powder or soda) by about
one-quarter the normal amount. A bitter
aftertaste is apparent if too much leavening is
used in biscuits or muffins. Since food rises
higher in the microwave oven, you will not see
a loss in volume from the reduction of soda or
baking powder.
Whel
redu(
minu
the g
I using a mix where leavening cannot be
:ed, allow the dough to stand about 10
tes before cooking in order for some of
as to be lost.
Brea_ is and rolls should
be reheated only until
ire warm to the touch. Overheating or
over¢ookinq makes bread tough and rubbery.
they
If a recipe contains buttermilk or sour cream,
do not change the amount of soda, since it
serves to counteract the sour taste and does
not act only as a leavening agent.
Cooking/Reheating
Guide
Item
Power
Approx. Co )king
or Reheatin(t Time
Special Notes
Hamburger buns, hot dog rolls,
frozen: 1 Ib (450 g)
Room temp.:
1
2
4
3
8
8
8
French bread,
Frozen:
Room temp.:
8
8
1 - 2 m[in.
20 - 30 sec.
i
8
8
8
15 - 25 sec.
Place on paper plate or towel.
If frozen, defrost foods for 30 to 40
25-35
50-60
seconds per serving at power level 3
before reheating.
[
2 -3
5 - 10
10 - 15
15 - 20
mln.
sec.
sec.
sec.
/
Place on paper plate or wrap in paper
towel.
!
i
t tb (450 g)
1 Ib (450 g)
Doughnuts, sweet rolls, muffins
4 oz (115 g) each
1
2
4
ss _ c.
!
Place on paper plate or towel.
i
Whole coffee cake,
Frozen:
10 - 13oz (280 -370 g)
Room temp.: 10 - 13 oz (280 - 370 g)
Butter cake
21/4 cups (550 mL) batter
i
8
8
1 -2
r_ n.
1/2 - 1 n_m.
i
[
1st stage
2nd stage
Place on paper plate or towel. Let
stand 5 - 10 minutes before serving.
5 - 7 nlin.
1 - 2 rflin.
5
HI
Place on inverted
pie plate.
i
Brownies
2 cups (500 mL) batter
8 - 11 rqin.
I
Cover with wax paper. Place on
inverted pie plate.
i
i
Bar cookies
1V2 cups (375 mL) batter
Muffins,
1/4 cup (50 mL) batter
1
2
6
5 -7 rnin.
each
7
7
7
[
40 - 60 sec.
1 - 11/2 rrtin.
3 - 4 rain.
25
Cover with wax paper.
Reheatin_l Item
Beverage
Water-based
Milk-based
Soups
Broth-based
Cream-based
Cooked pizza
10 inches cut into
8 portions
Meat
Sliced thin
Sliced thick, 1" (2.5 cm)
Chili,
stews
Chicken,
sliced
Cooked
1cup
(250mL)
2 cups (500 mL)
1cup
(250mL)
2 cups (500 mL)
1
2
1
2
Heat uncovered.
Stir after heating.
103/4 oz (300 mL) can
103/4 oz (300 mL) can
2 - 3 min.
3 - € min.
Use microwave-safe
Stir after heating.
2 wedges
4 wedges
whole
1/2 1 min.
1 - 2 min.
2 - 3 min.
Place on paper towels or paper plate or
leave in uncovered
cardboard
box. Points
toward center.
3 - 5 oz (85 -140 g)
3 - 5 oz (85 -140 g)
1/2 t 1 min.
1 -2 min.
Heat on microwave-safe
wax paper.
3 - 4 min.
Place in microwave-safe
dish. Cover.
halfway through
cooking time.
- 2 rain.
- 4 min.
- rain.
- min.
casserole.
Cover.
plate, covered
with
Stir
1/2F 1 rain.
1 -12 min.
2 -13 min.
Place on microwave-safe
plate.
paper towel. Turn over once.
pieces
1
2
4
6
1
1
2
3
Heat on microwave-safe
plate. Cover with
wax paper. If fried, cover with paper towel.
turkey,
3 - 5 oz (85 -140 g)
or fish casserole,
rice, pasta
61/20Z
(185
nlin.
- 2 min.
- 3 min.
- 5 min.
min.
g)
16 oz (450 g)
plate.
Cover
with
with
Pierce pouch and place on microwave-safe
plate. Flex pouch to mix halfway through
cooking time.
-!6 rain.
!
I
Remove from package to a microwave-safe
casserole. Cover. Stir once during cooking.
: min
Heat in microwave-safe
with plastic wrap.
1cup
(250mL)
2 cups (500 mL)
1
2
10 - 12 oz (280 -340 g)
3
8 oz (230 g)
15 oz (425 g)
18 oz (500 g)
1 -i2 min.
2 -13 min.
2 -!4 min.
mln,
I
vegetable
Heat on microwave-safe
wax paper.
Cover
!
-i5 min.
I
Vegetable,
frozen in pouch
Canned
Special Notes
1 serving
2 servings
4 servings
Seafood
Shrimp, crab, or scallops
in sauce, frozen
Seafood
frozen
"firne
2 cups (500 g)
Hamburgers,
meat loaf slices,
sausage patties
Poultry
Chicken
Amount
-15 min.
casserole,
covered
Pierce pouch. Place on microwave-safe
plate. Flex pouch to mix halfway through
cooking time.
Use microwave-safe
once.
casserole,
covered.
Stir
Cookin 9 Item
Amount
Special
Mashed potatoes,
instant
4 servings
3 -_min.
Follow package
1 tbsp (15 mL).
directions.
Reduce liquid by
31/4 oz (90 g)
4 -i6 min.
Follow
directions.
Stir once.
Pudding
and pie filling
mix
Notes
package
I
!
Cereals
Cream of wheat
(regular)
i
i
1/4cup
(50 mL)
1 -2
min.
1/2cup (125 mL)
3 -14 min.
1/4cup
1 -12 min.
I
3 -i4 min.
I
i
Wheat-bran
cereal
(50mL)
1/2cup (125 mL)
1
I
!
i
26
I
Add 3/4 cup (175 mL) of water. Cook
uncovered.
Stir once. Let stand 1 minute.
Add 11/2 cup (375 mL) of water. Cook
uncovered.
Stir once. Let stand 1 minute.
Add 3/4 cup (175 mL) of water. Cook
uncovered.
Stir once. Let stand 1 minute.
Add 11/2 cup (375 mL) of water. Cook
uncovered.
Stir once. Let stand 1 minute.
• Set Auto Defrost by Weight
instructions on page 10.
according
• La_ge roasts should be still icy in center. Allow to
sta nd.
to
• Fis h and seafood should also be slightly
• Remove food from wrapper and place in a
microwave-safe
dish or place on a
microwave-safe
roasting rack.
• Cover thin parts with aluminum
Item
• Fo, )d can be defrosted
in a styrofoam
icy.
package.
• So _netypes of food will need to be rearranged
th_ Pause.
foil.
Special
Notes
Beef
Ground
beef
Turn over and remove defro:;ted
portion at pause.
Liver
Drain liquid as it defrosts.
Roasts
Turn over at pause. Cover e lds with foil.
Sirloin steak
Turn over at pause.
Rib or T-bone
Turn over at pause.
Flank steak
Turn over at pause.
Stewing
Break apart at pause.
meat
Se 3arate pieces.
Pork
Bacon
Defrost in original
wrapper.
"urn over at pause. Center should be slightly icy.
Chops
Separate
Ribs
Turn over at pause.
Roasts
Turn over at pause. Cover eqds with foil.
and turn over at p_ use.
Lamb
Chops
Separate
and turn over at p_use.
Ribs
Turn over at pause.
Roasts
Turn over at pause. Cover
ads with foil.
Poultry
Chicken, whole,
up to 3 Ib - 2 oz (1.4 kg)
Check for and remove any r letal clamps or wires before defrosting.
Turn over at pause. Cover ends with foil. Rinse under cold water.
Pieces
Separate
Cornish hens
Check for and remove any r letal clamps or wires before defrosting.
Turn over at pause. Rinse u lder cold water.
and turn over at p_Luse.
Fish and Seafood
Crabmeat,
shrimp
Break apart at pause.
Fish fillets
Turn over and rearrange
at pause. Rinse under cold water to separate.
!
Fish whole, steaks
Turn over at pause. Cover t_ead and tail with foil.
Scallops
Break apart at pause.
RemOve defrosted
/
27
scallops.
at
3PERATION
FOODS
:3. What is wrong when the oven light will not
glow?
_,. There may be several reasons why the oven
light will not glow.
• The light bulb has burned out.
• START has not been touched.
Q. What is wrong when baked foods have a hard,
dry, brown spot?
A. This is caused by overcooking.
Shorten
cooking or reheating time.
r). Why is steam corrfing out of the air exhaust
vent?
A. Steam is normally produced during cooking.
The microwave oven has been made to vent
this steam.
Q. Can the microwave oven be damaged if it
operates empty?
A. Yes. Never operate while empty or without the
turntable positioned correctly on the roller rest.
Q. When the oven is plugged into a wall outlet for
the first time, it might not work properly. What
is wrong?
A. When the oven is plugged in for the first time
or when power resumes after a power
interruption, the microcomputer
used in the
oven control may temporarily
become
scrambled and fail to function as programmed.
Unplug the oven from the wall outlet and then
plug it back in. The microcomputer
will then
reset for proper functioning.
Q. Why do I see light reflection around the outer
case?
A. This light is from the oven light located outside
the oven cavity.
Q. Why is there noise coming from the turntable
when the oven is turned on?
A. This noise occurs when the turntable roller rest
and cavity bottom are dirty. Frequent cleaning
of these parts should eliminate or reduce the
noise.
Q. Instructions for aluminum foil use are
confusing. When should I use foil?
A. It should be used to shield portions of food
from becoming overcooked or overdefrosted.
Use small flat pieces of foil for shielding.
(Refer to page 8)
Why do eggs sometimes pop?
A. The egg yolk may pop because of steam
build-up inside the membrane. To prevent this,
simply pierce the membrane with a toothpick
before cooking it.
CAUTION: Never microwave eggs in the shell
since they may explode.
e.
Q. Why are scrambled eggs sometimes a little dry
after cooking?
A. Eggs dry out if they are overcooked. You may
need to vary the cooking time for one of these
reasons:
• Eggs vary in size.
• Eggs are at room temperature
one time and at
refrigerator temperature another time.
• The shapes of utensils vary, which makes it
necessary to vary cooking time.
• Eggs continue cooking during standing time.
e.
A.
What is wrong when three potatoes bake
thoroughly
and the fourth one is still not
cooked?
The fourth potato may be slightly heavier than
the others and should be cooked 30 to 60
seconds longer. Remember to allow one inch
(2.5 cm) around each potato when baking. For
more even cooking, place potatoes in a circle.
Q. Why do baked apples sometimes burst during
cooking?
A. As in regular cooking methods, steam is
formed in the interior of the apple, causing it to
swell and expand during the cooking process.
How are boil-overs avoided?
A. Use a larger utensil than usual for cooking. If
you open the oven door or touch STOP/CLEAR,
the food will stop boiling.
a.
Q. Why does the dish become hot when I
microwave food in it?
A. As the food becomes hot it will conduct the
heat into the dish. Use oven mitts to remove
food after cooking.
28
SPEC IAL CARE
For b ._stperformance
and safety, the inner door
panel and the oven front frame should be free of
food .)r grease buildup. Wipe them often with a
mild ,Jetergent. Then rinse and wipe dry. Never
use c eaning powders
or rough pads.
Wipe the oven inside and outside with a soft cloth
and a mild detergent solution. Then rinse and wipe
dry. This should be done on a weekly basis- more
often if needed. Never use cleaning powders or
rough pads. Excessive oil splatters on the inside
top will be difficult to remove if left for many days.
Wipe spatters with a wet paper towel, especially
after cooking chicken or bacon.
After cleaning the control panel, touch
STOF /CLEAR to clear any entries that might have
been entered accidentally while cleaning the panel.
REMOVABLE PARTS
The following parts may be removed as described.
They should be washed in warm (not hot) water
with a mild detergent and a soft cloth. Once they
are clean, rinse them well and dry with a soft cloth.
Never use cleaning powders, steel wool or rough
pads.
CAUTION
- Product Damage
Hazard
1cleaned
cavity cover (located in the right
oven cavity) will cause fire,
bl trn or sparking.
si, de wall of the
•
•
The turntable may be cleaned at the sink. Be
careful not to chip or scratch the edges as this
may cause the turntable to break during use.
The turntable roller rest should be cleaned
regularly.
cI ean your oven with wet towel.
"WE SERVICE WHAT WE SELL"
Here' ; a comparative
warranty
and Maintenance
you the benefits of a
Ag re ment chart showing
Sear,, Microwave
Oven Maintenance
Agreement.
"We Service
What We Sell" is our assurance
to you
that you can depend
on Sears for service
because
Sears Service
is nationwide.
YEARS
Your Sears Kenmore Microwave Oven has added
value when you consider that Sears has a service
unit near you, staffed by Sears Trained
Technicians-professional
technicians specifically
trained on Sears Kenmore Microwave Ovens,
having the parts, tools and equipment to insure
that we meet our pledge to you-"We Service What
We Sell!"
Kenmore
Microwave
Ovens
3.Ann. ual preventive
m#intenance
check at your
re_que st
W-W, kRRA NTY
MA-I_IAINTENANCE
is more
than
are designed,
an extension
W
2 nd Yr.
thru
5 th Yr.
MA
W
W
MA
MA
AGREEMENT
Cont ]ct your Sears salesperson or local Sears
Serv ce Center today and purchase a Sears
Main tenance Agreement.
manufactured,
and tested for years of dependable
operation.
Yet, any modern
appliance
may require
service from time to time. A Sears Maintenance
Agreement
Warranty.
1 st Yr.
COVERAGE
Replacement
of defective
1.p_rts other than magnetron
t
2.R_placement
of magnetron
TO FURTHER ADD TO THE VALUE OF YOUR
MICROWAVE OVEN, BUY A SEARS
MAINTENANCE AGREEMENT.
Sears
OF OWNERSHIP
of the
It provides complete protection from unexpected
repair bills and undue inconvenience.
It assures
you of maximum efficiency from your Microwave
Oven.
29
You can often correct operating problems yourself,
check your problem by using the chart below and
If the microwave oven still does not work properly,
f your microwave oven fails to work properly,
the solutions for each problem.
c _ntact the nearest authorized service center.
PROBLEM
POSSIBLE CAU 3E
POSSIBLE SOLUTION
Oven will not start.
1. Electrical cor_ for oven is
not plugged El.
2. Door is open
3. Wrong opera don is set.
1. Plug into the outlet.
ion is set.
Err appears in the display
window
1. Wrong
Arcing
1. Materials to ,e avoided in
microwave o /en are used.
2. The oven is c 3erated when
empty.
3. Food refuse emains in
the cavity or nside the
cavity is uncl ,=aned.
or sparking
Unevenly
cooked foods
Overcooked
Undercooked
foods
foods
Improper defrosting
opera
1. Materials to _e avoided
in
microwave o ,en are used.
2. Food is not d efrosted
completely.
3. Cooking time / Cooking
power level i not suitable.
4. Food is not t_ irned or stirred.
2. Close the door and try again.
3. Check instructions,
(pages 9-13)
1. Touch
STOP/CLEAR.
1. Use microwave-safe
cookware
only,
2. Do not operate
empty.
3. Clean cavity
1,
(page 8)
with oven
with
wet towel.
Use m icrowave-safe
cookware
2. Completely
only, (page 8)
defrost food.
3. Use correct
time/cooking
power level.
4. Turn or stir food.
1. Cooking time / Cooking
power level i not suitable.
1. Use correct time/cooking
power level.
1. Materials to )e avoided in
microwave o cen are used.
2. Food is not d efrosted
completely.
3. Oven ventila ion ports are
restricted.
1,
Use microwave-safe
cookware
2. Completely
only, (page 8)
defrost food.
3. Check to see that oven
ventilation
restricted.
ports
4. Cooking time /Cooking
not suitable.
power level
4.
1. Materials to )e avoided
in
microwave o cen are used.
2. Cooking tim_ / Cooking
not suitable.
power level
3. Food is not t_lrned or stirred.
1. Use microwave-safe
30
are not
Use correct time/cooking
power level.
cookware
only, (page 8)
2. Use correct time/cooking
power level.
3. Turn or stir food.
Instrucciones
en espa ol
Modelo
565, 66480
Alimentacion
120V CA, 60 Hz
Consumo
Salida
de energia
13,2 Amperios,
maxima
Capacidad
Diametro
del horno
de la bandeja
Dimensiones
1480 W
1000W (Los procedimientos
rotativa
(an x al x prf)
IEC-705)
14-3/16" (360 mm)
23-7/16.' x 14" x 17-5/8 ''
(595 mm x 357 mmx
Peso (aprox.)
448 mr l)
45,2 Ibs. (20,0 kg)
Especificaciones
KENMORE
•
El horno
•
La bandeja
rotativa
y el apoyo de la bandeja
rotativa
deben estar en el horno para evitar
posibles
da_os.
•
Ponga
debe
estar
los utensilios
plataforma
para evitar
rotativa
posibles
sujetas
es una marca
nivelado.
de cocinar
y manipOlelos
da_os.
a ca "nbios sin previo
aviso.
cot lercial
de Sears, Roebuck
registrada
and Co.
,n comidas con muy poca humedad puede
:asionar incendios, quemaduras o chispas.
) cocine tocineta directamente en la bandeja
tativa. El calentamiento
local excesivo de la
b_ =ndeja rotativa puede causar su rotura.
N caliente biberones ni comidas para bebes
e! el homo de microondas.
El calentamiento
d_ _sigual puede producirse y causar daSos
p* _rsonales.
N ) caliente recipientes de cuello estrecho, tales
c( ,mo botellas de jarabe.
N ) intente freir en el homo de microondas.
N ) caliente latas en conserva en este horno de
m icroondas
porque es imposible asegurar que
to do el contenido del recipiente alcanzar_i la
te "nperatura de ebullicion.
C(
o_
en la
con cuidado
•
El empleo
incorrecto
del plato de tostar pueden
causar roturas
en la bandeja
rotativa.
Vea la
pagina 8.
•
Emplee solo el tama_o
de bolsa especificado
cuando
emplee
la funcion
de palomitas
de mal'z
automcfiticamente.
•
El homo tiene varios interruptores
incorporados de seguridad para asegurar que
la alimentacion
queda desconectada cuando la
puerta esta abierta. No manipule estos
interruptores.
•
:le prueba
1,6 pies c0bicos
No opere el homo de microondas estando
vacio. La operacion del horno sin comidas
N ) emplee este horno de microondas para
Este homo de
a_ ,licaciones comerciales.
m icroondas est,5 hecho solo para su empleo en
el hogar.
o
PRECAUCIONES PARA
flTAR LA POSIBLE
EXPOSICION A EXCES] VA ENERGIA DE
MICROON[ )AS
(a)
(b)
(c)
(d)
No intente operar el homo de microondas con la pu, ;rta abierta porque la operacion con la
puerta abierta puede ocasionar la exposicion perjud cial a la energia de microondas.
Es importante no desactivar ni manipular los bloque os de seguridad.
No coloque ning0n objeto entre la superficie frontal det homo y la puerta ni permita que
suciedad ni residuos de limpiadores
se acumule en I a superficies de sellado.
No opere el homo siesta da_ado. Es muy importan :e que la puerta del homo se cierre bien
y que no haya da_os en:
(1) LA PUERTA (combadura)
(2) BISAGRAS Y ENGANCHES (rotos o flojos)
(3) SELLOS DE LA PUERTA Y SUPERFICIES DE SELl ADO
El horno no debe ser ajustado ni reparado por nadie que no sea el personal de servicio
cualificado.
31
Cuando emplee dispositivos electricos, deberan seguir se las
precauciones de seguridad, incluyendo Io siguiente:
ADVERTENCIA
-
Para reducir
et peligro
de quemaduras,
_n personas
o exposicion
fuegos,
da_os
microondas:
1. Lea todas las instrucciones
utilizacion.
2,
3.
Si
•
•
•
antes de la
6. Algunos
cascara,
cerrados
ejemplo,
calentarse
Lea y respete las "PRECAUCIONES PARA
EVITAR LA POSIBLE EXPOSICION A EXCESIVA
ENERGIA DE MICROONDAS" en la pagina
anterior.
se produce un fuego:
Mantenga la puerta del horno cerrada.
Desconecte el horno, y
Desenchufe el cable de alimentacion
o
desconecte la alimentacion
en el fusible o panel
del disyuntor.
8. AI igual
deberan
4.
para
12. No guarde
o situe
este horno
solo
de instalaci6n
GUARDE
de acuerdo
solo
ni emplee
reparaciones
o ajustes.
las rejillas
de ventilacion
este aparato
en exteriores.
13. No emplee
este horno cerca de agua, cerca del
lavadero
de la cocina ni en sotanos
humedos
asi como
tampoco
14. No sumerja
15. Mantenga
calientes.
17. Cuando
interiores
el cable
el cable
16. No permita
de la mesa
Este horno debe conectarse a tierra. Conecte
solo a una toma de tierra adecuada. Consulte
las "INSTRUCCIONES DE TOMA DE TIERRA" en
la pagina 33.
las instrucciones
los examenes,
11. No cubra ni bloquee
del homo.
No emplee la cavidad para guardar cosas. No
guarde productos combustibles,
como por
ejemplo pan, galletas, productos de papel, etc.
dentro del horno. Si un rayo afecta la Ifnea
electrica, el homo podria conectarse por si
mismo.
5. Instale
aparatos,
los ni_os
bajo supervision.
10. El servicio
de este aparato debe efectuarlo
solo
tecnicos
de servicio
cualificados.
Pongase en
contacto
con el centro de servicio
autorizado
No emplee anudadores de alambre en el
homo. AsegQrese de, inspeccionar
los
productos comprados para ver que no tengan
anudadores y saquelos antes de poner los
artfculos en el horno.
C,
que con otros
usar el homo
9. No opere el homo si tiene el cable o la clavija
da6ados,
si no funciona
correctamente
o si ha
sufridos
da_os o caidas.
No sobrecocine comidas. Mire siempre el
homo. Tenga cuidado si se ponen dentro del
homo papeles, plasticos, u otros materiales
combustibles
para facilitar el cocinado.
b.
este homo solo para Io que esta
como se describe
en este manual.
No emplee
nunca productos
quimicos
ni
vapores
corrosivos
en este homo.
Este tipo de
homo esta especificamente
dise6ado
para
calentar
o cocinas comidas,
y no esta diseSado
para aplicaciones
industriales
ni laboratorios.
Tenga presente las reglas siguientes en todo
momento:
a.
de
articulos
tales como huevos en
agua con aceite o grasa, recipientes
y jarras de vidrio cerradas,
por
pueden
explotar,
por Io que no deben
en este homo.
7. Emplee
indicado
AI igual que con la mayor parte de utensilios de
cocina, se requiere mucha supervision
para
reducir el peligro de incendios en la cavidad del
horno.
descargas
electricas,
a e×cesiva
energia
cerca
de una piscina.
ni la clavija
apartado
que el cable
o mostrador.
en el agua.
de superficies
cuelgue
por el borde
limpie la puerta y las superficies
del horno, emplee solo jabones
o
detergentes
suaves que no sean abrasivos
y
apliquelos
con una esponja
o paso suave.
(Consulte
las instrucciones
de "Limpieza"
de la
con
provistas.
pagina
ESTAS
29.)
NSTRUCCIONES
.2
Jtte a un electricista cualificado si no se
enti,e lden bien las instrucciones de puesta a tierra
para zer si el aparato esta correctamente puesto a
tierra
Cons
PELIGRO-
Peligro de descargas
electricas
No desmonte este aparato. Si toca ciertos
componentes
internos, aunque el aparato
este desenchufado,
pueden producirse
descargas electricas que pueden producir
da_os personales graves o incluso la muerte.
Se $L -ninistra
Este aparato debe ponerse a tierra. Si hay un
cortocircuito,
la toma de tierra reducir el peligro de
descargas electricas proporcionando
un cable de
escape para la corriente electrica. El aparato esta
equipado de un cable que tiene un conductor de
tierra con clavija de tierra. La clavija debe
enchufarse a una toma que est_ correctamente
instalada y puesta a tierra.
Toma de corriente
con toma
correctamente
polarizada
de tierra
un cable
de alimentacion
corto
para
redu( :ir el peligro de enredos o de mezclarse
con
cable s mas largos.
Los jl Jegos de cables mas largos o cables de
exter sion podran usarse siguiendo
las
prec_ uciones siguientes:
L( s valores electricos del juego de cables o de!
ble de extension
deben ser iguales o mas altos
le los valores electricos del aparato,
El cable de extension debe ser del tipo de 3
6¢ nductores
con toma de tierra.
ca
qt
•
•
El cable mas largo debe disponerse
de modo que
quede suelto encima del mostrador
o mesa ni
d_rode niflos puedan tirar del mismo o pueda
pi sarse por accidente.
n(
y
El ca )le de alimentacion
electrica debera
man1 enerse seco y no debera pellizcarse ni
reto r ;erse de ningL_n modo.
_IL ADVERTENCIA
Peligro de descargas- electricas
Clavija
de tres cuchillas
(con toma
i
empleo inadecuado
de la clavija de tierra
Jede ocasionar descargas electricas.
o la enchufe a ninguna toma de corriente
_sta que el aparato este correctamente
stalado y puesto a tierra.
de tierra)
ir
HORNO
DE MICROONDAS
GARANTIA
El se
simp
LAT
DES
KENMORE
PARA TODO UN AI iO
Durante un periodo de un afio a partir de la
fecha de adquisicion, si este homo de
microonclas Kenmore falla debido a un
defecto de materiales o de mano de obra,
Sears Io reparar_i sin ningQn cargo.
MAGNETRON
GARANTIA
ENTEROS
"vicio de garantia estcfi disponible
lemente PONIENDOSE EN CONTACTO CON
ENDA DE SEARS MAS CERCADA O CENTRO
ERVlClO SEARS de los Estados Unidos.
Esta garantia se aplica s61o mientras
se ut iliza en los Estados Unidos.
este producto
La g_=rantia le proporciona derechos legales
espe sificos y usted puede tener otros derechos
que' _arian segun el estado.
KENMORE
PARA CINCO AI IOS
SEARS, ROEBUCK AND CO.,
DEPT. 817 WA,
HOFFMAN ESTATES, IL. 60179
Durante un periodo de cinco aflos a partir
de la fecha de adquisici6n, si el magnetron
de este homo de microondas Kenmore se
averfa debido a un defecto de materiales o
de mano de obra, Sears Io reparara sin
ningun cargo.
Para el servicio,
Ilame al nQmero
La garantfa de arriba se aplica sClo a los hornos de
microondas que se emplean para aplicaciones
privadas en el hogar.
33
1 - 800-
676- 5811
Cuando se completa un ciclo de cocinado, la ban Jeja rotativa seguira girando hasta tlegar a la misma
posicion en la que estaba al principio. Sin embargo, si usted abre la puerta, se parara inmediatamente aunque no haya Ilegado a ta
correcta.
ixtraiga todos los materiales de embalaje y los
_ccesorios.
ixamine el horno para ver si tiene algQn daflo,
'.omo por ejemplo golpes o si la puerta est_i rota.
4o instale el homo siesta dafiado.
Seleccione una superficie nivelada que
proporcione suficiente espacio libre (vea la
ilustraci6n de la derecha) para las rejillas de
entrada y/o salida.
•
Deje una holgura
minima
de 3 pulgadas
(7,5 cm) por encima
del homo.
•
No saque las patas de la parte inferior
horno.
del
Se requiere una holgura minima de 3
pulgadas (7,5 cm) entre el horno y cualquier
pared adyacente. Un lado debe estar
abierto.
• Si se bloquean las aberturas de entrada y/o
salida puede daflarse el horno.
No instale el horno sobre otro homo, cocina de
gas ni otro aparato que produzca calor.
Nota:
Enchufe el horno en una toma de corriente
normal de 120 voltios/60 Hz. AsegQrese de que
el circuito electrico tenga por Io menos
15 amperios y que su homo de microondas sea
el Qnico electrodom6stico
en el circuito.
Este aparato no esta dise_ado para 50 Hz ni
para ningun circuito que no sea un circuito de
120 voltios CA/60 Hz. Fste horno est_
disefiado para colocarlo encima de una mesa
o mostrador solamente.
Si se inserta en un
mueble o pared se dafiaria el producto y se
anularia la garantia.
34
(1) Ven tanilla de Indicaciones
Cue nta en segundos de forma regresiva el
den po de cocinado. Ensefia la hora cuando
el h _rno no esta en uso.
(2) Indi ;adores
STE P1/STEP2/STEP3:
Indi _'adores de cocinado.
AU" "O/DEFROST/PAUSE:
Mo_ Jalidad de cocinado.
TIIV1E/POWER/SERVING/LB/oz
• Una luz
des :ellante indica cuando selecionar el
tien ipo de cocinado, seleccion de potencia,
el p _so de la comida, o el numero de
pon ;iones.
,-- SIEP
AUTO
DEFROSTI
_
]
PAUSE
(1)
(2)
Quick
Touch
SENSOR
Teclas :tel sensor automatico
-(4)
(3)--
(paginas 39 y 15 - 18)
(3) P01 ATO (patatas)
(4) VE( IETABLE (verduras)
--(5)
(5) SEn SOR REHEAT (Recalentado
(6) STE W/SOUP
(6)_
--(8)
--(10)
(11)
I
(12)_
(13)-
(Cocido/sopa)
(7) PIZ] :A SLICE (porcion de pizza)
(8) DOt IENESS <HIGH/LOW> (Alto/bajo)
(7)
(9)
con sensor)
Botone s del menu automatico
(9)
I
PC PCORN (palomitas de maiz) {Pagina 37}
(10) AL TO DEFROST
(de scongelador automatico) {Pagina 38}
(11) QL liCK ON
(co =inando rapidamente) {Pagina 37}
--(14)
5)
(12) PC WER LEVEL (bot6n del nivel de potencia)
{P_ gina 40}
(13) TI! 4E (boton del tiempo) {Pagina 40}
(14) HC 'LD WARM (boton para mantener el calor)
{P_ gina 41}
(15) Bo tones de nt_meros
(1
(18) --
0
__
CLEAR
STOP
DOOR
(16) TII__IEOF DAY (hora del dia) {Pagina 36}
(17) ST _RT (boton para iniciar)
--(17)
I
(18) ST DP/CLEAR (bot6n para parar o borrar)
Bor •a todos los comandos previos si se
pre, ;iona antes de comenzar a cocinar.
Mie ntras el homo este en uso presione una
vez para parar, y dos para parar y borrar los
corr _andos previos.
START
RELEASE
Sonidc , de zumbido
Hal )ra un sonido cuando algt_n bot6n del panel
de ;ontroles sea presionado para indicar que
un; funcion
ha sido programada.
35
Cuando el homo se enchufa por
primera vez o cuando la
electricidad vuelva despues de
set desconectada, los n0meros
del reloj leeran 0:00. Ajuste el
reloj.
Para ajustar a 3:15 :
'
C
•
1
O!
Presione TIME OF DAY.
Presione 3, 1, y 5.
Presione TIME OF DAY.
El reloj empieza a contar.
.
: DAY j
Si el reloj (o vis_ alizador) muestran
alguna anormalidad,
horno de la sa!,i0 de corriente
CA. Conectelo nuevamente
reloj.
Su horno tiene una funci6n de
seguridad para prevenir el uso
accidental del homo por un
nifio.
Si el homo es accidentalmente
programado para cocinar, el
horno no se conectara cuando
esta funci6n haya sido
programada.
desconecte
y reajuste
Para Programar:
Presione TIME OF DAY.
C©
2.
Presione
9 cuatro
veces.
4 v_:ces
3.
Presione START.
El indicador L se prendera y la
indicacion del reloj reaparecer_
I_._
Para Cancelar:
Presione TIME OF DAY.
2.
(
D
4_
_ces
Presione 7 cuatro veces.
Presione START.
El indicador L desaparecera
la indicaci6n del reloj
reaparecera.
3(
y
el
el
Estafuncionlepermite
cocinar
unabolsadepalomitas
demaiz
de3,5-oz(100-g)
6 3,0-oz
(85-g)
preempacadas
parael
microondas
demanerafacily
rapida.
Para coci lar una bolsa de palomitas para microondas
de 3,5-oz (100-g) :
Presione POPCORN una vez.
La indicacion enseha el tamaSo
de la bolsa.
Seleccione el tamar_o como sigue.
.
Tama[5o
Recomendaciones para cocinar
Palomitas de maiz
La bolsa de las palomitas de
maiz debe de estar a
temperatura ambiente.
• Coloque solamente una bolsa
en el horno a la vez. Siga las
instrucciones del paquete. No
incremente la cantidad.
• Articulos para facilitar el
cocinado de las palomitas no
son recomendables
para
usarse con esta funcion.
Presione POPCORN
3,5 oz (100 g)
3,0 oz (85 g)
una vez
dos veces
•
Presione
,
START.
La indicacion
contara
para cocinarse.
el tiempo
_F3
•
Si el tamaSo de la 1343_a no es de 3,5 oz (100 g) 5 de 3,0 oz (85 g) siga
las instrucciones
deli nanufacturador
y no use esta funci6n.
No deje el homo desz tendido mientras las palomitas
se cocinan.
Recuerde de supervis ar a los nitros cuidadosamente.
•
•
,_
PRECAUC ION - Peligro de da_os personales
* Despues de cocin ar abra la bolsa cuidadosamente.
Las palomitas ye I vapor estan extremadamente calientes.
* No recaliente el n laiz que no haya tronado, ni reuse la bolsa.
El sobrecalentam iento puede incendiar el horno.
* Nunca utilice una bolsa de papel cafe para cocinar las
palomitas.
QUICK ON es un bot6n para
ahorrar tiempo. Este control
simplificado
le permite una
programaci6n
r_pida y poder
comenzar a cocinar sin tener
que tocar el bot6n START.
Podra seleccionar 10 posiciones
de tiempo de cocinado
preajustado (de 30 segundos a 9
minutos) para cocinar al nivel de
potencia mas alta (HI).
Un diagrarna para cocinar con
Quick On aparece en la p_igina
26.
Cocinado de 30 segundos
Para ajustar el cocinado rapido
(QUICK ON) a 30 segundos,
presione el bot6n QUICK ON y 0.
Para aju: =tar Quick on y cocinar en dos minutos:
,
ON
QUICK
Presione QUICK ON.
Presione 2.
El homo comenzara a cocinar y
la indicaci6n contara el tiempo
para cocinar.
,
Puede abrir
programado
presione
la pue_alpara
dejar de cocinar antes de que el tiempo
se .aoaib¢. Para comenzar otra vez, cierre la puer[a y
START.
37
_|
Para
_a funci6n de descongelacion
]utomatica segun el peso hace
)osible descongelar de forma
)recisa y uniforme los
"omestibles congelados de
:orma automatica.
_ulse la tecla AUTO DEFROST, e
ntroduzca entonces el peso de
os comestibles congelados
Jsando las teclas de los
qomeros (peso hasta 5,9 libras).
--I menu selecciona 1 libra si no
_e introduce el peso.
:lescongelar 1,2 libras de piezas de polio:
Presione
I.......1
IF
OC
Coloque
1 y 2.
.
o
de
©
Un diagrama del descongelador
autom_tico (Automatic Defrost
Chart) aparece en la pagina 27.
•
•
Recomendaciones
para descongelar
• Revise la comida
durante
presionando
0[r,osT
Presione START para reanudar la
descongelacion.
Para programar
L n peso que sea menor de una libra siempre presione
primero. Por ejen iplo, para programar
0,2 lb. presione 0 y despu_s 2.
Solamente
un nt_ "nero puede ser programado
despues de un punto
decimal. Si est&
duda convierta
el nt)mero mas bajo.
la
descongelaci6n.
•
Saque la comida congelada de
su envoltura original de papel o
de plastico. Cuando sea dificil
sacar la envoltura, descongele
la comida en su envoltura hasta
Tabla de Conversion
la pausa. Durante la pausa,
saque la envoltura.
•
•
Coloque las comidas en un
plato compatible
con el
microondas
o una parrilla para
asar para el goteo.
La comida debe de estar algo
congelada
en el centro cuando
sea removida
del homo.
•
•
LB
Despues de a primera etapa de cocinado, el tono de pitido
suena 5 vecq;s. El indicador cambia de STEP1 a STEP2 y
parpadea el indicador PAUSE durante 5 segundos. Abra la
puerta y sep are, redisponga o de la vuelta a la comida.
°
Para la descongelacion
manual
usando
el "Rempo de Cocinado
yea la pagina
40.
el peso
F
J-
Presione START.
El indicador STEP1 se enciende y
aparece el tiempo total de
descongelacion
en el visualizador.
tiene un
-necanismo
de pausa incorporado
;lue permite verificar, dar la vuelta,
separar o redisponer
las comidas.
Cuando parpadea el indicador
PAUSE en el visualizador
(y suena
5 veces el tono de pitido), abra la
puerta y redisponga
la comida. Si
no abre la puerta durante la pausa,
el horno iniciara autombticamente
el segundo periodo
descongelacion.
DEFROST.
lOS
.
_ausa
-sta caracteristica
AUTO
.
El menu para el Descongelado
Automatico
incluye el tiempo
de pausa.
Onzas
Decimas de
una libra
1-2
0.1
3-4
0.2
5
0.3
6-7
0.4
8
0.5
9 -10
0.6
11 -12
0.7
13
0.8
14-15
La comida puede descongelarse
en una envoltura
de espuma de
estirol.
38
0.9
0
La funcion
sensor
de cocinado
con
Para rec_lentar
k
automatico/recalentado
permite
la operacion
de acceso
directo para varias comidas.
Se incorporan
cinco cursos de
cocinado.
AI principio de un periodo de
cocinado, el sensor mide et
vapor generado por la comida
en el homo con el fin de
determinar el tiempo correcto de
cocinado y el nivel de potencia.
SENSOR_
.
REHEAT
El numero del curso aparece en el
Pulse dos veces SENSOR REHEAT.
AUTO _--I
visualizador.
ILl
LI IL
D_H
ONENES_
,
IGHtLOWJ
Pulse una o dos veces la tecla
DONENESS HIGH/LOW para el ajuste,
si asi Io desea.
Pulse una
cocinado
indicador
Pulse dos
cocinado
indicador
Consulte las paginas 15-18 para
ver mas informaci6n sobre el
cocinado con sensor y las
recetas de muestra.
Consejos para el cocinado:
• Cubra la comida con envuelta
de plastico, papel encerado o
con una tapa de cacerola que
se adapte bien. Las cubiertas
que no cierran bien pueden
hacer que el horno calcule
erroneamente
el tiempo de
cocinado. (No emplee nunca
recipientes de plastico
hermeticos.)
• Las cantidades peque_as de
comidas (menos de 4 oz 6
115 g) nunca deben cocinarse
usando el sensor automatico.
Cocinelas con el cocinado por
tiempo.
• La temperatura de la sala
debe ser de menos de 95°1:
(35°C).
• Mantenga secos el interior del
homo, la bandeja rotativa y el
exterior de los recipientes de
cocinado. Frote todo Io que
se haya derramado.
La humedad excesiva en el
homo puede causar un
calculo incorrecto del tiempo
de cocinado.
• No abra la puerta del horno
mientras el visualizador
todavia muestre el numero
del curso seleccionado al
principio del cocinado.
Durante este periodo, el
sensor del homo mida la
cantidad de vapor en el homo
para determinar el tiempo de
cocinado, que aparece en el
visualizador cuando se
completa e proceso.
1 porcion de comida congelada:
vez para un tiempo de
mas largo. ApareceM el
H.
veces para un tiempo de
mas corto. Aparecera el
L.
El homo se ajustaM automaticamente
a cocinado de nivel medio si no se
hace ninguna seleccion.
=
START
I
Pulse START.
Mietras la pantalla muestra el numero
del plato seleccionado y/o el grado de
cocido, el sensor del horno mide la
cantidad de vapor en el horno para
determinar el tiempo de cocinado.
Despues de que el sensor ha medido
el vapor, aparece el tiempo de
cocinado en la pantalla. Suena un
tono durante 1 segundo y se inicia la
cuenta regresiva del tiempo.
Cursor de cocinadqi f_et AUTO SENSOR
Categoria
SENSOR
de comida
Pulse la tecla
N. ° de curso
Una vez
H1
Dos veces
H2
Una vez
A1
Una vez
A2
Una vez
A3
REHEAT
(para recalentar comida F
10 congeladas)
SENSOR REHEAT(para d{_scongela
recalentar comidas conge la,das)
POTATO(PATATAS)
STEW/SOUP
(COCIDO/SC
r/
PA)
VEGETABLE(VERDURAS
PIZZA SLICE (PORCIONO -" PIZZA)
Teclas DONENESS
varia segOn cada individl
el sensor automatico:i ap
conseguir los mejores re
Una vez
IIiGH/LOW:
JO. Despues
•endera
_ultados
El nivel adecuado
de algunas
Io que producen
pruebas
A4
de cocinado
de cocinado
los ajustes
con
para
para usted.
de error (El o E2):
Si parpadea
un mensaj,
• Si se abre la puerta an tes de aparecer la cuenta regresiva del tiempo en
el visualizador,
E1 p¢lrl )adeara.
Presione dos veces STOP/CLEAR y
vuelva a empezar usaf =do el cocinado por tiempo. (Las comidas
parcialmente
cocinad_ s no pueden seguir cocinandose
con el sensor
automatico.)
• E2 parpadeara
si no s_ ha enchufado
el horno a una toma de corriente
durante mas de cinco "ninutos cuando se haya empezado un cocinado
con el sensor. Presier e dos veces STOP/CLEAR
y espere 5 minutos
para volver a empezar desde el paso 1.
39
Este metodo
con el homo
permite
tiempo
Para :ocinar en el nivel 8 por 40 segundos:
basico para cocinar
de microondas
cocinar
deseado.
la comida
por el
Presione TIME.
.
Aparte
del nivet de potencia
maxima,
HI POWER se puede
seleccionar
de 9 niveles de
Programe 40 segundos
presionando el 4y el O.
poder, 1 (10% de la potencia
total) hasta 9 (90% de la
potencia
total) para las comidas
que requieren
ser cocinadas
mas lentamente.
El homo tiene tambien
el nivel
de potencia
0 (sin potencia)
poder utilizar
el reloj como
temmporizador
de minutos.
Para mas detalles,
consulte
pagina
I
LE\
la
41.
Para comprobar el nivel de
potencia mientras el homo este
en uso, simplemente oprima
POWER LEVEL.
El nivel de potencia aparece en
la ventanilla de indicaciones.
'.
Para descongelar manualmente
(sin usar las funciones del
descongelador
automatico)
utilice el nivel de potencia 3.
Para apresurar la
descongelacion
de comidas
densas de mas de 1 libra (450 g),
se puede comenzar en
HI per 2 minutos y despues
reducir al nivel 3.
GD
Presione
8 para seleccionar
el
nivel 8. La indicacion
ensefiara
8.
STEPI
Presione
START.
I
.
•
•
8
1
POWER
hasta 99 minutos
El tiempo
para cc cinar puede ser programado
segundos.
Cuando cocine ei el nivel HI, no efectue los pasos 3 y 4.
GUIA DE AJUSI
Nivel de
Potencia
Manualmente
,'-,'/ }
POWER
Comidas con altas cantidades de
humedad deben de ser
cocinadas con la maxima
potencia y que este es el modo
mas r_fipido y mantiene mejor la
textura y sabor de las comidas.
Descongelando
Presione POWER LEVEL.
Pov
.
para
y 99
DEL NIVEL DE POTENCIA
Ejempilc sde
Cocinttd 0
il
i;
1
• Ablanc amiento de queso cremoso y de mantequilla.
• Mante _er cacerolas y guisados calientes.
2
• Ablanc ar chocolate y clarificar mantequilla.
• Catent ]r panes, tortas, tacos, tortillas y pan frances.
• Sacar 31frio de las frutas. Calentar poca comida.
3
• Compl _tar el ciclo de cocinar de cacerolas,
salsas
• Desco _gelar manualmente.
• Deshe ar came, aves y mariscos.
4
• Cocim r piezas de came no tan suaves en liquidos, o platillos que
se coc inen despacio.
• Compl etar el ciclo de cocinar de postres no tan suaves.
5
• Cocim r guisados y sopas despues de hervir.
• Cocin_ r flan y pastas.
• Cocin_ r asados, jam6n, ternera y cordero.
6
• Cocin_ r huevos revueltos.
7
• Cocin_ do de comidas con queso.
8
• Rec_l_ ntar r_fipidamente comidas ya preparadas.
• Cocin_ do de pescado.
.9
• Cocin_ r cebollas,
• Recal_ ntamiento
HI
• Cocin_ do de polio, verduras y platos de came con verdura
• Precal_=n[ar un ptatitlo que debe de dorarse Hervir agua
4(
guisados y algunas
Cocinar pasteles.
apio, y pimientos
de arroz y pasta.
rapidamente.
Esta es una caracteristica
apropiada para conservar
calientes las comidas tales como
cocidos, potajes, etc.
La funci0n para conservar
catientes las comidas las
conserva calientes durante 100
minutos programados despues
de haberse terminado el
programada de cocinado o hasta
que se abre la puerta o se
presiona el boton STOP/CLEAR
La caracterfstica para conservar
calientes las comidas puede
usarse con el programa de
cocinado por tiempo. Presione
HOLD WARM y luego repita los
pasos para cocinado por tiempo
que se muestran en la pagina
anterior.
para mar itener un cocido caliente:
.
f
i!
L
i,
HOLD
WARM
Presione HOLD WARM.
START
Presione START.
HOLD aparecerfi en et
visualizador.
.
_F4
•
No descongele
la COn ida y emplee luego la caracteristica
conservar
calientes la s comidas, porque se podria echar
La alarma se puede utilizar para
otros propCsitos aparte de!
de cocinar.
para
a perder.
Program 31opor 3 minutos para Ilamar por telefono:
u
i!,
.
'_
TIME
Presione TIME.
,
Presione
.
_
LEV!EL
POWER
.
3, O, y O.
Presione POWER LEVEL.
Presione O(nivel de poder 0).
'i
i
,
Presione START.
STARq-
Usted puede prograr nar hasta 3 etapas de cocinado en secuencia.
Para programar 2 6 ," etapas de cocinado, repita los pasos del 1 a 4
de la pagina anterior y oprima START.
Utilizando la alarma 3ara la primera etapa0 se puede dilatar el
tiempo para empeza a cocinar hasta por 99 minutos y 99 segundos.
Empleando la ca_act, ristica de descongelacion
peso para la prime_a etapa, podrfi descongelar
programar hasta 3el aiPas de cocinado.
41
automcftica
por el
primero
y podra
SEARS
®
MICROWAVE
OVEN
OWNER'S
MANUAL
For in-home major bland repair service
Call 24 hours a da[Y,7 days a week
1-80044+REPAIR
Model No.
565.66480
Para pedir servl_i 0 de reparacibn
a domicllio,
Llame
24
horas
_1 djat
7 dias
a la semana
i 800-676-5811
The model
number
of
your microwave
oven is
found on the inner left
side of the control
panel.
When requesting
service, always provide
the following
information:
For the! Io_ation of a
Sears Repair Servie_l_enter in your area
Cal124hoursald_y, 7 daysaweek
_
1"800'488"
1222
atom
1_
For informationlola _)urchasing a Sears
Maintenance Agreement or to inquire
about an eXiStlng Agreement
call 9 am- 5 _m, _onday-Saturday
1-800,827-6655
• Product
Type
• Model
Number
•
Serial
• Problem
Number
Description
Sears,
Part
No.
16130
Roebuck
and Co.,
Hoffman
Estates,
IL. 60179,
U.S.A.
11/96
Printed in Singapore