1
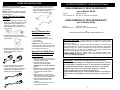
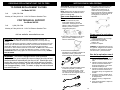
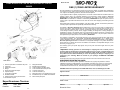
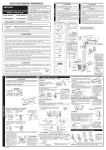
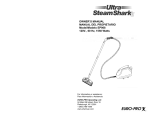
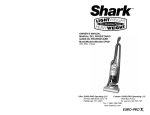
OWNER’S MANUAL
MANUAL DEL PROPIETARIO
Model / Modelo HV166
120V., 60Hz., 1000 Wats
EURO-PRO Operating LLC
94 Main Mill Street, Door 16
Plattsburgh, NY 12901
Tel.: 1 (800) 798-7398
www.sharkvac.com
IMPORTANT SAFETY INSTRUCTIONS
Modelo HV166
When using your EURO-PRO ULTRA BIG SHARK, basic safety precautions
should always be observed, including the following:
1.
2.
3.
4.
5.
6.
7.
8.
9.
10.
11.
12.
13.
14.
Read all instructions before using your
ULTRA BIG SHARK hand vacuum.
Use the system only for its intended use.
To protect against a risk of electric shock,
do not immerse any part of the system in
water or other liquids.
Never yank cord to disconnect from
outlet; instead, grasp plug and pull to
disconnect.
Do not allow cord to touch hot surfaces.
Do not run appliance over cord.
Do not operate the system with a damaged
cord or plug, or if the appliance or any other
part of the system has been dropped or
damaged. To avoid the risk of electric
shock, do not disassemble or attempt to
repair the ULTRA BIG SHARK. Return the
system to Euro-Pro Operating LLC (see
warranty) for examination and repair.
Incorrect re-assembly or repair can cause a
risk of electrical shock or injury to persons
when the ULTRA BIG SHARK is used.
Close supervision is necessary for any
appliance being used by or near children.
Do not leave the system unattended while
connected.
Keep hair, loose clothing, fingers and all
parts of body away from opening and
moving parts.
Do not use to pick up flammable or
combustible liquids such as gasoline or use
in areas where they may be present.
Do not pick up anything that is burning or
smoking such as cigarettes, matches or hot
ashes.
Use extra care when cleaning on stairs.
Do not use the hand vacuum without the
dust cup filter in place.
This appliance is intended only for
household use. Follow all user instructions
in this manual.
To reduce the risk of fire, electric shock, or
injury:
• Do not leave the ULTRA BIG SHARK
plugged in when unattended. Unplug the
electrical cord when not in use and before
servicing.
• Do not allow to be used as a toy. Close
attention is necessary when used by or near
children, pets or plants.
• Use only as described in this manual. Use
only manufacturer’s recommended
accessories.
• Do not pull cord, use cord as a handle, close
a door on cord, or pull cord around sharp
edges or corners. Keep cord away from
heated surfaces.
• Use only extension cords UL-rated or cUL at
15 amperes. extension cords rated for less
amperage may overheat. Care should be
taken to arrange the cord so that the cord
cannot be pulled or tripped over.
• Turn off all controls as applicable before
unplugging from electrical outlet.
• Do not unplug by pulling on cord. To unplug,
grasp the plug, not the cord.
• Do not handle plug or hand vacuum with wet
hands or operate without shoes.
• Do not put any objects into openings. Do not
use with any opening blocked. Keep free of
dust, lint, hair and anything else that may
reduce air flow.
• Store your appliance indoors in a cool, dry
area.
• Keep your work area well lit.
• Do not immerse the hand vacuum into water
or other liquids.
• Keep end of hose, wands and other openings
away from your face and body.
• Use only on dry surfaces.
• Using improper voltage may result in damage
to the motor and possible injury to the user.
Correct voltage is listed on rating label.
SAVE THESE INSTRUCTIONS
For Household Use Only
WARNING: To reduce the risk of electric shock, this appliance has a
polarized plug (one blade is wider than the other). This plug will fit in a
polarized outlet only one way. If the plug does not fit fully in the outlet,
reverse the plug. If it still does not fit, contact a qualified electrician to install
the proper outlet. Do not modify the plug in any way.
1
Rev. 03/02D
GARANTÍA LIMITADA DE UN (1) AÑO
Euro-Pro Operating LLC garantiza este artefacto contra defectos de materiales y de fabricación por un (1) año a
partir de su fecha de compra cuando se le da uso doméstico normal y bajo las siguientes condiciones,
exclusiones y excepciones.
Si este artefacto presentase algún defecto cubierto bajo los términos de esta garantía durante el periodo de la
garantía, Euro-Pro Operating LLC, a su criterio, reparará o reemplazará cualquier pieza defectuosa si el
comprador original lo devuelve con flete prepagado a Euro-Pro Operating LLC, 94 Main Mill Street, Door 16.,
Plattsburgh, NY 12901. El cliente debe incluir el documento que pruebe la fecha de compra y un cheque por
$9.95 para cubrir el costo de manipuleo, reembalaje y flete de retorno al cliente*.
Esta garantía no cubre y expresamente excluye piezas que se gastan por su uso y requieren cambiarse, como
bolsas colectoras de polvo, filtros, escobillas y piezas eléctricas.
La responsabilidad de Euro-Pro Operating LLC se limita únicamente al costo de la reparación o de las piezas
que se cambien o al cambio del artefacto completo, a criterio de EURO-PRO. Esta garantía no cubre piezas
sujetas a desgaste normal por su uso y no se aplica a artefacto alguno que haya sido alterado, intervenido
físicamente o usado comercialmente. Esta garantía limitada tampoco cubre daños causados por maltrato, mal
uso, manipulación negligente, empaquetamiento defectuoso, manipulación en tránsito ni por daños resultantes
de alteraciones o servicio por personal no autorizado por EURO-PRO a cualquier pieza de la unidad.
Esta garantía se extiende al comprador original del artefacto y excluye toda otra garantía legal y/o convencional.
La responsabilidad de Euro-Pro Operating LLC, si alguna, se limita a las obligaciones específicas
expresamente asumidas bajo los términos de esta garantía limitada. En ningún caso será Euro-Pro Operating
LLC responsable por daños incidentales o consecuenciales, o de ninguna otra naturaleza.
Esta garantía le otorga derechos específicos y también podría tener otros derechos que varían de un Estado a
otro.
*Importante: Empaque el artefacto cuidadosamente para evitar que se dañe durante el transporte. Antes
de empaquetar el artefacto, asegúrese de rotularlo con su nombre completo, dirección y teléfono, y de
incluir una nota con los datos de la compra, modelo, número de serie y una explicación de lo que usted
cree que sea el problema. Recomendamos asegurar el paquete (porque los daños durante su transporte
no están cubiertos por esta garantía). En el exterior del paquete, además de la dirección arriba indicada,
marque “ATTENTION CUSTOMER SERVICE”.
TARJETA DE REGISTRO DE PROPIEDAD
Para validar la Garantía Limitada precedente, por favor llene esta tarjeta de registro y remítala
por correo dentro de los diez (10) días siguientes a la compra. El registro nos permitirá
contactarlo en el poco probable caso de tener que enviarle una notificación de seguridad. Al
enviar esta tarjeta, usted está aceptando haber leído y entendido las instrucciones para el uso y
las advertencias en el instructivo que se acompaña.
REMITA A: Euro-Pro Operating LLC, 94 Main Mill Street, Door 16, Plattsburgh, N.Y. 12901
Modelo del artefacto: HV166
……………………………..…………………………………………………………………………..……..
Fecha de Compra:
Nombre de la Tienda o Almacén
………………………………………..…………………………………………………………………..…...
Nombre del Dueño (Comprador)
……………………………………………………………………………..………………………………….
Dirección:
Impreso en China
Ciudad
Estado:
Cód. Postal
GETTING TO KNOW YOUR ULTRA BIG SHARK
9
19
Cloth Dust
Cup Filter
Debris Screen
HEPA Filter
1. Push to Open Dust Cup (Container)
2. On/off Power Switch
3. Suction Hole
4. Handle
5. Exhaust Cover Lock
6. Exhaust Cover
7. Shoulder Strap
8. Oval Brush
9. Holes for Attaching the Shoulder Strap
10. Dust Cup (Container)
11.
12.
13.
14.
15.
16.
17.
18.
19.
Technical Specifications
Voltage:
Power:
120V., 60Hz.
1000 Watts
2
Flexible Hose
Crevice Tool
Hepa Dust Cup Filter
Air Driven Turbo Brush
Floor Attachment
Extension Tubes (2)
Deluxe Hose With Suction Control
Deluxe Brush With
Removable Bristles
Cloth Dust Cup Filter
OPERATING INSTRUCTIONS
Warning: Always unplug from
electrical outlet before opening the dust
cup (container).
Note: HEPA dust cup filter or cloth dust
cup filter must be used when operating
the hand vacuum.
5. To use the deluxe hose with suction
control, push the end of the hose
into the suction hole, then attach the
desired accessory to the hose
directly or to the extension tubes.
FILTROS DE REPUESTO Y ASISTENCIA TÉCNICA
PARA ORDENAR FILTROS DE REPUESTO
para el Modelo HV166
Llame al:
Lunes a Viernes de
Using The Unit As A Hand
Vacuum
1 (800) 798-7398
8:30 A.M. a 5:00 P.M. Hora del Este
PARA ORDENAR FILTROS DE REPUESTO
1. To open the dust cup (container), push
button and pull out the dust cup. Verify
that the HEPA dust cup filter or the
cloth dust cup filter is inside, then
attach the dust cup (container) to the
hand vacuum.
para el Modelo HV166
Llame al:
Lunes a Viernes de
How To Operate Your
Hand Vacuum
2. To use the Hand Vacuum with the
shoulder strap, attach it to the unit as
shown below.
1. Hold the hand vacuum firmly in
your hand by the Handle.
2. Push the On/Off Power Switch to
“On” position.
3. Start vacuuming.
Caution: The Hand Vacuum is a
very powerful unit. Make sure that you
hold it firmly, otherwise it can slip out of
your hand and cause injury.
3. To attach the crevice tool or oval
brush to the Hand Vacuum, push
brush into the suction hole, as
shown below.
Using The Unit With Floor
Attachment or Air Driven
Turbo Brush
1. Slide the narrow end of one of the
extension tubes into the wide end of
the other extension tube.
2. Slide the narrow end of the
extension tube into the floor
attachment or the air driven turbo
brush.
3. Slide the wide end of the assembled
extension tube onto the round end
of the deluxe hose with suction
control.
4. Slide the narrow, oval side of the
deluxe hose with suction control into
the suction hole of the vacuum unit.
5. Attach the shoulder strap to the
vacuum and hang it from your
shoulder.
6. You can now proceed to vacuum
your carpet or hard floor.
4. To use the flexible hose, push the
smaller end of the hose into the
suction hole, then attach the desired
accessory to the other end of the
flexible hose, as shown below.
3
1 (800) 798-7398
8:30 A.M. a 5:00 P.M. Hora del Este
O
visite nuestro sitio en la internet: www.sharkvac.com
Por Favor Tome Nota: El filtro HEPA para el contenedor de polvo puede
lavarse; sin embargo recomendamos que NO se haga con una frecuencia
menor a tres meses.
Para lavar el filtro HEPA, agárrelo de la brida del bastidor (con la brida hacia
arriba) enjuáguelo bajo el chorro de agua del grifo hasta observar que toda la
suciedad se haya ido. Alguna decoloración se puede producir al material del
filtro HEPA, pero esto no afecta su rendimiento. Al terminar, sacúdalo para
eliminar el exceso de agua. No lo lave en el lavavajillas.
Cuando se lave el cartucho filtrante HEPA, es importante dejarlo secar
COMPLETAMENTE antes de volverlo a usar. Recomendamos secarlo al aire
por 24 horas. NO USE SECADOR.
Importante: Este motor está equipado con un termostato
protector para que apague la unidad automáticamente si el motor
se recalienta por cualquier motivo. Si esto ocurriese, desenchufe
la unidad del tomacorriente y mueva el interruptor a la posición
apagado (Off). Remover el contenedor de polvo y vaciarlo.
Limpie el diltro. Deje que la unidad se enfrie por
approximadamente 1 hora. Para volverla a arrancar, enchúfela al
tomacorriente y enciéndala moviendo el interruptor a la posición
"On".
16
LIMPIEZA Y CAMBIO DEL FILTRO POSTERIOR DEL
MOTOR
1. Antes de limpiar, desenchufe la
unidad de la corriente.
2. El Filtro debe limpiarse por lo menos
dos veces al año o cuando se vea
que está obstruido.
3. Siempre haga funcionar la
aspiradora con el filtro instalado.
4. No lave el filtro en una máquina
lavadora.
5. No use un secador de cabello para
secarlo.
1. Para abrir la tapa del filtro, presione
el seguro de la tapa.
2. Saque el filtro de la rejilla del filtro.
3. Enjuague el filtro con agua tibia y
espere a que seque completamente.
4. Reinstale el filtro en la rejilla.
5. Cuando el filtro se obstruya
completamente, debe lavarse con
agua tibia. Puede agregarse un
detergente suave si se requiere.
GUÍA PARA DIAGNÓSTICO DE PROBLEMAS
OPERATING INSTRUCTIONS
Using The Unit With Floor
Attachment or Air Driven
Turbo Brush cont.
Please note: If floor nozzle does
not move easily, we suggest that you
reduce suction power on the variable
suction control.
Please note:The Variable Suction
Control will allow you to adjust the
amount of suction by sliding it up or
down.
Note: Adjustable height can be
obtained by using 1 or both extension
tubes.
To ensure peak performance from the Air
Driven Turbo Brush:
1. Empty the dust cup frequently.
2. “TapClean” the HEPA dust cup filter
every time dust cup is emptied.
3. Ensure that the rotating brush is kept
free of hair and string which may
accumulate and decrease brush
performance.
4. Keep air Driven Turbo Brush turbine
free of dirt and foreign matter. (See
illustration below for cleaning
instructions.)
Caution: The suction hole must be
open, free of any obstructions at all
times. Otherwise, the motor will overheat
and could become damaged.
Using the Deluxe
Brush with Removable
Bristles
Cleaning Air Driven Turbo
Brush
Locking Latch
PROBLEMA
CAUSA POSIBLE
La aspiradora de
mano no funciona
1. El cordón no está bien
enchufado en el
tomacorriente.
2. No hay electricidad en el
tomacorriente.
3. Necesita servicio.
4. El termostato ha saltado.
1. Enchufe bien la unidad.
2. Revise el fusible o interruptor de circuito y
reemplácelo si es necesario
3. Llame al 1-800-798-7398.
4. Apague la unidad y desenchúfela.
1. El contenedor de polvo está
lleno.
2. La unidad está obstruida.
3. El cartucho filtrante HEPA o
el filtro de tela necesitan
limpieza o cambio.
4. La manguera está acodada u
obstruida. El tubo de
extensión está obstruido.
1. Evacue el contenedor (Vea la Pág. 5)
2. Apague la unidad y desenchúfela de la
corriente. Saque el cartucho filtrante
HEPA o el filtro de tela y elimine
cualquier objeto extraño que estuviese
obstruyendo el conducto de aire.
3. Limpie o cambie el cartucho filtrante
HEPA o el filtro de tela del contenedor de
polvo. (Vea la Pág. 5).
4. Apague la unidad y desenchúfela de la
corriente. Enderece la manguera o
elimine las obstrucciones de la manguera
o del tubo de extensión.
La unidad no aspira
o lo hace
débilmente
1.
Fuga de polvo de la
aspiradora
2.
El contenedor de polvo está
lleno.
El cartucho filtrante HEPA o
el filtro de tela tiene una
perforación o agujero.
La manguera o las
escobillas no
aspiran
1.
2.
Manguera obstruida.
Contenedor de polvo lleno.
15
Note: The deluxe brush with
removable bristles can only be used
with the deluxe hose.
Tilt
Upwards
SOLUCIÓN POSIBLE
In order to vacuum high, hard to reach
places such as ceilings,
curtains/drapes, etc., use the deluxe
brush with removable bristles as
follows:
Turbine
1. Evacue el contenedor de polvo
2. Revise el cartucho filtrante HEPA o el filtro
de tela de acuerdo a las instrucciones.
(Vea la Pág. 5).
Reemplace el cartucho filtrante HEPA o
el filtro de tela para polvo. (Vea la Pág. 5)
1. Desconecte la manguera y/o la escobilla
y elimine las obstrucciones.
2. Evacue y limpie el contenedor de polvo.
1. Remove the floor attachment.
2. Insert the deluxe brush to the deluxe
hose with suction control.
3. If you need a brush action, slide on
the removable bristle brush onto the
deluxe brush. (See fig. 1)
4. When vacuuming drapes/curtains,
we recommend adjusting the
variable suction control.
1. Slide locking latch forward then tilt the
top housing of the brush upwards. The
top housing is hinged and will tilt up
approximately 45° only.
2. Inspect turbine wheel and air passage
for debris and/or blockage. Remove
debris if present.
3. Inspect the rotating brush for built-up
hair or string. If present, remove by
carefully cutting with scissors. Avoid
damaging or cutting bristles.
4. Once clean, close the top cover of the
turbo brush and slide the locking latch
toward the rear of the brush to lock.
Slide
Fig. 1
4
OPERATING INSTRUCTIONS
Cleaning & Changing the
HEPA Dust Cup Filter
Warning: Always unplug the unit
from electrical outlet before opening
the Dust Cup (container).
1. To open the Dust Cup (container), push
button and detach the Dust Cup
(container ). (Fig. 2)
2. Pull out the HEPA Dust Cup Filter or
cloth dust cup filter. (Fig. 3)
Fig. 2
Fig.3
3. Empty the dust from the Dust Cup
(container).
4. Separate the debris screen from the
HEPA filter cartridge by grasping the
debris screen with one hand and the
filter frame with the other and pull
apart. (fig. 4)
Debris
Screen
Fig. 4
INSTRUCCIONES PARA OPERAR
Ensure that you do not damage the
pleated filter material during cleaning.
Also note that discoloration occurs
during use. This is normal and does
NOT affect the filter’s performance.
7. Reassemble the debris screen to the
HEPA filter cartridge and replace into
dust cup (container). Ensure that the
filter assembly is completely seated
inside the dust cup (container).
8. Attach the dust cup (container) to the
hand vacuum.
Important: Do NOT use the HEPA filter
cartridge without the debris screen in
place.
WARNING: It is very important to ensure
that the fine dust which adheres to the
filter media is completely removed. This
fine dust powder is left on the filter will
severely reduce the suction performance
of your vacuum. TapClean everytime the
dust cup is emptied.
CHANGING & CLEANING
CLOTH DUST CUP FILTER
Warning: Always unplug from electrical
outlet before opening the Dust Cup
(container).
1. To open the Dust Cup (container),
push button and pull out the Dust Cup
(container ). (Fig. 6)
2. Pull out the Cloth Dust Cup Filter.
(Fig. 7)
3. Empty the dust from the Cloth Dust
Cup Filter.
4. Rinse the Cloth Dust Cup Filter in
cold water, and then wait until it dries
completely before replacing it into the
Dust Cup (container).
5. Place the Cloth Dust Cup Filter
carefully into the Dust Cup
(container).
6. Attach the Dust Cup (container) to the
Hand Vacuum.
HEPA Filter
Frame Flange
5. Rinse the debris screen under the
faucet until clean. Allow to air dry or
dry with a clean dish towel. Do NOT
wash in dishwasher.
6. To clean the HEPA filter cartridge,
hold filter by frame flange and tap
filter vigorously on the inside wall of a
dust container (garbage can), until
no more dust comes out of the filter.
(Fig. 5)
Limpieza y cambio del filtro
HEPA para polvo
Asegúrese de no dañar el material
plegado del filtro durante la
limpieza. También observará que el
filtro se decolora durante el proceso.
Esto es normal y no afecta su
eficiencia.
7. Reensamble la malla en el cartucho
filtrante HEPA e instálelo en el
contenedor para polvo,
asegurándose que se asiente
completamente dentro del
contenedor.
8. Instale el contenedor en la
aspiradora.
Importante: No use el filtro HEPA sin
la malla colectora de suciedad.
Advertencia: Siempre desenchufe la
aspiradora de la corriente antes abrir en
contenedor de polvo.
1. Para abrir el contenedor de polvo,
presione el botón (Fig. 2) .
2. Saque el filtro HAPA para polvo
(Fig. 3).
Fig. 2
Fig.3
Limpieza y cambio del filtro
de tela
3. Evacue el polvo del contenedor.
4. Quite la malla del filtro HEPA
agarrándola con una mano y el
bastidor del filtro con la otra, y
sepárelos tirando de ellos. (Fig. 4)
Malla
Filtrante
Advertencia: siempre desenchufe
del tomacorrientes antes de abrir el
contenedor.
1. Para abrir el contenedor de polvo,
presione el botón (Fig. 6) y sáquelo.
2. Saque el filtro de tela para polvo
(Fig. 7).
3. Evacue el polvo del contenedor.
4. Lave la suciedad del filtro de tela en
agua fría y después espere que
seque completamente antes de
reinstalarlo en el contenedor.
5. Reinstale el filtro de tela
cuidadosamente en el contenedor.
6. Reinstale el contenedor en la
aspiradora.
Filtro HEPA
Fig. 4
5. Limpie la suciedad de la malla
colocándola bajo el chorro de agua
del grifo hasta que quede limpia.
Luego deje que seque por efecto del
aire o con un paño secador de vajilla.
No lave en el lavavajillas.
6. Para limpiar el filtro HEPA, agárrelo
firmemente del bastidor y golpéelo
vigorosamente contra la pared interior
de un receptáculo para polvo
(basurero). (Fig. 5)
Fig. 6
Cuidado: El orificio de succión
siempre debe estar libre de
obstrucciones, de lo contrario el motor
se recalentará y podría dañarse.
Fig. 5
Fig. 6
5
Fig. 7
Fig. 7
Fig. 5
14
INSTRUCCIONES PARA OPERAR
CLEANING & CHANGING THE POST MOTOR FILTER
Por favor tome nota: Si la
boquilla para pisos no se mueve con
facilidad, le sugerimos que reduzca la
potencia de succión mediante el
regulador de succión.
Uso De La Unidad Con Accesorios
Para El Piso O Con La Escobilla
Movida Por Aire
Para asegurarse de obtener el
rendimiento máximo de la turbo
escobilla movida por aire:
1. Evacue el contenedor polvo
frecuentemente.
2. Cada vez que evacue el polvo del
contenedor, limpie el cartucho
filtrante HEPA golpeándolo
levemente.
3. Asegúrese que la escobilla
rotativa no tenga acumulados
pelos, hilos, pelusas, etc. que se
adhieren durante su uso.
4. Mantenga la turbina de la
escobilla sin suciedad ni
materiales extraños. (Para las
instrucciones de limpieza,
Vea la Fig. )
Por favor tome nota: El regulador
de succión le permitirá regular la
potencia de succión deslizándolo
hacia arriba o abajo.
1.
1. Disconnect from electrical outlet
before cleaning the filter.
2. Filter should be cleaned at least twice
a year or when it becomes visible
solid.
3. Always operate the cleaner with the
filter installed.
4. Do not use a washing machine to
rinse the filter.
5. Do not use a hair dryer to dry it.
2.
3.
Nota: Se puede regular la altura
4.
5.
usando uno o dos tubos de extensión.
Uso de la escobilla de lujo
con cerdas desmontables
Nota: La escobilla de lujo con cerdas
desmontables sólo se puede conectar
en la manguera de lujo.
Para aspirar lugares altos de acceso
difícil, tales como cielos rasos,
cortinas, etc. use la escobilla de lujo
con cerdas desmontables.
Limpieza de la Turbo Escobilla
Movida por Aire
1. Saque el accesorio para pisos.
2. Inserte la escobilla de lujo en la
manguera con regulador de
succión.
3. Si necesita cepillar a la vez que
aspira, instale las cerdas
deslizándolas en la escobilla de lujo.
(Vea la Fig. 1).
4. Cuando aspire cortinas,
recomendamos controlar la potencia
de succión con el regulador.
seguro hacia
turbina
1. Deslice el seguro hacia delante e
incline el casco superior de la
escobilla hacia arriba. El casco
superior tiene una bisagra y se
abre únicamente a 45 grados.
2. Inspeccione la rueda de la
turbina de aire y las vías de aire,
y elimine cualquier cuerpo
extraño u obstrucción.
3. Inspeccione la escobilla rotativa y
elimine cualquier acumulación de
cabellos, hebras, etc. cortándolas
con tijeras. Evite dañar o cortar las
cerdas de la escobilla.
4. Una vez que la escobilla esté
limpia, cierre el casco superior y
deslice el seguro hacia atrás
para fijar la escobilla.
PROBLEM
HAND VACUUM
WILL NOT
OPERATE
POSSIBLE REASON
1.
2.
3.
4.
POSSIBLE SOLUTION
Power cord not firmly plugged
into outlet.
No power in wall outlet.
Needs servicing.
Thermostat has tripped.
1.
2.
3.
4.
1.
HAND VACUUM
WILL NOT PICK-UP
OR SUCTION
POWER IS WEAK
TURBO BRUSH
DOES NOT
ROTATE OR
ROTATES
SLOWLY
DUST ESCAPING
FROM HAND
VACUUM
HAND VACUUM
HOSE OR
BRUSHES WILL
NOT PICK-UP
13
Put the filter into the grill-filter.
A severely solid or clogged filter
should be thoroughly washed
with fresh tepid water. A mild
detergent can be used if required.
TROUBLE SHOOTING GUIDE
1.
2.
3.
4.
2.
Dust cup s full.
Unit clogged.
HEPA or Cloth Dust Cup
Filter needs cleaning or
replacing.
Curved Hose / Extension
Wand clogged
3.
4.
Deslice
Fig. 1
Push the Filter Cover Lock
to open the filter cover.
Remove the filter from the
grill-filter.
Rinse filter in lukewarm water
and dry the filter completely.
1.
2.
3.
4.
1.
2.
3.
1.
2.
Rotating brush or elbow
obstructed.
Belt broken.
Hose obstructed.
HEPA or cloth dust cup filter
clogged.
1.
Dust cup is full.
HEPA or Cloth Dust Cup
Filter is not installed correctly.
There is a puncture/hole in
HEPA or Cloth Dust Cup
Filter.
1.
2.
2.
3.
4.
3.
1.
Hose clogged.
Dust cup is full.
2.
6
Plug unit in firmly.
Check fuse or breaker.
Replace fuse/reset breaker.
Call 1-800-798-7398.
Turn the unit off and unplug
from outlet.
Allow unit to cool down, then
restart. Empty dust cup – (see
page 5).
Turn unit off and unplug from
wall outlet. Remove HEPA or
Cloth Dust Cup Filter and
check for object(s) in air duct
and remove.
Clean or replace HEPA or
Cloth Dust Cup Filter. (see
page 5).
Turn unit off and unplug from
wall outlet. Check for objects
in curved hose / wand
extension.
Clear obstructions. (see page
4.)
Call 1-800-798-7398.
Clear obstruction.
Clean HEPA or cloth dust cup
filter. (See page 5.)
Empty dust cup.
Review HEPA or Cloth Dust
Cup Filter instructions.
(see page 5)
Replace HEPA dust cup filter.
(see page 5)
Remove hose and/or bushes.
Remove obstruction from
hose.
Empty and clean dust cup.
ORDERING REPLACEMENT DUST CUP FILTERS
TO ORDER REPLACEMENT FILTERS
for Model HV166
Call:
1 (800) 798-7398
Monday to Friday 8:30 A.M. - 5:00 P.M. Eastern Standard Time
FOR TECHNICAL SUPPORT
for Model HV166
Call:
1 (800) 798-7398
Monday to Friday 8:30 A.M. - 5:00 P.M. Eastern Standard Time
INSTRUCCIONES PARA OPERAR
Advertencia: Siempre desenchufe de
la corriente antes de abrir el contenedor
de polvo.
Nota: Siempre que se haga funcionar la
aspiradora debe tener instalado el filtro
HEPA.o el filtro de tela.
5. Para usar la manguera de lujo con
regulador de succión, inserte el
extremo de la manguera en el
orificio de succión y presiónelo,
luego conecte el accesorio deseado
directamente en el otro extremo de
la manguera o en el tubo de
extensión.
Uso como Aspiradora de
Mano
1. Abra el contenedor de polvo
presionando el botón y tire del
contenedor. Verifique que el filtro
HEPA o el filtro de tela esté instalado
adentro y vuelva a cerrar el
contenedor para polvo.
or
visit our website: www.sharkvac.com
Please Note: The HEPA Dust Cup Filter may be washed. However, we
recommend that this NOT be done more frequently than once every three (3)
months.
To wash your HEPA Dust Cup Filter, hold filter cartridge by frame flange and rinse
under a tap until all observable dirt has been removed. Some discoloration of the
HEPA filter material may occur, this is normal and will not affect the filter’s
performance. When finished, shake off excess water. Do NOT wash in dishwasher.
It is important that when you wash the HEPA dust cup filter, you allow it to dry
COMPLETELY before using again. We recommend 24 hours to air dry. DO NOT
DRY IN DRYER.
Important: This motor is equipped with a motor protective
thermostat. If for some reason the vacuum cleaner should overheat,
the thermostat will automatically turn the unit off. Should this occur,
unplug the vacuum cleaner from the wall outlet and turn off switch.
Remove dust cup and empty. Clean dust cup filter. Allow the unit to
cool for approximately 1 hour. To restart, re-plug into wall outlet and
turn switch back on.
7
Cómo operar la aspiradora
de mano
2. Para usar la aspiradora con la correa
para el hombro, instálela como se
indica a continuación.
1. Agarre la aspiradora por el mango
y sosténgala firmemente .
2. Presione el interruptor a la
posición “On”.
3. Comience a aspirar.
CUIDADO: La aspiradora de mano es
muy potente. Asegúrese de sostenerla
firmemente, de lo contrario se puede
caer de la mano y causar lesiones.
3. Para instalar la boquilla para
hendiduras o la escobilla ovalada en la
aspiradora, inserte y presione el
accesorio dentro del orificio de succión
como se muestra a continuación.
Uso de la aspiradora con el
accesorio para pisos
1. Conecte el extremo angosto de uno
tubo en el extremo ancho del otro
tubo.
2. Instale el extremo angosto del otro
tubo en el extremo redondo del
accesorio para pisos o en la turbo
escobilla movida por aire.
3. Conecte el extremo ancho del otro
tubo en el extremo redondo de la
manguera de lujo con regulador de
succión.
4. Conecte el extremo ovalado de la
manguera en el orificio de succión
de la aspiradora.
5. Instale la correa y cuélguela del
hombro.
6. Ahora puede proceder a aspirar la
alfombra o el piso.
4. Para usar la manguera flexible inserte
su extremo pequeño y presiónelo
dentro del orificio de succión, luego
conecte el accesorio deseado en el
otro extremo de la manguera como se
muestra a continuación.
12
FAMILIARÍZACIÓN CON SU ASPIRADORA ULTRA BIG
SHARK
Model HV166
ONE (1) YEAR LIMITED WARRANTY
Euro-Pro Operating LLC warrants this product to be free from defects in material and workmanship
for a period of one (1) year from the date of the original purchase, when utilized for normal household
use, subject to the following conditions, exclusions and exceptions.
9
If your appliance fails to operate properly while in use under normal household conditions within the
warranty period, return the complete appliance and accessories, freight prepaid to Euro-Pro
Operating LLC, 94 Main Mill Street, Door 16, Plattsburgh, NY 12901. If the appliance is found by
EURO-PRO to be defective in material or workmanship, EURO-PRO will repair or replace it free of
charge. Proof of purchase date and $ 9.95 to cover the cost of return shipping and handling must be
included. *
Non-durable parts including, without limitation, dust bags, filters, brushes and electrical parts which
normally require replacement are specifically excluded from warranty.
The liability of Euro-Pro Operating LLC is limited solely to the cost of the repair or replacement of
the unit at our option. This warranty does not cover normal wear of parts and does not apply to any
unit that has been tampered with or used for commercial purposes. This limited warranty does not
cover damage caused by misuse, abuse, negligent handling or damage due to faulty packaging or
mishandling in transit. This warranty does not cover damage or defects caused by or resulting from
damages from shipping or repairs, service or alterations to the product or any of its parts, which have
been performed by a repair person not authorized by EURO-PRO.
This warranty is extended to the original purchaser of the unit and excludes all other legal and/or
conventional warranties. The responsibility of Euro-Pro Operating LLC if any, is limited to the
specific obligations expressly assumed by it under the terms of the limited warranty. In no event is
Euro-Pro Operating LLC liable for incidental or consequential damages of any nature whatsoever.
Some states do not permit the exclusion or limitation of incidental or consequential damages, so the
above may not apply to you.
This warranty gives you specific legal rights, and you may also have other rights which vary from
state to state.
19
Filtro de tela
para polvo
Malla filtrante
Filtro HEPA
1. Presione para abrir el contenedor de polvo
2. Interruptor
3. Orificio succionador
4. Mango
5. Seguro de la tapa de escape
6. Tapa de escape
7. Correa para el hombro
8. Escobilla ovalada
9. Orificios para la correa para el hombro
10. Contenedor de polvo
11.
12.
13.
14.
15.
16.
17.
18.
19.
Especificaciones Técnicas
Voltaje:
Potencia:
120V. 60Hz.
1000 Wats
11
Manguera flexible
Boquilla para hendiduras
Cartucho HEPA para filtrar polvo
Turbo escobilla accionada por aire
Accesorio para pisos
Tubos de extensión (2)
Manguera de lujo con regulador de succión
Escobilla de lujo con cerdas desmontables
Filtro de tela para polvo
*Important: Carefully pack item to avoid damage in shipping. Be sure to include proof of
purchase date and to attach tag to item before packing with your name, complete address and
phone number with a note giving purchase information, model number and what you believe is
the problem with item. We recommend you insure the package (as damage in shipping is not
covered by your warranty). Mark the outside of your package “ATTENTION CUSTOMER
SERVICE”.
yyyyyyyyyyyyyyyyyyyyyyyyyyyyyyyyyyyyyyyyyyyyyyyyyyyyyyyyyyyyyyyyyy
OWNERSHIP REGISTRATION CARD
Please fill out and mail the product registration card within ten (10) days of purchase in order to
validate the foregoing Limited Warranty. The registration will enable us to contact you in the unlikely
event of a product safety notification. By returning this card you acknowledge to have read and
understood the instructions for use, and warnings set forth in the accompanying instructions.
RETURN TO Euro-Pro Operating LLC: 94 Main Mill Street, door 16, Plattsburgh, NY 12901
________________________________________________________________________
Appliance model
________________________________________________________________________________
Date purchased
Name of store
________________________________________________________________________________
Owner’s name
________________________________________________________________________________
Address
City
State
Zip code
Printed in China
8
INSTRUCCIONES IMPORTANTES DE SEGURIDAD
Cuando use su aspiradora EURO-PRO ULTRA BIG SHARK, tome
precauciones básicas de seguridad, incluyendo las siguientes:
1. Lea todas las instrucciones antes de usar
la aspiradora de mano Ultra Big Shark.
2. Use la aspiradora sólo para lo que está
diseñada.
3. Para evitar choques eléctricos, no
sumerja parte alguna de este artefacto
en agua u otros líquidos.
4. Nunca desenchufe la aspiradora jalando
el cordón, hágalo jalando del enchufe.
5. No permita que el cordón haga contacto
con superficies calientes.
6. No pase la aspiradora sobre el cordón.
7. No opere la aspiradora si el cordón o el
enchufe están dañados; tampoco cuando
la aspiradora o cualquiera de sus
componentes se ha caído o dañado.
Para evitar el riesgo de choque eléctrico,
no desarme ni intente reparar la
aspiradora Ultra Big Shark. Devuélvala
a Euro-Pro Operating LLC para su
revisión y reparación (refiérase a la
garantía). El reensamblaje o reparación
inadecuados pueden causar choque
eléctrico o lesiones a las personas
cuando se use.
8. Se requiere supervisión estrecha cuando
los niños usan cualquier artefacto o
cuando se opere cerca de ellos. No deje
la aspiradora desatendida cuando esté
enchufada.
9. Mantenga su cabello, ropa suelta, dedos
y todas las partes de su cuerpo alejadas
de las aberturas y piezas movibles.
10. No use la aspiradora para recoger
líquidos inflamables o combustibles
(bencina para encendedores, gasolina,
kerosén, etc.) ni la use en áreas donde
estos materiales estén presentes.
11. No use la aspiradora para recoger
materiales ardientes o humeantes como
cigarrillos, fósforos, cerillos o cenizas
calientes.
12. Tenga cuidado especial cuando aspire
escaleras.
13. No use la aspiradora sin el filtro del
contenedor de polvo.
14. Este artefacto está diseñado sólo para
uso doméstico. Siga todas las
instrucciones en este manual.
Para reducir los riesgos de incendio,
choque eléctrico o lesiones:
• No deje la aspiradora de mano Ultra Big
Shark enchufada cuando no esté en uso ni
cuando se le dé servicio.
• No permita que se use como juguete. Ponga
atención cuando la usen los niños o se use
cerca de ellos, de mascotas o de plantas.
• Use sólo como se indica en este manual.
Sólo use los accesorios recomendados por el
fabricante
• No jale el cordón ni lo use como asa para
cargar la aspiradora, no jale el cordón sobre
bordes o esquinas filosas. Mantenga el
cordón alejado de superficies calientes.
• Sólo use cordones de extensión aprobados
por UL o cUL de 15 amperios, los de menor
capacidad se pueden recalentar. Tenga
cuidado de extender el cordón a modo de no
jalarlo o tropezarse con él accidentalmente.
• Antes de enchufar o desenchufar la
aspiradora del tomacorriente, siempre
apáguela poniendo el interruptor en “OFF”.
• No jale del cordón para desenchufar, hágalo
del enchufe.
• No manipule el enchufe o la unidad con las
manos mojadas, ni opere con los pies
descalzos.
• No introduzca objetos en las aberturas del
artefacto, ni lo haga funcionar si alguna
abertura está obstruida
• Guarde el artefacto en un área interior fresca
y seca.
• Mantenga el área de trabajo bien iluminada.
• No sumerja el artefacto en agua u otros
líquidos.
• Mantenga el extremo de la manguera, tubos
de extensión y otras aberturas alejadas de su
cara y del cuerpo.
• Sólo use la aspiradora en superficies secas.
• La conexión a corriente de voltaje inadecuado
puede dañar el motor y posiblemente causar
lesiones al usuario. El voltaje adecuado se
indica en el rótulo de especificaciones.
CONSERVE ESTAS INSTRUCCIONES
Sólo para uso Doméstico
ADVERTENCIA: Para reducir el riesgo de choque eléctrico, este artefacto tiene un enchufe
polarizado (una espiga es más ancha que la otra) y entra en un tomacorriente polarizado sólo
en una forma. Si no entra, inviértalo. Si aún así no entra, llame a un electricista calificado para
que instale un tomacorriente adecuado. No modifique el enchufe en forma alguna.
10
Rev. 03/02D