1
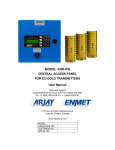
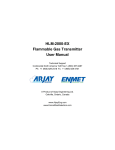
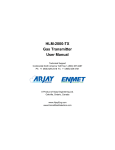
EC-Gold
Gas Concentration Transmitter
User Manual
Technical Support
Continental North America Toll Free 1-(800) 387-9487
Ph: +1 (905) 829-2418 Fx: +1 (905) 829-4701
A Product of Arjay Engineering Ltd.
Oakville, Ontario, Canada
www.ArjayEng.com
www.EnmetGasDetection.com
EC-GOLD
for General Locations Use
The EC-GOLD series of sensor transmitter has been designed specifically for use
with the following electrochemical toxic sensors:
carbon monoxide (CO)
nitrogen dioxide (NO2)
ammonia (NH3)
hydrogen sulfide (H2S)
chlorine (Cl2)
0-500 ppm
0-20 ppm
0-100 ppm
0-100 ppm
0-10 ppm
# E90507
# E90510
# E90526
# E90527
# E90528
Electrochemical sensors offer the advantage of selective response to the target gas
while minimizing nuisance alarms from interference gases.
Plug-in wiring terminal block
for quick installation and maintenance.
1/2” and 3/4" knockouts, front and
back for easy installation.
LED alarm status indication
including flashing fault alarm.
Alodized protective aluminum housing
with electronics filter screen
External calibration port for easy
application of Test Gas (used with onboard CO sensor)
External push button for calibration
means the user is not required to open
the unit to calibrate(behind shield).
Shielded sensor port for plug-in sensors
External Push-to-Test for CO sensor
(behind shield)
The EC-GOLD may by used as a stand-alone 4-20 mA (or 2-10 vdc) transmitter for use with alarm panels or building automation systems. An
optional SPST DC voltage to ground contact is available for activation of remote controls and relays. The EC-Gold can be used in conjunction
with any Enmet master control panel (Gas Alert, 2000 CAP Scanner, ISA 66RLU, or Central Control Panel(CCP))
Plus ! These features are standard with the Carbon Monoxide sensor:
-daily self test using an internal reactive gas to confirm sensor response
-fault acknowledgement on sensor failure or expiration
-manual Push-to-Test by external button to confirm operation
-3 year sensor life guarantee
-single point calibration
your representative
Specifications
Input Power:
Output Signal:
Operating Temperature:
Enclosure:
Accuracy:
Humidity:
15-24 VDC @ 0.100A max.
4-20 mA non-isolated or 2-10 vdc proportional
RS-485 Modbus to Scanner or third party system
VDC threshold signals to Enmet Panels
Optional VDC to Ground contact
-20 C to + 50 C
Type 1, 197mm (7.75") x 76mm (3") x 76mm (3")
+/- 2% of reading
90% maximum with no condensation
Arjay Engineering
www.arjayeng.com
1 (905) 829-2418 (Canada)
ECGOLDUM17.DOC
Model: EC-GOLD
Rev: 1.7
TABLE OF CONTENTS
1.0
2.0
3.0
4.0
INSTRUMENT OVERVIEW ............................................................................................3
1.1
FEATURES ........................................................................................................3
1.2
DESCRIPTION...................................................................................................3
1.3
SPECIFICATIONS .............................................................................................4
1.3
SPECIFICATIONS .............................................................................................5
INSTALLATION...............................................................................................................6
2.1
MECHANICAL INSTALLATION.........................................................................6
2.2
ELECTRICAL INSTALLATION ..........................................................................7
STARTUP AND CONFIGURATION ...............................................................................9
3.1
NOTES ON THE USER INTERFACE OPTIONS ..............................................9
3.2
STARTUP ..........................................................................................................9
3.3
USING THE DIP SWITCH FOR SETUP AND CALIBRATION..........................10
ENTERING SETUP MODE ...................................................................10
3.3.2
SETTING CONFIGURATION................................................................10
3.3.3
SETTING THE HIGH ALARM ...............................................................11
3.3.4
SETTING THE LOW ALARM ................................................................11
3.3.5
SETTING THE CALIBRATION GAS CONCENTRATION ....................11
3.3.6
SETTING THE NETWORK ADDRESS.................................................12
3.3.7
EXITING SETUP MODE .......................................................................12
CALIBRATION ................................................................................................................13
4.1
5.0
3.3.1
CALIBRATION NOTES......................................................................................13
4.2
SINGLE POINT CALIBRATION ...............................................................13
4.3
DUAL POINT CALIBRATION ...................................................................14
SELF-TEST FEATURE ...................................................................................................16
5.1
PUSH TO TEST .................................................................................................16
5.2
PERIODIC SELF TEST .....................................................................................16
6.0
TROUBLESHOOTING....................................................................................................17
7.0
CONTROLLER SETTINGS SHEET ...............................................................................18
-2-
ECGOLDUM17.DOC
Model: EC-GOLD
1.0
INSTRUMENT OVERVIEW
1.1
FEATURES
1.2
Rev: 1.7
•
Single gas transmitter for a large variety of gas types.
•
Carbon Monoxide sensor has expected life of 5 years min. (3 year guarantee)
•
Other sensors have expected life of 2 years (1 year guarantee)
•
Carbon Monoxide sensor has self test feature: periodic & on demand.
•
Output may be user selectable for analog (4-20mA / 2-10V) or Arjay’s Discrete Voltage Output
(DVO).
•
Convenient pushbutton calibration.
•
User selectable for Single or Dual Point calibration
•
High, Low, and System Fault indication
•
User selectable High and Low Alarm levels
•
Modbus protocol via RS-485 for access by Arjay/Enmet Central Access Panel or compatible
system
•
User specified custom features may be added by contacting Arjay Engineering Ltd.
DESCRIPTION
The EC-Gold transmitter may be used to sense a large variety of gases including CO, NO2, Ammonia,
Chlorine, and Hydrogen Sulfide (H2S).
The Carbon Monoxide sensor offers a unique self-test feature, which may be activated either via the
onboard Push To Test pushbutton, or remotely via the Arjay/Enmet Central Access Panel.
The analog output may be field configured either as a 4-20mA / 2-10V output or as an Arjay/Enmet
Discrete Voltage Output (DVO). The DVO is a 4 level output: 0V = ok, Low Alarm = 1.8V, High Alarm =
2.8V, Sensor Fault = 10V. The DVO is a common signaling method: any sensor in a zone triggers the
corresponding Low, High or Sensor Fault alarm at the Arjay/Enmet ISA-66RLU alarm panel.
In Discrete Voltage Output mode, the transmitter may be connected as part of a zone connected to an
Arjay/Enmet ISA-66RLU zone system. In Analog mode, the transmitter puts out a 4-20mA output
proportional to the adjustable Span value.
Independent of the output type selected, the transmitter may also be accessed by an Arjay/Enmet Central
Access Panel (modbus protocol) to form part of a networked gas monitoring system where up to 128
transmitters may be linked on a 2-wire RS485 connection. The networked approach allows more
complex control strategies based on the gas concentrations of a number of transmitters.
24VDC
2 Wire
2 Wire RS-485 Network
ENMET EC-GOLD
CENTRAL ACCESS PANEL
(CAP)
UP TO 128 TRANSMITTERS ON THE NETWORK
4-20mA
or
Enmet RLU output
Alarm LED's
Vents
BLOCK.DSF
Calibration / Config
Push to test
pushbutton (from bottom)
pushbutton (from bottom)
Sensor access for calibration
Depending on sensor, access is
either from bottom or front.
EC-GOLD NETWORK
Figure 1.0
-3-
APPLICATION
ECGOLDUM17.DOC
Model: EC-GOLD
3 Wire Discrete Voltage Output shielded connection
Rev: 1.7
To other sensors
RS-485
Alarm LED's
ENMET ISA 66RLU
ZONE PANEL
BLOCK.DSF
Vents
Calibration / Config
Push to test
pushbutton (from bottom)
pushbutton (from bottom)
Sensor access for calibration
Depending on sensor, access is
either from bottom or front.
EC-GOLD
3 Wire Discrete Voltage Output shielded connection
RLU APPLICATION
To other sensors
RS-485
Alarm LED's
GAS ALERT
Vents
BLOCK.DSF
Calibration / Config
Push to test
pushbutton (from bottom)
pushbutton (from bottom)
Sensor access for calibration
Depending on sensor, access is
either from bottom or front.
EC-GOLD
GAS ALERT APPLICATION
3 Wire Connection:
1- 24V
2- Ground
3- 4-20mA or Voltage output
RS-485
Alarm LED's
Vents
Calibration / Config
Push to test
pushbutton (from bottom)
pushbutton (from bottom)
Sensor access for calibration
Depending on sensor, access is
either from bottom or front.
BLOCK.DSF
EC-GOLD 4-20mA / DC VOLTAGE OUTPUT APPLICATION
TYPICAL APPLICATIONS
-4-
ECGOLDUM17.DOC
Model: EC-GOLD
1.3
Rev: 1.7
SPECIFICATIONS
OPERATION
SELF TEST FEATURE
The EC-Gold is a single channel gas concentration transmitter. A variety
of gases may be sensed when fitted with the appropriate sensor. The
output may be field selected to be one of two types: Analog 4-20mA / 210V, or Arjay’s RLU Discrete Voltage Output which is used in grouped or
zoned alarm systems. In addition, an RS-485 interface is available so
that the EC-Gold can be accessed by an Arjay/Enmet network master
(Central Access Panel or CAP) or user modbus compatible system.
On demand using the Push to Test pushbutton AND a periodic test
approx. every 18 hours.
USER INTERFACE
Calibration and setup DIP switches, pushbutton, and LED status lights.
Self Test
Pushbutton. Only for units with CO sensor.
Network
RS-485 modbus protocol. Used either with the ARJAY/ENMET CAP unit
or via third party, modbus compatible systems.
INPUTS
Integral Sensors
Single sensor. Electrochemical type for gases including CO, H2S, NH3,
NO, NO2 and Cl2.
OUTPUTS
mA output
DC Voltage output
mA / Voltage output
RLU DV output
Alarms
Alarm Indication
When configured for Analog output: 4-20mA into 650 ohms max.
When configured for Voltage output: 2-10V proportional to calibrated
range.
0.1% resolution – non-isolated.
When configured for RLU Discrete Voltage Output mode:
0V = No Alarm, 1.8V = Low Alarm, 2.8V = High Alarm, 10V = Sensor
Fault. (Sensor Fault only detected with CO sensor).
3 alarms (High, Low and Sensor Fault).
High (Red), Low (Yellow), and a 2 color LED for Sensor Fault (Red) and
No Alarms (Green). The 2 color LED is also used to flash calibration
errors (Red for ~2 seconds after an unsuccessful calibration).
PERFORMANCE
Accuracy
±2% of Full Scale Range (the accuracy is limited by the sensors – the
electronic accuracy is better than 1%.
POWER
15VDC - 24VDC @ 0.100A max
MECHANICAL SPECIFICATIONS
Enclosure
Dimensions
Weight
Nema 1 wall mount
7.75” [197mm]H x 3” [76mm]W x 3” [76mm]D
0.3 kg
ENVIRONMENTAL SPECIFICATIONS
Operating Temp.
Relative Humidity
-20°C to +55°C
90% max. with no condensation.
-5-
ECGOLDUM17.DOC
Model: EC-GOLD
2.0
INSTALLATION
2.1
MECHANICAL INSTALLATION
Rev: 1.7
MECHANICAL INSTALLATION
BASE
Dual 3/4" & 1/2" diam.
knock-outs for top entry
cabling.
FRONT COVER
TOP VIEW
2.25"
7.75"
5.25"
Dual 3/4" & 1/2" diam.
knock-outs for rear entry
cabling.
EC GOLD
TRANSMITTER
BOARD
6.00"
3.00"
Mounting holes
(4 Places)
BASE
FRONT COVER
MECHINST.DSF
Figure 2.0
Locate the EC-Gold on a vertical surface away from drafts, open doors or windows, condensation or
dripping moisture.
The vertical placement (above the floor) depends on the gas being monitored. For CO, the unit should be
located within the breathing zone: about 4 - 5 feet above the finished floor*. For other gases, refer to an
Arjay Engineering representative.
* Check local building codes (i.e. Ontario Building code requires mounting 2’11” to 3’11”).
-6-
ECGOLDUM17.DOC
Model: EC-GOLD
ELECTRICAL INSTALLATION
ELECTRICAL INSTALLATION
OUT
!
RS-485 NETWORK
Use good installation practice!
Do not run high voltage cables in the
same conduit as signal wires.
+24VDC
- +
For Networked applications, the 2 wire RS-485 network
connects to the Enmet Central Access Panel.
- +
5 4 3 2 1
For RLU Loop (alarm only) applications, the Output is
configured for Loop output and connects to the corresponding
Zone connection on the ISA-66RLU board.
EC GOLD
TRANSMITTER
BOARD
ENMET EC GOLD
CENTRAL ACCESS PANEL or
HAND HELD CALIBRATOR
4 Wires + shield
(Shld connected at
this point only)
GND
24VDC
RS-485
(2 Wires)
54321
DD+
OUT
GND
24V
54321
DD+
OUT
GND
24V
54321
DD+
OUT
GND
24V
DD+
EC GOLD
Transmitter
EC GOLD
Transmitter
EC GOLD
Transmitter
ALARM RELAYS
Up to 128 EC Gold transmitters on the network
4 3 2 1 ZONE5
4 3 2 1 ZONE4
4 3 2 1 ZONE3
4 3 2 1 ZONE2
ENMET ISA-66RLU
4 3 2 1 ZONE1
For clarity only Zone5 is shown connected.
Sensors per zone: Typically around 20 depending on
wires sizes and lengths.
SGND connection (on ISA-66RLU) NOT made to
EC GOLD transmitters
24V
PGND
VSIG
SGND N/C
54321
DD+
OUT
GND
24V
54321
DD+
OUT
GND
24V
54321
To other
Zones
DD+
OUT
GND
24V
2.2
Rev: 1.7
EC GOLD
Transmitter
EC GOLD
Transmitter
EC GOLD
Transmitter
ELECINST.DSF
Figure 2.1
-7-
ECGOLDUM17.DOC
Model: EC-GOLD
Rev: 1.7
ELECTRICAL INSTALLATION
OUT
!
Use good installation practice!
Do not run high voltage cables in the
same conduit as signal wires.
RS-485 NETWORK
+24VDC
- +
For Networked applications, the 2 wire RS-485 network
connects to the Enmet Central Access Panel.
- +
5 4 3 2 1
For Discrete Voltage Output (DVO for alarm only) applications,
the EC Gold Output is configured for DVO mode and connects
to the corresponding Zone connection on the ISA-66RLU
board or to the Gas Alert DVO connector.
EC GOLD
TRANSMITTER
BOARD
The Gas Alert only accommodates a single zone.
Sensors per zone: Typically around 20 depending on
wires sizes and lengths.
SGND connection (on Gas Alert) NOT made to
EC GOLD transmitters
4321
DVO Connector
GAS ALERT
24V
PGND
VSIG
SGND N/C
DD+
OUT
GND
24V
54321
DD+
OUT
GND
24V
54321
DD+
OUT
GND
24V
54321
EC GOLD
Transmitter
EC GOLD
Transmitter
EC GOLD
Transmitter
ELECINST.DSF
Figure 2.2
All user connections are via mating plug/receptacle connectors to make installation and service easier.
CAUTION:
THE UNIT HOUSES SENSITIVE ELECTRONIC COMPONENTS AND SHOULD BE HANDLED WITH CARE. IF
PUNCHING OR DRILLING THROUGH THE ENCLOSURE WALLS IS NECESSARY MAKE SURE THAT THE
INTERNAL ELECTRONIC MODULES ARE SHIELDED FROM DEBRIS ESPECIALLY METAL PARTICLES.
PLEASE MAKE SURE THAT THE CONNECTIONS HAVE THE POLARITY AS INDICATED OR THE CONTROLLER
MAY BE DAMAGED.
USE GOOD INSTALLATION PRACTICE! DO NOT RUN HIGH VOLTAGE CABLE IN THE SAME CONDUIT AS
SIGNAL WIRES.
-8-
ECGOLDUM17.DOC
Model: EC-GOLD
3.0
Rev: 1.7
STARTUP AND CONFIGURATION
USER INTERFACE OVERVIEW
3
1
2
3
4
5
TB1
4
5
SENSOR BOARD
Gnd
D-
D+
2
+24V
mA / Vout
ON
1
1
2
3
6
4
5
6
7
The DIP switch and the
Calibration pushbutton are
used to configure / calibrate
the unit.
Micro
7
7 POSITION DIP SWITCH
RS-485
High Alarm
Low Alarm
Status (2 color)
Green
Green blinking (ON and OFF)
Orange (Red & Green both ON)
Red (On for 2 seconds only)
Red (Steady ON)
Push to Test
pushbutton
Calibration
pushbutton
STATUS LED COLOR
Push to Test
pushbutton
Calibration
pushbutton
CO sensor shown for example
Push to Test only available
when used with CO sensor
MEANING
Instrument ok, no faults. Will remain green for High or Low Alarms
In Configuration entry mode or while waiting for 2nd Calibration point.
Calibration request acknowledge - while cal pushbutton pressed
Calibration error or user error.
Instrument failure / Sensor Fault condition
USRINT.DSF
Figure 3.0
3.1
NOTES ON THE USER INTERFACE OPTIONS
The EC-Gold may be configured and calibrated using either of 2 methods:
1. Using the integral DIP switch and Calibration pushbutton. The EC-Gold front cover must be
removed to access the DIP switch. For calibration only, the pushbutton is accessible without
removing the front cover.
2. Using Arjay’s optional 2000-CAL hand held calibrator. The calibrator communicates with the ECGold via the RS-485 connection using the modbus protocol. The calibrator’s LCD and keypad
offer a more convenient method of setting up and calibrating the EC-Gold unit.
3.2
STARTUP
Power up the unit. The status LED should be green. The High and Low alarm LED’s should go off in
less than a minute.
The unit is normally pre-configured and calibrated at the factory so field setup is not required on
startup.
To check calibration, or to re-enter / modify settings, follow the procedures described below. The method
used will depend on if the integral user interface is used (DIP switch / pushbutton) or if the Arjay/Enmet
-9-
ECGOLDUM17.DOC
Model: EC-GOLD
Rev: 1.7
2000-CAL hand held calibrator is used. Only the integral DIP switch / pushbutton user interface
procedure is described here. See the 2000-CAL hand held calibrator manual for details if using it instead.
3.3
USING THE DIP SWITCH FOR SETUP AND CALIBRATION
Note: all of these settings are preset at the factory as per the customer requirements.
These settings are listed on the packing slip and may be entered in the controller
setting of this manual for future reference. The following procedures should only be
followed if changes are required.
3.3.1
ENTERING SETUP MODE
Set DIP switches 1-6 (switch 7 is not important here) to the ON position, and press the
Calibration pushbutton. The Status LED starts to blink Green indicating the system is now
ready to accept configuration changes.
ON
1
3.3.2
4
5
6
7
While the Status LED is blinking green, set the DIP switch as follows:
MODE SETTINGS
ON
2
3
SETTING CONFIGURATION
1.
1
2
3
4
5
6
4
Sensor supports self tests
Sensor does not support self tests
5
Single point Cal
2 Point Cal
6
Continuous output mode - For mA output Sw7=Off, V out Sw7=On
DVO (Discrete Voltage Output) mode. This requires Sw7 to be set for voltage output (On).
2.
Self Test Feature: If the sensor is for Carbon Monoxide and supports the self test
feature, then set switch 4 to the On (up) position, else set it to the off (down) position.
3.
Single Point / Dual Point Calibration: The default position is Single Point Calibration.
A Single Point calibration assumes the instrument has already been zeroed
successfully. This mode saves calibration time. The Dual Point calibration is selected
if the sensor has not been successfully zeroed, or if a new sensor is installed in the
field. Set switch 5 On (up) for Single Point and Off (down) for Dual Point calibration.
4.
Output Mode: In Analog output mode, the output is proportional to the gas
concentration. In Discrete Voltage Output mode, the output is set to one of 4 step
values based on alarms and is compatible with Arjay’s ISA 66RLU/Gas-Alert systems.
Notes:
•
Wire connections to the OUT terminal are dependent on the type of Output
mode selected.
•
When configured for mA out, the transmitter does not become a 2 wire Loop
Powered transmitter. The mA output is referenced to the Ground terminal
(Terminal #2 –see Electrical installation for terminal number details).
For Analog output, switch 6 should be On (up) and switch 7 should either be Off
(down) for 4-20mA output, or On (up) for voltage output (2V – 10V).
For RLU Discrete Voltage output, switch 6 should be in the Off (down) position, and
switch 7 should be in the On (up) position.
Note: Switch 7 acts immediately and does not require configuration mode to be
entered, or the Cal pushbutton to be pressed to take effect. It can be changed at
any time.
- 10 -
ECGOLDUM17.DOC
Model: EC-GOLD
Rev: 1.7
After switches 4 – 6 are set as required, press the Cal pushbutton to lock in the values.
3.3.3
SETTING THE HIGH ALARM
The EC-Gold will register a High Alarm condition when the sensor detects a gas
concentration equivalent or exceeding this value.
1. While the Status LED is blinking green, set the DIP switch as follows:
SET HIGH ALARM FUNCTION
4 56
ON
1
2
3
4
5
6
SWs 4-6 set 1 of 8 different High Alarm values:
4 56
code 0 = 5
code 4 = 75
code 1 = 10
code 5 = 100
code 2 = 20
code 6 = 150
code 3 = 50
code 7 = 200
2. Switches 4-6 should be set as per the desired High Alarm ppm value. For example to
set the High Alarm value to 50 ppm, set switch 4 On (up), and switches 5 and 6 Off
(down).
3. Press the Cal pushbutton to lock in the value.
3.3.4
SETTING THE LOW ALARM
The EC-Gold will register a Low Alarm condition when the sensor detects a gas
concentration equivalent or exceeding this value.
1. While the Status LED is blinking green, set the DIP switch as follows:
SET LOW ALARM FUNCTION
4 56
4 56
ON
1 2 3 4 5 6
SWs 4-6 set 1 of 8 different Low Alarm values:
code 0 = 1
code 4 = 20
code 1 = 2
code 5 = 25
code 2 = 3
code 6 = 35
code 3 = 10
code 7 = 50
2. Switches 4-6 should be set as per the desired Low Alarm ppm value. For example to
set the Low Alarm value to 35 ppm, set switches 4 and 5 Off (down), and switch 6 On
(up).
3. Press the Cal pushbutton to lock in the value.
3.3.5
SETTING THE CALIBRATION GAS CONCENTRATION
This value tells the EC-Gold what the value of gas concentration will be used during
calibration.
1. While the Status LED is blinking green, set the DIP switch as follows:
SET CAL CONCENTRATION FUNCTION
1
2
3
4
5
4 56
4 56
ON
6
SWs 4-6 set 1 of 8 different Cal2 values:
code 0 = 5
code 4 = 35
code 1 = 10
code 5 = 50
code 2 = 20
code 6 = 75
code 3 = 25
code 7 = 100
2. Switches 4-6 should be set as per the desired calibration gas ppm value. For example
to set the value to 100 ppm, set switches 4, 5, and 6 Off (down).
3. Press the Cal pushbutton to lock in the value.
- 11 -
ECGOLDUM17.DOC
Model: EC-GOLD
3.3.6
Rev: 1.7
SETTING THE NETWORK ADDRESS
This value is only used in network applications. Each EC-Gold transmitter connected on a
network must have a unique address. Network problems will result if 2 or more
transmitters have identical addresses.
2 34 5 6
SET RS-485 ADDRESS FUNCTION
ON
1 2 3 4 5 6
SWs 2-6 set 1 of 31 different addresses
2 34 5 6
2 34 5 6
2 34 5 6
=1
=9
= 17
= 25
=2
= 10
= 18
= 26
=3
= 11
= 19
= 27
=4
= 12
= 20
= 28
=5
= 13
= 21
= 29
=6
= 14
= 22
= 30
=7
= 15
= 23
= 31
=8
= 16
= 24
1. While the Status LED is blinking green, set the DIP switch as follows:
2. Switches 2-6 should be set as per the desired number between 1 and 31. For example
to set the address to 5, set switches 2, 3, and 5, On (Up) and switches 4 and 6 Off
(down). Note: the maximum address that can be entered via the DIP switches is 31.
To set values up to 128, use the Arjay/Enmet EC-Gold hand held calibrator.
3. Press the Cal pushbutton to lock in the value.
3.3.7
EXITING SETUP MODE
After all configuration is done, the setup mode must be exited for normal operation. Also,
calibration cannot be done via the Calibration pushbutton while in setup mode.
To exit setup mode (i.e. Status LED is blinking green), set the DIP switches 1-6 (switch 7 is
not important) to the ON position, and press the Calibration pushbutton. The Status LED
should remain steady green.
ON
1
2
3
4
5
6
7
IMPORTANT: after exiting the setup mode, do not leave the DIP switches (1-6) in the
ON position as shown above. This will cause entry to Setup mode if calibration is
attempted (i.e. if Calibration pushbutton is pressed). Set at least one switch (1-6) in
the off position. Typically, switch 6 may be set to the OFF position.
FOR EXAMPLE, LEAVE THE DIP SWITCH IN THE FOLLOWING
POSITION FOR NORMAL OPERATION:
TYPICAL SETTING FOR NORMAL OPERATION
ON
1
2
3
4
5
6
7
THIS COMPLETES THE STARTUP AND CONFIGURATION
- 12 -
ECGOLDUM17.DOC
Model: EC-GOLD
4.0
CALIBRATION
4.1
CALIBRATION NOTES
Rev: 1.7
If the EC-Gold configuration is known i.e. what the calibration gas concentration value has been
set for, and the calibration type (Single, or Dual Point) then the entire calibration procedure can be
completed without removing the front cover.
THE CALIBRATION PUSHBUTTON MAY BE ACCESSED WITHOUT REMOVING THE FRONT
COVER BY USING A FINE TOOL SUCH AS A SCREWDRIVER THROUGH AN OPENING LOCATED
FACING DOWN, LEFT OF CENTER.
The EC-Gold may be calibrated using either a Single Point or Dual Point calibration procedure.
A full Dual Point calibration is always performed at the factory and involves zeroing the sensor in clean
air, then calibrating at a preset gas concentration. The Single Point calibration is typically used in the
field since it is more convenient. Also, it does not require clean air as one of the calibration points, since
clean air cannot be guaranteed in all installations. A Single Point calibration assumes the unit has
already been zeroed. This is always true for new units from the factory.
CALIBRATION
EC-GOLD
EC-Gold
Calibration
Port
Flowrate regulator
preset for 0.5Lpm
Male, Quick Disconnect
tube inserted into ECGold Calibration Port.
Flow ON/OFF
knob
6 feet of 5/16" O.D. x 3/16" I.D.
flexible, clear tubing.
CAL GAS CANISTER
CAL.DSF
Figure 3.1
4.2
SINGLE POINT CALIBRATION
The EC-Gold must be configured for Single Point calibration, and the calibration gas
concentration value must be known. If either setting is in doubt, then see section 3 to set
these values.
1.
Determine what Calibration gas concentration the EC-Gold is expecting. This value is
listed on the packing slip and may be recorded in the back of the user manual in the
CONTROLLER SETTINGS sheet for future reference. This value can be changed at
- 13 -
ECGOLDUM17.DOC
Model: EC-GOLD
Rev: 1.7
any time as described in SETTING THE CALIBRATION GAS CONCENTRATION
section described earlier.
2.
4.3
There are 2 possible sensor types:
•
Front facing sensor (CO only) which must be gassed by inserting the end of the
calibration tubing through the front plate. Take care not to press the end of the tube
too hard against the sensor.
•
Down facing sensors which must be gassed by fitting the calibration cup over the
sensor fitting.
3.
Make sure the DIP switches 1-6 are NOT all in the ON position. If they are, move any
one to the Off (down) position.
4.
Start gassing the sensor by opening the valve on the canister. The flow rate is preset
to 0.5 Lpm (or ~1 SCFH (Standard Cubic Foot per Hour). Wait about 90 seconds.
5.
Press and hold the calibration pushbutton until the Status LED glows orange
acknowledging the calibration request. Release the pushbutton.
6.
If the Status LED does not glow orange, and starts blinking green after the
Calibration pushbutton is released, then the DIP switches (1-6) are probably set to
Enter Setup Mode i.e. all of them are set to ON. If this is the case, press the
Calibration pushbutton to exit the Setup Mode, then set DIP switch 6 to OFF (down).
Attempt calibration again from step 4.
7.
If the Status LED glows orange, and starts blinking green after the Calibration
pushbutton was released, then the EC-Gold is in Dual Point calibration mode. First,
press the Calibration pushbutton again until it glows orange then release it. The Status
LED will glow red for ~3 seconds indicating that the calibration was unsuccessful (no
change in gas concentration for a Dual Point calibration). The unsuccessful calibration
does not change the EC-Gold calibration values. Go to section 3.0 to change the
calibration type to Single Point, and then attempt calibration again from step 4.
8.
If the Status LED remains green after the Calibration pushbutton is released,
then the Calibration has been successfully completed. If the calibration was
successful, the Status LED remains green. If there was a calibration error such as not
enough change for the gas concentration used, then the Status LED shows red for
about 2-3 seconds before reverting back to green. For unsuccessful calibrations, the
original calibration values remain unchanged. For example, if the EC-Gold calibration
gas is set as 100 ppm via the DIP switches (this is described earlier), but the actual
gas used is only 20 ppm then the calculated sensitivity will be out of allowed limits and
will cause a calibration error. The Status LED will light red for 2-3 seconds, but the
new erroneous calibration values will be discarded.
DUAL POINT CALIBRATION
This procedure is typically done at the factory. The Dual Point calibration not only trims the
sensitivity (like a Single Point calibration), but also zeroes the reading i.e. 0 ppm in clean air.
The EC-Gold must be configured for Dual Point calibration, and the calibration gas
concentration value must be known. If either setting is in doubt, then see section 3 to set
these values.
The Dual Point calibration is carried out if the EC-Gold must be zeroed in the field (i.e. a
new sensor has been installed). This is the procedure:
1. Determine what Calibration gas concentration the EC-Gold is expecting for the second
point – the first point is always assumed to be 0 ppm. This value is listed in the back of
the user manual in the CONTROLLER SETTINGS sheet. This value can be changed at
- 14 -
ECGOLDUM17.DOC
Model: EC-GOLD
Rev: 1.7
any time as described in SETTING THE CALIBRATION GAS CONCENTRATION
section described earlier.
2. Important: first make sure that the ambient air around the sensor is clean i.e. it has no
traces of the gas being monitored. This can be difficult in places where there are
vehicles etc. In applications where the ambient air is not guaranteed to be clean, use a
compressed air calibration canister and apply the air to the sensor as described below
for gassing the sensor with the second point.
3. After making sure that the sensor is in clean air (either ambient or from a canister),
press and hold the calibration pushbutton until the Status LED glows orange
acknowledging the calibration request for the first point.
4. If the Status LED does not glow orange, and starts blinking green after the
Calibration pushbutton is released, then the DIP switches (1-6) are probably set to
Enter Setup Mode i.e. all of them are set to ON. If this is the case, press the Calibration
pushbutton to exit the Setup Mode, then set DIP switch 6 to OFF (down). Attempt
calibration again from step 3.
5. If the Status LED glows orange, and then glows red for ~3 seconds after the
Calibration pushbutton is released, then the EC-Gold is in Single Point Calibration
mode. Go to section 3.0 to change the calibration type to Dual Point, and then attempt
calibration again from step 3.
6. If the Status LED now starts blinking Green, the first point of the Dual Point
calibration has been entered. The EC-Gold is now expecting the second point.
7. There are 2 possible sensor types:
•
Front facing sensor (CO only) that must be gassed by inserting the end of the
calibration tubing through the front plate. Take care not to press the end of the tube
too hard against the sensor.
•
Down facing sensors which must be gassed by fitting the calibration cup over the
sensor fitting.
8. Start gassing the sensor by opening the valve on the canister. The flow rate is preset to
0.5 Lpm (or ~1 SCFH (Standard Cubic Foot per Hour). Wait about 90 seconds.
9. Press and hold the calibration pushbutton until the Status LED glows orange
acknowledging the calibration request. Release the pushbutton.
10. Calibration is complete. If the calibration was successful, the Status LED remains
green. If there was a calibration error such as not enough change for the gas
concentration used, then the Status LED shows red for about 2-3 seconds before
reverting back to green. For unsuccessful calibrations, the original calibration values
remain unchanged. For example, if the EC-Gold calibration gas is set as 100 ppm via
the DIP switches (this is described earlier), but the actual gas used is only 20 ppm then
the calculated sensitivity will be out of allowed limits and will cause a calibration error.
The Status LED will light red for 2-3 seconds, but the new erroneous calibration values
will be discarded.
THIS COMPLETES THE CALIBRATION PROCEDURE
- 15 -
Model: EC-GOLD
5.0
ECGOLDUM17.DOC
Rev: 1.7
SELF-TEST FEATURE
The Self-test feature only applies to EC Gold units with Carbon Monoxide (CO) sensors. The sensor
health is checked by generating a small amount of Hydrogen gas in the sensor. Hydrogen produces a
response similar to CO. The amount of response is measured. With age, this response declines and is
used to determine when a sensor should be changed.
The test is initiated in 2 ways: Push to Test (on demand) and Periodic.
5.1
PUSH TO TEST
Press the Push to Test pushbutton to activate this feature. See Figure 3.0 for the pushbutton location.
When the button is pressed and released, the Status LED starts blinking green on and off every 2
seconds to indicate a test is underway.
The test lasts about 30 seconds.
If the test is successful, the Status LED goes back to steady green.
If the response is too low, the Status LED starts blinking red to indicate a sensor fault. If the sensor is
properly seated in its connector, then the sensor should be replaced.
When a sensor fault is detected, then if the sensor has been configured for Discrete Voltage Output
(DVO) mode, the output goes to 10V to signal the ISA66RLU panel the sensor fault condition. If analog
output mode is selected, then the output goes to full scale (20mA for current type and 10V for voltage
type).
The alarm sensor fault condition will continue until either the next successful self-test (either Push to Test
or Periodic), or the EC Gold power is turned off then on.
The alarms are still enabled so the yellow Low alarm and red High alarm LED’s may show alarm
depending on the sensor response and the alarm setpoints.
5.2
PERIODIC SELF TEST
This occurs every 18 hours, 12 minutes and 16 seconds from power up or from a calibration. The timer is
restarted by a calibration to stagger the self test times so all sensors in a system do not go into self test
simultaneously.
The test is identical to the Push to Test except it is initiated automatically based on elapsed time. The
actual test sequence takes about 30 seconds. During the test, the Status LED blinks green on and off
every 2 seconds to indicate a test is underway.
After 3 seconds, the response is checked.
If the test is successful, the Status LED goes back to steady green. Since the test is intended for
unattended operation, the alarms and voltage/current output are disabled for 15 minutes to allow the
sensor to recover and to prevent alarms due to the test. If an Arjay/Enmet CAP unit is connected to this
sensor, it too ignores the elevated ppm levels due to the test for 15 minutes. NOTE: the alarms and
voltage/current outputs are only disabled for 15 minutes if the test was successful.
If the response is too low, the Status LED starts blinking red to indicate a sensor fault. If the sensor is
properly seated in its connector, then the sensor should be replaced.
When a sensor fault is detected the 15-minute alarm disable period is aborted. In a sensor fault
condition, if the sensor has been configured for Discrete Voltage Output (DVO) mode then the output
goes to 10V to signal the ISA66RLU panel the sensor fault condition. If analog output mode is selected,
then the output goes to full scale (20mA for current type and 10V for voltage type).
The alarm sensor fault condition will continue until either the next successful self-test (either Push to Test
or Periodic), or the EC Gold power is turned off then on.
- 16 -
Model: EC-GOLD
6.0
ECGOLDUM17.DOC
Rev: 1.7
TROUBLESHOOTING
ERROR DESCRIPTION
WHAT TO DO
•
Check the power to the unit. The voltage
should be 24VDC at the power connector
with the positive and negative connected
as shown on the connector label.
•
If the Power checks out, call Arjay
Service.
•
Make sure that DIP switch 7 is set to Off
(down) position.
•
Make sure that the EC-Gold output mode
is set to Analog mode and not to Discrete
Voltage Output mode. See SETTING
CONFIGURATION section for details.
•
Calibration may be required. See the
calibration section for details.
•
Call Arjay/Enmet Service for Help if none
of the above fix the problem.
3. In Discrete Voltage Output mode, the ISA66RLU or Gas Alert connected to the ECGold always shows Sensor Fault
•
Make sure that DIP switch 7 is set to the
On (up) position.
•
Make sure that the EC-Gold output mode
is set to Discrete Voltage Output mode
and not to Analog.
4. When pressing the Calibration pushbutton
there is no calibration acknowledge (i.e. the
Status LED does not glow orange)
•
Make sure the calibration pushbutton is
pressed for at least 2 seconds.
•
Make sure that the DIP switches 1-6 are
not all On (Up). This will cause the
Setup mode to be entered when the
pushbutton is pressed. If the Status LED
is flashing green, first press the
calibration pushbutton to exit the Setup
mode, then set switch 6 to the Off (down)
position. Then proceed with the
calibration procedure.
1. No Output and all lights off
2. 4-20mA output does not track the gas
concentration.
- 17 -
Model: EC-GOLD
7.0
ECGOLDUM17.DOC
Rev: 1.7
CONTROLLER SETTINGS SHEET
The factory settings column below lists the typical default settings. The user may change these values at
any time either by the integral DIP switches or via the EC-Gold hand held calibrator. If changed, please
fill in the USER SETTING column for future reference.
PARAMETER
OUTPUT MODE
VOLTAGE /
CURRENT OUTPUT
CALIBRATION
TYPE
DESCRIPTION
There are 2 main output modes which may be field
selected:
Analog: the output is proportional to the gas
concentration. The output type may be further selected to
be mA type (4-20mA) or voltage type (2V-10V) – see
Voltage / Current Output setting.
Discrete Voltage Output mode: the output is compatible
with Arjay’s ISA 66RLU/Gas-Alert Alarm system.
If Analog output mode is selected, then the type of output
may be further selected to be current type (4-20mA) or
voltage (2V – 10V).
Note: if the Output type is RLU discrete voltage, then this
setting MUST be voltage type.
Field selectable for either Dual Point, or Single Point.
The Dual Point type zero’s and spans the instrument.
The Single Point type assumes the zero has been
successfully done, and only spans the instrument.
FACTORY
SETTING
As per order
As per order
Single Point
The self-test feature only applies to Carbon Monoxide
sensors that have this option.
If the self-test feature is set to NOT to Allow, then selftest requests are ignored.
The value in ppm at or above which a High Alarm
condition is entered.
As per order
LOW ALARM
The value in ppm at or above which a Low Alarm
condition is entered.
As per order
CALIBRATION GAS
The calibration gas value in ppm. This value is assumed
by the EC-Gold during calibration. Note: for Single Point
calibrations, this is the only gas used. For Dual Point
calibrations, the first gas is always assumed to be clean
air (0 ppm)
As per order
This value is only pertinent if Analog Output has been
selected. It is the full scale value in PPM at which
concentration the EC-Gold output is at its maximum:
20mA (current type) or 10V (voltage type).
Note: this value cannot be set via the integral DIP
switches. It can only be set via the EC-Gold hand held
calibrator or EC-Gold Central Access Panel.
Only required for network applications (where the RS485 bus is used).
The Address is used by the EC-Gold calibrator or by the
EC-Gold Central Access Panel to access each EC-Gold
transmitter on a network. Each EC-Gold on a network
must have a unique address number from 0 – 128. Note:
the maximum address value which can be set by the
integral DIP switches is 31. To set values higher than
this, use the EC-Gold hand held calibrator.
As per order
ALLOW SELF TEST
HIGH ALARM
CONCENTRATION
SPAN VALUE
NETWORK
ADDRESS
- 18 -
As per order
As per order
USER
SETTING